
Ground leveling tools are used to create flat, smooth surfaces for outdoor projects. These tools are useful for preparing lawns, gardens, and construction sites. For different tasks, you can choose from simple hand rakes to advanced self-leveling rotary laser level tools and heavy machines. You can work more efficiently and safely when you select the right tool. With less effort, you can also achieve professional results.
To get the best results, learn how to use a self-leveling rotary laser level, and match the tool size and type to your project.
Essential Ground Leveling Tools for DIY and Professional Projects
Hand Tools for Small Ground Leveling Jobs
Hand tools are ideal for small areas, such as flowerbeds or gardens. These tools will help you shape the soil and control the soil. With a garden rake, you can remove stones and spread soil. A shovel is useful for moving dirt and filling low areas. A tamper can be used to compact the soil and firm it up. These tools are best used for small jobs where precision and control are required.
After using your hand tools, always clean them. It keeps your tools sharp and ready to use for the next project.
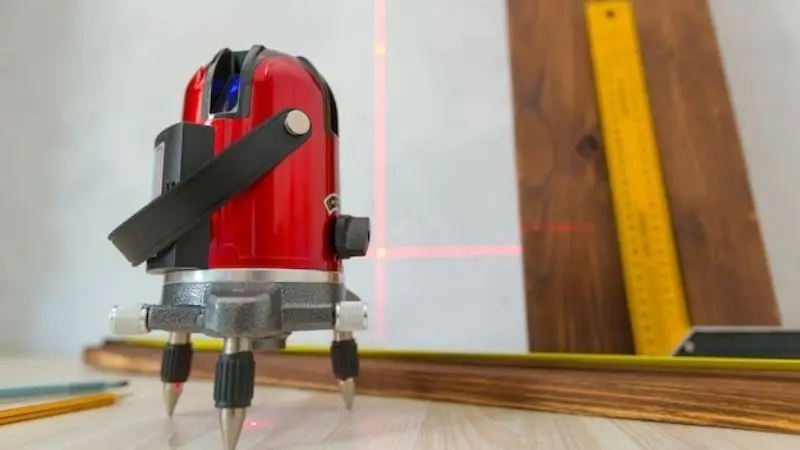
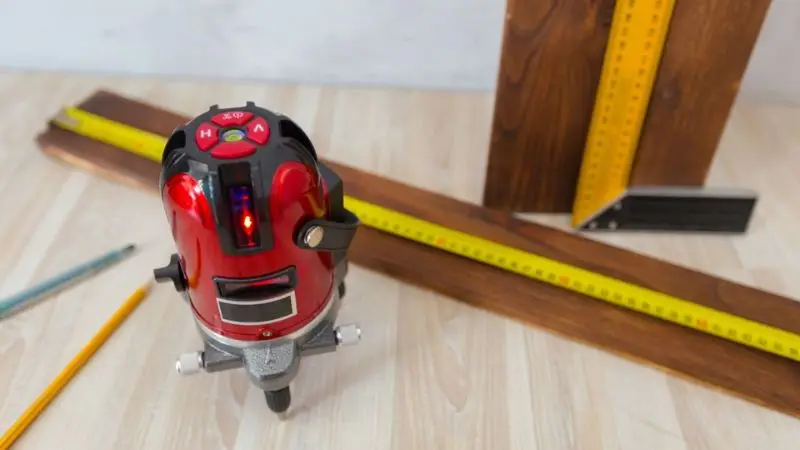
Laser and Digital Leveling Tools for Precision
Laser and digital tools are needed to create a flat, even surface. These tools will use sensors or light to determine if the surface is flat. A Laser Level will project a straight line on your work surface. This line can be used to guide you and monitor your progress. You can read digital levels on your screen. These tools can help you save time and avoid costly mistakes. These tools are used by many professionals to level large lawns, patios, and driveways.
Heavy-Duty Ground Leveling Tools and Machinery
For large projects, you will need heavy-duty land leveling machinery. A skid steer equipped with a grading tool or a mini excavator can be used. These machines can move large amounts of soil very quickly. These machines help shape land for construction or landscaping. Some land leveling machines have GPS systems to increase accuracy. Renting this equipment is an option if you don’t own it. The heavy-duty tools can make large jobs easier and faster.
How to Choose Self-leveling Rotary Laser Level Tools
The right tools for ground leveling will help you complete your project more quickly and with better results. Before you purchase or rent equipment, consider several factors. You must choose the right tools for each project.
Project Size and Scope
First, you should consider the size of your project. Simple tools are needed for small gardens or flowerbeds. Larger yards or construction sites require more powerful machines. You can use a shovel or a rake to level out a small area of soil. You may need to use a skid steer, or grader for larger areas. How much land you need to shape will determine the type of grading that you use. Fine grading is needed for some jobs to create smooth surfaces. Some jobs require rough grading for large quantities of soil.
Measuring your workspace before choosing your tools is a good idea. You can avoid purchasing equipment that’s too large or too small by measuring your work area.
Surface Type and Material
Check the surface and material that you intend to grade. Hand tools are easy to use on soft soil. Rock or clay surfaces require stronger equipment. Grading methods change depending on the material. You use different methods, for example, when you grade sand or gravel. You need to use tools that won’t damage the roots when you are working with turf. For hard surfaces, powered machines may be needed to break the ground.
| Surface Type | Recommended Tools | Types of Grading |
| Soft Soil | Rake, Shovel | Fine Grading |
| Rocky Ground | Pickaxe, Skid Steer | Rough Grading |
| Clay | Tiller, Grader | Slope Grading |
| Turf | Lawn Roller, Landscape Rake | Finish Grading |
Budget and Price Range
Set a budget prior to shopping. Hand tools are less expensive and can be used for smaller jobs. Powered machines are more expensive but can save you time when working on large projects. You can save money by renting equipment if you need it only once. Your costs can be affected by the type of grading that you select. The cost of fine grading using laser levels can be more expensive than rough grading using basic tools.
Compare prices between different rental companies or stores. Compare prices to find the best price for your project.
Manual vs. Powered Equipment
It is important to decide whether you prefer manual or powered laser leveling equipment. Manual tools such as rakes, tampers, and other rakes are less expensive and give you more control. Powered machines such as mini-excavators, graders, and dozers are faster and can handle more difficult jobs. You can choose between powered and manual options depending on the type of grading that you require. For patio finish grading, a level with a compactor is the best option. Heavy machinery is needed for rough grading of a large area.
- Hand Tools are good for simple, small projects. Simple to store and use.
- Power Equipment is best for big or difficult jobs. Savings in time and effort.
Ease of Use and Skill Level
Before you choose a tool, consider your level of skill. Some tools for leveling the ground require training or experience. Beginners can easily use hand tools. Some powered machines require special safety equipment or skills. Your choice can be influenced by the type of grading that you will do. You may need professional help if you plan to grade slopes. You can do basic leveling with simple tools.
Before you start using new equipment, read the manual or view online tutorials. You can avoid making mistakes by reading the manual or watching online tutorials. You can freely use a self-leveling rotary laser level for indoor and outdoor activities.
You can select the best ground leveling tool for you by considering your project size, your budget, your equipment, your level of expertise, and even your surface type. Matching the type of grading with your project will help you achieve smooth and even results.
Step-by-Step Guide: How to Level Ground Like a Pro

Preparing the Area
Remove all furniture, plants, or large rocks from your workspace. Remove all furniture, large rocks, and plants. It is important to have a clear area in order to work safely and see the ground. Rake up loose debris. Pull out weeds if you see them. For larger objects, you can use a hoe. Be sure that nothing is blocking your path.
Tip: Protect your hands and feet by wearing gloves and sturdy footwear while you prepare the work area and use a self-leveling rotary laser level for construction.
Marking and Measuring the Slope
Decide how you want your ground to slope. Mark the edges of your project with stakes and string. Place stakes in each corner. The string should be stretched tightly between the stakes. To check the distance, you can use a measuring tape. You can make your slope gentle if you want the water to drain. Most yards can be suited with a slope of 1 inch per 4 feet.
| Step | Tool Needed | Purpose |
| Mark corners | Stakes, string | Outline area |
| Measure slope | Tape measure | Set the correct angle |
Removing Debris and High Spots
Search for soil piles or bumps. Remove high spots with a hoe or shovel. Rake it to smooth the surface. Dig out large stones. Before you add any new soil, the ground should look good. Check for any roots or other objects that may cause issues later.
Filling Low Areas and Compacting Soil
Fill in low areas with fresh soil. Spread the soil with a rake until it looks even. Press the soil with a tamper, roller or squeegee. Compacting soil helps to prevent it from sinking. Repeat the process and add more soil if necessary. Check your progress frequently and work slowly.
Compacting your soil will make it stronger and more stable for future projects.
Checking Level With Laser or Manual Tools
Check your work before you finish. Use tools to level the ground, such as a laser or a board with bubbles. Check the level of the surface by placing the tool on it. If there are any areas that are uneven, adjust them. Repeat the test until you are satisfied.
Tip: Be patient with this step. A professional finish is achieved by checking carefully.
Mistakes to Avoid When Using a Self-leveling Rotary Laser Level
Avoid common mistakes when working on ground leveling projects. These mistakes can cause you to lose time and produce poor results. You can save time by knowing what to look for.
Ignoring Soil Compaction
Most people don’t compact the soil after leveling. You may later sink or shift the ground if you do not compact it. Press the soil to make it stable and strong. For small areas, use a hand roller or a tamper. You can rent a compactor for larger areas.
Tip: Compact the soil in layers. Compact the soil after adding a few inches. This helps to prevent uneven settlement.
Why soil compaction is important:
| Problem Without Compaction | Result |
| Soil sinks after rain | Uneven surface |
| Plants do not grow well | Poor root support |
| Patio stones shift | Cracked or uneven paths |
Not Measuring Slope Properly
Before you level, it is important to measure the slope. You may have problems with water draining away from your project if you try to guess the angle. Poor drainage can lead to puddles and damage your yard. Mark the slope with stakes, tape, and string. Use a level and laser tool to check your measurements.
- Place stakes in each corner.
- Stretch the string tight between the stakes.
- Measure the distance between the two ends.
Alert: Water will flow more efficiently away from patios and buildings if you create a slope of one inch per four feet.
Using the Wrong Tool for the Job
Match your tool with the type and size of your project. You will waste too much time if you use a small tool for a large lawn. Hand tools are best for small areas, and heavy machinery is better suited to large jobs. Check the surface type of your work area before selecting equipment.
Quick Guide for Tool Selection
| Project Size | Best Tool Choice |
| Small garden | Rake, shovel |
| Large lawn | Skid steer, grader |
| Patio | Laser level, tamper |
Note: The Right Tool will make your work easier, and you’ll get better results.
Avoiding these mistakes will help you finish your project quicker and with a smoother, more level surface.
Best Practices for Maintaining Ground Leveling Tools

Cleaning and Storing Hand Tools
After using your hand tools, clean them. Dirt and water will make your tools dull or rusty. You can use a wire scrubber to remove soil from shovels and picks. Metal parts can be cleaned with a dry rag. Place your tools in an area that is dry, such as a garage or shed. You can hang tools from hooks or place them on shelves. It keeps the area tidy and makes it easier to find your tools.
Before storing metal parts, rub a small amount of oil onto them. This will stop rusting and make your tools last a lot longer.
Calibrating Laser and Digital Levels
It is important to check laser and digital levels regularly. Before you begin a project, always check the calibration. Consult the manual of your device. Test the numbers by placing the level on an even surface. If the numbers are incorrect, reset the device or fix the settings. With motor graders, accurate levels are essential for a smooth finish.
- Test your level on a flat spot.
- If necessary, calibrate the device.
- Replace the batteries in your tools to ensure they work properly.
You can save time and avoid mistakes by using calibrated levels.
Servicing Heavy Machinery
Motor graders, for example, require regular maintenance. Check your equipment before using it. Inspect tires, hydraulic components, and blades. Remove any dirt and clean the engine. Lubricate moving parts to reduce friction. Have a professional check your motor graders at least once a year. Motor graders that are well-maintained work better and last longer.
| Maintenance Task | How Often | Why It Helps |
| Check blades | Before each use | Smooth grading |
| Oil joints | Monthly | Less damage |
| Professional check | Yearly | Longer life |
Safety checks are a must on motor graders. Safety machines are good for you and your job.
Follow these tips to keep your leveling tools in top condition. You can achieve good results with clean hand tools, serviced motor grades, and checked levels.
Conclusion
With the top-rated self-leveling rotary laser level tool, you can flatten and even out your land. You can do better work if you know about the different types of leveling tools and get expert advice. This guide will help you choose the right tools. Make your outdoor space look beautiful and durable by starting now.
FAQ
What is grading in ground leveling projects?
Grading means shaping the ground to create a smooth, even surface. You use grading to prepare land for lawns, gardens, patios, and construction. Grading helps water drain away and keeps your outdoor spaces safe and attractive.
Why do you need grading tools for landscaping?
Grading tools help you move soil, remove bumps, and fill low spots. You use grading tools to make the ground flat and ready for planting or building. Good grading tools save you time and give you better results.
How do you choose the right grading tool?
You look at your project size, surface type, and budget. For small grading jobs, you use hand tools. For large grading areas, you need machines. You match your grading tool to your skill level and the type of grading you want.
Can you do grading without heavy machinery?
You can do grading by hand for small spaces. You use rakes, shovels, and tampers for simple grading tasks. For bigger grading projects, you rent or buy machines. Hand grading works best for gardens and small yards.
What mistakes should you avoid during grading?
You should not skip soil compaction. You must measure the slope before grading. You need to use the right grading tool for your project. Careful grading helps you avoid uneven surfaces and drainage problems.
Tip: Always check your grading work with a level before you finish.


