
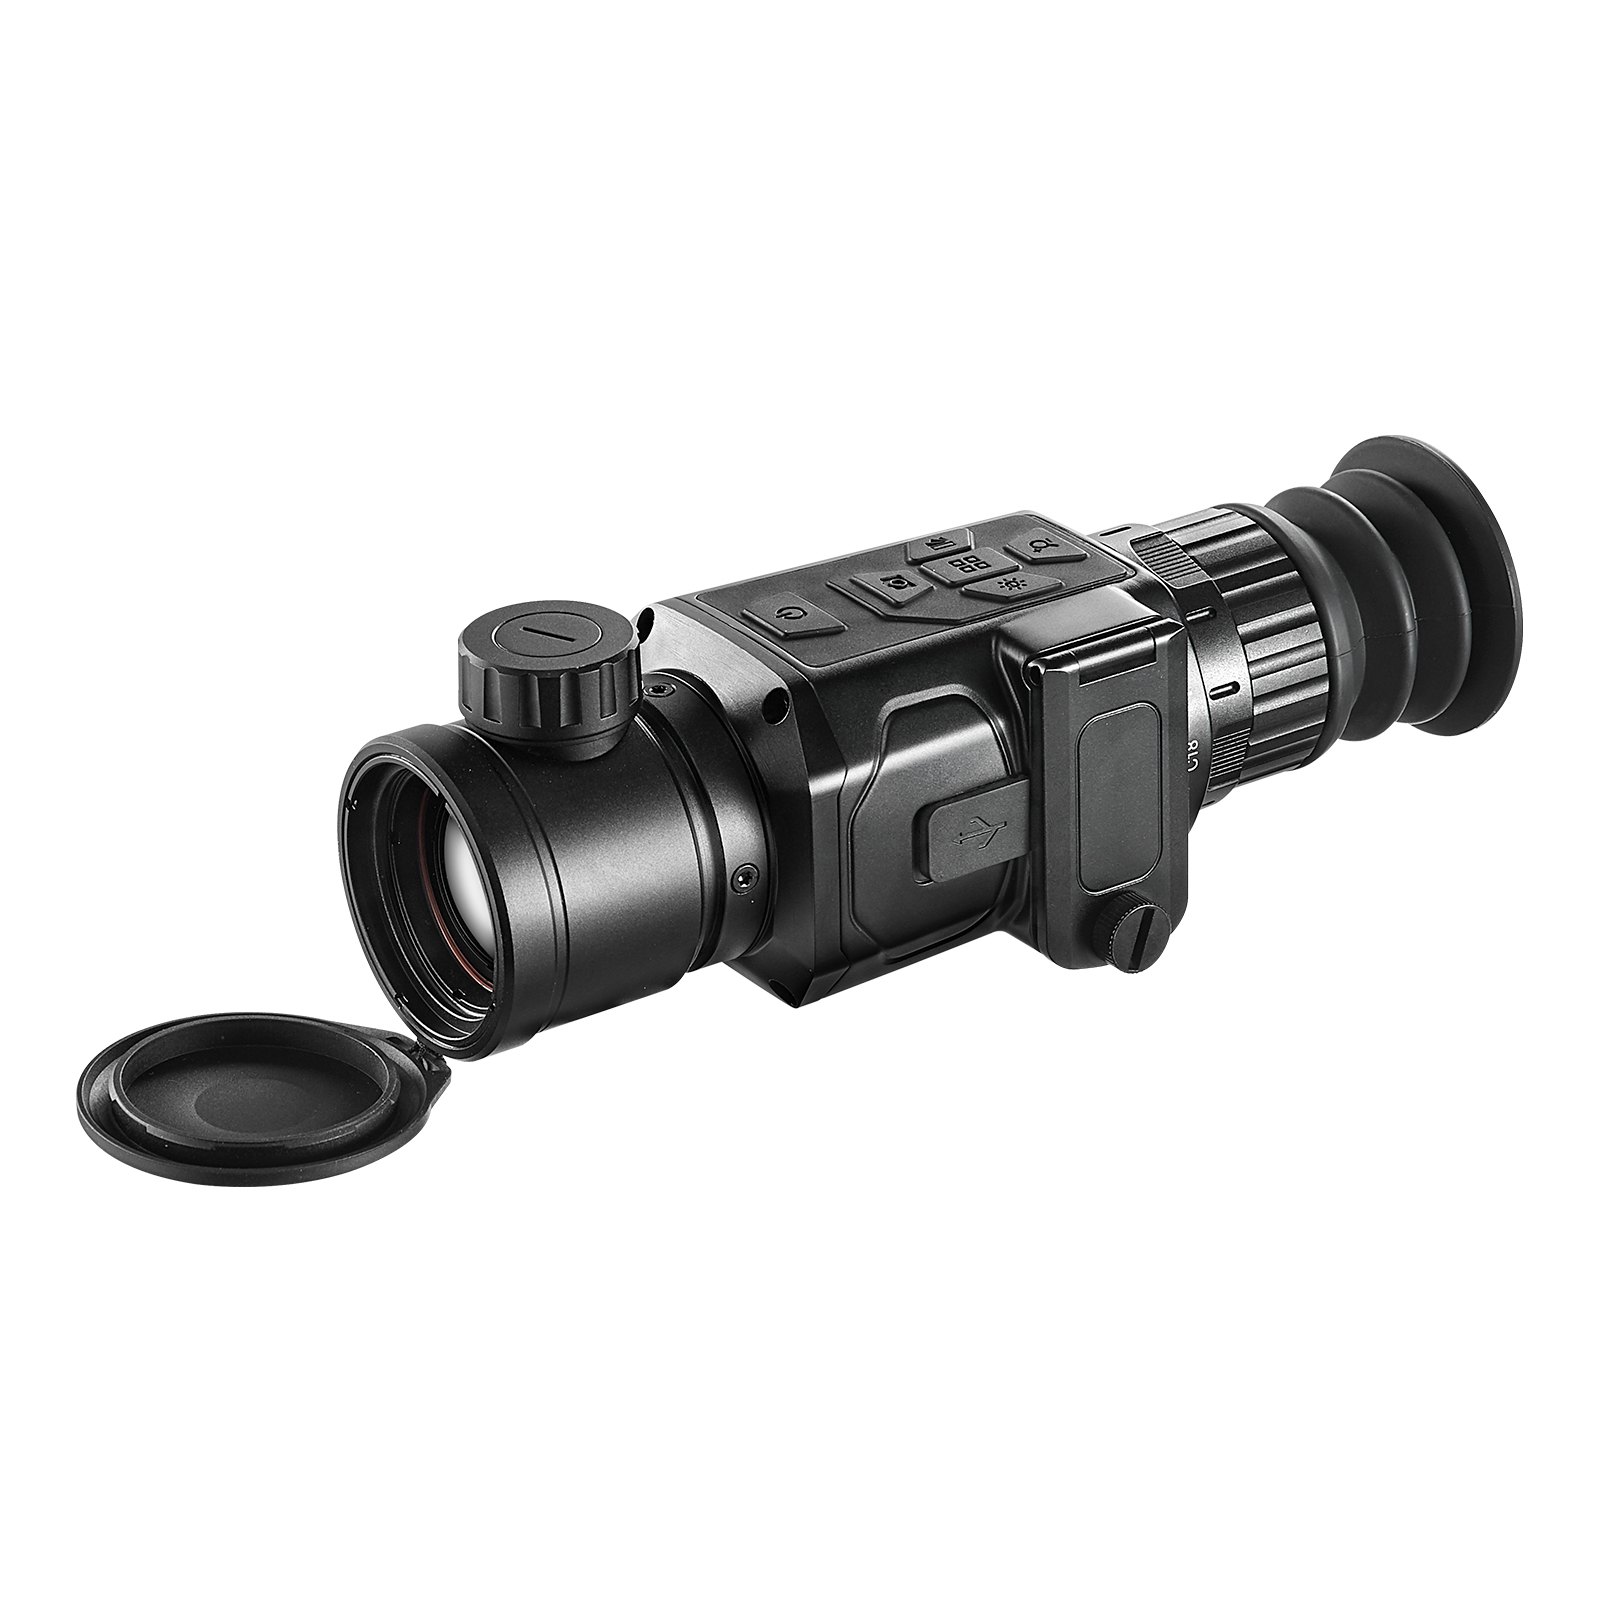
Unlock the full potential of your VEVOR Thermal Imager Monocular Hunting Imaging Telescope 1X -8X Zoom 0.39″ OLED Screen with our comprehensive product manual. Designed to provide in-depth guidance, this manual covers everything from initial setup and basic operations to advanced troubleshooting and optimization tips.
Whether you’re a novice or an experienced user, our step-by-step instructions make it easy to master your thermal imager and enhance your hunting experience.
With clear illustrations and detailed explanations, you’ll quickly learn how to navigate the 0.39″ OLED screen, adjust the 1X -8X zoom, and utilize all the features of this powerful imaging tool. Download now for hassle-free access to valuable information that ensures you get the most out of your VEVOR Thermal Imager.
VEVOR Thermal Imager User Manual
Model: HT-C18
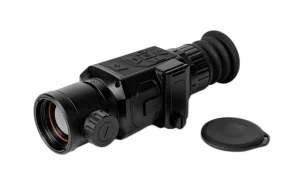
Assembly precautions
Please observe the following guide in order not to damage the product:
Don’t assemble or dismantle the product without permission. The product is a type of super-precise equipment. Don’t try to dismantle, assemble, or remodel any part of the product. Repair of the product should only be made by technical personnel designated by VEVOR Company.
Note: Don’t directly put the product close to a strong heat source (such as an electric iron). Otherwise, it may damage the probe.
Product hum
When the product works, there is a light clicking every several seconds. This is a normal phenomenon when the lens captures images.
Use precautions
The warning describes the acts that may cause harm to users. Please observe the following operation to avoid electric shock or personal injury.
- If the product case is damaged, don’t use it continuously. Don’t hesitate to contact VEVOR’s local distributors or agents under such conditions.
- If the product emits smoke, sparks, or a burnt smell, please stop using it immediately.
- The product power supply should be powered off first in such a condition. After the smoke and peculiar smell disappear completely, don’t hesitate to contact the local VEVOR distributors or agents.
- Don’t remodel the adapter and the data line. Otherwise, such remodelling may cause a short circuit or fire.
- Don’t weld the battery without permission.
Such an operation may damage the battery and result in leakage and explosion. - Avoid causing the battery to be impacted (e.g., collision, falling, etc.). Such a condition may damage the battery case or result in the battery leaking or exploding.
- Please remove the adapter from the power socket when it is not being used. It may overheat, deform, and catch fire if connected to a power supply for a long time.
- Please ensure that the adapter plug is inserted into the specified power socket. The adapter plug may be different due to the regions.
- Please confirm whether the adapter’s specifications are consistent with the specifications of electric appliances in your region. Otherwise, this may cause equipment overheating, electric shock, fire, chemical leakage inside the battery, explosion, and other serious consequences.
- When the adapter’s plug or wire is damaged, stop using it immediately. Don’t change the battery unless the charger’s plug is inserted into the socket completely.
- Do not touch the electric wire with wet hands.
It can cause an electric shock when touching the electric wire with wet hands. When pulling out the electric wire, hold the wire headfirst to pull it out. Don’t pull off the electric wire directly. Otherwise, the electric wire may be broken, causing electric shock and fire. - Forbid dipping the product into water caught in the rain.
If the case contacts any liquid, please wipe it dry immediately. If water or other liquid enters the inside of the instrument, please turn off the power supply immediately. Continuous use may result in product damage. - Clean the dust on the adapter plug and the data line
When exposed to a dusty and dirty environment for a long time, the dirt surrounding the electric equipment will accumulate moisture. This may cause a short circuit and fire. - Please use the company’s original adapter to charge the product. Using non-original power supply accessories may cause equipment overheating, electric shock, fire, chemical leakage inside the battery, explosion, and other serious consequences.
- Don’t use abradant, isopropanol, or solvent to clean the device’s enclosure. Such an operation may damage the product case.
- The product temperature may increase after charging for a long time. You may feel scorching heat when your hands touch the sensors.
- Problem caused by water condensation
Don’t bring the instrument into a low-temperature environment from a high-temperature environment in a short time or from a low-temperature climate to a high-temperature environment. This may result in the inside of the instrument and its appearance producing water condensation. In such a condition, the instruments should be placed into a portable box or a plastic bag. Before use, make sure it returns to the environmental temperature and take it out to use. If the product has water condensation inside, please power it off immediately. Otherwise, the instrument may be damaged. Operation is not allowed unless the water condensation disappears. - Please avoid impacting the product (e.g., collision, falling, etc.). Such an operation may damage the product.
- Long-time storage and regular charging
If the product is not used often, it should be placed in a cool and dry environment. If a product installed with a battery is stored for a long time, it should be charged regularly. Otherwise, the battery will run out, reducing its service life.
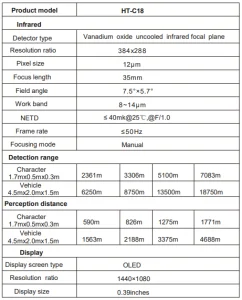
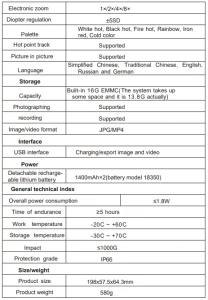
VEVOR Thermal Imager Technical Specifications
Introduction to Product Structure
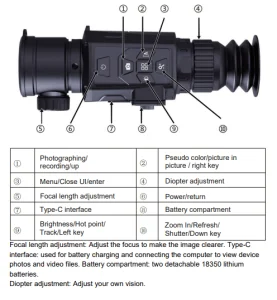
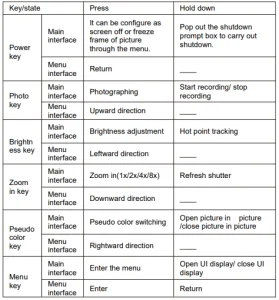
Key Description
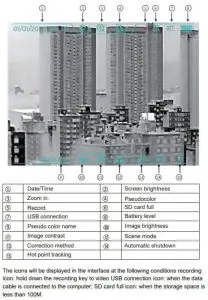
Introduction to the Icon of the Main Interface
Thermal Imager Menu Description
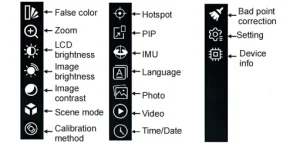
- False color: White hot, black hot, fire hot, rainbow, iron red, cold color.
- Zoom: Electronic amplification 1X, 2X, 4X, 8X. LCD brightness: The display brightness can be adjusted to 1~10 levels.
- Image brightness: The brightness of the infrared image can be adjusted to 1~10 levels
- Image contrast: The contrast of the infrared image can be adjusted to 1~10 levels.
- Scene mode: The application scene can be standard, city or jungle.
- Calibration method: The infrared image correction method can be used for manual, automatic, and scene calibration.
- Hot spot: The hot spot tracking of infrared images can be set to on or off.
- PIP: The picture-in-picture function is on or off in infrared image mode.
- IMU: Pitch angle and roll angle display, set on or off.
- Language: Set the device’s language, including simplified Chinese, traditional Chinese, English, Russian and German.
- Photo: Photo list, view photos
- Video: Video list, view video.
- Time/Date: Set the date (year, month, day) and time (hour, minute), time format(12 hours, 24 hours), and date format (year/month/day/month/year, month/day/year).
- Bad point correction: HT-C17 refers to automatic Bad point correction(operate according to prompts), HT-C18 and HT-C19refer to manual Bad point correction(left, right, up and down navigation keys adjust the cursor position. The menu key determines to remove bad points and press the power key to return)
- Settings: Short-press the power button, video interface, automatic shutdown time, recording duration, and picture-in-picture position.
- Press the power button: can set the power. Press it for display or freeze frame of the picture. Video interface: set whether to bring Ul display information when recording;
- Automatic shutdown time: may set no shutdown, 5 minutes, 10minutes, 20minutes, 30 minutes.
- Recording duration: set the duration of each video file, including5minutes, 10minutes, 20 minutes and 30 minutes;
- Position of picture in picture: Set the position of picture in pictureinthecenter, which can be set as upper right, lower right, lower left and upper left.
- Device info: View the device’s model, detector pixel, detector type, screen size, screen pixel, battery capacity, hardware version, firmware version, application version, storage space, etc., and also carry out application updates, parameter resets, and device formation.
Photos and videos
- View photos: In the photos of the menu, open the photo list and press the menu key to view pictures. When viewing a photo, press the brightness key to view the previous photo, and press the pseudo colour key to view the next photo.
- Photo deletion: In the photo list, press the brightness key to pop up a prompt for deleting photos, and press the menu key to confirm deletion.
- View video: To view a video in the menu video, open the video list and press the menu key.
- Delete video: In the video list, press the brightness key to pop up a video deletion prompt, and press the menu key to confirm the deletion.
Introduction to Palette
The colour palette can change the pseudo colour display of infrared images on the display screen. Some palettes are more suitable for specific applications and can be set as needed. The palette is divided into six colours: white hot, black hot, fire hot, rainbow, iron red, and cold.
These palettes work best under conditions with high thermal contrast, allowing for additional color contrast between high and low temperatures.
Choose the right color palette to display the details of the target object. For palette colours of rainbow, iron red and cold colours, the colouration outweighs the display colours, which are very suitable for high thermal contrast, and are used to improve the colour contrast between high and low temperatures.
However, white heat and black heat provide uniform linear color. The following pictures are taken from the same object, but with different palettes selected:
Charging of the Battery and Description
Use the USB data line to charge:
This product has a built-in rechargeable battery. When the battery level is low, the top right of the screen will display “low battery “Please charge in time through the TEPY-C USB interface. Pull off the USB line after fully charging
Use a Recharge Stand to Charge
- Unscrew the battery cover and take out the batteries
- Charge the batteries using the charger from the original manufacturer. Install the batteries properly according to the polarity shown on the charger.
- After fully charging, disconnect the power supply from the charger and remove the batteries.
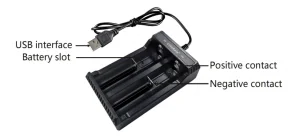
Prompt: When this product lies idle for long, it shall be charged at least every three months to prevent irreversible loss of capacity due to too low battery power arising from its discharge as it is kept too long.
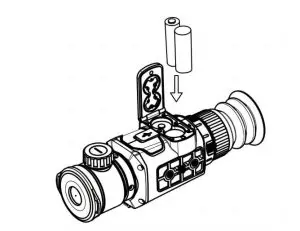
Installing the Thermal Imager Battery
- Turn the battery compartment knob counterclockwise to open the battery compartment cover.
- Install the battery in strict accordance with the positive and negative-poled directions of the battery on the battery compartment cover.
- Close the battery compartment cover, and turn it clockwise until it is locked up.
Note:
- Please do not use the battery whose insulating layer is damaged.
- If the battery’s positive and negative poles are wrongly connected, the device will not work, damaging the battery.
MAINTENANCE/ Service
Please clean the device’s enclosure with a damp cloth or weak soap. Don’t use abrasives, isopropanol, or solvents. The lens and screen should be cleaned with cleaning agents for professional optical glasses.
Please note that Lack of maintenance may result in warranty cancellation. The guarantee of this tool will be void if the machine has been modified, or you attempt to take apart the machine or open the factory-made sealing without the consent of an authorised manufacturer representative.
Thermal Imager Lens Maintenance
Prevent damage to the infrared lens:
Clean the infrared lens carefully. It has a refined anti-reflection coating. Don’t clean with force to prevent damage to the coating.
This selectable colour palette. For lens maintenance, use a cleaning solution such as alcohol-based commercial lens cleaners, alcohol, and a lint-free cloth or paper towel. Compressed air tanks can be used to remove loose particles.
Clean the lens
The compressed air tank or dry nitrogen ion gun (if applicable) may blow the loose particles on the lens surface.
Dip the lint-free cloth in alcohol. Squeeze the excess alcohol out of the cloth or lightly apply the lint-free or dry cloth. Wipe the lens surface in circular motions. Then discard the cloth.
If the above step must be repeated, please wipe the cleaning solution with a new cloth dipped in it.
Disposal
This product is subject to the European Directive 2012/19/EU provisions. The symbol showing a wheelie bin crossed through indicates that the product requires separate refuse collection in the European Union. This applies to the product and all accessories marked with this symbol.
Products marked as such may not be discarded with regular domestic waste, but must be taken to a collection point for recycling electrical and electronic devices.
Only qualified technicians are authorised to repair the Monocular outdoor thermal image telescope.
For your safety, please observe all safety notes, precautions, and details in this manual.
Thermal Imager Warranty
- This warranty shall only cover claims for damage due to a fault.
- If a warranty claim is made, the party entitled to warranty coverage must present the proof of purchase, including the purchase date.
- Customer satisfaction is always the motivation for our brand growth. We promise to help you solve any issues. Please just let us know if you need help.
OUR SERVICE TEAM PROMISES TO REPLY TO YOUR MESSAGE WITHIN 24H.
Scope of Warranty
- We guarantee that VEVOR products are produced per ISO 9001 Quality Management procedures and are free of manufacturing defects for the warranty period.
- This warranty covers product faults due to manufacturing defects within 1 year from purchase. After inspection by a sales representative, defective products will be replaced or repaired with equivalent goods free of charge.
- Any warranty claim made during the period shall not extend the overall coverage.
- Warranty periods: Warranty claim date!
Recommended For Your Project
VEVOR Thermal Imager Monocular Hunting Imaging Telescope Manual

Reviews
There are no reviews yet.