
If you’ve ever dealt with a stubborn clog and wished you could just see what’s going on in there, learning how to use a pipe inspection camera is a total game-changer.
It’s easier than it looks, super satisfying, and honestly kind of fun, like being your own mini-plumber detective.
Whether you’re using a basic inspection camera or a full sewer inspection camera, this guide keeps things simple and friendly.
Types of pipe inspection cameras
It is better to be aware of the various kinds of pipe inspection cameras available before you begin to use one. Each of them has its own vibe, based on the type of job you are taking. The following are the key ones you will encounter:
- Portable inspection cameras: Ideal for quick inspections and superficial pipes.
- Sewer inspection camera systems: Larger, heavier, ideal for long or deep drains.
- Sewer camera and locator: Helps you locate the precise position of the obstruction in the ground.
- Plumbing pipe cameras: The general-use cameras are suitable for most household plumbing lines.
What you need before you start
A pipe inspection camera is not that difficult to use, although the correct equipment simplifies the task. These are the things to get straightened out before you start.
Choosing the right camera for your pipe type
You desire a camera of inspection that is equal in size and length of the pipe you are inspecting. Big drains? Order a sewer inspection camera. Smaller indoor pipes? A plumbing pipe camera that fits in the hand is ideal. And should you wish to locate the trouble below the ground, take a sewer camera with locator; it spares you a lot of guesswork.
Additional tools and safety gear
A complete toolbox is not necessary, but some add-ons are welcome. Wear gloves (believe me, pipes are dirty), carry a flashlight, and cleaning wipes to clean the camera head. In case you are using a VEVOR sewer camera, most of them are already equipped with gloves and accessories, so you are almost ready.
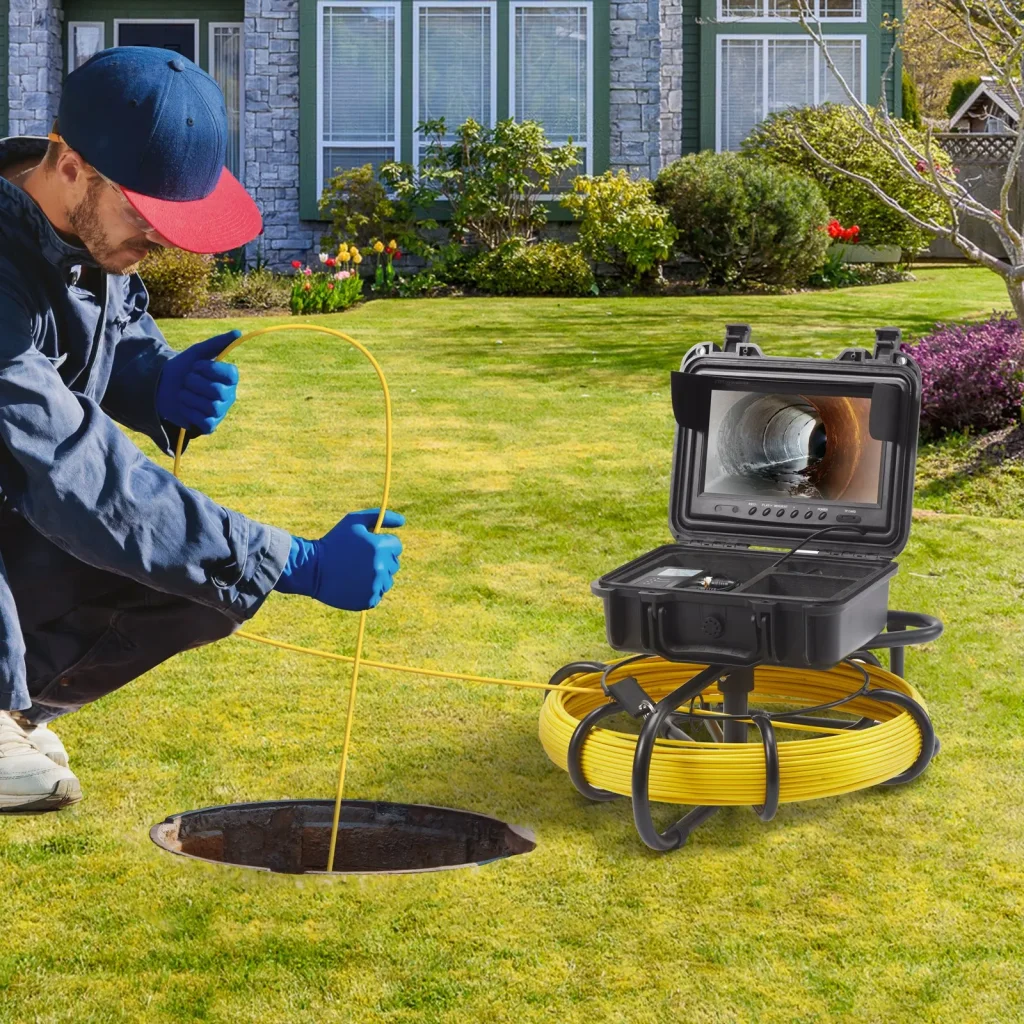
How to use a pipe inspection camera correctly
The pipe inspection camera is initially very daunting to use, but after a while, one becomes used to it and it becomes like a video game, only that the explosions are not as frequent. Here is a quick guide on how to use a pipe inspection camera:
Preparing the pipe and camera setup
Begin by ensuring that the pipe aperture is free so that the camera can slide in with ease. Switch on your sewer inspection camera, test the battery, and test the video feed. Clean the camera lens, that is no better than seeing a mystery block of blurry and thinking it is a blockage.
Inserting the camera and navigating the pipe
Slowly insert the camera into the pipe and push the cable. Do not press it, allow the head to bend. Using a plumbing pipe camera, trace the natural line of the pipe. When you have a sewer camera and a locator, turn the locator on to be able to trace your location underground.
Interpreting the video feed and identifying issues
Observe the live screen and record anything abnormal, cracks, roots, build up, foreign objects or sagging pipes. The better your camera (most VEVOR sewer cameras), the easier it is to see what is going on. There is no hurry; pipes are not a contest.
Tips for best results and avoiding problems
Pipe inspection camera is not difficult to use; however, some clever practices will make your inspection much easier, smoother, and less frustrating.
The following are the most friendly and practical tips that can assist you to achieve perfect results each time, regardless of whether you are using a simple plumbing pipe camera or a complete VEVOR sewer inspection camera.
- Feed the camera gradually and continuously: Bending the camera may cause damage to the camera head, or scratching the lens.
- Wipe the lens: A small spot can turn your sewer inspection video into fog.
- Record your video: The majority of sewer cameras allow you to record video, which is incredibly useful later in case of repairs or demonstrating to a plumber.
- Use the locator feature (where present): A sewer camera with a locator assists you in locating the exact underground trouble spot.
- Marking on the cable: A scrap of tape every few feet will assist you in keeping track of the depth.
- Before starting: Check the battery or power source before starting. Trust me, you do not want the feed dying in the middle of the pipe.
- Keep the cable straight: This helps avoid tangling and allows you to get through the pipe more easily.
Common mistakes to avoid
Even though using a pipe inspection camera is simple, there are a few classic mistakes that beginners (and honestly, even pros) run into. Avoiding these will protect your equipment, give you clearer footage, and make your sewer inspection way easier.
- Forcing the camera through tight bends: This is the #1 camera killer. Let the cable bend naturally, or reposition yourself.
- Skipping lens cleaning: A dirty lens makes everything look like a mysterious blob… and not the helpful kind.
- Using the wrong type of camera: A tiny handheld model won’t handle a 100-ft sewer line; use the right sewer inspection camera for the job.
- Ignoring cable knots or twists: Knots create resistance and can damage the wiring inside your plumbing pipe camera.
- Not clearing the pipe entry first: Debris around the opening can scratch the lens or block the camera from entering smoothly.
- Working with a low battery: Halfway through the pipe is not where you want your VEVOR sewer camera to shut off.
- Dragging the cable on rough surfaces: Dirt, concrete, and sharp edges wear down the cable’s protective coating fast.
These simple tweaks help you use your sewer inspection camera safely, keep your footage clear, and make each inspection smoother than the last.
When to call a professional instead of DIY inspection
When your camera has been stuck again, the pipe is blocked, the clog is in the main line and you see significant damage such as cracks or tree roots, then that is when a professional should be engaged.
A pipe inspection camera is wonderful for diagnosing, and some of the repairs are really the work of an expert, and a person who will not mind crawling about in the mess.
FAQs
Can a pipe inspection camera work on any pipe size?
Mostly yes, but match the camera head to the pipe. Smaller pipes need compact heads, while sewer lines need a larger sewer inspection camera.
Is it safe to use a camera in a wet or flooded pipe?
Yep, most plumbing and sewer inspection cameras are waterproof. Just make sure yours is rated for submerged use before dunking it.
How deep can a home pipe inspection camera reach?
Most home units reach 20–100 feet, depending on the model. A VEVOR sewer camera usually covers long distances easily.
Can I reuse the camera for multiple inspections?
Absolutely. Just clean the lens and cable after every use and store it properly so it lasts longer.
Conclusion
The art of operating a pipe inspection camera is, quite honestly, one of those skills that simplify home maintenance to a lot easier task. You save time, you do not guess, and you see problems before they turn into large and costly problems.
And in case you are looking at a reliable, easy-to-use system, the sewer cameras of VEVOR provide you with excellent visibility, long cable range, and crystal-clear images, which are ideal when it comes to making inspections without stress.


