
If you want to improve your home with a sturdy and stylish hand railing, no worries! Learning how to install a hand railing is easier than you might think. With just a bit of planning and the right tools, you can make your stairs or porch safer and more attractive. Whether you’re a first-time DIYer or have some experience, this guide will walk you through every step.
In this blog, we’ve covered everything you need to know about how to install a hand railing the right way. Let’s get started and make your space secure and stylish.
Tools and Materials:
Drywall
You need the correct tools to get started with DIY handrail installation on drywall. Here’s a list to guide you:
- Locate a stud: Identify the wooden studs that are hidden behind the drywall. To make the railing strong, you need to attach the brackets to the studs.
- Drills and drill bits are tools used to make holes for inserting screws and clips.
- Level: This protects your fence from leaning.
- Tape measure: This helps you find the proper distance and height between things.
- The brackets are held to the wall by screws and wall bolts.
- Pencil: Marks where to drill.
Concrete
Concrete steps or walls need different tools. If you’re tackling a DIY project, you may need:
- Hammer drill: Drills into dense concrete.
- Carbide-tipped masonry bits: These bits work in conjunction with a hammer drill to create clean holes.
- Expansion bolts or concrete anchors: Hold the brackets tightly in concrete.
- Level: Check that the railing is even.
- Tape measure: Measures placement.
- Pencil or chalk: Marks drilling spots.
Outdoor Steps
Outdoor railings face weather and moisture. To understand how to install outdoor hand railing for steps properly in these conditions, use these tools and materials:
- Weather-resistant handrail kit: Prevents rust and damage.
- Galvanised or stainless steel screws/bolts: Resists corrosion.
- Base plates and expansion bolts: Secure posts to concrete or wood.
- Drill with appropriate bits: Matches the surface type.
- Level: Keeps the railing straight.
- Tape measure: Ensures correct placement.
- Safety glasses and gloves: Protect your eyes and hands.
Why Each Tool Matters
Tip: Using the right tool makes your job easier and safer.
| Tool/Material | Purpose |
| Stud finder | Finds strong support in drywall |
| Hammer drill & masonry bits | Drills into tough concrete |
| Weather-resistant materials | Protects outdoor railings from the elements |
| Level | Keep your railing straight and safe |
| Expansion bolts/anchors | Secures brackets in concrete or wood |
Choosing the right tools is crucial when learning how to install a wooden hand railing on stairs. It helps you build a strong, safe hand railing that lasts for years.
Preparation:
Measuring
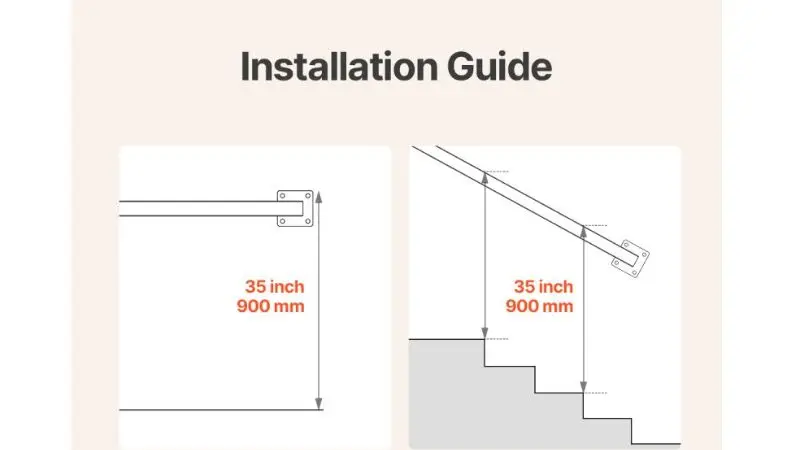
Installing a wooden hand railing on stairs begins with measuring the height of your handrail. Start by measuring the height of your hand railing. Use a tape measure to find the distance from the front edge, or nosing, of each stair tread up to the spot where the handrail will go. The standard height for most hand railings is between 34 and 38 inches above the stair tread nosing. This range keeps the railing comfortable and safe for most people. Measure at several points along the stairs to ensure the height stays even.
Tip: Always double-check your measurements before you move to the next step.
Marking
After you measure, mark the spots where you will attach the brackets or posts. Use a pencil or chalk to make clear marks on the wall or steps. Place marks at the top and bottom of the stairs first. Then, use a level to draw a straight line between these points. This line will guide you when installing the stair handrail along the staircase. If you need more brackets for longer railings, space them evenly along this line.
Safety Gear
Wear the proper safety gear before starting to drill or cut. Safety glasses protect your eyes from dust, debris, and other hazards. Gloves keep your hands safe from sharp edges and splinters. Use ear protection to guard your hearing if you work with concrete or power tools. Good safety gear is essential when undertaking any project, especially when learning how to install a handrail.
Code Requirements
Check your local building codes before you begin. Many areas have rules about handrail height, spacing, and strength. Some codes require a specific type of bracket or fastener. You can find this information online or by calling your local building department. Following the code ensures that your handrail is safe and compliant. Proper hand railing installation ensures your project meets the code and stays secure.
How to Install a Hand Railing?
Drywall Installation
You can install a hand railing on drywall by following these steps:
- Find the Studs
Use a stud finder to locate the wooden studs behind your drywall. Identify and mark each stud along the route. You need to anchor the brackets into these studs for strength.
- Mark Bracket Locations
Measure the correct height from the nosing of the stair tread. Mark the bracket spots on the studs. Use a level to draw a straight line between the marks. This line will guide your installation.
- Drill Pilot Holes
Drill small pilot holes at each mark. This step helps prevent the drywall from cracking and makes it easier to drive in screws.
- Attach the Brackets
Secure the brackets to the studs using long screws. Tighten each screw until the bracket feels securely in place.
- Mount the Handrail
Place the handrail onto the brackets. Use a level to ensure the surface remains level. Screw the handrail to the brackets.
- Final Check
Pull gently on the handrail to make sure it does not move. Check that all screws feel tight.
Concrete Installation
You can follow a simple process for DIY handrail installation on concrete by using the right tools and steps:
- Mark the Locations
Use a tape measure to find the correct height. Mark the bracket or post locations on the concrete with chalk.
- Drill Holes in Concrete
Use a hammer drill with a carbide-tipped masonry bit to drill holes at each mark. Make sure the holes match the size of your expansion bolts or anchors.
- Clean the Holes
Remove dust from each hole. You can use a small brush or a can of compressed air.
- Install Expansion Bolts or Anchors
This is a key part of successful hand railing installation. Insert the expansion bolts or concrete anchors into the holes. If needed, tap them in gently with a mallet or hammer.
- Attach Brackets or Posts
Place the bracket or post base over the anchors. Tighten the bolts with a wrench until the bracket or post feels securely in place.
- Mount the Handrail
Set the handrail onto the brackets or posts. Use a level to check for straightness. Secure the handrail with screws or bolts.
- Final Check
Push and pull the handrail to ensure it’s secure. That completes your DIY handrail installation on concrete steps.
Note: A hammer drill makes drilling into concrete much easier and faster.
Outdoor Steps Installation
Outdoor steps require special care due to the varying weather conditions. Here is how to install outdoor hand railing for steps to ensure safety and durability:
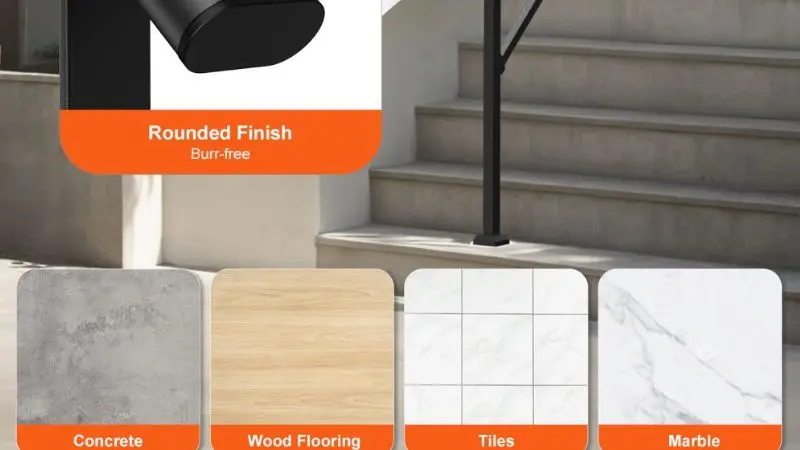
- Choose Weather-Resistant Materials
Pick a handrail kit made for outdoor use. To prevent rust, use galvanised or stainless steel screws and bolts. Choosing the right materials is the first step to building a railing that can withstand outdoor conditions.
- Mark the Post Locations
Measure and mark where you want to place the posts or brackets. Use chalk for concrete or a pencil for wood.
- Drill Pilot Holes
For concrete, use a hammer drill and a masonry bit. For wood, use a regular drill and wood bit. Drill holes at each mark. Accurate drilling is essential in installing the stair handrail securely.
- Install Base Plates and Expansion Bolts
Place the base plate over the holes. Insert expansion bolts or lag screws. Tighten them until the base plate feels solidly in place.
- Attach the Posts or Brackets
Secure the posts or brackets to the base plates. Ensure everything aligns with your marks.
- Mount the Handrail
Place the handrail onto the posts or brackets. Use a level to check that it is straight. Fasten the handrail with weather-resistant screws or bolts.
- Final Check
Shake the handrail gently. Make sure it does not move. Check all bolts and screws for tightness. A secure finish ensures the railing lasts for years.
Tip: Always use weather-resistant hardware for outdoor railings. It keeps your handrail safe and looking excellent for years to come.
Finishing Touches
Sealing and Protection
As part of hand railing installation, sealing and protecting the materials is essential for long-term durability. You want your hand railing to last for many years. Apply a wood finish or paint for indoor railings to protect against scratches and stains. For outdoor railings, use a weatherproof sealant or rust-resistant paint. This step prevents moisture and sun damage to the surface. If you use metal parts, check that all screws and bolts have a protective coating. You can use a small brush to reach tight spots. Always follow the product instructions for drying times.
Tip: Sealing your handrail helps prevent rot, rust, and fading.
Cleaning Up
After you finish the DIY handrail installation, clean up your work area. Pick up all tools and leftover materials. Sweep or vacuum any dust and debris from the drilling. Wipe down the handrail with a damp cloth to remove fingerprints and dirt. If you use any chemicals or sealants, store them safely out of the reach of children and pets. A clean space helps you spot any missed steps or loose parts.
- Collect all screws, bolts, and tools.
- Dispose of packaging and waste properly.
- Check for any sharp edges or splinters.
Final Checks
Before declaring the project complete, conduct a final inspection. Walk up and down the stairs while holding the handrail. Make sure it feels sturdy and does not wobble. Look for any gaps between the railing and the wall or posts. If you encounter any issues, address them promptly. This step is a vital part of installing the stair handrail and ensures your railing is safe for everyone.
| Final Checkpoint | What to Look For |
| Stability | No movement or wobble |
| Fasteners | All tight and secure |
| Surface | Smooth, no sharp edges |
If you want to review the process, go back to the earlier steps. Careful finishing makes your project safe and professional.
Troubleshooting
Common Mistakes
You may encounter problems during your project. Many people make the same errors when they don’t know what to do. Here are some of the most common mistakes:
- Missing the Studs or Anchors
You may attach brackets to drywall or concrete without hitting a stud or using the correct anchor, which can compromise the integrity of the railing.
- Incorrect Height
Sometimes, you measure from the wrong spot or forget to check the height at each step. It can cause the railing to become uneven or unsafe. This is a standard error that can make the installation hazardous.
- Loose Fasteners
If you do not tighten screws or bolts enough, the handrail may wobble.
- Skipping the Level
You might forget to use a level, which can cause the railing to tilt or look crooked.
- Using the Wrong Materials
Indoor screws or untreated wood will not last outside. The weather can damage them quickly.
Tip: Always double-check your work as you go. It helps you catch mistakes early.
Fixes
You can fix most problems with a few simple steps. Use this table to match the mistake with the right solution:
| Mistake | How to Fix It |
| Missed stud/anchor | Move the bracket to a stud or use a proper anchor |
| Wrong height | Remove and reattach at the correct height |
| Loose fasteners | Tighten all screws and bolts |
| Crooked railing | Loosen, adjust with a level, then retighten |
If something’s wrong, remove the handrail and try again. Review the steps or consult a professional if needed.
Note: Careful troubleshooting keeps your handrail safe and strong for everyone.
Conclusion:
You can complete this project by planning each step and wearing the necessary safety gear. Always double-check your work and take the time to do it right. If you feel unsure about building codes, contact your local building authority. You now know how to install a hand railing with confidence. If you require additional assistance, consider seeking guidance or consulting a professional for further support. Remember, patience and careful work lead to a safe, sturdy handrail.
Stay safe, and enjoy your finished project!
FAQ
How do you find wall studs for a handrail?
You can use a stud finder. Move it slowly along the wall where you plan to install the handrail. When the device lights up or beeps, you’ve found a stud. Mark the spot with a pencil.
What is the best height for a handrailing?
Most building codes require a handrail height between 34 and 38 inches above the stair tread nosing. Knowing this helps ensure you follow proper guidelines for hand railing installation.
Can you install a handrail without power tools?
You can use manual tools, such as a screwdriver and hand drill, but power tools make the job much easier and faster. Tool choice plays a significant role in doing the job effectively and safely.
How do you keep an outdoor handrail from rusting?
- Use weather-resistant materials, such as stainless steel or galvanised metal.
- Apply a protective sealant or paint made for outdoor use.
- Check the handrail yearly for signs of rust and touch up as needed.


