
Using a dustless drywall sander makes finishing ceilings and walls quicker and safer. Its dust collection system traps dust as you sand. Unlike traditional dustless sanders, you do not have to worry about cleaning up dust and spending more time to get a professional finish. Dustless sanders come in a variety of sizes, from handheld options for small projects to large dustless sanders that reach high walls. This guide will help you choose the right sander for your projects, and will detail the benefits, types, features, and maintenance tips of drywall sanders used for walls and ceilings.
- What Is a Dustless Drywall Sander?
- Benefits of Using a Dustless Drywall Sander
- Different Types of Dustless Drywall Sanders
- Key Features to Look for in a Dustless Drywall Sander
- How to Use a Dustless Drywall Sander Properly
- Dustless Drywall Sander vs Regular Drywall Sander
- Maintenance and Care Tips for a Dustless Drywall Sander
What Is a Dustless Drywall Sander?
As you finish a drywall project, fine dust is created. With a dustless drywall sander, you can finish your drywall sand project and let the sander do its magic. The dustless drywall sander allows you to sand drywall from an optimal distance, thus giving you the end result and a clean surrounding area.
This tool proves invaluable for projects, renovations, and new builds where breathable and organized surroundings are crucial. It enhances comfort and safety when sanding by minimizing airborne particles.
How a Dustless Drywall Sander Works
Dustless drywall sanders utilize a self-contained dust collection system while sanding, and when the sanding disc glides over the wall or ceiling, the attached vacuum removes dust. This prevents dust from dispersing throughout the room and helps to achieve a smoother finish because loose particles can’t fall back onto the surface.
Most models are built to be user-friendly, and many homeowners appreciate lightweight dustless drywall sanders for easier sanding and less arm strain. The tool maintains visibility while sanding walls or ceilings and lessens the need for heavy dust covers and extensive cleanup.
Features that distinguish the drywall dustless sander from regular sanders include:
- Inbuilt dust collection while sanding
- Dustless sanding provides cleaner air and a less messy working environment
- Easier and faster cleaning after completing sanding work
- Providing a professional and smooth finishing touch
Benefits of Using a Dustless Drywall Sander

Using a dustless drywall sander changes drywall projects to make sanding cleaner, faster, and more comfortable. It has several benefits, providing a better level of efficiency and outcomes. Here’s why this tool is so successful:
- Reduces Airborne Dust and Improves Air Quality: Built-in vacuum picks up dust while you sand, and the air stays cleaner, your lungs are saved, and fine dust is not left on the furniture and floors.
- Saves Time on Cleanup: Most dust is removed instantly, so you spend less time sweeping and wiping. This gives you the opportunity to move straight on to priming/painting.
- Creates a Smoother, More Professional Finish: Dust-free sanding can help achieve a consistent wall surface, which minimizes any visible marks and creates a cleaner, more even finish on walls and ceiling surfaces.
- Ideal for DIYers and Professional Contractors: Whether you are just looking to upgrade a single room or tackle large projects, this tool offers better workflow, comfort, and control, and will work well for beginners and pros alike.
Before, using a dustless drywall sander means that every project will be faster, cleaner, and safer. It combines the professional level results and easier handling to make the drywall sanding more fun for anyone.
Different Types of Dustless Drywall Sanders
Choosing the right tool can make your drywall work easier, as not all drywall projects are the same. Different tools come with different capabilities and features, and with varying degrees of comfort. Knowing the different types of tools available will help you select the right tool that matches your needs.
Sanders come in a variety of cleaning capabilities and sanding improvements for walls and ceilings. The following are the most common types of walk-around drywall sanders that will help you achieve a cleaner sanding experience.
Electric Dustless Drywall Sanders
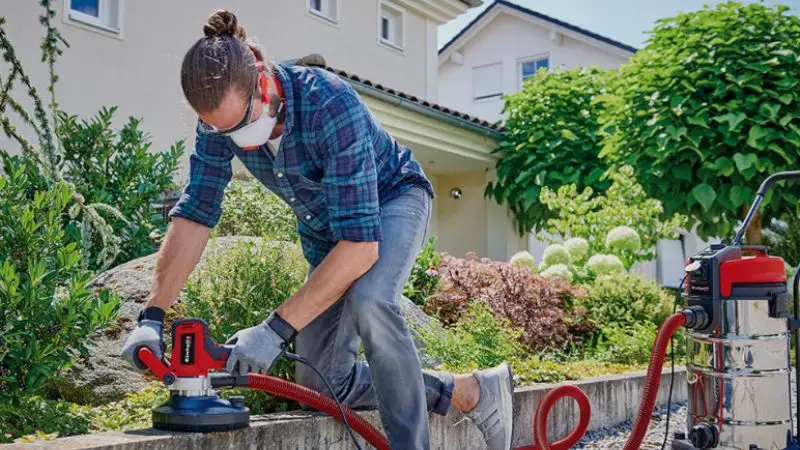
For medium and large drywall projects, homeowners and contractors often select electric models. These sanders are suitable for most standard power outlets and will provide you with more sanding power, less physical sanding effort, and greater efficiency. For home use, these models are often regarded as the best dustless drywall sanders because they provide the best balance between sand power and control. Most electric versions have speed controls, allowing you to sand sensitive areas gently, while removing more material on tougher surfaces. With a built-in vacuum or an attached one, they become dustless drywall sanders with vacuum, keeping the workspace air clean. They are great for large areas, renovations, and extensive sanding when consistent power is required.
Pole-Mounted Dustless Drywall Sanders
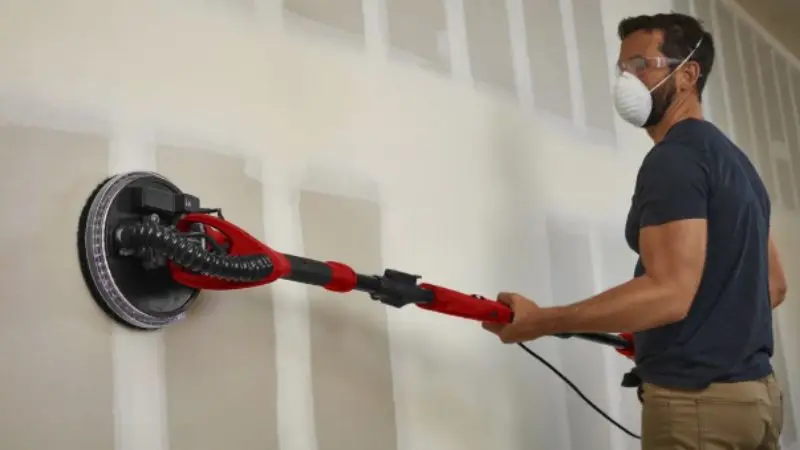
Designed to reach soaring heights without the aid of a ladder, pole-mounted sanders are optimal when paired with a drywall sander for walls and ceilings, making sanding overhead more secure and comfortable. The elongated handle lets you maintain equilibrium while covering extensive vertical or horizontal areas.
Models of this type typically require an external vacuum or dust bag to stay on top of the dust, even in hard-to-reach areas. Pole-mounted dustless drywall sanders are lightweight and can make lengthy projects less tiring.
Dustless Drywall Sanders with Handheld Models
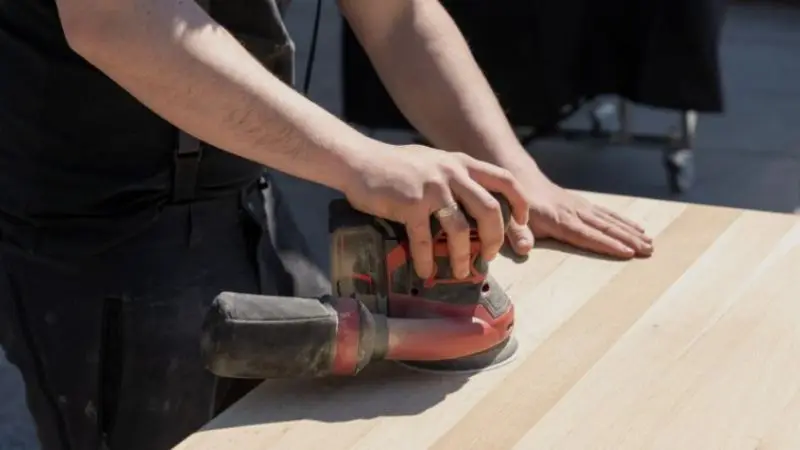
Handheld sanders work great for small, detailed tasks. Their smaller design helps them to be more precise than larger sanders, allowing you to have more control when sanding over corners, edges, or patch repairs. While larger areas are beyond their capabilities, these sanders work great in small areas where larger tools just won’t fit.
Many handheld models are equipped with basic dust collection features, allowing for minimal mess during small repair jobs. These sanders are often used with larger models to complete detail work. For homeowners doing small repairs, a dustless handheld drywall sander is a perfect fit. These sanders provide detailed work while maintaining a clean work area. Selecting a high-quality model delivers great results while protecting your workspace and your health.
Key Features to Look for in a Dustless Drywall Sander
Selecting a dustless drywall sander isn’t only about the price or the power. There are a variety of features built into the tools that will determine the quality of your work and how your tools perform their tasks. Knowing what features are important to you allows the selection of a model that will assist you in quality drywall sanding.
The right features address elements like dust creation, mobility, and even comfort to provide the best work possible while requiring less work from you. The following features are the most critical for proper consideration when selecting a model to complete your work.
Built-In Vacuum and Effective Dust Collection System
An efficient dust collection system is a key aspect of dustless drywall sanders. As you go, an integrated vacuum removes dust from the surface so it doesn’t become airborne. This is beneficial from an aesthetic point of view, and it is also better for the lungs.
Some models come with a dust collection bag, while others act as dustless drywall sanders and vacuums, as they require a shop vacuum. Dust containers that are easy to remove and sturdy hose connections simplify maintenance. Good dust collection prevents dust from resettling on the wall, allowing better quality control and a more even finish.
Adjustable Speed Settings for Better Sanding Control
With adjustable speed settings on the dustless drywall sanders, you can control how fast the sanding device operates. In detail sanding and on a softer surface, you can go slow, and on a broad and flat surface, you can go fast to sand effectively.
Such control reduces surface damage and is highly preferred by homeowners. Models that have speed adjustment allow you to simultaneously work on big and small projects.
Sanding Disc Size and Compatibility With Standard Discs
The size of a sanding disc impacts your efficiency and precision while working. Larger discs allow you to sand wider surfaces. If you are sanding in tighter areas, discs of a smaller size allow you to be more precise.
In order to optimally use a drywall sander, there should be a good sanding disc size compatibility. This ensures that replacement discs are readily available. A little more practice goes into drywall sanders that enable disc changing while working. Good sanders should allow you to change your sanding discs and keep you from long delays.
Lightweight Design and Comfortable Handle Ergonomics
The heavy-duty design of a drywall sander should not be a design that has excess weight. Good weight distribution should reduce drywall sander weight and should reduce the strain on your arms and shoulders so that you can sand for longer.
A lightweight sander should also improve the weight distribution in the design. An ergonomic handle design should also influence the weight so that your control is not compromised. Having the right weight in the right places so that the tool is optimally balanced can help you feel natural while allowing steady movements.
Hose Length and Portability for Easy Movement
Considering hose length is essential for determining how easily you will be able to move around within the workspace. A longer hose means being able to reach high walls and ceilings without having to constantly reposition the vacuum. This allows for a more continuous flow of work.
Portability also matters when having to work in different rooms. A compact, easy-to-carry dustless drywall sander reduces time spent on setup, storage, and transportation. This also increases efficiency throughout the entire sanding process.
How to Use a Dustless Drywall Sander Properly
Using the right tool for the job is essential, but how it is used is arguably the more important factor in determining success. Appropriate technique will get you smooth walls and will contain the dust. Without the right technique, sanding will be more difficult and will be less efficient.
We will cover the elements of preparation, the right way to use a tool, and the pitfalls to avoid so that you accomplish your goals of achieving a high level finish with a low level of mess in the process.
How to Prepare Your Workspace for Dust-Free Sanding
Getting ready for work involves preparing your work zone. It’s a smart idea to remove any furniture from the room. Or tape some plastic sheets to the furniture. You should do this to protect your furniture. It should also protect your floors. A drop sheet will go on the floor to protect it from dust. Close any windows or doors. This will keep dust contained in the work zone instead of spreading throughout the house.
Check your sander to ensure it will work properly. Make sure your dust bag or container is empty. You should be sure you have some sandpaper discs. If you work like this, the drywall sander should be able to work efficiently. It will also keep your sanding process smooth from start to finish.
Step-by-Step Process for Using a Dustless Drywall Sander
Using the right tools will help you get the most out of the drywall sander. You should go for the correct sanding disc first. Now you need to connect a vacuum to the sander. This will be important for dust extraction. Now turn the sander on. You should adjust the speed of the sander. Lower speeds should be used on detailed areas. Higher speeds should be used on wider areas.
Maintain even pressure with the sander flat against the wall and move it with steady and slow overlapping strokes. When sanding, try to maintain that control by starting from the top and working your way down. As you go, check the surface regularly and replace the sanding discs if they become worn. Additionally, to keep the vacuum function of your dustless drywall sander working at its best, empty the dust container when it becomes full.
Common Drywall Sanding Mistakes You Should Avoid
Even with the correct tool, small mistakes can significantly change the effect of the sanding. For example, pressing down the sander too hard can harm the drywall and make divots. Forcing the sander is not necessary; let the tool do the work. Additionally, if you want to get the most from your dustless drywall sander, it is essential to remember the dust bag check. Failing to do so will result in dust escaping into the air and negate the benefit of using a dustless sander.
Another easy mistake to make is sanding too fast. This type of movement can create deep scratches and swirl marks that will be hard to repair. By relaxing and working with slow, consistent, controlled strokes, you will create a good surface to work with and a professional look to the drywall. Doing this to avoid the previously mentioned mistakes will keep more air in the room and improve the quality of your professional-looking drywall.
Dustless Drywall Sander vs Regular Drywall Sander
Your choice of a dustless or a regular drywall sander can impact your comfort, time, and results quite a bit. While both are designed to smooth out drywall, their different approaches to dust control can make a big difference. Comparing their performance, cost, and usability can help you better choose the one that suits your project and work environment the most.
Performance Differences Between Dustless and Regular Drywall Sanders
To begin with, a dustless drywall sander is designed to keep dust to a minimum. The dust collection system actively collects the fine dust particles that are created while sanding before they have a chance to spread, keeping the floors, furniture, and nearby surfaces dust-free. This system also enhances the visibility of the work, helping to create a more productive and healthy environment while sanding, especially when you’re working indoors.
A regular drywall sander has no such dust collection feature, which makes it the opposite. Dust particles will spread throughout the room, which can be irritating to the lungs, and the cleanup will take some time. With a dustless drywall sander for walls and ceilings, your work will be faster and better because you do not have to keep stopping to clean.
Cost Comparison and Long-Term Value
At first glance, a dustless, drywall sander may seem more expensive than a regular model. However, the long-term worth usually overshadows the initial cost. Tools like these save effort on every project by lessening the amount of cleaning, protecting your home, and increasing the quality of your air.
Over time, you also lower the spending on cleaning supplies and dust-related damage to your furniture and electronics. Many homeowners feel that for better results, less fatigue, and more efficient workflow over multiple projects and time, the best dustless drywall sander for home use is worth the money.
Choosing the Right Drywall Sander for Your Project
The right tool for the job is just about the project size and your priorities. If you are working indoors or if you value clean air, a dustless drywall sander with a vacuum provides more advantages than other models. In addition, they help achieve smoother surfaces and less stress on your part during the sanding.
For large projects or frequent sanding, a dustless model offers greater convenience and efficiency. Regular sanders may still work for occasional use, but they require more cleaning and even patience to use. Getting the right tools to best fit your needs makes the sanding task a whole lot more enjoyable.
Maintenance and Care Tips for a Dustless Drywall Sander
Proper maintenance ensures your dustless drywall sander stays efficient, lasts longer, and delivers smooth, professional results every time. Regular cleaning and timely part replacement keep airflow strong, dust collection effective, and sanding consistent.
How to Clean the Dust Collection System
Cleaning the dust collection system after each usage is very important to have optimal performance. Dust getting inside the vacuum or dust bag can prevent airflow and decrease suction, which can make sanding less effective. Always turn off and unplug your sander when you clean.
To clean the dust collection system:
- Remove the dust bag from the vacuum or open the vacuum compartment.
- Empty out all of the dust collected into a sealed trash bag.
- Use a small brush to get dust off corners and edges.
- Wipe the compartment’s inside with a damp cloth.
- Let all parts dry thoroughly before reassembling.
Regular cleaning allows suction to be maintained and ensures that the sanding results are smoother and dust-free.
When to Replace Sanding Discs and Filters
Sanding discs and filters wear out over time and must be checked before every project. Worn discs create uneven surfaces, while dirty filters reduce airflow and dust collection efficiency. Keeping extras on hand avoids interruptions during work.
Check and replace parts as follows:
- Inspect sanding discs for smooth spots or damage.
- Replace discs that do not sand evenly.
- Examine filters for dust buildup.
- Replace filters if airflow decreases noticeably.
Maintaining clean discs and filters ensures your lightweight dustless drywall sander continues delivering professional, consistent results and keeps your workspace cleaner.
Wrap-Up
Dustless drywall sanders allow for much more efficient finishing touches on walls and ceilings. They allow for cleaner workspaces, better health, and save time on cleaning. They also provide smoother and more professional results. There is a range of sanders, from handheld models that are good for small repairs to pole-mounted sanders for high ceilings. Which models work best for you will depend on your individual project requirements.
Ensure that you’re optimizing features such as speed control, dust collection, and ergonomic design for maximum efficiency. With proper maintenance, use, and part replacement, your tool will last longer. Using dustless drywall sanders and investing in better quality ones also makes drywalling projects more fun, faster, and cleaner.
FAQ
How often should you clean the dust collection system?
After every use, the dust collection system should be cleaned to ensure that your sander runs better and to avoid clogs. This also protects your air quality. For best results, try to empty the dust bag or dust collection vacuum before it gets full.
Can you use a dustless drywall sander on ceilings?
Dustless drywall sanders are designed to be usable on ceilings. For cleanliness, comfort, and ease, use a pole-mounted model. With an overhead dust collection system, you won’t have dust floating in your workspace.
How fine should sanding discs be when sanding drywall?
For most drywall jobs, starting with a medium grit, about 120, is acceptable. To achieve a smooth finish, use sanding discs with a finer grit, about 220. Always follow the sander’s instructions for best results.
Can I use a dustless drywall sander in my home?
A dustless drywall sander is even safe for home use. Because the dust collection system minimizes airborne dust, it protects your lungs and keeps your home clean. For extra protection, be sure to wear safety glasses and a dust mask.


