
Ever wish your backyard felt more inviting at night? With DIY string light poles, you can easily transform any outdoor space, even if you have no trees or fences.
This affordable diy project lets you create easy outdoor string light poles using simple supplies. Check out this tutorial for custom diy light poles and sturdy string light poles.
Plan Your DIY String Light Poles
Consider details for your project
Before you start, think about a few key things. First, decide where you want your lights. Sketch a quick map of your space and mark where each pole will go.
Most people find that poles about 8 to 10 feet tall work best. This height gives you enough room for the lights to hang above your head, even with a little swag in the cord.
You should also choose between wood and metal for your diy string light poles. Wood feels warm and classic, while metal looks modern and sleek.
For stability, planter bases work well on patios or decks. Fill them with soil, gravel, or even concrete if you live in a windy area. If you want to install poles in the ground, fork-style bases are easy to step in and keep steady.
Here’s a quick planning checklist for your outdoor projects:
- Map out your pole and light layout.
- Pick a pole height (8-10 feet is ideal).
- Choose wood or metal poles.
- Decide on planter or in-ground bases.
- Fill planters tightly for stability.
- Attach your lights with hooks or zip ties.
- Test everything before your big night.
What Materials and Tools Do You Need?
To create a magical backyard, you’ll need more than just string lights. Here are the materials and tools you’ll need for your DIY project:
For DIY Outdoor String Light Poles
You can build outdoor string light poles with easy-to-find supplies. Here’s what you should have on hand:
- 2–4 wooden or metal poles (8–10 feet tall)
- Heavy-duty planters or buckets (if not installing in the ground)
- Quick-setting concrete, gravel, or sand (for stability)
- Hooks, eye bolts, or cup hooks (to attach the lights)
- String lights (outdoor rated)
- Zip ties or strong outdoor tape
- Potting soil or decorative stones (if using planters)
- Optional: spray paint, flowers, or plants for extra style
You can opt for VEVOR Vinyl-Coated Wire Rope Kit that keep your lights secure with this 164 ft coated cable kit. It includes 189 accessories for safe, stylish installation, ideal for string lights, vines, or even clotheslines.
Essential Tools List
You don’t need fancy tools for diy outdoor string light poles. Most people already have these at home:
| Tool | Purpose |
| Drill | For making holes for hooks |
| Screwdriver | To secure hardware |
| Measuring tape | To space poles evenly |
| Level | To keep poles straight |
| Shovel | For digging if using ground bases |
How To Build DIY String Light Poles
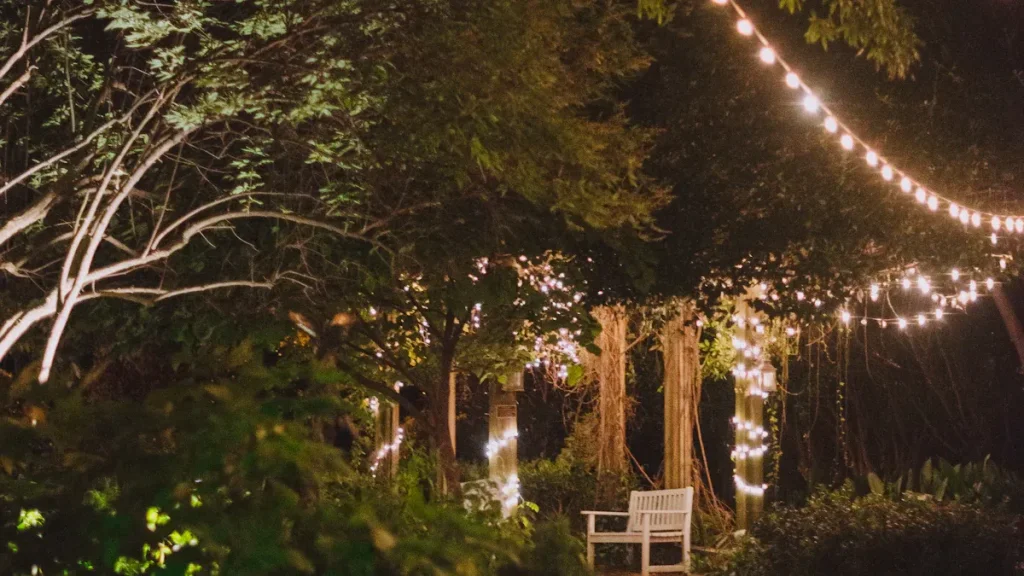
Imagine you just bought a set of lights for your backyard party. You want to create a cozy space, but you have no trees or fences. VEVOR 100ft LED Outdoor String Lights brighten your evenings with waterproof, shatterproof bulbs perfect for year-round ambiance.
These energy-efficient lights are easy to hang and built to last. Here is how you can set up your lights like a pro:
Prepare Planter or Ground Base
You have two main options for your base: planters or in-ground. If you want to move your poles or use them on a patio, planters work best. For a permanent setup, you can set the poles directly in the ground.
Planter Base Steps:
- Pick heavy-duty plastic planters. They should be deep and wide enough to hold your pole steady.
- Fill each planter about three-quarters full with quick-set cement. This gives your poles for DIY string lights a robust anchor. Set your wood, metal or PVC pole inside the wet cement.
- Confirm that the pole’s base is resting on the base of the planter. Then, take a 6-inch magnetic level and ensure that the pole is perfectly vertical.
- Mount the pole using temporary wooden braces in the region above the cement. Clamp the braces in a cross shape and press them down toward the bottom of the planter or ground.
- Do not touch the brace for some time immersion to the harden state. Use the instructions on the cement packet for maximum performance.
Instructions for In-Ground Bases:
- Dig a pole deep enough to fit the pole (18-24 inches).
- Then place the pole inside the hole and fill the space around the pole with either quick-setting cement or packed gravel.
- Afterwards take a level to ensure the whole structure is straight and brace the pole until the cement is dry.
Set and Secure the Poles
Once your bases are ready, you can set up the poles. This step is key for safety and stability. You want your diy string light poles to stay upright, even in wind or rain.
- Make sure the cement has fully cured before you move or use the poles.
- Remove any braces after the cement is hard.
- If you use eye hooks or cup hooks, add washers and double nuts. This keeps the hooks from loosening or spinning.
- For extra strength, use turnbuckles to tighten any wire runs between poles. This helps keep your lights from sagging.
- If you use wire rope, crimp the ends several times (3-4) to lock them in place.
- Spacing and height are crucial, so measure adequately before fastening anything. Such strategies will keep the lights orderly and set the organization of the setup.
Hang the String Lights
Now the fun part. Light up the place as the lights come alive. The lights can be attached directly to the poles using hooks, zip ties, or quick links.
- Always start at any endpoint. If there are poles with metal loops, you can either clip or thread the lights directly.
- In the case of wood/PVC poles, you will have to screw in either cup hooks or eye bolts at the top.
- Bond it using zip ties or strong tape. In case there is the need to connect spaced poles, run wire enclosed in vinyl tubing so as to protect the wire from trees or other surfaces.
- Adjust any slack so that the lights hang at the desired height. No big dips, only gentle sways.
How to make a pole for outdoor light?
Have you ever set up your backyard for a party, only to worry about your lights falling or getting ruined by rain? Many people run into these problems with outdoor string light poles.
If you want your space to look great plus safe, regardless of the weather. Here are steps and tips to help you keep everything solid and strong.
Durability and Weatherproofing
The outdoor string light poles should last through every weather.To withstand rain, sunlight, and windy conditions, one must acquire specific materials. In such cases, galvanized metal or pressure-treated wood is most suitable.
When sealing such wood, outdoor paint or a clear waterproof coating is essential, otherwise, moisture will lead to decay.
Stability and Safety
Stable poles mean safe lighting. In order to offer additional weight, one must fill the planters with gravel or concrete. If poles are set in the ground, the surrounding soil must be tightly compacted. A level is essential in order to confirm that each pole is vertical.
This is a brief safety checklist:
- Before hanging, check your lights.
- Cords should not be near walkways.
- Make use of extension cords that are rated for outdoor use.
- Look for any loose wires or hooks.
FAQ
How tall should DIY string light poles be?
You want to shoot for 8 to 10 feet. That puts your lights out of head-hitting range and provides a great swag. It’s pretty ideal for most patios and yards.
Can I use DIY string light poles on a deck or patio?
Yes! Make use of heavy planters with concrete or gravel. This arrangement allows you to move your DIY string light poles and holds them firmly on hard surfaces.
How do I weatherproof DIY string light poles for outdoor use?
You need to employ pressure-treated wood or galvanized metal. Seal wood using outdoor paint or clear finish. Choose outdoor-rated lights and seal hardware using silicone to add an extra layer of protection.
Conclusion
With only a few easy steps, you can have a warm, welcoming outdoor room made with DIY string light poles. Whether you are illuminating a patio or having a party in the backyard, your arrangement will glow throughout the night. For durable, affordable materials, visit VEVOR.
It has everything from lights to hardware in pro-grade quality. They are rugged, simple to install, and great-looking. Get your space enchanted, the VEVOR way!


