
Getting a scratch on your car can be annoying, but fixing it is often easier than it seems. Most scratches can be repaired at home if you know what type you’re dealing with. Some only affect the clear coat, while others go deeper into the paint. Once you figure that out, you can choose the right tools, like scratch remover, touch-up paint, or sandpaper.
Knowing how to repair a deep car scratch helps you tackle the damage correctly and avoid costly body shop visits. With a little time and the right steps, this car scratch repair process can make your car look smooth and clean again. This guide will show you how to fix different types of scratches quickly and easily, even if you’re a beginner.
Identifying Scratch Types
Not all car scratches are the same, and treating them properly starts with understanding what kind of scratch you’re dealing with. Each layer of your car’s paint serves a purpose, so knowing how deep the damage goes is key to choosing the right repair method. Here are the four main types of scratches you’re most likely to encounter:
Clear Coat Scratches – Surface-Level Scuffs
These are the most common and, fortunately, the easiest to fix. Clear coat scratches only affect the top layer of your car’s paint, which acts as a protective barrier over the color beneath. They often appear as light, thin marks caused by car washes, tree branches, or accidental brushes against surfaces.
How to identify them:
Gently run your fingernail over the scratch—if it doesn’t catch, it’s likely a light scratch on the clear coat. These scratches usually look faint and don’t affect the color of the paint beneath. They’re typically easy to fix with buffing or polishing.
How to repair:
- Use a rubbing compound and a microfiber cloth or buffing pad.
- Light polishing can restore the shine without affecting the paint layer.
- For slightly deeper clear coat scratches, you may need to buff in multiple stages.
Base Coat Scratches – Color-Layer Damage
Base coat scratches go a level deeper, cutting through the clear coat and into the colored paint layer. These scratches are more noticeable because they affect your car’s color, and they can lead to fading or further damage if left untreated.
How to identify them:
To check a scratch, gently run your fingernail over it. If your nail catches, the scratch is likely deeper and has reached the paint layer. If it doesn’t catch, it’s probably just on the surface and easier to fix.
Also, take a look under bright light. If the scratch causes reflections to scatter or the color to look uneven, it’s a sign that the damage goes beyond the top layer. In that case, a more careful or professional repair may be needed.
How to repair:
- You’ll need touch-up paint that matches your car’s exact color.
- Clean and prep the area, apply the touch-up paint, and seal it with a clear coat.
- Be cautious when buffing—removing too much of the surrounding clear coat can reduce UV protection and lead to further issues.
Primer Scratches – Exposed Undercoat
Primer scratches are more serious—they cut through both the clear coat and base coat, revealing the primer layer underneath. These often appear as a dull gray or white line, depending on your car’s primer color.
Warning sign:
If you see any signs of rust around a scratch, it means the damage has likely reached the metal beneath the paint. This type of scratch needs to be repaired as soon as possible to prevent the rust from spreading and causing more serious damage.
How to repair:
- Clean the area thoroughly.
- Lightly sand around the scratch to create a smooth edge.
- Apply automotive primer, then follow with color-matched touch-up paint and a clear coat.
- Allow each layer to dry properly before applying the next.
For larger or complex scratches, it’s best to consult a professional to avoid further damage and ensure a smooth, long-lasting finish.
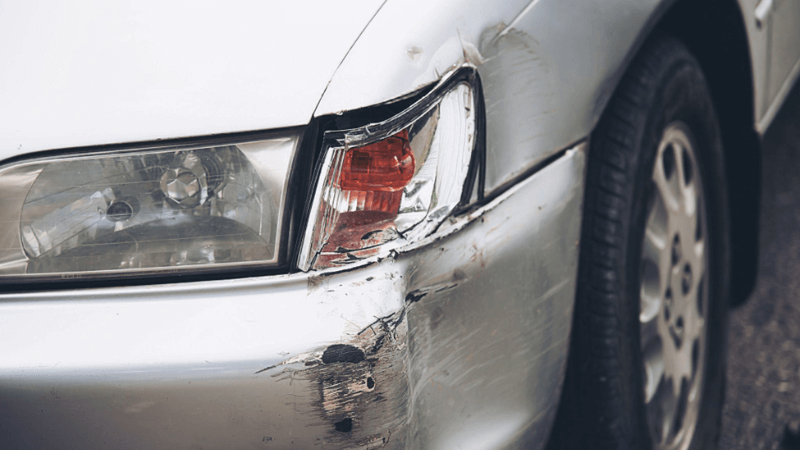
Deep Scratches – Exposed Metal and Risk of Rust
Deep scratches are the most serious. They cut through all the paint layers and reach the metal under your car’s surface. If not fixed quickly, the metal can start to rust.
Why it matters:
Rust spreads over time and can cause bigger problems. It makes your car look worse, costs more to fix later, and lowers the car’s value. Fixing deep scratches early keeps your car in better shape and helps you avoid more damage in the future.
How to repair:
- Clean and inspect the damaged area.
- Sand down rough edges to prevent paint from peeling.
- Apply a rust-inhibiting primer to protect exposed metal.
- Use matching touch-up paint, allow it to dry, and then apply a clear coat.
- Finish with sanding and polishing to blend the repair seamlessly.
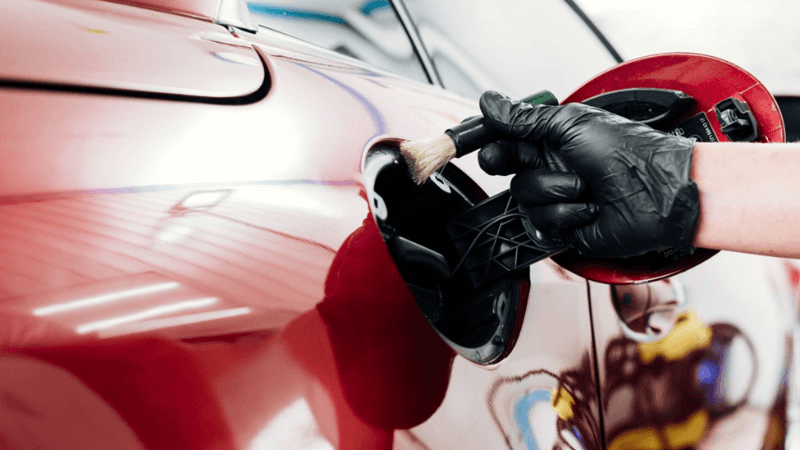
Tools and Materials for Car Scratch Repair
Repairing car scratches becomes much easier—and more effective—when you have the right tools at hand. Whether you’re dealing with light surface marks or deeper damage, using the correct materials ensures a smoother finish and longer-lasting results. This guide covers everything you need for DIY car scratch repair step-by-step, making it easier to handle your own car scratch repair at home.
Sandpaper & Buffing
Surface preparation is key to fixing scratches effectively.
- Sandpaper helps level out the scratch. Start with a coarse grit (e.g., 2000) for deeper damage, then move to finer grits (3000+) for smoothing. This gradual process ensures a smoother, more even surface for painting or for car scratch repair without repainting, depending on the depth.
- Buffing polisher, especially those that attach to drills, helps blend the repair and bring back the car’s shine. They work by polishing the surface, making the repaired area match the rest of the car’s finish.
- Combo kits like 3M’s Scratch Removal System are great all-in-one options that include both tools for sanding and polishing. These kits make it easier for DIY repairs, providing everything you need for a professional-quality finish.
Primer & Touch-Up Paint
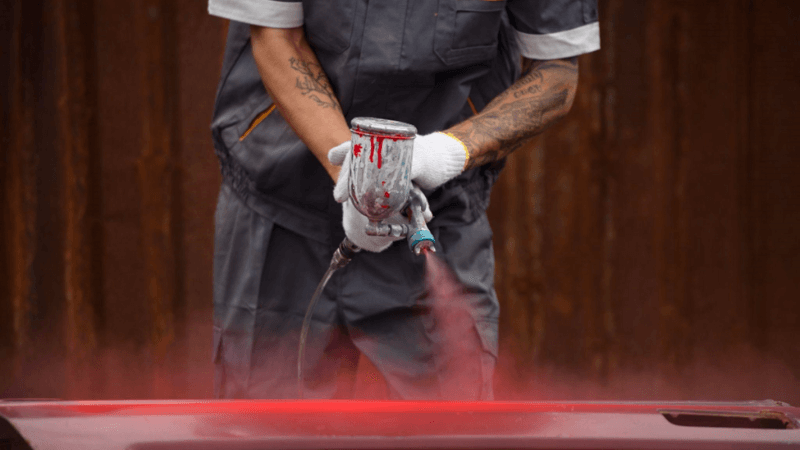
Deeper scratches that reach the primer or metal need more than just polishing.
- Primer fills in the scratch and prepares the surface for paint. It helps create a smooth base that ensures the paint sticks properly and lasts longer.
- Touch-up paint must match your car’s exact color (usually found via your VIN or manufacturer’s paint code). Using the correct color ensures a seamless repair that blends in with the original paint.
- After painting, always apply a clear coat to protect the repair and match the factory finish. The clear coat adds a protective layer, helping prevent fading and keeping the finish looking new.
Rubbing & Polishing Compounds
These compounds restore the look of your paintwork after a scratch repair.
- Rubbing compound is more abrasive, removing oxidation and surface scratches. It works by cutting through the paint’s imperfections, helping to restore a smoother, more even surface.
- Polishing compound refines the surface, giving it a smooth, glossy finish. It works by polishing away any remaining marks, leaving a shiny and flawless appearance.
- Use a product like Meguiar’s Ultimate Compound for reliable, high-quality results on both new and older vehicles. It’s designed to handle various scratches and bring back a smooth, even finish for your car.
Cleaning & Protection
Clean surfaces are essential for any paint repair, and protection helps prevent future damage.
- Use automotive soap and microfiber towels to remove dirt without causing new scratches. Microfiber towels are gentle on your car’s surface, reducing the risk of abrasions while cleaning.
- If your car has a ceramic coating or paint protection film, make sure to use compatible, pH-balanced cleaning products. These products preserve the coating’s effectiveness and prevent it from breaking down over time.
- After repair, consider applying ceramic coatings or paint sealants for long-term defense against scratches and UV damage. These protective layers create a barrier that helps maintain your car’s finish and keeps it looking new.
Using the right tools not only makes the repair easier but ensures the finish looks seamless. Whether you’re handling minor scuffs or deeper damage, the right products can make all the difference in quality and durability.
Step-by-Step Process to Remove Scratches
Fixing scratches on your car might seem intimidating, but with the right steps, you can handle it like a pro. Let’s break it down into DIY car scratch repair step-by-step, so you can remove scratches and restore your car’s shine.
Step 1: Cleaning and Preparing the Area
Before starting any car scratch repair, it’s crucial to ensure the surface is clean. Dirt and debris can interfere with the repair and even create more scratches if not properly removed. Begin by mixing car wash soap with water in a bucket, then use a soft sponge to gently clean the scratched area. Rinse the area with clean water to remove any soap residue and dry the surface thoroughly with a microfiber cloth.
Make sure the area is completely dry before moving on, as any moisture can affect how well the touch-up paint adheres. Taking the time to properly clean and prepare the surface ensures a smooth, effective repair and better results.
Step 2: Assessing the Scratch Depth
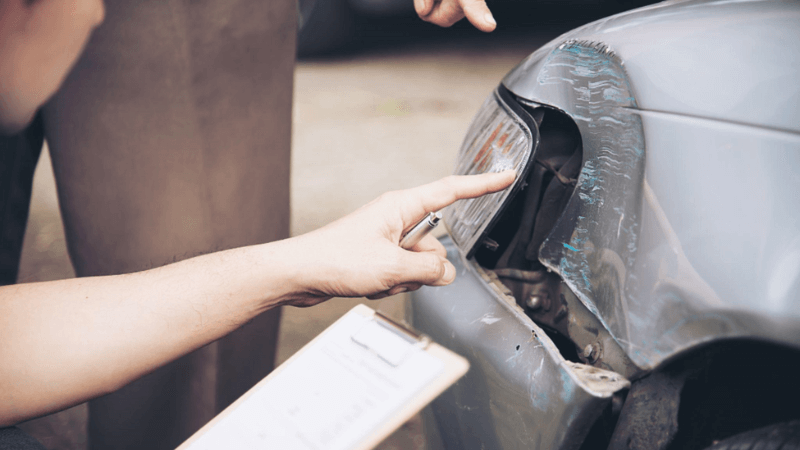
Not all scratches are the same, so it’s important to assess how deep the damage goes. This helps you determine the best repair method. Run your fingernail over the scratch—if it doesn’t catch, it’s likely a minor surface scratch that only affects the clear coat. If your fingernail catches, the scratch is deeper and may have reached the base coat or primer. For deep car scratches, check if the metal underneath is exposed.
If rust is visible, you need to act quickly to prevent further damage. Understanding the depth of the scratch is key to choosing the right tools and repair materials for the job.
Step 3: Sanding and Smoothing the Surface
Sanding is an essential step in fixing car scratches, as it helps smooth out rough edges and prepares the surface for touch-up paint. Start by using 1000-grit sandpaper to remove the rough edges around the scratch. Then, switch to 2000-grit sandpaper to smooth the surface further. Be sure to sand in a circular motion, and avoid pressing too hard to prevent further damage.
After sanding, wipe the area with a clean microfiber cloth to remove any dust. Always test your sanding technique on a small, inconspicuous area first to ensure you’re using the right approach. Take your time—rushing through this step can lead to uneven results, so patience is essential.
Step 4: Applying Primer and Touch-Up Paint
Once the surface is smooth, it’s time to apply primer and touch-up paint to restore the color and protect your car from further damage. Start by applying a thin layer of primer to the scratch using a small brush or applicator, and let it dry completely. Then, use touch-up paint that matches your car’s exact color. Apply it carefully with a toothpick or fine brush, and allow the paint to dry for several hours, or as instructed by the product.
For a smoother finish, apply multiple thin layers of touch-up paint instead of one thick layer. Choose the right primer for the job—Chipex for deeper scratches or ColorNDrive for smaller ones. Correct application ensures a seamless repair and flawless finish.
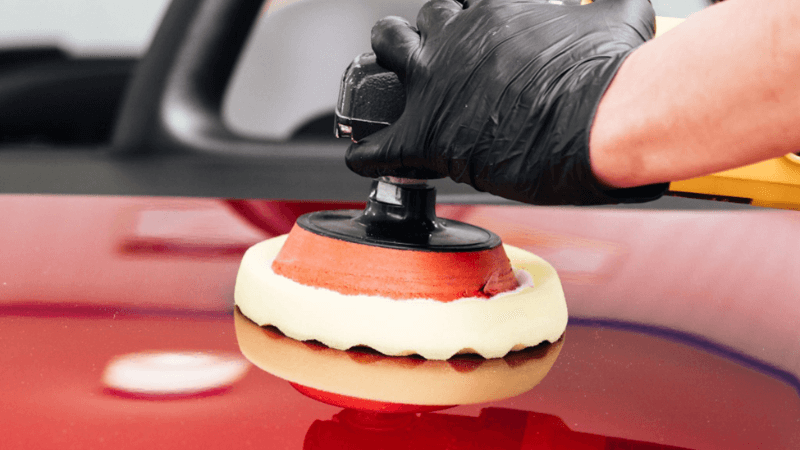
Step 5: Blending, Buffing, and Polishing
The final step is blending the repair with the rest of your car’s surface for a natural look and restored shine. Lightly sand the repaired area with 2000-grit sandpaper to smooth it with the surrounding surface. Then, apply a small amount of rubbing compound to a microfiber cloth and buff the area in a circular motion until the scratch fades.
Finish by applying car polish to restore the shine, buffing gently to make the repair less noticeable. Be careful not to apply too much pressure while buffing, as it can damage the surrounding paint. This blending and polishing will leave your car looking as good as new.
Preventive Measures to Avoid Future Car Scratches
Preventing scratches is easier—and more cost-effective—than repairing them. With the right habits and protective solutions, you can significantly reduce the risk of damaging your car’s paint. Here are the key preventive measures every car owner should follow:
Wash and Dry Your Car the Right Way
Improper washing is one of the most common causes of paint scratches. Even small particles of dirt can act like sandpaper if rubbed into the surface.
Best practices:
- Always rinse the car thoroughly before washing to remove loose dirt.
- Use a soft microfiber cloth or sponge, not abrasive brushes or old rags.
- Apply gentle pressure and wash in straight lines, not circles.
- When drying, avoid air drying, which leaves water spots. Use a clean microfiber towel and gently pat the surface dry.
Wash your car in the shade or during cooler parts of the day. Sunlight can cause soap to dry too quickly, leaving behind streaks that may scratch when wiped off.
Apply Protective Coatings and Films
Protective layers can shield your car from daily wear and tear, making it harder for scratches to reach the paint.
Effective options include:
- Paint Protection Film (PPF): A transparent, durable layer that absorbs small impacts from rocks, keys, or shopping carts.
- Ceramic Coating: Creates a hydrophobic surface that repels water, dirt, and grime. It also provides UV resistance and adds a glossy finish.
- High-Quality Wax or Sealants: While not as durable as PPF or ceramics, regular waxing adds a temporary protective layer that can help resist minor scratches.
Proper installation and quality materials are key to getting the most out of these protective options.
Park Strategically
Where and how you park plays a big role in keeping your car scratch-free.
Smart parking tips:
- Avoid tight spaces or parking too close to other vehicles, especially in high-traffic areas like shopping centers.
- Choose end spots or park slightly away from crowded zones when possible.
- Use covered or shaded parking to avoid environmental risks like falling branches, bird droppings, or hail.
- When parking on the street, fold in your side mirrors to avoid contact with passing vehicles or pedestrians.
Simple parking choices can prevent a wide range of minor damage over time.
Maintain and Inspect Regularly
Regular maintenance not only keeps your car clean—it helps you catch scratches early, before they become worse.
Maintenance habits to adopt:
- Inspect your car during or after washes for new scratches, scuffs, or chips.
- Clean your vehicle regularly to prevent dirt from becoming abrasive.
- Apply wax every few months to maintain a smooth, protective barrier.
- Touch up small scratches quickly to prevent them from deepening or rusting.
Being proactive with inspections and cleaning routines helps preserve your car’s appearance and value.
Preventing scratches isn’t about expensive solutions—it’s about consistent care and attention to detail. By following these simple practices, you can significantly reduce the risk of paint damage and keep your car looking newer for longer. A scratch-free car isn’t just better to look at—it’s also easier to maintain and more valuable over time.
When to Get Professional Help for Car Scratch Repair
While many car scratches can be repaired at home with the right tools and techniques, there are times when professional help is not just advisable—it’s essential. Knowing when to involve an expert can save you from costly mistakes and ensure your vehicle retains its appearance and value.
Deep or Extensive Scratches
If a scratch on your car goes deeper than the clear coat and base paint, showing the primer or even bare metal, it’s usually best to let a professional handle it. These deep car scratches are harder to fix and can cause rust or other damage if not repaired correctly.
A professional repair also blends the new paint perfectly with the rest of your car, so the fix isn’t noticeable. Fixing deep scratches quickly is important—it helps prevent rust and keeps your car in good shape. If left untreated, deep scratches can even lower your car’s resale value by 10–15%.
Lack of Tools or Experience
DIY kits can work well for small scratches, but if you don’t have the right tools or experience, getting professional help is usually the better choice. Experts have access to advanced tools and high-quality paint systems that most people don’t have at home. They can also match the color of your car perfectly, even if it’s older or has a custom paint job.
Because they are experts, car painters understand the various effects of different paint types and can give each car the care it needs. If you’re uncertain about DIY scratches or fear you might make things worse, a good body shop will make sure the scratch is fixed effectively on the first try.
Warranty or Insurance Limitations
A good idea is to look at your vehicle’s warranty and insurance policy before starting any DIY repairs. Fixing a scratch at home or getting it done at an uncertified shop may make it so you’re no longer covered.
A few car brands insist that repairs must be handled by approved mechanics to hold the warranty in force. Most insurance companies require that the coverage only applies when repairs happen at licensed facilities.
Key Points About Luxury and High-End Autos
Scratches on luxury cars call for separate and extra care. People working on these vehicles need to know about special aluminum panels, how to paint them nicely, and the kind of coatings used. Most DIY approaches aren’t suitable for this type of craftsmanship. Experts rely on 3D scanners and AI to help make each repair accurate. They have worked with rare types of paint and fine-textured coating services. Incorrect repairs on a luxury car can quickly reduce its value, so it’s safe to rely on the experts.
Having your luxury car fixed professionally will let it run well for years and save you from losing your investment.
Final Thoughts
Fixing car scratches is manageable for many car owners, especially when it comes to minor clear coat damage. However, for deep car scratches, luxury cars, or any case involving warranties and insurance, professional help is often the wisest choice. The key is knowing your limits—if you’re confident with the tools and the scratch is small, go for it. But when in doubt, let the experts take over.
You’ll save time, avoid frustration, and ensure your car stays in top condition. Ultimately, whether you choose DIY or professional car repair, timely attention to scratches helps maintain your car’s appearance and long-term value.
FAQ
What is the easiest way to tell if a scratch is too deep for DIY repair?
If you are able to run your fingernail over the scratch and it catches or you can see metal, it is likely too deep for you to fix it by yourself. In this case, professional help might be your best option.
Can I use items found at home to help fix up car scratches?
To an extent, yes. In terms of minor scratches on the clear coat, toothpaste used with a soft cloth and some gentle rubbing can do the trick. Rubbing it off after applying is vital as well. That said, products meant for professional use do give much better results.
How much time do you need to fix a scratch on a car?
When it comes to small scratches, a DIY fix would take 1-2 hours. If the scratches are deeper, then professional repairs might take more time, depending on the damage and the method used.
What type of paint should I use for the touch-ups?
Touch up paint is something that you need to carry for the car’s paint color pre-registered on the car’s site. There is usually a sticker inside the driver’s door or in the owner’s manual that contains the exact code. If the code is not followed and a different shade is used, it stands to reason that the repair would become quite prominent.
Does self-repair for scratches void the warranty for the car?
Not always, but it can. Unless you check the terms of the warranty, starting with a DIY fix would run the risk of voiding it. Certain cases do exist where auto companies insist that repairs be done by certified professionals to keep the warranty intact.


