
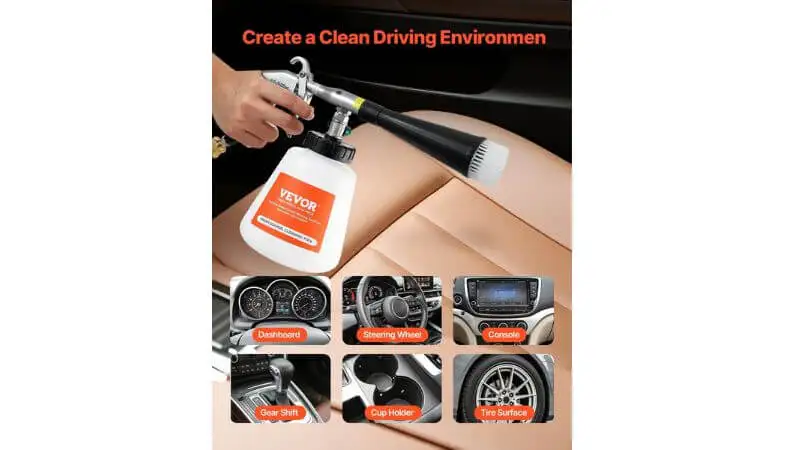
Want your car to look and feel like new again? A deep clean is the secret. It’s more than a simple wash—it clears away dirt, stains, and smells that regular cleaning can’t reach. Tools like a car cleaning gun make it even easier to get into tight spots and lift out embedded grime.
With the right steps, you don’t need a pro to get a showroom-worthy shine. Whether you’re gearing up for a road trip or simply want to enjoy a cleaner drive every day, follow along and see how easy it is to upgrade your ride at home.
Preparation
Getting ready is the first step in any successful deep clean. With the right setup, your car’s interior and exterior cleaning becomes much easier and more effective. Let’s start with the basics to prepare your space and supplies for a smooth and satisfying clean.
Clear Out the Clutter
Start by clearing everything out of your car. Remove trash like food wrappers, empty bottles, and old receipts. Take out personal items such as sunglasses, chargers, toys, or bags. Make sure to check under the seats, inside the trunk, and inside compartments where things often get stuck.
Getting rid of clutter gives you a clean space to work and helps you reach every area. It also makes car interior cleaning much easier. Place everything you remove in a basket or bag so you can sort it later. This simple step sets the stage for a complete deep clean.
Gather Your Cleaning Supplies
You don’t need fancy tools to get great results—just the right basics. Start with a car cleaning gun or a vacuum that has attachments, soft microfiber cloths, car wash soap (never use dish soap), a couple of buckets, and a sponge or wash mitt.
Set Up Your Work Area
Choose a cool, shaded area where you have plenty of room to move around your car. Sunlight dries soap too quickly and can leave streaks or spots behind. Make sure you have access to water, power, and space to clean every side. Open all the doors and windows to let in fresh air and light.
Lay out your tools and supplies before you begin so you don’t have to stop and search later. A smooth setup helps you follow your step-by-step car deep cleaning guide with ease. This simple prep makes the whole cleaning process faster and more effective.
Car Deep Cleaning Steps
Now that you’re set up, it’s time to begin the deep cleaning process. Let’s start with the car exterior cleaning steps that will make your vehicle shine like new. These steps remove dirt, grime, and even hidden buildup, getting your car ready for polish and protection.
Step 1: Start with a Full Rinse
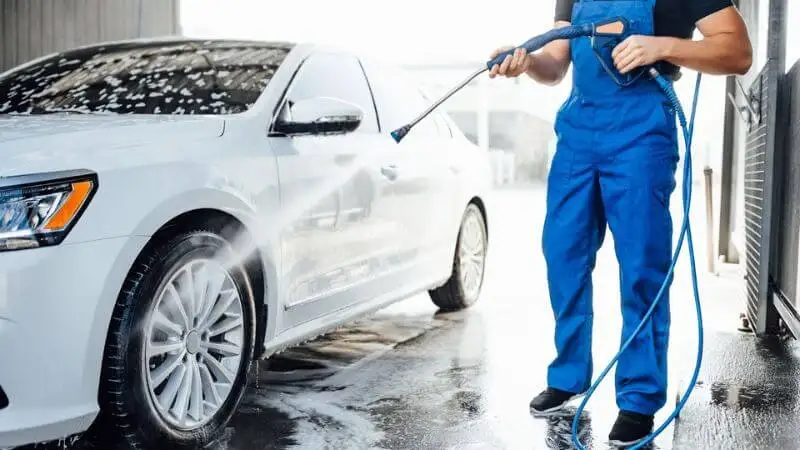
Before washing, rinse your car with clean water using a hose or pressure washer. This step loosens dirt and dust so it doesn’t scratch the surface during washing. Focus on areas like the lower panels and wheel wells, which collect the most grime.
A full rinse gives you a clean base and makes washing more effective. Always clean from the top down so dirty water doesn’t run over areas you’ve already finished. This small habit makes a big difference in your professional car cleaning results.

Step 2: Wash in Sections with Safe Soap
Use two buckets—one with car wash soap, one with clean water. Dip your soft mitt into the soapy bucket and scrub a small section. Then rinse the mitt in clean water to remove dirt. This keeps your mitt clean and protects your paint.
Work from the roof downward and rinse each section right away. Never use dish soap, as it strips wax and harms the paint. For an extra-deep clean, foam cannons or thick soap lather tools help lift more dirt from the surface gently.
Step 3: Clean Your Wheels and Tires
Wheels and tires need special care during car exterior cleaning. Spray a wheel-safe cleaner and let it sit briefly. Use a brush to scrub the wheels, tires, and wheel wells. Rinse thoroughly to remove all cleaner. If you’re using one bucket for the whole car, wash the wheels last.
To protect your rims, always use a separate brush for tires. Clean wheels improve your car’s overall look and keep brake dust from damaging finishes. Don’t skip this step—it’s key to that polished look.
Step 4: Remove Buildup from Paint
Even after washing, your car’s paint may still feel rough to the touch. That’s where a clay bar comes in. Spray a clay lubricant on a small area of the car, then gently rub the clay bar across the surface. It lifts off stuck-on grime like tree sap, tar, or fine dirt that washing can’t remove.
Keep folding the clay to a clean side as you go. This step is key in any step-by-step car deep cleaning guide because it smooths the surface and gets your car ready for polishing or waxing. Your paint will feel cleaner and look shinier right away.
Step 5: Polish to Remove Swirls
Polishing helps bring back your car’s shine and removes light scratches or swirl marks. Use a soft pad and apply a small amount of polish. Work in small sections, moving in straight lines, not circles. Wipe away the polish with a clean microfiber cloth. This step gives your paint a smooth, glossy finish and makes the color look richer.
Use good lighting so you can see your progress clearly. While deeper scratches may need professional car cleaning or paint correction tools, light polishing is great for regular care. It boosts your results and makes your car look freshly detailed and well-maintained.
Step 6: Protect with Wax or Sealant
Waxing is the final touch that protects your paint and keeps your car looking shiny. Use a foam pad to spread a thin, even layer of wax or sealant. Let it dry to a light haze, then gently buff it off with a clean microfiber cloth. Sealants usually last longer than natural wax and offer stronger protection.
This step makes car exterior cleaning easier in the future by helping water and dirt slide right off. With the paint now sealed, your car stays cleaner and resists sun damage, giving it that fresh, professional car cleaning finish that lasts.
Step 7: Clean Glass and Mirrors
Use a streak-free glass cleaner by spraying it onto a microfiber towel, not directly on the glass. Wipe in straight lines and clean all windows inside and out. Use a second dry towel to buff away any streaks. Don’t forget the mirrors, including the rearview and side mirrors.
Clean glass makes your car look polished and also helps you see clearly while driving. This easy step adds a final touch of shine and completes your car interior cleaning with a crisp, neat finish. Clean, clear windows are the small detail that makes a big difference in your deep cleaning results.
Step 8: Restore Trim and Plastic
Plastic trim and rubber seals often fade and lose their color over time. To fix this, use a plastic restorer or protectant to bring back their deep, rich look. Apply the product using a clean cloth or foam pad, and wipe off any excess. Be careful not to get it on your car’s paint or windows.
This step may be small, but it makes a big difference. It adds to that polished, just-cleaned look and helps shield these areas from the sun and weather. Restoring your trim completes your professional car cleaning and ties together your whole car deep cleaning process.
Consider Professional Help
If you’d rather skip the hard work, professional car cleaning services are a great option. A full deep clean usually costs between $150 and $300, and mobile detailers can even come right to your driveway. Still, with this step-by-step car deep cleaning guide, you can achieve amazing results on your own. With some time, effort, and the right tools, you’ll get your car looking fresh and spotless. Plus, doing it yourself saves money and gives you the pride of knowing you brought back that like-new shine all on your own.
Clean Your Car Interior
A spotless interior makes every ride more comfortable. Regular car interior cleaning removes crumbs, dust, stains, and odors that build up over time. Whether you’re preparing for a road trip or just want a cleaner car, this section breaks down the step-by-step car deep cleaning guide for your interior. You’ll learn how to clean seats, carpets, windows, and more—right at home.
Step 1: Take Out and Clean the Mats
Begin by removing all floor mats from your car. Shake them outside to loosen dirt and crumbs. Rubber mats can be rinsed with water and left to dry in the shade. Carpet mats should be vacuumed thoroughly. Removing mats gives you full access to the floor, making it easier to vacuum and clean.
If the mats are very dirty, you can use a carpet cleaner and a soft brush to refresh them. Be sure they’re fully dry before placing them back. This simple step helps prevent odors and prepares your interior for deeper cleaning.
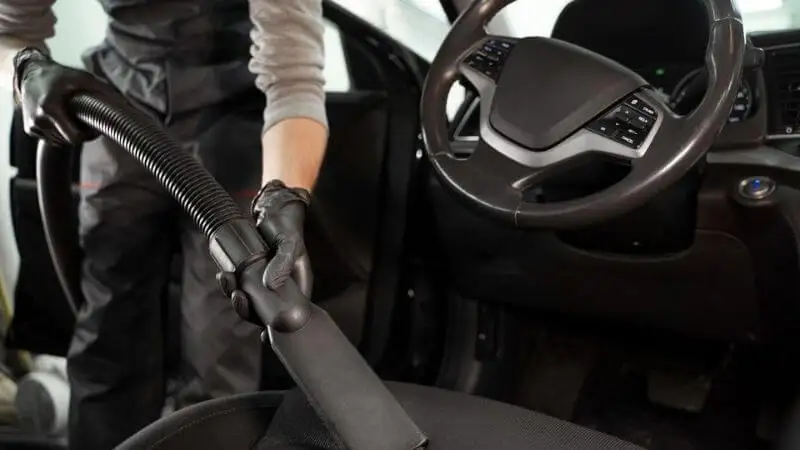
Step 2: Vacuum Every Inch
Use a car cleaning gun to reach all the tight spots in your car. Slide the seats forward and backward to clean under them. Go over the carpets, seats, and floor with slow, steady strokes. Don’t skip the trunk—it often collects just as much debris.
For seats and carpets, a brush attachment can lift more dirt. This part of car interior cleaning clears away dust, food crumbs, pet hair, and debris. A thorough vacuum gives your interior a fresh start and makes the rest of your deep cleaning much more effective.
Step 3: Clean Seats and Upholstery
Your car seats see a lot of wear, so give them extra care. For fabric seats, spray a fabric-safe cleaner and scrub with a soft brush. Wipe with a clean towel. For leather seats, apply a leather cleaner followed by conditioner to keep the material soft and prevent cracking.
Tough stains or old spills may need a hot water extractor or steam cleaner. These tools pull out dirt from deep in the fabric. If you’re learning how to deep clean a car interior at home, treating the seats properly makes a big difference in comfort and appearance.
Step 4: Deep Clean Carpets and Floors
Carpets often hold odors and stains from everyday use. Spray a carpet-safe cleaner and scrub with a stiff brush to loosen grime. Follow up with a vacuum to remove the dirty foam. If you want a deeper clean, a steam machine or extractor can lift even tough stains from high-traffic areas like the driver’s side.
This step is essential for keeping your car smelling clean and looking its best. Consistent car interior cleaning helps maintain your vehicle’s value and gives your ride a fresh, like-new feel every time you step inside.
Step 5: Wipe the Dashboard and Console
The dashboard, console, and door panels collect dust and fingerprints over time. Use a soft microfiber cloth and an interior-safe cleaner to wipe down all hard surfaces. Pay close attention to buttons, knobs, and touchscreens. For tight spots, use a small brush or cleaning gel.
Don’t spray cleaner directly onto screens—always spray your cloth instead. After wiping, use a dry cloth to buff away streaks. A clean dash not only looks great but also helps reduce glare on sunny drives. This small step adds a polished, professional look to your deep cleaning results.
Step 6: Tidy Up Vents and Gaps
Air vents and tiny crevices are often overlooked, but they collect dust fast. Use cleaning gel, putty, or a small detailing brush to reach into those small spaces. Press the gel into the vent, then pull it out to lift out dust and dirt. A can of compressed air can also help remove debris.
These tools make it easier to finish the job right. Clean vents improve airflow and make your car interior cleaning more complete. A few extra minutes here go a long way in making your car feel fresh and well cared for.
Step 8: Wash Interior Windows and Mirrors
Dirty windows make it harder to see clearly and ruin the look of your interior. Use a glass cleaner sprayed onto a microfiber towel and wipe in long straight lines. Focus on the inside of the windshield, side windows, and rear window. Buff dry with a second towel to avoid streaks.
Also, clean the rearview and side mirrors. Clean glass improves visibility and gives your car a bright, finished look. When following a step-by-step car deep cleaning guide, don’t forget this part—it’s simple but adds a huge improvement to how your car feels.
Step 9: Get Rid of Bad Odors
Lingering odors can make your car feel uninviting. After cleaning, sprinkle baking soda on carpets and seats, let it sit, then vacuum it away. For deeper smells, use a fabric-safe odor remover or steam cleaner. Steam helps remove germs and hidden smells from upholstery and vents.
If your car still smells off, check for hidden spills or moisture under the seats. Once the source is gone, use a natural spray or air freshener to add a pleasant scent. A clean-smelling car boosts your comfort and shows how effective your car interior cleaning has been.
Consider Professional Interior Services
Sometimes, you may want expert help. Professional car cleaning services offer deep interior cleaning with tools like extractors and steamers that reach beyond what most people can do at home. Prices typically range from $100 to $250, depending on your vehicle’s size. But if you’ve followed this step-by-step car deep cleaning guide, you can often get amazing results yourself. With the right products and a bit of effort, you’ll enjoy a clean, fresh-smelling interior—and save money while doing it your way.
Maintain Your Car After Deep Cleaning

Once your car is sparkling clean, you’ll want to keep it that way. Good maintenance means you won’t have to deep clean as often, and your vehicle will stay looking fresh longer. A few simple habits and some light care can help protect all your hard work. Whether you’ve done professional car cleaning or used a step-by-step car deep cleaning guide, here’s how to maintain those results daily and weekly.
Build Simple Cleaning Habits
You don’t have to wait for messes to pile up. Small, regular tasks help keep your car neat between deep cleanings. Remove trash and clutter at the end of each day. Keep a small bag in the car for wrappers or receipts.
Wipe the dashboard and seats with a microfiber cloth every week. Shake out floor mats when dirt shows up. These quick tasks take just a few minutes and make your next car interior cleaning much easier. By making cleaning part of your routine, you’ll keep your ride looking fresh and avoid time-consuming messes later.
Protect the Surfaces You Cleaned
Surface protection keeps your car looking newer for longer. Use seat covers if you travel with pets or kids. Apply UV protectant to your dashboard and door panels once a month to prevent sun damage. Wax your paint every three months—it helps water and dirt slide off, making car exterior cleaning much easier.
For leather seats, use conditioner as needed to keep them soft and crack-free. When you protect your car inside and out, you won’t need deep cleaning as often. These simple steps help extend the life and shine of your hard-earned results.
Keep Cleaning Supplies Organized
Having your cleaning tools ready makes it easier to stay on top of messes. Store your microfiber cloths, interior sprays, and brushes in a clean, dry plastic bin. Keep this bin in your trunk or garage so it’s always within reach. Make sure all bottles are sealed tightly and standing upright to avoid leaks.
Every few weeks, check your supplies and replace anything you’re low on. If you clean often or follow a step-by-step car deep cleaning guide, staying organized saves time and frustration. With your tools in one place, you’re always ready for a quick refresh.
Wrap Up
Deep cleaning your car is more than just a chore—it’s a way to protect your vehicle, boost its value, and enjoy every drive. With the right tools and this simple step-by-step car deep cleaning guide, you can handle both car interior cleaning and car exterior cleaning like a pro.
Whether you’re tackling dust, stains, or faded paint, taking your time makes a big difference. From DIY efforts to occasional professional car cleaning, the key is staying consistent. Keep your car fresh, clean, and cared for, and it will reward you with comfort, style, and a smoother ride every time.
FAQ
1. How often should I deep clean my car?
You should deep clean your car every three to six months. If you have kids or pets, you might want to do it more often. Regular deep cleaning keeps your car looking and smelling fresh.
2. Can I use household cleaners on my car?
It’s best to use products made for cars. Household cleaners can damage paint, leather, or plastic. Car-specific cleaners protect your car’s surfaces and help them last longer.
3. What’s the difference between a regular wash and a deep clean?
A regular wash removes surface dirt. A deep clean goes further. You clean every part, inside and out. You remove stains, odors, and hidden grime. Your car feels and looks like new after a deep clean.
4. Do I need special tools for deep cleaning?
You can get great results with basic tools like a vacuum, microfiber cloths, and car soap. For tough stains or odors, try a steam cleaner or hot water extractor. These tools make deep cleaning easier and more effective.
5. How can you keep your car clean longer?
- Pick up trash every day.
- Shake out mats weekly.
- Use seat covers and floor liners.
- Apply wax or protectant every few months.
Small habits help your car stay clean and fresh between deep cleans.


