
You can build a chicken coop with a nesting box by following simple steps and using basic, affordable tools. A well-designed nesting box keeps your chickens healthy and comfortable, and encourages consistent egg laying. Place each box about 18 inches above the floor, and use a 12x12x12-inch size for most breeds to give hens enough space. Building your own coop lets you customize the layout for your flock, save money, and add features like easy-access lids or roll-away boxes. Even beginners find this project rewarding, straightforward, and a great way to create a safe, productive home for their chickens.
How to Plan Your Chicken Coop Before Building
Before you build your chicken coop, you need to plan carefully. A carefully considered plan means that your chickens will be healthy, safe, and comfortable. Thinking ahead about location, size, and features like nesting boxes will make daily care easier as well as encourage better egg laying. Taking the time to plan will stop any costly mistakes and keep your flock happy in the long run.
How to Choose the Best Location for Your Chicken Coop
Choosing the best location for your chickens isn’t as simple as picking an outcrop of your yard. The area should get plenty of morning sunlight, as this helps to keep the chickens healthy, and some afternoon shade helps to protect the chickens from heat. Avoid low areas that flood easily, and make sure there is good drainage so that water does not puddle up around the coop.
It’s also important that you distinctly place your chicken coop with nesting box away from noisy roads or other stressors. Chickens prefer to live in quiet areas and feel safer if there is a lower chance of predators reaching them. If you live in a neighborhood, be sure to check local rules regarding the number of chickens you may keep and the placement of the coop; getting the coop as close as possible to the house for easy feeding and cleaning is a great idea.
How to Decide the Right Size for Your Chicken Coop
Deciding which size of your coop you need depends on how many chickens you are going to have. Each chicken requires a minimum of 2-3 square feet of space inside the coop for them to remain healthy. A chicken coop with nesting boxes for 4 chickens should have enough room not only for the birds but also for the nesting boxes where the birds will lay eggs.
Plan for one nesting box for every 3-4 hens for comfort and productivity. Overcrowding can stress your chickens and lower the laying of eggs. Adding additional space makes cleaning easier and allows you flexibility in case you decide to increase the size of your flock in the future. Measuring out your yard and marking out the area for the coop before building will help you visualize the final area and avoid space issues.
Materials and Tools You Need to Build a Chicken Coop With Nesting Boxes
Before starting your chicken coop project, it’s very important to gather the right materials and tools. Using durable materials means that your coop will last for years, your chickens will be safe, and you’ll have an easier time with daily maintenance. Having the right tools at your disposal saves time and can help you work safely. With proper planning, you can construct a low-cost chicken coop with a nesting box that is strong, comfortable, and ideal for egg laying.
How to Choose the Best Wood and Materials for a Durable Chicken Coop
The key to creating a long-term chicken coop with a nesting box is to choose good materials. Use strong, weather-resistant wood for the frame, such as pine or cedar wood, as it will resist rot and insects. Exterior plywood will work on walls, and treated plywood is best for the floor to deal with moisture. For windows and vents, a hardware cloth will permit air circulation without letting in predators.
Other important material choices are:
- Roofing material: Metal or shingles are used to protect chickens from rain and other harsh weather conditions.
- Paint or sealant: Apply non-toxic materials to help guard against moisture and pests.
- Nesting boxes: Sturdy wood and space for your hens to sit comfortably while laying their eggs
Avoid old pallets or scrap wood with chemicals; these can be dangerous for chickens. Always look for sharp edges or nails before construction.
Essential Tools You Need to Build a Chicken Coop
You don’t need expensive tools to do building of DIY chicken coop with a nesting box for 4 Chickens but having the basics will make it easy and safe to do. Essential tools include:
- Hammer
- Tape measure
- Saw (hand saw or circular saw)
- Drill with bits
- Screwdrivers
- Level and square
- Pencil for marking
- Safety goggles and gloves
A power drill helps when working with screws, and a level helps to keep walls and roofs straight. Keeping things organized saves time and makes the job more fun. Simple hand tools suffice for most stages, but it is a good investment in better tools if you intend to construct more coops in the future.
Step-by-Step Guide to Building a Chicken Coop With Nesting Boxes
Building your own chicken coop might sound like a difficult task, but with a well-laid-out plan and step-by-step organizing instructions, it is something that you can get around to. It is important to follow the right sequence to ensure your coop is strong, safe, and comfortable for your chickens. This guide will show you how to make the best chicken coop with nesting boxes for laying eggs like the frame, walls, roof, and nesting boxes.
Step 1 – Building a Strong Frame for the Chicken Coop
Start by creating a sturdy frame, which forms the foundation of your chicken coop with a nesting box. Use treated wood for the base to resist moisture and wear.
Steps to build the frame:
- Measure and cut four pieces for the bottom and four for the top of the rectangle.
- Connect the corners with screws to form a solid rectangle.
- Stand four posts at each corner and attach the top frame.
- Use a level to ensure the frame is perfectly straight.
This frame gives your coop stability and a safe base for the walls and roof. Using a square helps keep corners at perfect 90-degree angles.
Step 2 – Constructing the Walls and Roof
Once the frame is ready, it is time to build the walls and the roof. Cut panels of plywood to fit each side and screw them securely in place. Leave Spaces for Windows and Doors
For the roof:
- Employ sloped beams to ensure that rainwater easily runs off.
- Cover with metal sheets or shingles for durability.
- Make sure that the roof hangs out past the walls to shelter the chickens from the rain.
Add vents around the top to allow proper air. Good ventilation means that your chicken coop with a nesting box for 4 chickens will be fresh and healthy with less moisture and less odor inside.
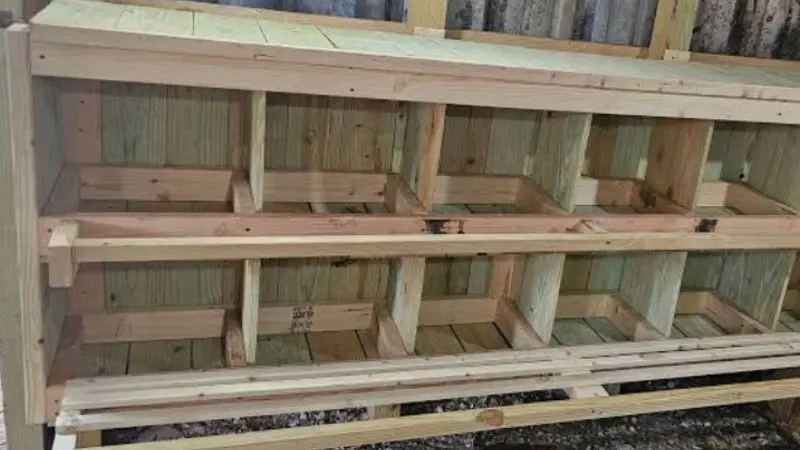
Step 3 – Building Nesting Boxes for Your Chickens
Nesting boxes give hens a comfortable place to lay eggs. Build boxes from plywood, with each box measuring about 12x12x12 inches. Attach the boxes to one wall inside the coop, about 18 inches above the floor.
Plan for one nesting box for every 3–4 hens:
- 3–4 hens → 1 nesting box
- 6–8 hens → 2 nesting boxes
- 9–12 hens → 3 nesting boxes
Add a small lip at the front of each box to keep bedding inside, and fill each with straw or wood shavings. Proper nesting boxes help your hens feel safe and encourage consistent egg laying, making your best chicken coop with nesting boxes for egg laying more productive.
Step 4 – Installing Doors, Windows, and Ventilation
Finally, install doors and windows to make your coop accessible and well-ventilated.
Key steps:
- Put a door large enough for you to get in, with strong hinges and a good latch.
- Add windows covered with hardware cloth to let the light in and the predators out.
- Place vents near the roof for fresh air and moisture control.
Check all openings for sharp edges before letting your chickens into them. Proper ventilation also keeps the chicken coop with nesting box clean and helps to limit the likelihood of respiratory issues with your flock.
Best Nesting Box Design Ideas for Your Chicken Coop
Nesting boxes are an essential part of any chicken coop. The right design makes egg collection easier, keeps hens comfortable, and improves egg-laying consistency. Choosing between internal and external boxes, and adding easy-access features, can help you build the best chicken coop with nesting box for egg laying that fits your yard and routine.
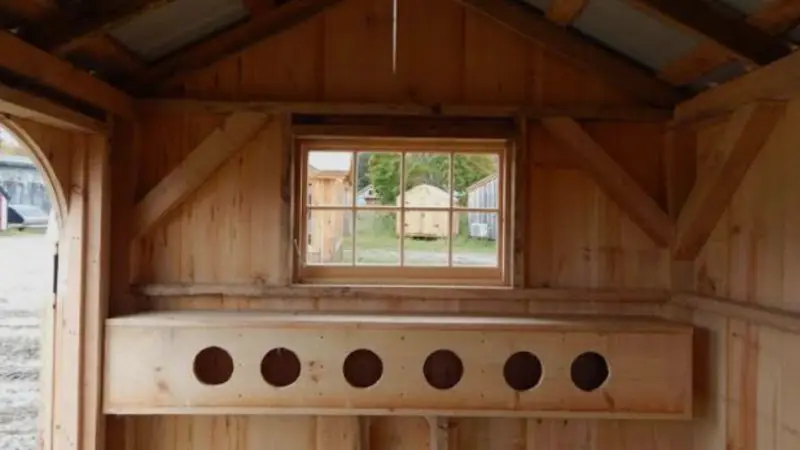
Internal vs. External Nesting Boxes
Depending on your space and climate, you can select between internal and external nesting boxes
Nesting boxes are internal to the main coop. They keep the hens warm in the winter and, at the same time, give them protection from predators. These boxes can be constructed along one wall to save space and are easier to clean because you will be able to reach them from within the coop.
External nesting boxes attach to the outside using a nesting box. They occupy space inside the coop, and you have a chance to collect the eggs without having to enter, keeping your shoes clean. External boxes must have weatherproof lids and sturdy latches, and edges must be well sealed to protect against rain and wind.
When deciding between internal and external designs, consider the space of your yard as well as the climate and routine of your life in order to find the suitable fit for your flock.
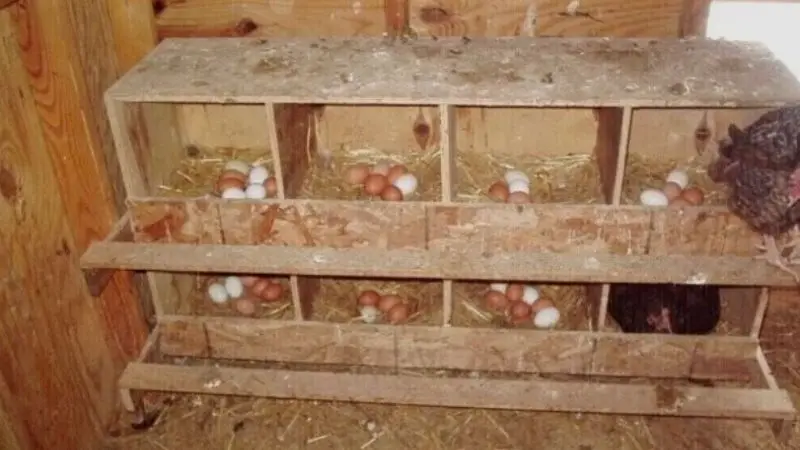
Easy-Access Nesting Boxes for Quick Egg Collection
Collecting eggs quickly and safely is easier with easy-access nesting boxes. Many chicken keepers use boxes with a hinged lid on top or at the back, allowing you to lift the lid and reach in without disturbing the hens.
Other designs include roll-away nesting boxes with a sloped floor, so eggs gently roll to a covered collection area. This keeps eggs clean and reduces the chance of breaking. You can also add a small perch in front of each box, which hens enjoy stepping on before entering.
Checking your nesting boxes daily ensures eggs stay fresh and clean, making your chicken coop with nesting boxes for 4 chickens more efficient and comfortable for both you and your flock.
How to Keep Your Chicken Coop Safe and Comfortable
A safe and comfortable chicken coop ensures that your hens stay healthy, lay their eggs consistently, and are not stressed. By predator-proofing your coop and keeping nesting boxes clean, you keep your flock safe and make providing daily care easier. These steps are necessary in any chicken coop with a nesting box for 4 chickens.
How to Predator-Proof Your Chicken Coop
Keeping chickens safe from predators is a high priority. Raccoons, foxes, snakes, and neighborhood dogs are all potential threats to your flock. The first step is using strong and durable materials. Hardware cloth is a lot better than chicken wire because it is not susceptible to chewing and digging. Cover all windows, vents, and gaps, and bury wire at least 12 inches deep so predators cannot tunnel under the walls.
Other safety precautions include:
- Installing strong locks on all doors and nesting box lids
- Using carabiner clips or padlocks for extra security
- Checking the coop once a week for holes/weak spots and repairing them immediately
- Removing leftover food at night to prevent attracting predators
- Motion-activated lights or alarms can also help to deter nighttime predators and provide you with additional peace of mind.
Bedding and Maintenance for Healthy Nesting Boxes
Clean bedding in your nesting boxes helps keep your hens clean and healthy, and eggs clean. Good bedding has a way of absorbing moisture, controlling odor, and is easy to replace. Straw, pine shavings, and shredded paper are popular choices. Change bedding at least weekly and dispose of wet or soiled material as soon as possible.
For daily care:
- Check nesting boxes for broken eggs or droppings
- Monthly washing of wash boxes with mild soap and water, and drying before adding fresh bedding
Fresh bedding reduces mites, keeps the eggs clean, and makes the hens more comfortable. Well-maintained nesting boxes will ensure you have the most productive and happy chicken coop with nesting box laying egg-laying birds.
Wrap Up
Building a chicken coop, including a nesting box, requires planning, the proper materials, and a touch of construction. Choosing the right location, designing easy access nesting boxes, and keeping your bedding clean ensure your chickens are safe, comfortable, and productive. Predator-proofing and proper ventilation keep hens healthy, and durable materials and thoughtful design make your coop stand the test of time. Whether you decide on an internal or external nesting box or create your own low-cost chicken coop with a nesting box, with these steps, your flock of happy chickens will lay eggs on a regular basis. With this guide, you can be confident in constructing a coop that will meet the needs of your flock.
FAQ
How many nesting boxes do you need for your chickens?
You need one nesting box for each three to four hens. This helps to avoid crowding and keeps eggs cleaner. Extra boxes do not hurt, but most hens do share.
What is the most suitable bedding for nesting boxes?
You can use straw, pine shavings, or shredded paper. Straw and pine shavings are good at absorbing moisture and controlling odors. Change bedding once a week for healthy hens.
How high should nesting boxes be placed?
Position nesting boxes about 18 inches above the coop floor. This height makes the eggs safe and makes it easy for hens to get in. Avoid placing boxes too high.
Can You Build a Chicken Coop With Recycled Material?
Yes, you can have recycled wood or materials if they are clean and safe. Do not use wood with chemicals or sharp pieces of metal. Always look out for nails and splinters before building.


