
A leakage or damaged exhaust pipe can be really frustrating, especially when you don’t know where to start. Learning how to MIG weld an exhaust pipe on a car might seem tough at first, but with the right tips, it becomes much easier. Exhaust pipes are thin, so you need a careful technique to avoid burning through the metal.
Start by cleaning the pipe well and adjusting your MIG welder for thin materials. With some practice and patience, you’ll be able to make clean, strong welds. Whether it’s a repair or upgrade, mastering this skill can save you money and keep your car running smoothly. In this blog, we’ll walk you through the easy steps, tools, and tips to help you MIG weld an exhaust pipe like a pro.
Tools and Materials for Welding the Exhaust Pipe
Before you begin welding, having the right setup is key to getting strong, clean welds. From choosing the proper tools to wearing protective gear, preparation makes a big difference in your results and safety.
Tools You Need to MIG Weld an Exhaust Pipe
Using the right tools can make MIG welding an exhaust pipe much easier and safer. These tools help you prepare the pipe, keep it steady, and ensure cleaner welds.
Essential tools include:
- MIG welder with adjustable settings for thin metals
- Welding cart to move the welder easily
- A grinder or wire brush to clean rust and dirt off the pipe
- Clamps or magnets to hold the pipe in place during welding
- Welding hammer and chipping tools for cleaning welds afterwards
These tools work together to help you weld accurately and with better results. Getting the setup right at the start saves time and prevents mistakes later.
Materials Needed for Welding the Exhaust Pipe
Choosing the right materials is key to getting a strong and lasting weld. Car exhaust pipes are made from thin metals, so you need filler wire and settings that suit them perfectly.
Common materials and tips:
- Exhaust pipe metals: stainless steel, structural steel, or titanium
- Material thickness: usually around 1 mm
- Filler wire: match it with your pipe material for better bonding
- Power source: The TPS/i welder gives even welds and reduces mess
- Productivity boost: A good power source can speed up welding by 20%
When the right materials are combined with the right tools, you get cleaner welds that can handle heat and vibration from daily driving.
Safety Gear for MIG Welding
Welding can expose you to heat, sparks, and harmful fumes. That’s why proper safety gear is not optional—it’s essential. Always suit up before you start any welding work.
Must-have safety gear:
- Auto-darkening helmet protects your eyes from sparks and light
- Heat-resistant gloves to keep your hands safe from burns
- Welding jacket or apron to shield your upper body
- Safety glasses worn under your helmet for extra eye protection
- Steel-toed boots to prevent foot injuries
- Well-ventilated workspace to reduce fume inhalation risks
Using this safety gear every time helps prevent injuries and creates a safer, more controlled environment while you work.
Preparation for How to MIG Weld the Exhaust Pipe on a Car

Preparation is key before you begin welding your car’s exhaust pipe. A clean surface, an organized workspace, and correct welder settings are all essential for a strong, lasting weld.
Let’s look at each of these steps in detail.
Cleaning and Preparing the Exhaust Pipe
Welding won’t work well if the car exhaust pipe is dirty or greasy. Clean the pipe thoroughly to remove all rust, dirt, and oil before you start. Use a wire brush or grinder to clean the area where you will weld. For greasy spots, apply a degreaser or acetone. Make sure there’s no residue left.
When welding stainless steel or titanium pipes, only clean tools are used to prevent contamination. Using tools previously used on other metals can cause corrosion or weak welds. Once cleaned properly, double-check the pipe. A clean surface helps the metal fuse strongly and creates a durable bond.
Setting Up the Workspace for Welding the Exhaust Pipe
A tidy and safe welding area helps prevent accidents and makes the work easier. Remove any unnecessary items to avoid clutter. Keep all your tools—MIG welder, clamps, brush, grinder—within reach. Good lighting and proper airflow are also very important. They improve visibility and protect you from harmful welding fumes.
Your workspace should be well-organized to keep you moving smoothly between tasks. Being prepared before striking the first arc not only boosts your safety but also helps you work faster and with better results throughout the entire welding process.
Adjusting MIG Welder Settings for Thin Materials
Setting your MIG welder correctly is key to welding thin exhaust pipes without burning through them. Thin metal requires low voltage and slow wire feed speed. This helps control the heat and avoids making holes in the pipe.
Leave a small gap between the pipe ends, around 1.6 mm or equal to the pipe thickness. If the gap feels too wide, lower the current and slightly extend the wire stick-out. Always move the gun steadily and hold it at a consistent angle. Proper settings lead to neat, strong welds that last longer.
Step-by-Step Guide to MIG Weld Exhaust
Once your preparation is complete, it’s time to begin the welding process. This section will guide you through three essential steps to help you secure, weld, and finish the exhaust pipe properly. Each method is designed to protect the thin pipe material and produce long-lasting results.
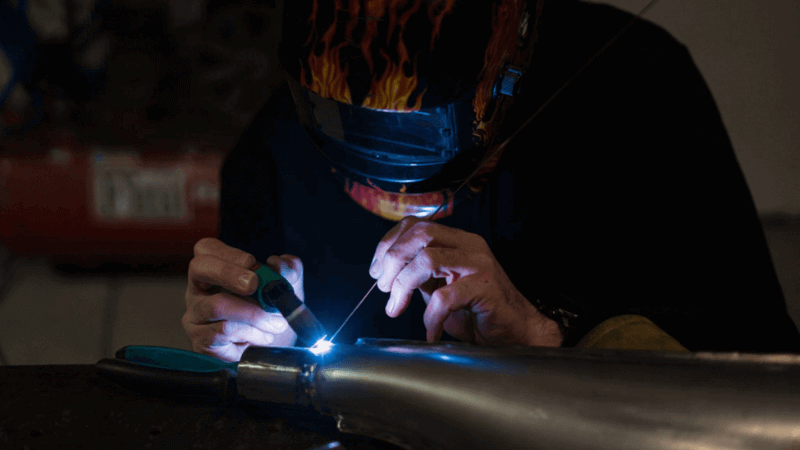
Step 1: Tack Welding to Secure the Exhaust Pipe
Tack welding is the first step in holding the car’s exhaust pipe sections in place. Begin by carefully aligning the pipe sections and securing them with clamps or magnets to prevent movement. Set your MIG welder to low voltage and wire feed speed to match the thickness of the pipe.
Hold the welding gun at a 90-degree angle and make small, quick welds spaced evenly around the joint. These tack welds temporarily fix the pipe pieces together like anchor points. After applying the welds, recheck the alignment to make sure everything is secure and in the right position before continuing.
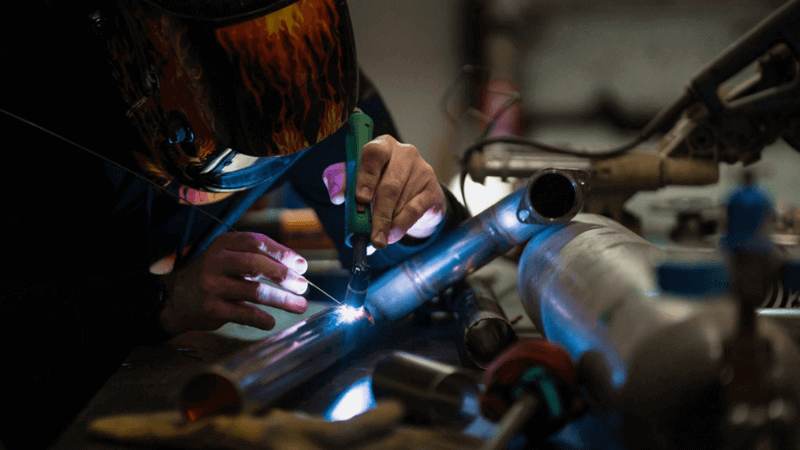
Step 2: Stitch Welding for Thin Materials
After tack welding, use stitch welding to prevent too much heat from damaging the thin pipe. This technique involves creating short welds in sections instead of one continuous line. Position your welding gun at a slight 10-15 degree angle. Start at one end of the joint and make a short weld about an inch long.
Pause briefly, then weld the next section slightly overlapping the previous one. Repeat this along the pipe. This approach helps control heat and keeps the pipe from warping or burning through. Stitch welding also gives the joint strength while protecting the pipe’s shape.
Step 3: Using the Push Technique for Better Control
The push technique is perfect for finishing MIG welds on thin exhaust pipes. In this method, you angle the welding gun slightly—about 10 to 15 degrees—and push it away from the weld pool as you go. This technique gives you a better view of the weld area, letting you guide the weld more precisely.
It also reduces the amount of spatter and helps you control heat more effectively. As you push the gun steadily along the joint, keep a short wire stick-out of about 3/8 inch. This ensures clean, even welds and helps prevent overheating the metal surface.
Tips for Beginners on Welding the Exhaust Pipe
If you’re new to welding, working on a car exhaust pipe can be a great way to learn. However, thin materials like exhaust pipes require extra care and attention. Mastering a few beginner techniques can help you get better results and avoid damaging the pipe.
This section covers the three most important beginner-friendly practices: how to build skills on scrap metal, avoid common welding issues, and maintain control during the process.
Practicing on Scrap Metal
Before welding the exhaust pipe, it’s best to start with scrap metal. Practicing helps you get used to the feel of the welding gun, the speed of your movements, and the proper angles. Use metal pieces similar to the exhaust pipe for more accurate learning.
Try adjusting your position and changing angles while welding. After each weld, check for signs of spatter, uneven lines, or gaps. Review each result and try again to improve. This hands-on practice helps you adjust your welder settings more effectively and gain confidence.
Avoiding Burn-Through and Spatter
Burn-through and spatter are common problems when welding thin exhaust pipes. To avoid burn-through, set your MIG welder to a low voltage and reduce the wire feed speed. Always keep the welding gun moving to avoid focusing heat on one spot for too long.
Burn-through weakens the pipe and ruins the weld. Spatter happens when molten metal shoots out during welding. To reduce it, keep the wire stick-out short and use a smooth, controlled motion. A cleaner weld makes your work stronger and neater. Reducing heat and spatter ensures the pipe stays in good condition throughout the process.
Maintaining Proper Visibility and Control
Clear visibility and steady control are both key to successful welding. Make sure you use a quality helmet with an auto-darkening feature so you can always see the weld pool clearly. Position yourself where you have a direct line of sight to the joint and can follow the weld bead as it forms.
Control comes from maintaining a consistent angle—about 10 to 15 degrees—and a smooth, steady movement across the joint. Avoid stopping in one place too long, as this increases the risk of burning through the pipe. With good visibility and control, you’ll produce cleaner, stronger welds.
Safety Precautions for MIG Weld Exhaust
Welding exhaust pipes involves risks that can affect your health and safety. Taking the right safety steps helps protect you from injuries, harmful fumes, and other hazards. This section covers essential safety precautions to wear the correct protective gear, ensure good ventilation, and handle materials like galvanized steel carefully.
By following these guidelines, you can reduce risks and weld more confidently and safely.
Wearing Protective Gear
Wearing proper protective gear is crucial when MIG welding. It shields your body from sparks, intense UV light, and harmful fumes that can cause burns or long-term health problems. Always wear a helmet with an auto-darkening feature to protect your eyes from bright welding arcs.
Heat-resistant gloves keep your hands safe from burns, while a welding jacket or apron protects your body from sparks and heat. Safety glasses under your helmet offer extra eye protection, and steel-toed boots guard your feet from heavy objects or falling debris. Proper gear minimizes risks and keeps you safe.
Ensuring Proper Ventilation
Proper ventilation is vital during exhaust pipe welding to protect your lungs from toxic fumes. Welding produces harmful gases that, if inhaled, can cause serious health issues over time. Work in areas with good airflow or use ventilation systems to keep the air clean.
Source extraction exhaust equipment removes fumes directly from the welding zone, while filtration systems clean and recycle indoor air. Always check your workspace for adequate ventilation to avoid breathing dangerous fumes and maintain a safer welding environment.
Avoiding Hazards with Galvanized Steel
Welding galvanized steel requires extra caution because the zinc coating releases toxic fumes when heated. These fumes can cause metal fume fever, a flu-like illness that includes chills and fever. To stay safe, always work in well-ventilated areas or use respirators that filter out harmful gases, especially in confined spaces.
Following safety standards such as ANSI/ASC Z49.1 helps protect you from these hazards. Ventilation systems are essential to remove zinc fumes from the air. Understanding these risks and precautions ensures you can weld galvanized steel without compromising your health.
Troubleshooting Common Issues in Welding the Exhaust Pipe
Even with careful preparation, welding exhaust pipes can present challenges. Problems like poor weld penetration, spatter, or uneven welds may occur, affecting the strength and appearance of your work.
Understanding how to identify and fix these common issues will help you create durable, professional welds. Below are key troubleshooting tips to improve your welding results and avoid common pitfalls.
Fixing Poor Weld Penetration
Poor weld penetration weakens the joint and reduces its durability. To fix this, start by adjusting your MIG welder’s settings. Increase the voltage slightly to allow the weld to sink deeper into the metal. Ensure your wire feed speed matches the voltage for a stable arc.
Hold the welding gun at a 10-15 degree angle and move slowly and steadily along the joint, especially on thicker areas, to let the weld fully penetrate. Proper surface cleaning is also essential, as dirt and rust can block the weld from bonding well.
Reducing Spatter and Achieving Clean Welds
Spatter makes welds messy and harder to finish cleanly. To minimize spatter, set your machine’s voltage and amperage according to the material’s thickness. Keep the wire stick-out short—around 3/8 inch—for better control. Hold the welding gun at a slight angle, no more than 15 degrees, to maintain a steady arc.
Clean your pipe and tools before welding to remove grease or dirt that can cause spatter. Also, use high-quality welding consumables that match your project for smooth, neat welds that require less cleanup.
Addressing Uneven Welds
Uneven welds weaken the joint and affect the appearance. To fix uneven welds, consider adjusting your gas mix by adding more CO2 to increase weld energy for stronger, consistent joints. Using thinner welding wire can also improve current flow and produce smoother weld beads.
If needed, switch from pulsed to traditional welding for better control. Keep your hand steady and move the welding gun at a consistent speed to avoid wobbly lines. Practicing on scrap metal will help improve your technique before working on the actual exhaust pipe.
Wrap Up
MIG welding an exhaust pipe may seem tough, but with the right tools and techniques, beginners can learn it with practice. Start with a clean pipe, use low heat settings to avoid burn-through, and weld in small sections to prevent warping. Always wear safety gear and work in a clean, well-lit, and ventilated area.
Use tack welds, stitch welds, and the push technique for strong, clean joins. Practice on scrap metal first to build confidence. With patience and care, MIG welding can save you money, improve your skills, and help maintain your car’s exhaust system for the long run.
FAQ
Can I weld on an exhaust pipe while it is still attached to the car?
Welding the pipe isn’t a problem while it remains connected. Make sure the area where work occurs is safe and can be entered. Insert clamps to hold the pipe in position. Ventilation is important to make sure fumes don’t collect under the car while you are working.
Which wire should I use to fill welds in exhaust systems?
For steel pipes, choose ER70S-6 wire, and choose ER308L for stainless steel. The wires achieve a firm, clean connection when welding. For good performance, use a wire type that is suited to the pipe you have. Always test to see if the equipment is compatible before getting into the setup.
How can I keep from burning holes in thin exhaust pipes when welding them?
Select low voltage and a moderate wire feed speed when using a helmet. Improve cooling by relying on stitch welding methods. Steadily keep the gun moving while you shoot. Working on scrap metal can help you develop your welding skills and keep the pipe from getting overheated.
Can I weld close to the car’s fuel tank safely?
It is dangerous to weld close to the fuel tank. Sparks can set fuel vapours alight. If it is necessary, relocate the car to a secure place or get rid of the gas tank. Put safety first if you are welding on or near things that burn quickly.
What is the best way to get spatter off the welding pipe?
Remove spatter from your artwork with a wire brush or grinder. When spots are difficult to remove, use a spatter cleaner solution. Maintaining a clean pipe ensures it finishes well and doesn’t corrode. Gloves and goggles will help keep you safe when cleaning up.


