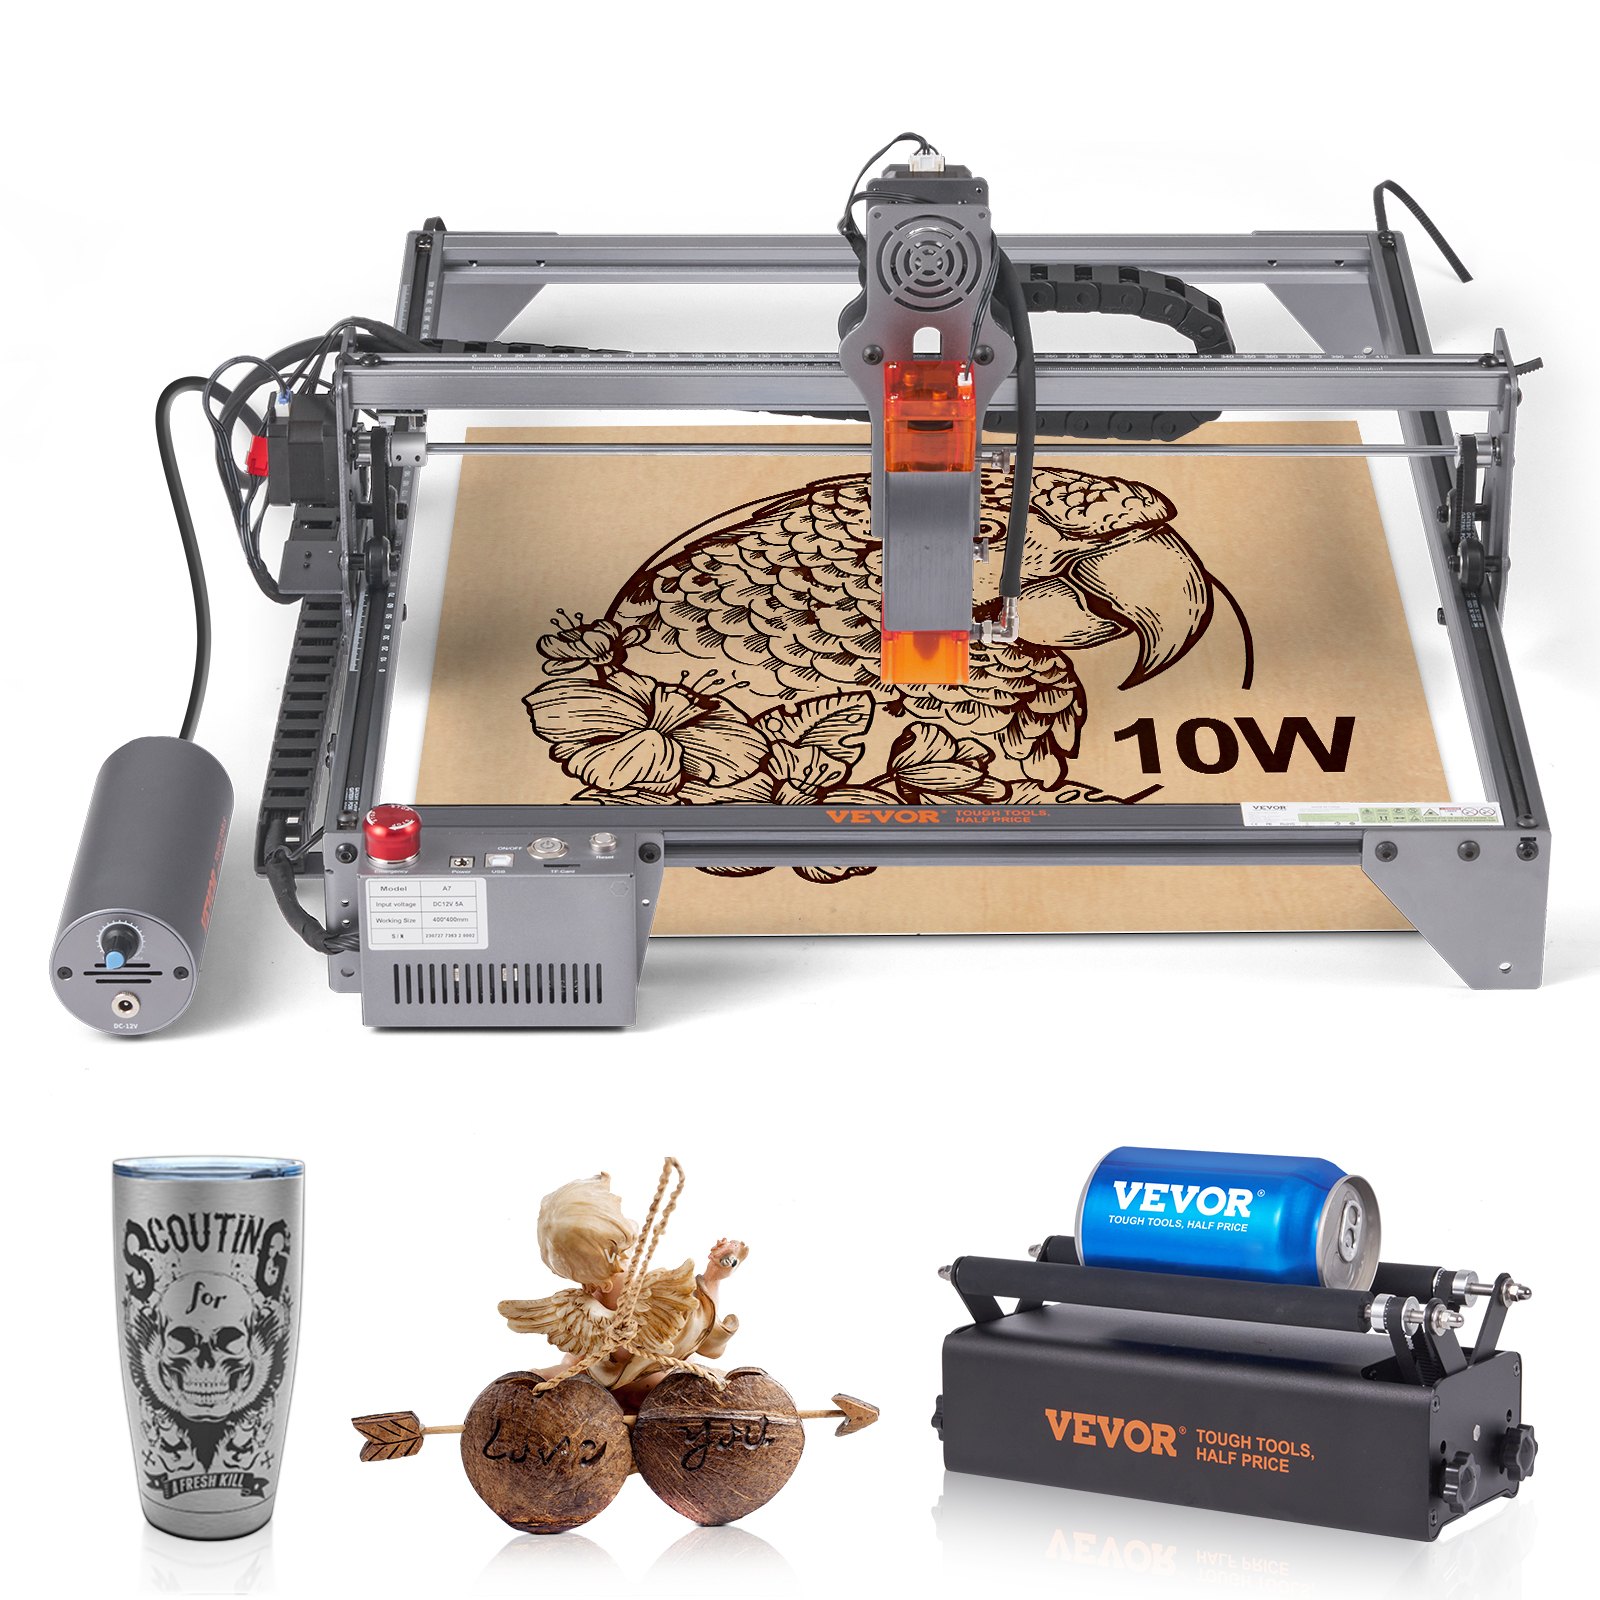
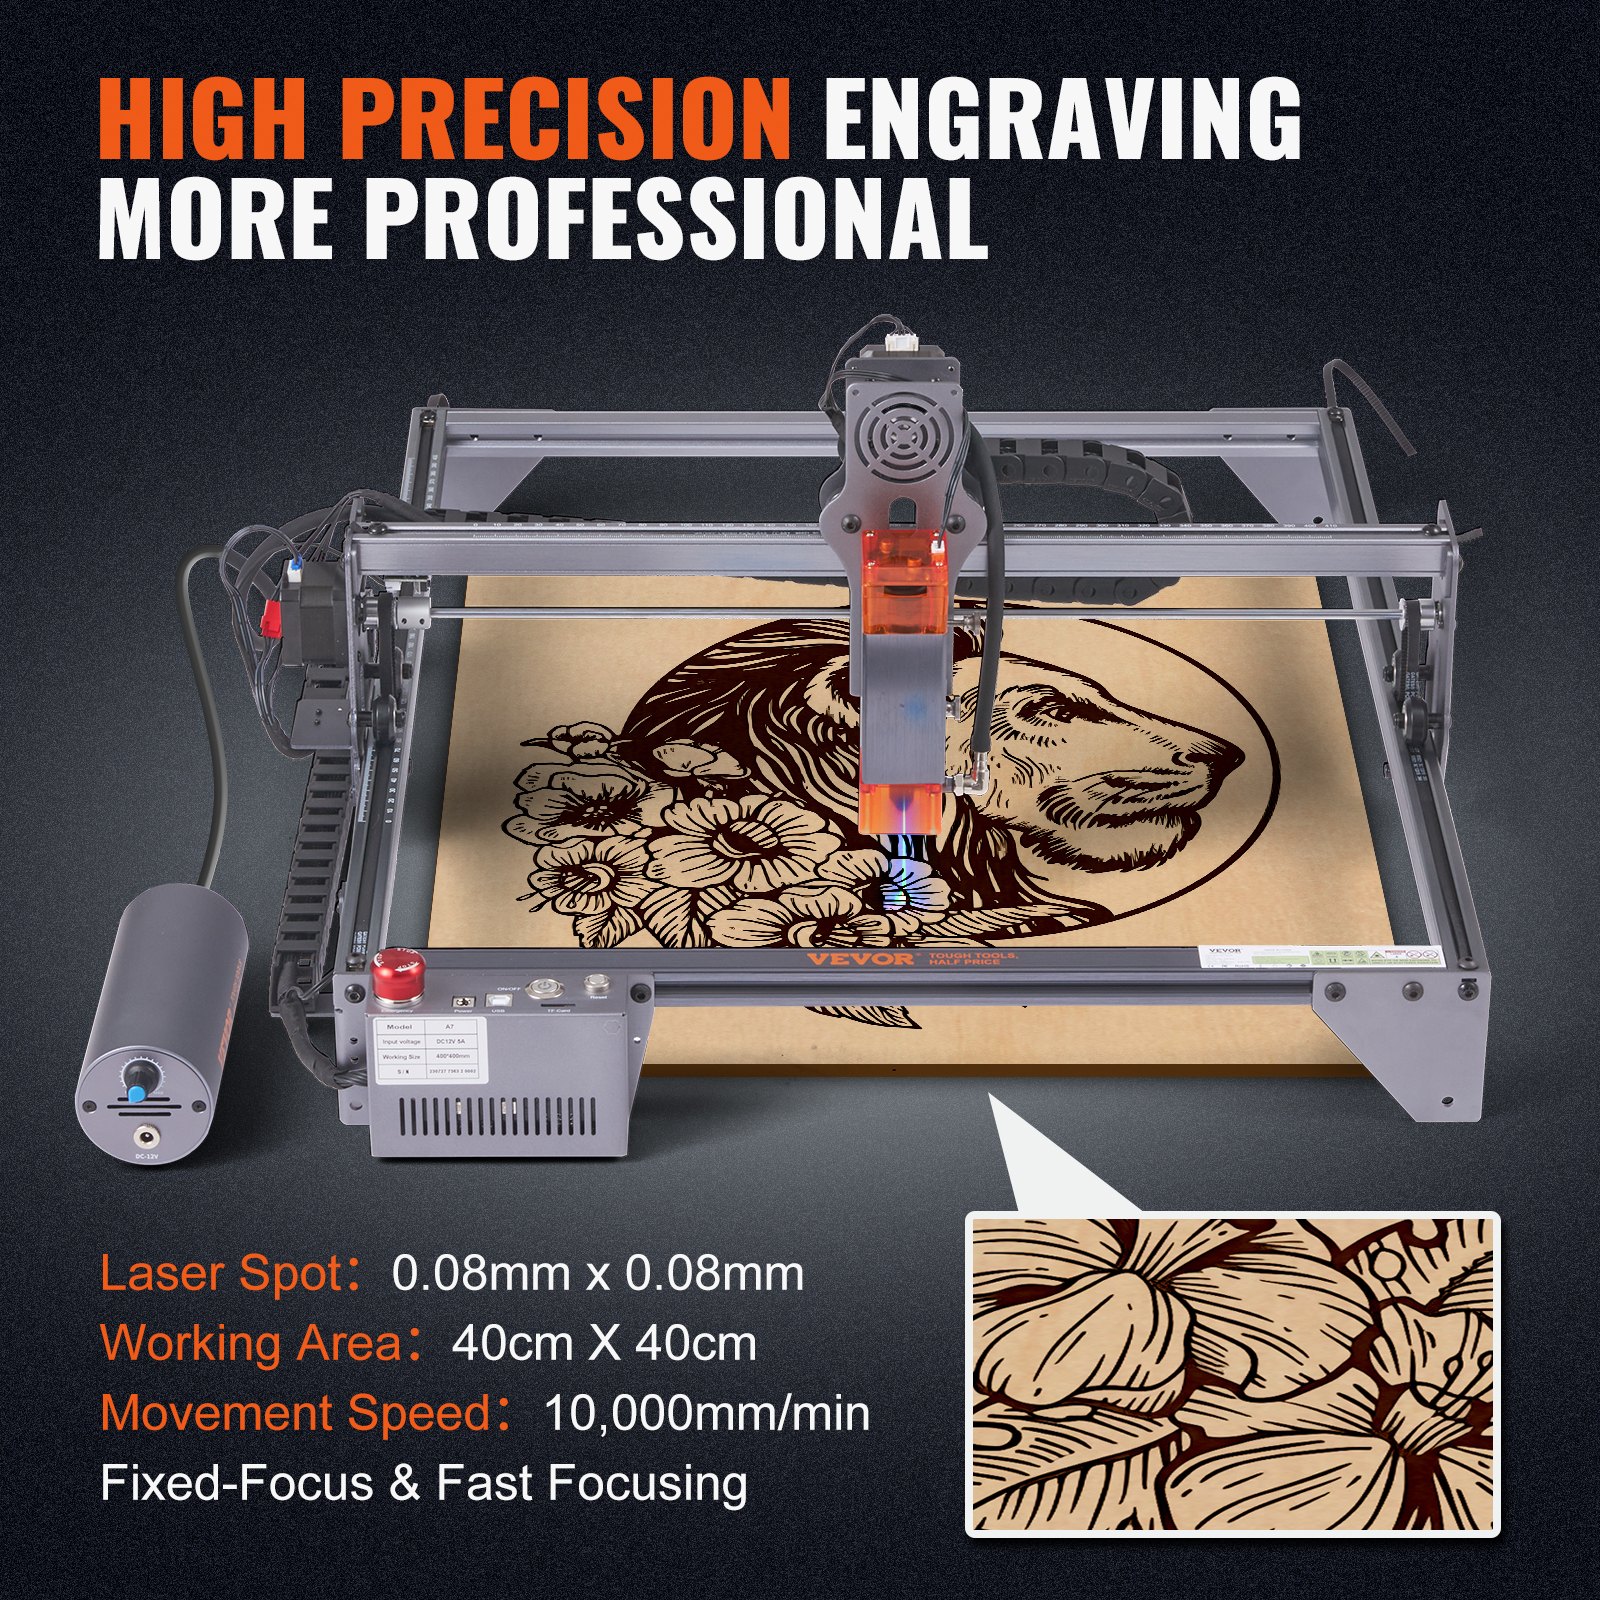
Unlock the full potential of your VEVOR Laser Engraver with our comprehensive product manual download. Designed for the 10W Output Laser Engraving Machine, this manual provides step-by-step instructions for setup, troubleshooting, and optimizing your engraving projects. With a large working area of 15.7″ x 15.7″ and an impressive movement speed of 1000,0mm/min, this VEVOR Laser Engraver is perfect for detailed work on wood, metal, and acrylic.
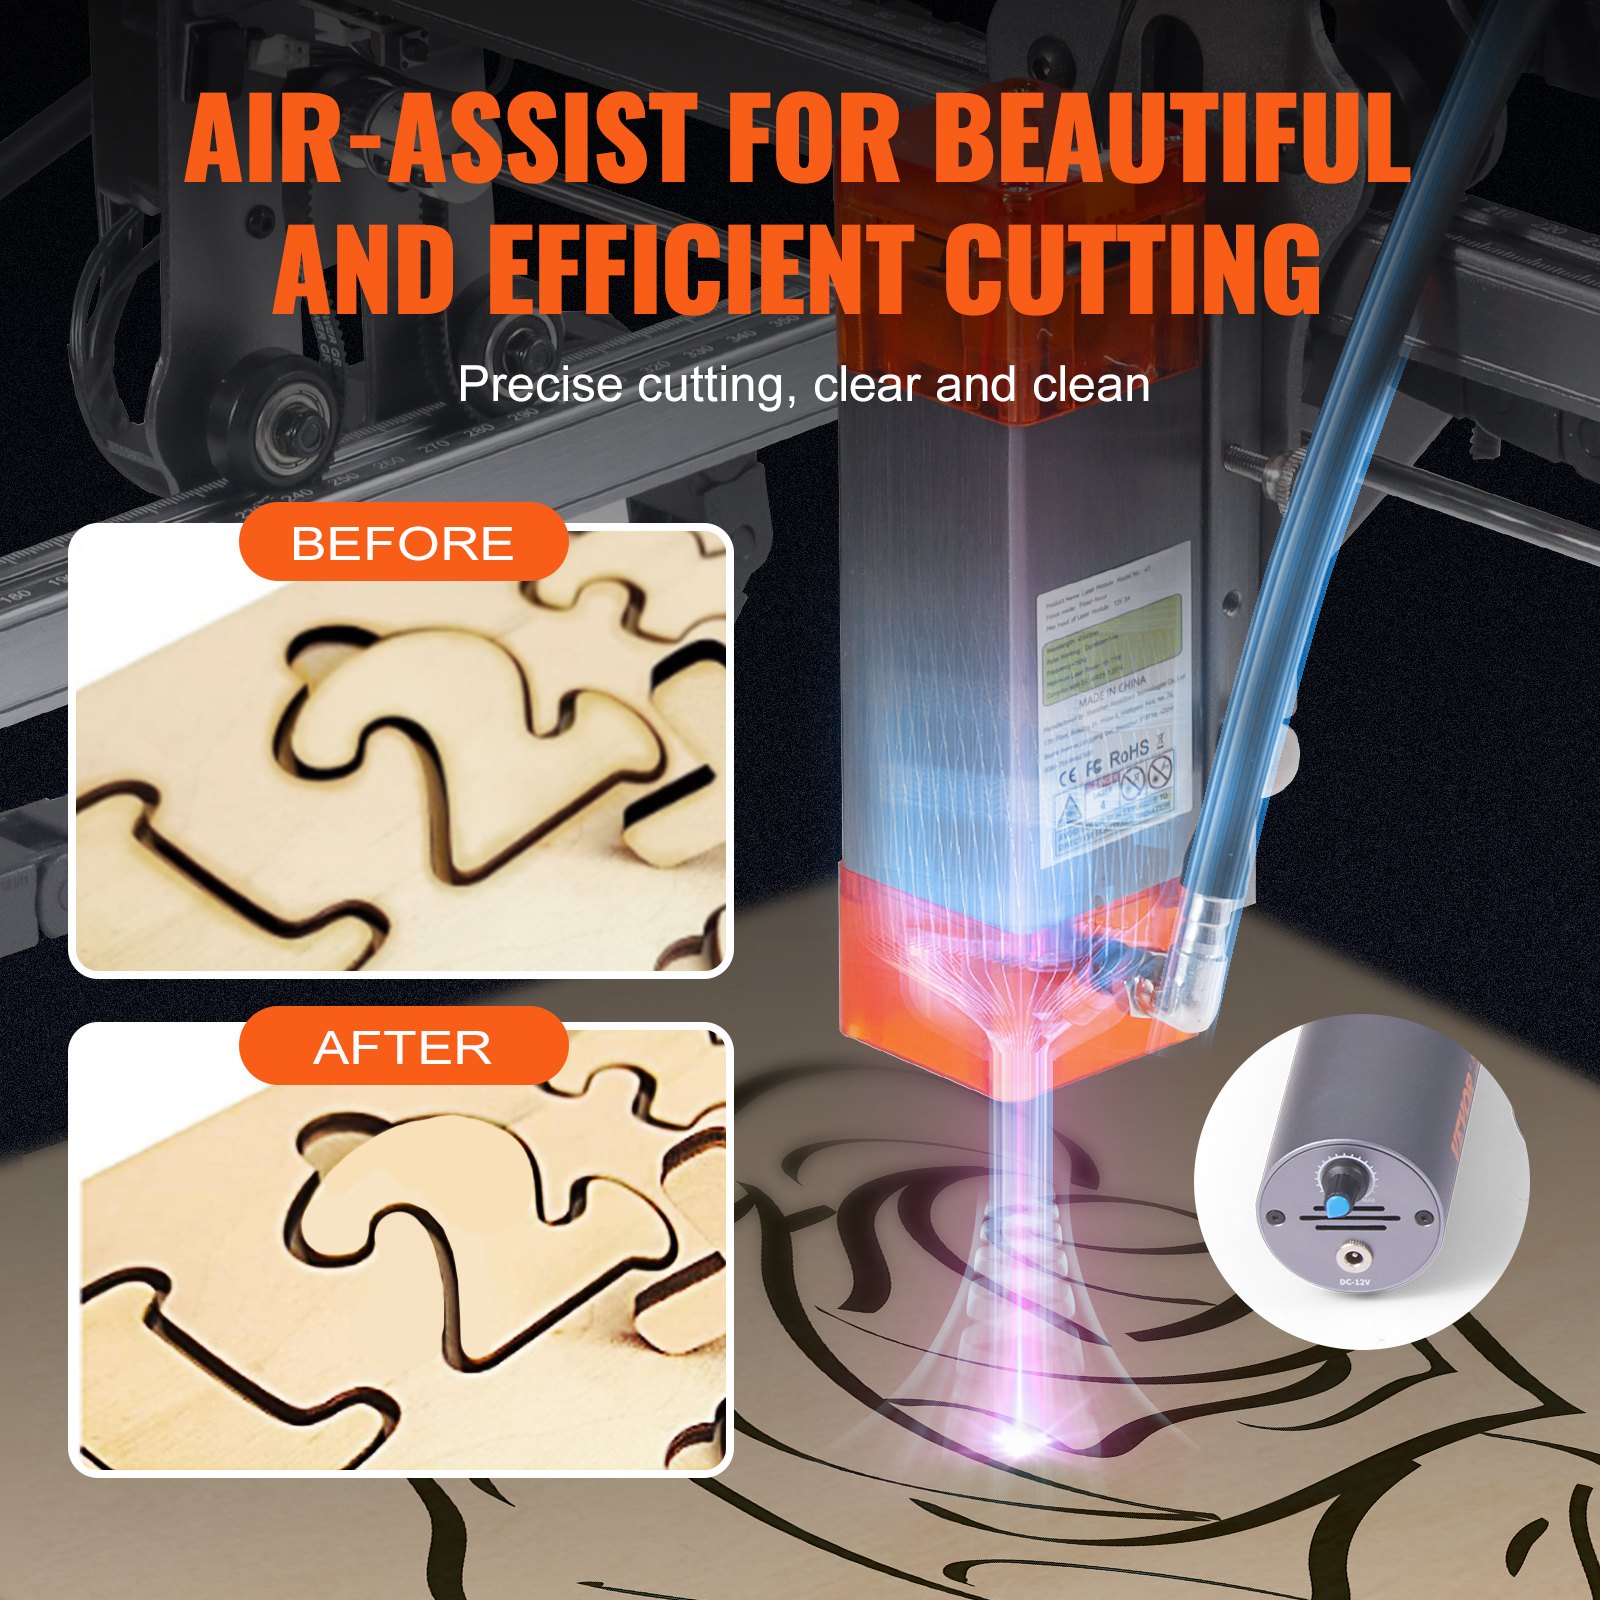
The manual also covers using the compressed spot with the rotary roller, ensuring you can achieve precision cuts and engravings. Whether you’re a beginner or an experienced user, our user-friendly guide will help you maximize your machine’s capabilities, making your engraving tasks easier and more efficient.
Download now to get started!
Part 1: Security Statement Before Installation
Before using the laser engraving machine, please read this safety guide carefully. It contains information about situations that require special attention and warnings of unsafe practices that can cause damage to your property or even endanger your safety.
- The product belongs to Class 4 laser products. The laser system itself must meet the requirements of IEC 60825-1, the latest version; otherwise, the product is prohibited from being used.
- If a protective housing is equipped with an access panel that provides “walk-in” access, then:
a)Means shall be provided so that any person inside the protective housing can prevent activation of a laser hazard equivalent to Class 3B or Class 4.
b)There is a warning device to provide adequate warning of emission of laser radiation equivalent to Class 3R in the wavelength range below 400 nm and above 700 nm, or of laser radiation equivalent to Class 3B or Class 4 to any person in the protective housing.
c) Where “walk-in” access during operation is intended or reasonably foreseeable, emission of laser radiation that is equivalent to Class 3B or Class 4 while someone is present inside the protective housing of a Class 1, Class 2, or Class 3R product shall be prevented by engineering means.
Note: Methods to prevent humans from radiation when they are inside the protective housing can include pressure-sensitive floor mats and infrared detectors, among others.
- The laser itself has a protective cover, screws or magnets fasten the protective cover. When the laser is installed on the laser engraver, the protective cover should be checked to ensure it is reliably locked and can not be removed in the energized state.
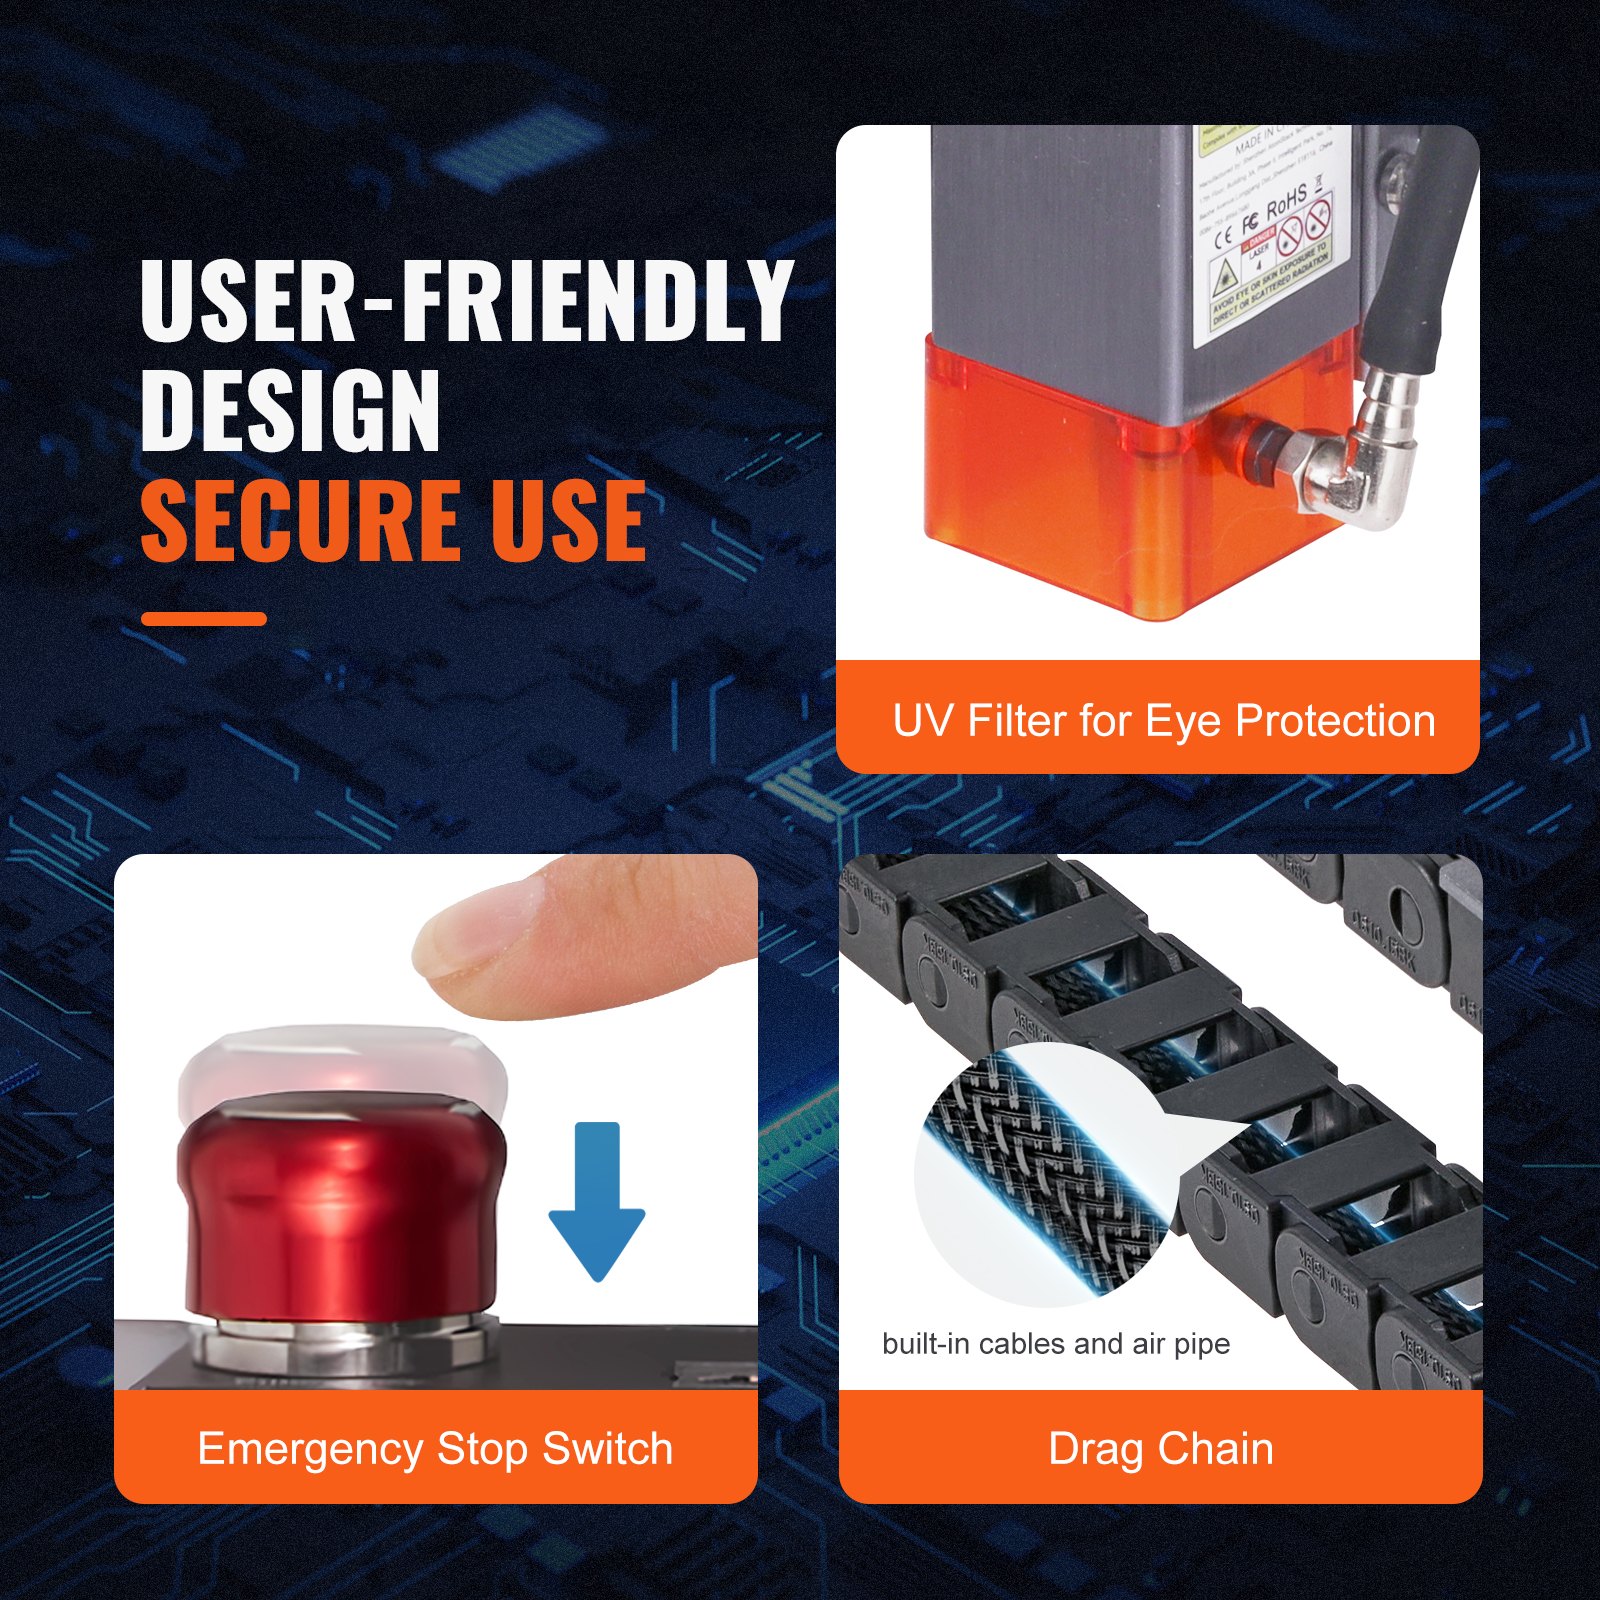
- The laser engraver has an emergency stop button, which can immediately stop the laser output when pressed under unexpected circumstances.
- The laser engraver has a reset button, which can resume work under the condition of confirming safety after lifting the interlock or emergency stop.
- Set a warning mark on any window or channel that can actively observe or passively receive laser radiation on the laser engraving machine.
- If the laser burns the skin or eyes, please immediately visit a nearby hospital for examination and treatment.
Part 2: User Security Statement
Laser light can harm human eyes and skin. Do not expose your eyes or skin directly to laser light. This laser product emits a collimated laser beam through an optical lens.
The light emitted by the product, whether direct or reflected, can be very harmful as it can travel long distances while maintaining high optical density.
When handling the product, wearing appropriate goggles (OD5+) is necessary to protect the eyes from all laser light, including reflected and stray light.
Reflected and stray light that spills into unintended areas should be attenuated and/or absorbed.
2.1 Laser safety
We have installed a laser shield on the laser, which can filter out most of the diffuse reflection of the laser spot. However, when using the laser engraving machine, it is recommended to wear laser protective glasses to prevent eye damage.
Avoid skin exposure to type 4 laser beams, especially at close distances. Teenagers must be supervised by their parents while using the machine.
Do not touch the laser engraving module while the machine is active.
2.2 Fire safety
Because cutting burns off the substrate, a high-intensity laser beam generates extremely high temperatures and a lot of heat. Certain materials can catch fire during cutting, creating gases and fumes inside the equipment.
A small flame usually appears here when a laser beam hits the material. It will move with the laser and will not stay lit when the laser passes by.
Do not leave the machine unattended during the engraving process. After use, clean up the debris and flammable materials in the laser cutting machine.
Always keep an available fire extinguisher nearby to ensure safety. When laser engraving machines are used, smoke, vapour, particles, and potentially highly toxic materials (plastics and other combustible materials) are produced from the material. These fumes or air pollutants can be hazardous to health.
2.3 Material safety
Do not engrave materials with unknown properties. Recommended materials are wood, bamboo, leather, plastic, fabric, paper, opaque acrylic, and glass.
Materials not recommended: Metal, precious stones, transparent materials, reflective materials, etc.
2.4 Use Safety
Use the engraver only in horizontal position and ensure that it has been securely fixed to prevent fires caused by accidental shifting or dropping from the workbench during work.
It is forbidden to point the laser at people, animals or any combustible object, whether in working condition or not.
2.5 Power safety
The laser engraver provides a power adapter with a ground wire to prevent accidental disasters such as fire and electric shock.
When using the laser engraving machine, insert the power plug into a power socket with a ground wire with a ground wire when using the Laser Engraver.
2.6 Environmental safety
When installing engraving and cutting equipment, please ensure that the workplace is cleaned and that flammable and explosive materials are not present around it.
A metal plate must be placed under the bottom when engraving or cutting.
Part 3: Disclaimer and Warning
This product is not a toy and unsuitable for people under 15. Do not allow children to touch the laser module. Please be careful when operating in scenes with children.
This product is a laser module. Please read the operating instruction manual carefully. VEVOR reserves the right to update this disclaimer and the safe operation guide.
Please read this document carefully before using the product to understand your legal rights, responsibilities, and safety instructions. Otherwise, it may bring property loss, safety accidents, and hidden dangers to personal safety.
Once you use this product, you shall be deemed to have understood and accepted all terms and contents of this document. The user undertakes to be responsible for his or her actions and all consequences arising therefrom. The user agrees to use the Product only for legitimate purposes and agrees to the entire terms and contents of this document and any relevant policies or guidelines that VEVOR may establish.
You understand and agree that VEVOR may not be able to determine the cause of the damage or accident and provide you with after-sale service unless you provide the original engraving or cutting files, engraving software configuration parameters used, operating system information, video of the engraving or cutting process, and operational steps prior to the occurrence of a problem or failure.
VEVOR is not liable for any losses arising from the user’s failure to use the product per this manual. Users are prohibited from disassembling the machine by themselves without the guidance of the company’s technical personnel. If this behavior occurs, the loss caused by the user shall be borne by the user.
VEVOR has the ultimate right to interpret the document, subject to legal compliance. VEVOR reserves the right to update, modify, or terminate the Terms without prior notice.
Part 4:Installation Steps
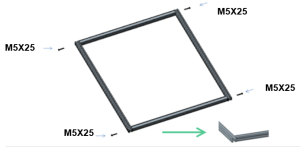
Step 1: Assemble the Frame
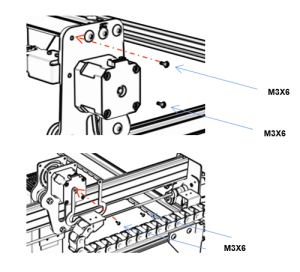
Step 2: Install the X-axis Assembly
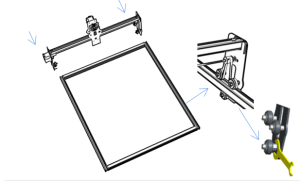
If installation is difficult, adjust the offset wheel.
The guide rail passes through the middle of the 3 rollers. Adjust the distance between the upper and lower guide wheels.
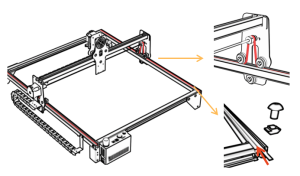
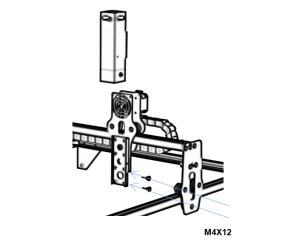
Step 3:Install the support foot assembly and the Y-axis tank chain
After assembly, if you find that the four feet are not aligned, please slightly loosen the screws of the support feet. After the four feet are aligned, tighten the screws again.
Step 4:Install the X-axis tank chain
Step 5:Install the timing belt
Using M5 × 6 T-shaped combination nut locking with belt
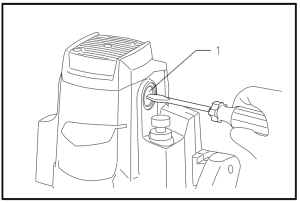
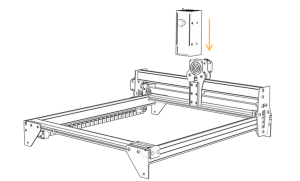
Step 6:Step 6.1:Laser installation (for 5W and 10W models)
Step 6.2:Mounting laser (for 20W)
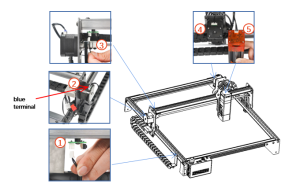
Step 7:Install the cable
Step 8:Adjust the eccentric wheel
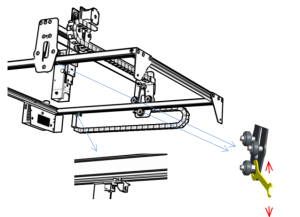
Use a wrench to turn the eccentric nut to adjust the tightness of the guide wheel and the guide rail
TIPS: How to determine the tightness of eccentric nuts?
To ensure that the bracket does not shake, you can lift one end of the machine to an angle of 45 degrees with the horizontal plane and release the X-axis or Y-axis bracket from a high place. The tightness is suitable if the bracket can slide at a constant speed to the end.
Part 5:Control box description
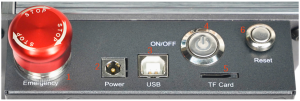
- Emergency stop switch: In emergencies, pressing the emergency stop switch immediately stops the machine. When you need to unlock it, turning the button clockwise restarts the engraver.
- Power socket: DC 12V power supply(A7),DC 24V power supply(G3).
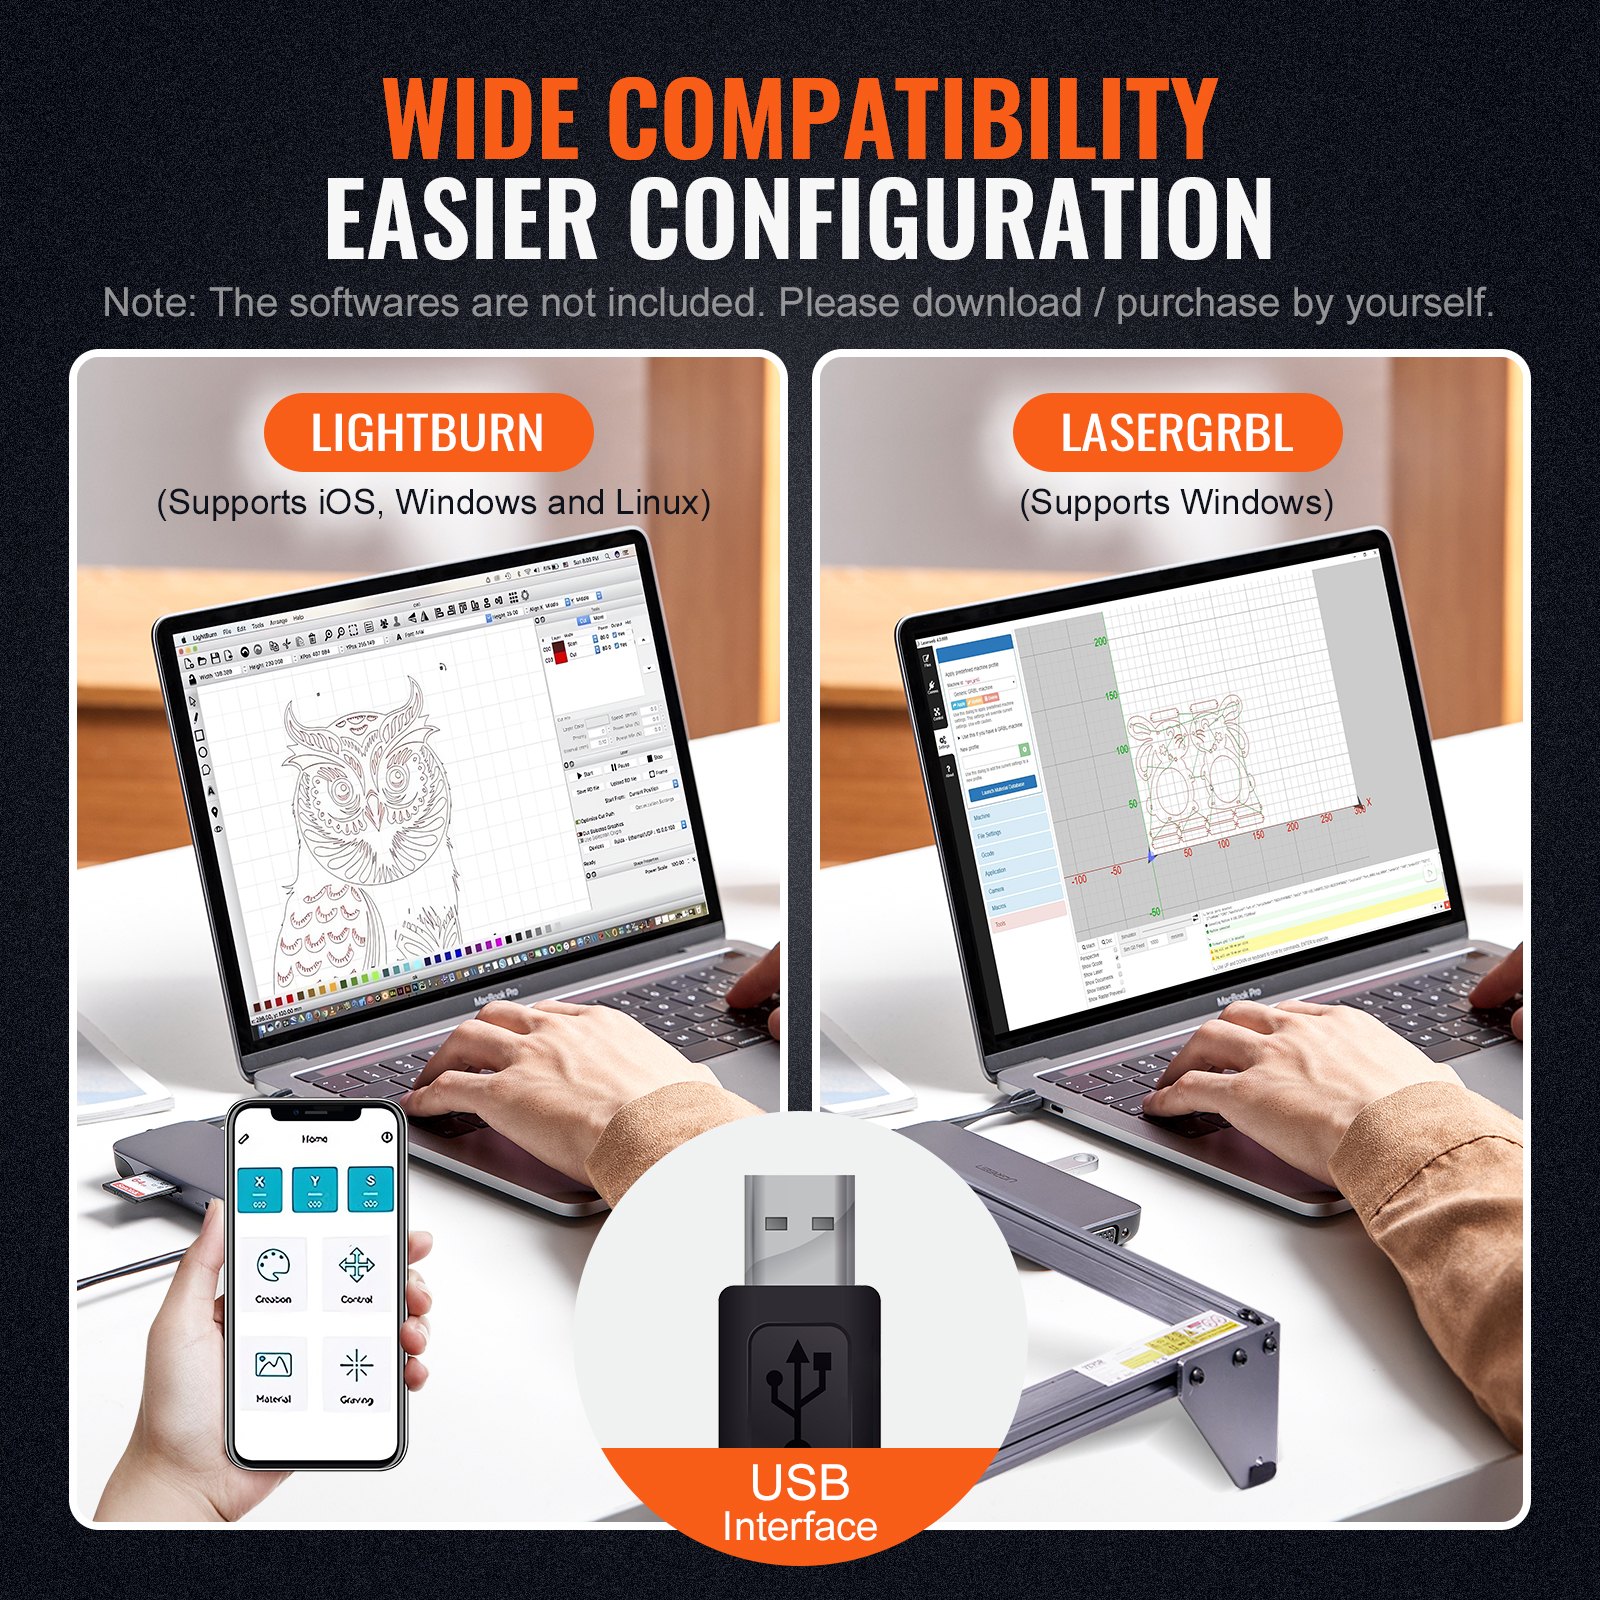
- USB interface: control the engraver on the computer by connecting to the computer through a USB cable.
- Power switch: control the power on and off.
- The TF card slot is where you insert the TF card (you need to purchase it yourself).
- Reset switch: When the machine is stuck in an emergency, press the reset button to restart the engraver.
NOTE: Before use, please make sure that the emergency stop switch is in the up state.
Instructions for exporting nc and gc format files
LaserGRBL Software
- Import the picture to be engraved or cut into laserGRBL. After setting the engraving speed and energy parameters etc., click File, and select Quick Save.
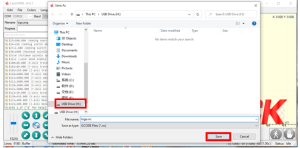
- Select TF card as the save path, click Save to generate nc file.
Lightburn software
- Import the picture to be engraved or cut into Lightburn. After setting the engraving speed and energy parameters etc., click Save Gcode.
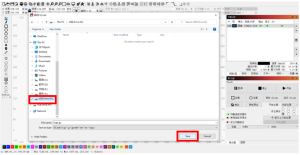
- Select TF card as the save path, click Save to generate gc file.
Part 6:Software installation and use
- Downloading LaserGRBL software
- Installing LaserGRBL
- Adding custom buttons
- Connect laser engraving machine
- Setting Engraving Parameters
- Laser focus adjustment
- Positioning
- Start, Termination carving or cutting
- LightBurn Installation Tutorial
1. Downloading the LaserGRBL software
LaserGRBL is one of the most popular DIY laser engraving software programs in the world. LaserGRBL download website:
2. Installing LaserGRBL
Double-click the software installation package to start the software installation, and keep clicking Next until the installation is complete.(Picture1)
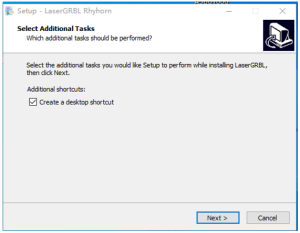
Picture 1: LaserGRBL software installation
3. Adding custom buttons
The software supports users to add custom buttons, You can add custom buttons in the software according to your usage. We recommend the official Custom Buttons from LaserGRBL.
Custom button download address: http://lasergrbl.com/usage/custom-buttons/. The downloaded custom button is displayed in the figure. (Picture2)
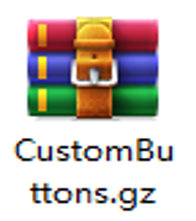
Picture 2:custom button package
Next, we will load the custom buttons into the LaserGRBL software. In the LaserGRBL software, right-click on the blank space next to the bottom button (as shown in Picture 3) -> Import custom button, then select the custom button zip file downloaded to import, keep pressing Yes (Y) until no window pops up. (Picture 4、Picture 5)
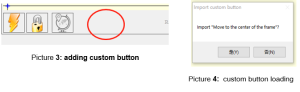
The installed software is shown as the following figure.
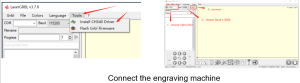
4. Connect the laser engraving machine
- Connect the engraver to a computer with LaserGBRL software installed.
- Plug in the power supply of the engraving machine
- Open the LaserGRBL software
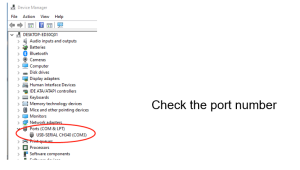
- Select the correct port number and baud rate in the software – 115200, (in general, COM ports do not need to be selected manually, but if you have more than one serial device connected to the computer, it needs to do so, you can find the port of the laser engraver in the device manager of the Windows system, Or you can simply try the port numbers displayed one by one).
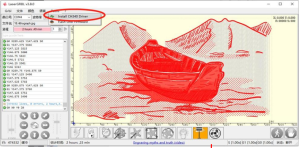
- First, install the CH340 Driver. In the LaserGRBL software, click “Tools”>”install CH340 Driver” to install the driver, and restart the computer after installation to connect.
- Click on the lightning connection logo in the software. When it changes to a red X, the connection is successful.
- If the computer and engraving machine chain machine encounter failure, you need to update the drive. The method is as follows
- In LaserGRBL, click “Tools” > in turn. Install CH340 Driver. Update and install the Driver, restart the computer after the update, and then connect, as shown in the picture below.
5. Setting engraving parameters
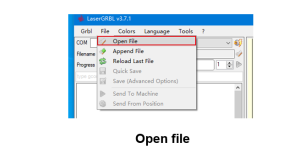
Select the engraving file.
Open LaserGRBL software, click “File”> “Open File”, then select the graphics you want to engrave. LaserGRBL supports NC, BMP, JPG, PNG, DXF, and other formats.
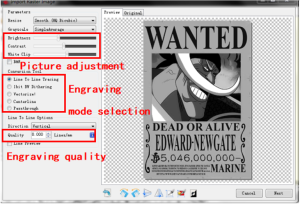
Picture parameters, engraving mode, and engraving quality settings
a. LaserGRBL can adjust the sharpness, brightness, contrast, highlight, and other attributes of the target picture. When adjusting the picture parameters, the factual effect will be shown in the right preview window. There is no standard here; just adjust the effect you want.
b. Engraving mode usually chooses “line-to-line tracking” and “1-bit dithering.” 1-bit dithering is more suitable for engraving grayscale graphics. If you will cut, select the vector graphics or centerline engraving mode.
c. Engraving quality essentially refers to the line width of the laser scan. This parameter mainly depends on the size of the engraving machine’s laser spot. It is recommended to use an engraving quality of 8. The response to laser illumination varies among different materials, so the exact value depends on the specific engraving material.
d. At the bottom of the preview window, the image can be rotated, mirrored, cut, etc., operations.
e. After completing the above settings, click next to the carving speed, carving energy, and carving size settings.
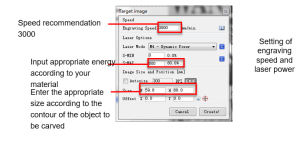
Introduction of the Setup Interface
Engraving speed, engraving energy, and engraving size Setting
a. The recommended engraving speed is 3000; after repeated experiments, this is the best value for the engraving effect. Of course, you can increase or decrease the speed according to your preference; a faster speed will save engraving time, but it may reduce the engraving effect. Slower speed is the opposite.
b. When selecting the laser mode, there are two commands for the laser: M3 and M4. It is recommended to use the M4 command for 1-bit letter engraving and the M3 command for other cases. If your laser only has M3 instructions, please check whether the laser mode is enabled in the GRBL configuration. Please refer to the official instructions of LaserGRBL for GRBL configuration.
c. Choose the engraving energy according to different materials,
d. Finally, set the size you want to engrave, click on the “Create” button, and all the engraving parameters have been set.
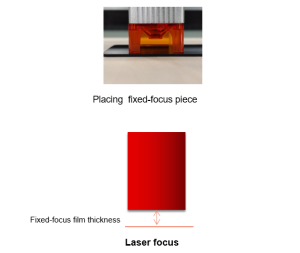
6. Laser focus adjustment
The effect of engraving or cutting largely depends on whether the laser is focused. Most of the existing laser engraving machines on the market use zoom lasers. To observe whether the laser is focused, you must turn the focus nut while staring at the laser spot. Staring at the laser spot for a long time can hurt your eyes (even with goggles), and it is difficult to distinguish small changes in focus, so it is difficult to find the best laser focus.
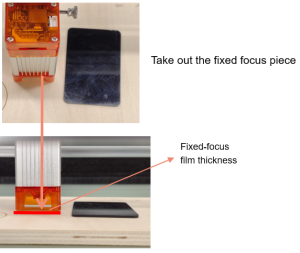
To solve this problem, we abandoned the traditional zoom laser and installed a fixed-focus laser on our engraving machine. The focus is on the thickness of a fixed-focus film of the laser attached to the package. When using, only need to adjust the laser.
The following is the specific operation:
a. Move the laser head to the object to be engraved or cut.
b. Place a fixed focus film on the object to be engraved or cut. The focal distance of different power lasers is 5W 2mm,10W 3mm, and 20W 4mm.
c. Secure the laser with two screws to the right of the machine’s slider and allow the laser to slide freely until it touches the prime focus.
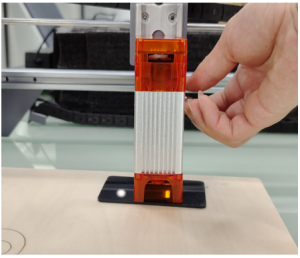 d. Tighten the two screws securing the laser to the right side of the slider.
e. Take out the fixed focus piece and finish focusing
7. Positioning
a. The engraver does not know where to engrave, so before you start engraving, there is an important task which is positioning. We will complete the positioning operation in three steps.
b. Select the “Move to Center” button, the laser will move to the pattern’s center, and the engraving will be placed below the laser.
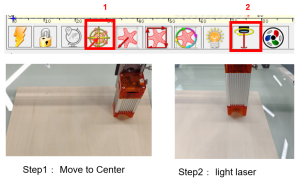
c. Click the “light laser” button. The laser will emit a weak light. The irradiation point of the laser is the center of the engraving pattern. Based on this, adjust the position of the engraved object!
d. Click the “Profile Scan” button. The laser will start to scan the outer contour of the pattern on the computer. You can change the position of the engraved object again according to the scanned outer contour position. Besides, you can click on the “wrap-around” button several times until the outer contour is at the position you want to engrave.

8. Start, Termination, carving or cutting
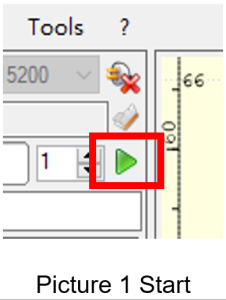
Start
After finishing all the above operations, click the green button, as shown in the figure, to start engraving. Next to the start button, there is a number that can be edited.
It is the number of times the engraving or cutting is performed. LaserGRBL allows multiple consecutive engraving or cutting of uniform shapes, which is especially useful for cutting.
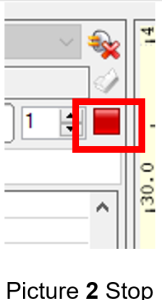
Termination
If you want to terminate the job midway, click the terminate button as shown in the picture to terminate the engraving or cutting.
9. LightBurn Installation Tutorial
We can download the installation package from the LightBurn website: https://lightburnsoftware.com/
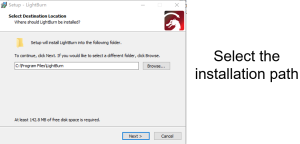
Double-click on the installation package to install and click “Next” in the pop-up window.
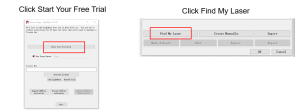
(Note: LightBurn is a paid software. For a better experience, we recommend you buy the original one. Here we will demonstrate the installation of the trial version.
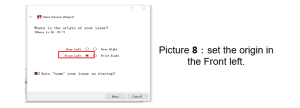
To set the origin, we usually set it in the front left.
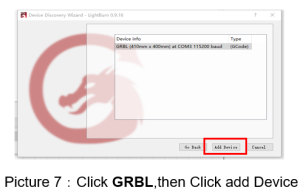
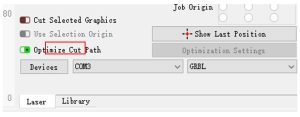
If the computer cannot be connected to the machine, we can try to select different ports of the laser engraving machine, as shown in the image below. If it still doesn’t work, don’t hesitate to get in touch with our customer service.
Part 7: Techniques for using machines
- The closer the laser is to the table, the less stable the structure will be. When using the laser, try to elevate it as far away from the table as possible.
Precise positioning of the pattern and the engraved object.
a. Move the laser to the lower left of the frame.
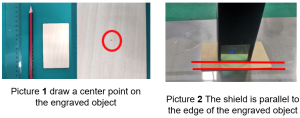
b. Using a ruler and pencil to draw a center point on the engraved object(Picture 1.)
c. The shield must be parallel to the edge of the engraved object(Picture 2)
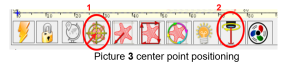
d. Click on the following two buttons in sequence to move the laser so that the laser point moves to the center of the engraving. Once the positioning is complete, you can start engraving.
Part 8: Maintenance instructions and warning
This product uses a highly integrated design and requires no maintenance. However, if the laser system installed with this product needs to be repaired or adjusted, please:
1. Unplug the power connector on the laser, so that the laser is in a state of power failure;
2. If you need laser assistance for adjustment, please:
- All present personnel wear protective glasses, OD5+ protective glass is needed;
- Make sure there are no flammable or explosive materials around.
- The position and direction of the laser are fixed to ensure that the laser will not accidentally move and shine on people, animals, flammable, explosive, and other dangerous and valuable objects during debugging.
- Don’t look at lasers
- Do not shine the laser on the mirror object, lest the laser reflection cause accidental injury.
3. Laser module cleaning
After a period of utilization, the laser module will retain some remains at the protective cover, heat sink, and laser head. The remains need to be cleaned in time so that they do not affect the module’s use.The windshield and protective cover must be removed before cleaning.
Part 9: List of accessories
- Instruction manual *1
- Eye protection glasses *1
- USB communication cable *1
- Clean the brush *1
- Try small wooden boards *3
- Try small acrylic plates *3
- Determine the focus block *1
- Open-end wrench *1
- Screw-bag *7 (M5×25mm*4PCS、M5×8mm*4PCS、M5×15mm*7PCS, (M5×6mm*4PCS、 M3×6mm*8PCS、 M4×12mm*2PCS)
- Dust-free cloth *1
- Cable ties *10
- H3 hexagonal L-shaped wrench*1
- H2 hexagonal L-shaped wrench*1
- H2.5hexagonal L-shaped wrench*1
- Air-assisted pumps *1 (A710W and G3 models only)
- Rotary Roller User Manual *1(Only available on A710W+Roller and G3+Roller models)
Part 10: Precautions for common problems
- Please select the correct COM port for connecting the software and equipment, and the baud rate should be selected: 115200, to ensure that the connection between the computer port and the USB cable is not loose. If you need laser assistance for tuning, please:
- Before engraving, please confirm whether each mechanism is loose (synchronous belt, eccentric column of roller, and laser head are loose or shaken)
- Correctly adjust the focus and confirm that the distance from the end of the laser protective cover to the engraving is Fixed-focus film thickness.
- LaserGRBL/LightBurn software can refer to the parameter table in the corresponding manual for engraving and cutting different materials. Engraving mirror metal requires manual surface blackening treatment.
Address: Baoshanqu Shuangchenglu 803long 11hao 1602A-1609shi Shanghai
Imported to USA: Sanven Technology Ltd., Suite 250, 9166 Anaheim Place, Rancho Cucamonga, CA 91730
Made in China
Recommended For Your Project
VEVOR Laser Engraver, 10W Output 15.7" x 15.7" Manual

Reviews
There are no reviews yet.