Unlock the full potential of your VEVOR FR-770 Continuous Band Sealer with our comprehensive and easy-to-follow product manual. Designed to provide an in-depth understanding of your Automatic Band Sealer with Digital Temperature Control, this manual is your go-to resource for seamless setup, effective troubleshooting, and optimal performance.
Whether you’re a seasoned user or new to the VEVOR FR-770, our manual covers everything from initial assembly to advanced operation tips, ensuring you get the most out of your horizontal band sealer.
Download now to access step-by-step instructions, detailed diagrams, and expert advice to enhance your sealing experience and maintain your equipment in peak condition.
Continuous Band Sealer Operation Manual
Use
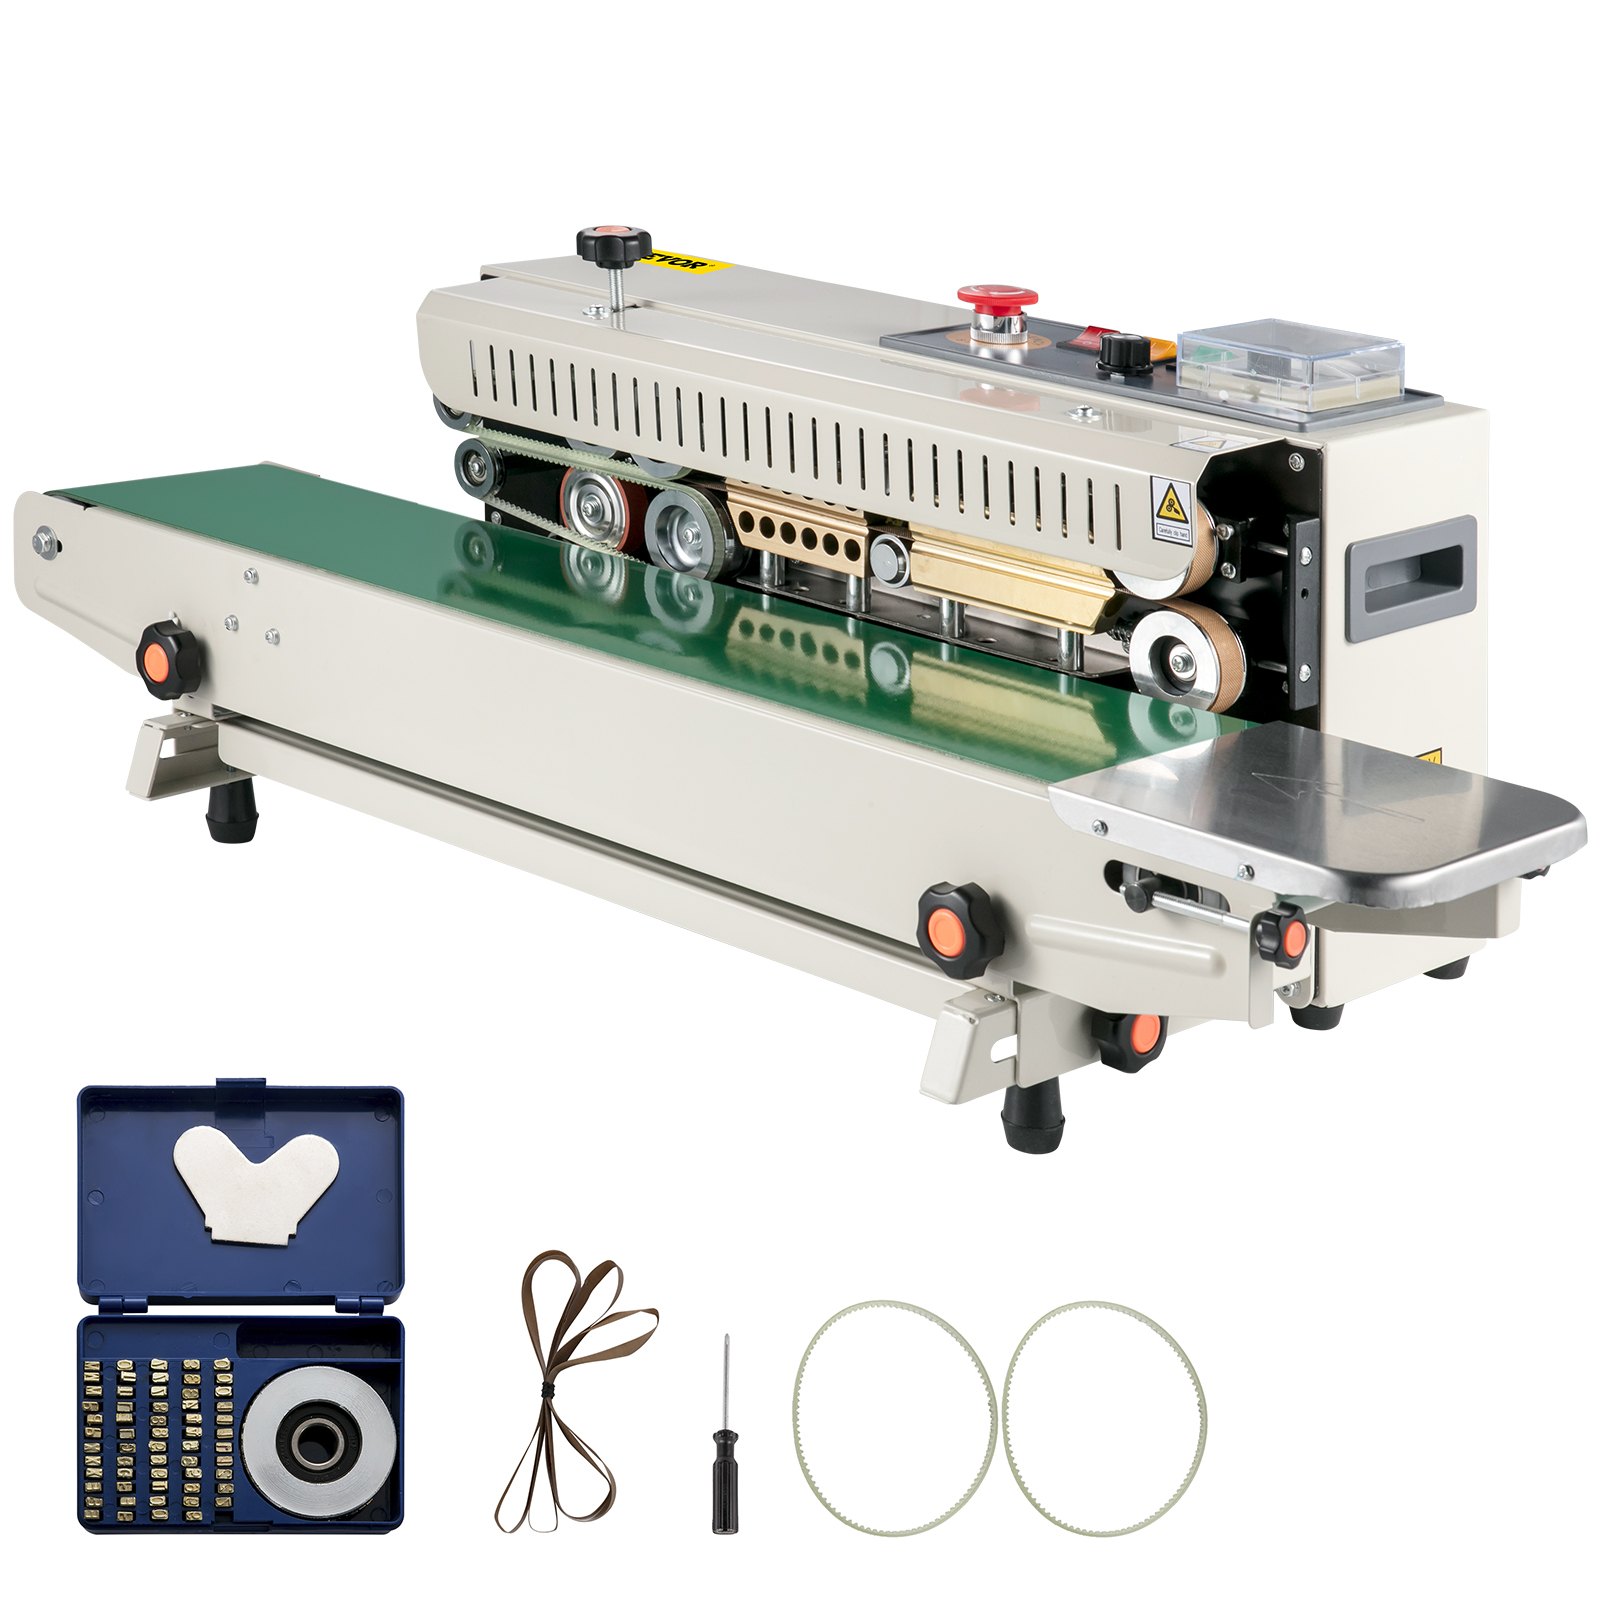
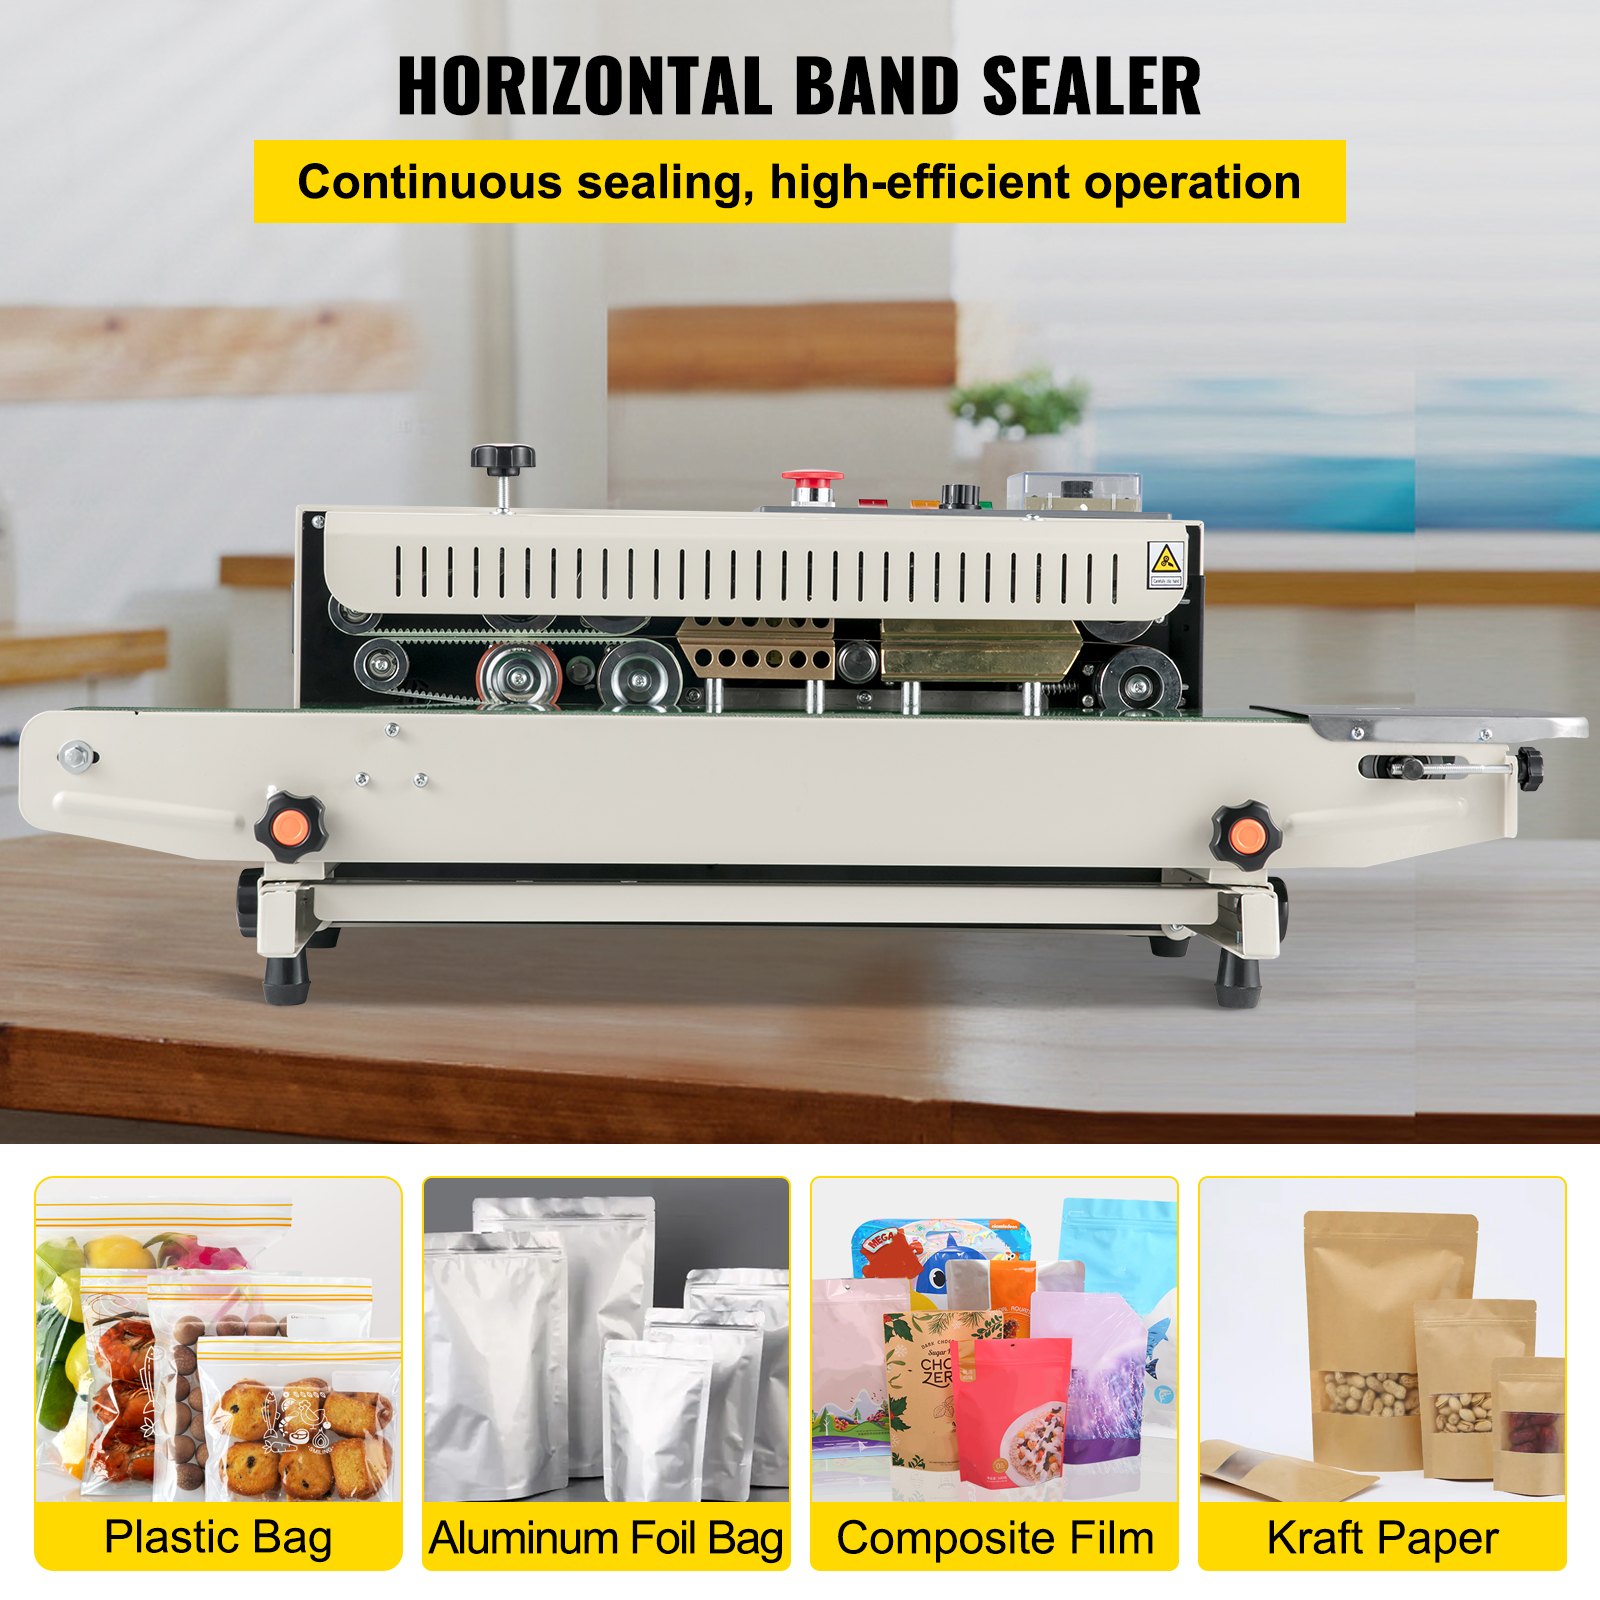
This band sealer is suitable for sealing all kinds of plastic films. It is widely used in food, medicine, cosmetics, daily use, and vegetable seeds. It is the best sealing equipment for packing batch products from factories and shops.
Security advice
- Make sure that the adopted power supply is correct (the machine adopts AC 220V/50Hz, and the yellow and green wire is a leakage protection ground wire, which can not be removed, and the power line should be prevented from pressing, please tidy away when it is not in use.
- After the powder has been connected, do not touch any electric device.
- When the machine is operating, do not touch any transmission parts, which may cause injury.
- When the machine is operating, do not touch both heating blocks and the ink roller heating block.
- Do not operate the continuous band sealer in a corrosive environment.
- Do not change any machine parts at will.
- Keep the machine clean both inside and outside, and clear dirt from the sealing belt in time.
- Fill and exchange oil in the worm-gear case regularly, and remember to oil the gear and chainwheel (YP7408 semiliquid gear oil).
- Cut off the power supply when the machine is not in use.
- Keep this operation manual near the machine in case there is any need.
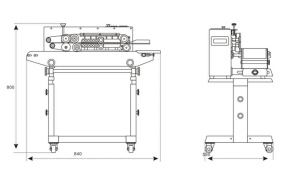
Specifications
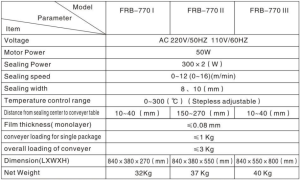
Note: The bag is fed from the right for the FRB-770 Series and from the left for the FR-770 Series.
Band Sealer Performance Features
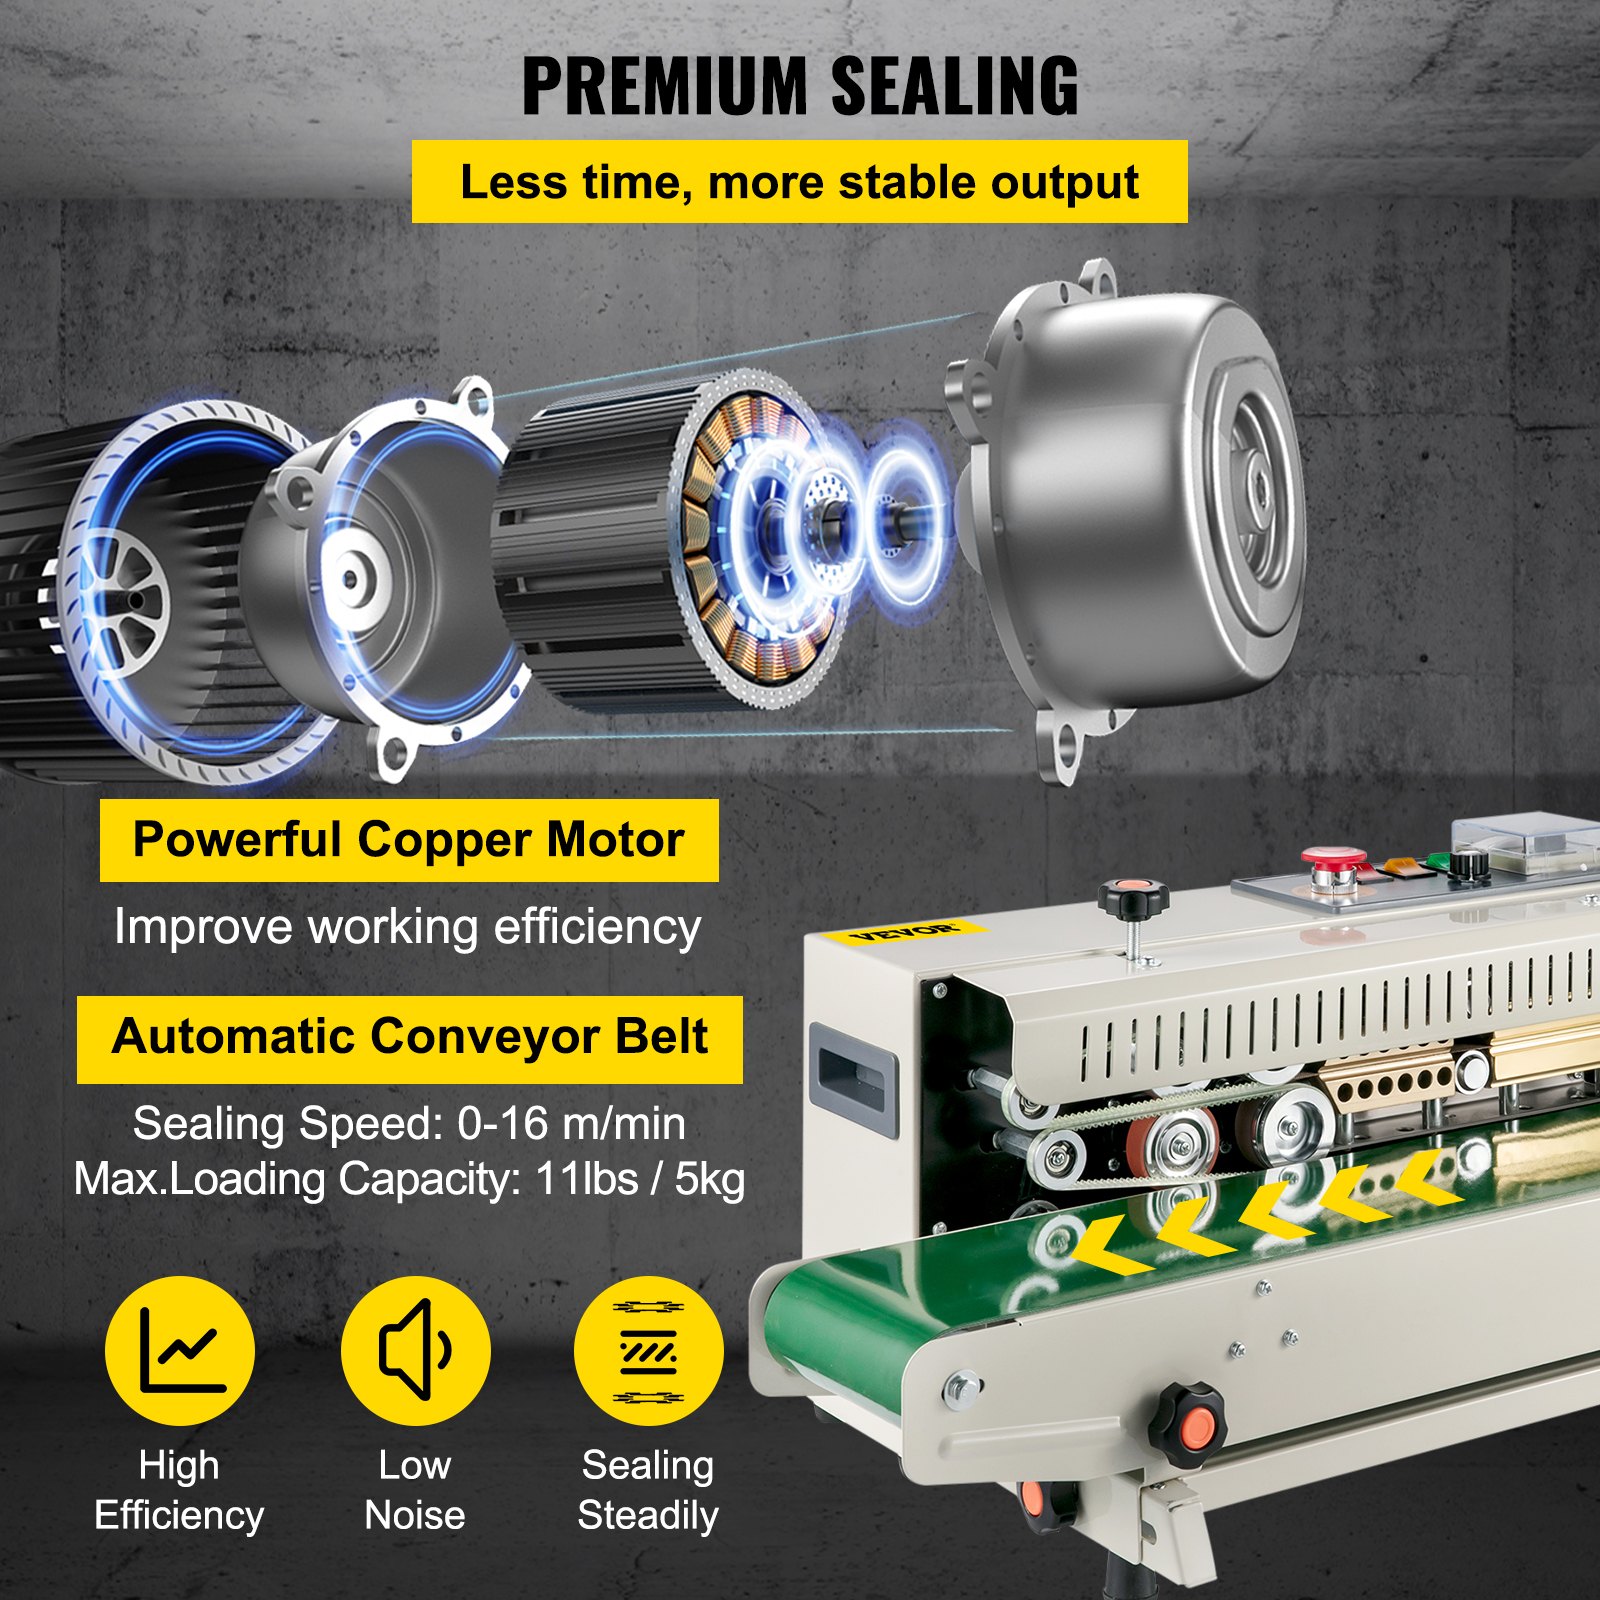
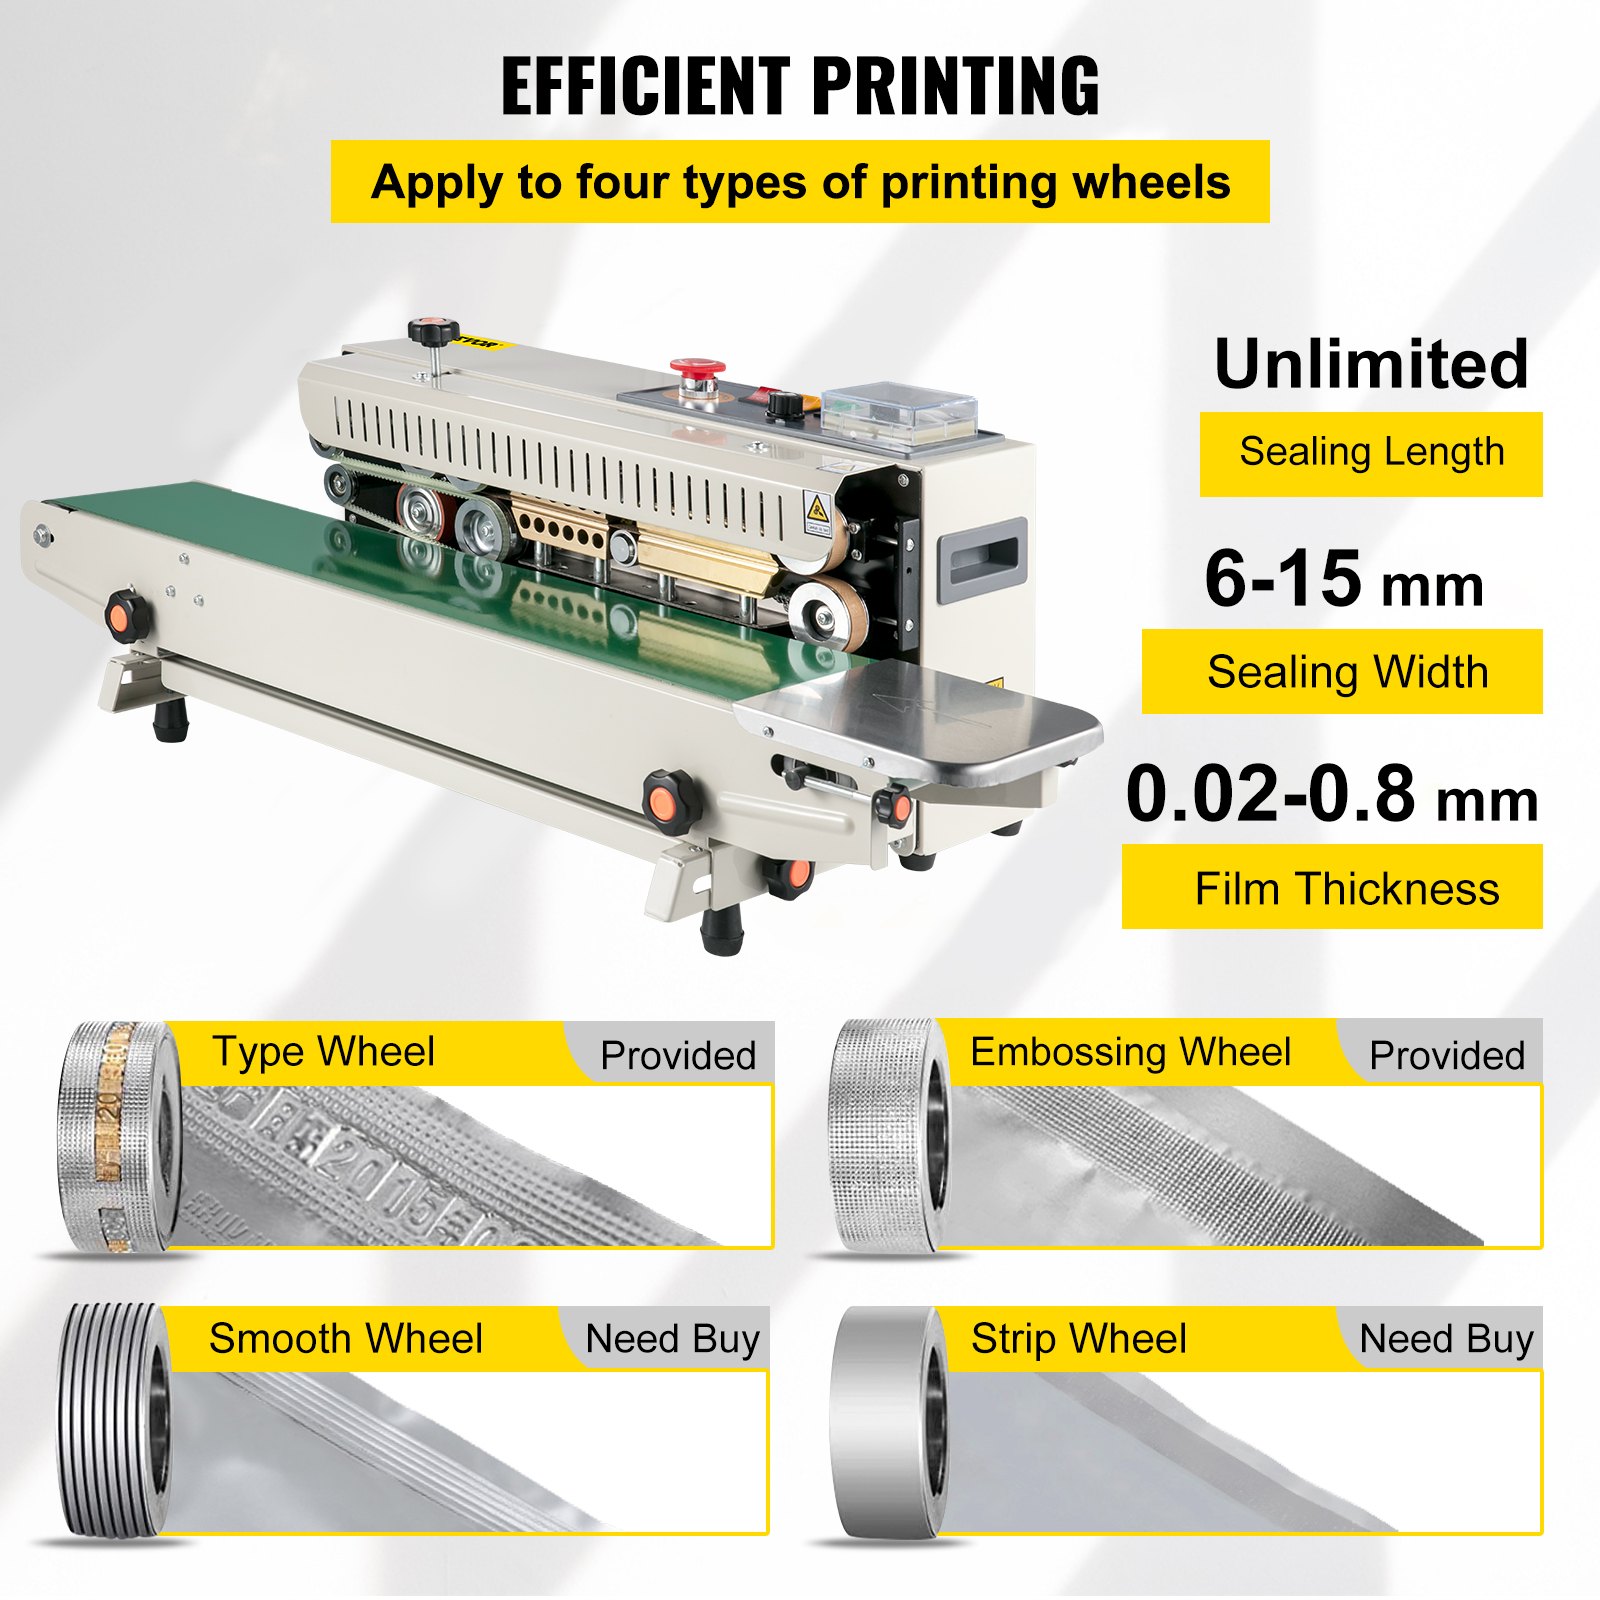
- Adopting an electronic thermostat control unit and a stepless speed-regulation transmission mechanism, this sealer can seal various plastic film bags in different materials and be equipped with varied packaging product lines. The machine has no limitation on sealing length and is characterized by high efficiency in continuous sealing, reliable sealing quality, rational structure, and convenient operation.
- This series provides three models: horizontal, vertical, and console. The horizontal type is suitable for packing and sealing dry materials, while the vertical type is suitable for packing materials in powder or liquid form.
Structure & Working Principle
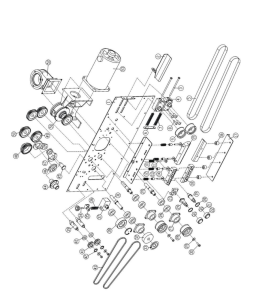
This continuous band sealer is made up of a rack, speed-adjusting mechanism, sealing temperature control system, transmission, and conveying system, etc. (see following picture)
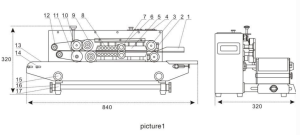
- Feed opening
- Driven wheel holder
- Driven wheel
- Control panel
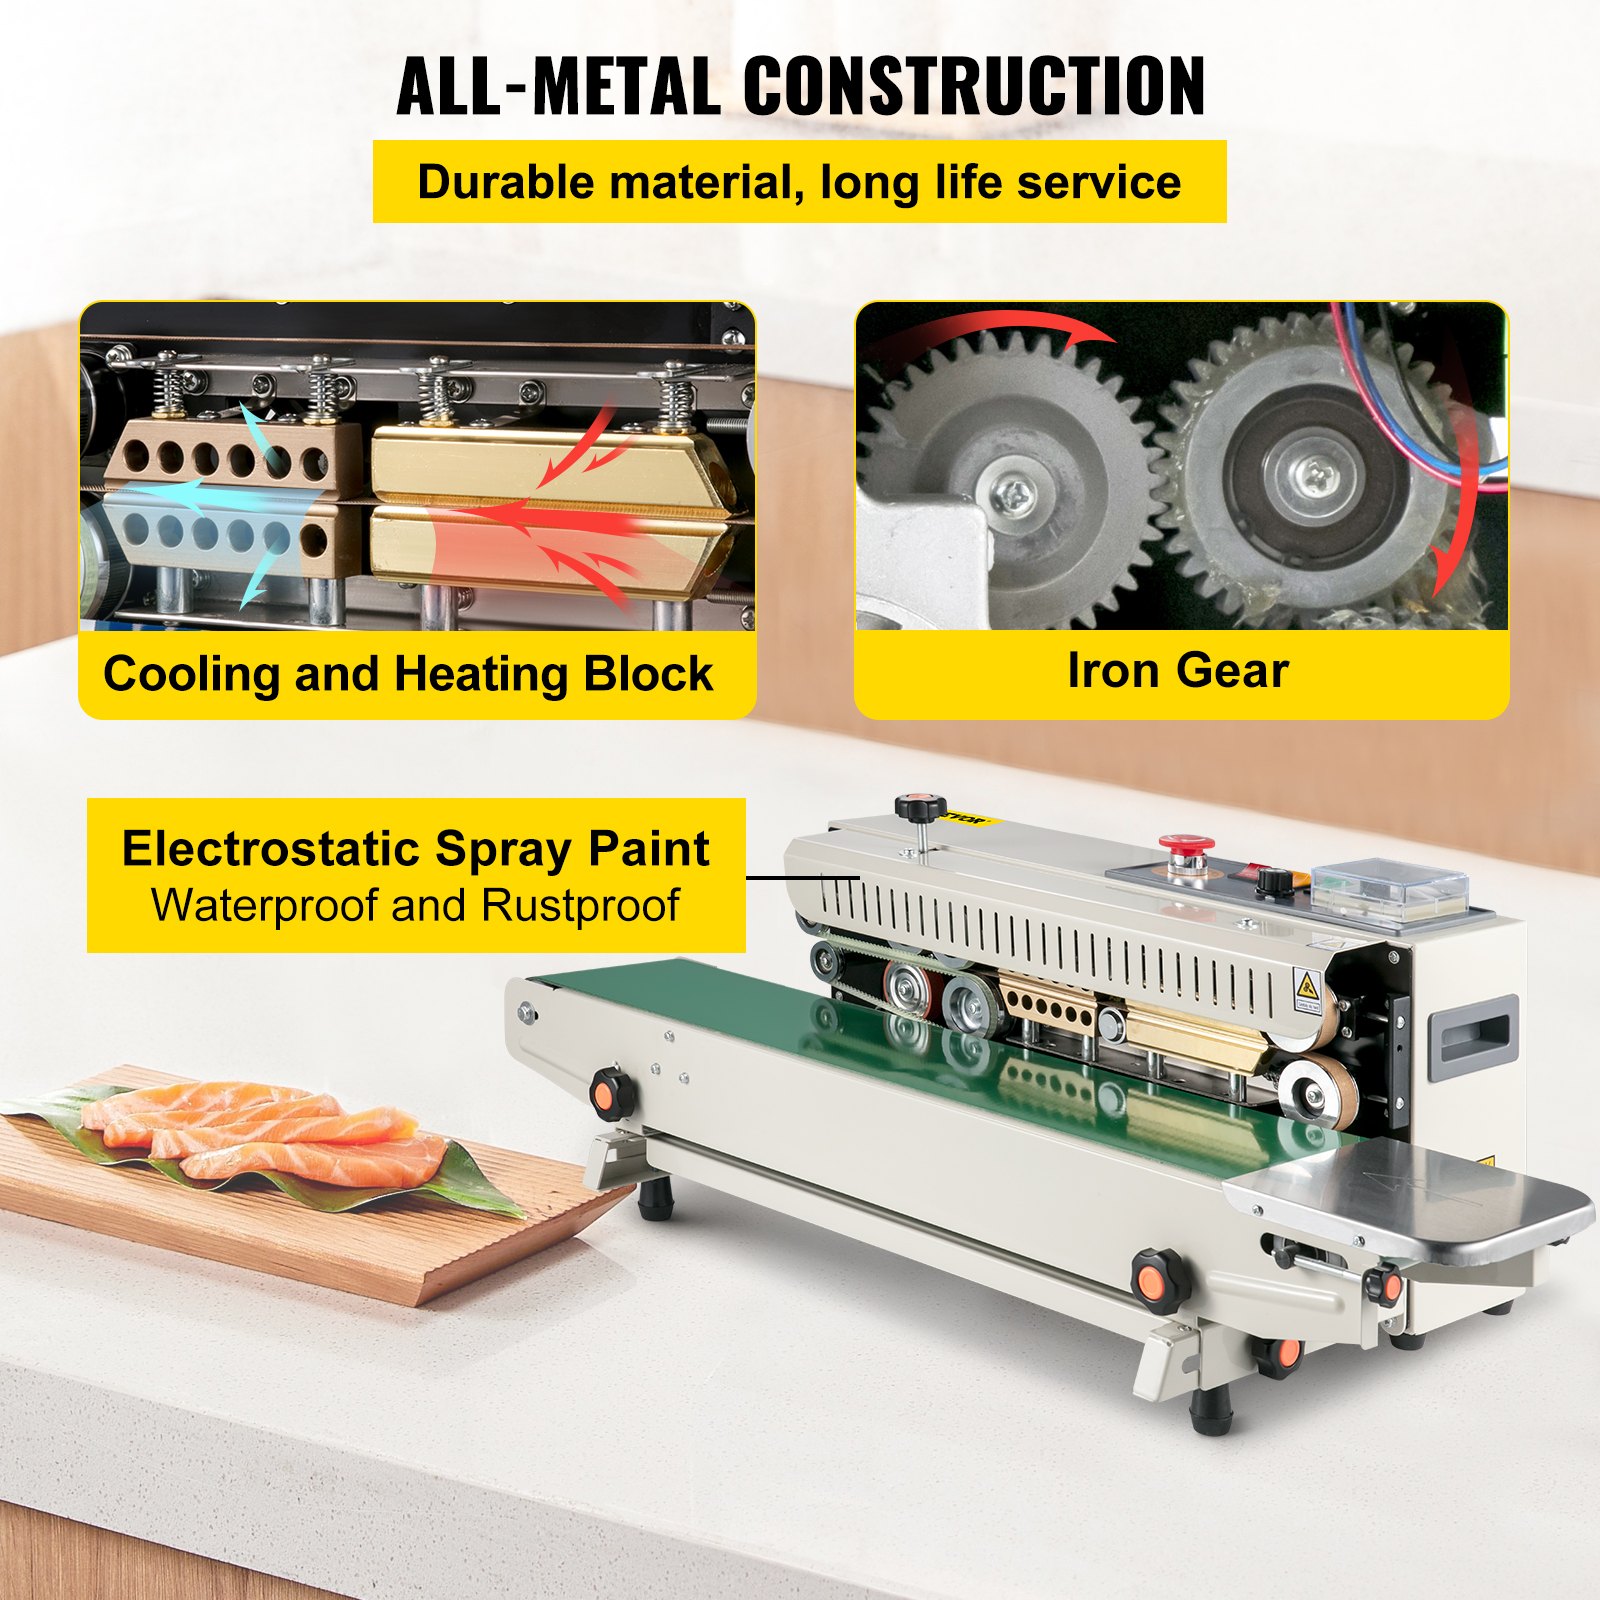
- Heating block
- Holding plate
- Pressing wheel
- Cooling block
- Driving wheel
- Embossing wheel
- Silicone wheel
- Guiding wheel
- Conveyer belt
- Conveyer table
- Fastening knob for lifting the elevating table
- Transverse adjusting knob for conveyer
- Ledge
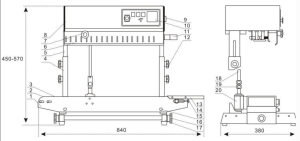
- Conveyer table
- Driving roller
- Conveyer belt
- Fixed bracket
- Slip bracket
- Safety cover
- Adjusting knob for embossing wheel
- Casing
- Air-break switch
- Control panel
- Feed opening
- Fastening knob
- Worktable
- Adjusting knob for conveyer table
- Tightening nut
- Tightening knob for conveyer transverse-adjusting
- Rack
- Vertical shaft
- Gimbal assembly
- Cone gear assembly
Electrothermal elements produce heat after the power supply is connected, leading to a rapid temperature rise of both upper and lower heating blocks. The required temperature and speed can be obtained by adjusting the temperature controller and the speed-adjusting mechanism. A conveying belt transmits the plastic packing bag, and its sealing part is conveyed into the clearance between the two sealing belts.
Two sealing belts clamp and convey the sealing part into the heating area. There, it is pressed by two heating blocks and pressing wheels, which could cause the plastic film to fuse and stick together. After this, it is conveyed into the cooling area for cooling and then pressed by an embossing wheel to make a stripe or netted pattern or to mark a label.
A motor starts the transmission of sealing and printing, which drives sealing belts, guiding belts, and the conveyor belt to work synchronously, making the printing mechanism work intermittently.
VEVOR Continuous Band Sealer Operation Instruction
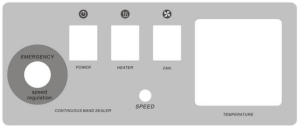
1) Control panel
2. Prepare the machine before use
- This machine has three three-phase grounded sockets; please check that they are well connected to ensure safe operation.
- First-time use or too long an intermission will moisten the electronic heating elements, so several minutes of low-temperature preheating are necessary before normal operation.
- Adjust the conveyor table’s height and horizontal location to get the required sealing position.
- Regulate the position of the feed opening according to the distance from the sealing line to the bag opening.
- Adjust the clearance between the heating and cooling blocks according to the thickness of the material to be sealed. Adjust the clearance between two sealing belts by adjusting the stopping flakes, specifically, turn the stopping flake clockwise to raise the block or counterclockwise to lower the block. The clearance between two sealing belts should be equal to the thickness of the packing bag in one layer, which must guarantee the firmness of sealing and high definition of embossing, and ensure a suitable length extended from the two ends of the sealing part. After adjusting, fix the limiting screws.
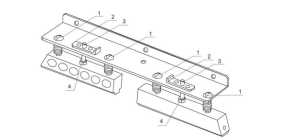
- Screw
- Stopping flake
- Fastening screw
- Nut
- To adjust the transverse of the conveyor table, loosen two nuts (1) on the bottom of the conveyor table. The footrest (2) has three location holes. Insert square head bolts into them as needed, then fasten.
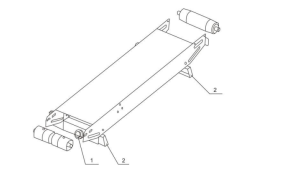
- Adjusting knob
- Foot rest
Ways of exchanging and adjusting the sealing belt
a. Remove the safety cover. After the heating block is cooled, turn the stopping flakes on both the upper heating block and the upper cooling block by 30° to lift both blocks. Then, loosen the springs on the embossing wheel and pressing wheel. Finally, remove the guiding belt to prepare for removing the sealing belts.
b. Move the driven wheel holder (adjusting block), and remove the sealing belt.
c. Replace with a new sealing belt and install the guiding belt back.
d. Return the driven wheel, heating and cooling blocks, pressing wheel, etc., to their original position.
e. Connect the power supply and test the machine, if irregular sealing appears on the belt, you can adjust through adjusting screws on the driven wheel holder (adjusting block).
f. Install the safety cover. When the temperature reaches the set temperature, the machine is ready to work continuously.
3. Starting procedure
- Connect the power supply and startup switch, indicating light will shine, then adjust the speedadjusting knob and all transmission parts start to run synchronously.
- Micro-adjust the knob of embossing wheel to make that wheel swivel, after getting a proper pressure, fix limiting screw.
- Once the heating switch is turned on, the green light of the electronic temperature controller will shine. According to the material and thickness of the packing bag, adjust the temperature controller to the necessary temperature, then set the position of heating knob of ink roller. When the heating blocks and ink roller heating block begin to preheat, the machine needs to be started meanwhile and keeps running at low speed.
- Whether the fan needs to be turned on for cooling depends on the material and thickness of the packing bag.
- Flatten and align the two sides of the sealing film at the sealing opening, then deliver the bag by aligning the bag opening with the feed opening. When the sealing belts grip the bag opening, the bag moves forward automatically. At that moment, please do not push it in or pull it out by force; otherwise, irregular sealing or breakdown will happen.
- If dirt is found on the sealing belt or the heating block, you need to stop the continuous band sealer and clear it.
4. Stop Operation
To prolong the using life-span of the sealer, please remember, before shutting down the machine, you should return the temperature-adjusting knob to 0 position first, then turn on the fan, at this time, the temperature on the indicator begins to fall. The sealing belt should still be in a state of running. Several minutes later, when the temperature drops below 100℃, you can only turn off the fan and the main power supply switch.
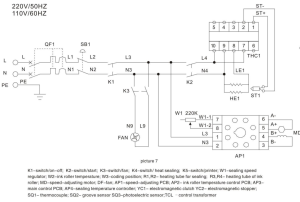
Band Sealer Circuit Diagram
Breakdown Drawing of Machine Body
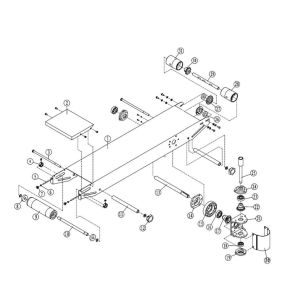
Breakdown Drawing of Conveyor
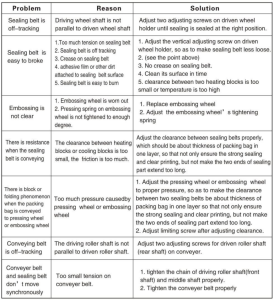
Troubleshooting the Continuous Band Sealer
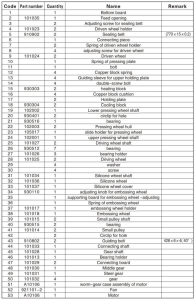
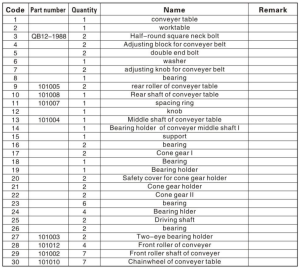
Spare Parts List

Recommended For Your Project
VEVOR FR-770 Continuous Band Sealer (Horizontal) Manual
Reviews
There are no reviews yet.