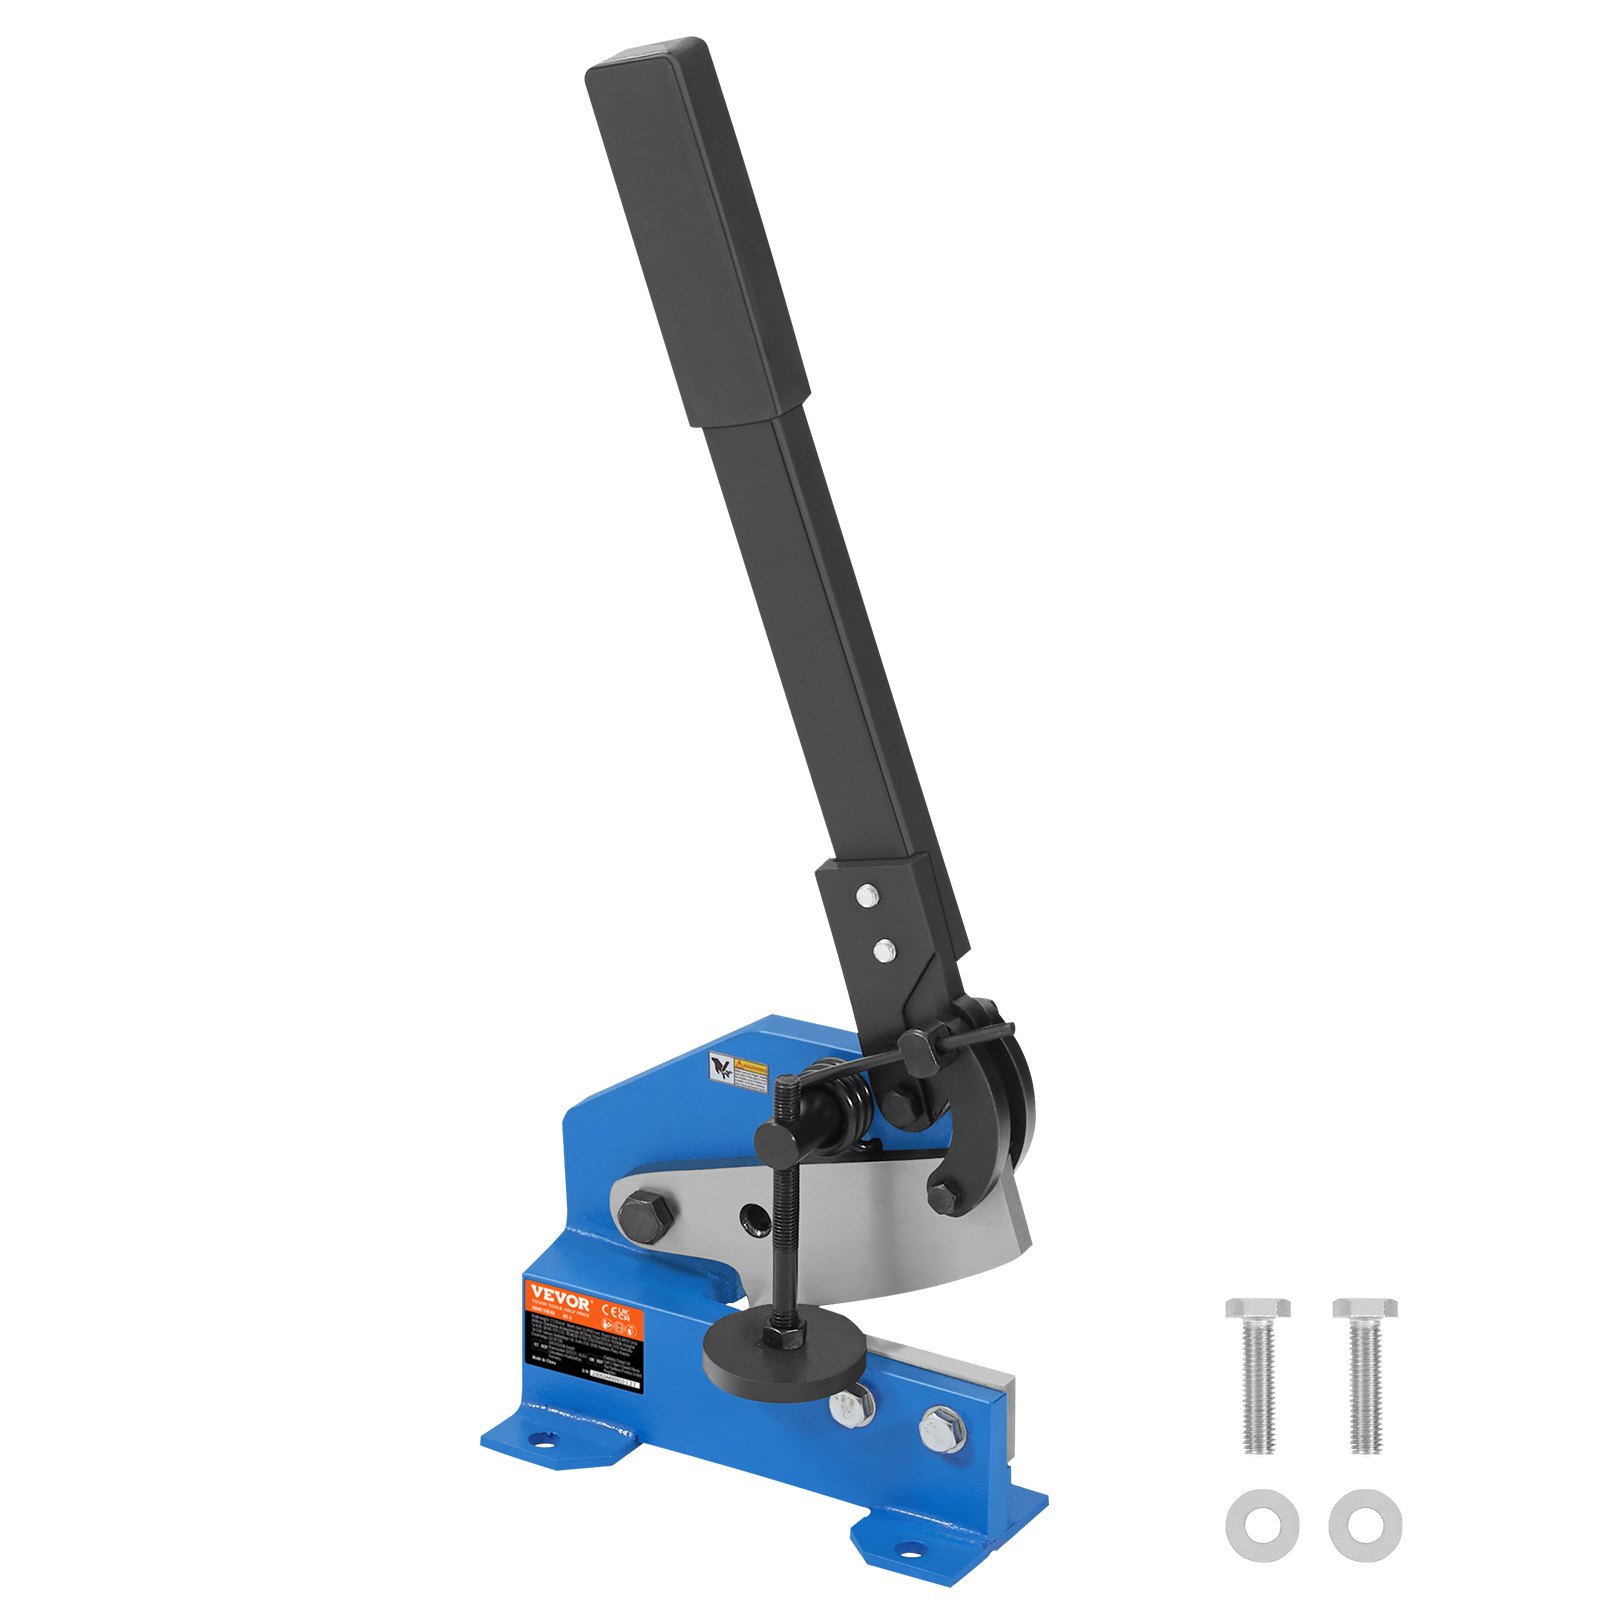


Unlock the full potential of your VEVOR 5″ Manual Hand Plate Shear for Metal Sheet Processing with our comprehensive product manual. Designed specifically for the HS-5 Benchtop Cutter, this guide is your essential companion for mastering the craft of metal sheet processing. This heavy-duty roll press machine is made from durable Q235 material and is perfect for builders and DIY enthusiasts.
Our detailed manual covers every setup, optimization, and troubleshooting aspect, ensuring you get the best performance from your VEVOR plate shear.
Whether you’re a seasoned professional or a hobbyist, this manual provides step-by-step instructions and expert tips to help you achieve precise cuts and efficient operation. Download it today to make your metal crafting projects smoother and more efficient.
MODEL: HS-5/8/12
Unpacking
The Hand Shear is shipped from the manufacturer in a carefully packed carton box. Upon opening the package, thoroughly inspect the product. After unpacking the unit, carefully inspect for any damage that may have occurred during transit.
Check for loose, missing, or damaged parts. Shipping damage claims must be filed with the carrier and are the user’s responsibility.
Specifications
HS-5 Model
- Blade length: ” (130mm)
- Sheet steel: 0.24″(6mm)
- Flat steel: 2.76″x0.24″ (70 x 6 mm)
- Round steel: 0.43″(11mm)
HS-8 Model
- Blade length: 8″ (203mm)
- Sheet steel: 0.24″(6mm)
- Flat steel: 2.76″x 0.24″ (70 x 6mm)
- Round steel: 0.51″(13mm)
HS-12 Model
- Blade length: 12″ (305mm)
- Sheet steel: 0.24″(6mm)
- Flat steel: 2.76″x 0.24″ (70 x 6mm)
- Round steel: 0.51″(13mm)
Standard Accessories

Important
Blades are coated with a protectant. To ensure proper fit and operation, remove the coating. Coating is easily removed with mild solvents like mineral spirits and a soft cloth. Avoid using cleaning solutions on paint, rubber, or plastic parts. Solvents may deteriorate these finishes. Use soap and water on paint, plastic, or rubber components. After cleaning, cover all exposed surfaces with a light coating of oil.
WARNING: Never use highly volatile solvents. Non-flammable solvents are recommended to avoid possible fire hazards.
SAVE THESE INSTRUCTIONS
Thank you for purchasing our HS series Hand Shear. Before attempting to operate your new tool, please read these instructions thoroughly. You will need these instructions for the safety warnings, precautions, assembly, operation, maintenance procedures, parts list, and diagrams. Keep your invoice number with these instructions. Write the invoice number on the inside of the front cover. Keep the instructions and invoice in a safe, dry place for future reference.
General Safety Information
CAUTION: Always follow proper operating procedures as defined in this manual, even if you are familiar with using this or similar tools. Remember that being careless for even a fraction of a second can result in severe
personal injury.
Manual Hand Plate Shear Safety Information
- Wear proper apparel. Do not wear loose clothing, gloves, neckties, rings, bracelets, or other jewelry that may get caught in the machine’s moving parts.
- Wear protective hair covering to contain long hair.
- Wear safety shoes with non-slip soles.
- Wear safety glasses complying with the United States ANSI Z87.1. Every day, glasses have only impact-resistant lenses. They are NOT safety glasses.
- Be alert and think clearly. Never operate tools when tired, intoxicated, or when taking medications that cause drowsiness.
- Keep the work area clean. Cluttered work areas invite accidents.
- The work area should be appropriately lit.
- Keep visitors at a safe distance from the work area.
- Keep children out of the workplace. Make workshop childproof. Use padlocks to prevent any unintentional use of tools.
- Assemble only according to these instructions. Improper assembly can create hazards.
- When tools are not in use, store them in a dry, secure place out of the reach of children. Inspect the tools before storage and before reuse.
- Maintain product labels and nameplates. These carry important safety information.
WARNING: The warnings, cautions, and instructions discussed in this instruction manual cannot cover all possible conditions or situations that could occur. The operator must understand that common sense and caution are factors that cannot be built into this product, but must be used by the operator.
Know How to Use the Manual Hand Plate Shear
- Use the right tool for the job. Do not force a tool or attachment to do a job that was not designed for.
- Keep hands out of the path of shear blades.
- This machine’s maximum capacity is 1/4” mild steel or equivalent. Exceeding capacity may be dangerous to the operator and may damage the machine.
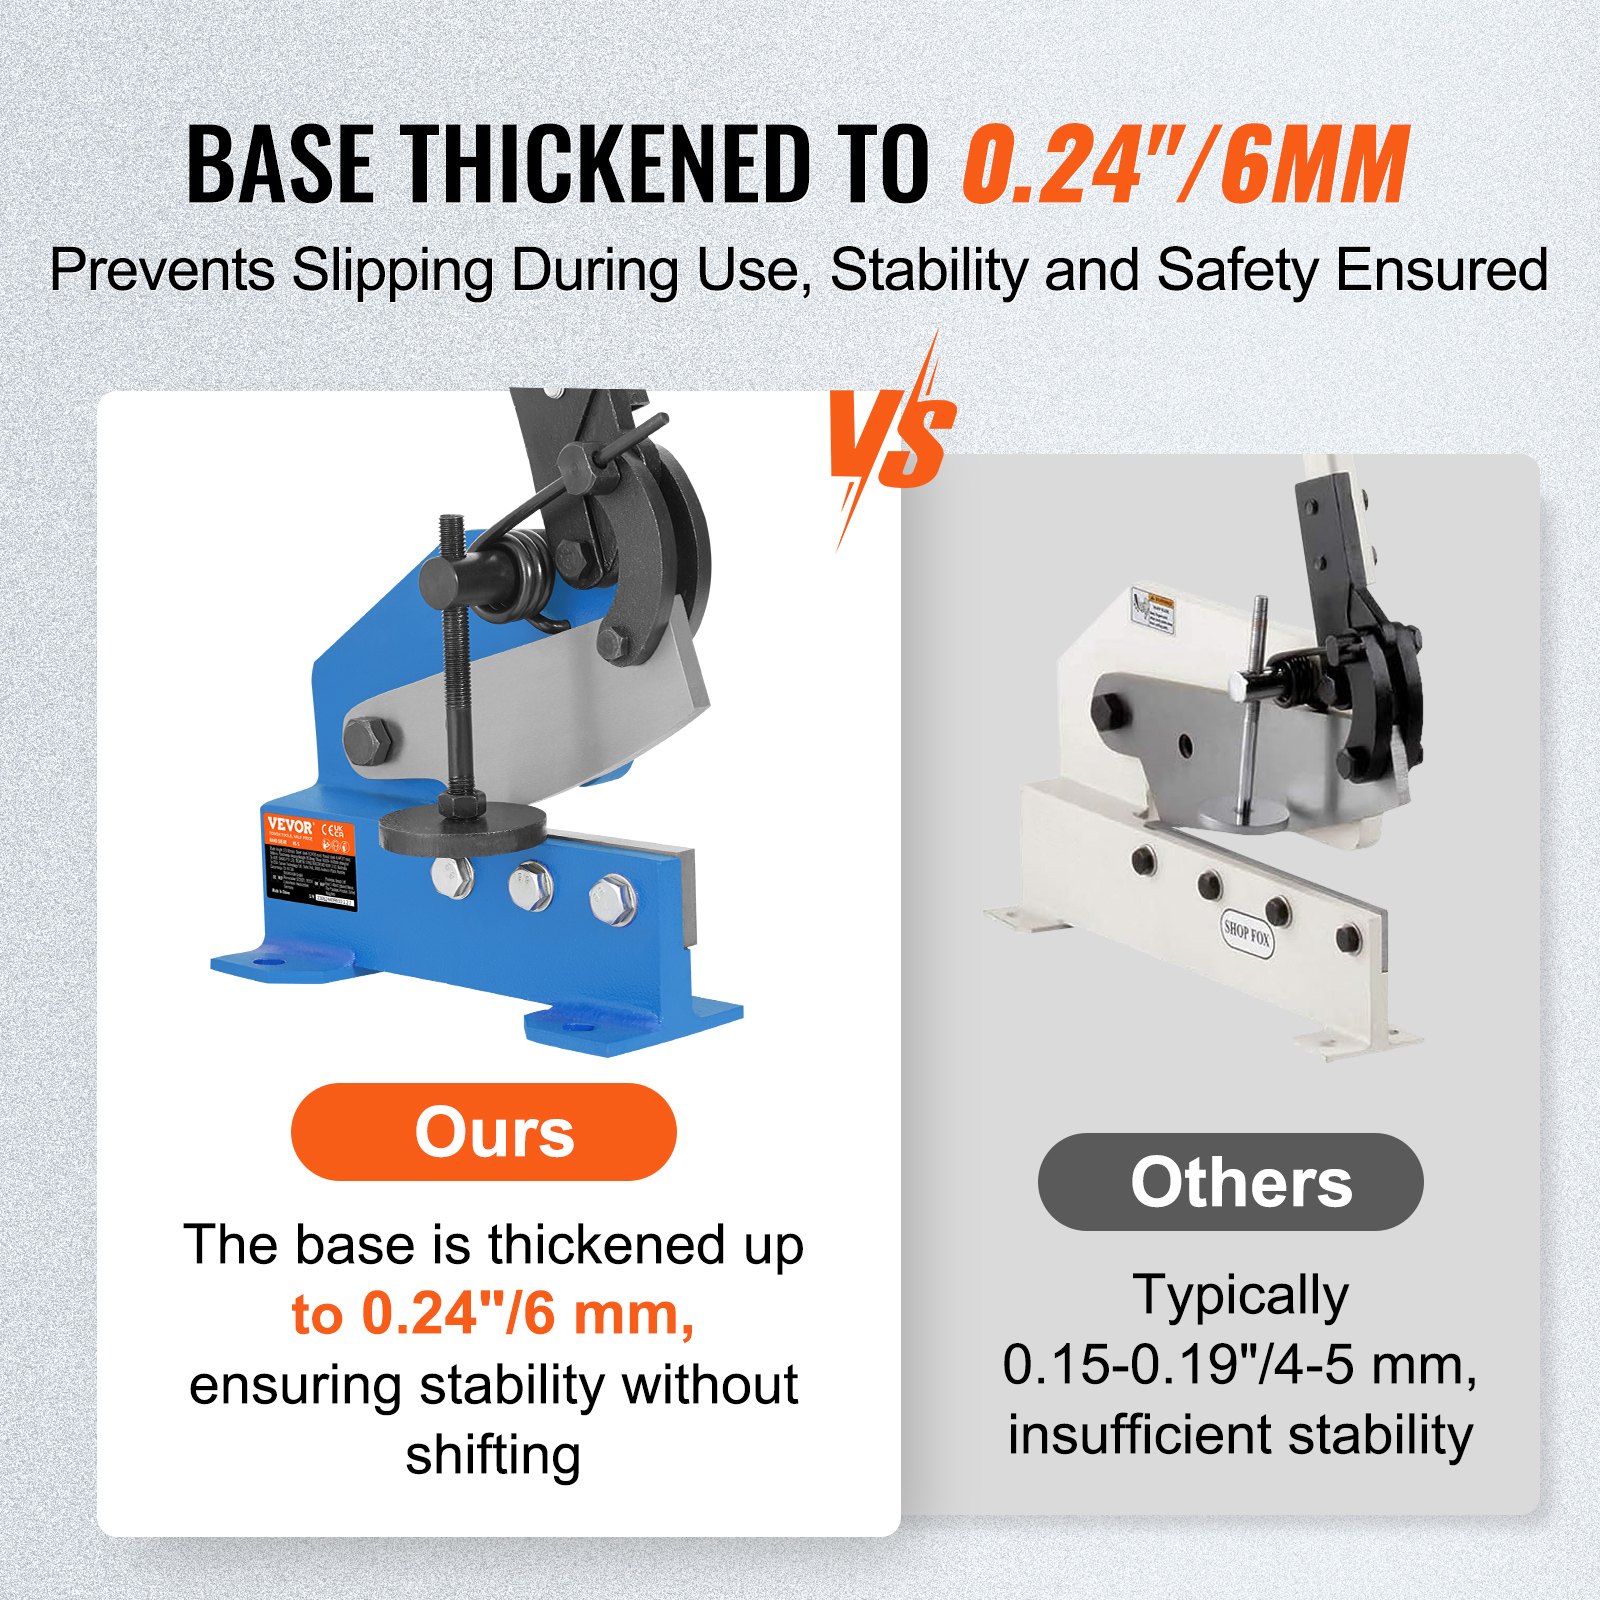
- To prevent the machine from sliding or tipping, bolt it to the floor or a sturdy stand bolted to the floor.
IMPORTANT: DO NOT attempt to shear hardened or stainless steel blocks or rods. You will damage or break your shear blades!
Manual Hand Plate Shear Assembly
Mount Handle
Remove two hex head bolts #15 from pivot arm#12. Mount handle#13 into the groove on the pivot arm. Secure handle with hex head bolts. Tighten bolts securely.
Mount Hold-Down Plate
Insert threaded rod of hold-down plate #1 through the hole in support block #4.
Installation
The machine should be installed on a level surface with proper lighting. The machine can be floor-mounted, stand-mounted, or bench-mounted. Be sure to provide clearance for handlebar rotation. Use four mounting holes on the base to bolt the machine securely to the floor, bench, or stand (fasteners not included). The area around the machine should be clear of scraps, oil, or dirt. Apply a suitable non-skid material to the floor.
Operation
Rotating handle #13 operates the shear. Be sure to keep your hands clear of the shear when rotating the handle—the maximum capacity of themachinesis¼” mild steel.
Shearing Plate and Flat Bars
- Adjust hold-down plate #1 so the workpiece can lie horizontally between the shear blades. Place the workpiece between blades #7 and #20, and underneath the hold-down plate. Adjust the hold-down plate to be positioned at the top surface of the workpiece, with the workpiece held horizontally. Secure the hold-down plate in position by tightening it.
- Support the workpiece between the blades and underneath the hold-down plate at the desired cut position. With both hands, pull handle #13 forward until the blade cuts through the workpiece.
CAUTION: Do not reach into the back of the shear to grasp the fallen piece.
Shear thicker material is done by “snapping” crank handles so that the upper blade impacts the workpiece. The upper blade is mounted at an angle so the workpiece can be sheared in small increments. Approximately 5/8” of the workpiece should be sheared with impact to minimize distortion.
Shearing Round Bars
Round bars up to 7/16” diameter can be cut with shear HS-5/ 6.Roundbars up to 1/2” diameter can be cut with shear HS-8 / 10 / 12. Place bar through holes in the face of upper blade #7 and die #10. Positionbar wherecutis desired and pull handle #13 forward until bar is cut.
Shear Blades
Always keep shear blades lubricated and free of dirt or rust. Abrasive particles on blades will drastically reduce their life. Only a competent grinding service should sharpen these blades according to industry standards.
NOTE: Do not force the shear if the material seems too thick or hard! Instead, use a metal-cutting bandsaw to cut the workpiece.
Maintenance
- Consult the manual for specific maintenance and adjusting procedures.
- For the safest operation, keep the tool lubricated and clean. To prevent rusting, coat all exposed surfaces with light oil.
- Remove adjusting tools. Form a habit of checking to see that adjusting tools are removed before using the machine.
- Keep all parts in working order. Check whether the guard or other parts will operate properly and perform their intended function.
- Check for damaged parts. Check for alignment of moving parts, binding, breakage, mounting, or any other condition that may affect a tool’s operation.
- Check the handle and base mounting bolts to ensure they are tight.
- A guard or other damaged part should be properly repaired or replaced. Do not perform makeshift repairs. (Use the parts list provided to order repair parts.)
Troubleshooting Chart
HS-5/8 Drawing
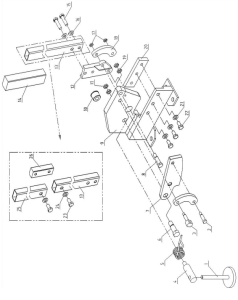
HS-12 Drawing
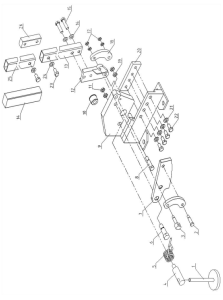
HS-5 Parts List

HS-8 Parts List

HS-12 Parts List

Made in China.
Recommended For Your Project
VEVOR 5" Manual Hand Plate Shear for Metal Sheet Processing, HS-5 Benchtop Cutter Manual


Reviews
There are no reviews yet.