Unlock the full potential of your VEVOR 250Amp MIG Welder with our comprehensive product manual download. This detailed guide is expertly crafted to assist both beginners and seasoned welders in setting up, troubleshooting, and optimizing their welding machine. With step-by-step instructions, clear illustrations, and professional tips, you will effortlessly master the 3 in 1 Welding Machine, capable of handling 220V Flux Core, Gas, and Solid Wire Welding.
The manual covers all features, including the advanced IGBT Inverter and the versatile Digital MIG/Lift TIG/Stick Multiprocess Welder. Whether you need to troubleshoot issues, fine-tune settings, or perform routine maintenance, our user-friendly manual ensures you get the most out of your welding machine.
Download now to streamline your welding projects and achieve professional-quality results with ease.
MODEL: MIG-160 & MIG-200D3 & MIG-250 & MIG-270
Safety Warnings
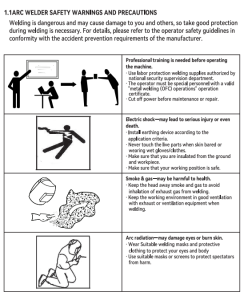
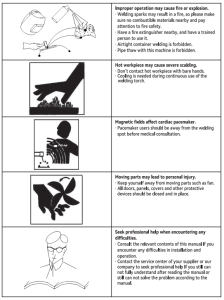
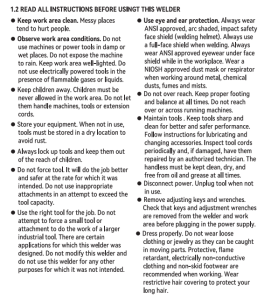
READ ALL INSTRUCTIONS BEFORE USING THIS WELDER.
IMPORTANT SAFETY INSTRUCTIONS
(WARNING: To reduce the risk of burns, electrocution, fire or injury to persons!)
- Do not disassemble the unit except for the authorized serviceman.
- Unplug the unit before filling. Do not exceed the MAX mark.
- Do not touch the socket with a wet hand to reduce the risk of electrocution.
SPECIFICATIONS
The welding machine adopts the most advanced inverter technology, which is suitable for gas welding (solid wire) and gasless welding (Flux-cored wire).
The development of inverter welding equipment profits from developing the inverter power supply theory and components. An inverter welding power source utilises a high-power component, lGBT, to transfer 50/60Hz frequency up to 100kHz, then reduce the voltage and commutate and output high-power voltage. Because the main transformer’s weight and volume were significantly reduced, efficiency increased by 30%.
The appearance of inverter welding equipment is considered a revolution for the welding industry.
Inside the machine is an electronic reactor circuit that can accurately control the electric short transition and blending transition process, resulting in excellent welding characteristics. Compared with another machine, it has the following advantages: stable wire speed, compact body, power saving, no electromagnetic noise, and continuous and stable operation with small current.
It is especially suitable for welding sheets of low-carbon, alloyed, and stainless steel. It has features like automatic voltage pulsation compensation capability, slight sparkle, good arcing, uniform welding pool, and high duty cycle.
Thanks for purchasing the product. We will dedicate to produce the best products and offer the best service.
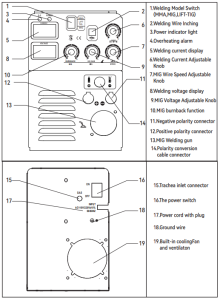
MIG WELDER MACHINE INTRODUCTION
MIG-160/200D3/250/270
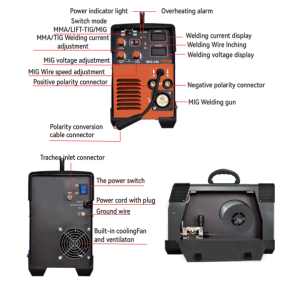
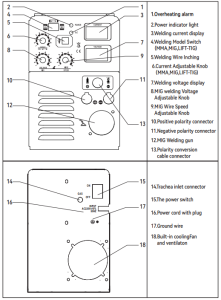
Single-voltage series panel introduction
MMA/LIFT-TIG/MIG
Note: Very important!
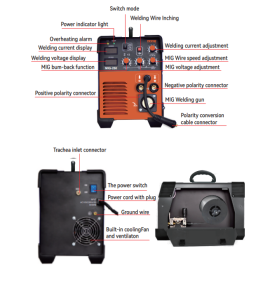
- When using solid carbon steel welding wire, connect the polarity conversion cable connector to the positive polarity connector. Ground wire clamp the negative polarity connector!
- When using the airless self-protective wire connector, connect the polarity conversion cable connector to the negative polarity connection and the Ground wire clamp to the positive polarity connector!
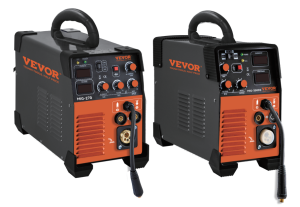
MIG-250/270
Dual voltage series panel introduction
MMA/LIFT-TIG/MIG
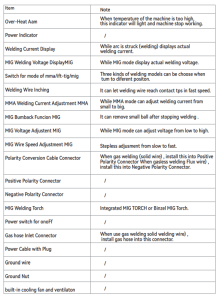
Description For Various Functions
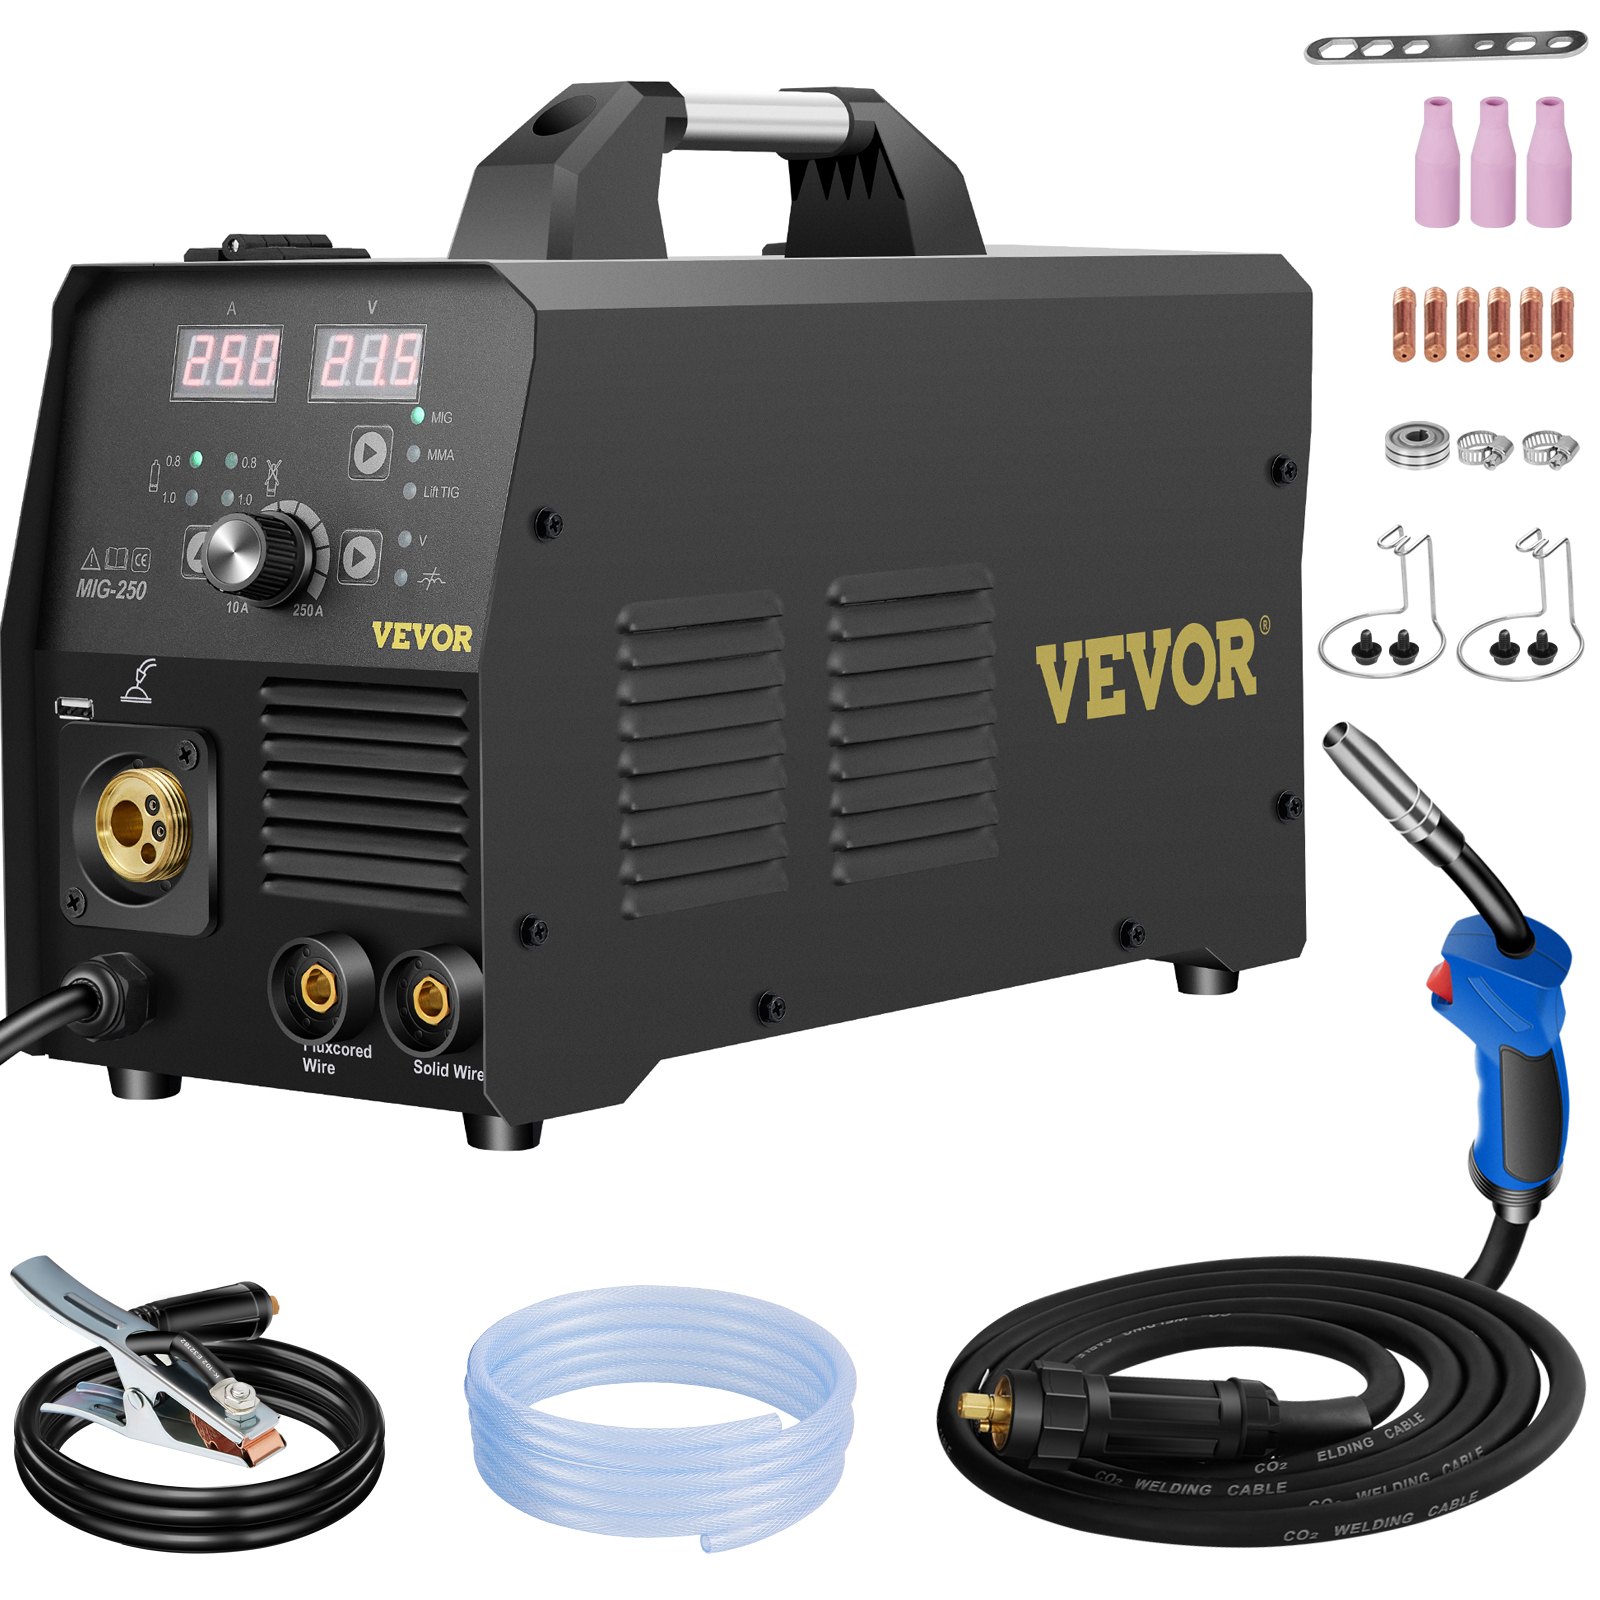
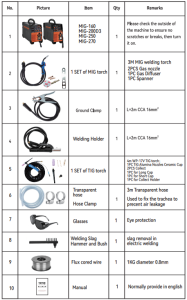
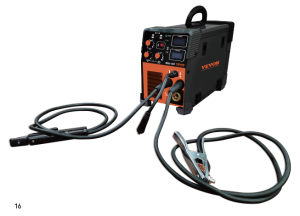
WHAT’S INCLUDED
Simple Test for Powering on the Machine
EVOR Welding machines are subjected to strict tests when they leave the factory to ensure that each one that reaches the user is of high quality. Our machines have to undergo tens of thousands of kilometres of long-distance transportation from the factory to the delivery to you.
Some uncontrollable factors will inevitably cause some internal components of the machine to become loose or even damaged. We recommend that you check the external device as soon as you get the welder and turn on the power to ensure that it is a qualified product.
SIMPLE TEST FOR THE POWERING MACHINE
-
Please make sure your power supply voltage is AC220V, 110V/220V±10%. It supports 220V or 110V/220V input voltage, and if you have a generator power supply, please ensure that the generator is not less than 4000W.
-
Choosing a 50A circuit breaker protection is recommended when the input voltage is AC110V.
-
Please choose the power plug that suits your local electrical law requirements.
Note:
-
The digital display shows irregular changes at the beginning, and then returns to normal after 3 seconds, which is normal.
-
To reduce the working temperature of the machine, it is normal for the fan to continue to rotate for a few seconds after the power is turned off.
-
During high-strength continuous welding, machine protection may occur. After continuous heat dissipation, the machine will return to normal.
Attached table: Self-examination of abnormal conditions without response when turning on the machine:
-
The machine’s power switch is not turned on.
-
The power input voltage is wrong.
-
The power plug is loose.
-
The internal circuit is loose (due to long-distance transportation or bumps). You need to open the cover and check the internal connection line.
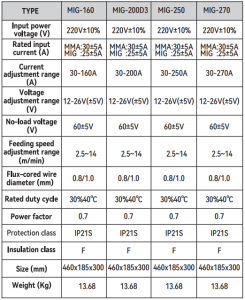
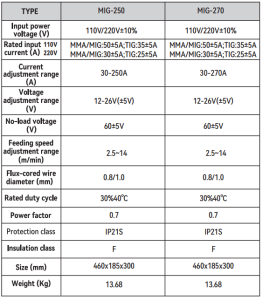
VEVOR MIG WELDER TECHNICAL SPECIFICATIONS
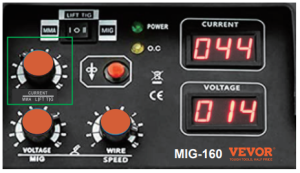
 MIG WELDER CONTROL PANEL
MIG WELDER INSTALLATION
MMA MODE
If you want to repair some broken fences or fix brackets, you can use traditional welding rods for operation. And you can use MMA mode for welding.
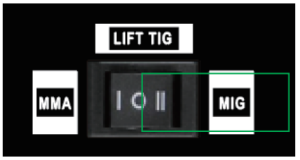
1. Select MMA mode
2. Connect welder holder and ground clamp
To adjust the current, and only the current can be adjusted.
Note:
- The welding rod specification supported by VEVOR is below 3.2 mm (1/8 in), usually 2.5 mm(3/32 in) and 3.2 mm(1/8 in) . European style generally uses E6013, American style generally uses E7018, and stainless steel generally uses ER308.
- It supports welding of1-5 mm (1/647/32 in) carbon steel and 1-3.2 mm (1/641/8 in) stainless steel. Aluminium can not be welded. For carbon steel, please use a carbon steel electrode. For stainless steel, please use a stainless steel electrode.
- Connect the ground clamp to clean bare metal. The metal without rust, paint or other coatings can ensure good electrical conductivity.
- The ideal distance between the welding rods and the welding object is 1-2 mm (1/64~5/65 in). It ensures the continuous and stable contact between the welding rod and the workpiece. The welding rod should not be too high or pressed too low to avoid arc breaking and adhesion.
- It is normal for novices to experience adhesion during the welding process, and you can try to use a friction arc to avoid adhesion.
Possible problems
-
There is no arc. Check the ground wire connecting the workpiece to ensure that it is free of rust, paint, or other coatings.
-
If there is no arc, check the distance between the welding rod and the welding object. The ideal distance is 1-2 mm. Also, check whether the welding object has rust or oil stains. It is recommended to polish with sandpaper or a grinder.
-
When welding, the spatter is very big, and it feels very difficult to weld. Please try to change the polarity connection of the ground wire clamp and the welding clamp with the machine.
-
Overcurrent protection may occur during welding if the time exceeds 3 minutes. You must stop working for a few minutes, let the machine cool down, and recover automatically. The machine will automatically recover if the air cools for more than 10 minutes. Please shut down and restart the machine.
-
Don’t hesitate to contact us if you have any problems that cannot be solved.
MIG MODE
Select MIG Mode
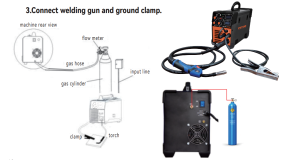
Instalment when use gas welding (solid wire):
- Connect the gas bottle with the CO2 regulator, flow meter, and the Input Gas. The connector is behind the machine via a gas hose.
- Insert the cable connector of earth cable into the socket in the front panel.
- Set the welding wire spool on the wheel axis, the wheel hole should be matched with the wheel fixer.
- Choose wire slot according to wire size
- Loosen the screw of wire-pressing wheel, put the wire into slot via wire-lead tube, and tune the wire distorts and affects wire sending wire is usually set to the fixed hole on the wheel side. To prevent the bent wire from getting stuck, please cut off this part of the wire.
- The MlG torch has been settled inside the machine, and you just need to put the wire into the Wire-pressing wheel to prevent it from gliding.
- The wire roller should rotate clockwise to let out the wire to prevent it from gliding; the torch should be held by hand.
Connect the welding gun and ground clamp.
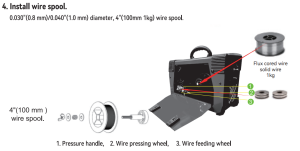
Install Wire Spool
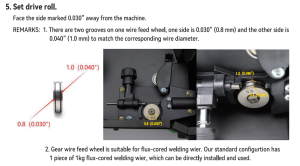
Set Drive Roll
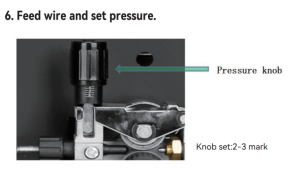
Feed Wire and Set Pressure
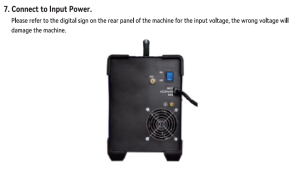
Connect to Input Power
Replace Consumables. Remove the Consumables and depress the trigger until the wire comes out.

Be sure to use Porcelain Nozzles.

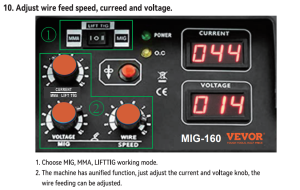
Adjust Wire Feed, Current, and Voltage
With the welding torch 1/4 inch away from the metal, press the trigger completely to initiate the arc.
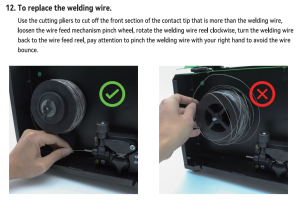
To replace the Welding Wire
Wearing Paets of Welding Gun
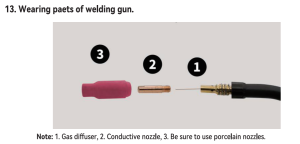
Note:
-
Please strictly follow the picture instructions to connect. Otherwise, it will not be possible to solder.
-
The flux-cored welding wire supports 0.8mm and 1.0mm in diameter.
-
The machine can install 1kg(2.2lb) of welding wire reels.
-
The machine is equipped with a 1kg(2.2lb) flux-cored wire, which can be directly installed and used.
-
Support welding material, carbon steel, aluminum, and stainless steel cannot be welded.
-
The diameter of the welding wire, the groove of the wire feed wheel, and the aperture of the contact tip must be matched.
-
The pressure roller of the wire feeding structure should not be too tight or too loose, which will cause the wire feeding to be unstable.
-
The installation of the wire feed reel should not be too loose or too tight, as this will cause the wire to become loose and cause a slow feeding speed.
Possible problems
-
There is no response when turning on the power. Please check the plug connection.
-
If the power does not respond when turned on, please open the cover and check whether the internal connecting wires are loose.
-
The wire feeding is unstable. Please check the wire feeding reel and the wire feeding pressure roller. The welding gun should not be wound. Pay attention to the diameter of the welding wire, which matches the wire feeding wheel groove and contact tip.
-
If there is no wire feeding, please confirm that the working mode is MIG state, that the welding gun is connected well, and that if there is no wire feeding, please contact us.
-
During the welding process, overcurrent protection may occur if the time exceeds 3 minutes. You need to stop working for a few minutes, let the machine cool for a period of time, and then automatically recover. If the air cools for more than 10 minutes and the machine does not automatically recover, please shut down and restart.
-
If you have any questions, don’t hesitate to contact us.
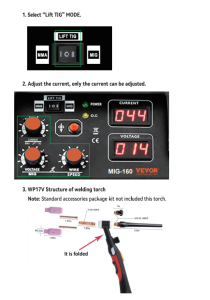
LIFT TIG MODE
VEVOR MIG for thin plates with higher welding process requirements or welding with higher process requirements, especially for stainless steel welding, you can use the LIFT TIG mode, which requires pure argon.
Remark:
- Ceramic nozzle
- Tungsten collet
- Tungsten collet body
- Short back cap
- Long back cap.
Please keep the above wearing parts in stock.
Note:
- Please connect according to the picture, otherwise it cannot be welded.
- This machine is not a professional high-frequency arc-starting argon arc welding machine; it is only a LIFT TIG contact arc-starting or friction-starting machine.
- Need to use TIG, wp17v torch, this torch is not included, you need to buy it yourself.
- Support welding material, carbon steel, stainless steel, alloy steel, aluminum can not be welded.
- This welding mode requires the use of tungsten needles, which need to be purchased separately. and the size of the tungsten needle must match the collet and collet body of the welding gun, otherwise it cannot be installed.
- In this mode, you must use argon welding.
Possible problems
- There is no response when starting up. Please check the plug connection.
- If you don’t receive a response when booting up, please open the cover and check whether the internal connection wires are loose.
- During the welding process, if the time exceeds 3 minutes, over-current protection may occur. You need to stop working for a few minutes, let the machine cool for a period of time, and automatically recover. If the air cools for more than 10 minutes, the machine does not automatically recover; please shut down and restart.
- If you have any questions, don’t hesitate to get in touch with us.
- Lift tig is different from professional high-frequency tig. Lift tig needs to be welded after contact with arcing. High-frequency tig does not require contact with arcing. Lift tig is not suitable for spot welding.
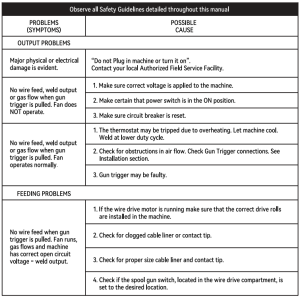
MIG Welder Troubleshooting
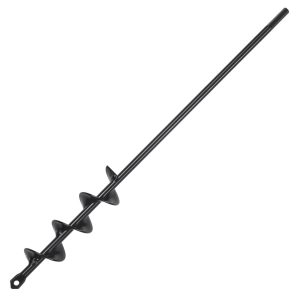
Recommended For Your Project
VEVOR 250Amp MIG Welder, Welding Machine 3 in 1, 220V Manual


Reviews
There are no reviews yet.