
Unlock the full potential of your VEVOR CNC Router Machine with our comprehensive product manual download. Designed specifically for the 300W, 3 Axis GRBL Control Wood Engraving Carving Milling Machine Kit, this manual covers every aspect of your machine’s capabilities, from setup to optimization.
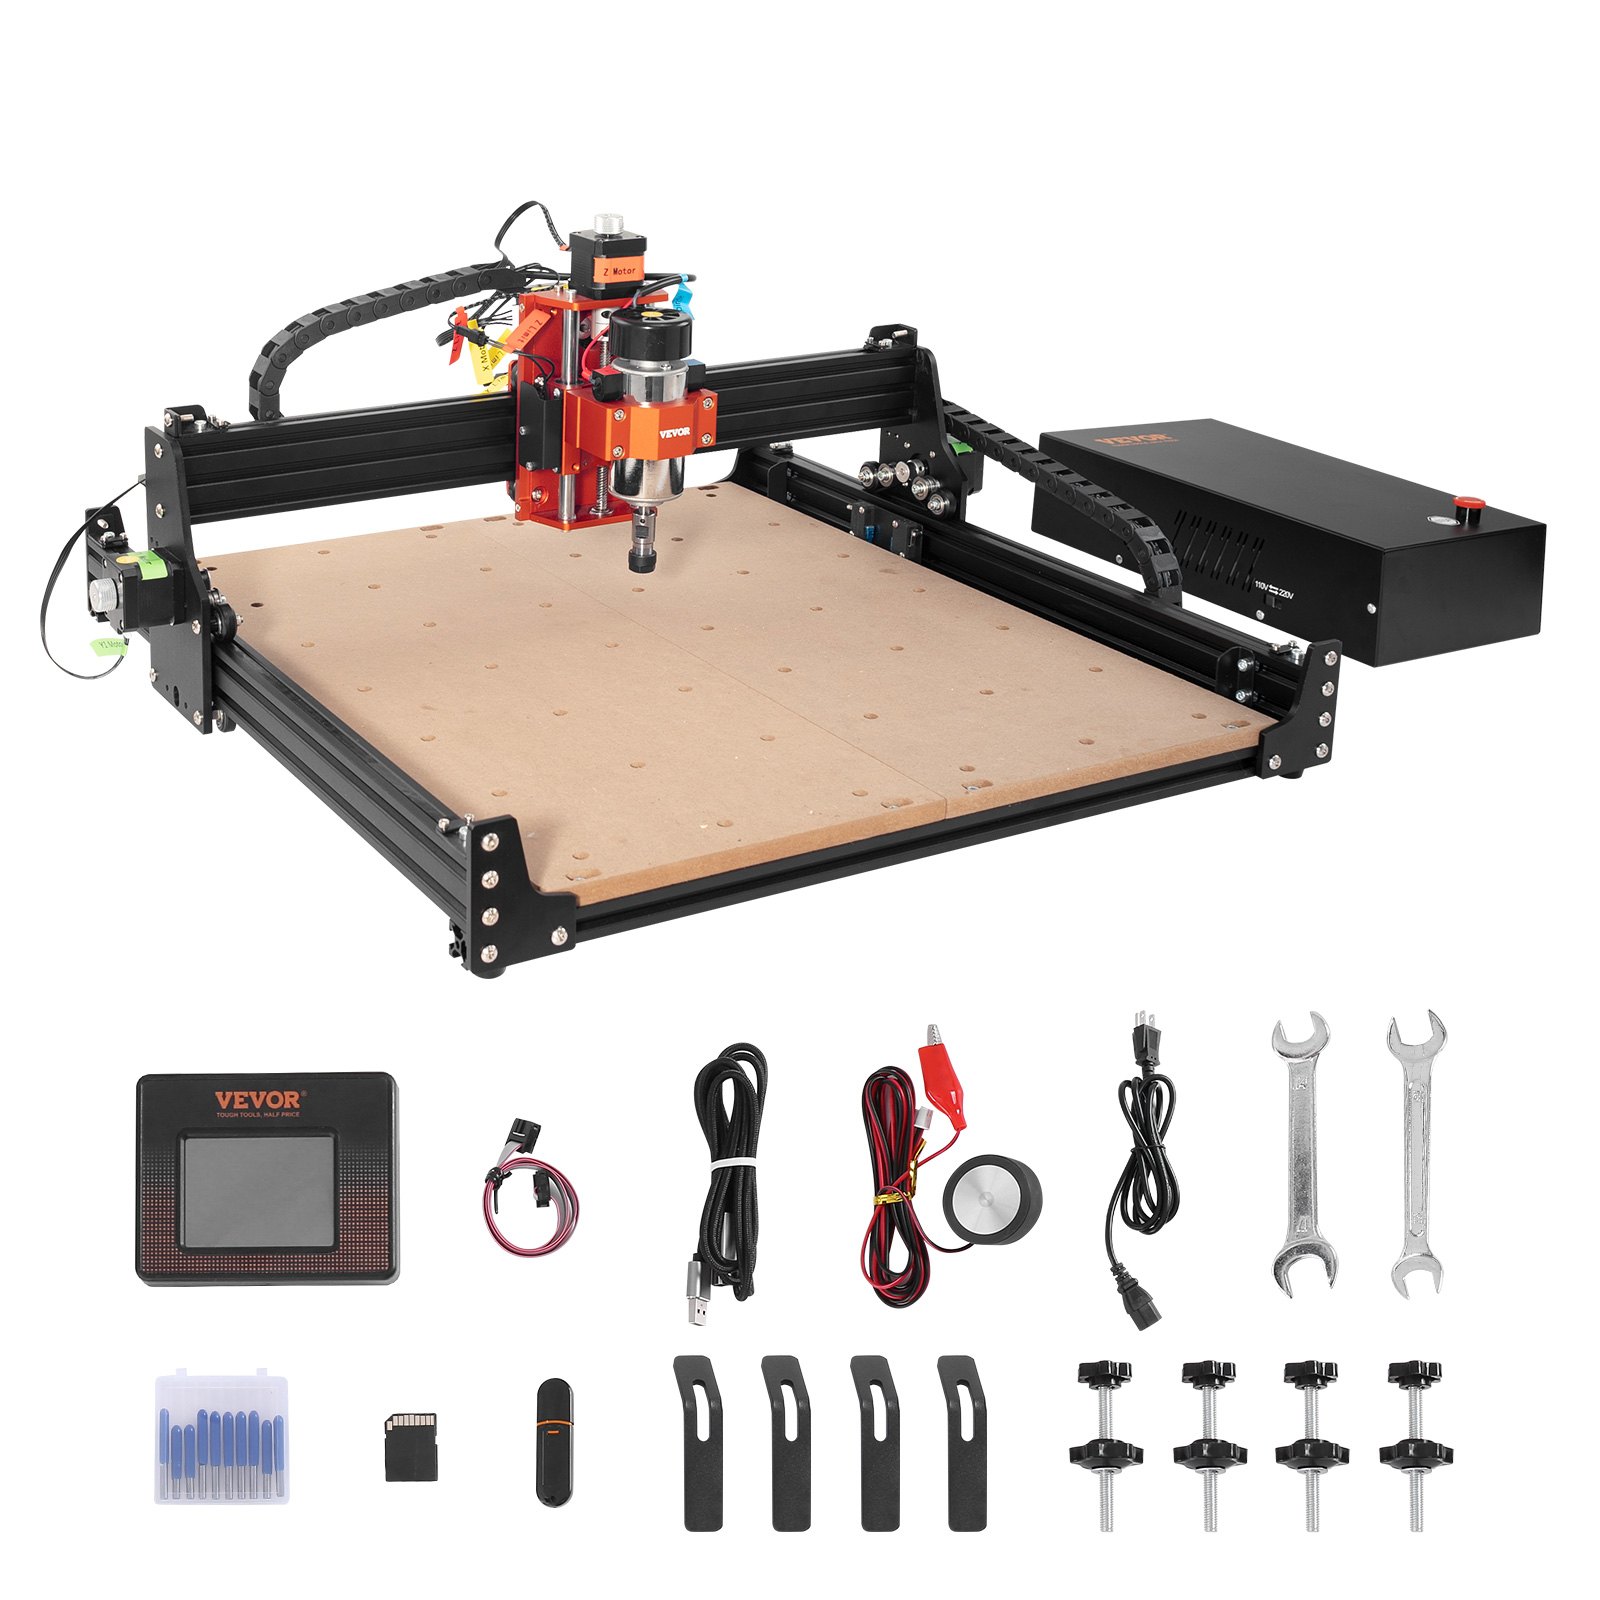
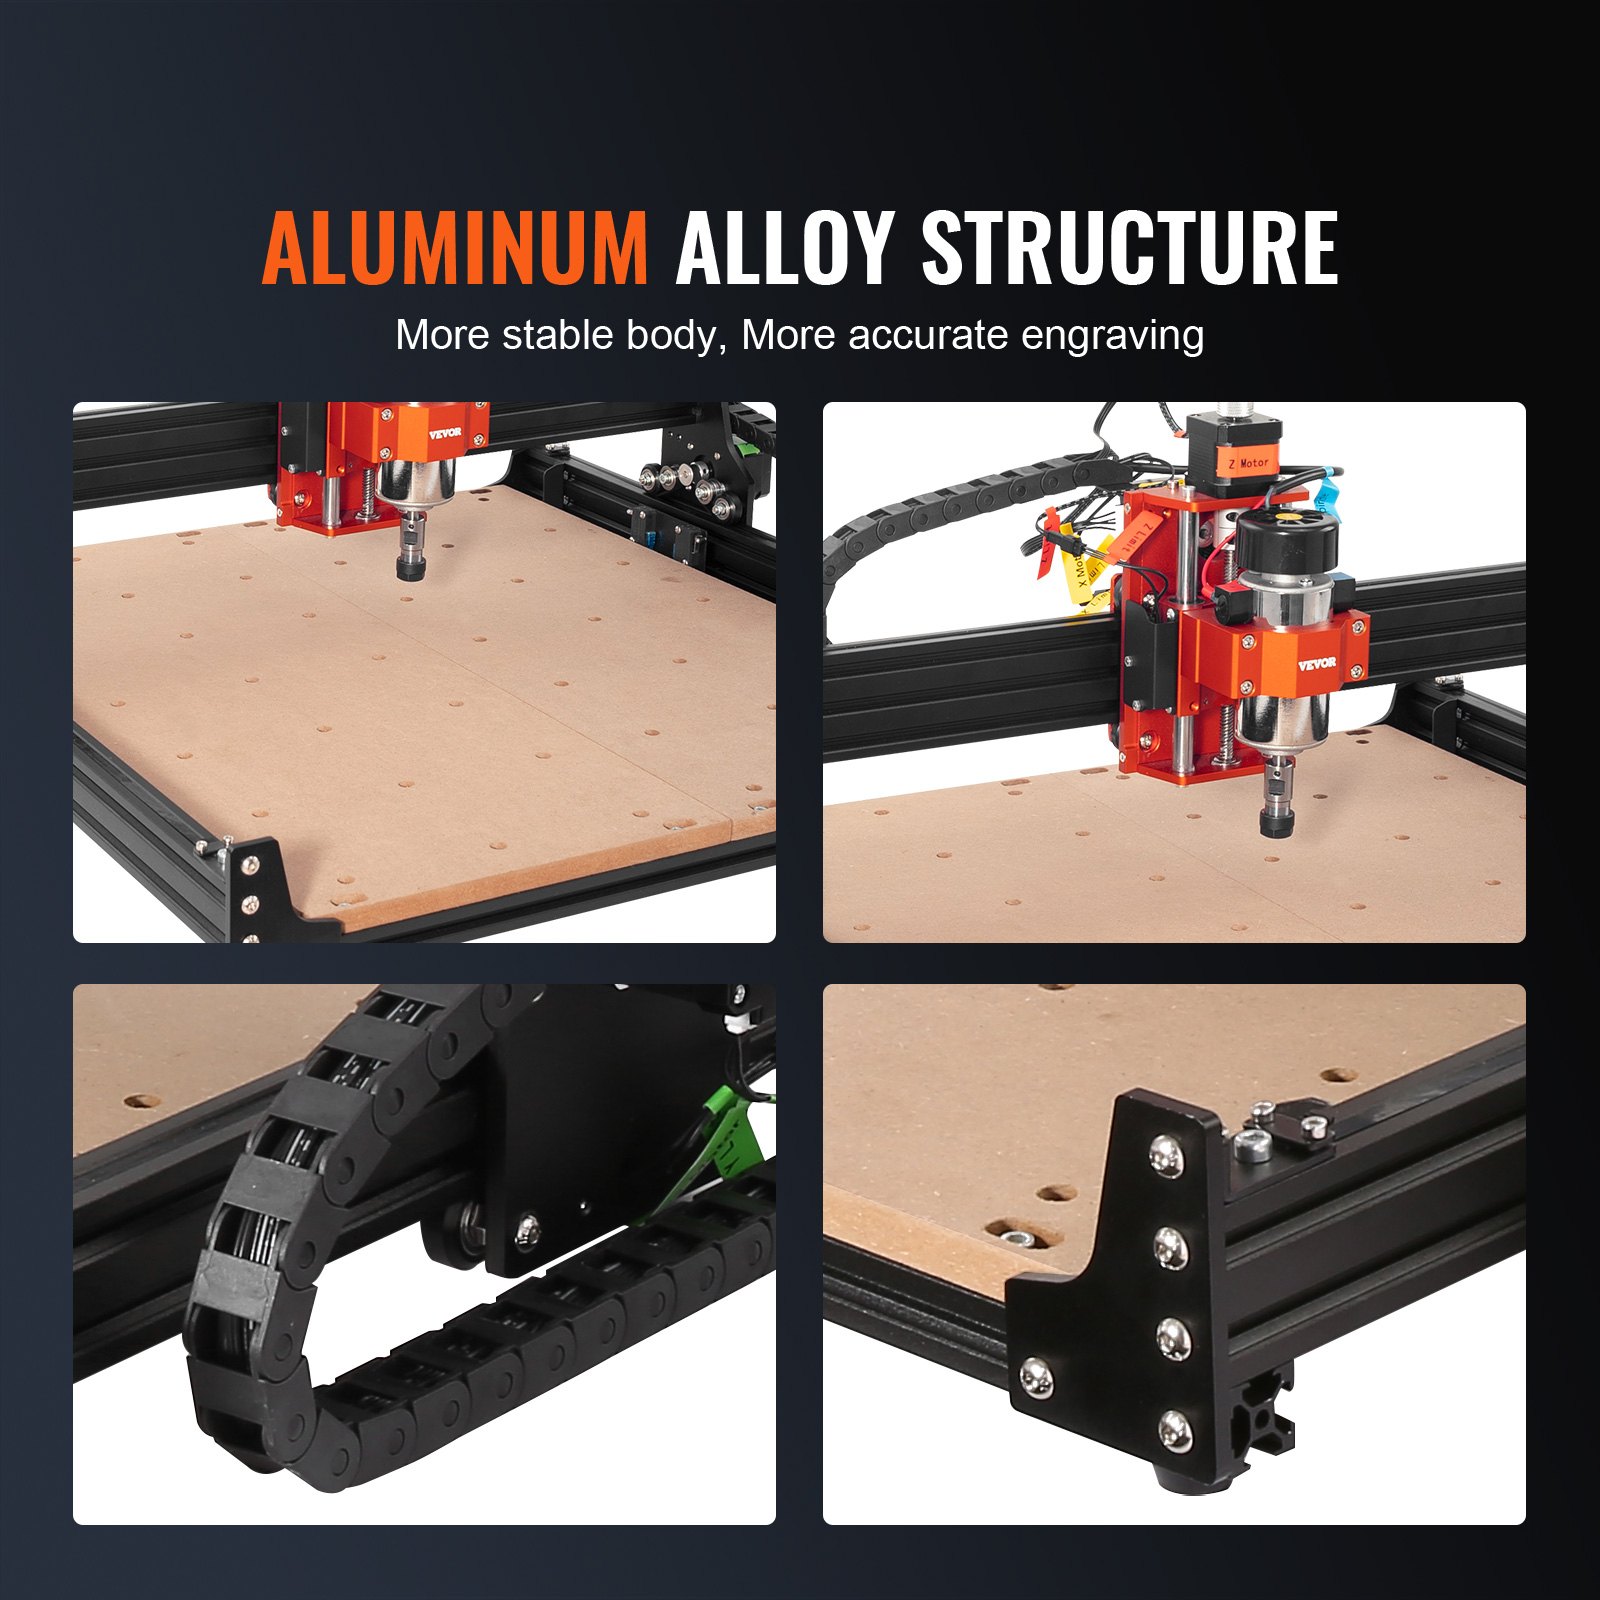
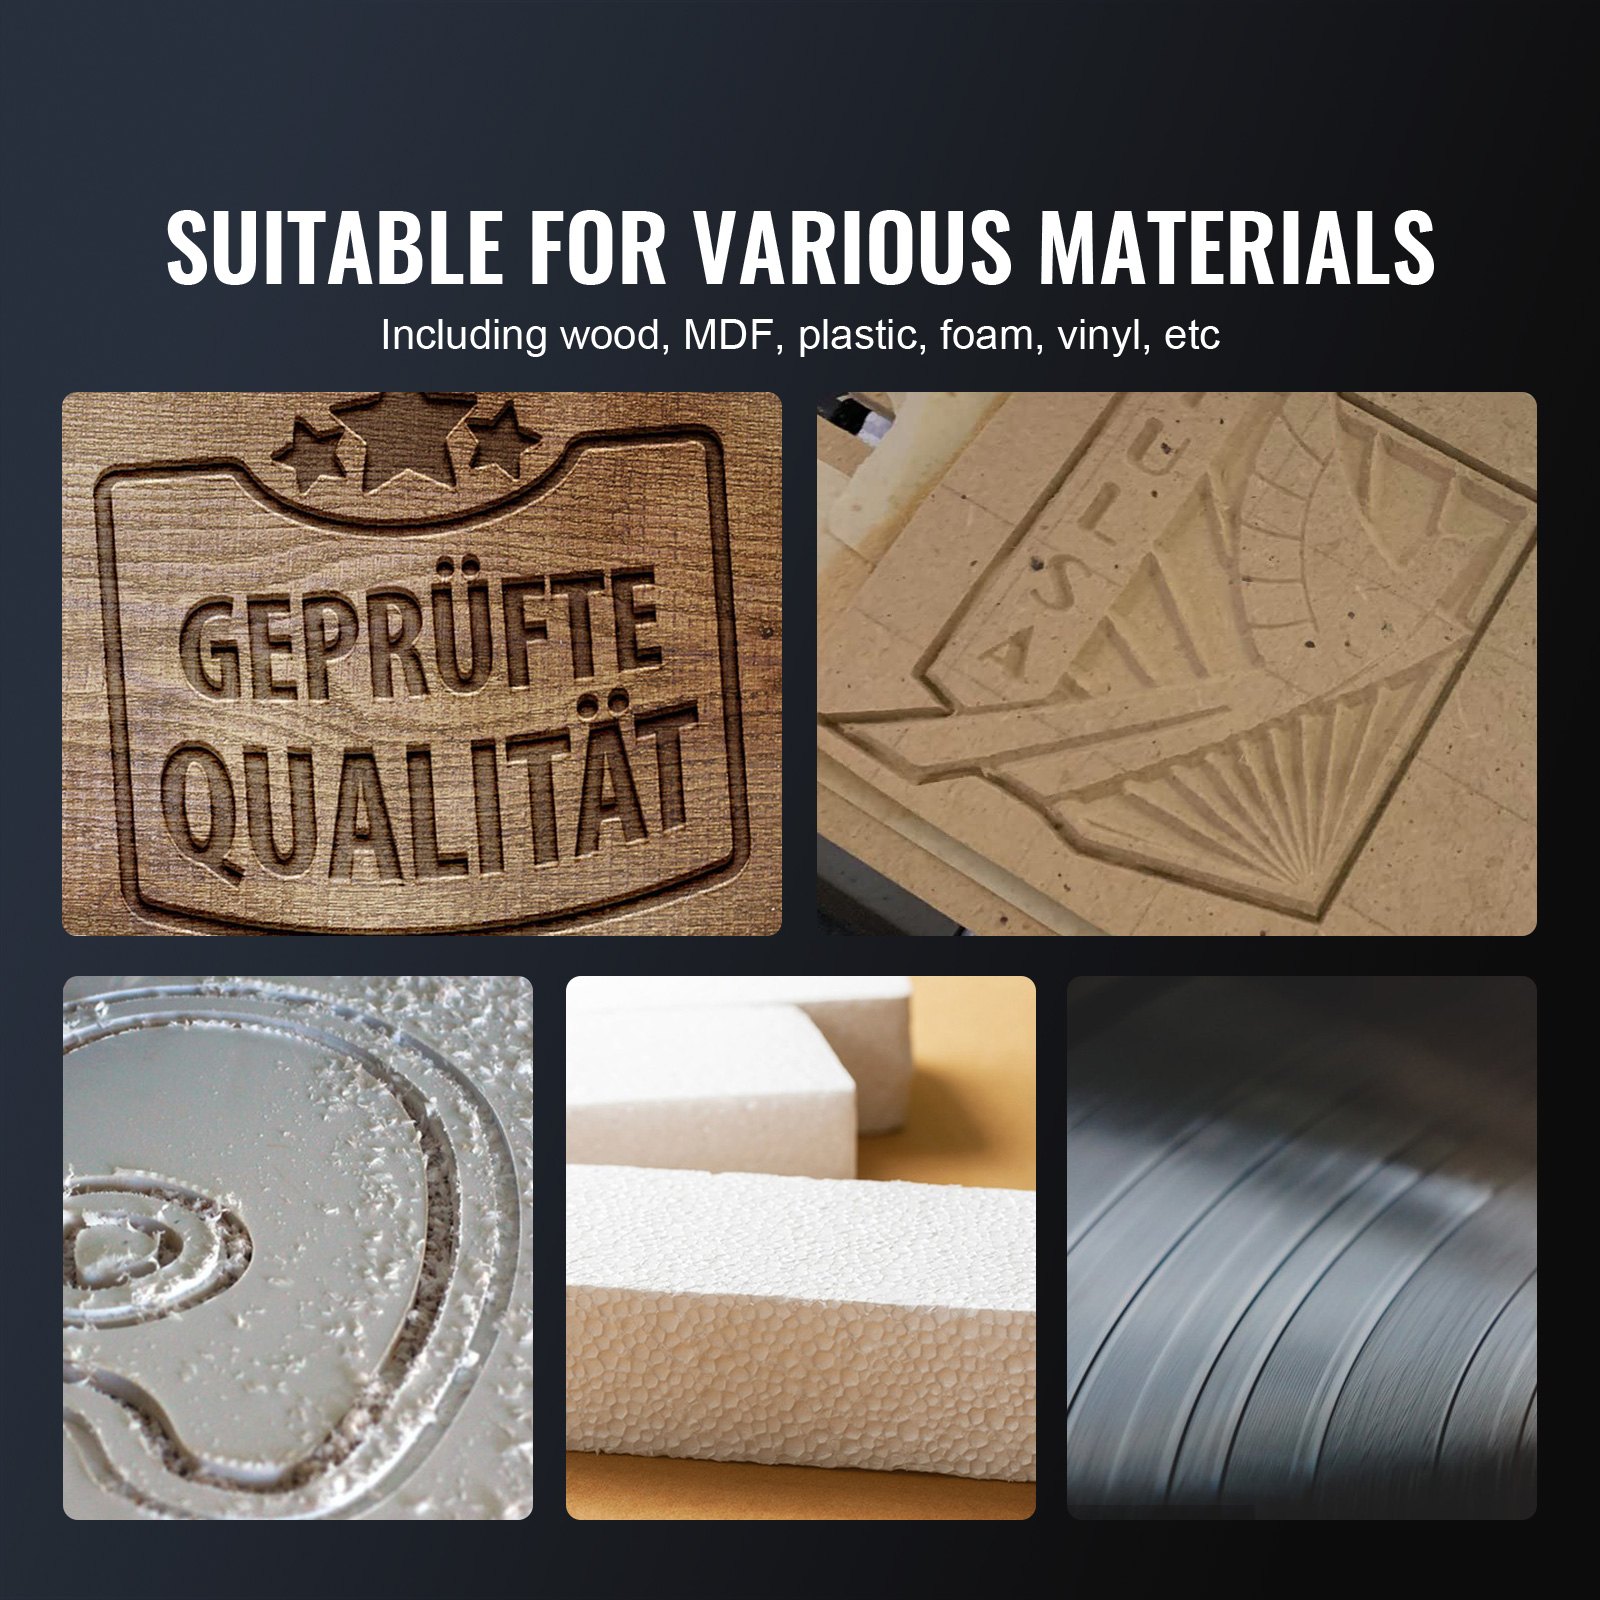
With a working area of 400 x 400 x 75 mm (15.7 x 15.7 x 2.95 inches) and a powerful 1200 RPM motor, this CNC router is perfect for working with wood, acrylic, MDF, PVC, plastic, and foam. Our detailed guide includes step-by-step instructions, troubleshooting tips, and best practices to ensure you get the most out of your machine.
Whether you are a beginner or an experienced user, this manual is a valuable resource for achieving precision and efficiency in your projects. Download now and embark on a seamless CNC routing experience easily and confidently.
CNC Router Machine User Manual
MODEL: S4040
Important Safety Instructions
Warning: To reduce the risk of burns, electrocutions, or injury to persons!
MATTERS NEEDING ATTENTION
Warning
- Please wear protective glasses when using the machine. In case your eyes hurt.
- Before replacing the tool, please disconnect the machine’s power supply to avoid accidents.
- Unplug the socket when not in use, before replacing parts and maintaining the machine.
- Unplug when assembling and disassembling the unit.
- Close supervision is necessary when any appliance is used near children.
- Do not force the unit to operate with excessive pressure to avoid jamming the CNC Router Machine.
- Do not immerse wires or machines in water, which can cause an electric shock.
- This appliance is not intended for use by persons(including children) with reduced physical, sensory, or mental capabilities or lack of experience and knowledge unless they have been given supervision or instruction concerning the use of the appliance by a person responsible for their safety.
- Children should be supervised to ensure they do not play with the appliance.
- If the supply cord or plug is damaged, it must be replaced by the manufacturer, its service agent, or similarly qualified persons to avoid a hazard. Or do not operate this appliance. Please return it to the store for service or repair by a professional serviceman.
SAVE THESE INSTRUCTIONS
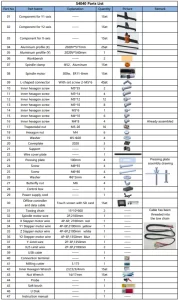
CNC Router Machine Parts List
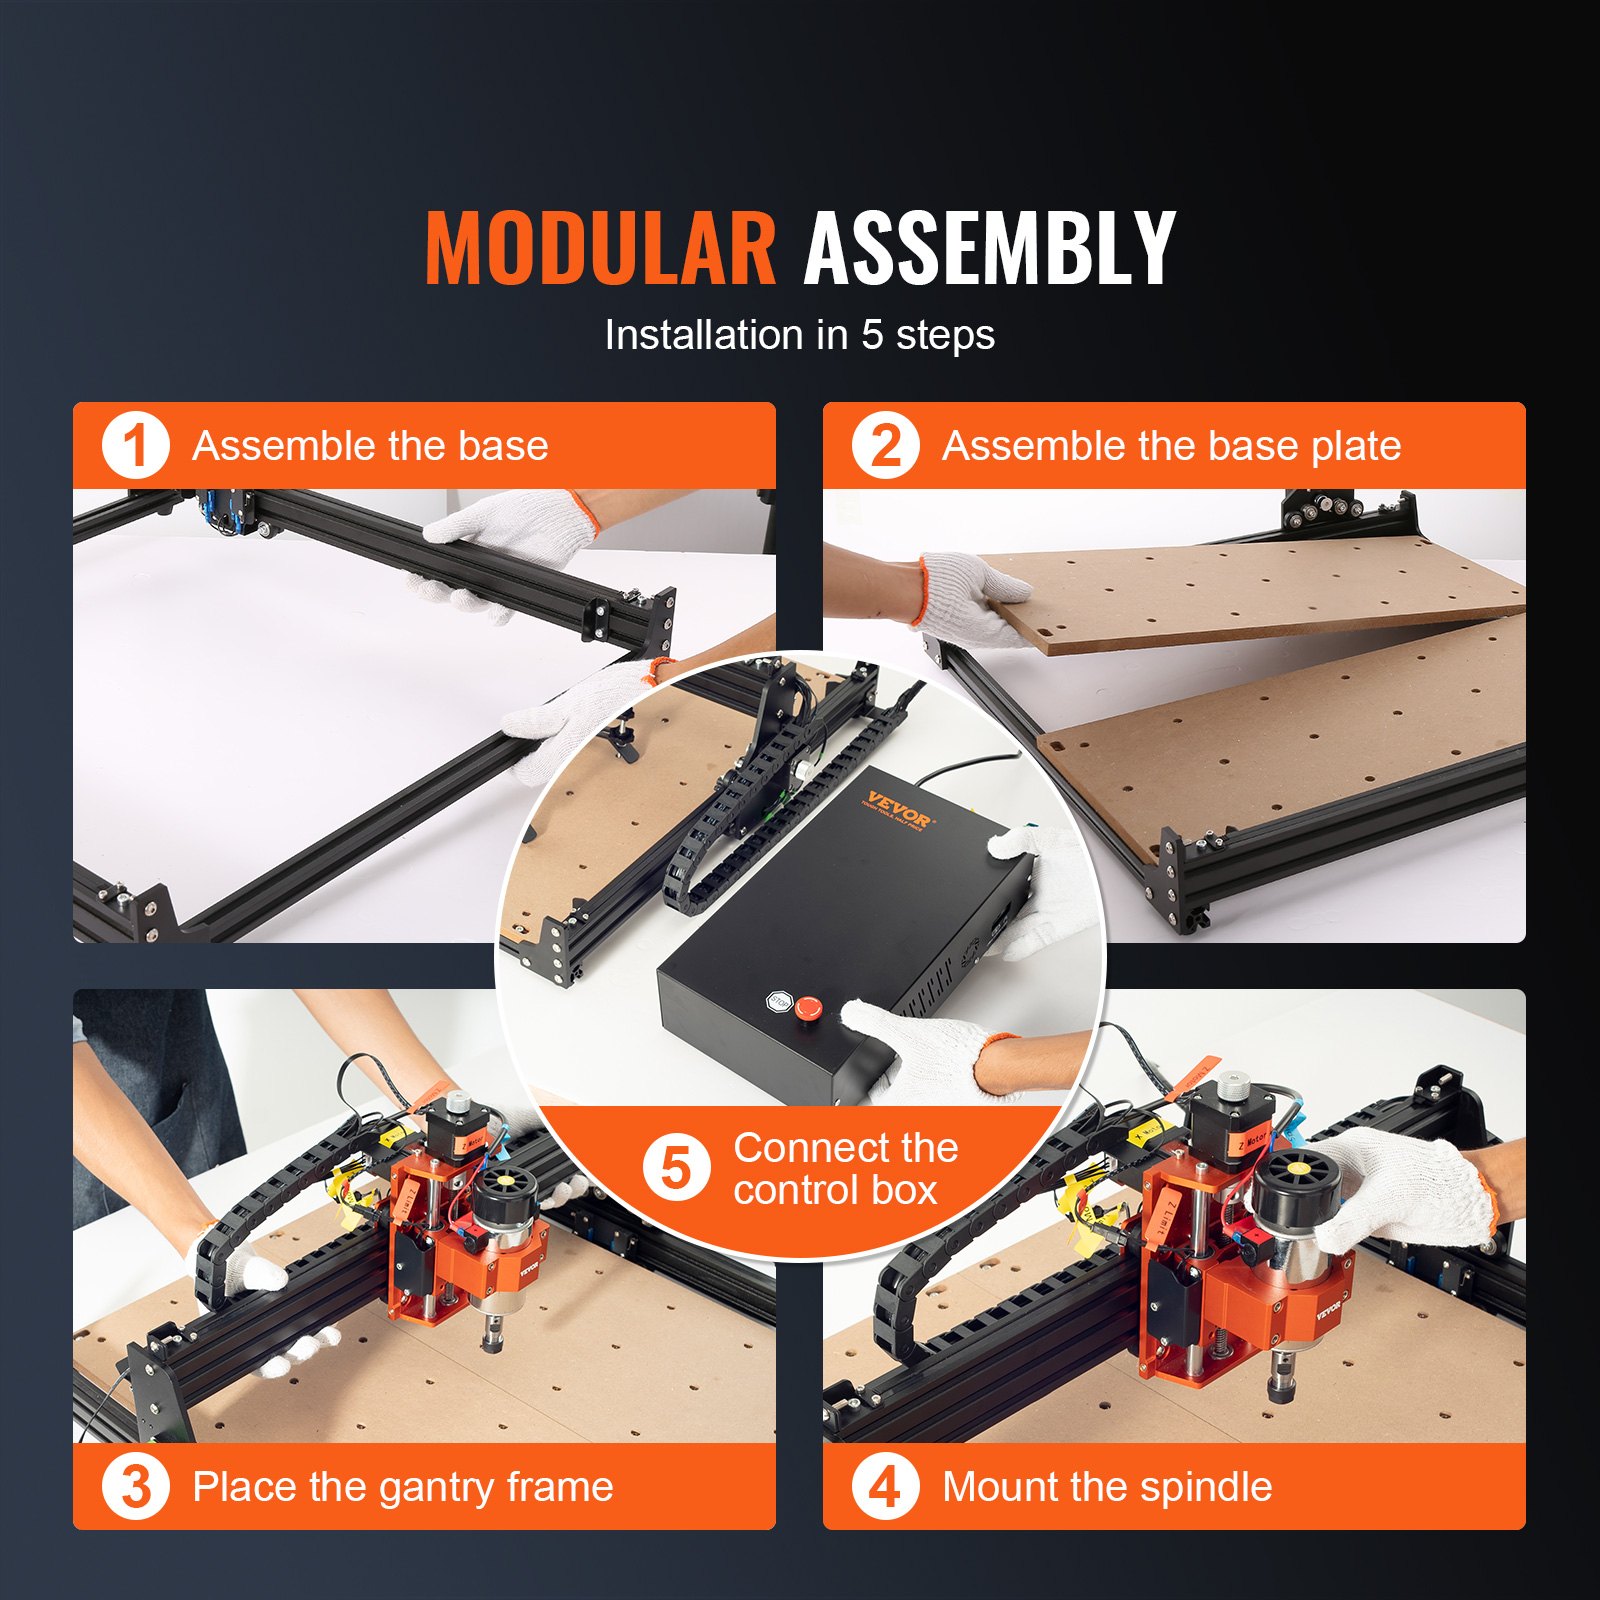
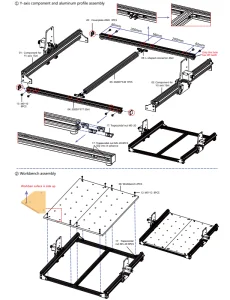
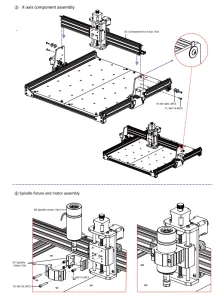
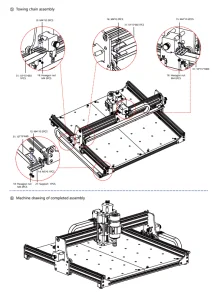
CNC Router Machine Assembly
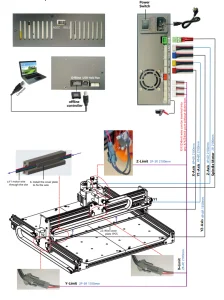
Instructions for ports on the control box
Candle Software
Candle is a GUI application for GRBL-based CNC machines with a G-Code visualizer. It is open-source software suitable for CNC machine tool processing. Candle supports G-code file processing and visual display functions:
- Controlling GRBL-based CNC-machine via console commands, buttons on form, numpad.
- Monitoring the CNC machine state.
- Load, edit, save, and send G-code files to the CNC machine.
- Visualizing G-code files.
States
Work coordinates:
Represents current X, Y & Z local coordinates of the CNC.
Machine coordinates:
Represents current X, Y & Z absolute machine coordinates.
One of the following CNC statuses:
- Idle – waiting for a G-code command Running – running a G-code command
- Home – homing cycle is executing
- Check – G-code command check mode is turned on
- Hold – paused by a “!” command, needs to be restarted by a “~” command
- Alarm – CNC doesn’t know where it is and blocks all G-code commands
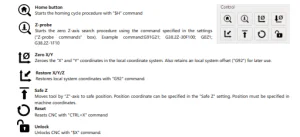
Control
Software using steps
Install the driver
For the first time use, please connect the device to the computer via USB cable, and click the CH341SER.exe file in the driver folder to install the driver.
Under normal circumstances, the Win10 system will automatically identify and install the driver. For Win7 and Win8 systems, please install it manually.
Set the port and connection.
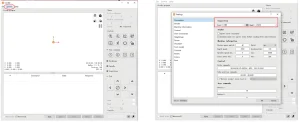
After installing the driver, open the computer’s device manager and click on the port option to see the content inside the red box on the screen shown in the figure below (the port information is in brackets).
Remember the port information queried above, switch to the Candle software interface, and click the “Settings” option in the upper left corner.
Selecting the setting will pop up the setting window. Under “Connection,” select the port name you queried, select the baud rate 115200, and then click ” OK” to finish the settings.
Complete connection
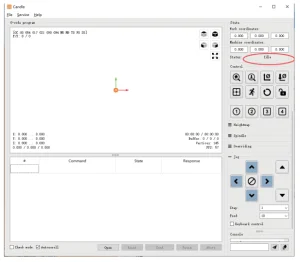
After setting the port and baud rate, click Finish. The status bar at the top right of the Candle interface will show Idle. At the same time, the console at the bottom right will display the information shown below, indicating that the connection has been successfully established.
Processing documents
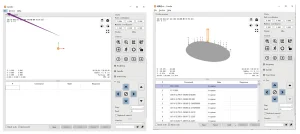
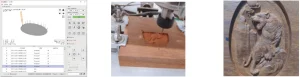
Click the “File” option at the top of the candle, then click “New” to create G-Code. On the command bar at the bottom of the interface, click “Open” to select a G-code file to import. After importing, the middle of the interface will display a visual graph composed of tool paths (the position of the pen-shaped graph in the graph is the current tool position).
Hold the left mouse button in the visualization window to rotate the graph, and the right button to move. Graphics, scrolling the middle wheel can zoom in and out of the graphics. At the same time, the content of the G-Code will be displayed in the lower command bar.
The machine will run one by one during processing according to the G-Code commands.
Fixture, tool installation, and set the working coordinate origin
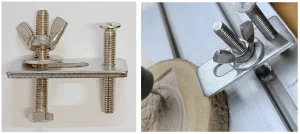
The fixture in the product kit is not assembled. There are four sets in total. The appearance and usage of the assembled fixture are shown in the correct figures. Before running the G code program, you need to find the position of the engraving figure relative to the overall engraving plate.
There is a three-axis coordinate system in the visual graphics. The origin of the three-axis coordinate system is the tool setting point of the actual processing graphic. You can move the tool to determine the position of the engraving graphic relative to the overall engraving plate based on the position of this origin. The engraving figure in the figure below is taken as an example.
After the selected tool position is started, the X/Y and Z axes are reset to zero (the zeroing X/Y and Z axes buttons).
Before returning to zero, make sure that the tool approaches the distance of one sheet of paper for engraving, and then return the X/Y and Z axes to zero (please use a flat-bottom sharp knife when engraving and a cylindrical milling cutter when machining planes, slots, and holes). The effect is that the sculpted figure will be carved with the blade tip as the origin.
The ER11 collet on the spindle motor should be clamped into the fixed head first and then in place. Please do not overextend the collet when installing the cutter, as shown in the first figure below.
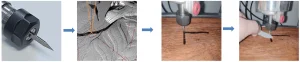
Start Carving
After finding the engraving position, click the send button below, and the device will automatically start engraving. The status bar at the top right shows that it is running. The visualization window shows that the tool is moving along the tool path.
When engraving, you can choose the pause and stop buttons below. (After pausing, click again to continue the previous carving. After termination, click Send to start processing from the beginning.)
Finished processing
After the processing, the visualization window prompts that the engraving is completed and the time required for carving.
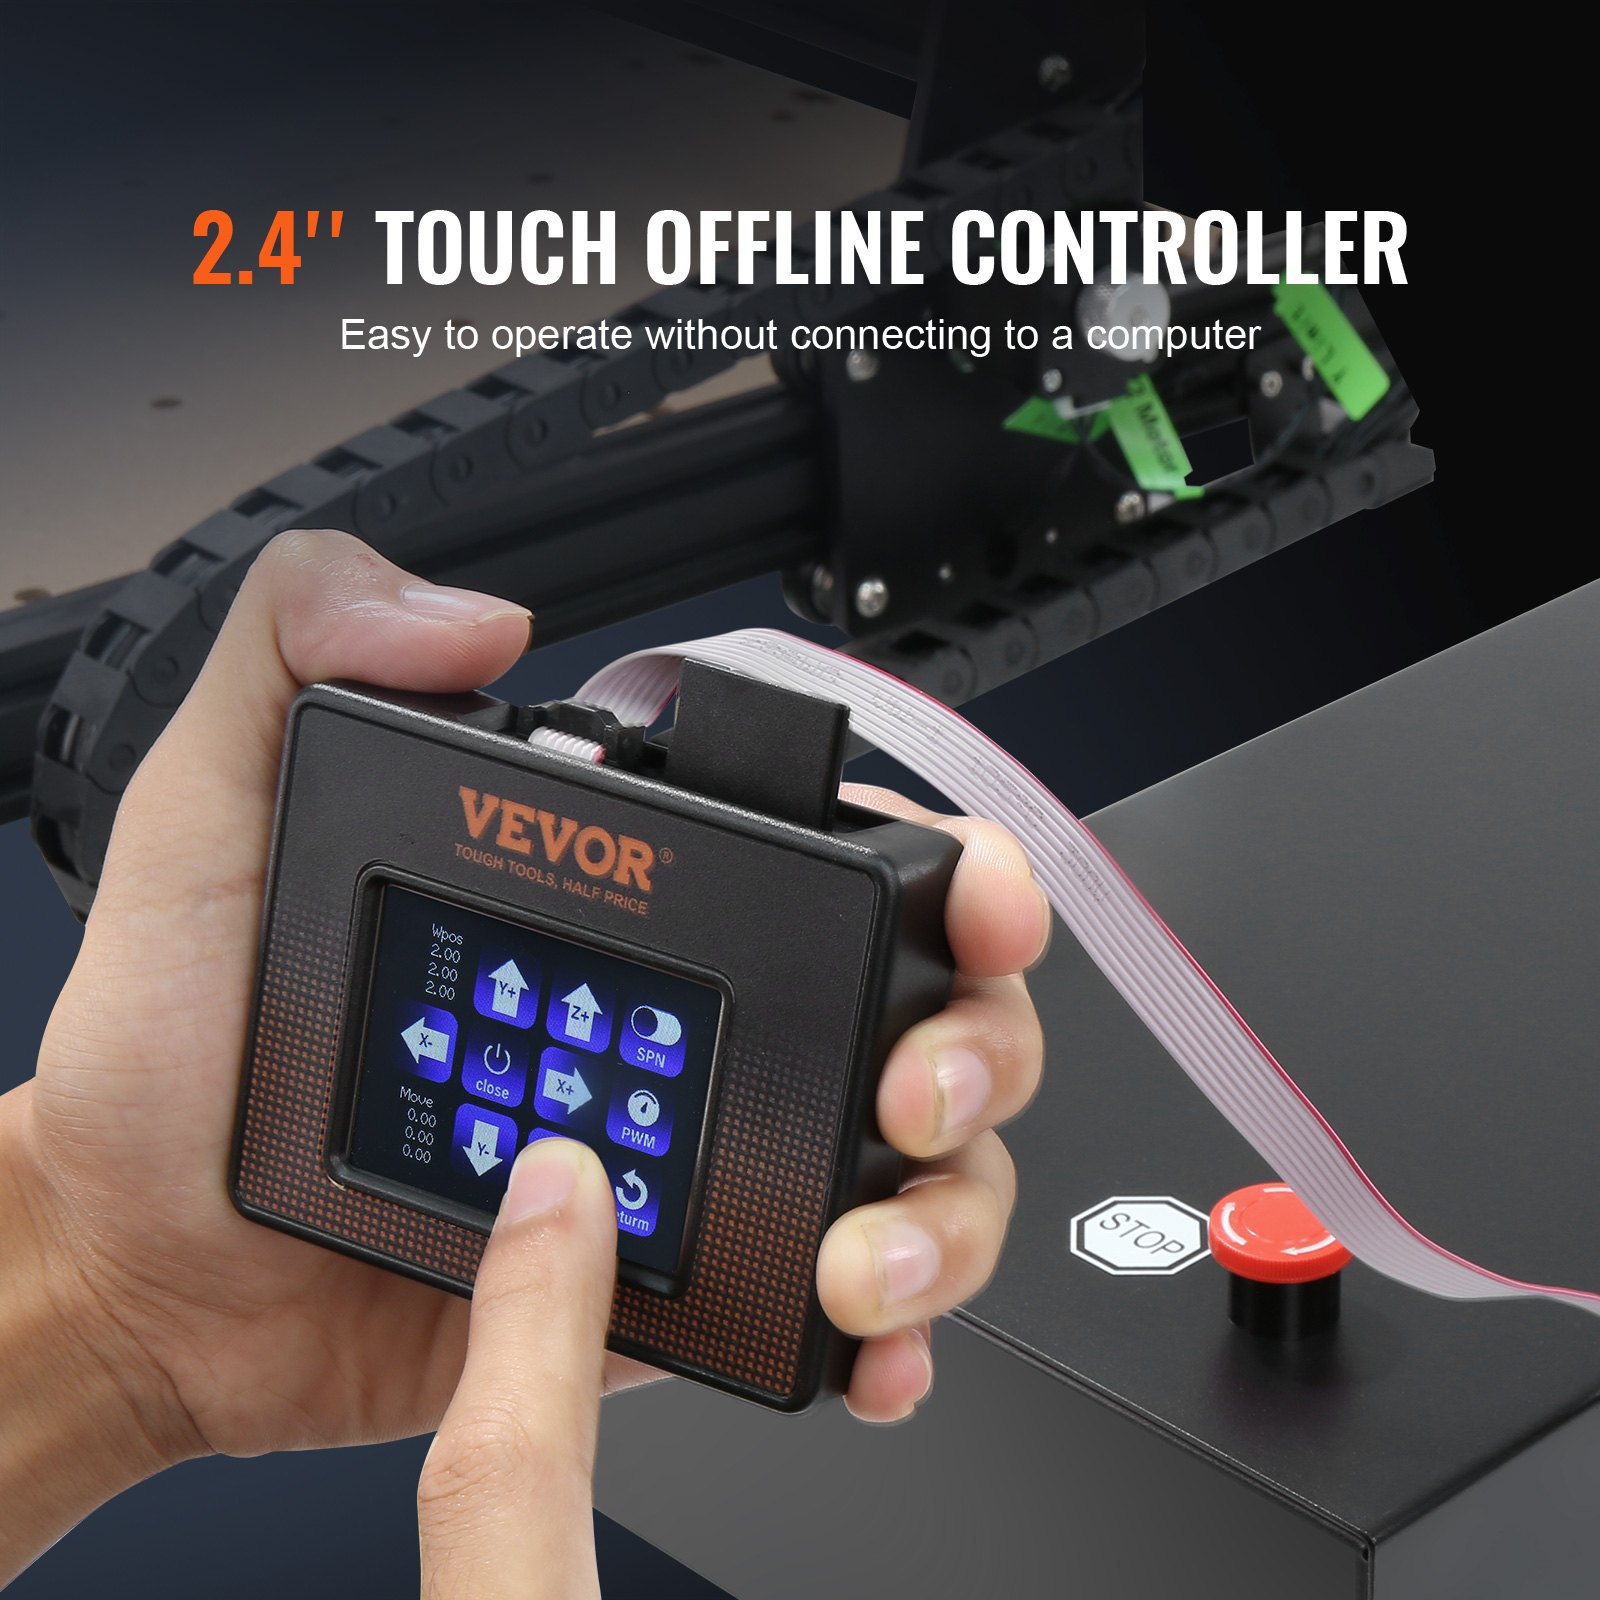
Offline controller (Optional)
Note: The offline controller and computer cannot simultaneously connect to the engraving machine. Please ensure the machine and the computer’s USB cable are disconnected when using the offline controller.
Main page
Y-: right Y+: left Z+: Send $X to the GRBL motherboard to unlock it.
OK/SPN: Confirm button.
Control page
Manually move each axis to the desired position. X+: The x-axis moves in the right direction, and the X- moves in the opposite direction. Y+: Y axis moves forward direction, Y- opposite. Z+: Z axis moves in the up direction, Z- opposite.
OK/SPN: Spindle test switch, press to open the spindle (corresponding to SPN gray on the screen), press again to close the spindle (the corresponding SPN on the screen returns to normal). Long press to enter the changing spindle speed page.
At this page, Y+/Y—is the High/Low spindle speed. Long press OK/SPN to exit the changing spindle speed page.
Exit/STP:
Function 1: Tap on each axis button of XYZ to change the movement distance by 0.1, 1, 5, 10 cycles each time.
Function 2: Press and hold for about 2 seconds to exit.
File page
File list Select the file to be engraved. Support documents include: NC, NCC, TAP, TXT, Gcode, GCO, NL, CUT, CNC . Y+: up, Y-: down
OK/SPN: Confirm the selection and enter the confirmation engraving page.
Confirm the engraving page
Confirm that the engraving file starts without errors.
OK/SPN: Confirmation starts, ready to print becomes the progress display percentage, the file selection page is returned after the engraving is completed.
Settings page:
X+/ X-: Chang Baud rate; Y+/Y-: Change Feed rate by ±100/Click; Z+/Z-: Change Feed rate by ±10/Click; OK/SPN: Change Laser Mode ON/OFF
Restore Factory Settings
If the mechanical movement of the machine is smooth, but the engraving movement appears stuck, or the stepper motor does not move, please try to restore the factory settings of the main board.
Method: Run Candle software, send the command $RST=* to the machine, and reboot the machine.
CNC Router Machine Repair Guide
Recommended For Your Project
VEVOR CNC Router Machine, 300W, 3 Axis GRBL Control Manual

Reviews
There are no reviews yet.