

Unlock the full potential of your VEVOR 10 Gallon Heavy-Duty Sand Blaster with our comprehensive product manual. Specifically designed for the 60-110 PSI High Pressure Sandblaster, this detailed guide will walk you through every aspect of setup, operation, and troubleshooting. Whether you are tackling stain, rust, or paint removal, our manual ensures you maximize efficiency and safety with your Portable Abrasive Blasting Tank.
This easy-to-follow manual includes step-by-step instructions, vivid illustrations, and expert tips to help you get the most out of your Air Sand Blasting Kit with 2 Ceramic Nozzles & 7.5ft Hose. From initial assembly to optimized performance, you’ll find all the information you need to operate your sandblaster confidently. The manual is crafted to cater to novice users and seasoned professionals, ensuring every user can achieve outstanding results with minimal hassle.
Don’t let confusion or setup difficulties slow you down. Download your VEVOR 10 Gallon Heavy-Duty Sand Blaster manual today and take the first step towards seamless and efficient abrasive blasting. Equip yourself with the knowledge to easily handle any stain, rust, or paint removal task.
ABRASIVE BLASTER TANK USER MANUAL
MODEL: FF-Q904
Safety Warnings and Precautions
Thank you for using this product. To ensure you can operate the machine correctly, read these instructions carefully before operating it and keep them properly for future reference. Please read this page’s precautions and safety rules to ensure your safe use.
This manual outlines safety warnings, precautions, operating, maintenance, and cleaning procedures. The warnings and instructions reviewed in this manual cannot cover all possible conditions and situations that may occur. Caution and common sense are not built into this product, since we believe the users will comply with these codes.
Please read ALL the instructions before using your machine.
- Keep the work area clean. Cluttered areas invite injuries.
- Observe work area conditions. Do not use machines in damp or wet locations, don’t expose them to rain, keep the work area well-lit, or use the product in the presence of flammable gases or liquids.
- Keep children away. Children must never be allowed in the work area. Do not let them handle machines, tools, or extension cords.
- Store idle equipment. When not in use, tools must be stored in an airtight location to inhibit rust. Always lock up tools and keep them out of the reach of children.
- Use the right tool for the job. Do not attempt to force a small tool or attachment to do the work of a larger industrial tool. This tool was designed for specific applications. It will do the job better and more safely at the rate for which it was intended. Please do not modify or use this tool for a purpose for which it was not designed.
- Dress appropriately. Do not wear loose clothing or jewelry, as they can get caught in moving parts. Protective, electrically non-conductive clothes and no-skid footwear are recommended when working. Wear restrictive hair coverings to contain long hair.
- Use eye and ear protection. Always wear ANSI-approved impact safety goggles.
- Maintain tools with care. Inspect tool cords periodically; if damaged, have them repaired by an authorized technician. The handles must always be kept clean, dry, and free from oil and grease. Please power off and unplug before maintenance and cleaning.
- Avoid unintentional starting. Please turn off the air source when not in use.
- Stay alert. Watch what you are doing, and use common sense. Do not operate any tool when you are tired.
- Check for damaged parts. Before using any tool, any damaged part should be carefully checked to determine whether it will operate properly and perform its intended function. Check for alignment and binding of moving parts, broken parts or mounting fixtures, and any other condition that may affect proper operation. Any damaged part should be properly repaired or replaced by a qualified technician. Do not use the tool if any switch does not turn on and off correctly.
- Replacement parts and accessories. When servicing, use only identical replacement parts. Use of any other parts will void the warranty. Only accessories intended for use with the tool are allowed.
- Do not operate the heavy-duty sand blaster if under the influence of alcohol or drugs. Read warning labels on prescriptions to determine if your judgment or reflexes are impaired while taking drugs. If there is any doubt, do not operate the tool.
- Maintenance. For your safety, maintenance should be performed regularly by a qualified technician.
- Never use the machine around flammable materials.
- Do NOT immerse the heavy-duty sand blaster in water or any other liquid.
- 17. This product cannot be used for other purposes. Not suitable for commercial use. INDOOR USE ONLY.
- Do not use alcohol or gasoline as a coolant.
- Keep bystanders a safe distance away from the work area. Anyone entering the work area must wear personal protective equipment. Fragments of a workpiece or a broken accessory may fly away and cause injury beyond the immediate area of the operation.
- This appliance is not intended for young or infirm persons unless supervised by a responsible person to ensure they can use it safely. Young children should be supervised to avoid playing with the appliance, and children and pets should stay away from it.
- DO NOT CLEAN IT WITH ANY ABRASIVE MATERIAL.
- Never leave it unattended while in use. Warning: The warnings, cautions, and instructions discussed in this instruction manual cannot cover all possible conditions and situations that may occur. The operator must understand that common sense and caution are factors that cannot be built into this product, but must be supplied by the tool operator.
HEALTH RISK WARNING
WARNING!
Please do not use the Heavy-Duty Sand Blaster until you have read this manual and understand its contents and warnings. These warnings are included for the health and safety of the operator and those in the immediate area.
Keep this manual for future reference.
Dust created by power sanding, sawing, grinding, drilling, and other construction activities may contain chemicals known to cause cancer, birth defects, other reproductive harm, and respiratory illnesses. Some examples of the substances include:
- Lead from lead-based paints
- Crystalline silica from bricks, cement, and other masonry products. Arsenic and chromium from chemically-treated lumber
Your risk from these exposures varies depending on how often you do this work. To reduce your exposure to these chemicals, Work in a ventilated area and wear approved safety equipment, such as dust masks specially designed to filter out microscopic particles.
Abrasive blasting produces harmful dust. Everyone in the blasting area must wear a properly fitted and maintained NIOSH-approved supplied-air respirator.
SILICOSIS AND OTHER DUST WARNINGS
Breathing dust from silica sand may cause silicosis, a fatal lung disease. Breathing dust during blasting operations may also cause asbestosis and/or other serious or deadly diseases.
A NIOSH-approved,well-maintained air-supplied abrasive blasting respirator must be used by anyone blasting, anyone handling or using media containing toxic substances, or media with more than one percent crystalline silica, and anyone in the area of the dust.
Harmful dust can remain suspended in the air for long periods after blasting has ceased, causing serious injury or death. Before removing the respirator, use an air monitoring instrument to determine that the atmosphere is safe to breathe.
Contact the local OSHA or NIOSH office to determine the proper respirator for your application. Supplied-air respirators do not remove or protect against carbon monoxide(CO)or any other toxic gas. A carbon monoxide removal device and a monitoring device with the respirator are used to ensure grade D quality air.
Follow all applicable OSHA standards and OSHA regulation 1910.134(d).
SAVE THESE INSTRUCTIONS
You will need these for the safety instructions, the operating procedures, the parts list, and the warranty. Put them in a safe and dry place for future reference.
IMPORTANT SAFETY INSTRUCTIONS
WARNING: When using tools such as your air compressor, whether powered by an electric motor or a gasoline engine, basic safety precautions should always be followed to reduce the risk of fire, electric shock, and personal injury
You should review the safety instructions for your Heavy-Duty Sand Blaster before beginning any work with it.
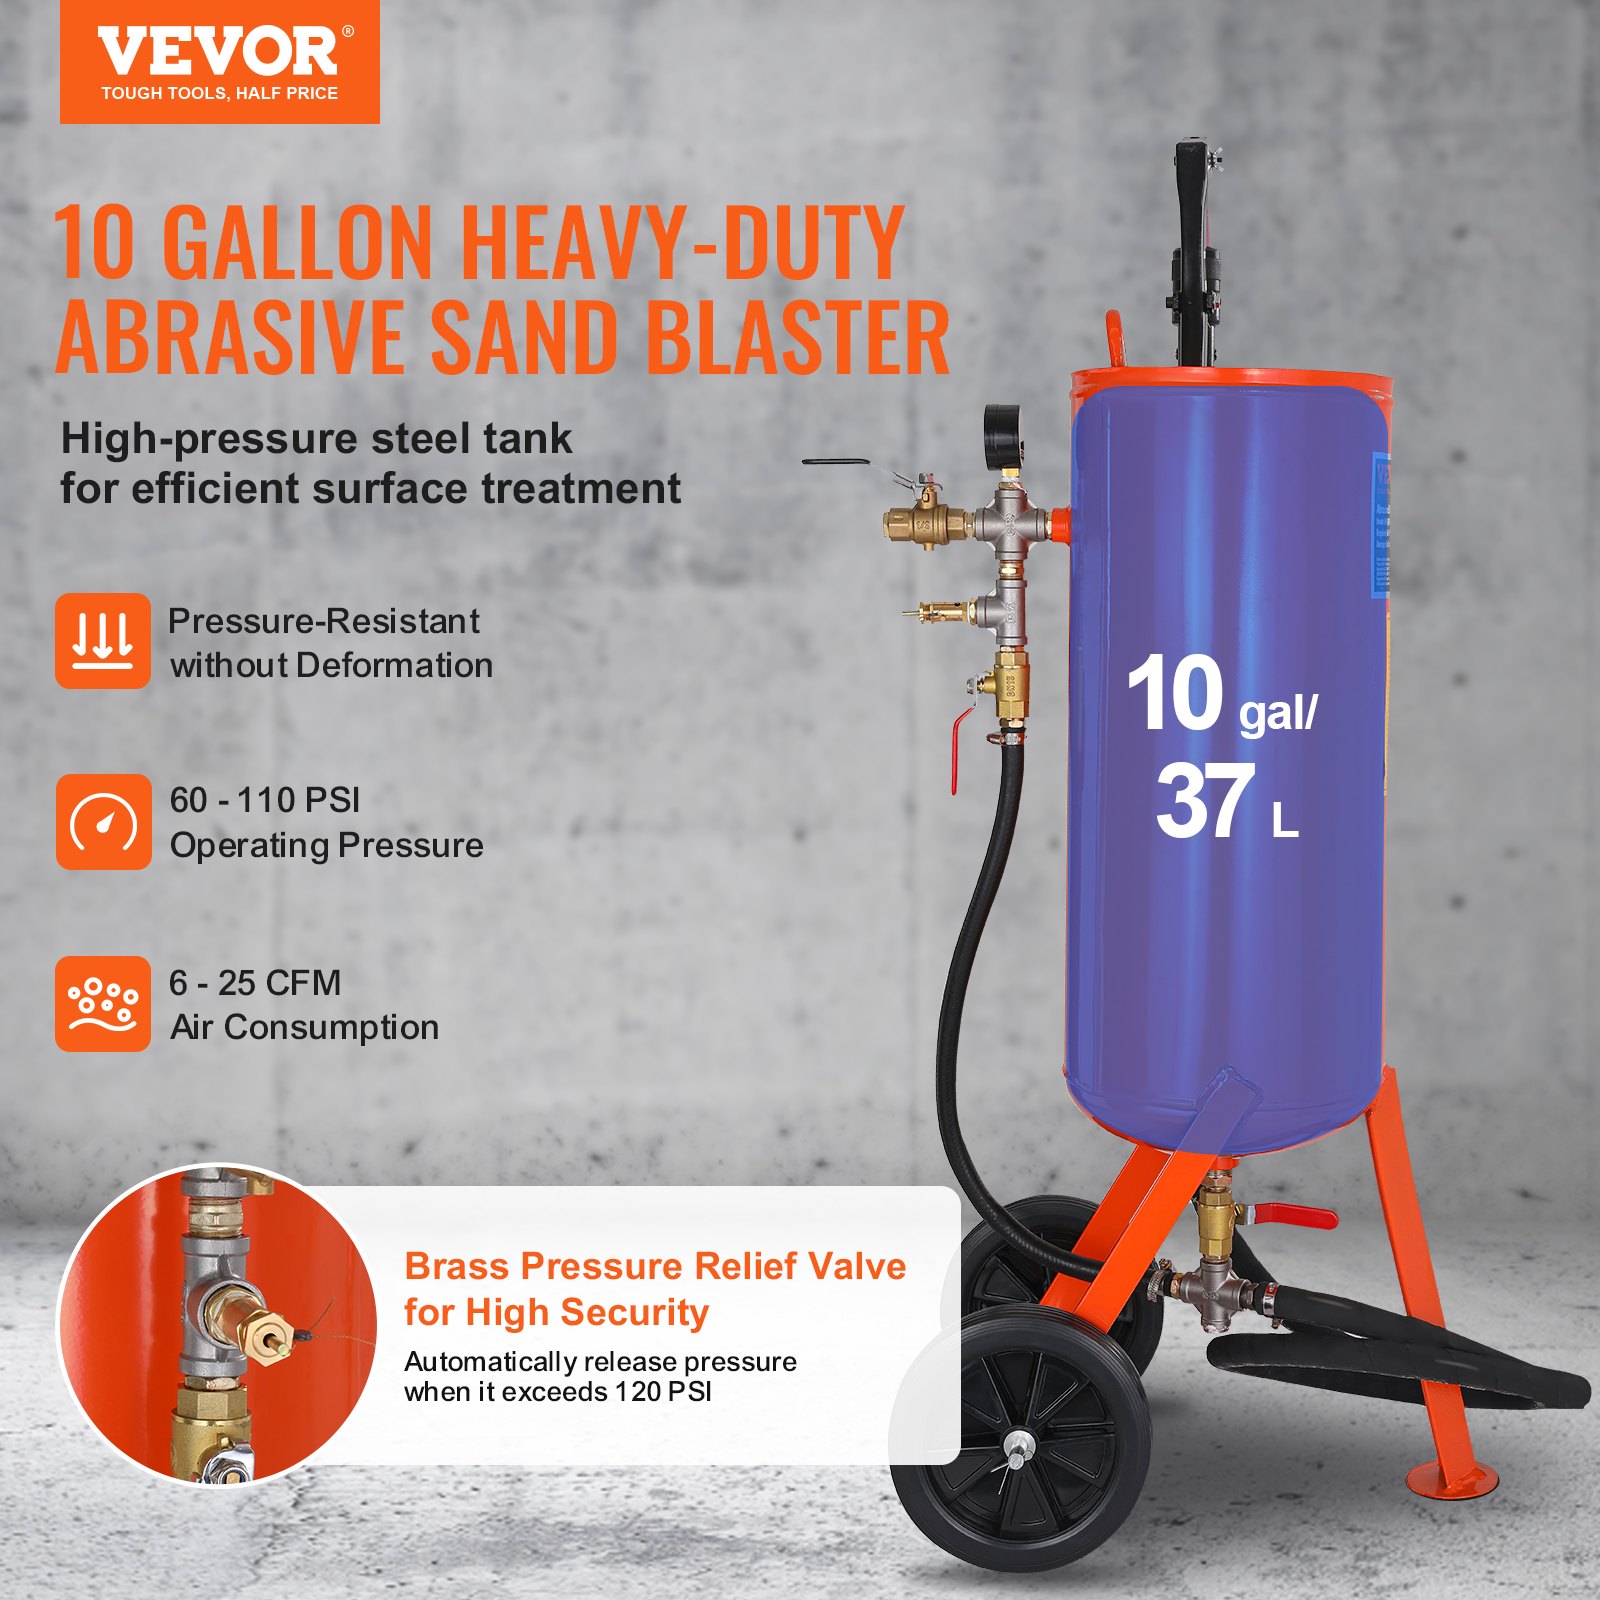
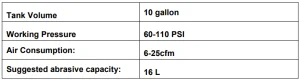
PRODUCT PARAMETERS
Attention:
- Do not use accessories that are not specifically designed and recommended by the tool manufacturer.
- Drain the water from the air compressor before use to ensure the air is dry and avoid abrasive (media) clumping; otherwise, it will not work.
- One of the ceramic nozzles has been installed on the product.
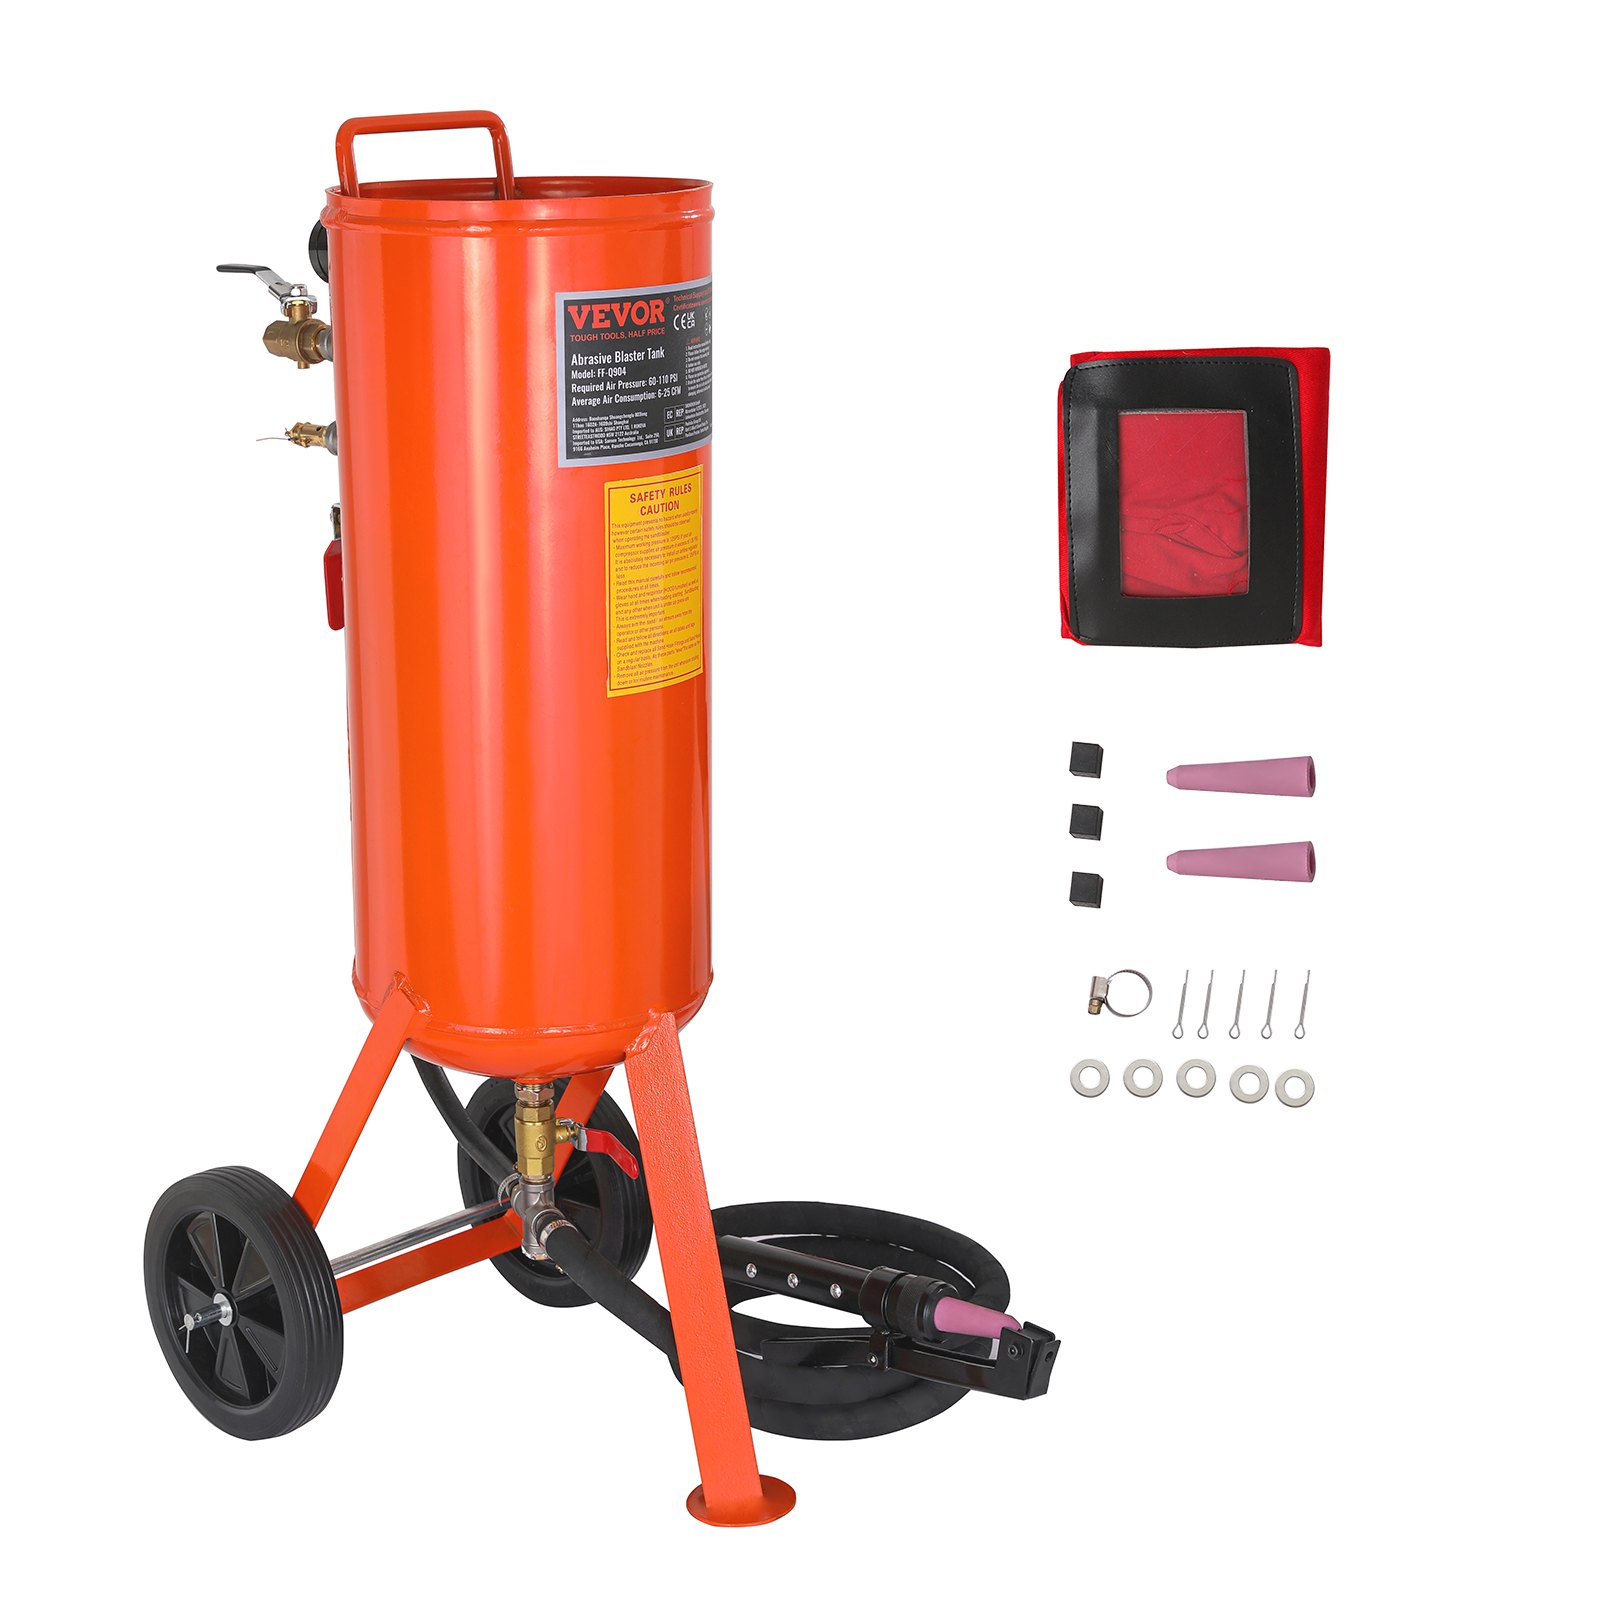
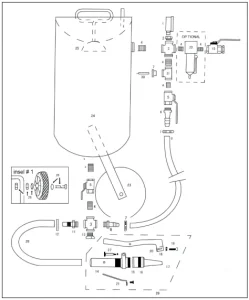
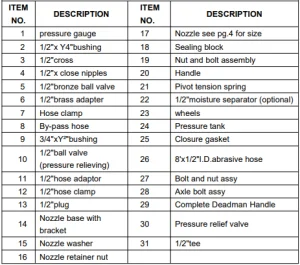
Heavy-Duty Sand Blaster Parts List
INSTALLATION NOTES
- Please carefully dispose of all plastic bags and keep them away from children and pets.
- Check all components provided according to the list in this manual. Make sure you have all of the parts listed.
- Although paying particular attention when manufacturing this product, you must be careful during the assembly process to avoid being scratched by sharp edges.
- Wear eye-protective goggles and protective gloves during assembly and use.
- The product should be placed on a flat surface.
Heavy-Duty Sand Blaster Assembly Instructions
- Attach the wheel assembly to the wheel bracket. Do not tighten the nut snugly against the wheel hub, as some movement is required to allow wheel freerolling. Tighten the hex nut directly against the wheel support housing to lock the wheel assembly in place.
- The abrasive regulator valve has been pre-assembled and attached to the tank’s bottom. Pipe dope has been used on all fittings for positive sealing. Apply pipe dope to the plumbing’s bottom. Connect the hose assemblies in the illustration with enclosed hose stems and clamps.
- Attach the abrasive and air bypass hose to the tank base. As shown in the diagram, proceed with assembling the air intake, choke valve, and pressure gauge. The optional air filter assembly should also be attached during this step. The Manufacturer recommends using pipe dope on all fittings for positive sealing. Several sub-assemblies have been completed at the factory for your convenience. Ensure all pipe fittings and hose clamps are tight before using the blaster.
WARNING!
Disconnecting the hose while the Unit is under pressure could cause serious injury or death. To help prevent accidental disconnection, use safety lock pins and safety cables in all coupling connections.
If twist-on type air hose couplings are used, they must be secured by safety lock pins or wires to prevent accidental disconnection while under pressure. Hose disconnection while under pressure could cause serious injury.
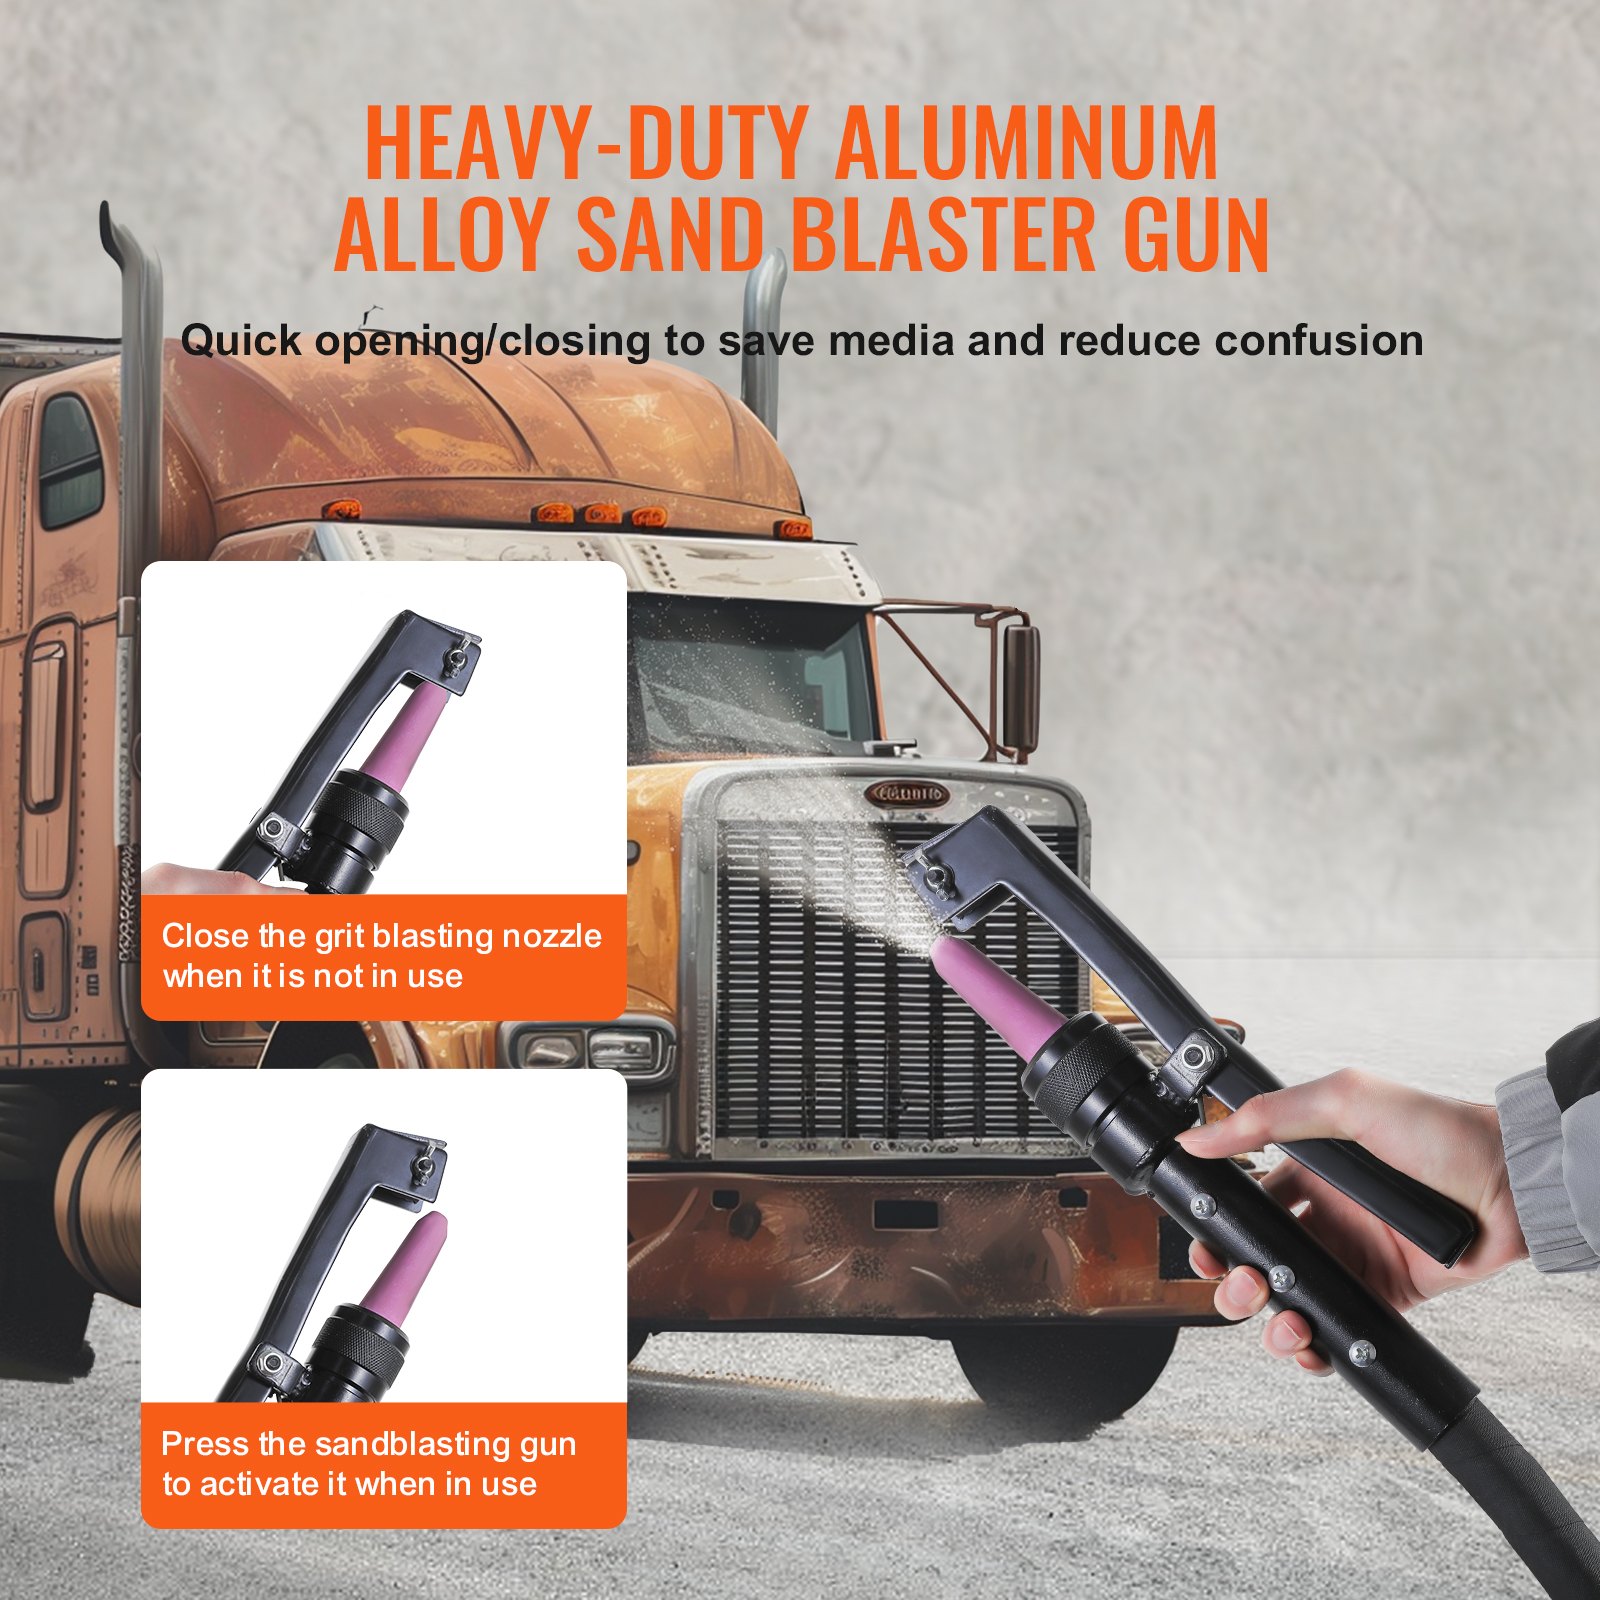
- The Deadman Valve Assembly has been pre-assembled and attached to the abrasive hose. It allows single-handed operation with a safety shut-off when the operator’s hand is removed or the valve is dropped. (Do not over-tighten the retaining nut against the ceramic nozzle. Excessive tightening may cause damage to the nozzle.)
IMPORTANT: The sealing block/nut and bolt assembly must be adjusted after inserting the ceramic nozzle.
- Recheck all pipe fittings and hose clamps to ensure they are securely tightened.
PRESSURE BLASTER SAFETY PROCEDURES
CAUTION: READ THESE SAFETY PROCEDURES IN THEIR ENTIRETY. PARTS OF THE OPERATING INSTRUCTIONS ARE WITHIN THESE WARNINGS.
These procedures are not intended to be exhaustive due to the many variables in the abrasive blasting field. Therefore, we INSIST that the hands, ears, mouth, nose, and eyes be covered with appropriate safety protection.
- Do not place fingers, body parts, or components in the filler plug seal area when the blast machine is being pressurized. Failure to keepbodypartsfromthe filler plug area will result in serious injury.
- Do not exceed the maximum working pressure of 125 PSI. Failure to keep maximum working pressure below 125 PSI can cause the blast machine to burst, causing death or serious injury.
- Everyone in the blast area, including the equipment operator, should correctly use and maintain a NIOSH-approved air-supplied respirator, even after blasting has ceased. Harmful dust can remain suspended in the air for long periods after blasting has stopped, causing injury or death.
- Before using the pressure blaster, wear safety glasses, gloves, and a NIOSH-approved respirator. Always wear these protective items when operating and servicing your abrasive blaster. While a protective hood is provided to help protect you from flying parts as you use the machine, the hood does not protect you from airborne particles. Anyone blasting must use a well-maintained air-supplied blasting respirator.
- Use thick gloves to protect your hands.
- Use backboards to prevent overspray from hitting someone or something else because the dust will travel a long distance. Blast in a large open area to minimize abrasive accumulation in the surrounding regions.
- Do not pull the media tank around by the abrasive hose or let the tank fall over, as a fitting may break, rendering the machine unsafe. Media and air under 125PSI have a very high destructive force. Never leave a pressurized machine unattended. If an emergency occurs, such as a burst blast hose, shut down the machine immediately.
- Drain air out of the tank through the inlet valve and disconnect power before maintenance cleaning of any kind. When removing the nozzle, caution must be
- exercised as air pressure may still be in the hose if the nozzle is plugged.
- For safe operation, perform recommended preventive maintenance on the blast tank, remote unit, and accessories. Replace all worn parts before they fail. Worn components must be replaced immediately. Failure to replace worn components could expose the operator or bystanders to high-speed media and compressed air, causing serious injury.
- Do not use corrosive materials of any type in the unit. Use only clean, dry media.
- Do not splice abrasive hose. The splice will wear out quickly and may violently spray media over the surrounding area. A worn blast hose could suddenly fail by bursting. Couplings and nozzle holders may not adequately grip worn hose, causing them to blow off under pressure. Compressed air and abrasive escaping from a burst hose, or a disconnected coupling or nozzle holder, could cause severe injury.
- Welding, grinding, or drilling on the blast machine could weaken the vessel. Compressed air pressure could cause a weakened blast machine to rupture, resulting in death or serious injury. Welding, grinding, or drilling on the blast machine vessel without a National Board R stamp voids the ASME and National Board certification, if applicable.
- Always place the machine so the outlet is pointed away from objects or persons. Stand clear of the path of the exiting abrasive. It may come out at high velocity, and the impact of the exiting abrasive could cause severe injury.
- Do not use electrical adaptors that eliminate the ground prong on 115-volt plugs. Failure to properly ground the machine can cause injury from electric shock and equipment damage. Always ground the Blast machine to help reduce the possibility of static electricity and its related hazards.
- Do not use this equipment in any hazardous area or where flammable gases or liquids are present. Failure to do so may cause an explosion, resulting in serious injury.
- The use of this equipment can create static electricity. Do not use within fifty feet of any explosive, potentially explosive Substances, or their vapors, as an explosion can occur.
- Do not overfill the tank with media, and do not fill it to within 6 inches of the top.
- BEFORE OPENING THE TANK, release the air pressure on the abrasive tank. To do this, turn off the air supply valve (19) and push down to open the DEADMAN valve(1) to release pressure in the line. Ensure that the tank pressure gauge reads zero, then open the tank.
- MAINTAIN CORRECT AIR PRESSURE: A maximum of 110PSI is recommended; pressure must not exceed 125PSI. If pressure exceeds 125PSI, stop all work immediately and disconnect the air compressor to reduce the excess pressure. Do not investigate the blaster’s pressure problem until the pressure reads zero.
OPERATING INSTRUCTIONS
OPERATING TECHNIQUE
- Connect the air hose to the air inlet valve. The manufacturer recommends using a minimum incoming air hose of 1/2″ I.D. Using an air hose smaller than 1/2″ I.D. will restrict air volume and result in poor unit operation. Before air injection, the air inlet and nozzle valve are in the OFF position. With the Deadman Valve closed and filler plug tight, open the air inlet valve, allowing air to pressurize. The operating range of the unit is 40 to 110 PSI. After proper nozzle selection insert nozzle into retainer base. Set the washer again, slide the retainer nut over the nozzle, and tighten by hand.
- The Pressure Blaster has a unique semi-automatic pull-up, closed design. The manufacturer recommends a fine grade abrasive with granular sizes similar to table salt. This assures proper flow and reduces the possibility of nozzle obstruction. When ready to pressurize the container, pull up the closure and turn on the incoming air. The internal air pressure will seal the closure.
- With the blaster pressurized and the abrasive flow regulator valve at the unit’s base closed, open the choke valve, allowing air to flow through the bypass hose to the unit’s base. Then, holding the abrasive hose by the nozzle retainer housing with the nozzle directed away from the unit and operator, quickly squeeze the Deadman Valve fully open and adjust the regulator valve at the base of the tank to bleed the abrasive into the airflow. Slowly open the regulator valve until abrasive material is slightly visible.
Once the regulator flow valve is adjusted to the desired setting, further adjustment should only be required when changing the grade of abrasive material or when using a nozzle with a different ID.
For best performance, the Deadman Valve should be opened and closed quickly.
Note: The choke valve located at the rear of the tank on the bypass air line must always be open during blasting
WARNING
All persons except the equipment user must stay clear of the blast machine. The user may pressurize or depressurize the machine at any time. The noise generated by the sudden release of compressed air while the machine is pressurized or depressurized may startle bystanders and may vent abrasive material under pressure. Either condition could result in injury,
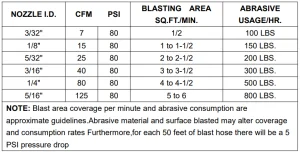
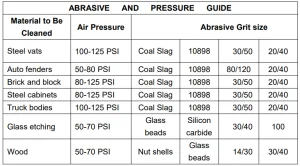
NOZZLE SELECTION CHART
WARNING!
The threads on the nozzle and nozzle holder must be inspected each time the nozzle is secured to the holder. Check the threads for wear, and make sure the nozzle holder securely grips the nozzle. The nozzle washer must also be inspected for wear. Worn nozzle washers cause thread erosion.
A loose-fitting nozzle may eject from the holder under pressure and cause severe injury. Disconnecting the hose while the unit is under pressure could cause serious injury or death. Use safety lock pins and safety cables in all coupling connections to help prevent hose couplings from accidental disconnection.
If twist-on air hose couplings are used, they must be secured by safety lock pins or wires to prevent accidental disconnection while under pressure. Hose disconnection while under pressure could cause serious injury.
AIR COMPRESSOR RECOMMENDATION
To permit efficient air compressor operation, follow these guidelines: Use a smaller size nozzle to control the air demand.
- 1. Do not blast continuously. Stop the blasting operation periodically to allow the compressor to cool.
- No compressor is designed to run at full RPM constantly. Use 70% of the rated output. Use a minimum 1/2″ air hose or metal piping from your air compressor to the blaster. If your compressor is creating excessive moisture, we recommend using a water trap or a moisture separator. Open the bleeder valve until water slowly flows out continuously.
- The air compressor should be drained at the bottom of the supply tank through a drain valve and should be blown down daily. Draining three or four gallons of water from the supply tank on a high-humidity day is not unusual. An additional supply tank will help keep dust and media created by blasting away from the air compressor unit.
- Observe the blaster’s maximum air pressure requirements. Either set your compressor to run within these limits or use a pressure regulator valve to reduce the air pressure to the appropriate range.
ABRASIVE (MEDIA) USAGE
- Moisture in the media will eventually damage the blaster tank or plug the system. To avoid this problem, keep the media and compressor air dry.
- If the media is moist, screen and dry it before use.
- Do not leave media in the tank after blasting because it can absorb moisture and impair blasting performance.
- Store media in a dry place; keep media off the ground or concrete floors. Put it on a wooden skid.
- If the humidity is excessively high, it may not be advisable to blast at that time.
- Consider using different grades or media types to prevent nozzle clogging due to high moisture content.
- Do not use sand.
Warning!
Do not fill the pressure vessel to within six (6) inches of the top of the vessel. If a hose is accidentally disconnected during use, media spray may occur.
See respiratory-related WARNINGS at the beginning of the manual.
Coal Slag
Coal slag is used when paint and rust have to be removed from steel, such as in carbodies, tanks, or heavy machinery. Coal Slag is superior to silica because it only has 0.1% free silica, is faster cutting, can be reused, is moisture-free, and will not pack or absorb moisture. (25 lb. container)
Steel Grit
Steel grit is extremely fast cutting on rusty metal and hard to remove paint. SteelGrit is popular because it leaves a very smooth finish. It is also comparable in price to most other specialty abrasives. Steel Grit is recommended for reclaimed systems or cabinets. (25 container)
Glass Bead
Glass beads create a satin or matte finish and are recommended for reclaim systems or cabinets.
Aluminum Oxide
Aluminum Oxide is a high-quality abrasive that is sharper than sand(not recommended) and cuts twice as fast as sand. It leaves a smooth texture with no pits. Aluminum Oxide is rougher than glass beads and can be used repeatedly. It is among the most economical abrasives in any reclaim systems or cabinets.
Plastic Grit
It is primarily used to strip aluminum and fiberglass. It is great for stripping paint, light oxidation, and surface rust. Blasting cabinets are recommended because they create very little dust. It works quickly, lasts a long time, and increases visibility within the cabinet.
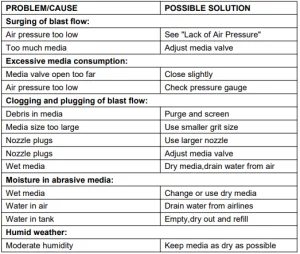
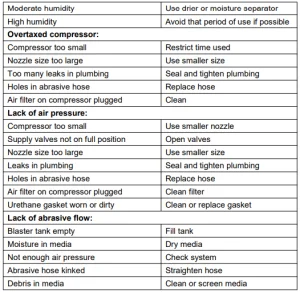
Heavy-Duty Sand Blaster Troubleshooting Tips
 Heavy-Duty Sand Blaster Maintenance
WARNING!
Failure to observe the following before performing any maintenance could cause serious injury or death from the sudden release of compressed air:
Depressurize the blast machine. Disconnect the power supply. Lock out and tag out the compressed air supply. Bleed the air supply line to the blast gun.
Wearing components must be replaced immediately. Failure to do so could expose the operator or bystanders to high-speed media and compressed air, which could cause death or serious injury. Leaks around couplings and nozzle holders indicate worn or loose-fitting parts.
Nozzle holders and couplings that do not fit tightly on hoses and nozzles that do not fit tightly in nozzle holders could disconnect while under pressure. Impact from nozzles, couplings, hoses, or abrasive parts disconnected while under pressure could cause severe injury. To ensure a long and efficient operational life of the Deadman Handle, it is highly recommended that the following procedures be followed:
- Periodically(after 5-6 months of moderate use or after 10-15 hours of heavy industrial use) replace all hose adaptors for abrasive flow use only.
- Replace the rubber sealing block after 7-10 hours of use to maintain proper shut-off.
- Check abrasive hose when it begins tos sputter or leaks media or air around the hose or handle area.
- Replace the nozzle when it wears to the next larger size.
- Check the urethane gasket in the pull-up closure when the air leaks excessively from the opening (ensure the gasket is free from media).
Recommended For Your Project
VEVOR 10 Gallon Heavy-Duty Sand Blaster, 60-110 PSI Manual


Reviews
There are no reviews yet.