
Unlock the full potential of your VEVOR Electric Hydraulic Paper Cutter with our comprehensive product manual. Designed for the Heavy Duty Paper Cutter Machine with a 26″ / 660.4mm cutting width and 3.14″ / 80mm cutting thickness, this manual ensures you get the most out of your electric paper trimmer equipped with a 7″ touchscreen numerical control. Our detailed guide walks you through every step of setup, troubleshooting, and optimization, making achieving precision and efficiency in your cutting tasks easier than ever.
Whether setting up for the first time or fine-tuning your machine, this manual is your go-to resource for expert tips and best practices. Download it now to enhance your experience and ensure smooth, hassle-free operation of your VEVOR Electric Hydraulic Paper Cutter.
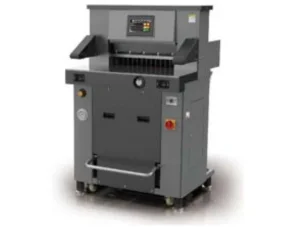
Electric Hydraulic Paper Cutter User Manual
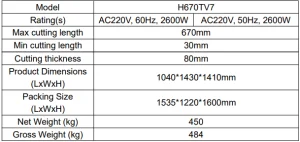
MODEL NO.: H670TV7
Warning
Please read this manual carefully before using the product. Failure to do so may result in serious injury. SAVE THIS MANUAL.
Warning: This machine can only cut printed paper, books, or soft leather. It is forbidden to cut metal sheets or other hard objects that could harm the machine’s quality.
- Forbid children from operating the machine.
- Keep your hand away from the blade.
- Do not extract or transport the blade without protection, not cut your hand or splintery materials.
- Must use a socket with a ground wire connected.
Note:
Read this manual for more usage information on the Numerical-controlled Paper Cutting Machine. This will help you improve your working efficiency and realize the property. The machine will have the best cutting effects. This will also be good for the maintenance of the machine and can prolong the service life of the machine.
Safety Precautions
1. Open the box and check
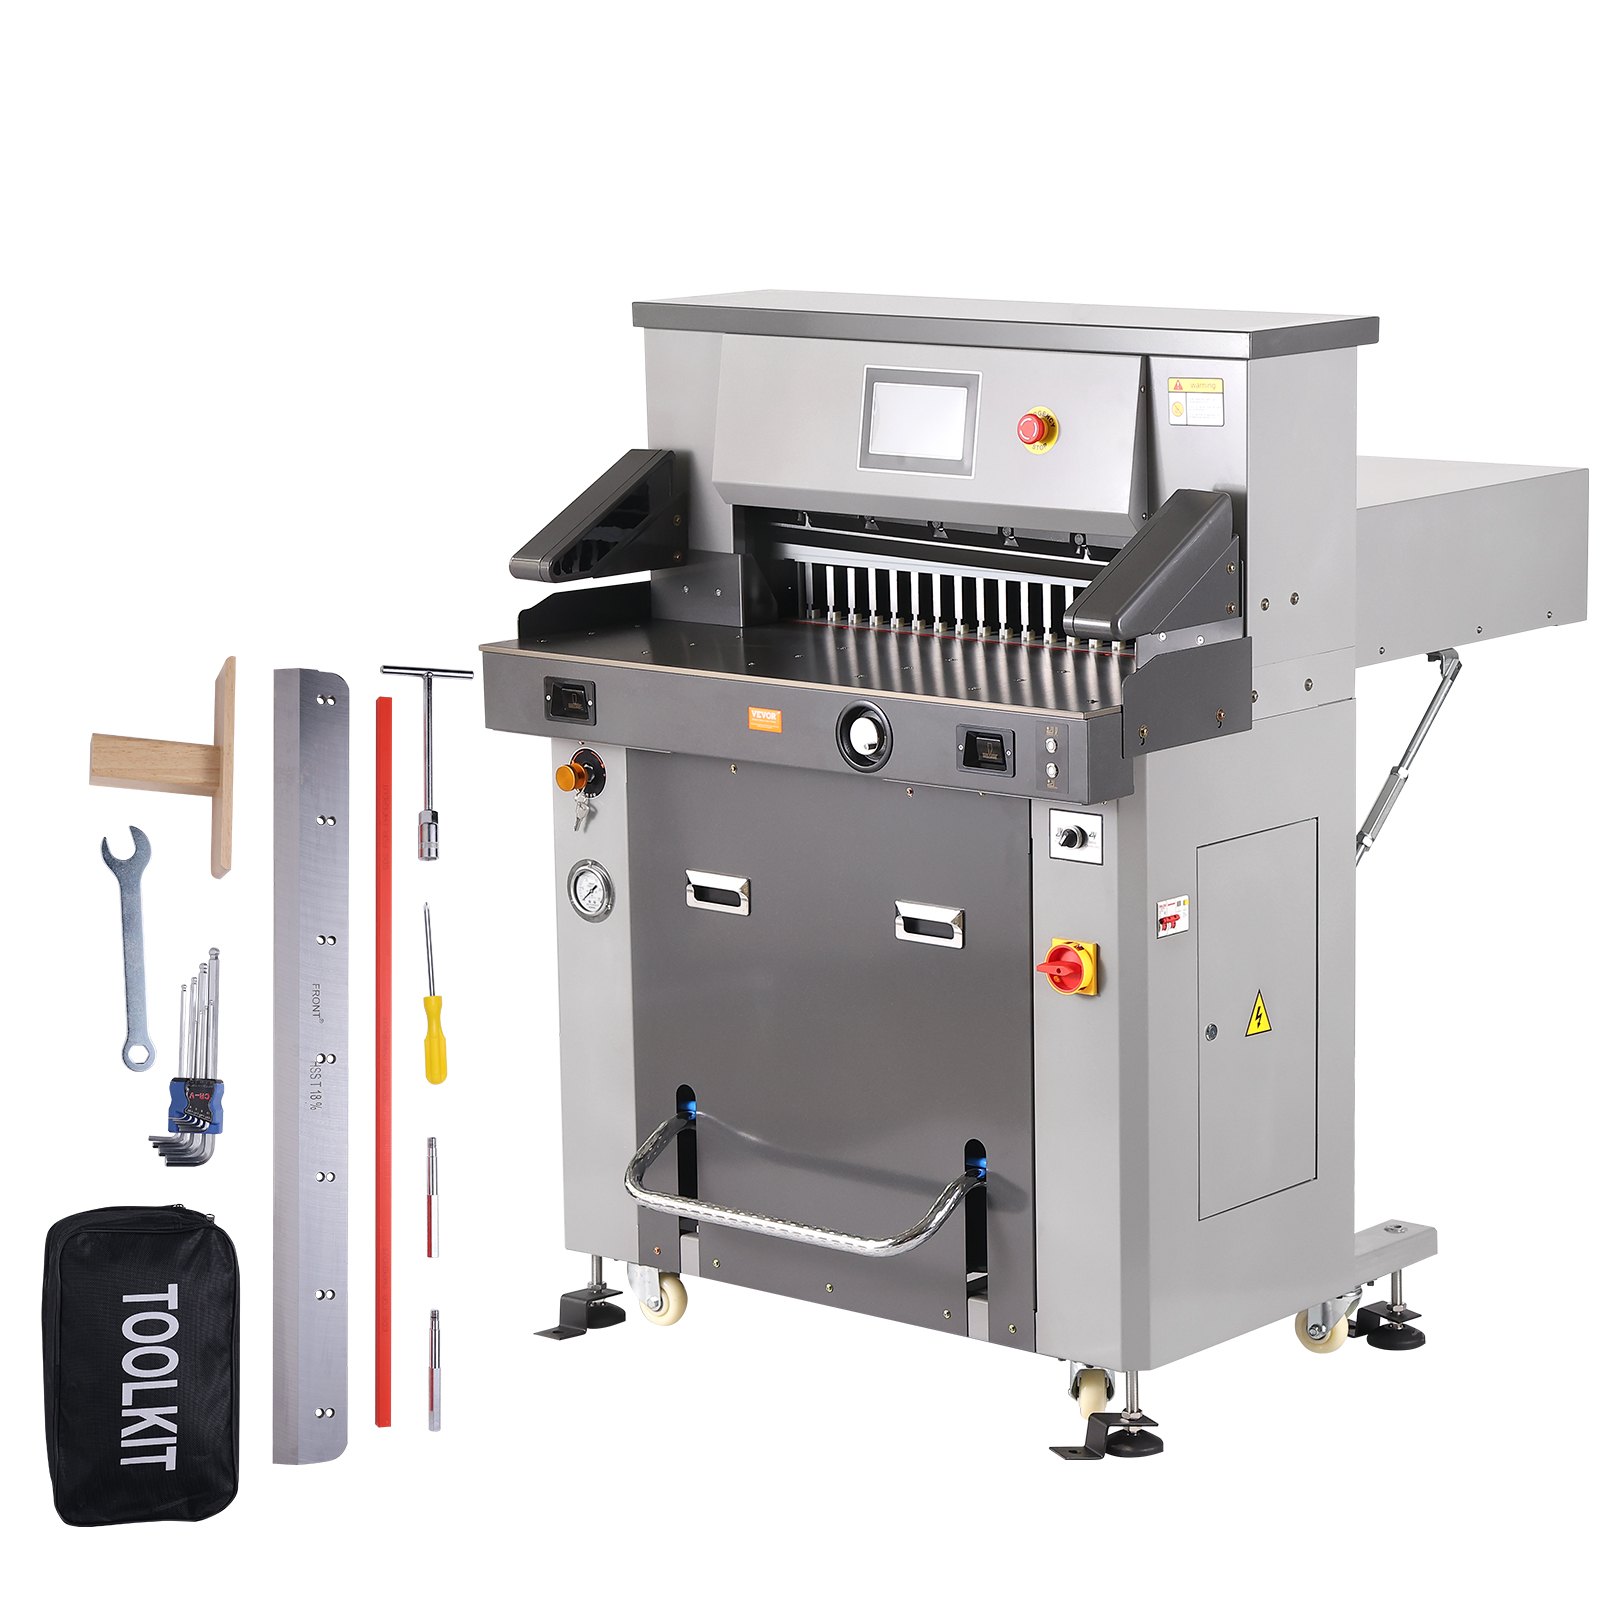
First, when you open the Electric Hydraulic Paper Cutter’s package, check the machine and the relevant accessories. Don’t hesitate to contact the seller or the company if there is any damage or shortage.
- 1 set of main engine
- 1 instruction manual
- 1 set of tools
- 2 screws for tool removal
- 1 Certificate
- 1 blade and 1 power line
- 1 warranty certificate
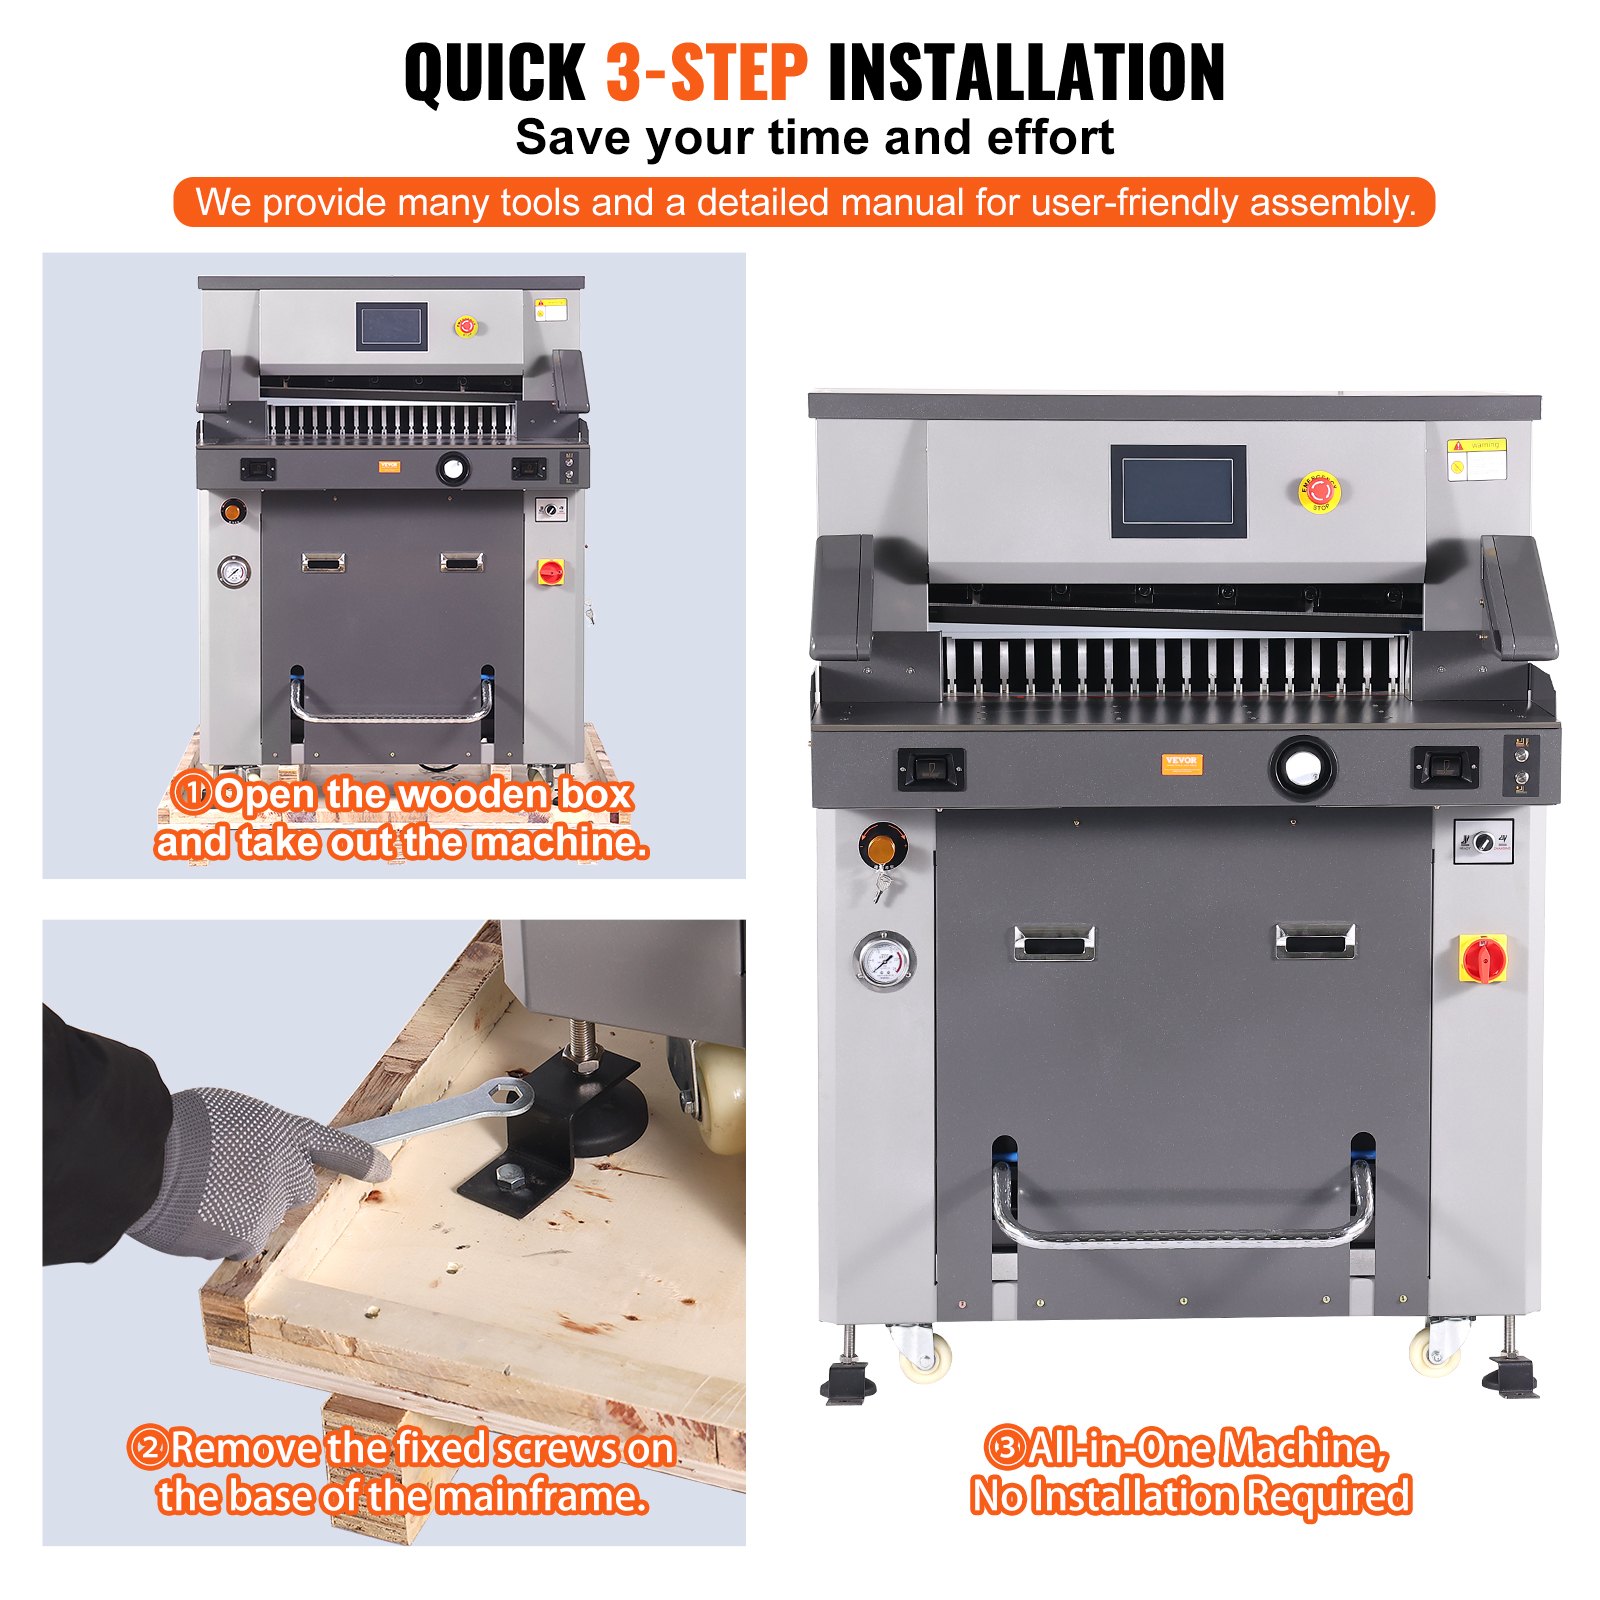
2. Electric Hydraulic Paper Cutter installation and initial commissioning
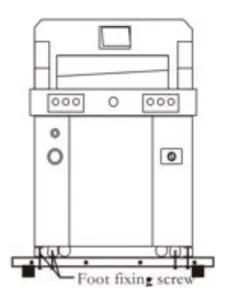
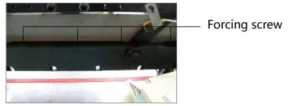
Remove the wooden box, the accessories, and the fixing screws on the base of the main engine. The hydraulic press needs to be shoveled by a forklift.
The location of the paper cutter should meet the following requirements:
- No vibration
- The ground shall be level and level, and the grade of concrete on the ground shall be at least 300 mm, enough to carry the machine.
- It can avoid the operator’s accidental injury caused by uneven ground.
- Keep a proper distance from buildings and ancillary equipment.
- It is recommended to adjust the levelness of the console with a level gauge.
Check the packing list for completeness and missing items.
Check and clean all parts of the machine.
3. Usage environment
The machine must be placed in a clean working environment to avoid direct sunlight and air outlets. Environment temperature: 10 ~ 30℃,
It shall not exceed 32 ℃; Ambient temperature: 50 ~ 80%;
Connect the ground wire correctly.
4. Hot tip
Remember that only one professional is allowed to operate this machine. When cutting, the button must be operated with both hands simultaneously; Do not remove the safety cover.
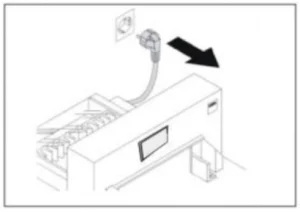
When hands or foreign matter enter the cutting area, the power supply must be cut off first.
When replacing the blade, strictly follow the blade replacement instructions.
It is forbidden to modify the internal structure and circuit of the machine without permission.
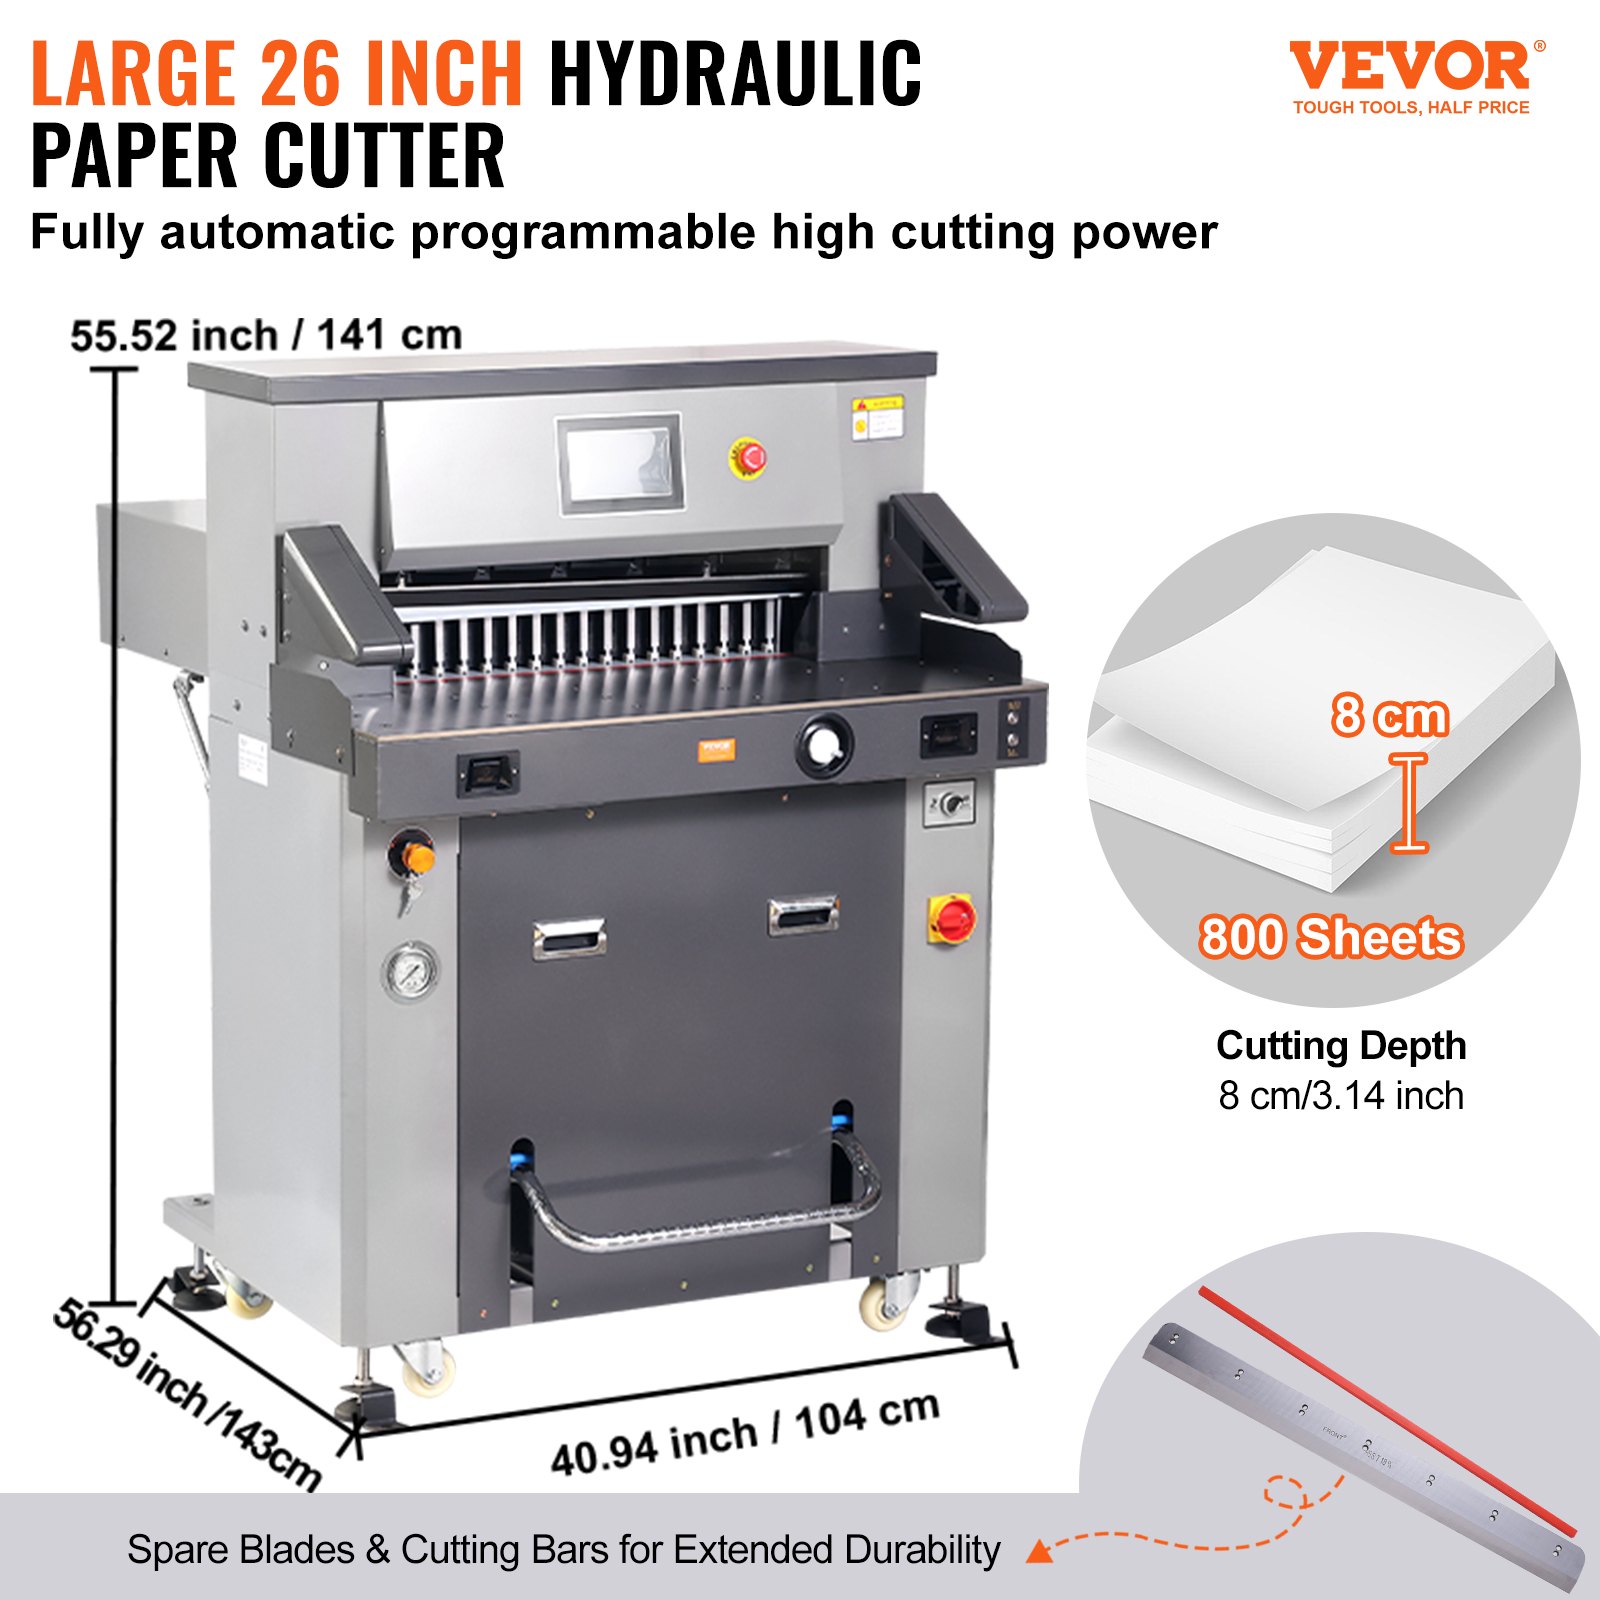
Electric Hydraulic Paper Cutter Technical Specifications
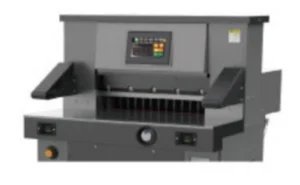
Electric Hydraulic Paper Cutter Parts Description
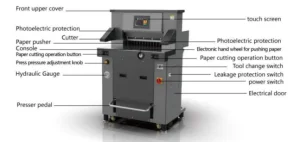
Operation Panel
Operation diagram of a paper cutter.
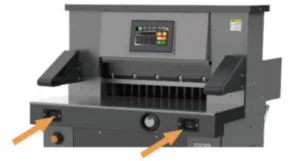
Turn on the power supply, turn on the power switch, and turn the switch to on. The display will be on, and it will show the president’s switch. When the knife light is on, the paper pusher automatically adjusts the size, which indicates that it has entered the normal startup state.
The correct way to operate the machine is to stand in front of the center of the machine and face the paper cutter. The left hand controls the button on the left, and the right hand controls the button on the right (you can also step on the pedal switch for single pressure or single pressure before cutting), as shown in the figure.
Basic operation and adjustment
1. Basic Operation
Power on
Before starting the Electric Hydraulic Paper Cutter, check whether there are other articles on the machine, and clean them up;
Turn on the power supply;
Turn the electrical protection switch to the “on” position, turn on the power switch, the NC screen / LCD screen will display, the position indicator line will be on, and the paper pusher will be automatically calibrated, indicating the power is normal.
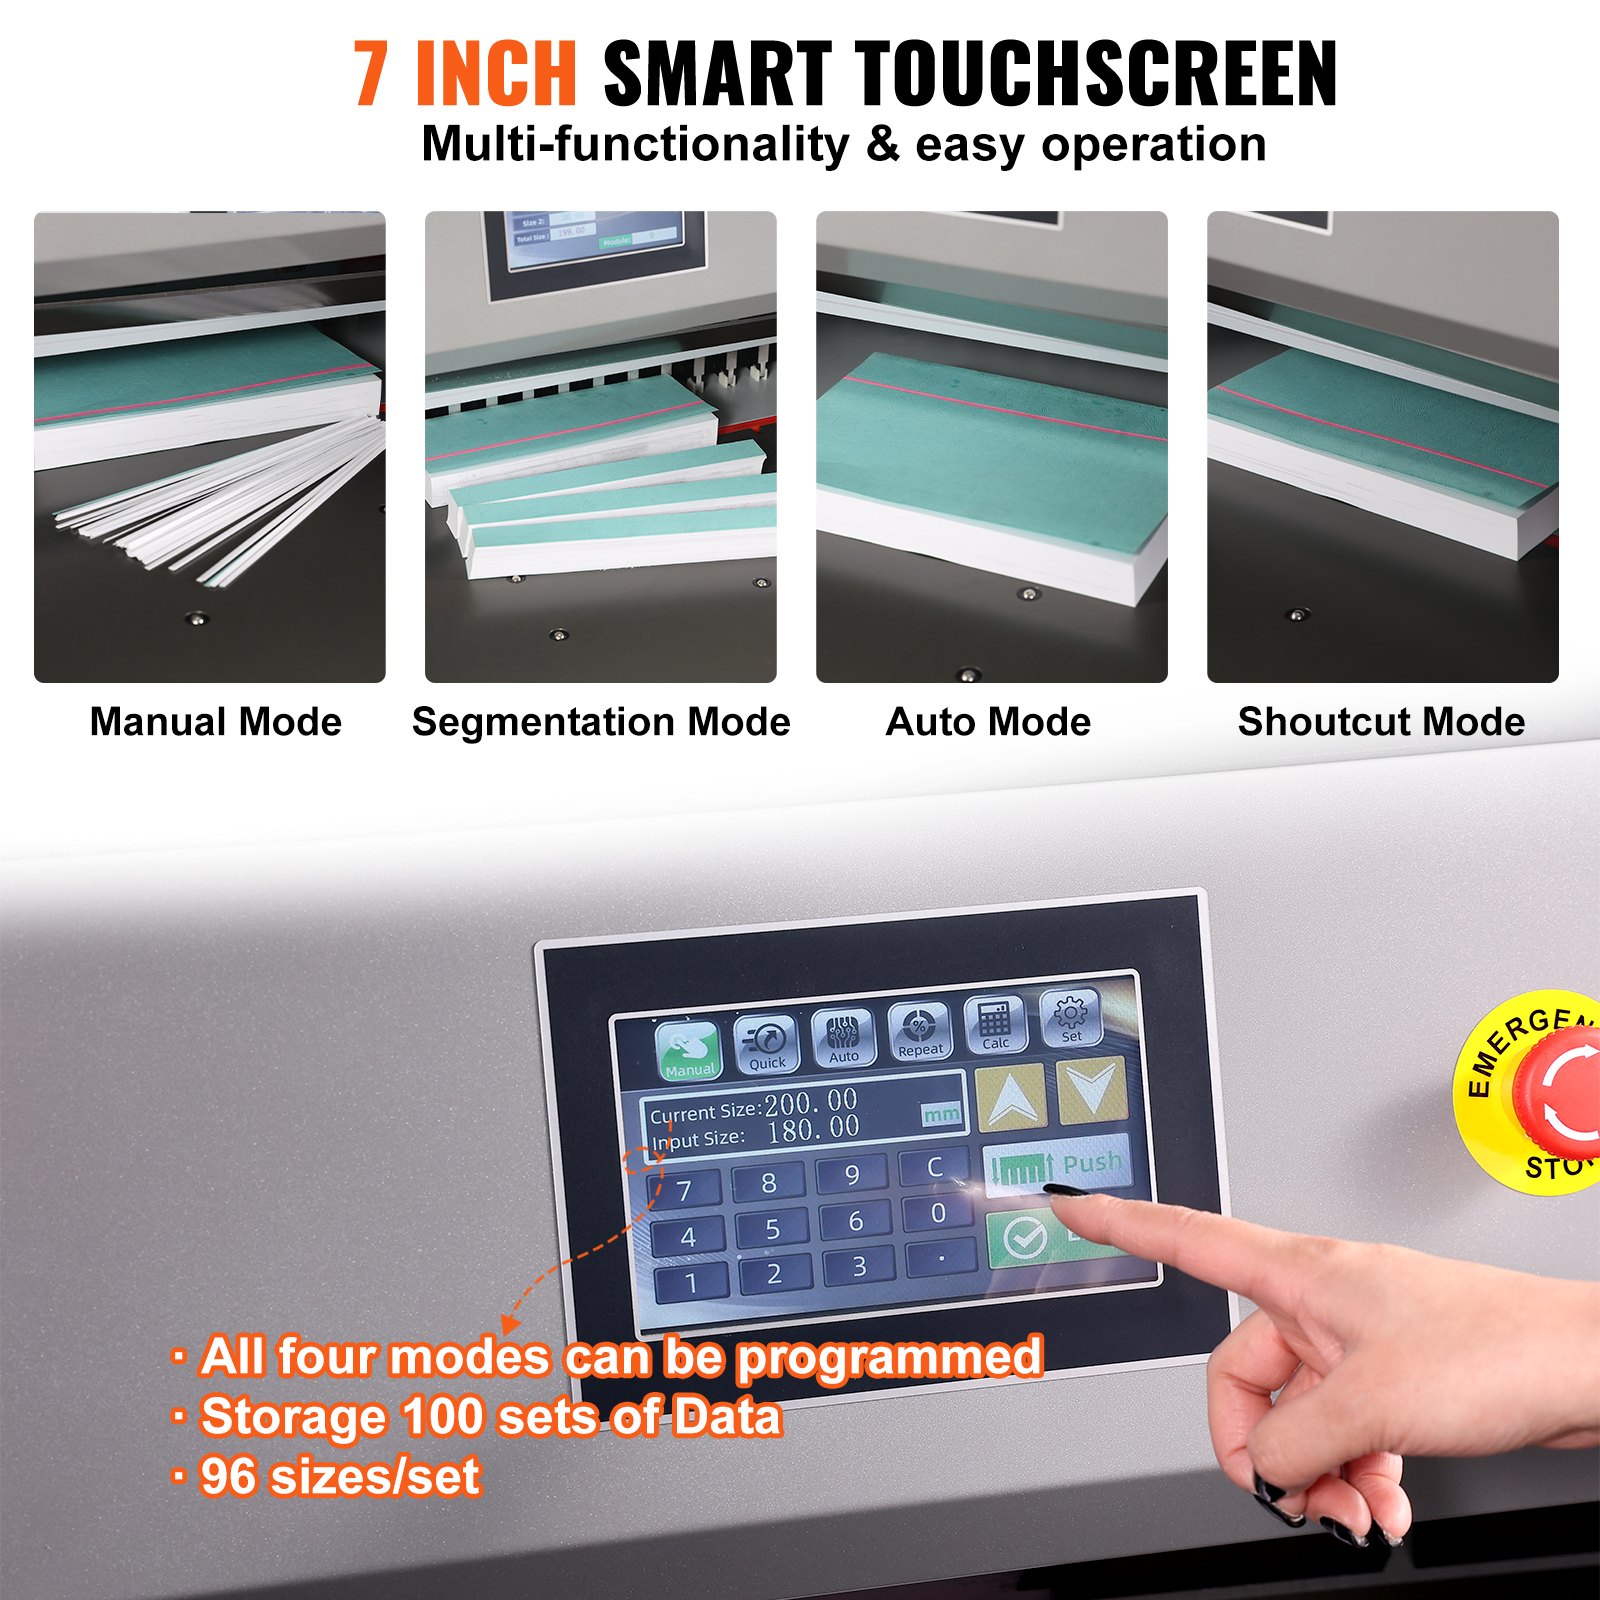
Operation instructions of the touch screen paper cutter
The program-controlled computer has three paper-pushing modes.
Now, 285mm is taken as an example to push paper respectively
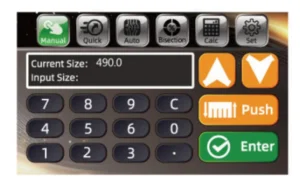
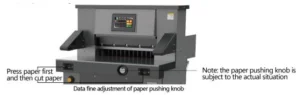
A. Manual mode
After startup, if the current mode is not manual, click manual to switch to manual mode, as shown in the figure. In manual mode, there are two methods to input data. One is the paper-pushing knob (not recommended, as it is relatively slow and not recommended. The paper-pushing knob is only used for data fine adjustment).
The second method is to directly click 480 to reverse select, press the clear key, enter 285.0, and OK. The paper pusher moves to the position of setting size.
Use of electronic handwheel
Rotate the button clockwise, and the paper pusher moves toward the arrow, 0.1 mm per click. Press and hold the rotation button continuously, and the pusher moves slowly to fast.
When the button is rotated counterclockwise, the paper pusher moves toward the arrow, 0.1 mm per click.
Press and hold the rotation button continuously, and the pusher moves slowly to fast.
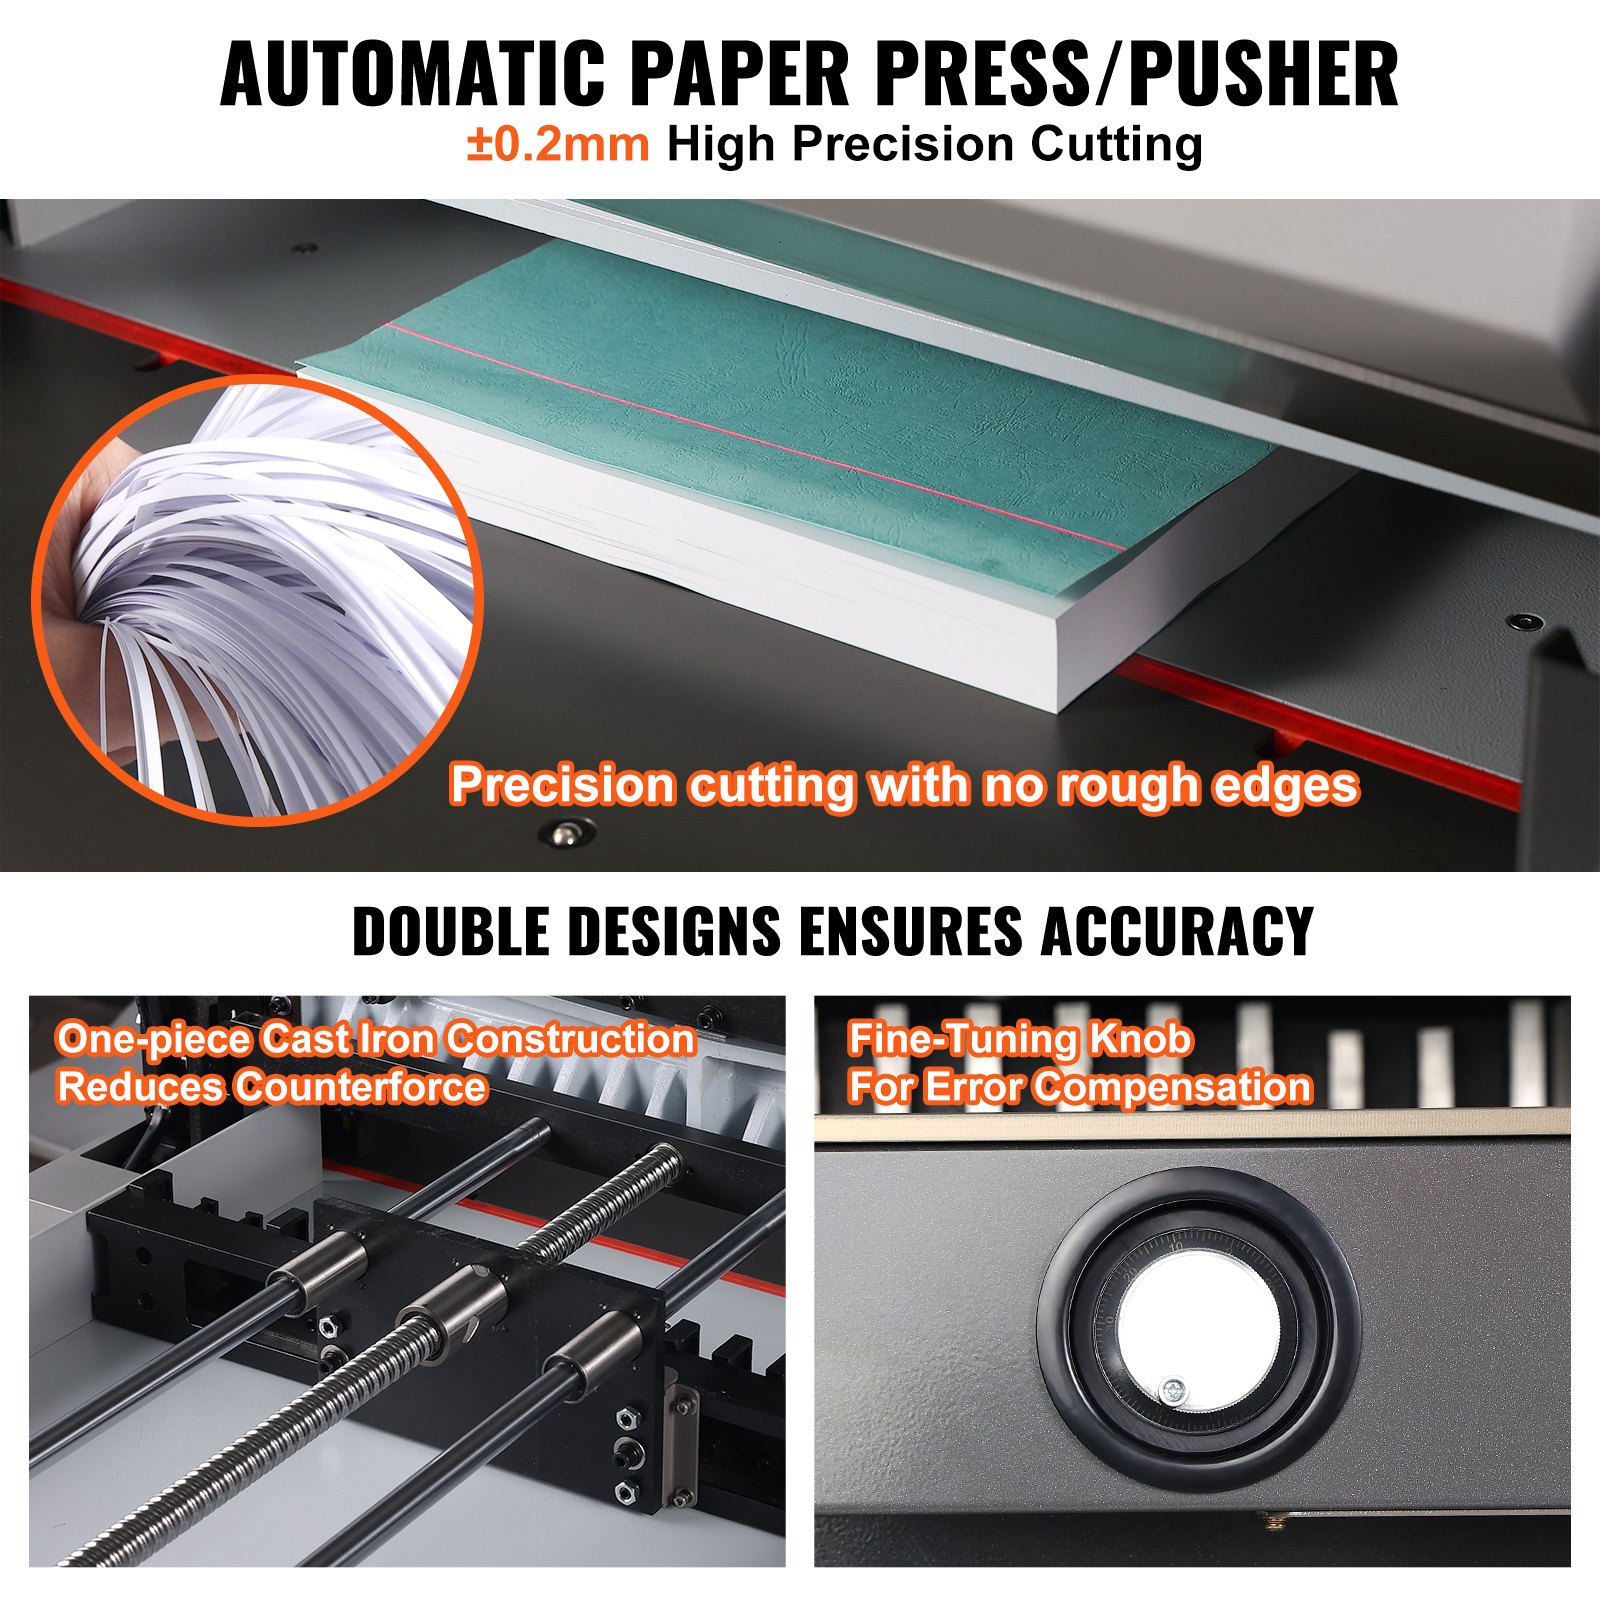
Push the cutting paper or book in and place it on the left side to align with the ruler bar.
After confirming the size, you can cut the paper. Step on the foot switch, the presser starts to press the paper, press the cutting button with both hands, and start cutting after pressing the paper (you can also press the cutting button directly with both hands without stepping on the foot switch, and the paper holder starts pressing the paper after pressing the paper).
When there is any error, release the button, the knife and the presser will automatically return to their original position, and continue to press if there is no error Live the cutting button to complete cutting;
After cutting, the paper pusher pushes the book out (set the automatic push book cutting), completing the cutting process.
To continue cutting, repeat the above steps.
B. Segmentation mode
Click bisection to switch to bisection mode, click OK, and the paper pusher will automatically push to the first size. When you need to edit the size, click the programming mode to enter the first group of programming modes, as shown in the figure. To modify the data, click Edit, click Bisection Edit, switch to bisection editing, switch dialog box, modify data, and confirm to return.
Push the cutting paper or book in and place it on the left side to align with the ruler bar;
Push the cut paper or book in and place it on the left to align with the ruler.
After confirming the size, you can cut the paper.
Step on the foot switch, the presser starts to press the paper, press the cutting button with both hands, and start cutting after pressing the paper (you can also press the cutting button directly with both hands without stepping on the foot switch, and the paper holder will start pressing the paper after pressing the paper). When there is any error, release the button, the knife and the presser will return to their original position automatically, and press it again after confirmation Hold the cutting button to finish cutting the size ofthe first knife of 60.0 mm, and then continue to press the cutting key to cutthe size of the second knife of 110.0 mm.
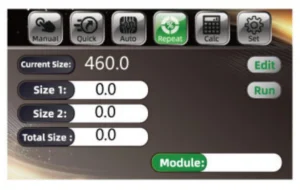
Program control mode operation
Click program control to switch to program control mode. As shown in the figure above, you can see a lot of data listed. Click to turn the page. Click Edit to input cutting data.
After entering, click Edit to save data again, and click Change Module to switch the data of different modules. After clicking, the paper pusher will move to the corresponding size, push in and cut the paper or book, and put the paper or book on the left, which is close to the ruler.
After setting the size, push in the cutting paper or book and arrange it to the left so that the edge is in line with the ruler.
After confirming the size, the paper can be cut. Step on the foot switch, and the paper presser presses the paper. Press the cutting button with both hands, respectively. Press the paper to start cutting (or do not step on the foot switch, press the cutting button with both hands, and the paper holder starts pressing the paper, then starts cutting after pressing the paper.
If any error is found, release the button. The knife and presser will return to their original position automatically. Continue to press and hold if there is no error.
The cutting button is used to cut the size of the first knife to 60.0 mm, and then continue to press the cutting key to cut the second knife size of 110.0 mm. After cutting the first and second knives, press the cutting key to return to the first knife 60.0 automatically.
Cut and repeat until the cutting sequence is completed (it is invalid to push books by yourself in the bisection mode).
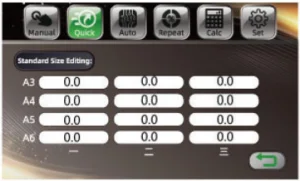
Shortcut mode
Click the shortcut to switch to shortcut mode. Several common standard sizes appear.
Click the required size, and the paper pusher will automatically push to the first size, as shown in the figure.
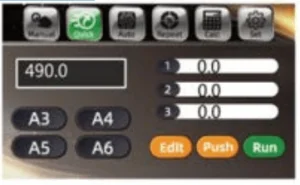
To edit the size, click Edit mode, click the standard size edit to enter the modification interface. After modification, click the return icon, as shown in the figure.
Basic Adjustment
Size proofreading and adjustment. Cut off the power supply.
Remove the bottom plate of the machine and check whether there are foreign matters stuck on the driving screw rod;
Check the stepper motor, remove the rear bottom plate, and check whether the synchronous motor and synchronous belt (hidden under the motor) are fixed normally.
Adjust the limit support on the wire holder and adjust it before and after, until the size of the display screen conforms with the size of the ruler, then lock the fixing screw. Then lock the fixing screw.
Cutter depth adjustment
In the process of using, there are two adjustment methods when the bottom paper is continuously cut:
a. Through the control program adjustment of the display screen.
First, adjust the cutter depth fine adjustment device (adjust the depth range to about 5mm) or change the blade’s cutting surface; click Set and click the common parameters to modify according to the actual situation, with a maximum modification value of 20.

It is completed by the top cutter screw on the tool holder.
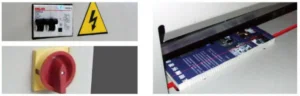
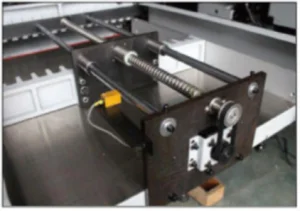
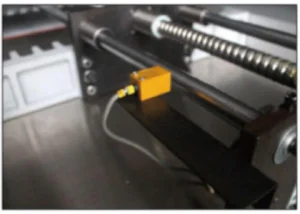
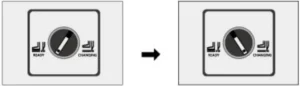
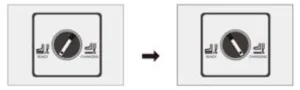
Change the tool switch, and rotate the tool change switch from the normal state to the tool change state, as shown in the figure.
If you can’t cut off the next sheet of paper, you need to adjust the top cutterscrew; generally, adjust it to 0.3-0.5 mm of the cutter insert pad. Try cutting with a piece of paper. If the cutting is continuous, readjust according to the above steps.
Turn the tool change switch from the tool change state to the normal state.
Stick adjustment
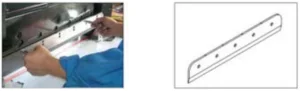
The blade has 4 sides, each side can be used twice, and can be recycled 8 times;
If the knife mark on the blade is too deep, it is necessary to adjust or replace the blade.
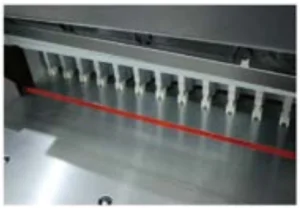
The blade can be taken out with a screw driver, and it should be smoothly installed into the cutting table when it is replaced;
The blade should be on the left.
Pressure adjustment
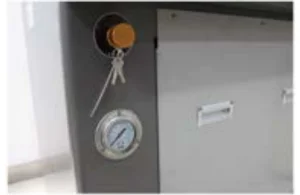
Press the cutting button with both hands, and the pressure gauge will display the pressure when the pressure drops to press the paper;
Standard pressure: 40kg / cm² ~ 50kg / cm². Turn the pressure adjustment knob to increase the clockwise pressure and decrease the counter clockwise pressure.
Press the cutting button again until the presser presses the paper to display the new pressure.
Blade replacement (please follow the steps carefully)
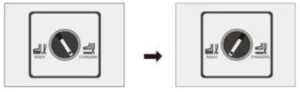
Turn the tool change switch from normal state to tool change state, as shown in the figure.
Press the cutting button with both hands, under the knife.
Loosen and remove the locking screw 1 with an opening on the tool holder;
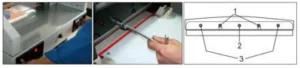
Remove other locking screws on the tool holder, except for screw No. 2; Turn the tool change switch from the tool change state to the normal state.
On the tool, rotate the opening screw hole 1 of the two tool removal screwsclockwise. If it is fixed and locked, remove other screws and No. 2 screws, and pay attention to the blade falling;
Turn the two screw rods anticlockwise for a half-circle to remove the blade. Wrap the blade with gloves or cloth and put it into the cutter box to avoid scratches.
Take out a new blade, pay attention to safety, the blade is facing outwards, screw the two removal screws into the opening hole of the blade, install theblade on the tool holder, tighten and fix with screws in turn, and then adjust according to the cutting depth adjustment method.
Pressure adjustment
Due to different cutting materials, the pressure required is different.
Therefore, it is necessary to adjust according to the figure.
To adjust the presser pressure, first loosen the locking screw 2 and turn the adjusting handle 1 to adjust the pressure. Turn the pressure clockwise to increase and the pressure to decrease in the counter clockwise direction. The ideal pressure is 4MPa, and then lock the screw.
Note: under the condition of not affecting the cutting performance, reduce the pressure of pressing paper as far as possible, which is beneficial to the service life and safety of the machine.
In general, the cutting pressure does not need to be adjusted. If the system pressure exceeds the rated pressure, the machine is easily damaged, such as cutting paper should be ground in time. (The rated pressure is 8MPa).
Lubrication and maintenance
Lubrication
The machine should open the cover every month, check the cleaning, fasten the parts, and lubricate the transmission parts once a month. Please be careful not to drip lubricating oil on electrical circuits or electronic components when refueling to avoid failure.
Maintenance
When working, it is forbidden to put non-cutting objects on the machine to prevent hard objects from entering the knife and damaging the cutter.
Bound books should avoid bringing staples into the cutting area to prevent damage to the cutter. After the work is finished every day, wipe the machine, remove debris, and cut off the power supply.
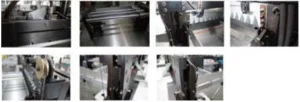
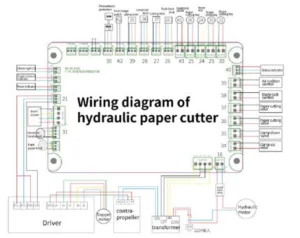
Attached Drawings
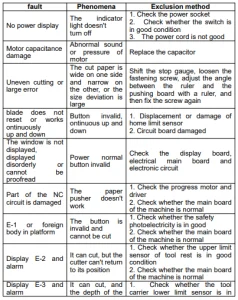
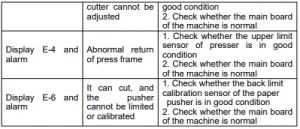
Electric Hydraulic Paper Cutter Common errors and elimination
Recommended For Your Project
VEVOR Electric Hydraulic Paper Cutter 26" /660.4mm Cutting Width Manual


Reviews
There are no reviews yet.