
Ja, es ist möglich, mit einer Benzin-Kettensäge auf so einfache und praktische Weise eine Holzbank zu bauen. Es ist ein schönes Projekt, bei dem man aus Baumstämmen eine stabile Sitzgelegenheit für den Garten fertigt. Mit der Kettensägen-Stammbank sieht man schnell Ergebnisse und kann sich schon bald an der Arbeit erfreuen. Sie verleiht dem Garten zudem einen rustikalen und selbstgemachten Look. Achten Sie stets auf gute Schutzausrüstung und lassen Sie sich Zeit. Kettensäge um beim Bau Ihrer Bank auf Sicherheit zu achten.
- Werkzeuge und Sicherheitshinweise für die Kettensägen-Stammbank
- Wie man einen Stamm für eine Kettensägenbank auswählt und vorbereitet
- Wie man einen Kettensägen-Werkbankstamm markiert, einkerbt und zuschneidet
- Wie man eine Kettensägen-Stammbank zusammenbaut und befestigt
- Wie Sie Ihre Kettensägenbank formen und fertigstellen
Werkzeuge und Sicherheitshinweise für die Kettensägen-Stammbank
Bevor Sie mit dem Bau Ihrer Blockbank beginnen, sollten Sie sich gut vorbereiten. Eine sorgfältige Vorbereitung macht Ihre Arbeit sicherer, reibungsloser und präziser. Eine einfache Anleitung zum Sägen einer Holzbank mit der Kettensäge, das richtige Werkzeug und ein sicherheitsbewusstes Vorgehen helfen Ihnen, den Überblick zu behalten und Fehler zu vermeiden. Das verbessert auch das Ergebnis beim Bau einer traditionellen Gartenbank und beim gesamten Projekt mit Kettensäge und Holzstämmen, insbesondere beim Sägen und Formen.
Checkliste für wichtige Werkzeuge
Für sicheres und stabiles Schneiden können Sie mit wenigen grundlegenden Werkzeugen Ihr Projekt beginnen. Das wichtigste Werkzeug ist eine Benzin-Kettensäge mit scharfer Kette, da sie für alle groben Schnitte verwendet wird. Mess- und Markierungswerkzeuge helfen Ihnen außerdem, Ihre Schnitte vor Beginn präzise zu planen.
Nachfolgend finden Sie eine Liste einiger grundlegender Werkzeuge:
- Sharp Kettensäge.
- Maßband und Zimmermannsbleistift.
- Sägeböcke oder stabile Baumstämme als Stützen.
- Keile und ein Hammer sorgen für Stabilität.
- Wasserwaage zum Überprüfen des Gleichgewichts.
Alle diese Werkzeuge sind wichtig für den schrittweisen Selbstbau einer Kettensägen-Werkbank. Mit all diesen Vorbereitungen gelingt das Arbeiten kontrollierter und effizienter, wodurch Schnittfehler reduziert werden.
Optionale Werkzeuge für höhere Genauigkeit und bessere Oberflächengüte
Optionales Zubehör ist zwar nicht unbedingt notwendig, kann aber die Schnittqualität und das Endergebnis deutlich verbessern. Es hilft Ihnen, sauberere Schnittlinien zu erzielen und eine professionellere Werkbank zu erhalten. Besonders praktisch ist es, wenn Sie glattere Oberflächen und mehr Kontrolle beim Arbeiten wünschen.
Einige nützliche optionale Werkzeuge sind:
- Gerade Schnitte mit Führungsschienen.
- Justierschrauben zur Gewährleistung der Ausrichtung.
- Kettenschmiergerät.
- Kettenreißmechanismus für schnelleres und gleichmäßigeres Schneiden.
Führungsschienen dienen dazu, die Kettensäge zu stabilisieren, und Nivellierschrauben sorgen dafür, dass der Holzstamm waagerecht bleibt. Diese Anbauteile sind beim Bau einer Holzbank mit einer Benzin-Kettensäge äußerst praktisch, da sie ein gleichmäßiges Schneiden ermöglichen und die Präzision erhöhen.
Sicherheitsausrüstung und Tipps zum Umgang mit der Kettensäge
Das oberste Prinzip beim Arbeiten mit der Kettensäge ist Sicherheit. Angemessene Schutzausrüstung verringert das Verletzungsrisiko und hilft Ihnen, sich während des Sägens zu konzentrieren. Die Verwendung vollständiger Schutzausrüstung ist bei allen Arbeiten wichtig, unabhängig vom Umfang der Aufgabe.
Sicherheitsausrüstung wie zum Beispiel:
- Helm (Ohren- und Gesichtsschutz) in der Forstwirtschaft.
- Augenschutz, Schutzhandschuhe.
- Handschuhe und Schutzhandschuhe.
- Stabilität: robuste Stiefel.
- Lange Hosen und lange Ärmel.
Beim Möbelbau mit einer Benzin-Kettensäge ist es äußerst wichtig, die Sicherheitsrichtlinien zu beachten, da die Kettensäge bei unsachgemäßer Handhabung zurückschlagen, nach hinten drücken oder einsinken kann. Halten Sie die Säge stets mit beiden Händen fest, achten Sie auf einen sicheren Stand und arbeiten Sie ohne Eile. Ein aufgeräumter Arbeitsbereich minimiert die Rutsch- und Stolpergefahr. Machen Sie Pausen, wenn Sie müde sind, um konzentriert zu bleiben und Ihr Projekt sicher abzuschließen.
Wie man einen Stamm für eine Kettensägenbank auswählt und vorbereitet
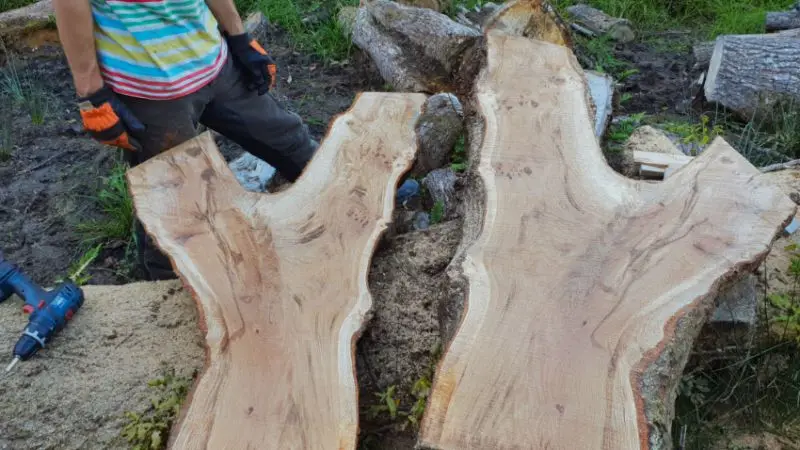
Der wichtigste Schritt vor dem Schnitzen ist die Auswahl und Vorbereitung des richtigen Holzstamms. Ein schöner Stamm stabilisiert Ihre Werkbank, macht sie sicherer und schöner. Dieser Schritt beugt späteren Schwierigkeiten vor und gibt Ihnen mehr Kontrolle beim Schnitzen. (Anleitung für Anfänger zum Schnitzen einer Holzbank mit einem Holzstämmen) KettensägeFür den Bau einer rustikalen Gartenbank eignet sich am besten eine Kettensäge aus Baumstämmen, da die natürliche Form des Holzes das Endprodukt bestimmt.
Wie Sie die richtige Holzart für Ihre Bank auswählen
Die Wahl des richtigen Holzes bestimmt die Länge Ihrer Bank und wie einfach sie zu bauen ist. Sie sollten stets nach guten, starken Stämmen suchen, die gesund und gut zu bearbeiten sind. Häufig verwendete Hölzer sind Kiefer, Zeder und Douglasie, da sie widerstandsfähig sind und sich leicht mit einer Kettensäge sägen lassen.
Bei der Auswahl Ihres Brennholzes sollten Sie lediglich auf einfache Qualitätsmerkmale achten:
- Keine nennenswerten Risse oder Fäulnis.
- Eine relativ glatte Form muss stabil sein.
- Muster oder Knoten in Faserrichtung, die von Interesse sind.
- Steindichtes Holz ist widerstandsfähig.
Es empfiehlt sich, sehr nasses Holz zu vermeiden, da es nach dem Sägen reißen oder sich verbiegen kann. Für ein DIY-Projekt zum Bau einer Werkbank mit der Kettensäge ist trockenes und formstabiles Holz stets vorzuziehen, da es die Konstruktion stabil und langlebig macht.
So bereiten Sie Ihren Baumstamm vor dem Schneiden vor
Sobald Sie den Stamm ausgewählt haben, ist die Arbeit mit der richtigen Vorbereitung sicherer und präziser. Schaffen Sie sich zunächst einen großen Arbeitsbereich, damit Sie sich um den Stamm herum bewegen können. Eine Fläche von 8 bis 10 Metern wird empfohlen, da dies die Sturzgefahr mit der Kettensäge minimiert.
Richten Sie dann Ihr Protokoll ordnungsgemäß ein:
- Lege es auf Sägeböcke oder Stützen.
- Halten Sie es auf Hüfthöhe, um eine bessere Kontrolle zu haben.
- Schnittlinien: Messen und markieren.
- Vor Beginn der Arbeiten die Ausrichtung prüfen.
Beim Zuschneiden von Bankbeinen oder -stützen sollten Sie möglichst ähnliche Stücke aus demselben Holzstamm verwenden. So bleibt Ihre Bank gleichmäßig und sieht gut aus. Der Bau einer Holzbank mit einer Benzin-Kettensäge ist eine gute Vorbereitung, da Sie damit sicher und präzise arbeiten können.
Wo man Protokolle findet und wie man die besten auswählt
Gute Baumstämme findet man oft an so unscheinbaren Orten wie dem eigenen Garten oder in der Nachbarschaft, wo die Bäume auf natürliche Weise umgestürzt sind. Umgestürzte oder alte Stämme werden wiederverwendet, was der Bank ein natürlicheres, rustikales Aussehen verleiht. Dieser Stil ist bei vielen Handwerkern beliebt, da er dem Endprodukt Charakter und Einzigartigkeit verleiht.
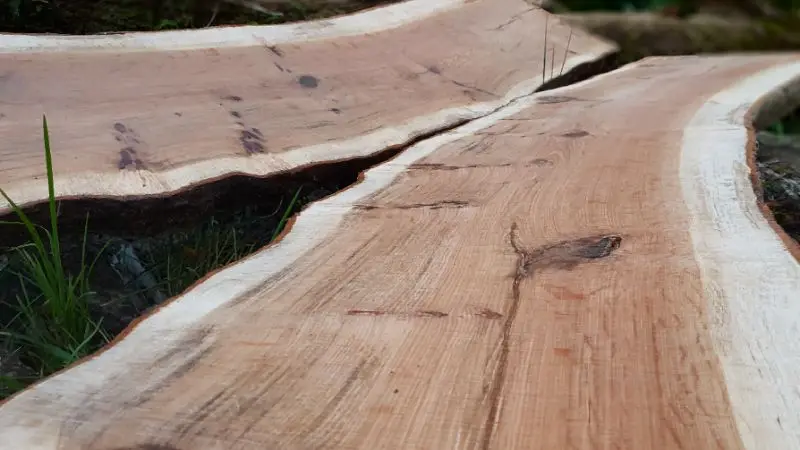
Es gibt auch Quellen für Holzstämme, bei denen Lieferanten Holz aus Städten oder Wäldern wiederverwenden, das durch Stürme beschädigt wurde. Die Maserung dieser Stämme weist in der Regel eine besondere Struktur auf, die Ihre Bank zu einem echten Hingucker macht.
Bei der Auswahl von Baumstämmen sollte man auf Festigkeit und Aussehen achten. Ein guter, runder Stamm lässt sich leichter schneiden und handhaben. Dies erleichtert auch die Einhaltung der Sicherheitsrichtlinien bei der Möbelherstellung. Benzin-Kettensäge, da das verwendete Material stabil sein sollte, um unerwartete Bewegungen beim Schneiden zu vermeiden und Ihnen eine bessere Kontrolle über Ihr Projekt zu ermöglichen.
Wie man einen Kettensägen-Werkbankstamm markiert, einkerbt und zuschneidet
Jetzt wird aus Ihrem Baumstamm eine richtige Bank, ein festes Gebilde. Präzision ist hier wichtig, denn jeder Schnitt beeinflusst Stabilität und Aussehen. In einer Anfängeranleitung zum Schnitzen einer Holzbank mit der Kettensäge können Sie Fehler vermeiden, indem Sie sorgfältig anzeichnen und schneiden. Das verbessert auch die endgültige Struktur bei einem rustikalen Gartenbankprojekt mit Kettensäge und Baumstämmen, deren natürliche Formen noch nicht optimal zur Geltung kommen.
Wie man sein Stammholz richtig misst und markiert
Vor dem Sägen sind klare und gut sichtbare Markierungen erforderlich. Mit Maßband und Bleistift lässt sich die Schnittlinie präzise festlegen. Für gerade und gleichmäßige Markierungen wird Ihre Werkbank nach dem Sägen eben sein. Markierwerkzeuge helfen bei größeren oder unebenen Stämmen, genauer zu arbeiten.
Gängige Kennzeichnungsformen sind:
- Mingo-Marker für lange, gerade Baumstämme.
- Acc-U-Mark-Siegel für beidseitige Messgenauigkeit.
- Einfaches, traditionelles Markierungslineal und Kreide.
Achten Sie darauf, die beiden Enden des Holzstamms zu messen, um sicherzustellen, dass Ihre Werkbank eben ist. Kreide lässt sich am besten im Freien verwenden, da sie auch bei hellem Licht gut sichtbar bleibt. Dies ist ein entscheidender Schritt beim Bau einer Werkbank für die Kettensäge, da unregelmäßige Markierungen später zu einem wackeligen Sitz führen.
Wie man den Hauptstamm für die Bankstütze ausklinkt
Dies dient der sicheren Befestigung der Sitzbank und der Stützen. Markieren Sie zunächst die Stellen, an denen die Stützleisten befestigt werden. Schneiden Sie anschließend mit Ihrem/Ihrer … Kettensäge Oberflächlich, kontrolliert, entlang der markierten Bereiche. Zunächst nicht zu tief – langsames Vorgehen ist leichter zu kontrollieren und weniger fehleranfällig.
Dies sind die grundlegenden Schritte, die zu befolgen sind:
- Erstellen Sie zunächst nur grobe Richtlinien.
- Zwischen den Schnitten langsam Holz abtragen.
- Überprüfen Sie die Passform regelmäßig während des Zuschnitts.
Die Kerben können Sie ruhig etwas grob lassen, wenn Sie einen rustikalen Look wünschen. Für eine glatte Oberfläche können Sie später einen Stechbeitel oder Schleifpapier verwenden. Dieser Arbeitsschritt ist beim Bau einer Holzbank mit einer Benzin-Kettensäge entscheidend, da die korrekte Kerbung die Sitzfläche fest und sicher fixiert.
Wie man Baumstämme für Bankstützen zuschneidet
Stützrundhölzer verleihen Ihrer Werkbank Stabilität und Balance und sollten daher sorgfältig zugeschnitten werden. Für eine ausgewogene Konstruktion verwenden Sie am besten Stämme ähnlicher Größe und Qualität. Überprüfen Sie die Maße vor dem Zuschnitt, um ein gleichmäßiges Ergebnis zu erzielen.
Empfohlene Abmessungen:
- Der Durchmesser des Stammes: mindestens 11 Zoll.
- Sitzflächenbreite: muss mindestens 6 Zoll betragen.
- Länge des Stammes: ungefähr 7 Fuß, um Stabilität zu gewährleisten.
Nehmen Sie sich Zeit beim Zuschneiden der einzelnen Holzscheiben mit der Kettensäge. Jedes Stück sollte flach und gleichmäßig sein. Leichte Schrägschnitte an den Enden verbessern den Bodenkontakt und die Stabilität. Verwenden Sie niemals Holzscheiben mit Rissen oder schwachen Stellen. Dies ist auch ein wichtiger Sicherheitshinweis beim Möbelbau mit einer Benzin-Kettensäge, da stabile und fehlerfreie Stützen nicht wackeln und die Stabilität der Bank insgesamt erhöhen.
Wie man eine Kettensägen-Stammbank zusammenbaut und befestigt
Nachdem Ihre Baumstämme zugeschnitten und vorbereitet sind, können Sie sie nun zusammenbauen. Jetzt nimmt Ihre Arbeit langsam Gestalt an und wird tatsächlich zu einer Bank. Beim Bau einer Holzbank mit einem Benzin-KettensägeDaher ist eine sorgfältige Montage unerlässlich, da Stabilität und Sicherheit davon abhängen. Dieser Schritt ist auch bei einem selbstgebauten Kettensägen-Werkbankprojekt entscheidend, denn präzises Passen und Ausrichten gewährleisten ein langlebiges Ergebnis.
Anleitung zum Zusammenbau des Blocks und zum Anbringen der Bankkonstruktion
Legen Sie zunächst Ihre vorbereiteten Teile an einen geeigneten Arbeitsplatz. Der Hauptstamm sollte an erster Stelle stehen, und die zuvor angebrachten Kerben sollten nach unten zeigen. Diese Kerben sorgen dafür, dass die Bank stabil steht.
Die Stützbohlen werden nun unter den Hauptstamm gelegt. Setzen Sie sie vorsichtig in die Aussparungen ein, sodass sie fest sitzen. Falls eine Bohle nicht passt, kürzen Sie sie mit der Kettensäge etwas, bis sie passt. Ziel ist ein fester, unbeweglicher Sitz.
Grundlegende Montageschritte:
- Stütze an jedem Ende des Hauptstamms.
- Bei einer langen Bank sollte in der Mitte eine Stütze angebracht werden.
- Neigen Sie den Stamm so, dass er auf allen Auflageflächen gleichmäßig aufliegt.
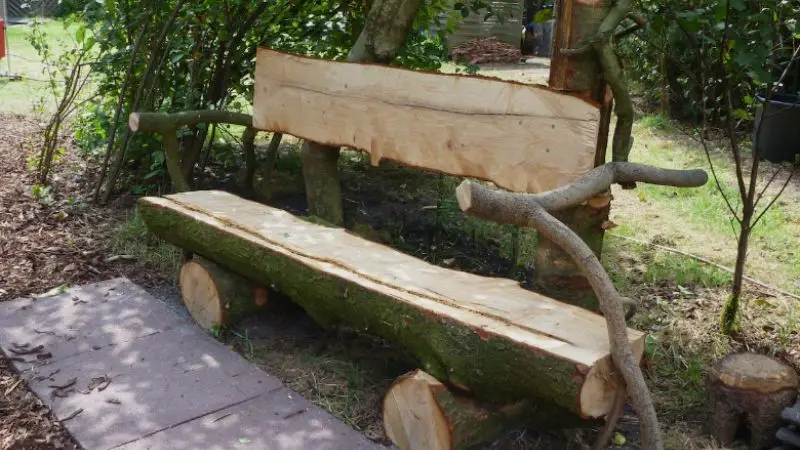
An dieser Stelle lässt sich auch der Stil festlegen. Eine raue Oberfläche wirkt rustikaler, eine glattere Form hingegen eleganter. Wer eine Rückenlehne wünscht, kann einen halbierten Baumstamm an die Rückseite der Bank legen. Dieser Schritt wird häufig beim Bau rustikaler Gartenbänke mit Kettensäge und Baumstämmen angewendet, um den Komfort und die Optik zu verbessern.
Wie man die Werkbank sicher ausrichtet und befestigt
Nach dem Aufbau des Gestells sollten Sie es festhalten. Eine stabile Bank ist wichtig für Sicherheit und Langlebigkeit. Achten Sie zunächst darauf, dass alle Stützpfosten gleichmäßig auf dem Boden aufliegen. Falls eine Seite locker ist, stabilisieren Sie die Konstruktion mit Holzkeilen.
Als Nächstes wird die Bank fixiert:
- Löcher zum Einsetzen der Schrauben stanzen.
- Sorgen Sie mit Holzschrauben oder Nägeln für eine stabile Befestigung.
- Sie können eine Senkbohrung verwenden, um eine glattere Oberfläche zu erzielen.
- Verwenden Sie Holzdübel, falls Sie verdeckte Befestigungselemente wünschen.
Befestigungsanleitung:
- Schrauben aus Holz: universell einsetzbar.
- Spikes: Spikes eignen sich am besten für schwere Baumstämme.
- Holzdübel: ideal für einen komplett rustikalen, metallfreien Look.
Überprüfen Sie nach dem Befestigen aller Teile mit einer Wasserwaage, ob die Werkbank waagerecht steht. Befindet sich die Libelle in der Mitte, ist die Werkbank richtig positioniert. Andernfalls unterlegen Sie sie mit Keilen, bis sie waagerecht steht.
Dieser Schritt ist besonders wichtig für die Sicherheit beim Möbelbau mit einer Benzin-Kettensäge, da eine lose oder unebene Werkbank umkippen und Verletzungen verursachen kann. Hier besteht keine Eile; achten Sie darauf, dass Ihre Werkbank robust und stabil ist und sich für den langfristigen Einsatz eignet.
Wie Sie Ihre Kettensägenbank formen und fertigstellen
Sobald Ihre Werkbank geformt ist, müssen Sie sie nur noch bearbeiten und veredeln. Ab diesem Zeitpunkt erhält Ihr Projekt ein glattes, komfortables und professionelles Aussehen. Dies ist unerlässlich, egal ob Sie eine Anfängeranleitung zum Schnitzen einer Holzbank mit der Kettensäge verwenden oder ein komplettes Bauprojekt mit einer Benzin-Kettensäge planen, denn die Oberflächenbehandlung verbessert sowohl die Optik als auch die Sicherheit.
Wie man die Oberfläche einer Werkbank glättet und raue Kanten entfernt
Beginnen Sie mit einer gründlichen Untersuchung der gesamten Werkbank, um raue Stellen, Splitter oder scharfe Kanten zu erkennen. Diese Stellen müssen geglättet werden, damit die Werkbank sicher sitzt und sich angenehm anfühlt. Kleine Stellen sollten mit Schleifpapier oder einem Schleifklotz abgeschliffen werden, während größere, unebene Bereiche mit einer Raspel oder einem Ziehmesser bearbeitet werden sollten.
Grundlegende Glättungsschritte:
- Wischen Sie alle Sitzflächen mit Sand ab.
- Glatte Oberflächen zum Fühlen.
- Scharfe Kanten und Splitter entfernen.
- Langsam sägen, um ein gleichmäßiges Ergebnis zu erzielen.
Tragen Sie beim Holzschleifen eine Staubmaske und Handschuhe, da der Staub Hautreizungen und Atemwegsbeschwerden verursachen kann. Dieser Schritt ist beim Bau rustikaler Gartenbänke mit Kettensäge und Baumstämmen unerlässlich, da er den Sitzkomfort erhöht, ohne das natürliche Aussehen zu beeinträchtigen.
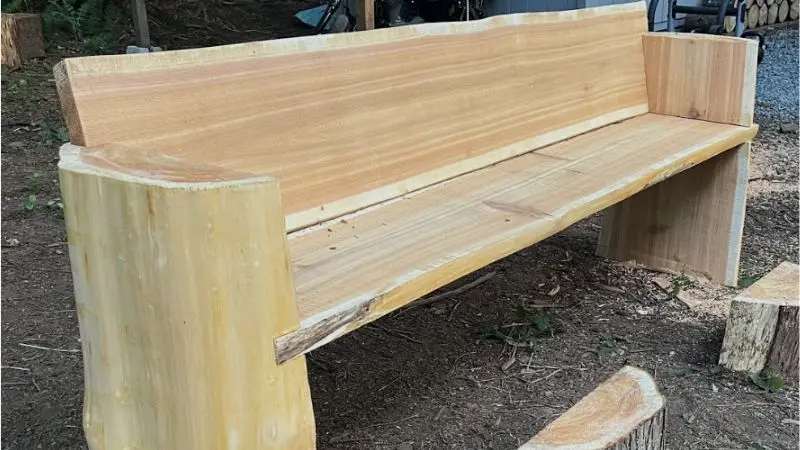
Wie man eine Rückenlehne hinzufügt und einfache Designmerkmale
Eine Rückenlehne oder andere Ergänzungen machen Ihre Bank bequemer und attraktiver. Am einfachsten lässt sich eine Rückenlehne bauen, indem man einen halben Baumstamm zuschneidet und ihn mit Schrauben oder einem Holzdübel an der Rückseite der Sitzfläche befestigt. Überprüfen Sie vor der Benutzung unbedingt die Stabilität.
Sie können auch kleine Gestaltungselemente hinzufügen wie:
- Initialen oder Daten in das Holz einritzen.
- Langweilige Becherhalter sind unpraktisch.
- Die Enden der Baumstämme werden durch Bemalung kontrastiert.
Achten Sie darauf, dass alle zusätzlichen Elemente fest montiert sind. Dieser Schritt verleiht Ihrem DIY-Projekt einer Kettensägen-Werkbank nach und nach eine persönliche Note und verwandelt eine einfache Bank in ein individuelles Gartenmöbelstück.
So tragen Sie eine Schutzschicht für eine lange Lebensdauer auf
Eine Schutzbeschichtung trägt dazu bei, dass Ihre Gartenbank im Freien länger hält, da sie wasser-, sonnen- und insektenabweisend ist. Tragen Sie mit einem Pinsel eine Holzversiegelung oder einen Außenlack auf die gesamte Bank und deren Unterseite auf.
Wichtigste Abschlussschritte:
- Tragen Sie eine Schicht mit einem Anstrich auf.
- Trocknen lassen.
- Bei Bedarf eine zweite Schicht auftragen.
- Alle offenen Holzoberflächen abdichten.
Beachten Sie stets die Produktanweisungen bezüglich Trocknungszeit und Anzahl der Anstriche. Eine fachgerechte Oberflächenbehandlung ist wichtig und sollte bei der Möbelherstellung unbedingt beachtet werden. Benzin-Kettensäge weil es Holzschäden verhindert, die die Konstruktion im Laufe der Zeit schwächen könnten.
Wrap-Up
Der Bau einer Holzbank mit einer Benzin-Kettensäge ist ein lohnendes Projekt, das Kreativität, Geschick und Sicherheit erfordert. Von der Auswahl des richtigen Holzstamms über das Formen bis hin zur Endbearbeitung – jeder Schritt trägt wesentlich zum Ergebnis einer robusten und schönen Gartenbank bei. Eine Anfängeranleitung zum Holzbankbau mit der Kettensäge lehrt Geduld, Sicherheit und Präzision statt Geschwindigkeit. Kleinigkeiten wie das Nivellieren, Schleifen und Versiegeln sind entscheidend für das Endergebnis. Letztendlich fertigt man nicht einfach nur ein Möbelstück, sondern ein handgefertigtes, rustikales und robustes Unikat, an dem man viele Jahre Freude haben kann.
FAQ
Wie viel wiegt eine normale Baumstammbank?
Eine Baumstammbank wiegt zwischen 100 und 300 Pfund. Ihr Gewicht hängt von der Größe und Art des verwendeten Baumstamms ab. Möglicherweise benötigen Sie Hilfe beim Aufbau der Bank.
Kann ich für meine Werkbank beliebige Holzarten verwenden?
Wählen Sie einen gesunden, nicht morschen Stamm. Kiefer, Zeder und Tanne eignen sich gut. Vermeiden Sie weiche Stämme mit großen Rissen. Ein guter Stamm verlängert die Lebensdauer Ihrer Werkbank.
Wird zum Zerschneiden des Baumstamms spezielle Ausrüstung benötigt?
Für die meisten Schnitte genügt eine Benzin-Kettensäge. Maßband, Wasserwaage und Keile sind hilfreich. Für glattere Schnitte kann eine Führungsschiene verwendet werden. Mit einfachen Werkzeugen und einem stabilen Holzstamm kann jeder eine Bank bauen.
Und wie kann ich meine Blockbank konservieren, damit sie nicht verrottet?
Ihre Blockhausbank sollte mit einer Außenverkleidung versehen werden. Achten Sie darauf, alle Ecken, einschließlich der Unterseite, abzudecken. Dies verhindert das Eindringen von Wasser und sorgt für eine lange Lebensdauer Ihrer Blockhausbank.


