
Det er en relativt nem opgradering med betydelige fordele at konvertere din golfvogn til lithium-batterier. Ved at lave en golfvogn af lithium-batterier opnår du en lettere vogn, længere batterilevetid og meget hurtigere opladning. Det reducerer også vedligeholdelsen, så du ikke behøver at spilde tid på at bekymre dig om at holde batteriet i god stand og kan i stedet. Mange brugere vælger at opgradere deres golfvogne til lithium for at forbedre ydeevne, jævn strømforsyning og effektivitet. Sørg altid for, at din golfvogn er kompatibel med... litiumbatterier før du bruger den. Enkle sikkerhedsforanstaltninger vil give en problemfri og sikker opgradering, der i sidste ende er både sikker og vellykket.
Hvad du skal bruge for at konvertere din golfvogn til lithium
Når du kender de korrekte dele og systemkrav, bliver det meget nemmere at opgradere din golfvogn.
Når du skal konvertere en elektrisk golfvogn til lithium-batterier, er forberedelse det vigtigste skridt. Før du går i gang med arbejdet, skal du vælge den rigtige type batteri, opladningssystem, sikkerhedsdele og værktøj. Dette garanterer en komfortabel betjening, øget batterilevetid og sikker installation.
Lithiumbatterimuligheder (LiFePO4 forklaret)
Der findes forskellige typer litiumbatterier, selvom LiFePO4 (lithiumjernfosfat) er det mest testede til brug i golfvogne. Det er almindeligt at konvertere en golfvogn til litium, da det giver sikkerhed, stabilitet og langvarig ydeevne.
LiFePO4 batterier er ønskelige, da de er:
- Letvægts i forhold til blybatterier.
- Langvarig og adskillige opladningscyklusser.
- Hurtig opladning og energieffektiv.
- Mere stabil og sikker i højden og ved belastning.
Disse funktioner gør dem perfekte til daglig brug i en golfvogn. LiFePO4 vælges af de fleste brugere, der søger det optimale lithiumbatteri til at drive golfvogne på grund af stabiliteten af effekten uden regelmæssig vedligeholdelse. Dette betyder mindre besvær og mere tid til at køre.
Kompatible opladere og spændingskrav
Den rigtige oplader er afgørende ved en litiumopgradering. Din gamle blysyreoplader fungerer ikke med litiumbatterier, da de har en bestemt opladningsprofil. Den forkerte oplader kan forkorte batteriets levetid eller beskadige pakken.
Her er nogle af de vigtigste punkter, du skal overveje, når du planlægger at konvertere en elektrisk golfvogn til lithium:
- Spænding på vogn (normalt 36V eller 48V systemer)
- Spændingen på batteripakkerne skal være den samme.
- Opladeren skal være lithium-kompatibel.
Justering af den passende spænding giver en stabil ydeevne og en jævn drift. Det hjælper også med at give din vogn en bedre rækkevidde og et ensartet strømforbrug.
Grundlæggende om batteristyringssystem (BMS)
Et af de vigtige sikkerhedselementer i ethvert litium-system er et batteristyringssystem (BMS). Det regulerer og beskytter batteripakken under brug og opladning. Litium-batterier kan ikke fungere sikkert og effektivt uden det.
BMS hjælper ved at:
- Arbejder med en balance mellem battericellerne.
- Forebyggelse af overopladning
- Undgå dyb udladning
- Beskyttelse mod overophedning
Dette system er især vigtigt for enhver gør-det-selv-opgradering af litiumbatterier i golfvogne, hvor sikkerhedsforanstaltninger skal implementeres korrekt. Et godt BMS forlænger også batteriets levetid og holder din golfvogn kørende under forskellige kørselsforhold.
Værktøj og udstyr Tjekliste
Før du starter din installation, vil det spare tid og reducere fejl at finde det rigtige værktøj. Arbejde med elektriske systemer bør altid prioriteres.
Simpelt udstyr du skal bruge:
- Skiftenøgler og skruetrækkere
- Sikkerhedsbriller og isolerende handsker.
- Strømkabler og stik.
- Voltmeter eller multimeter
- Kabelbindere eller kabelorganisering.
Andre brugere kan også lide lithium-golfvognskonverteringssæt, da de indeholder de fleste nødvendige komponenter i én pakke. Det forenkler installationsprocessen, især for nybegyndere, og forhindrer kompatibilitetsproblemer under installationen.
Sådan konverterer du en golfvogn til lithium (trin for trin)
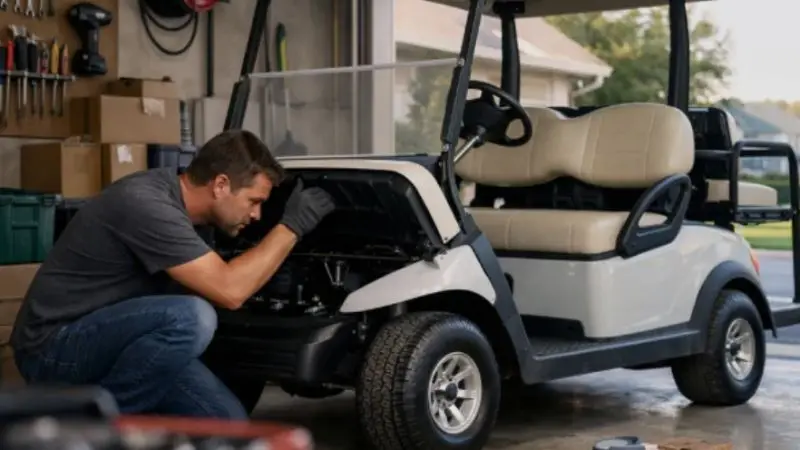
Når du har en klar proces fra start til slut, vil det være meget nemmere at opgradere din golfvogn. Hvis du planlægger at konvertere en elektrisk golfvogn til lithium-batterier, skal du følge en trin-for-trin-metode for at sikre sikkerhed, ydeevne og lang batterilevetid. Følgende er en ligetil og organiseret vejledning, der kan hjælpe dig med konverteringsprocessen uden komplikationer.
Trin 1 – Fjern eksisterende blybatterier sikkert
Det første skridt er at slukke din golfvogn helt og ikke lade nøglen sidde i den for en sikkerheds skyld. Brug isolerende handsker og sikkerhedsbriller, før du rører ved noget. Start med at fjerne det negative kabel og derefter det positive kabel for at forhindre kortslutning.
Fjern forsigtigt det ene blybatteri efter det andet. Disse batterier er ekstremt tunge, og det anbefales at søge hjælp, hvis det er nødvendigt, for at forhindre skader. Når du har fjernet dem, skal du placere dem på en stabil overflade og sørge for, at de bringes til en korrekt genbrugsstation. Dette vil give et rent grundlag for din gør-det-selv-opgradering af litiumbatterier til golfvogne.
Trin 2 – Rengør og inspicer batterirummet
Rengør resten af batterirummet efter at have taget gamle batterier ud. Ydelsen kan påvirkes af snavs, støv og korrosion; børst alle overflader. I tilfælde af rust eller skader skal det udbedres, før der fortsættes.
Sørg for, at rummet er helt tørt, før du installerer nye komponenter. Når du konverterer en golfvogn til et lithium-system, er det meget vigtigt at have en ren og stabil base, der gør det muligt at installere komponenterne nemt og sikkert.
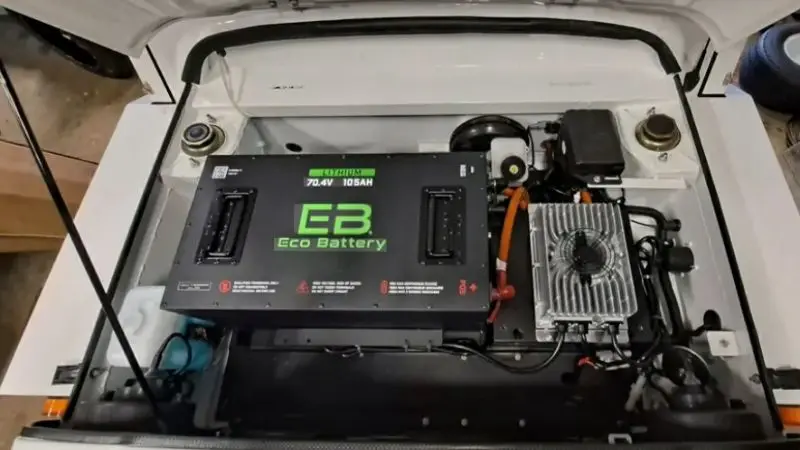
Trin 3 – Installer litiumbatterier
Dernæst, pop din litiumbatterier ind i rummet. Da litiumbatterier er betydeligt lettere end blysyrebatterier, kan du have brug for afstandsstykker eller understøtninger for at opretholde stabilitet og korrekt placering.
Installer batterierne, så de ikke bevæger sig under kørsel. Installationsvejledningen skal altid følges, især ved brug af litium-golfvognskonverteringssæt, som er optimeret til at gøre dem nemmere at installere og mere kompatible. Det er vigtigt, at placeringen er korrekt for at fungere sikkert og effektivt.
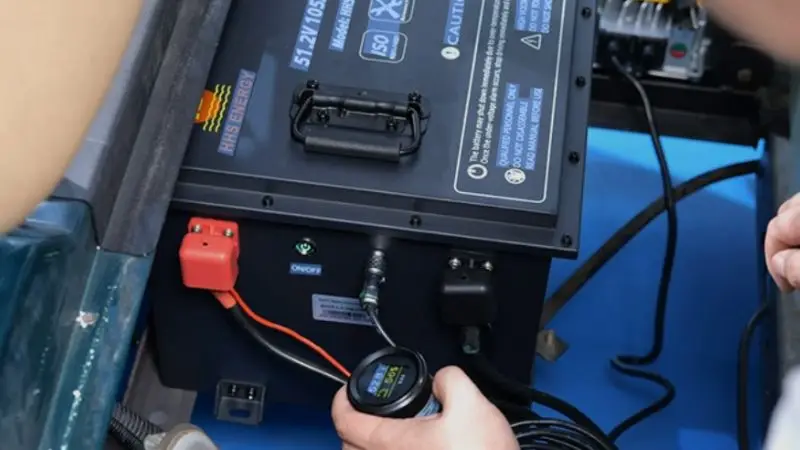
Trin 4 – Tilslut batterisystemet korrekt
Efter installation af batterierne skal du begynde at tilslutte dem med de relevante kabler. Sørg for, at alle spændingstilslutninger er kompatible med dit golfvognssystem, 36V eller 48V. Før du aktiverer et system, skal du bruge et voltmeter til at verificere det.
Sørg for, at alle forbindelser er lukkede for at forhindre løse ledninger eller strømtab. En korrekt og robust forbindelse giver god ydeevne ved omdannelse af en elektrisk golfvogn til lithium, og den forhindrer elektriske problemer i fremtiden.
Trin 5 – Opgrader oplader og elektriske komponenter
Nu skal du udskifte din gamle oplader med en litiumkompatibel oplader. Blysyreopladere passer ikke til litiumbatterier og kan beskadige dem alvorligt ved genbrug.
Undersøg andre elektriske komponenter, herunder sikringer, stik og ledninger. Alt slidt eller beskadiget bør udskiftes for at sikre sikkerhed og stabilitet. Dette er et afgørende skridt for at opgradere med den bedste litiumbatterier i golfvogne, fordi det forhindrer systemet i at fungere forkert i de indledende faser.
@tada.drivhus VEVOR Samrt batterioplader. 3 amp modeller at vælge imellem, der oplader po4 bly- og litiumbatterier. Reparerer et defekt batteri og har tvangsopladningstilstand #tiktokshoplabordayssalg#vevor#smartbatterioplader#batterioplader#vevortools
♬ original lyd – TaDa Greenhouse
Trin 6 – Test din golfvogn efter konvertering
Det sidste trin er at tænde din golfvogn og grundigt teste det nye litiumsystem. Start med at tage det roligt for at teste stabiliteten og ydeevnen. Vær opmærksom på advarselssignaler, unormale lyde eller adfærd.
Når alt går vel, har du foretaget en konvertering. Hvis der opstår problemer, skal du blot stoppe og inspicere dine forbindelser igen. Dette er det sidste trin, der sikrer, at din golfvogn, der er blevet konverteret til litiumbatterier, er komplet og sikker at bruge regelmæssigt. Hvis du er i tvivl, kan du altid søge hjælp hos en professionel.
Tips til ledningsføring og installation af konvertering af lithium-golfvogn
En af de afgørende komponenter i en vellykket litiumopgradering er ledningsføring. Når du planlægger at konvertere en elektrisk golfvogn fra blysyre til litium, vil korrekt ledningsføring, korrekt installation og sikkerhedsinspektion afgøre din golfvogns ydeevne. Du bør tage dig tid til at gøre alt korrekt for at undgå skader og sikre en jævn strømforsyning.
Sådan tilsluttes litiumbatterier (serie vs. parallel)
Batterier kan tilsluttes i serie eller parallelt. Ledningsføring kan være serieledning, der øger spændingen, og parallelledning, der øger batterikapaciteten. Langt de fleste golfvogne er serieforbundne, da de kræver en fast spænding for at fungere korrekt, især når man konverterer en golfvogn til lithium.
For at illustrere, antag at din vogn kræver 48 V; så ville du forbinde fire 12 V-batterier i serie. Denne ordning hjælper din vogn med at fungere med det optimale effektniveau uden problemer.
Når du konverterer til litiumbatterier med golfvognskonverteringssæt, skal du sørge for at bruge ledningsdiagrammet. Sættene er opstillet i en bestemt opstilling, og derfor kan det være meget nemt at lave kritiske fejl, når man gætter ledningerne.
Et nemt trick ville være at tage et billede af dine gamle ledninger og derefter fjerne alt. Dette hjælper dig med at tilslutte alt korrekt igen under installationen.
Almindelige fejl, der skal undgås under installationen
Installation er forbundet med mange problemer på grund af mindre fejl. Løse ledninger, forkerte forbindelser eller forkert konfiguration kan påvirke hele systemet. Glem aldrig at kontrollere det to gange, før du tænder din vogn.
Når du udfører nogle gør-det-selv-opgraderinger af lithium-batterier på golfvogne, er det bedst at holde gamle og nye lithium-batterier adskilt. Dette kan beskadige dit system og er ikke sikkert.
For at installere det uden komplikationer, husk:
- Test alle ledningsforbindelserne to gange, og tænd derefter.
- Brug den korrekte kabeltykkelse for at undgå overophedning
- Undgå at teste spændingen til at begynde med.
Valget af de optimale lithiumbatterier i golfvogne er også fordelagtigt for at eliminere problemer under installationen og forbedre ydeevnen.
Hold dit batteriområde sikkert og køligt
Litiumbatterier er mindre farlige end blybatterier, da de ikke udleder gas. Ikke desto mindre afhænger sikkerhed og ydeevne på lang sigt af korrekt konfigurerede og vedligeholdte opsætninger.
Hold altid batteriområdet rent, tørt og godt ventileret. Når man konverterer en elektrisk golfvogn fra blysyre til lithium, kan god luftgennemstrømning hjælpe med at regulere varmen og stabilisere systemet.
Brug altid sikkerhedshandsker og -briller, når du arbejder. Det er ikke godt at placere metalværktøj i nærheden af batteripolerne, da dette kan føre til kortslutninger.
En sikker installation sikrer, at dit system fungerer korrekt og hjælper dig med at opnå optimale resultater, når du konverterer din golfvogn til lithium.
Omkostningerne ved at konvertere en golfvogn til lithiumbatterier
At kende prisen er et vigtigt aspekt ved planlægning af opgradering. Når du overvejer at udskifte din blysyre-elektriske golfvogn med en lithium batteri, vil den samlede pris blive bestemt af batteriets størrelse, batteriets mærke og om du gør det selv eller hyrer en professionel. Selvom den oprindelige pris kan virke høj, kan den retfærdiggøres på lang sigt af den øgede effektivitet og forlængede batterilevetid.
Hvor meget koster en litiumkonvertering?
Den samlede pris for at konvertere en golfvogn til lithium-batterier ligger typisk mellem 1,500 og 4,000 dollars. Dette omfatter alle de vigtigste dele, der kræves for en komplet og sikker installation, såsom batterier, en oplader og sikkerhedssystemer.
Batteripakken udgør størstedelen af omkostningerne, og resten går til at understøtte udstyr, der garanterer passende ydeevne.
Dette er en grov oversigt over de gennemsnitlige omkostninger:
- Litiumbatterier: 1,000 USD – 3,000 USD
- Lithium-kompatibel oplader: $200 – $500
- Batteristyringssystem (BMS): $100 – $300
- Kabler og hardware: $50 – $150
- Installationsmaterialer: $50 – $100
Et komplet system med lithium-konverteringssæt til at gøre det til en golfvogn vil forårsage lidt mindre forvirring, da mange af disse er pakket som én, men prisen vil stadig blive bestemt af mærke og kapacitet.
Alt i alt vil valget af de passende lithium-batterier til brug i golfvogne have størst indflydelse på både den samlede pris og ydeevnen.
Gør-det-selv vs. professionel installationspris
Du vil være i stand til at reducere dine samlede omkostninger, hvis du beslutter dig for at gøre det selv. En gør-det-selv-opgradering af golfvogne med et litiumbatteri koster typisk mellem 1500 og 2500 dollars, fordi du blot betaler en pris for delene og ikke arbejdet.
Ikke desto mindre medfører det en ekstra omkostning på cirka 500-1,000 kroner at hyre en professionel. Dette alternativ vil være dyrt, men det giver professionel installation, en garanti for kvalitetsledninger og normalt en servicegaranti.
Enkelt sagt:
- Selvinstallation: Billigere og kræver mere indsats.
- Professionel installation: Dyrere, men mere sikker og pålidelig.
Begge er gode afhængigt af dit erfaringsniveau og kendskab til elektriske systemer.
Er en litiumopgradering pengene værd?
Selvom den oprindelige investering kan være dyrere, kan opgraderingen retfærdiggøres på lang sigt. Lithium batterier tager meget længere tid om at dø end blybatterier, kræver minimal vedligeholdelse og oplades hurtigere. Dette gør dem billigere i det lange løb.
Mange brugere, der skifter til lithium-batterier i golfvogne, hævder, at de sparer penge i det lange løb, fordi de ikke kræver så mange udskiftninger og vedligeholdelse. En lithium-opgradering er ikke kun en udgift, men også en investering i forbedret ydeevne, pålidelighed og bekvemmelighed.
Wrap Up
En lithiumopgradering til din golfvogn er en klog, langsigtet investering, der forbedrer ydeevnen, reducerer vedligeholdelse og forlænger batteriets levetid. Uanset om du gør det selv eller hyrer en professionel til at installere systemet, er det bedst at lære hele processen at kende for at undgå fejl og opnå de bedste resultater. Valg af den rigtige type batteri, ledningsføring, sikkerhedsinspektioner osv. er alle vigtige detaljer, der bidrager til en vellykket konvertering. Korrekt planlægning gør din golfvogn let, hurtig og effektiv. En lithiumopgradering er ikke blot en udskiftning, men en grundig forbedring af din golfvogns ydeevne.
Ofte stillede spørgsmål
Findes der lithium-batterier, der kan bruges i en golfvogn?
Ikke et hvilket som helst litiumbatteri duer. Du skal vælge et batteri, der passer til størrelsen og spændingen på din golfvogn. Læs altid producentens anbefalinger, inden du køber.
Hvor længe holder lithium-golfvognsbatterier?
Litiumbatterier har en levetid på 5 til 10 år. De har også en lang levetid sammenlignet med blybatterier. Korrekt pleje vil hjælpe dig med at få mest muligt ud af dine batterier.
Kræver lithiumbatterier særlig vedligeholdelse?
Du bør ikke tilsætte vand eller ren syre. Alt du skal gøre er at kontrollere forbindelserne og holde batteriområdet rent. Dette gør lithiumbatterier lettere at behandle end blybatterier.
Er det sikkert at bruge litiumbatterier?
Der er sikkerhedsregler, du skal overholde under installation af litiumbatterier. Brug handsker og sikkerhedsbriller. Følg instruktionerne i dit batterisæt. Dette vil hjælpe med at undgå ulykker.
Hvor kan man finde yderligere ofte stillede spørgsmål om konvertering af lithium-batterier til golfvogne?
Yderligere ofte stillede spørgsmål om konvertering af lithiumbatterier til golfvogne kan findes på andre websteder eller golfvognsfora, der tilbyder batteriproducenter. Disse kilder giver svar på typiske spørgsmål og hjælper dig med at lære mere om processen.


