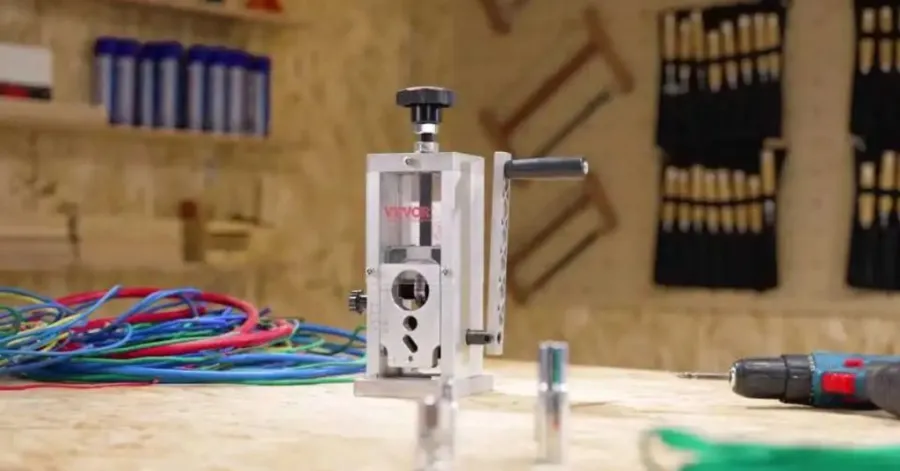
Aiemmin käytettyjen johtojen muuntaminen arvokkaaksi hyödykkeeksi, kupariksi, voidaan saavuttaa a:lla langankuorintakone porakoneella. Tämän projektin avulla voit tehokkaasti kierrättää ei-toivottua johtoa kotona, mikä säästää merkittävästi aikaa. Et tarvitse erikoislaitteita tai ammattitason tietämystä nauttiaksesi tapahtumasta. Merkittävä osa ihmisistä luottaa rautakaupoista saatavilla oleviin peruskäsityökaluihin ja -materiaaleihin. Jos kohtaat vaikean tilanteen, voit hakea lisäapua katsomalla videoita verkosta.
Tässä artikkelissa näytämme, kuinka voit tehdä itse porakoneella toimivan johdonkuorintakoneen muutamalla peruslaitteella ja edullisilla tarvikkeilla. Tällä kurssilla opit tehokkaan johdonkuorintakoneen rakentamisen perusprosessit, joiden avulla voit kierrättää hylättyä johtoa, ottaa talteen arvokasta kuparia ja säästää aikaa ja rahaa.
Sisällysluettelo
Tarvittavat työkalut Tee-se-itse-porakäyttöinen langankuorintakone
Ennen kuin aloitat itse tehdyn porakoneella toimivan johdonkuorijan rakentamisen, varmista, että sinulla on kaikki tarvittavat materiaalit ja laitteet. Suurin osa näistä tarvikkeista on melko helppo löytää omasta kodistasi tai oman autosi autotallista. Ensinnäkin, katsotaanpa, mistä lähtöpisteen tulisi olla.
Suositellaan projektiisi
Välttämättömät työkalut
Et tarvitse tähän projektiin erikoisvälineitä. Tässä on joitakin perustyökaluja, joita tarvitset:
- Johdoton tai johdollinen porakone (tämä on tärkein virtalähteesi)
- Ruuvimeisselit (Phillips- ja litteäpäiset)
- Jakoavain tai jakoavain
- Rautasaha tai muu työkalu metallin leikkaamiseen
- Mittanauha tai viivain
- Tussit tai lyijykynät
Vinkki: Jos porakoneessasi on säädettävä nopeus, käytä sitä. Tämä helpottaa langan kuorimisen hallintaa.
Tarvittavat materiaalit
Tarvitset muutamia osia kokoamaan tee-se-itse-automaattisen johdonkuorintakoneesi rungon ja työosat porakoneella. Seuraava taulukko on avuksesi, jotta pysyt ajan tasalla tarvittavista osista:
| Materiaali | Tarkoitus |
| Metalli- tai puinen jalusta | Kestää koko koneen |
| Laakerit (2 kpl) | Antaa akselin pyöriä helposti |
| Teräsakseli tai -tanko | Pitää leikkuuterää paikallaan |
| Leikkuuterä (apu- tai pyörivä) | Leikkaa johtimen eristyksen |
| Pultit, mutterit ja aluslevyt | Pitää kaikki osat yhdessä |
| Lankaohjain (metallilevy tai -putki) | Pitää langan suorana |
Valinnaiset osat paremman suorituskyvyn saavuttamiseksi
Mitä enemmän kiinnität oikeita lisävarusteita omaan porakoneeseesi kaapelinkuorintakone, sitä paremmin, turvallisemmin ja mukavammin se toimii. Langanohjain on mukautettavissa eri langanleveyksille. Jännitysjouset tarjoavat tasaisemman ja tasaisemman toiminnan. Toimiva käsisuojus suojaa sinua vaurioilta. Jalat ovat kumia, joten kone ei luista ja se pysyy paikallaan. Pidä ylimääräisiä kuorintateriä nopeaa vaihtoa varten, kun pääterät kuluvat loppuun. Tällaiset pienet säädöt voivat parantaa laitteesi tehokkuutta, hyödyllisyyttä ja pitkäaikaisia langankierrätysominaisuuksia.
Tee-se-itse-porakäyttöinen langankuorintakone: Askel askeleelta

Vaihe 1: Rakenna pohjarunko
Ensimmäinen asia, jonka haluat tehdä, on varmistaa, että parhaalla tee-se-itse-johdonkuorintakoneellasi on vankka perusta. Tässä voit käyttää pientä puu- tai metallipalaa. Leikkaa se sopivan kokoiseksi työskentelyalueelle. Haluat sen olevan vakaa ja tasainen. Merkitse muiden osien paikat ja kiinnitä ne. Poraa reiät muttereille ja ruuveille. Tämä perusta pitää kaiken koossa.
Vaihe 2: Asenna laakerit ja akseli
Sitten sinun on asetettava itsesi ja akseli oikeaan paikkaan, jotta voit jatkaa prosessia. Aseta laakerit alustalle oikeaan paikkaan aiemmin merkitsemäsi kohdan avulla. Jos haluat varmistaa esineen turvallisuuden, käytä pultteja ja muttereita. Aseta se erikseen molempiin laakereihin ja liu'uta sitten teräsakseli laakereiden läpi. Akselin on käännyttävä sisäänpäin niin täydellisesti kuin ihmismielisesti on mahdollista. Jos ote tuntuu liian tiukalta, löysää pultteja hieman helpolla itse tehdyllä johdonkuorijalla.
Vaihe 3: Leikkuuterän kiinnittäminen
Kuinka kuparilanka kuoritaan poralla? Leikkausterä on sitten kiinnitettävä akseliin prosessin loppuun saattamiseksi. Tarpeistasi riippuen voit ostaa joko yleisterän tai pyöröterän. Tavoitteena on sijoittaa terä akselin keskelle. Tarkista, että sahalaitainen reuna osoittaa ylöspäin. Terän liikkumisen estämiseksi muttereihin tai ruuveihin kohdistuvaa rasitusta on lisättävä. Sinun on aina tarkistettava, että terä on suorassa linjassa.
Vaihe 4: Kiinnitä porausliitäntä
Ennen toiminnon aloittamista varmista, että Tee-se-itse kuparilangan kuorinta kone on kiinnitetty tukevasti akseliin. Tämän on oltava paikallaan, jotta toimenpide voi jatkua. Voit käyttää joko kytkintä tai poraistukkaa pitämään poran paikallaan. On suositeltavaa liittää poran toinen pää akseliin ja toinen käyttämääsi poraan. Pora on suunniteltu siten, että akseli ja terä pyörivät. Käynnistä pora lyhyesti varmistaaksesi, että se on kiinnitetty tukevasti.
Vaihe 5: Lisää lankaohjain
Langan suoruus voidaan saavuttaa käyttämällä langanohjainta. Se voi olla esimerkiksi hyvin pieni putki tai metallilevy. Se tulee sijoittaa siten, että terä on sen edessä. Kiinnitä se tukevasti pulteilla. Ennen kuin lanka saavuttaa terään oikeassa asennossa, sen on kuljettava ohjaimen läpi. Tämä on edellytys sille, että lanka toimitetaan määränpäähänsä. Helppoon itse tehtyyn langankuorijaan tulisi tehdä tarvittavat muutokset, jos mahdollista.
Vaihe 6: Testaa ja säädä konetta
Sen täytyi todella olla todella vaikea valinta! Ota käyttöön oma kuparilangankuorintakoneesi ja suorita testi. Prosessin loppuun saattamiseksi sinun on pujotettava pätkä lankaa ohjaimen läpi. Terän kulkiessa eristeen läpi sinun on tarkkailtava sitä tarkasti. Riippuen siitä, onko leikkaus liian syvä vai liian matala, saatat joutua säätämään terän korkeutta tai langanohjainta leikkauksen aikana. Älä koskaan lopeta testausta, ennen kuin sinulla on nauha, joka on puhdas kaikista epäpuhtauksista.
Poran valmistelu johdonkuorintaa varten
Oikean poran valitseminen
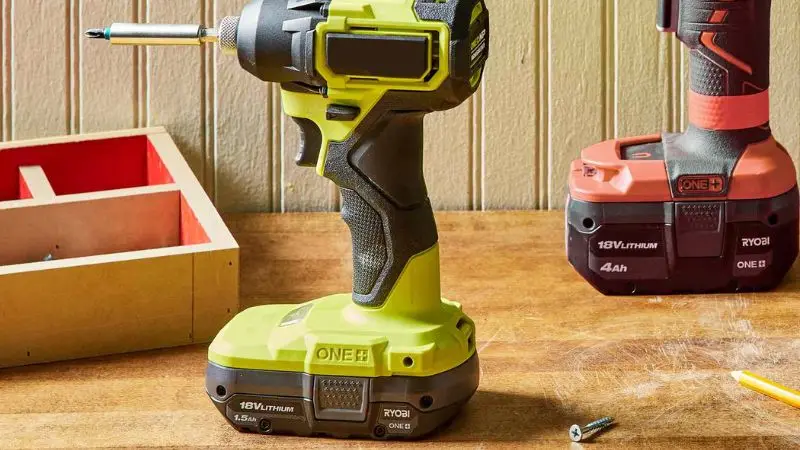
Haluat, että itse tekemäsi porakoneella toimiva johdonkuorija toimii täydellisesti kotona. Valitse porakone, joka tuntuu hyvältä kädessä. Akkuporakoneella voit liikkua vapaammin. Jos käytät johdollista porakonetta, varmista, että johto on vapaa. Hanki portaaton nopeusporakone. Tämän ominaisuuden avulla voit säätää akselin nopeutta. Et tarvitse tehokasta porakonetta. Sen pitäisi toimia hyvin useimpien tavallisten mallien kanssa.
Vinkki: Kokeile porakonetta, jossa on pikaistukka. Se tekee lisälaitteiden vaihtamisesta nopeaa ja helppoa.
Suositeltu porausnopeus
Miten kuori kuparilanka Käytätkö poraa? Nopeudella on merkitystä johtoa kuorittaessa. Liian nopea poraus voi vahingoittaa johtoa tai sen eristystä. Jos poraat liian hitaasti, terä ei välttämättä leikkaa siististi. Aloita hitaasti ja katso, miten kone toimii. Jos johto ei kuori hyvin, lisää nopeutta hieman. Useimmissa porakoneissa on liipaisin, jota painamalla nopeutta voidaan säätää kevyesti. Tavoitteena on 30–600 rpm:n nopeusalue. Tämä alue sopii useimmille johtopaksuuksille.
| Langan koko | Suositeltu kierrosluku |
| Ohut (12-16 AWG) | 300-400 |
| Keskikokoinen (8–10 AWG) | 400-500 |
| Paksu (6 AWG ja yli) | 500-600 |
Turvallisia käyttövinkkejä
Käydään ensin läpi turvallisuus. Muista aina käyttää käsineitä ja suojata silmäsi. Älä laita sormiasi veitsen päälle. Lanka on syötettävä suorassa linjassa ohjaimen kautta. Jos lanka juuttuu, pysäytä pora välittömästi. Tarkista terä ja ohjain ennen jokaista käyttökertaa. Pidä työtilasi aina siistinä ja järjestyksessä. Älä jätä parasta tee-se-itse-johdonkuorintakonetta ilman valvontaa käytön aikana.
Huomautus: Jos olet epävarma, pyydä apua joltakulta tai katso netistä video saadaksesi lisäohjeita.
Kuinka käyttää omaa Tee-se-itse-porakäyttöinen langankuorintakone
Langan syöttö oikein
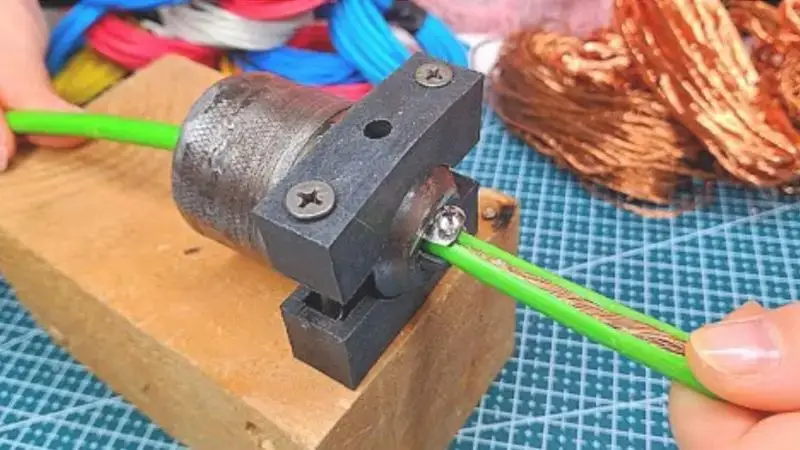
Langan saaminen koneeseen oikein tekee suuren eron. Jos syötät lankaa suoraan, saat joka kerta siistin suikaleen. Katkaise ensin lanka sopiviin pituuksiin. Pidä langasta tiukasti kiinni, mutta ei liian kovaa. Kohdista langan pää tee-se-itse-automaattisen kuorintakoneesi ohjaimeen. Työnnä lankaa varovasti ohjaimen läpi, kunnes se osuu terään.
Käynnistä porakone hitaalla nopeudella. Anna koneen vetää lankaa läpi. Jos tunnet vastusta, pysähdy ja tarkista, että lanka on jumissa. Eristys voi toisinaan tarttua terään. Vedä lankaa hieman taaksepäin ja yritä uudelleen. Pidä aina kätesi poissa terästä. Jos haluat kuoria pitkän kappaleen, syötä sitä hitaasti ja pidä se suorana.
Erilaisten johtojen kuorinta
Porakäyttöinen kaapelinkuorintakoneesi pystyy käsittelemään useita eri kokoisia johtoja. Sinun tarvitsee vain tehdä muutamia säätöjä. Ohuiden johtojen kohdalla laske terää niin, että se tuskin koskettaa eristystä. Paksumpien johtojen kohdalla nosta terää hieman. Käytä säädettävää langanohjainta, jos sinulla on sellainen. Tämä auttaa keskittämään johdon terän alle.
Tässä on lyhyt opas yleisiin lankakokoihin:
| Wire Gauge | Terän korkeus | Poran nopeus (RPM) |
| 12–16 AWG | Matala | 300-400 |
| 8–10 AWG | Keskikova | 400-500 |
| 6 AWG+ | Korkea | 500-600 |
Kokeile aluksi pientä terää. Jos terä leikkaa liian syvälle, nosta sitä. Jos se ei leikkaa tarpeeksi syvälle, laske sitä hieman. Saatat tarvita erillisen asetuksen jokaiselle lankatyypille. Käytä aikaa ja tee pieniä säätöjä, kunnes sinulla on puhdas nauha.
Huomautus: Tarkista aina asetuksesi ennen uuden lankaerän aloittamista. Tämä säästää aikaa ja estää lankahukkaa.
Yhteenveto
Jos olet kätevä työkalujen kanssa, voit tehdä oman porakoneen, joka on tarkoitettu eristyksen poistamiseen roskajohdosta. Tämä menetelmä voi säästää aikaa, parantaa tuottavuutta ja kerätä talteen arvokasta kuparia kierrätysprojekteihin. Ennen kuin käytät tietokonettasi säännöllisesti, sinun on suoritettava täydellinen testi. Käytä aina tarvittavia suojavarusteita ja noudata kaikkia ohjeita. Voit myös mukauttaa suunnittelua omiin tarpeisiisi ja ympäristöösi. Pienellä työllä ja oikeilla resursseilla voit hankkia hyvän johdonkuorintakoneen, joka tekee kierrätyksestä tehokkaampaa, nopeampaa ja paljon tuottavampaa.
FAQ
Kuinka turvallinen on tee-se-itse-porakone johdonkuorintaa varten?
Käytä aina käsineitä ja suojalaseja. Pidä kätesi poissa terästä. Jos noudatat näitä ohjeita, voit käytä konetta turvallisestiÄlä koskaan jätä sitä päälle, kun kävelet pois.
Voinko kuoria tällä koneella erityyppisiä johtoja?
Kyllä! Voit kuoria kuparia, alumiinia ja jopa joitakin päällystettyjä johtoja. Säädä vain terää ja ohjainta kullekin tyypille. Testaa ensin pienellä kappaleella saadaksesi parhaan tuloksen.
Mitä minun pitäisi tehdä, jos lanka juuttuu?
Pysäytä porakone heti. Vedä lankaa varovasti taaksepäin. Tarkista, onko terässä tai ohjaimessa roskia. Puhdista ne tarvittaessa. Yritä uudelleen hitaammalla nopeudella.
Tarvitsenko tähän projektiin erikoisporakoneen?
Et tarvitse hienoa porakonetta – useimmat tavalliset akku- tai johdolliset porakoneet toimivat. Portaatonopeuksinen porakone auttaa hallitsemaan prosessia tehokkaammin.