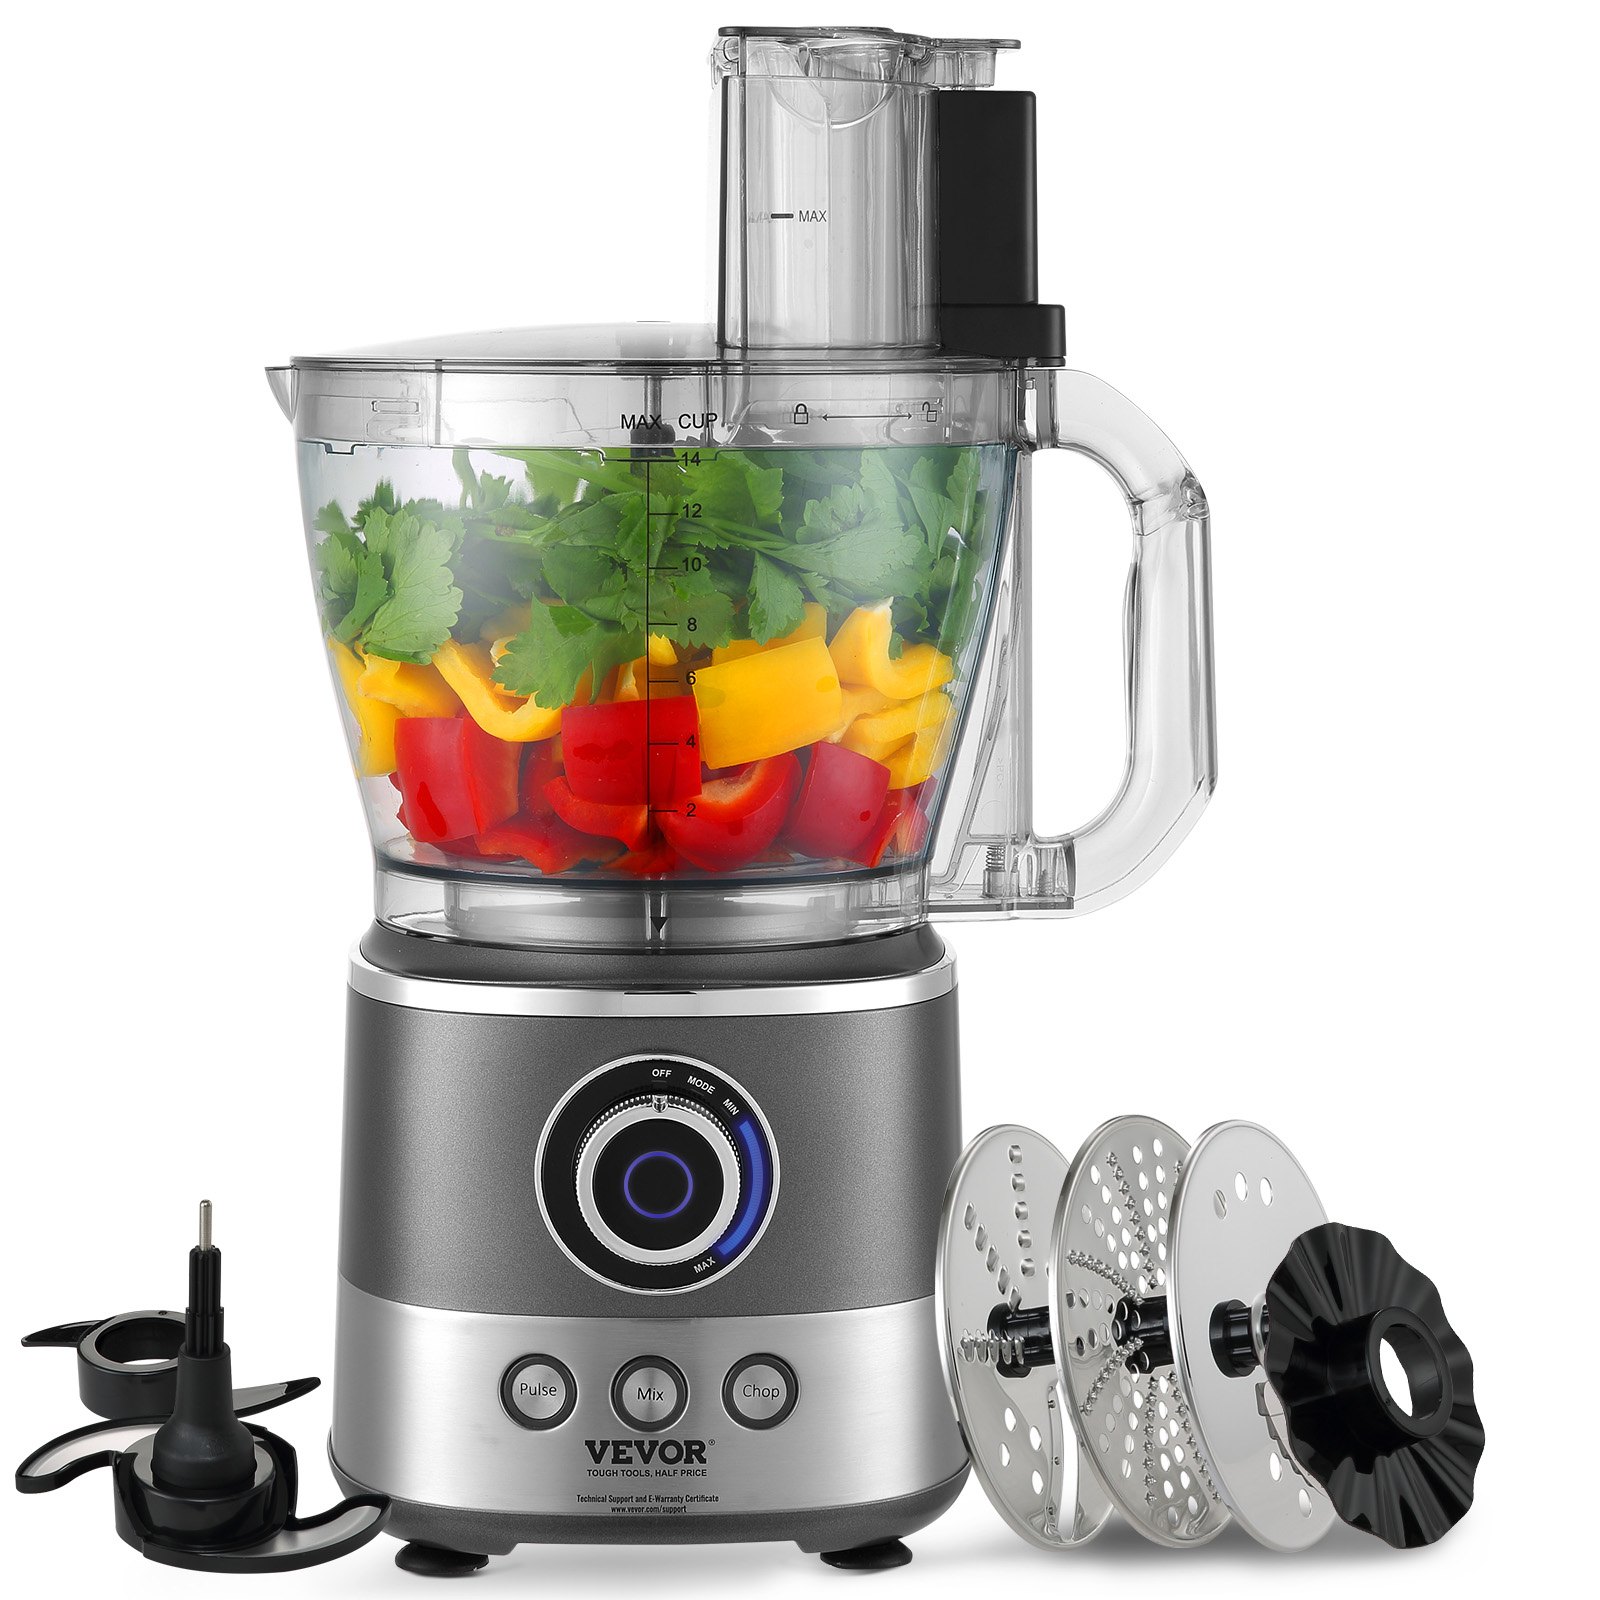
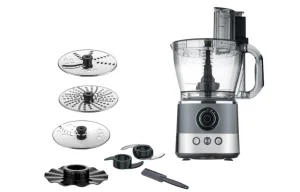
Unlock the full potential of your culinary skills with the comprehensive VEVOR Food Processor manual. This detailed guide is essential for users of the VEVOR Food Processor, 14-Cup Vegetable Chopper, designed for versatile kitchen tasks like chopping, mixing, slicing, pureeing, and kneading dough.
The 650 Watt Stainless Steel Blade Professional Electric Food Chopper ensures precision and ease of use, and our manual provides step-by-step instructions to maximize your efficiency.
Whether you’re setting up your new appliance, troubleshooting technical issues, or optimizing its use, this manual covers it all. With clear, user-friendly guidance, you’ll find it easy to assemble, clean, and maintain your food processor. Download the manual now and transform your cooking experience with the VEVOR Food Processor.
VEVOR Food Processor User Manual
MODEL: CY-329B
Technical Data
Model: CY-329B
Input: 120V~ 60Hz
Power: 650W
Capacity: 14CUP
Safety Instructions for the 14 Cup Food Processor
Read the operating instructions carefully before putting the appliance into operation, and keep the instructions for future reference.
- This 14 Cup Food Processor is for household use only.
- Never dip the machine into any liquid or sharp edges. Do not use the appliance with wet hands. If the appliance is humid or wet, unplug it immediately.
- This appliance can be used by children aged 8 years and above and persons with reduced physical, sensory, or mental capabilities or lack of experience and knowledge if they have been given supervision or instruction concerning the use of the appliance in a safe way and understand the hazards involved.
Children shall not play with the appliance.
Cleaning and user maintenance shall not be made by children without supervision. - Always disconnect the machine from the supply if left unattended before assembling, disassembling, or cleaning.
- If the supply cord is damaged, it must be replaced by the manufacturer or its service agent or a similarly qualified person to avoid a hazard.
- Keep your finger away from moving parts and fitted tools. Never put your fingers or other items into the hinge mechanism.
- Use only original spare parts.
- To ensure your children’s safety, please keep all packaging(plastic bags, boxes, polystyrene, etc.) out of their reach.
- Do not interfere with any safety switches.
- Place the machine on a smooth, flat and stable working surface.
- Be very careful when handling the blades or inserts, especially when removing them from the machine; their cutting edges are very sharp.
- Wait until the moving parts stop running before you remove the machine’s lid.
- Do not exceed the maximum content indicated on the accessories.
Before Connecting to Power
- Before connecting to the power, recheck that the supply type and mains voltage match the details given on the appliance’s rating label.
- Rip off all wrapping paper and plastic bags when using the machine for the first time. Clean the fittings.
SAVE THESE INSTRUCTIONS, HOUSEHOLD USE ONLY
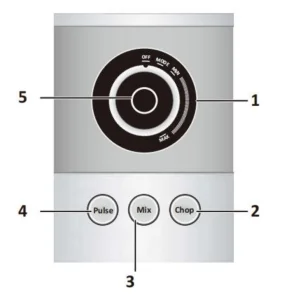
Intelligent Switch
- (Control knob): OFF/MODE/SPEED
(OFF level): On / Off
(MODE level): Shift into “Mode” control
(SPEED level): from Min Speed to Max speed - (Chop button): Chop function
- (Mix button): Mix function
- (Pulse button): pulse function
- (Status indicator): Blue light indicates the machine is well installed
- “OFF” LEVEL SWITCH CONTROL
This level control is to stop the machine or reset the machine’s speed.
- “MODE” LEVEL SWITCH CONTROL
Turn this switch control into the “OFF” position first
And then turn into the “MODE”, the 3 buttons and status indicator light blue. Once changed into “MODE”, 3 MODE buttons will be in bluelight and the status indicator will be blue light, which means the machine is ready.
If the status indicator is a red light, please recheck whether the accessories are installed well into the machine. Notice: Once “OFF” / “SPEED” is settled, the “MODE” SWITCH function will be invalidated, and the lights of the three buttons and the mode will turn off.
- “SPEED LEVEL” CONTROLS
Slow speed, turn the control knob to the beginning
Fast speed, turn the control knob to the end
- “Pulse” Mode button
Use this function to process foods quickly using the highest speed setting.
- Set the control knob (1) to the MODE. The indicators of the buttons Chop (2), Mix (3), and Pulse (4) light up.
- Press the Pulse (4) button to turn the product on. The indicators of the other buttons switch off.
Warning: Do not exceed the maximum operating time based on the attachment used. This will damage the product. - Release the button Pulse (4) to switch the product off and put it into standby mode. All button indicators light up.
- Remove the plug from the main socket, carefully remove the lid from the mixing bowl, and remove the attachment from the drive shaft.
- Remove the mixing bowl from the motor unit.
- Carefully remove the processed food from the mixing bowl.
- Clean the product once you have finished using it.
- “Mix” Mode button
Use this function to mix foods.
- Set the control knob (1) to the MODE. The indicators of the buttons Chop (2), Mix (3), and Pulse (4) light up.
- Press the Mix (3) button to switch the product on. The indicators of the other buttons switch off. The product will operate for 2 minutes and 18 seconds, increasing the speed from low to high when mixing the food. After the time has elapsed, the product switches into stand-by mode.
Information
To stop the function before the time has passed, press the Mix button again or turn the control knob to OFF. The product returns to standby mode. - Remove the plug from the mains socket, carefully remove the lid from the mixing bowl, and then remove the used attachment from the driveshaft.
- Remove the mixing bowl from the motor unit..
- Carefully remove the processed food from the mixing bowl.
- Clean the product once you have finished using it.
- “Chop” Mode button
Use this function to process foods using the highest speed setting quickly.
- Set the control knob (1) to the MODE. The indicators of the buttons Chop (2), Mix (3), and Pulse (4) light up.
- Press the button Chop (2) to switch the product on. The indicators of the other buttons switch off. The product will operate for 40 seconds at various speeds to chop the food. After the time has elapsed, the product switches into stand-by mode.
Information
To stop the function before the time has passed, press the button Chop again or turn the control knob to OFF. The product returns to standby mode. - Remove the plug from the mains socket, carefully remove the lid from the mixing bowl, and then remove the used attachment from the driveshaft.
- Remove the mixing bowl from the motor unit.
- Carefully remove the processed food from the mixing bowl.
- Clean the product once you have finished using it.
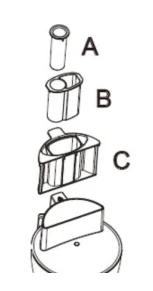
Using 3-in-1 Pushers
- 3 size pushers (A/B/C) are designed and used for the slicer/julienne/French-fried potato disc blade.
- For the best performance, choose the smallest size pusher for the ingredients.
- Before operating the Food Processor, be sure the workbowl, blades, and work bowl cover are properly assembled on the base.
Attention: Pusher C’s pin must be inserted into the bowl to start its system; if not, the machine will not work.
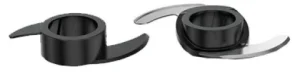
- Pusher A:
This pusher is for the smallest, thinnest food. It could be applied to a slicer/julienne disc blade.
- Well, insert pusher B and C into the bowl feed tube first.
- Insert the food into the hole of pusher B.
- Press the food down with Pusher A.
- Pusher B:
This pusher is for medium-sized food. Could be applied to slicer/julienne disc blade.
Insert Pusher A into Pusher B first before usage. Pusher B needs to be used with Pusher A
together.
- Well, insert pusher C into the bowl feed tube first.
- Insert the food into the hole of pusher C.
- Press the food down with Pusher B.
- Pusher C:
To process large items, use the entire feed tube. This could be applied to a slicer or French-fried potato julienne disc blade.
Insert Pusher A and B into Pusher C first before usage. Pusher C needs to be used together with Pusher A and B.
- Insert the food into the feed tube of the bowl lid.
- The pin of Pusher C must be inserted into the bowl to start its system; if not, the machine will not work.
- Press food down with Pusher C.
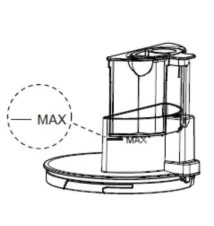
- Attention to the MAX mark on the feed tube. If the food is higher than this mark, the pin of Pusher C may not start the machine.
Using the Knife Blade
The 2 knife blades could be the most versatile of all the attachments.
For Stainless Steel Knife Blade:
- Before processing, cut the food into pusher-sized pieces.
- You are not allowed to work more than 3 minutes at a time. Cool the motor to room temperature for at least 30 minutes before the next operation.
- For coarser foods, use the pulse control.

For Plastic Knife Blade:
Not allowed to work more than 2 minutes. Per time, cool the motor to cool before the next operation with 30 min. at least.
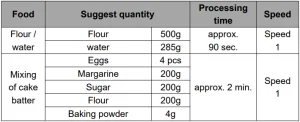
When the egg is too small or the egg white content is low, adding 1 to 2 more eggs is recommended.
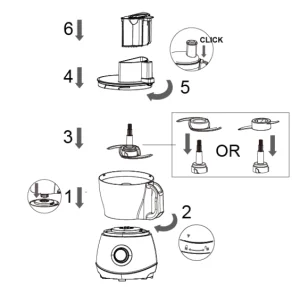
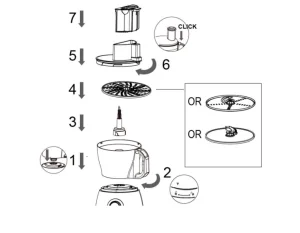
- Follow the flow below, pictured step by step, to assemble the machine.
- Ensure the bowl in step 2 and the lid in step 5 are locked well; otherwise, the machine will not work. In step 3, a Stainless Steel knife blade or a plastic blade could be settled, ensuring that either blade is fixed well on the shaft.
- After operation, you can disassemble machine by opposite flow and direction.
- Only open the lid when the blades have completely stopped.
Using the 14 Cup Food Processor

- Use the 2 1 Slicer/Julienne’ Disc’s slicer function for cheese, carrots, potatoes, cabbage, cucumber, zucchini, beetroot, and onions.
- Use the Julienne Disc’s julienne function to firm ingredients for salads, garnishes, casseroles, and stir fries.
- Use the French-fried potato Julienne Disc for French-fried potatoes.
- Use the Shredding Disc for cheese, carrots, potatoes, and foods of a similar texture.
- Please pay attention to the container’s capacity line. Once the food approaches the max line, please stop the operation and pour out the food.
- Switch on and push down evenly with the Pushers—never put your fingers in the feed tube.
- Do not work for more than 3 minutes. Allow the motor to cool for at least 30 minutes before the next operation.
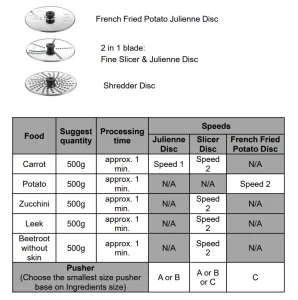
To get the best performance, follow the above suggestion on the push size chosen and the speeds.
For Julienne Disc, it is suggested on speed 1.
For the Slicer Disc, it is indicated on speed 2
For French Fried Potato Disc, it is suggested on speed 2
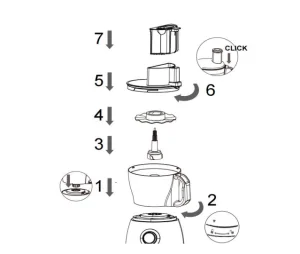
- Follow the flow pictured step by step to assemble the 14 Cup Food Processor.
- Ensure the bowl in step 2 and the lid in step 6 are locked well; otherwise, the machine will not work.
- In step 4, 3 type blade discs could be settled, ensuring each blade disc is fixed well on the shaft.
- After the operation, you can disassemble the machine by the opposite flow and direction.
- Always be careful when handling the stainless Steel blades; they are very sharp.
- Only open the lid when the blades are completely stopped.
Using the Emulsifying Disc
- Do not work more than 2 min., Allow the motor to cool beforethenextoperation at least 30 min.
- Use for aioli, instant pudding, mayonnaise, whipping cream, whiskingeggs, egg whites, and sponge cake mixtures.
- For egg white whisking, please use room-temperature eggs. Please ensure the bowl and emulsifying disc are dry and free from grease.
- Clean the emulsifying disc after each use.
- When the egg is too small or the egg white content is low, it is recommended to add 1 to 2 more eggs

- Follow the flow pictured step by step to assemble the machine.
- Ensure the bowl in step 2 and the lid in step 6 are locked well, or the machine will not work.
- After the operation, you can disassemble the machine by the opposite flow and direction.
- Only take the disc from the machine when the disc is completely stopped.
Proper Disposal
- This product contains recyclable materials.
- Do not dispose of this product as unsorted municipal waste.
- Please contact your local municipality for the nearest collection point.
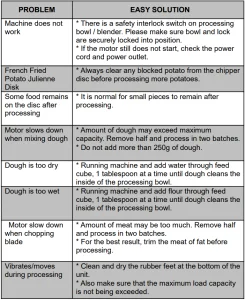
Troubleshooting the 14-cup food processor
Recommended For Your Project
VEVOR Food Processor, 14-Cup Chopper Manual
Reviews
There are no reviews yet.