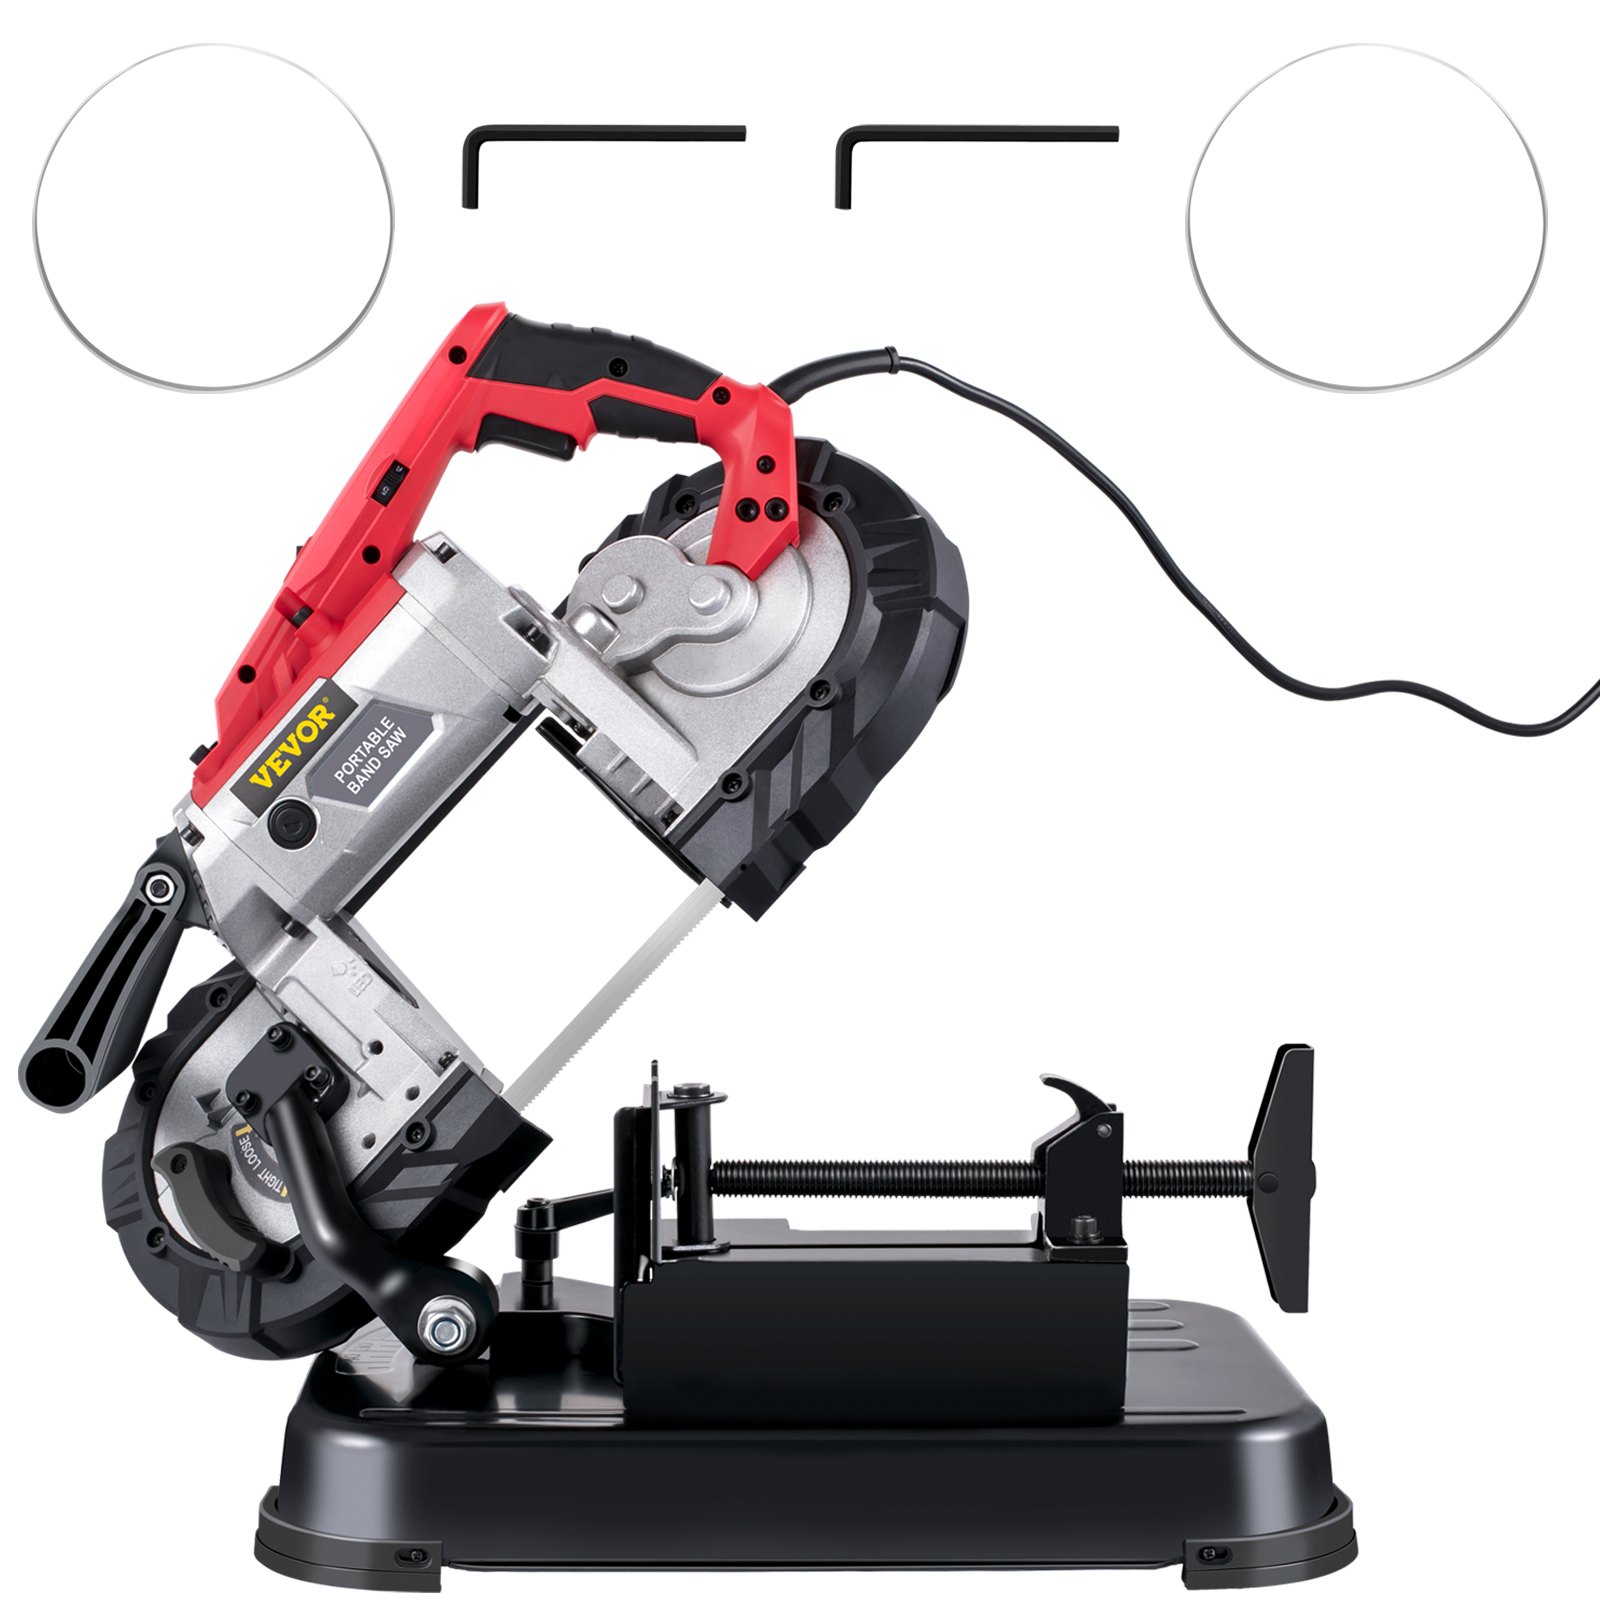


Unlock the full potential of your VEVOR Portable Band Saw with our comprehensive product manual download. This detailed guide is your ultimate resource for troubleshooting, setting up, and optimizing your 110V Removable Alloy Steel Base Cordless Band Saw. Whether you’re a seasoned professional or a DIY enthusiast, our Portable Band Saw Manual provides step-by-step instructions to maximize this versatile hand-held band saw’s 5-inch cutting capacity.
Equip yourself with in-depth knowledge on the Variable Speed Portable Bandsaw’s 10Amp Motor, designed for deep cuts through metal and wood. The user-friendly format ensures that you can quickly find solutions and tips, helping maintain and enhance your cutting tool’s performance. Download the VEVOR Portable Band Saw manual today and discover how easy it is to keep your band saw running at peak efficiency.
Technical Specifications

Safety
General Safety Instructions
WARNING! Read all safety warnings and all instructions. Failure to follow the warnings and instructions may result in electric shock, fire, and/or serious injury.
Save all warnings and instructions for future reference. The term “power tool” in the warnings refers to your mains-operated (corded) power tool or battery-operated (cordless) power tool.
Work Area Safety
- Keep the work area clean and well lit. Cluttered or dark areas invite accidents.
- Do not operate power tools in explosive atmospheres, such as those containing flammable liquids, gases, or dust. Power tools create sparks that may ignite the dust or fumes.
- Keep children and bystanders away while operating a power tool. Distraction can cause you to lose control.
Electrical Safety
- Power tool plugs must match the outlet. Never modify the plug in any way. Do not use any adapter plugs with earthed (grounded) power tools. Unmodified plugs and matching outlets will reduce the risk of electric shock.
- Avoid body contact with earthed or grounded surfaces such as pipes, radiators, ranges, and refrigerators. If your body is earthed or grounded, you are at an increased risk of electric shock.
- Do not expose power tools to rain or wet conditions. Water entering a power tool will increase the risk of an electric shock.
- Do not abuse the cord. Never use the cord for carrying, pulling, or unplugging the power tool. Keep the cord away from heat, oil, sharp edges, or moving parts. Damaged or entangled cords increase the risk of electric shock.
- When operating a power tool outdoors, use an extension cord suitable for outdoor use. This reduces the risk of electric shock.
- If operating a power tool in a damp location is unavoidable, use an earth leakage circuit breaker. This reduces the risk of electric shock.
Personal Safety
- Stay alert, watch your actions, and use common sense when operating a power tool. Do not use a power tool while you are tired or under the influence of drugs, alcohol or medication. A moment of inattention while operating power tools may result in serious personal injury.
- Use personal protective equipment. Always wear eye protection. Protective equipment such as a dust mask, non-skid safety shoes, a hard hat, or hearing protection, used under appropriate conditions, will reduce personal injuries.
- Prevent unintentional starting. Ensure the switch is in the off position before connecting to the power source and/or battery pack, picking up, or carrying the tool. Carrying power tools with your finger on the switch or energizing power tools with the switch on invites accidents.
- Remove any adjusting key or wrench before turning the power tool on. A wrench or a key left attached to a rotating part of the power tool may result in personal injury.
- Do not overreach. Keep proper footing and balance at all times. This enables better control of the power tool in unexpected situations.
- Dress properly. Do not wear loose clothing or jewelry. Keep your hair, clothing, and gloves away from moving parts. Loose clothes, jewelry, or long hair can be caught in moving parts.
- If devices are provided for connecting dust extraction and collection facilities, ensure these are connected and properly used. Dust collection can reduce dust-related hazards.
Power Tool Use and Care
- Do not force the power tool. Use the correct power tool for your application. The correct power tool will do the job better and safer at the rate for which it was designed.
- Do not use the power tool if the switch does not turn it on and off. Any power tool that cannot be controlled with the switch is dangerous and must be repaired.
- Disconnect the plug from the power source and/or the battery pack from the power tool before making any adjustments, changing accessories, or storing power tools.
- Such preventive safety measures reduce the risk of starting the power tool accidentally.
- Store idle power tools out of the reach of children and do not allow persons unfamiliar with the power tool or these instructions to operate the power tool. Power tools are dangerous in the hands of untrained users.
- Maintain power tools. Check for misalignment or binding of moving parts, breakage of parts, and any other condition that may affect the tool’s operation. If damaged, have the tool repaired before use. Poorly maintained power tools cause many accidents.
- Keep cutting tools sharp and clean. Properly maintained cutting tools with sharp cutting edges are less likely to bind and are easier to control.
- Use the power tool, accessories, tool bits, etc., in accordance with these instructions, taking into account the working conditions and the work to be performed. Using the power tool for operations different from those intended could result in a hazardous situation.
Service
- Have a qualified repair person service your power tool using only identical replacement parts. This will ensure its safety.
Safety Instructions For VEVOR Portable Band Saw
- When operating a power tool where the cutting accessory may contact hidden wiring or its cord, hold it by insulating gripping surfaces. Cutting accessories contacting a “live” wire may make exposed metal parts of the power tool “live” and could give the operator an electric shock.
- Never leave the Bandsaw unattended while it is running. Do not put the portable Band saw down until the blade comes to a complete stop.
- Before each use, ensure the Tension Handle is in the tightened position(making the blade taut).
- Cutting Material. Make sure the cutting material is securely fastened down before operating the Bandsaw. Work slowly and carefully when cutting corners, sharp edges, ragged welds, etc., to avoid snagging.
- Cutting material and the motor housing can get very hot during operation. Stop work until the unit cools down to a safe temperature. Spray coolant or water onto the blade.
- Maintain the tool’s labels and nameplates. These carry important safety information. If they are unreadable or missing, contact Harbor Freight Tools for a replacement.
- Avoid unintentional starting. Prepare to begin work before turning on the tool.
- Do not lay the tool down until it has completely stopped. Moving parts can grab the surface and pull the tool out of your control.
- When using a handheld power tool, maintain a firm grip on the tool with both hands to resist starting torque.
- Do not leave the tool unattended when plugged into an electrical outlet. Turn off the tool and unplug it from the outlet before leaving.
- This product is not a toy. Keep it out of reach of children.
- People with pacemakers should consult their physician(s) before use. Electromagnetic fields in close proximity to the heart pacemaker could cause pacemaker interference or failure. In addition, people with pacemakers should: Avoid operating alone. Do not use with the power switch locked on. Properly maintain and inspect to avoid electrical shock. Any power cord must be properly grounded. Ground Fault Circuit Interrupter (GFCI) should also be implemented – it prevents sustained electrical shock.
- WARNING: Some dust created by power sanding, sawing, grinding, drilling, and other construction activities contains chemicals known to the State of California to cause cancer and birth defects or other reproductive harm. Some examples of these chemicals are: Lead from lead-based paints, Crystalline silica from bricks and cement or other masonry products, Arsenic and chromium from chemically treated lumber. Your risk from these exposures varies, depending on how often you do this work. To reduce exposure to these chemicals, work in a well-ventilated area and work with approved safety equipment, such as dust masks specially designed to filter out microscopic particles. (California Health&SafetyCode§ 25249.5, et seq.)
- WARNING: The cord of this product contains lead and/or di (2-ethylhexyl) phthalate (DEHP), chemicals known to the State of California to cause cancer, birth defects, or other reproductive harm. Wash hands after handling.(CaliforniaHealth&SafetyCode § 25249.5, et seq.)
- The warnings, precautions, and instructions discussed in this instruction manual cannot cover all possible conditions and situations. The operator must understand that common sense and caution are factors that cannot be built into this product but must be supplied by the operator.
Vibration Safety
This tool vibrates during use. Repeated or long-term exposure to vibration may cause temporary or permanent physical injury, particularly to the hands, arms, and shoulders. To reduce the risk of vibration-related injury:
- Anyone using vibrating tools regularly or for an extended period should first be examined by a doctor and then have regular medical check-ups to ensure medical problems are not being caused or worsened by use. Pregnant women or people who have impaired blood circulation to the hand, past hand injuries, nervous system disorders, diabetes, or Raynaud’s Disease should not use this tool. If you feel any vibration-related symptoms (such as tingling, numbness, and white or blue fingers), seek medical advice as soon as possible.
- Do not smoke during use. Nicotine reduces the blood supply to the hands and fingers, increasing the risk of vibration-related injury.
- Wear suitable gloves to reduce the vibration effects on the user.
- Use tools with the lowest vibration when there is a choice.
- Include vibration-free periods each day of work.
- Grip the tool as lightly as possible (while still keeping safe control of it). Let the tool do the work.
- To reduce vibration, maintain the tool as explained in this manual. If any abnormal vibration occurs, stop use immediately.
General
- This tool should not be used by people under the age of 16 years.
- This tool is not intended for use by persons (including children) with reduced physical, sensory, or mental capabilities, or a lack of experience and knowledge, unless they have been given supervision or instruction concerning use of the tool by a person responsible for their safety
• Ensure that children do not play with the tool. Always disconnect the plug from the power source before making any adjustments or changing any accessory.
Outdoor Use
- Connect the tool via a fault current (Fl) circuit breaker with a triggering current of 30 mA maximum
Before Use
- Before using the tool for the first time, it is recommended to receive practical information.
- Always check that the supply voltage is the same as the voltage indicated on the nameplate of the tool (tools with a rating of 230V or 240V can also be connected to a 220V supply)
- Use suitable detectors to find hidden utility lines or call the local utility company for assistance (contact with electric lines can lead to fire or electrical shock; damaging a gas line can result in an explosion; penetrating a water pipe will cause property damage or an electrical shock)
- Do not work materials containing asbestos (asbestos is considered carcinogenic.)
- Dust from material such as paint containing lead, some wood species, minerals, and metal may be harmful (contact with or inhalation of the dust may cause allergic reactions and/or respiratory diseases to the operator or bystanders); wear a dust mask and work with a dust extraction device when connected.
- Certain kinds of dust (such as oak and beech dust) are classified as carcinogenic, especially when used in conjunction with additives for wood conditioning; wear a dust mask and work with a dust extraction device when connected.
- Follow the dust-related national requirements for the materials you want to work with.
- Do not clamp the tool in a vice.
- Use completely unrolled and safe extension cords with a capacity of 16 amps (U.K. 13 amps)
After Use
- After switching off the tool, never stop the accessory’s rotation by applying a lateral force against it.
Use
Blade Installation and Replacement
- Turn the Tension Handle clockwise to release the Blade tension
- Set the blade into both Guide Bearings J, ensuring the Blade is centered on them. Hold the blade on the guides and push in. Make sure the blade evenly fits around the wheels.
- Turn the Tension Handle A until the blade is taut and the handle is “Tight”. Plug in the tool, put on your ear/eye protection, and turn on the tool. Inspect the blade, ensure it runs steadily and evenly around the wheels, and that the teeth are pointed in the correct direction.
Guide Bar Assembly
- Assemble the Guide Bar G to the bandsaw before operation
- Release the Screws I on the Frame. Move the Guide Bar G around the blade as shown 3, then lock the screws.
Switching the Machine On and Off
- Turn on/off the Portable Band Saw by switch F, the electronic speed control.
- Adjust the speed by turning the speed dial E The user can choose different speeds for different cutting materials.
Switching the LED Light On and Off
- Turn on/off the LED light by Switch K.
Cutting Operations
- Ensure the Switch is in the off position, then plug in the tool. Secure your workpiece to a workbench or other solid surface.
- Make sure the cord is out of the way.
- Set the Guide Bar against the workpiece, keeping the blade at a 90° angle compared to the workpiece.
- Turn on the Band saw and let it come up to full speed before starting the cut.
- Adjust speed by turning the speed dial E.
- Tilt the unit so that the blade is vertical, as shown in. To start a cut, use minimal force to start a groove. Once the groove is started, allow the rest of the blade to cut into the workpiece. Doing this will prevent the blade from moving from side to side during cutting.
CAUTION! Do not apply force to the tool by pressing too hard with your hands or leaning into it. The tool’s weight creates enough force to make a clean cut. Forcing or leaning on the tool may twist or break the blade, damaging the saw and possibly causing injury. As you reach the end of your workpiece, finish off the cut by raising the unit slowly, bringing the blade up.
Maintenance/Service
- Protect the tool from impact, shock, and grease.
- Always keep the tool and cord clean (especially ventilation slots)! Disconnect the plug before cleaning!
- Do not attempt to clean ventilation slots by inserting pointed objects through openings.
Environment
- Do not dispose of electric tools, accessories, and packaging together with household waste material (only for EU countries)
- In observance of the European Directive on waste of electric and electronic equipment and its implementation following national law, electric tools that have reached the end of their life must be collected separately and returned to an environmentally compatible recycling facility.
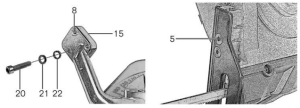
CAUTION!
Ensure the bandsaw is not connected to the mains before mounting it to the stand.
- Disconnect the bandsaw from the mains.
- Connect the bandsaw to the stand arm 15 by placing the arm fixing bolts 20, washers 21, and fixing washers 22 in the stand fixing holes 8.
- Ensure all bolts are tight with the No. 5 Allen key 24.
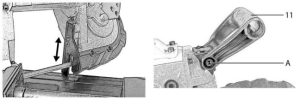
CAUTION!
Ensure the bandsaw is not connected to the mains before mounting to the stand.
- Open the guide bar locking screws 5.
- The guide bar 6 can now be adjusted.
- Tighten the guide bar locking screws to fix the guide bar in place.
- The guide bar 6 can now be adjusted.
- Tighten the guide bar locking screws to fix the guide bar in place.
Adjusting The Auxiliary Handle
- To adjust the auxiliary handle 11 , loosen the locking nut A using the No. 6 alien key 25.
- Move the auxiliary handle to the desired position.
- Fix the auxiliary handle by tightening the locking nut using the No. 6 Allen key.
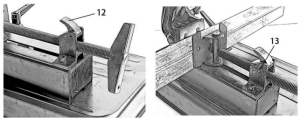
Securing the Workpiece
- Release the vise fixing knob 12
- Place the workpiece in the stand vise 13 and push the vise tight against the workpiece
- Tighten the vise fixing knob to secure
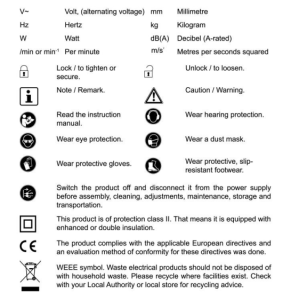
Symbols
The following symbols and abbreviations are found on the product, the rating label, and within these instructions. Familiarize yourself with them to reduce hazards like personal injuries and property damage.

Recommended For Your Project
VEVOR Portable Band Saw, 110V 5 Inch Cutting Capacity Manual


Reviews
There are no reviews yet.