


Unlock the full potential of your VEVOR Pro Press Tool with our comprehensive product manual. Designed for the 18v Electric Pipe Crimping Tool, this manual covers all aspects of using the tool for 1/2″ to 2″ stainless steel, copper, and PEX pipes. With step-by-step instructions, detailed diagrams, and troubleshooting tips, this manual ensures you can set up, optimize, and maintain your crimping tool effortlessly.
The manual highlights the tool’s 360° rotation capability, automatic crimping feature with a brushless motor, and 6 Pro Press Jaws, making it an invaluable resource for novice and experienced users.
Download now to ensure you get the most out of your VEVOR Pro Press Tool, enhancing your efficiency and precision on every job.
SAVE THIS MANUAL
Keep this manual for the safety warnings and precautions, assembly, operating, inspection, maintenance, and cleaning procedures. Write the month and year of purchase. Keep this manual and the receipt in a safe and dry place for future reference.
IMPORTANT SAFETY INFORMATION
In this manual, on the labelling, and all other information provided with this product:

This is the safety alert symbol. It alerts you to potential personal injury hazards. Obey all safety messages that follow this symbol to avoid possible injury or death.
DANGER indicates a hazardous situation which, if not avoided, will result in death or serious injury.
WARNING indicates a hazardous situation which, if not avoided, could result in death or serious injury.
CAUTION, used with the safety alert symbol, indicates a hazardous situation that could result in minor or moderate injury if not avoided.
GENERAL SAFETY RULES
TO WORK IN SAFE CONDITIONS WITH THIS TOOLING, IT IS IMPERATIVE TO READ CAREFULLY THE DIRECTIONS FOR USE AND TO FOLLOW THE INSTRUCTIONS IT CONTAINS. IF YOU DO NOT RESPECT THE INFORMATION WRITTEN IN THAT INSTRUCTION MANUAL, THE WARRANTY WILL BE CANCELLED.
1. Work area safety
- Keep the work area clean and clear. Cluttered or dark areas invite accidents.
- This tool is not insulated; please do not use it on a live conductor.
- Please do not use or store the tool at high temperatures or in a container containing corrosive fluid. Also, pay attention to the ageing sealing kits.
- Keep children and bystanders away while operating the battery-powered tool. Distractions will cause you to lose control.
2. Electrical safety
- Make sure the plug matches the plug seat. Never try any changes on the plug.
- Do not put the tool, battery, and charger in rainy or humid surroundings. Water entering the tool’s electrical system can easily trigger an electrical shock accident.
- Do not use electric wire to carry, pull, or draw out the plug, nor connect the “-“and “+”; damaged or twisted wires may cause an electric shock accident.
- If the charger is heavily crashed, dropped, or damaged in any way, please do not try to repair it yourself. Send it back to the authorized service center as soon as possible. A damaged charger may cause an electric shock accident.
- The best temperature for charging is between 10℃-40℃. Ensure the battery and charger’s air holes are uncovered during charging.
- Please cut off the power of the charger each time to reduce the hazard to children or people who are not experts on the tool.
- Do not charge when the power goes out. The power going out will cause the battery to stop working. Please keep the battery out of the tool to avoid the power discharge.
- Please do not burn the battery or cause a short-circuit; it may cause an explosion.
- Do not use the waste battery; otherwise, it will cause an electric shock.
- Do not disassemble the battery and charger. If you have any problems, don’t hesitate to contact the manufacturer or agent.
3. Personal safety
- Stay alert, watch your actions, and use common sense when operating the tool. Do not use the tool while you are tired or still under the influence of drugs, alcohol, or medication. A moment of inattention may result in serious personal injury.
- Use safety equipment. Always use safety equipment, such as a mask, helmet, safety cap, insulating shoes, and so on, to reduce the risk of personal injury.
- Dress properly. Do not wear loose clothing or jewelry. Keep your hair, clothing, and gloves away from moving parts. Loose clothes, jewelry, or long hair can be caught in moving parts.
- Maintain power tools. Check for misalignment or binding of moving parts, breakage of parts, and any other condition that may affect tool operation. If damaged, have the tool repaired before use. Poorly maintained power tools cause many accidents.
- Please use the pro press tool properly. A tool with the correct power will do the job better and safer at the rate for which it was designed.
- Do not put your fingers into the tool’s head while operating. You could be severely pinched.
4. Service
Have your Battery Pressing Tool serviced by a qualified service technician using only identical replacement parts. This will ensure the safety of the Hydraulic Crimping Tool Kit.
SPECIFIC SAFETY RULES
- Maintain labels and nameplates on the tool that carry essential safety information. If they are unreadable or missing, contact the agent to have them replaced.
- This product is not a toy; keep it out of reach of children.
- Do not put your fingers into the tool’s head while operating. You could be severely pinched.
- Make sure the head is locked firmly during operation.
- Do not use the tool without dies
- Do not knock any tool parts. Otherwise, it will cause injury.
- Do not operate at will, as it will damage the MCU and electrical system
- The design of the limit screw on the head is for preventing the head from dropping or popping.
- Make sure the head is locked firmly during operation.
- Do not use this tool continuously. After 30 to 40 cycles, allow the tool to cool for 15 minutes.
- Do not secure this tool in a vise. This tool is designed for hand-held operation.
- The built-in safety valve undergoes a strict pressure test before marketing; please do not adjust the pressure by an unprofessional person. If the pressure is insufficient, please return the tools to the service center. The tool can only be reused after being checked and tested by a trained person.
- The warnings, precautions, and instructions discussed in this pro press tool instruction manual cannot cover all possible conditions and situations. The operator must understand that common sense and caution are factors that cannot be built into this product but must be supplied by the operator.
UNDERSTANDING YOUR PRO PRESS TOOL
EB-1550 is a tool for connecting stainless steel pipe, XPAP, and PEX pipe with fittings. It is powered by Li-ion, actuated by a brushless motor, and controlled by an MCU. It is a perfect tool for the electrical construction site with a high-pressure hydraulic system and longer life, saving more power.
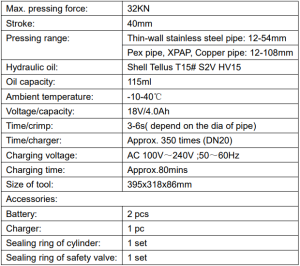
1. Specification
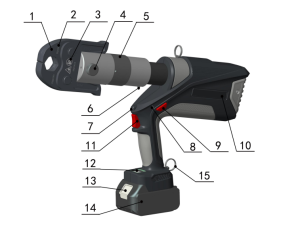
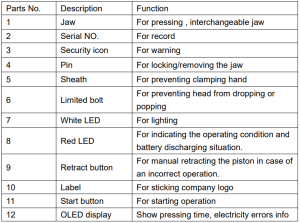
2. Description of components

3. Function description
Micro computer control system – automatically detects the pressure when pressing with double safety protection.

OLED display—This is a dot matrix OLED display that shows pressing times, battery power, working pressure (if equipped with a pressure sensor), maintenance reminders, and fault codes.

Pressure monitoring and control technology – A pressure sensor monitors the pressure of the tool system, and the tool is pressure-controlled. (if configured)

Auto reset – Release the pressure automatically, retract the piston to the <starting position when the max output is reached.

Manual reset – Can retract the piston to the starting position in case of an incorrect operation.

The unit is equipped with a double piston pump which is characterized by a rapid approach of the jaw towards the idler wheel and a slow working motion.

The head can be smoothly turned by 310°around the longitudinal axis to gain better access to tight corners and other difficult working areas.

If a deviation from the set operation pressure or low battery charges is identified, an acoustic signal sounds, and a red display flashes.

The tool’s overall structure is compact. It is ergonomically designed with a non-slip rubber grip and an optimised centre of gravity for more effortless operation.

A temperature sensor makes the tool stop working automatically when the temperature is over 60℃ under long-term working. The fault signal sounds, which means the tool can’t continue working until the temperature is reduced to normal.
Table 1: Signal Instruction and Meaning
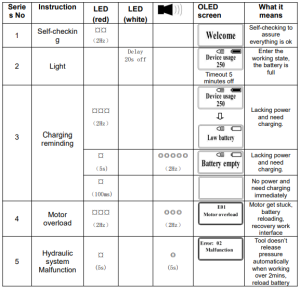
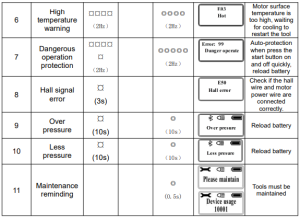
Note: NO.8.9.10 won’t show if the tool doesn’t match the pressure sensor.
OPERATING INSTRUCTION
Before using this product, read the entire SAFETY INFORMATION section at the beginning of this Pro Press Tool manual, including all text under subheadings. Use this tool for the manufacturer’s intended purpose; otherwise, using it for other purposes can result in injury or property damage.
1. Charging
Push the battery into the charger and connect the plug to the plug seat. Make sure the room temperature is between 10℃-40℃. The charging time is around 80 minutes. Please see the illustration below.
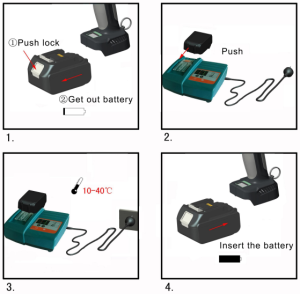
The details of the charging information, please refer to the manual (MANUAL FOR CHARGER)
CAUTION
- The battery can be used hundreds of times, but when its life span is reduced, please replace it with a new battery.
- Please charge the battery in time to prevent it from being used up completely; otherwise, it will become useless forever. If the battery is not used for a long time, it will discharge automatically. Make sure to charge it once per quarter.
- Do not connect the battery’s two poles with a wire, as this is likely to cause an electric spark, combustion, or even explosion.
- Do not use or charge the damaged battery, as this increases the risk of electric shock.
- Don’t burn the batteries, or they may explode.
- When charging the battery, do not cover the charger with anything so it cannot dissipate heat, which will likely cause a fire.
- Disconnect the charger when not in use. It will reduce the risk of injury to children and untrained personnel.
- Do not use the charger in a humid environment or expose it to rain and snow, as this can increase the risk of electric shock.
- Do not disassemble the battery and charger without permission. If there is any fault in the use process, please send it to the professional or the manufacturer for maintenance until the problem is solved.
2. Usage of the tool
2.1. OLED display interface description
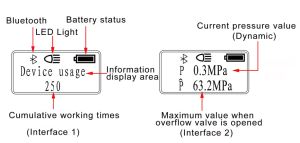
Note: If you configure a Pressure Sensor, the OLED display will increase to show the current pressure value and the overflow valve max value(see interface 2).
When tools start working, show interface 2, then interface 1, twenty minutes later.
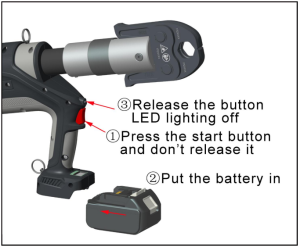
Tool LED illuminator: After clicking the start button, the LED illuminator turns on. After the tool is released, the button will automatically turn off after a 20-second delay. Press the start button before installing the battery. When the battery is installed, release the start button, and the LED light will be off.
If the light is on, the battery must be reinstalled. As shown in the figure.
2.2. Pressing operation

Warning:
- Do not hammer or knock any part of the tool. Before operation, check the pro press tool for damage, ageing, missing parts, misalignment, component jamming, and other unfavourable factors that endanger safety and normal operation. It works effectively without any jams. If you find any problems, stop using them immediately until the problem is solved.
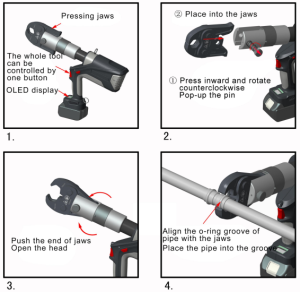
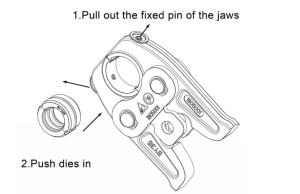
- During the crimping process, the mould fixing pin must be fully inserted into the clamp head to lock and prevent the mould fixing pin from slipping out!
- When crimping, the O-ring ring groove of the pipe fitting must be placed in the ring groove of the mold. Otherwise, the O-ring is easily crushed, and water leakage occurs.
- The limit screw on the clamp head prevents the clamp head from falling off or popping out. Do not remove it yourself!
- Remove any grease, dust, especially on the handle and control components, to prevent the tool from slipping during use.
- The built-in safety valve undergoes strict pressure detection before leaving the factory, and the user must not adjust it without authorization! If you are experiencing under-pressure, please take the tool to a qualified service technician and use it for pressure testing.
Warning: To avoid accidents, do not put any part of the human body, such as your fingers, into the working jaws while the tool piston is extended!
3. Pressing jaws
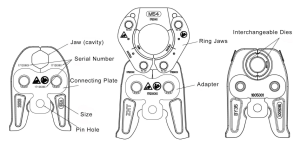
3.1. Introduction of press jaws
CAUTION
- The operation staff must have participated in professional training, and the construction engineering company must have the corresponding construction qualification recognized by the state.
- The pressing tool, jaw, adapter, or ring jaw is only for the corresponding piping system and fittings. Using other methods or modified standard accessories for other applications may damage tools and accessories and even result in personal injury.
Important Information
1. The jaw is a consumable part. When it is often used for crimping, the material fatigues, and cracks occur. A heavily worn jaw is prone to breakage, especially if it is used improperly (such as oversized fittings, skewed crimps, etc.) or operated illegally.
2. Check the jaw for breakage, cracks, component jams, and any other unfavorable factors that compromise safety and normal operation, either periodically or before each use. If you find any problems, please stop using them immediately and return them to the professional repair manufacturer or the factory for repair until the problem is solved.
3. Once you find the following phenomenon, please stop using it and replace it with a new one!
a. The board is cracked
b. The jaw arm is cracked and deformed
c. The jaw is cracked, scratched, sunken, or severely worn
d. Other anomalies
4) You are forbidden to disassemble the tools yourself. You are also strictly forbidden to weld, polish, drill, or make any other changes to the die accessories!
5) Do not put any part of the human body, such as your fingers, into the jaw during use!
6) This tool is a high-strength, heavy-duty appliance. Please strictly follow the instructions and precautions!
CAUTION: Improper operation can lead to leaks at the joint
1. Please ensure the crimp fitting specifications are identical to the jaw.
2. It should be confirmed that the jaw has been completely closed after the crimping.
3. When crimping, ensure the jaw and the crimping tool are correctly positioned on the fitting flange.
4. If the jaw cannot be closed entirely when crimped, it should be sent to the tool dealer or manufacturer for repair.
5. If the jaw connection is incorrectly squeezed, replace a new one and do not continue to use it.
6. If there is a burr on the pipe joint after crimping, it should be handed over to the tool dealer or manufacturer for inspection.
3.2. Standard Jaws Types
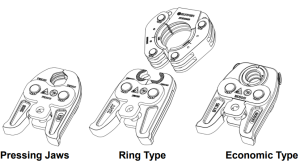
Note: When you purchase this tool, you can choose any type of jaws. Please supply us with the relative fitting standards and sizes. Different materials and designed fittings have different pressing effects.
3.3. Please refer to the illustration for the Economic type below
3.4. Please refer to the illustration for the ring type below
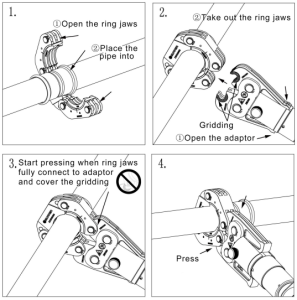
Note: Start pressing when the ring jaws fully connect to the adaptor and cover the gridding. The other operations are the same.
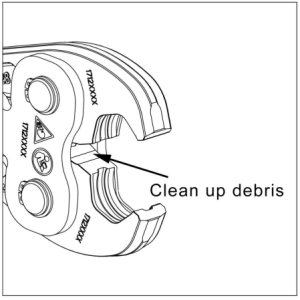
3.5. Jaw cleaning and maintenance
- Clean the residue accumulated in the crimping jaws in time. The residue can be cleaned with a scouring pad or steel wool, but it can’t be cleaned with something harder (such as sandpaper, filet, etc.), which will accelerate the wear on the edge of the cavity.
- After each crimping is completed, remove the impurities and dust on the surface of the jaws, especially the gap at the bottom of the jaws; then rub the lubricant on the surface of the jaw, especially the pin and jaws, and then put it into the dedicated toolbox.

- It is strictly forbidden to collide with any metal. It is strictly prohibited to contact any jaws with any sharp object.
- Check the jaw return spring before each use. The jaw can be easily opened and closed by applying a finger.
- It is recommended that the dealer or manufacturer check the wear of the jaw once a year.
MAINTENANCE AND SERVICING
WARNING
- Damaged equipment may cause serious personal injury. Do not use damaged equipment. If abnormal noise or vibration occurs, correct the problem before further use.
- Before each use, inspect the tool’s general condition. Check for loose screws, misalignment or binding of moving parts, cracked or broken parts, or any other condition that may affect its safe operation.
- After use, clean the tool’s external surfaces with a clean, moist cloth. Smear the rust-preventing oil on the metal surface of the tool and the dies to prevent rust. Store the tool in a dry environment.
- Service to the tool should only be done by a qualified Service Technician.
- To prolong the pro press tool’s life, please change the oil every year. Ensure the oil is filtered by a 120 mesh net or an over 30µm strainer. In the meantime, avoid putting dust into the oil cup.
- After a long time of use, the sealing kits will be damaged. If there is leakage, don’t hesitate to get in touch with the manufacturer and/or the distributor to change the sealing kits.
- If the tool has not been used for a long time, please make sure the piston stays in its starting position, clear up the tool, and paint the rustproof oil on both the tool and its accessories. Take out the battery, put it in a box, and store the tool in a dry environment.
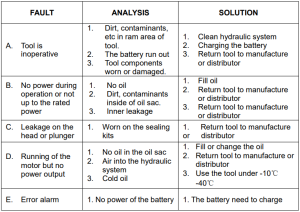
TROUBLESHOOTING
Made In China
Recommended For Your Project
VEVOR Pro Press Tool, 18V Electric Pipe Crimping Tool for 1/2" to 2" Stainless Steel, Copper, Manual


Reviews
There are no reviews yet.