
Unlock the full potential of your VEVOR Pistol Grip Grease Gun with our comprehensive product manual download. Designed for both novices and professionals, this manual provides step-by-step guidance on setup, troubleshooting, and optimizing your 6000, PSI, 14 OZ / 400 CC Capacity Heavy Duty Professional Grease Gun.
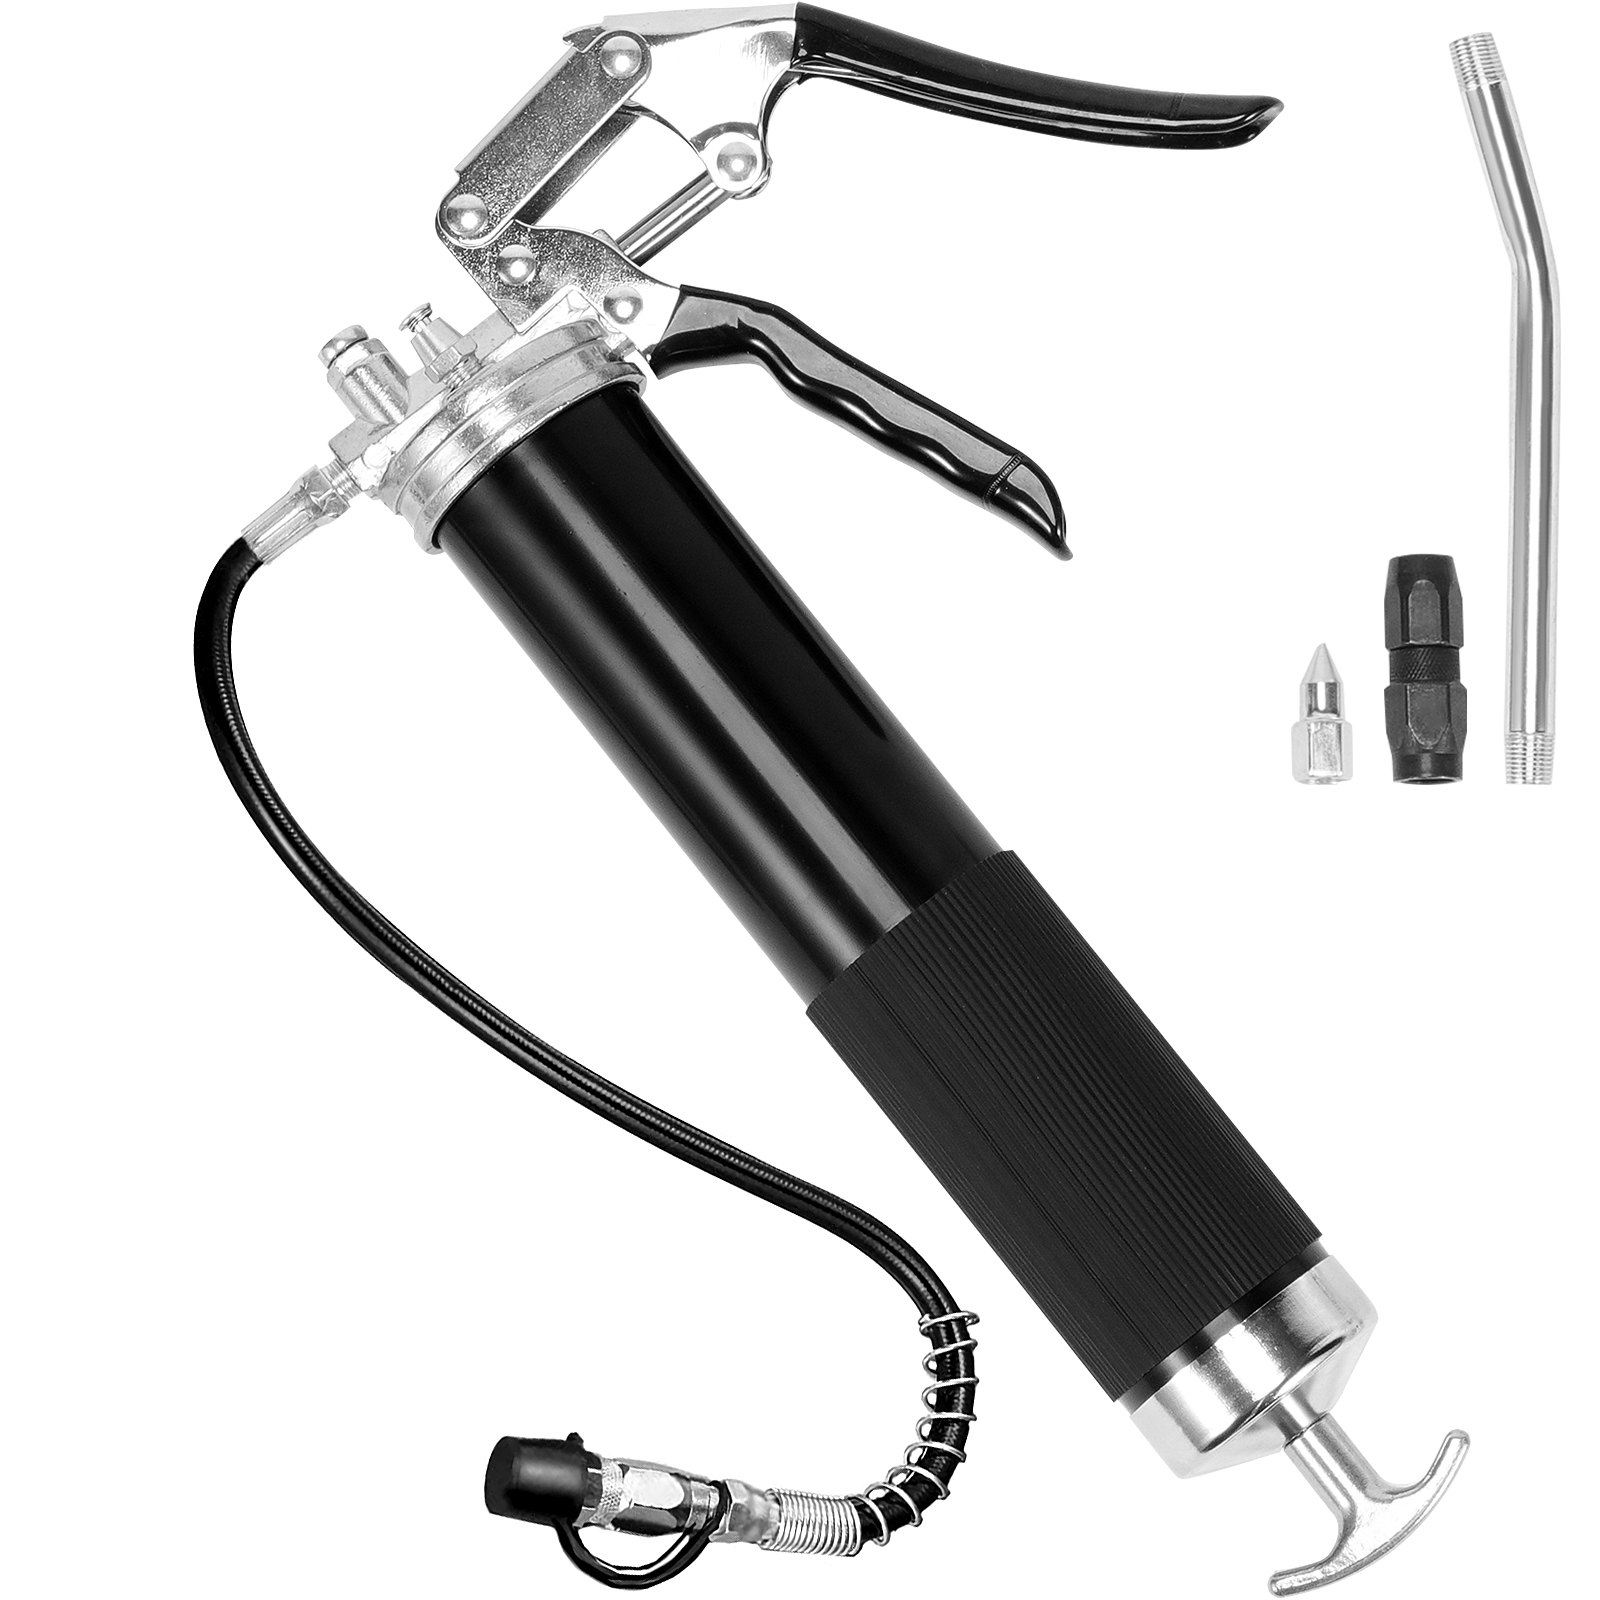
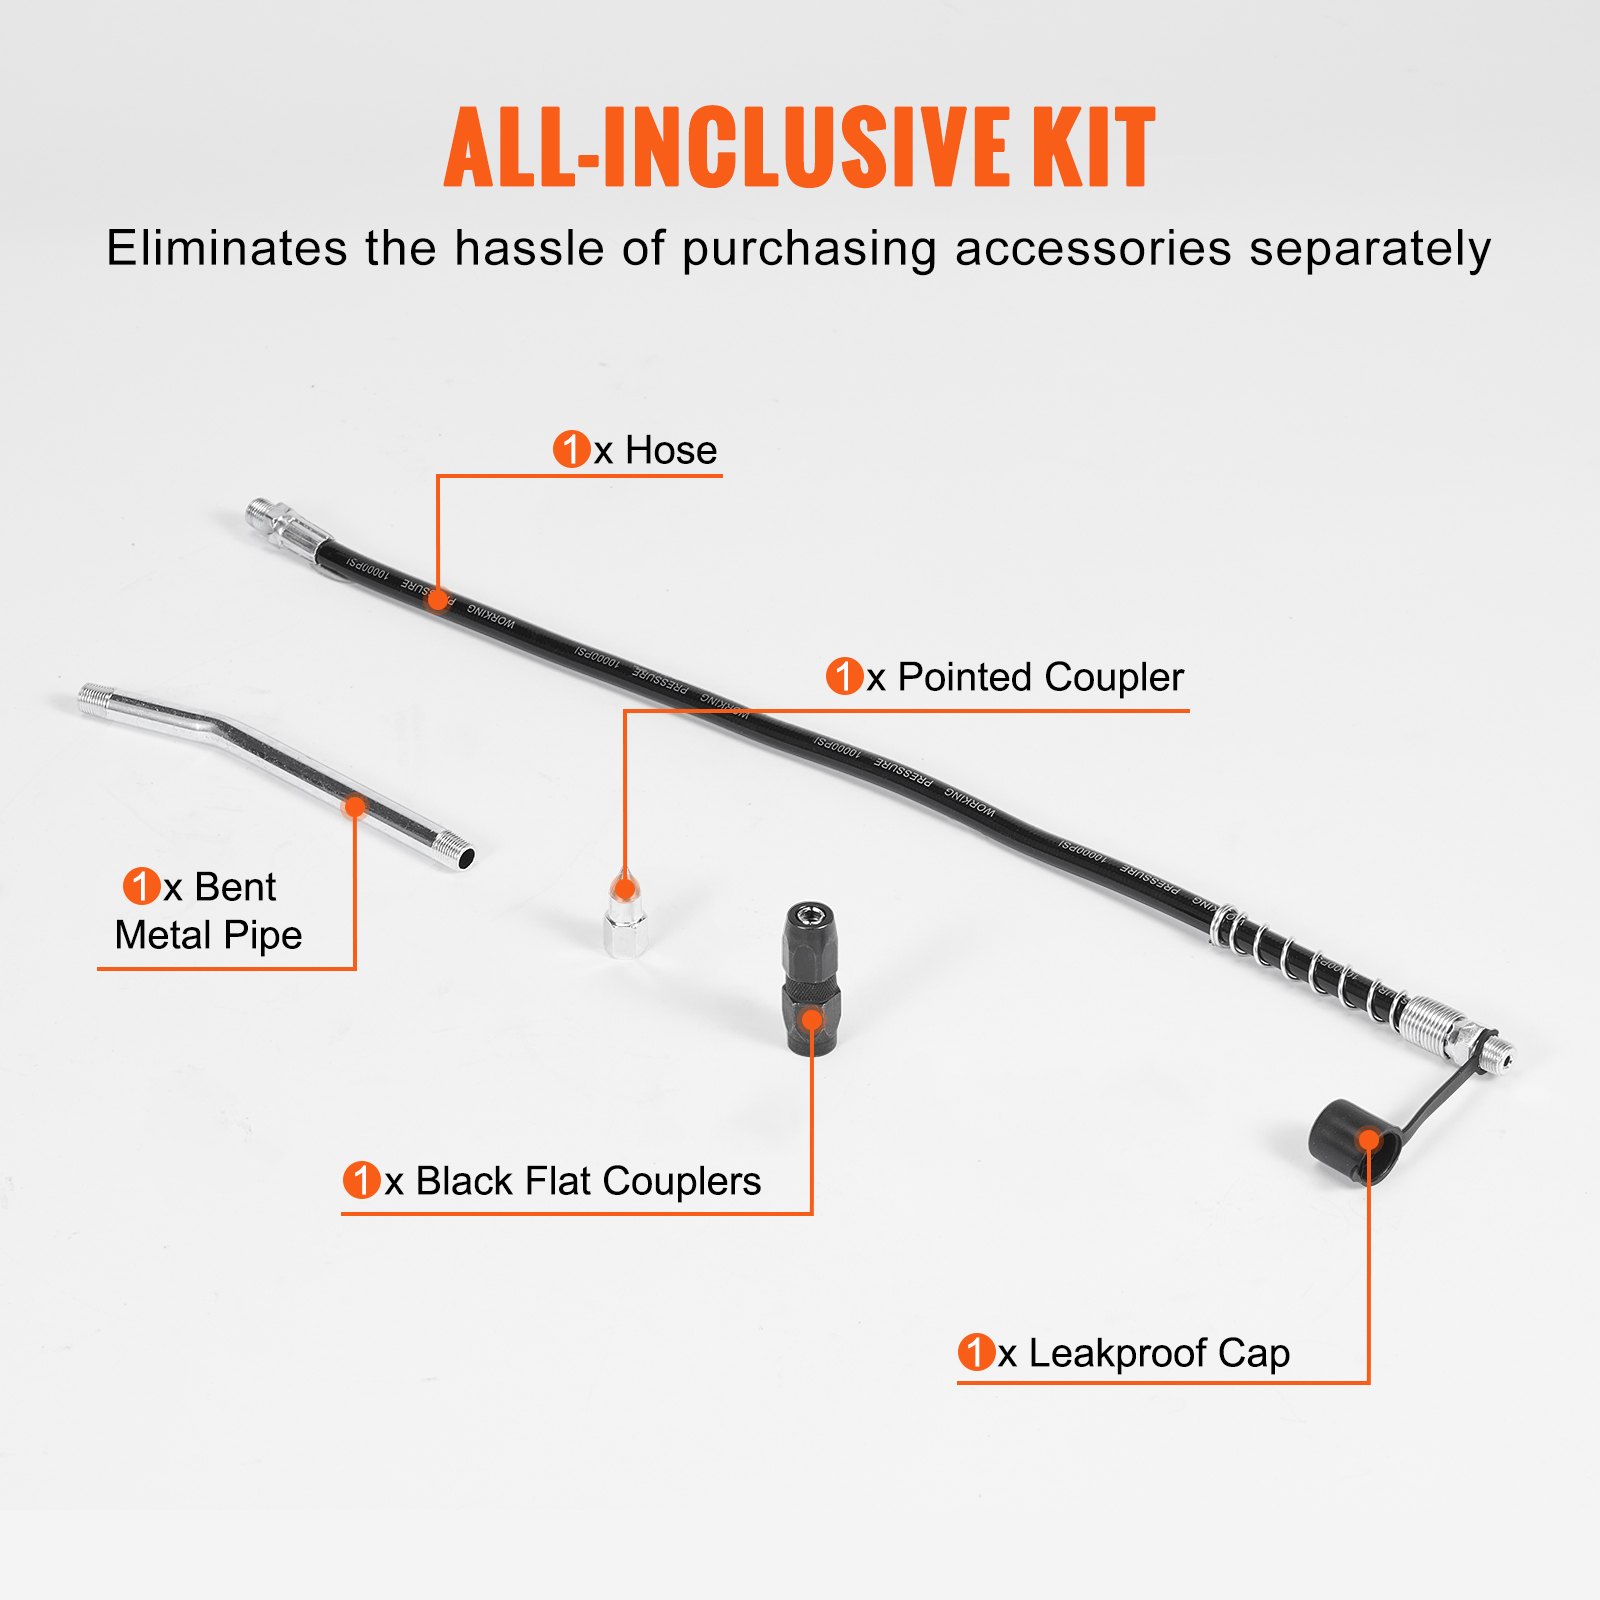
From understanding the intricacies of the 17.72-inch flexible hose to mastering the black flat coupler, pointed coupler, and bent metal pipe, our manual ensures you get the most out of your grease gun. Enjoy seamless maintenance and enhanced performance with this essential guide, simplifying complex procedures into easy-to-follow instructions.
Download now and experience hassle-free operation and maintenance for your VEVOR Pistol Grip Grease Gun.
Warning
- Read carefully and understand all ASSEMBLY AND OPERATION INSTRUCTIONS before operating.
- Failure to follow the safety rules and other basic safety precautions may result in serious personal
General Safety Rules
WARNING: Read and understand all instructions. Failure to follow all instructions listed below may result in serious injury.
Various dangers may occur if the hand lever grease gun is improperly handled during installation, commissioning and daily operation.
Risk of injury and damage to material property because of improper handling.
Hold the manual at the operating staff’s disposal for the unit’s use. Country-specific safety measures and accident prevention regulations must be observed. Only qualified and authorized persons are allowed to operate the grease gun.
Persons are qualified if they can assess assigned tasks and identify potentially hazardous situations due to their training, experience, instruction, and knowledge of the relevant standards. All persons charged with installation, operation, maintenance, and repair work must have read and understood these operating instructions.
The grease gun is designed exclusively for the delivery of grease lubricants. Any use beyond these parameters can lead to serious risks and is regarded as contrary to the intended purpose. The operator is responsible for damages other than the intended use.
CAUTION: Excess pressure can result in the bursting of the grease gun head and accessories!
Excess pressure at the greasing point can damage the grease nipple and the machine. Comply with the machine manufacturer‘s maintenance and service instructions.
Defective accessories can lead to personal injury and material damage. Grease hoses must not be kinked, twisted or stretched. During their use, accessories must be checked for wear, cracks, and other damage. Defective accessories should be replaced immediately. Please do not open the grease gun when it is under pressure!
Every time the grease gun head and barrel are to be separated, the push rod must be fully retracted and automatically locked utilizing the safety catch. Excess pressure can result in the bursting of grease gun heads and equipment. When using the pistol grip grease gun, use suitable equipment, such as protective gloves and eye protection.
SAVE THESE INSTRUCTIONS
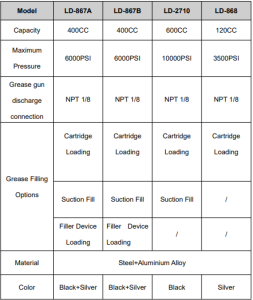
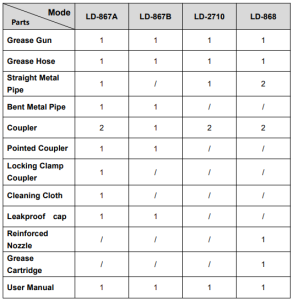
Pistol Grip Grease Gun Models and Parameters
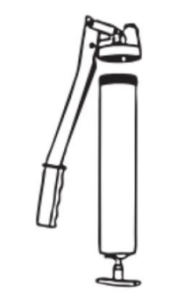
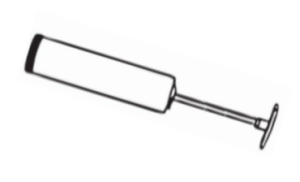
Grease Gun Structure Diagrams
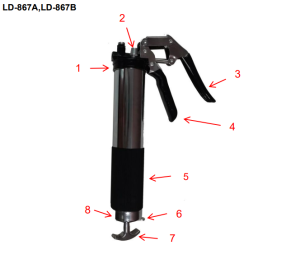
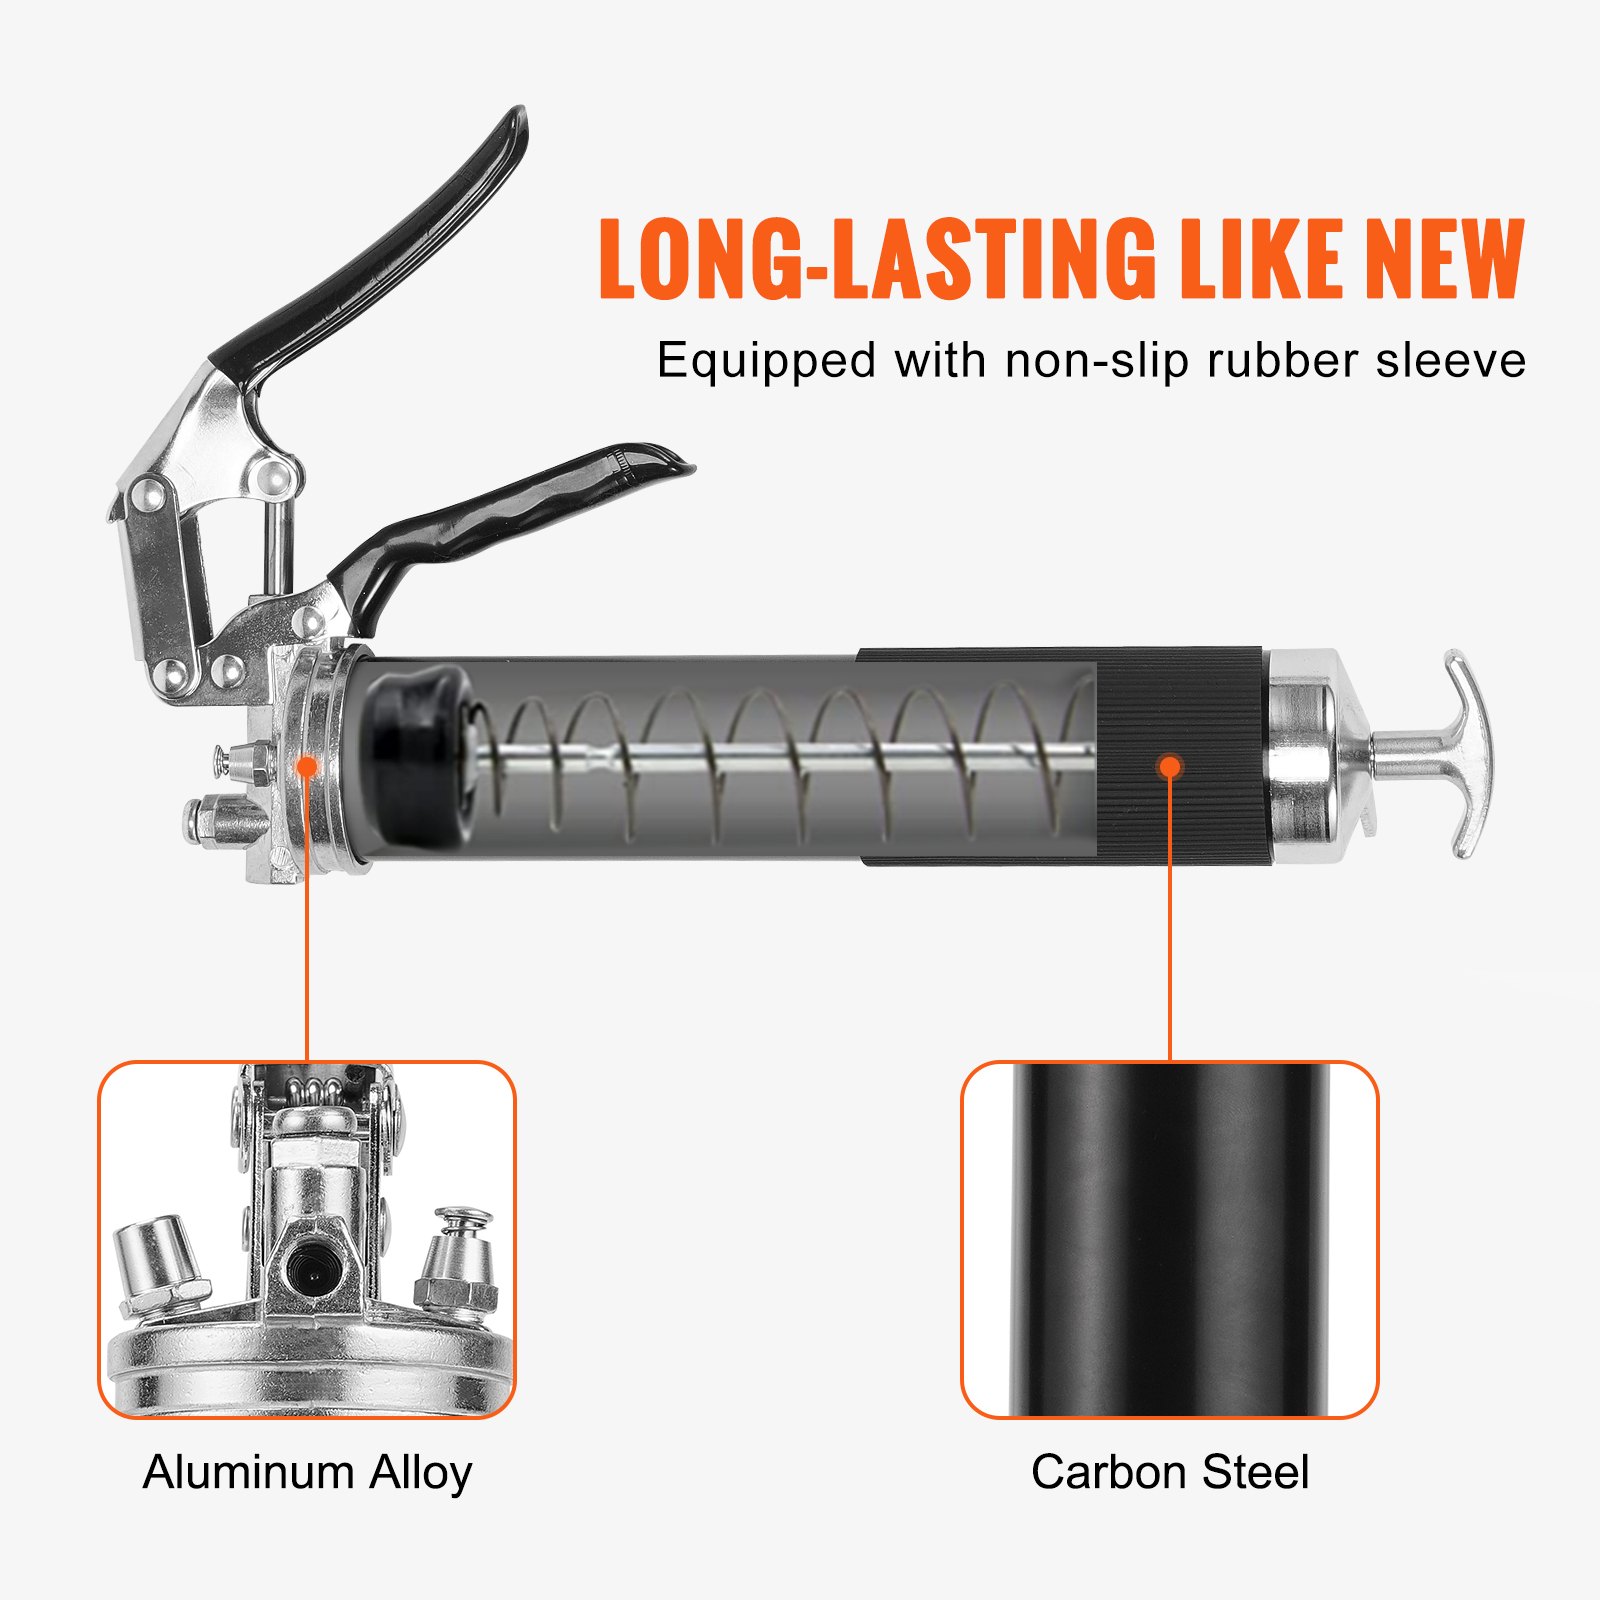
1. Head
2. Air Release Valve
3. Movable Handle
4. Fix Handle
5. Barrel
6. Safety Catch
7. Plunger Rod Handle
8. End Cap
1. Head
2. Air Release Valve
3. Handle
4. Safety Catch
5. Plunger Rod Handle
6. End Cap
7. Barrel
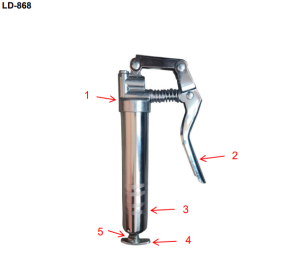
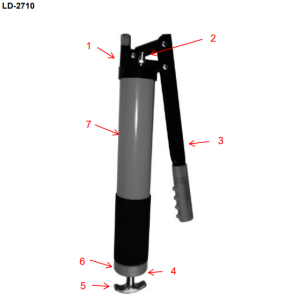
1. Head
2. Handle
3. Barrel
4. Plunger Rod Handle
5. Safety Catch
Components
Pistol Grip Grease Gun Operating Instructions
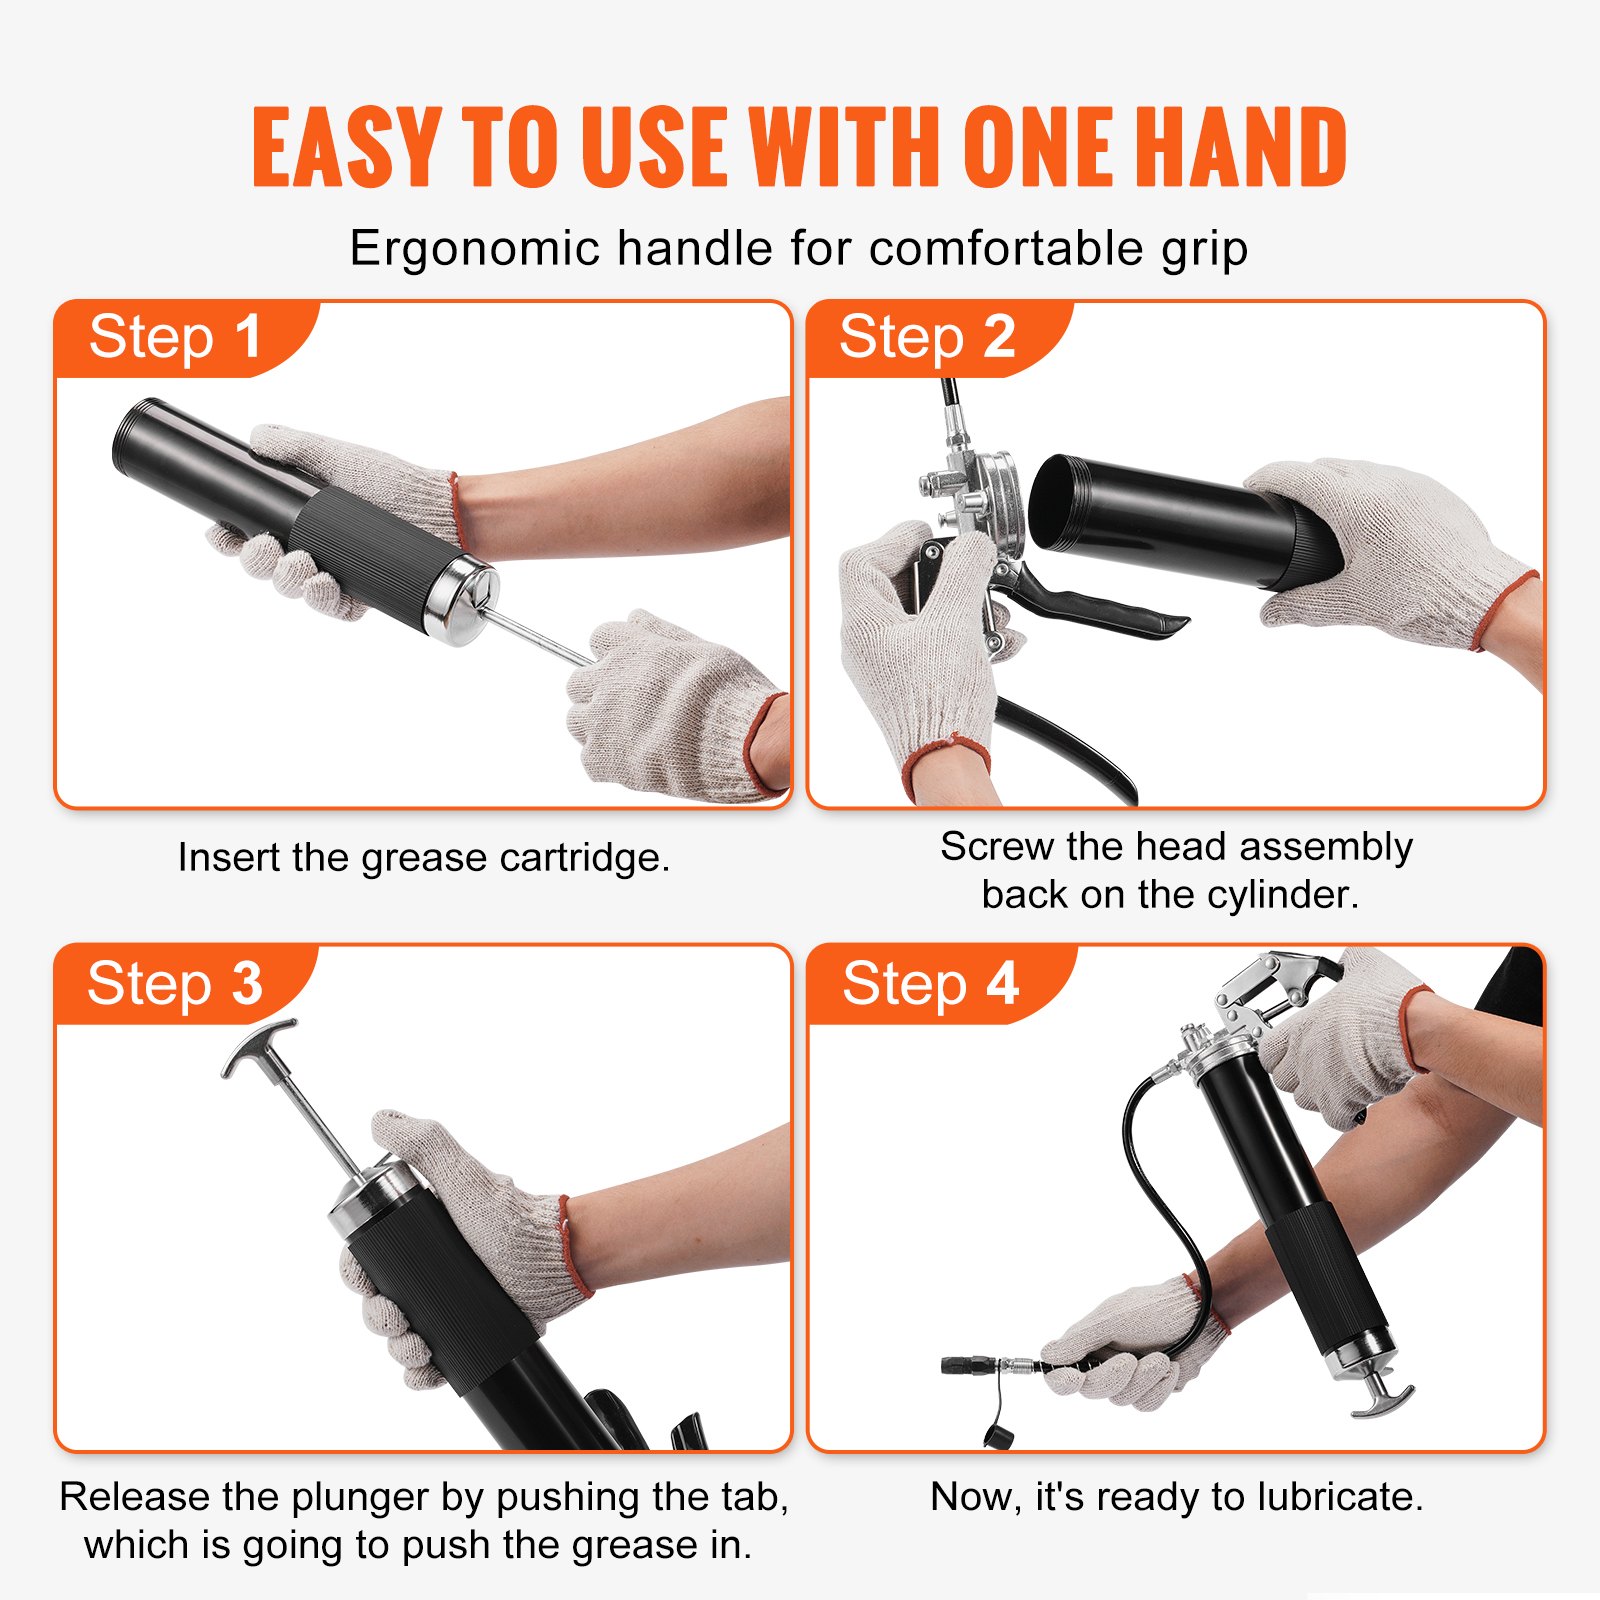
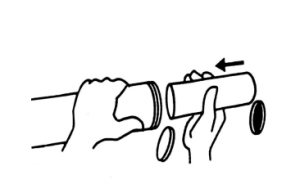
Step 1: Hold the head of the grease gun and unscrew the barrel. Take LD-2710 as an example.
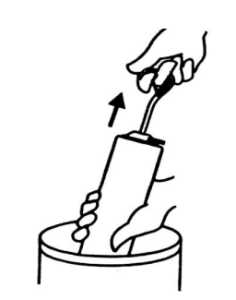
Step 2: Pull back the plunger rod handle and fill the barrel with grease.
Grease filling options:
Cartridge Loading: Remove the plastic cap from the cartridge and insert the open end of the cartridge into the grease gun barrel until the rim of the pull-tab end meets the rim of the barrel.
Suction Fill: Insert the open end of the barrel about 2” into the grease container. Slowly pull the plunger rod handle to draw in grease into the empty barrel while pushing the barrel deeper into the grease until the plunger rod is completely extended. The outside surface may have a lot of grease stuck to it and should be wiped clean for safety.
Grease Gun Filling Device: Place the grease gun onto the filling valve of the grease gun filling unit and hold it in place with light counterpressure. Fill the grease gun by activating the filling device.
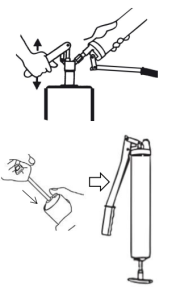
Step 3: Assemble the barrel back into the grease gun. Activate the safety catch and push the push rod back into the Barrel.
Step 4: Exhaust air by pressing the air release valve, loosening the gunhead and barrel (half a turn maximum), or repeatedly actuating the handle.
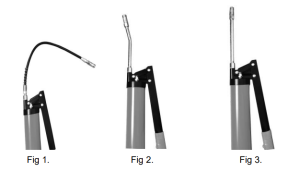
Step 5: Install the required fittings as shown below.(Fig1,Fig2,Fig 3)
Note: If necessary, wrap 3~5 loops of raw material tape around the joint.
Step 6: Press the coupler straight onto the grease fitting. Start operating the handle for grease filling.
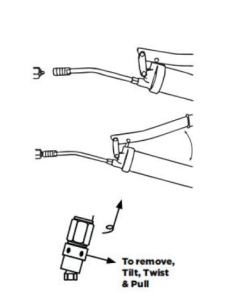
Once the greasing is done, slightly tilt the coupler, twist, and pull back. The tilt and twist action will allow the coupler to be easily removed from the grease fitting.
The LD-2710 operations are above. The LD-868, LD-867A, and LD-867B operations are the same as those of LD-2710.
Pistol Grip Grease Gun Troubleshooting

Grease Gun Maintenance
Before each use, inspect the grease gun’s general condition. Check for cracked or damaged parts, misaligned or bent moving parts, leaking connections, and any other condition affecting the product’s safe operation. If a problem occurs, have it corrected before further use. Do not use damaged equipment.
After every use, dry with a soft cloth, remove all grease and debris from Grease Gun. Do not use solvents to clean or immerse in any liquids.
When storing, keep it in a clean, dry, and safe location away from children.
Only a qualified service technician should perform all maintenance, service, and repairs not discussed in the manual.
Recommended For Your Project
VEVOR Pistol Grip Grease Gun, 6000, PSI, 14 OZ / 400 CC Capacity Manual

Reviews
There are no reviews yet.