


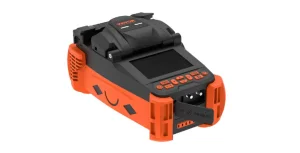
Unlock the full potential of your VEVOR Fiber Fusion Splicer 4 Motors with our comprehensive product manual download. This detailed guide covers all aspects of the Clad Alignment Fiber Optic Fusion Splicer Kit, which features a 4″ Digital LCD Screen, a 3 in 1 Optical Fiber Holder, and an Auto-Focus Optical Fiber Clearer Kit.
Designed for both beginners and professionals, our manual walks you through the setup, troubleshooting, and optimization processes step-by-step. Whether tackling your first splice or fine-tuning for maximum efficiency, this manual is your go-to resource.
Our easy-to-follow instructions ensure you get the most out of your 9s Splicing and 9- 25s Heating capabilities, making your fibre optic projects smoother and more efficient. Download now to make the most of your VEVOR Fiber Fusion Splicer Kit.
VEVOR Fiber Fusion Splicer User Manual
Model: ALK-T1
Warnings and safety precautions
This product is designed to fuse glass optical fibers for communication purposes and should not be used to fuse other substances. Incorrect handling may result in electric shock, fire, and personal injury.
For the safety of the user, please read and observe the following.
Warning
- Do not use power adapters, batteries, power cords, etc., other than those specified for this product. Do not use voltages other than those specified for this product, as this may cause a fire or electric shock.
- Do not allow liquids such as water or metallic substances to enter the machine’s interior, which may cause fire, electric shock, or machine failure. If water or metallic substances enter the machine, stop using it, unplug it from the mains, and contact our maintenance department.
- Do not use the fusion splicer in a flammable or explosive environment, which may lead to fire or explosion.
- Do not touch the electrodes when the fusion splicer is in operation to avoid being injured by the high voltage generated by the electrode discharge. Also, when replacing the electrodes, the power must be switched off and the cord unplugged.
- If you find the machine smoking, smelling, or making unusual noises, please stop using it immediately, unplug it from the power supply, and contact our maintenance service. Continued use may cause fire, electric shock, machine failure, and other accidents.
- To avoid heat, rupture, or fire, it is forbidden to dismantle or modify the fusing machine, battery, or power adapter.
- Please use the battery strictly according to the operating instructions. Incorrect use of the battery may result in heat, rupture, explosion, fire, or personal injury.
Caution
- Do not use and store the fusion splicer in an environment with high temperatures and humidity, as this may cause damage to the equipment.
- Do not touch the heat shrink tube during or just after heating, as it is very hot and may cause burns.
- Do not touch the fusion splicer, AC power cord, and AC plug when your hands are wet, as this may cause electric shock.
- Do not use chemicals besides alcohol to clean microscope lenses, V-grooves, displays, etc., as this may result in blurred images, smudges, and even corrosion and damage to the equipment.
- When used in dusty environments, appropriate dust control measures must be taken to avoid large amounts of dust entering the inside of the machine and causing it to malfunction.
- Do not subject the fusion splicer to strong vibrations and shocks, as this may damage the machine. Instead, use a special carrying case to transport or store the fusion splicer.
- Use the power adapter supplied as standard; if you use your own adapter, the fusion splicer may not work properly.
- Please check the battery level before using the fusion splicer. If the battery level is low or there is an under-voltage alarm, please recharge the battery pack in time. (When the battery is fully charged but still has a very short operating time, please replace the battery with the specified type in time.)
Product Description
Basic Parameters

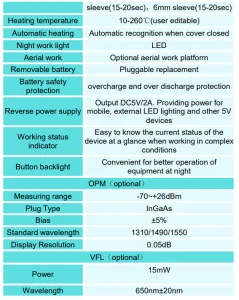
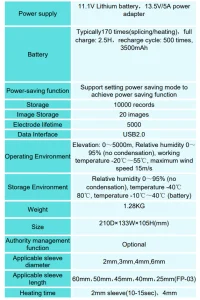
Configuration
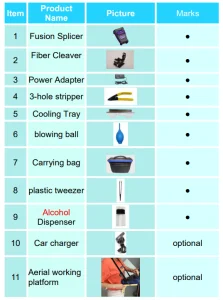
Introduction of Fusion Splicer Components
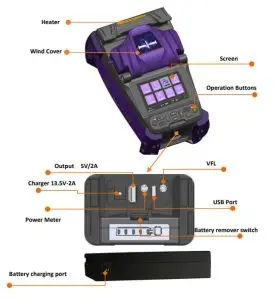
NOTE: VFL and optical power meter are optional functions.
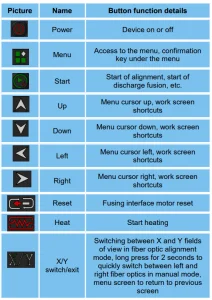
Fiber Fusion Splicer Operation Buttons
Splicing

Heater
Basic Operation
This chapter describes the basic operation of the fusion splicer. Read this chapter in detail to use the equipment correctly and avoid problems such as damage and abnormal results.
Power supply connection
The product supports the following two types of power supply: internal lithium battery pack (no external power adapter plugged in) and external power adapter (external power adapter plugged in). Charging the battery pack requires plugging the adaptor’s DC output cable into the fusion splicer’s external power connector.
When the battery is too low, the fusionsplicer displays an alarm message, and the user should promptly charge the battery pack or power it with the power adapter.

When the battery is too low, the fusionsplicer will display an alarm message, and the user should recharge the battery pack or use the power adapter to supply power in time.

Power On and Off
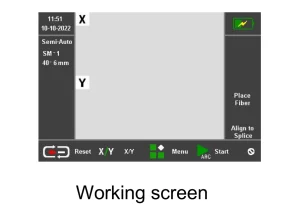
Short-press the power button to turn on the machine. The power button indicator turns red, and the buzzer emits two “beep, beep” sounds. After that, the display shows the working screen.
Long-press the power button to switch off the machine. The display will first turn off, the power indicator will flash, and the indicator will go out after you release the hand, indicating that the fusion splicer has been closed normally.
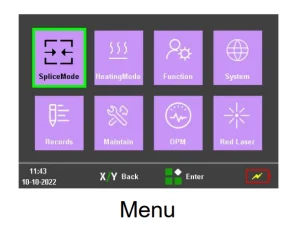
Fiber Fusion Splicer main menu and shortcut key operations
Introduction to the main menu screen
Press the menu key ” ” to enter the main menu screen
Introduction to Shortcut Keys
Four shortcut keys have been added to the workbench interface to operate the operation as follows.
1) Press and hold the “arrow up key for 2s, the red light on logo will appear on the right side of the workbench. At this time, it means the red light is on. Press and hold the “arrow up key again for 2s, then the red light will turn off.
Press and hold the “arrow left for 2s, and the workbench will jump to the power meter setting screen.
Press and hold the “arrow down key for 2 seconds, and the table will jump to the ARC calibration screen.
Press and hold the “arrow right” button for 2 seconds, and the workbench will jump to the red light setting screen.
Preparation Before Splicing
Stripping of protective layers other than the fiber coating.

Install Heat Shrink Tubing

Removal and cleaning of fiber optic coatings

After stripping the fiber, dust-free paper moistened with high-purity alcohol removes debris from the coating layer, starting at the interface between the coating and the bare fiber and rotating in a circular direction towards the bare fiber.
Cleave the fiber
- Open the cleaver flap and place the stripped fiber into the cleaver fiber holder slot, keeping the fiber perpendicular to the cleaver surface.
- Slowly press down on the cleaver fiber holder flap and the cleaver flap.
- Gently push the slider forward to cut the fiber.
- Open the cleaver and fiber holder flap and remove the cut fiber.
- Remove the fibre scrap and place it in the fibre scrapbox.
Note: When the cutting end is not good or the fiber cannot be cut, please adjust the cutter face; using the cleaver that comes with the fusion splicer is also better.
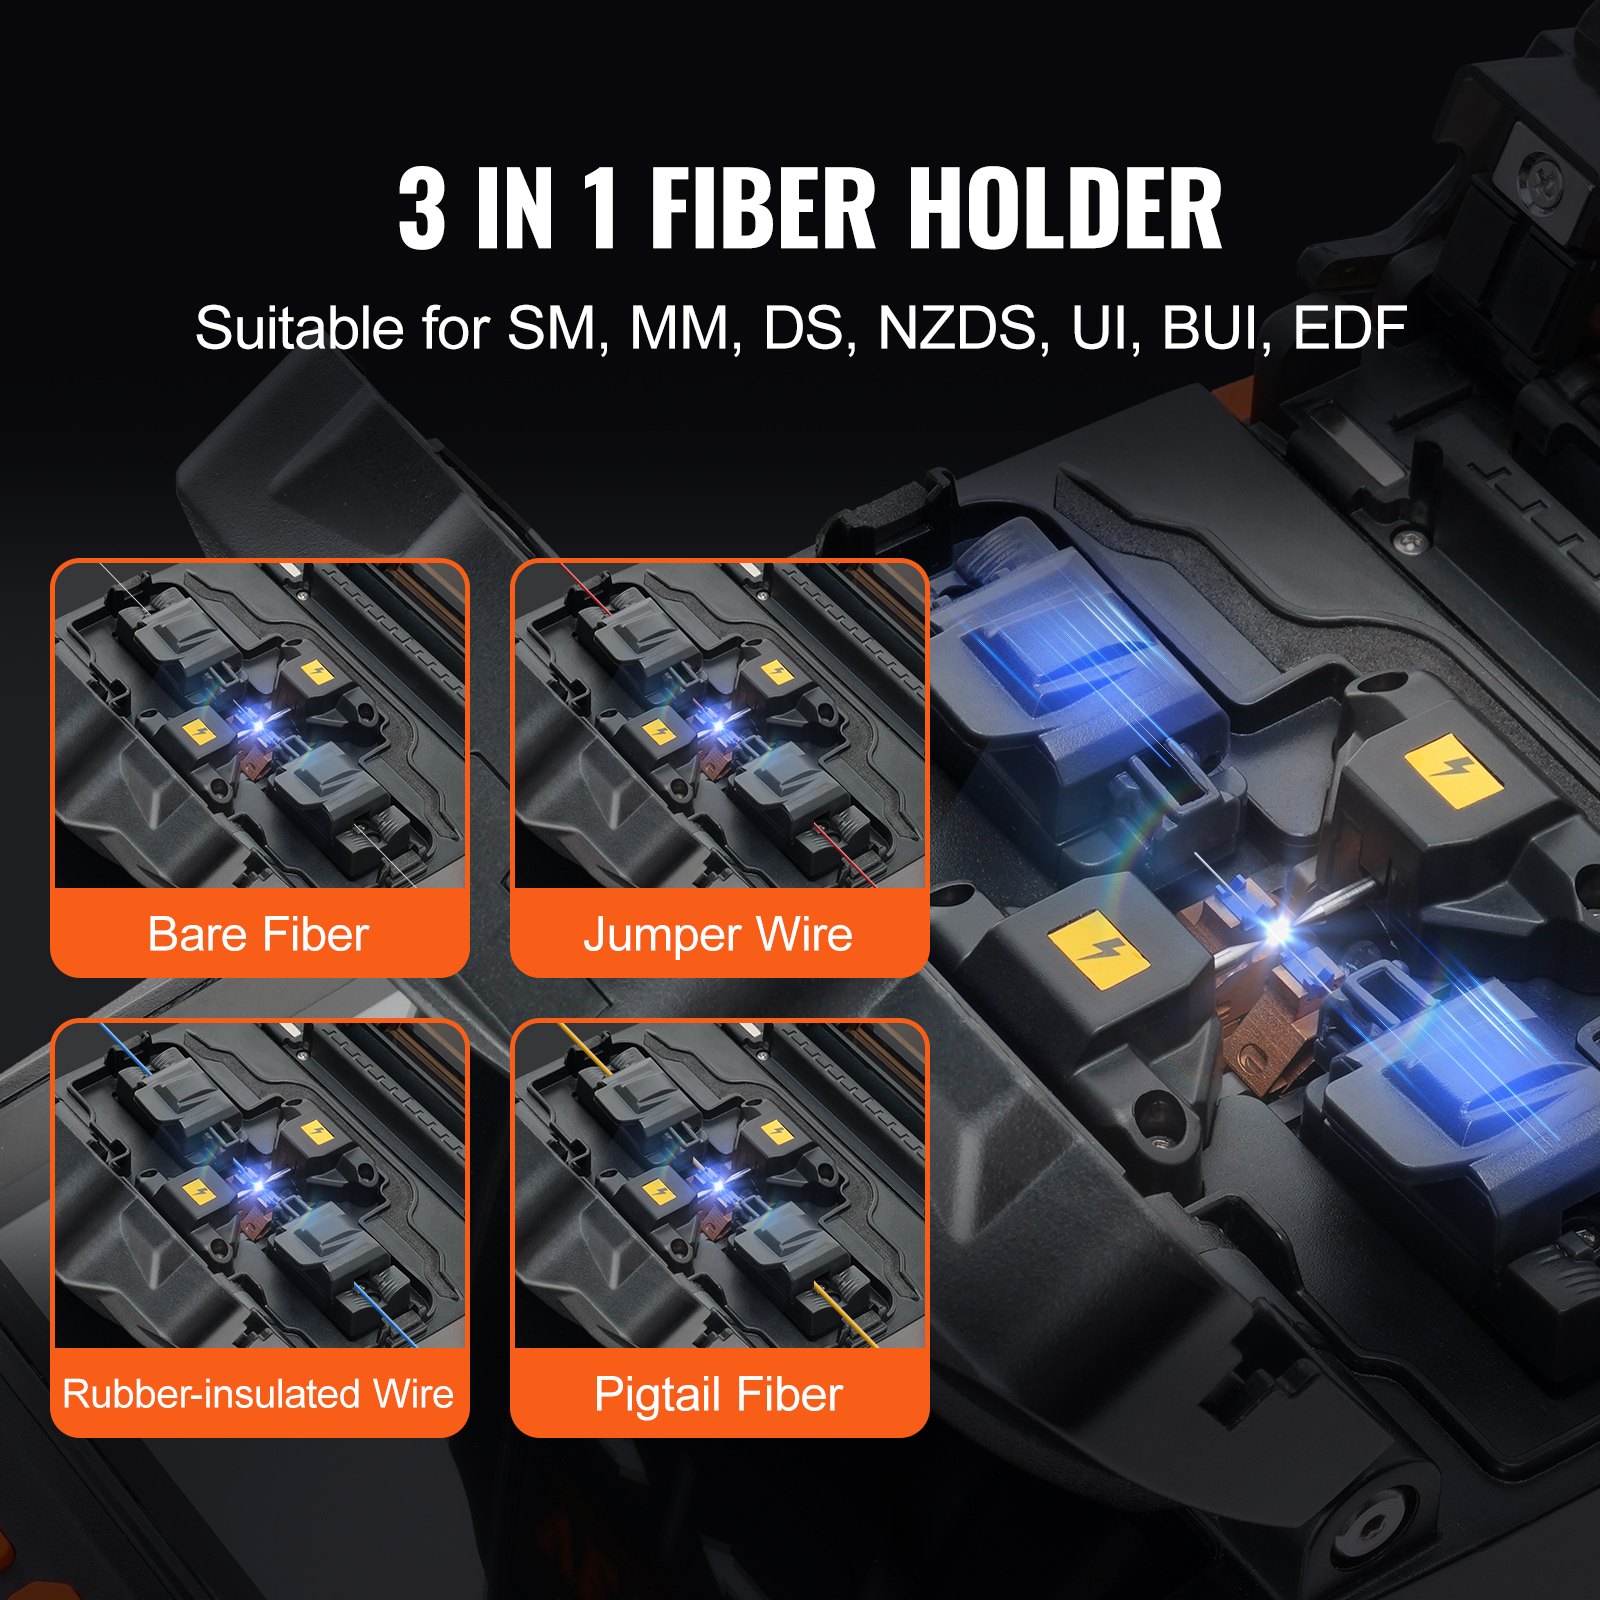
Put Fiber
- Open the wind cover and observe if the V-slot is clean. If not, clean it as described in chapter 3, section 3.5.
- Place the cut optical fiber into the fiber holder.
- Observe that the end face of the fiber is positioned between the tip of the electrode and the part placed in the V-slot.

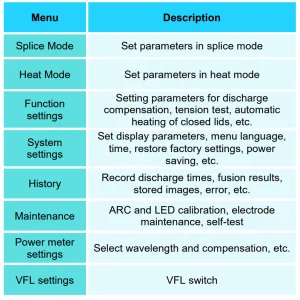
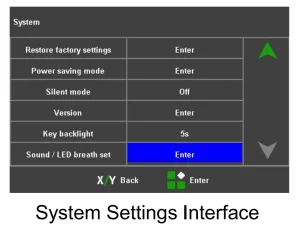
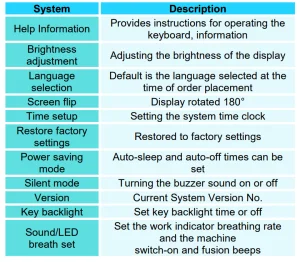
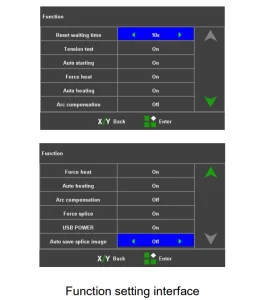
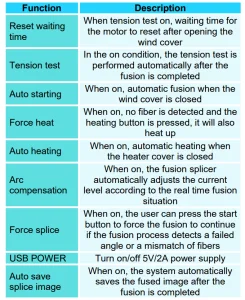
Fiber Fusion Splicer System and Function Settings
Splicing Operations
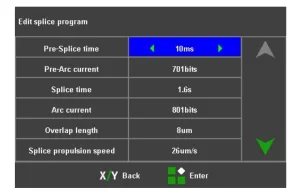
Select the splicing program and set splicing parameters
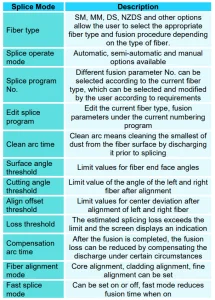
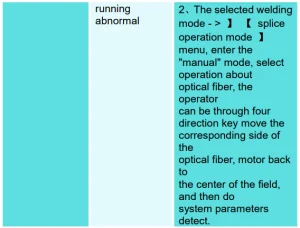
Splice mode description
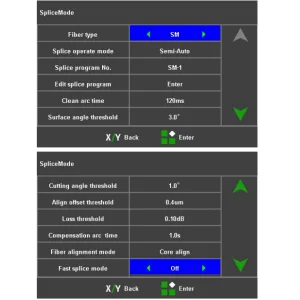
Under the [ splice mode] menu, select [ Edit splice program].

Splicing Loss Estimation and Quality Evaluation
After the fibers have been spliced, the splicing loss is evaluated on the right side of the display. The limit value for the splicing loss is found in the menu [Fusion Splice Settings].
Note that the splices sometimes look slightly thicker than the rest of the splice; this is a normal splice and does not affect the splice loss.
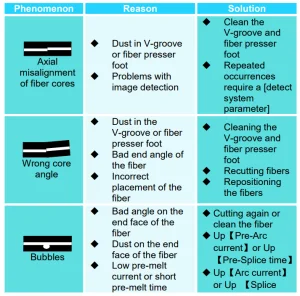
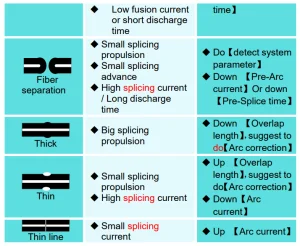
Explanation of fusion splice exceptions.
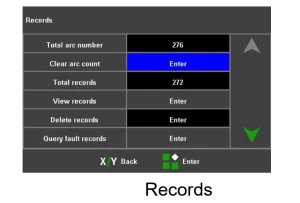
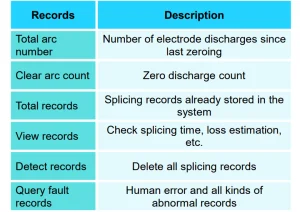
Splice Result Save and Find
Heating Operation
Enter【Heating Mode】in the main menu.
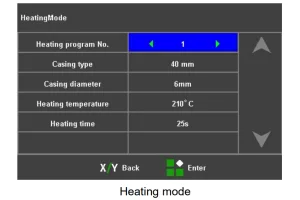
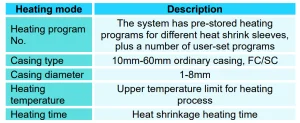
Note: Select [Heating Mode] in the main menu and choose the appropriate heating program according to the diameter and length of the heat shrink tube, using the preset heating parameters as far as possible.
The heating temperature and time are adjustable due to environmental differences.
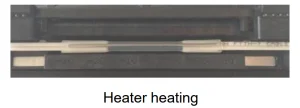
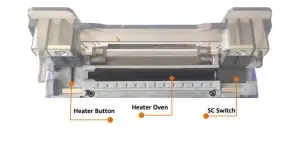
- Open the cover of the heater.
- Open the fusion splicer wind cover, remove the spliced fiber, and move the heat shrink tubing to the center of the fusion splice point.
- Place the heat shrink protection sleeve into the heater, gently straighten the optical fiber, and place the heat shrink protection sleeve into the center of the heating bath. Then, cover the heater with the heating indicator light on.
- After the heating action is completed, the heating indicator light goes out; at this time, you need to open the heater cover immediately and remove the optical fiber. (Note: Do not touch the heated heat shrink protection sleeve with your hands to prevent burning)
- Check the heat shrinkage effect. If it is qualified, put it into the cooling tray for natural cooling. If it is not qualified, such as dust or air bubbles inside, it is recommended that the heat shrinkage operation be carried out again.
OPM and VFL Operation
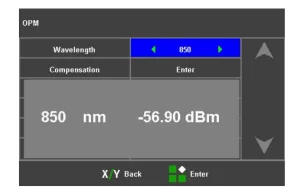
(1) Select [OPM] in the main menu to enter the power meter setting menu.
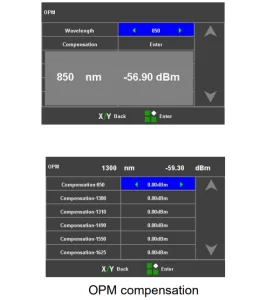

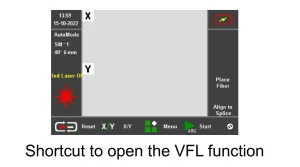
Select【VFL】in the main menu to enter the VFL setting menu

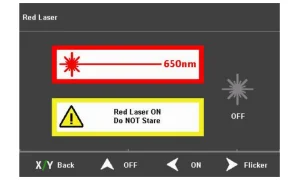
Red light on operation: Press the arrow up key to turn on the red light and keep the constant light setting, press the arrow up key again, and the red light changes to the flashing setting, press the arrow up key again to turn the red light off.
Maintenance
Equipment maintenance menu
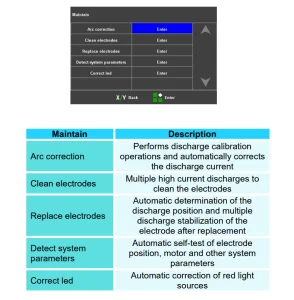
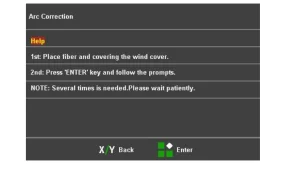
Arc Correction
It is strongly recommended that the fusion splicer be calibrated after a change in the type of fiber, a system upgrade, a large change in the environment’s temperature, humidity, and air pressure, continuous fusion failures or high losses, long periods of non-use of the fusion splicer, or excessive use of the electrodes, or cleaning or replacement of the electrodes.
Otherwise, the splicing effect will be affected.
The procedure for arc calibration is as follows.
- Select【Arc correction】in the【Maintain】menu.
- Place the cut fibers in the fusion splicer and close the wind cover.
- Press the start button to execute.
- If the display indicates “Discharge current too high” or “Discharge current too low”, repeat (2) and (3) above until the arc correction is successful.
- If ” arc correction failed” is indicated, start again with step (1).
Electrodes Maintenance
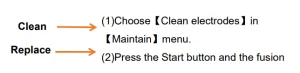
Note: When replacing the electrode, do not touch the tip with a hard object to avoid damaging it and affecting the splicing effect.
Use will wear out the electrodes. Please replace them in time; otherwise, the splicing effect of the fibers will be affected. The number of discharges must be cleared after replacing the electrode. Do not touch the tip of the electrode when replacing.
- Before replacing the electrode, the user must switch off the power supply.
- Loosen the screws securing the electrode cover and remove the electrode.
- Install the new electrode into the electrode slot, fit the electrode cover, and slowly tighten the screws.
- Observe that the two electrode connections are in the horizontal and vertical planes; if not, reinstall the electrodes.
- Turn on the power, put the prepared optical fibers into the fusion splicer, and select [Replace electrodes] in the [Maintain] menu.
- After completing the above operation, please perform [Detect system parameters] and [Arc correction] again.
System parameter self-test
Strongly recommended that the fusion splicer perform system parameter self-test after system upgrade; replace electrode rods or move electrode rods; the fusion splicer has undergone long-distance transportation or severe vibration. Otherwise, it will affect the splicing effect. The steps of system parameter self-test areas follow:
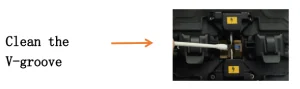
- Clean the V-groove with a cotton swab dipped in alcohol, and clean the prepared optical fiber.
- Select [Detect system parameters] in the [Maintain]menu, and press the menu key twice continuously to enter the system parameter self-test interface.
- Put the cut optical fiber into the fusion splicer, close the windproof cover, and press the start button to start the system parameter self-test.
- Under normal circumstances, the parameter self-test will last for about 2 minutes. Please observe the prompt information on the LCD screen. If the self-test fails, please correct the operation according to the prompt information, and restart the system parameter self-test (step 2)
Cleaning and maintenance of Fiber Fusion Splicer
- Open the windproof cover of the fusion splicer.
- Use the delivered dust blower to clean the pollutants on the V-groove.
- Clean the bottom of the V-groove with a cotton swab dipped in alcohol.
Note: Do not touch the electrode tip. Do not use excessive force when cleaning not to damage the V-groove, resulting in abnormal use.
Open the windproof cover, wipe the surface of the presser foot with a fine cotton swab dipped in alcohol to ensure it is clean, and then dry the presser foot with a dry cotton swab.
- Turn off the power of the fusion splicer and open the windproof cover.
- Gently and carefully wipe the lens with a fine cotton swab
- Turn on the power and do a light source calibration in the equipment maintenance
Note: Do not touch the electrodes when cleaning, and do not touch the lens with hard objects.
Password Control Function(Optional)
Management options interface
Enter the management interface through”Management Options” under the “System Settings” interface. The management options allow you to control functions such as the fusion splicer’s validity period, the number of valid times of use, and the power-on password.
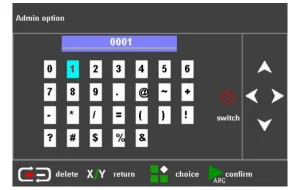
The management password supports 1~16digits, and the factory default value of the management password is 8888. Press the up, down, left, and right keys to adjust the character to be input; press the menu key to use this selected character as the current input.
Press the reset button to cancel the current input password; press the start button to confirm the password input. If the input is correct, it will directly enter the management interface; otherwise, it will prompt an input error. Press and hold the key continuously for quick adjustments.
- “Validity period verification”: When the validity period verification function is enabled, no matter whether the power-on mandatory password verification function is enabled or not, if the system detects that the set validity period has expired, the system will pop up the password login interface, and the key composed of red numbers will appear on the password login interface. It is necessary to inform the manager of the fusion splicer of the key to obtain the temporary power-on password.
After entering the correct password, the system will automatically activate the previous password. When the validity period verification function is turned off, the system will not detect the fusion splicer’s validity period and will consider it permanently valid. - “Set validity period”: This option allows you to set the validity period of the fusion splicer. Use the left and right buttons to adjust the validity period field; press the up and down buttons to adjust the validity period, and press and hold the up and down buttons continuously to make quick adjustments. Press the menu key to save the validity period.
- “Valid times verification”: When the ” valid times verification ” function is turned on, no matter whether the power-on forced verification password function is turned on or not, if the system detects that the number of valid times exceeds the set number, the system will pop up the password login interface, and a password composed of red numbers will appear on the password login interface key. The user needs to inform the manager of the fusion splicer of the key to obtain the temporary power-on password for this time, and the system will automatically activate the previous password after the input is correct. When the valid times verification function is turned off, the system no longer limits the number of uses.
- “Valid times”: the number of welding times the machine can use.
- When “Validity Verification” and “ValidityTimes” are enabled at the same time, “Validity Verification” is used as the default verification method. When”ValidityVerification” and “Validity Times” are turned off at the same time, the use rights of the machine are no longer restricted.
- “Set system time”: Through this option, you can set the system time of the fusion splicer. Use the left and right buttons to adjust the time field; use the up and down buttons to adjust the time, and press and hold the up and down buttons continuously for quick adjustment. Press the menu key to save time.
- “Set power-on password”: This option allows you to set the login password for the fusion splicer. Press the up, down, left, and right keys to adjust the character to be input; press the menu key to use the selected character as the current input. Press the reset key to cancel the current input password; press the start key to save the current input password and prompt that the setting is successful. Press and hold the key continuously for quick adjustments.
- “Power-on password verification”: When this function is enabled, the user must enter a password every time the device is turned on. If password authentication is not required for booting, this function can be turned off.
- “Set Admin Password”: This option allows you to set the admin password. Press the up, down, left, and right keys to adjust the character to be input; press the menu key to use the selected character as the current input.
Press the reset key to cancel the current input password; press the start key to save the current input password and prompt that the setting is successful. Press and hold the key continuously for quick adjustments.
Power-on password login interface introduction
- The power-on password supports 1~16 digits, and the factory default value is 111111111111. After the user logs in successfully, the power-on password can be changed through the “Set Power-On Password” under the “Management Options” interface.
- On the power-on password login interface, press the up, down, left, and right keys to adjust the character to be input; press the menu key to use the selected character as the current input. Press the reset button to cancel the current input password; press the start button to confirm the password input. If the input is correct, it will directly enter the welding interface; otherwise, it will prompt an input error. Press and hold the key continuously for quick adjustments.
- When the valid period verification method is adopted, the number below the password input box is the machine’s validity period; when the valid times verification method is adopted, the number below the password input box is the machine’s remaining usage times. If the fusion splicer exceeds the valid period of use or the number of valid uses, a key composed of red numbers will appear on the interface.
The user needs to inform the administrator of the key to obtain the temporary power-on password. After the input is correct, the system will automatically prompt for a password before activation. The key will not appear on this interface if the validity period or the number of valid times has not been exceeded. - If the validity period verification function is turned on, the fusion splicer’s validity period will be displayed on this interface. If the function is turned off, the splicer’s validity period will not be displayed on this interface.
If the validity times verification function is turned on, the remaining usage times will be displayed on this interface. If the validity times verification function is turned off, the remaining usage times will not be displayed on this interface.
Appendix 1 Warning Information

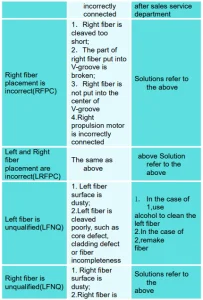
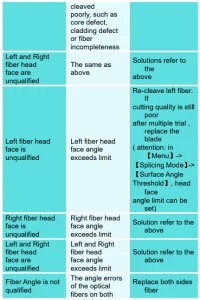
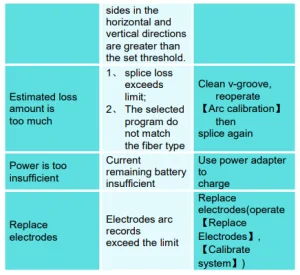
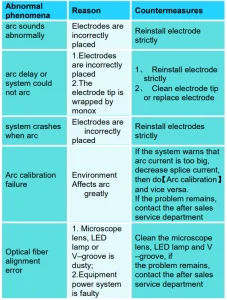
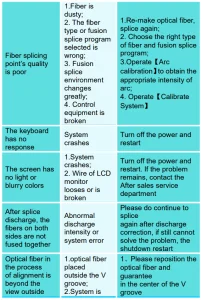
Appendix 2 Fiber Fusion Splicer Troubleshooting
Recommended For Your Project
VEVOR Fiber Fusion Splicer 4 Motors Manual


Reviews
There are no reviews yet.