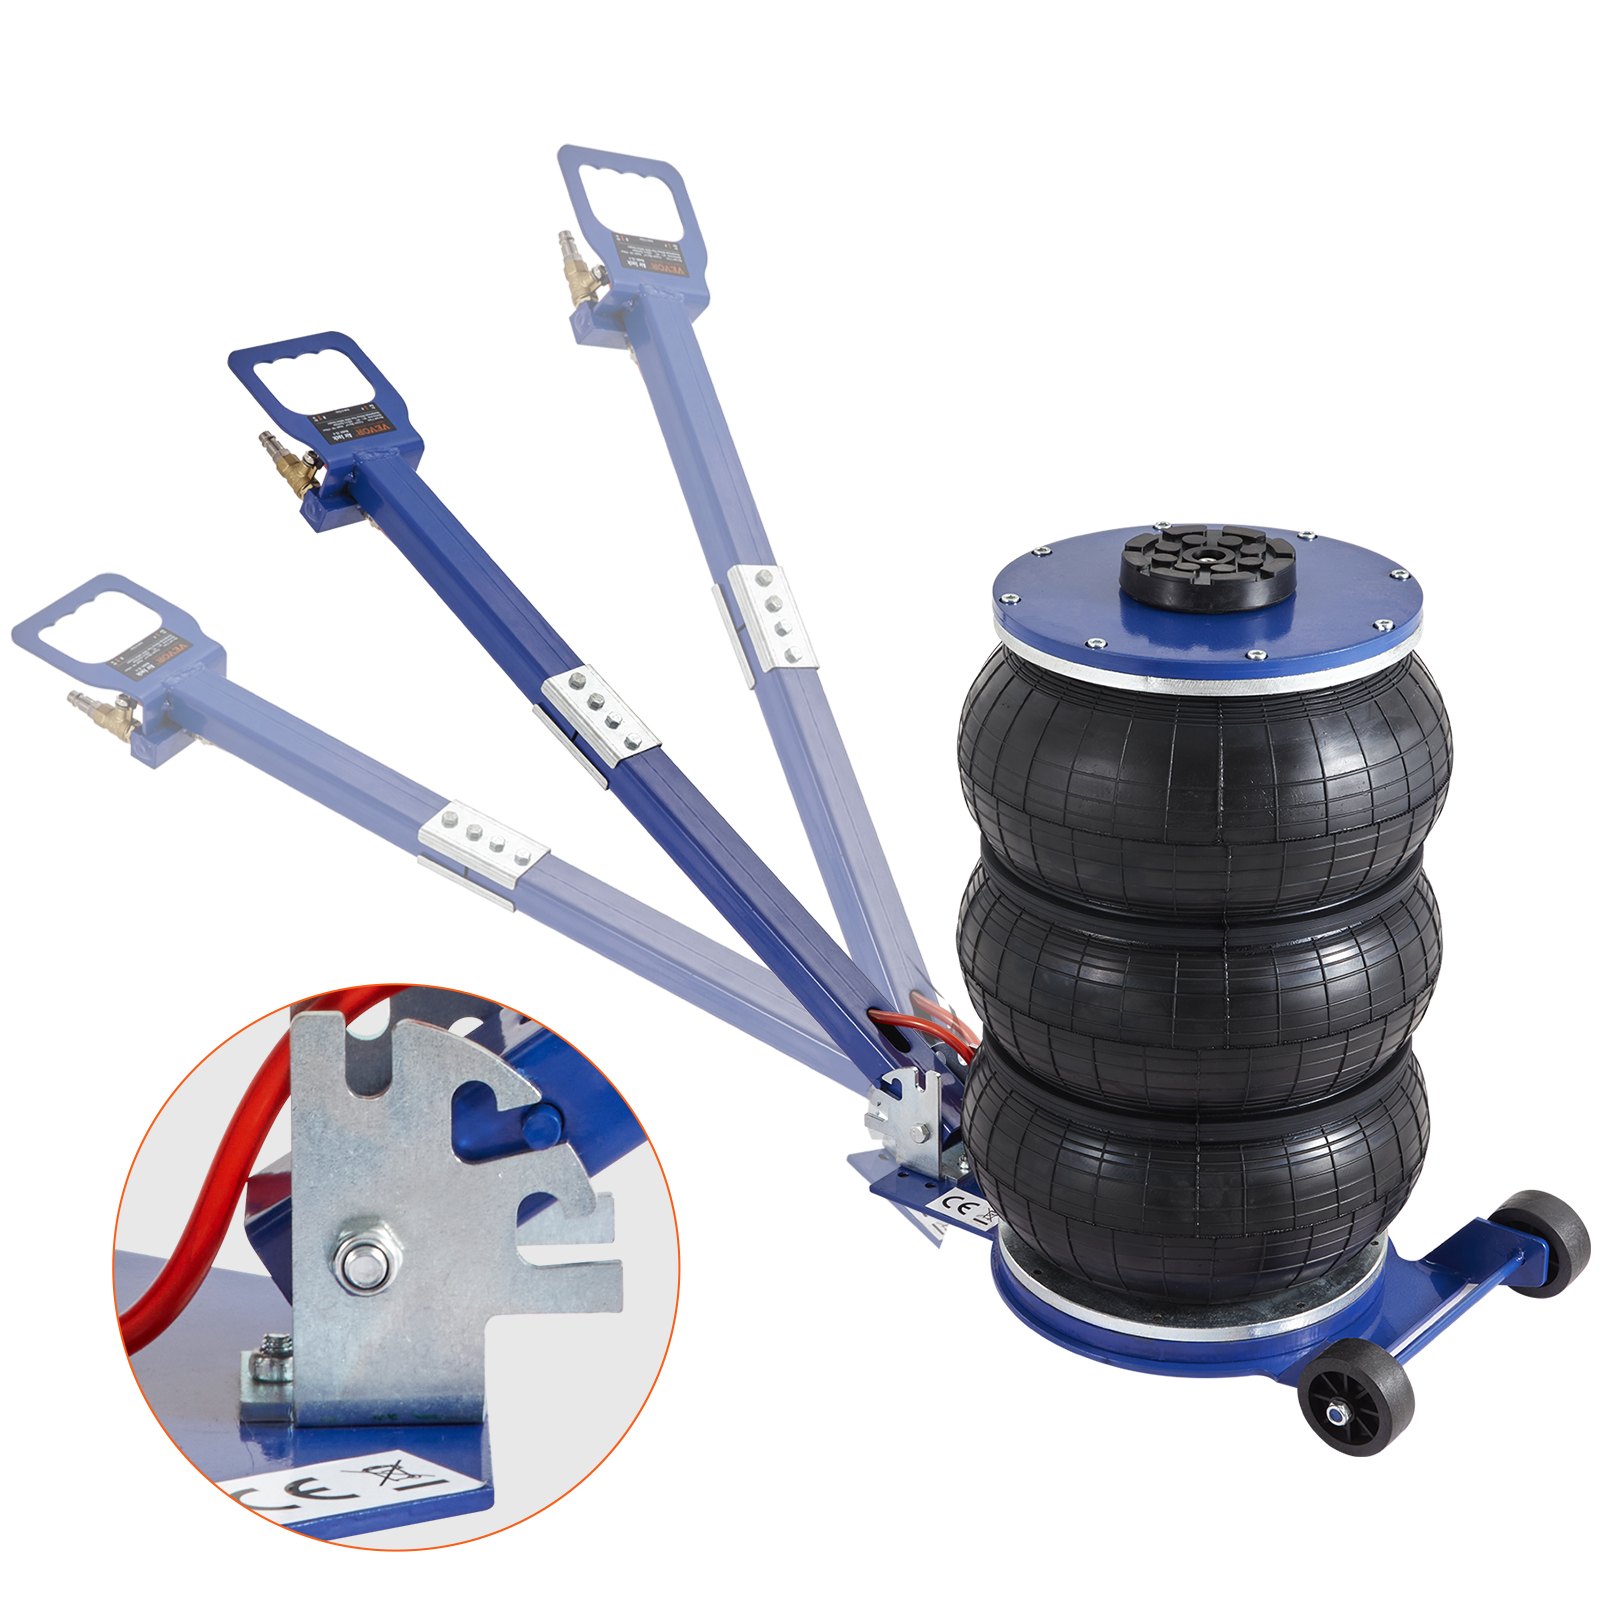
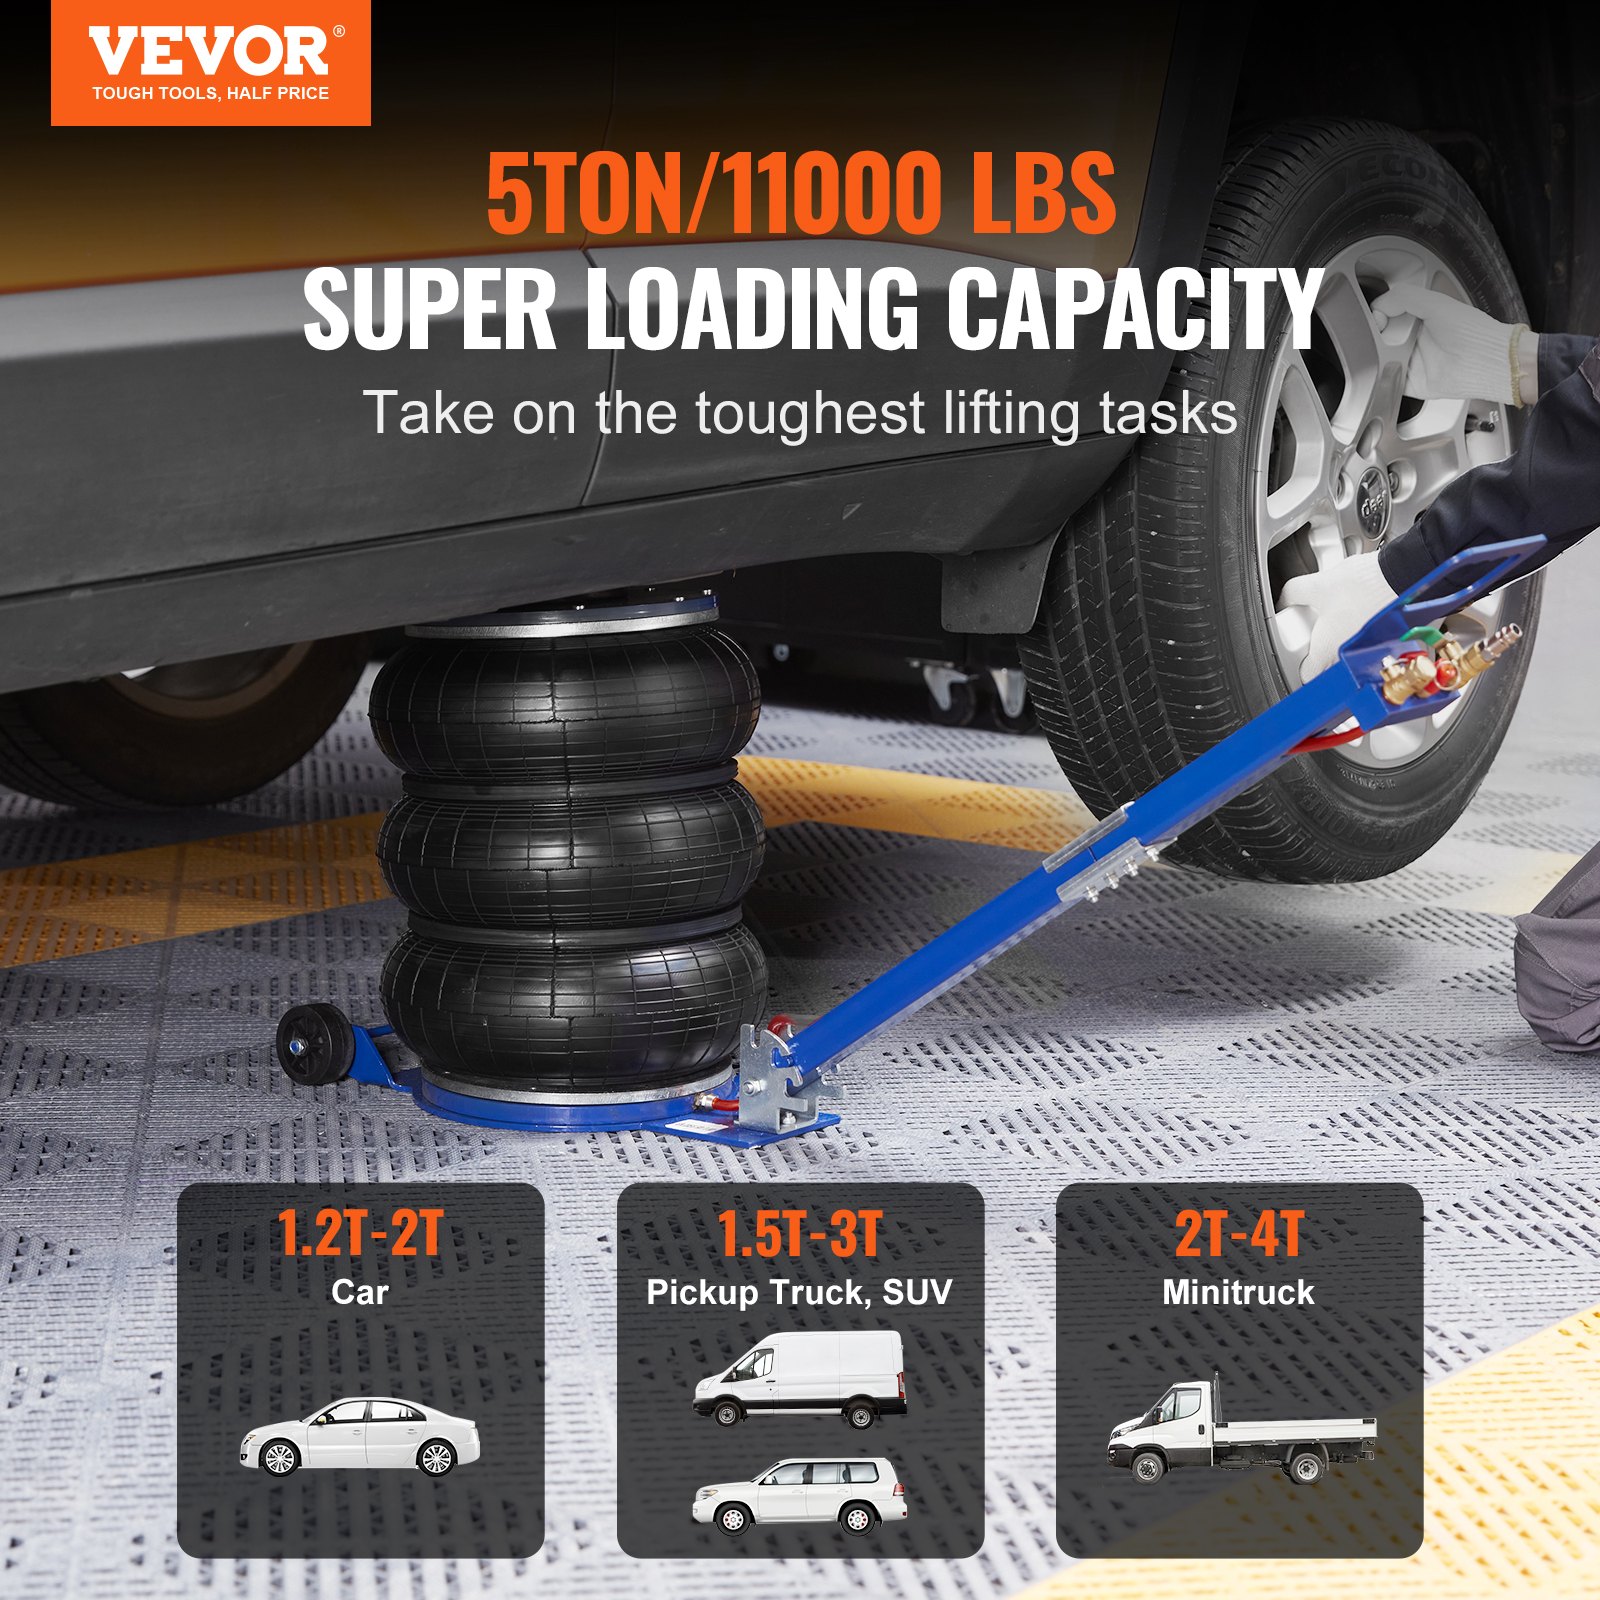
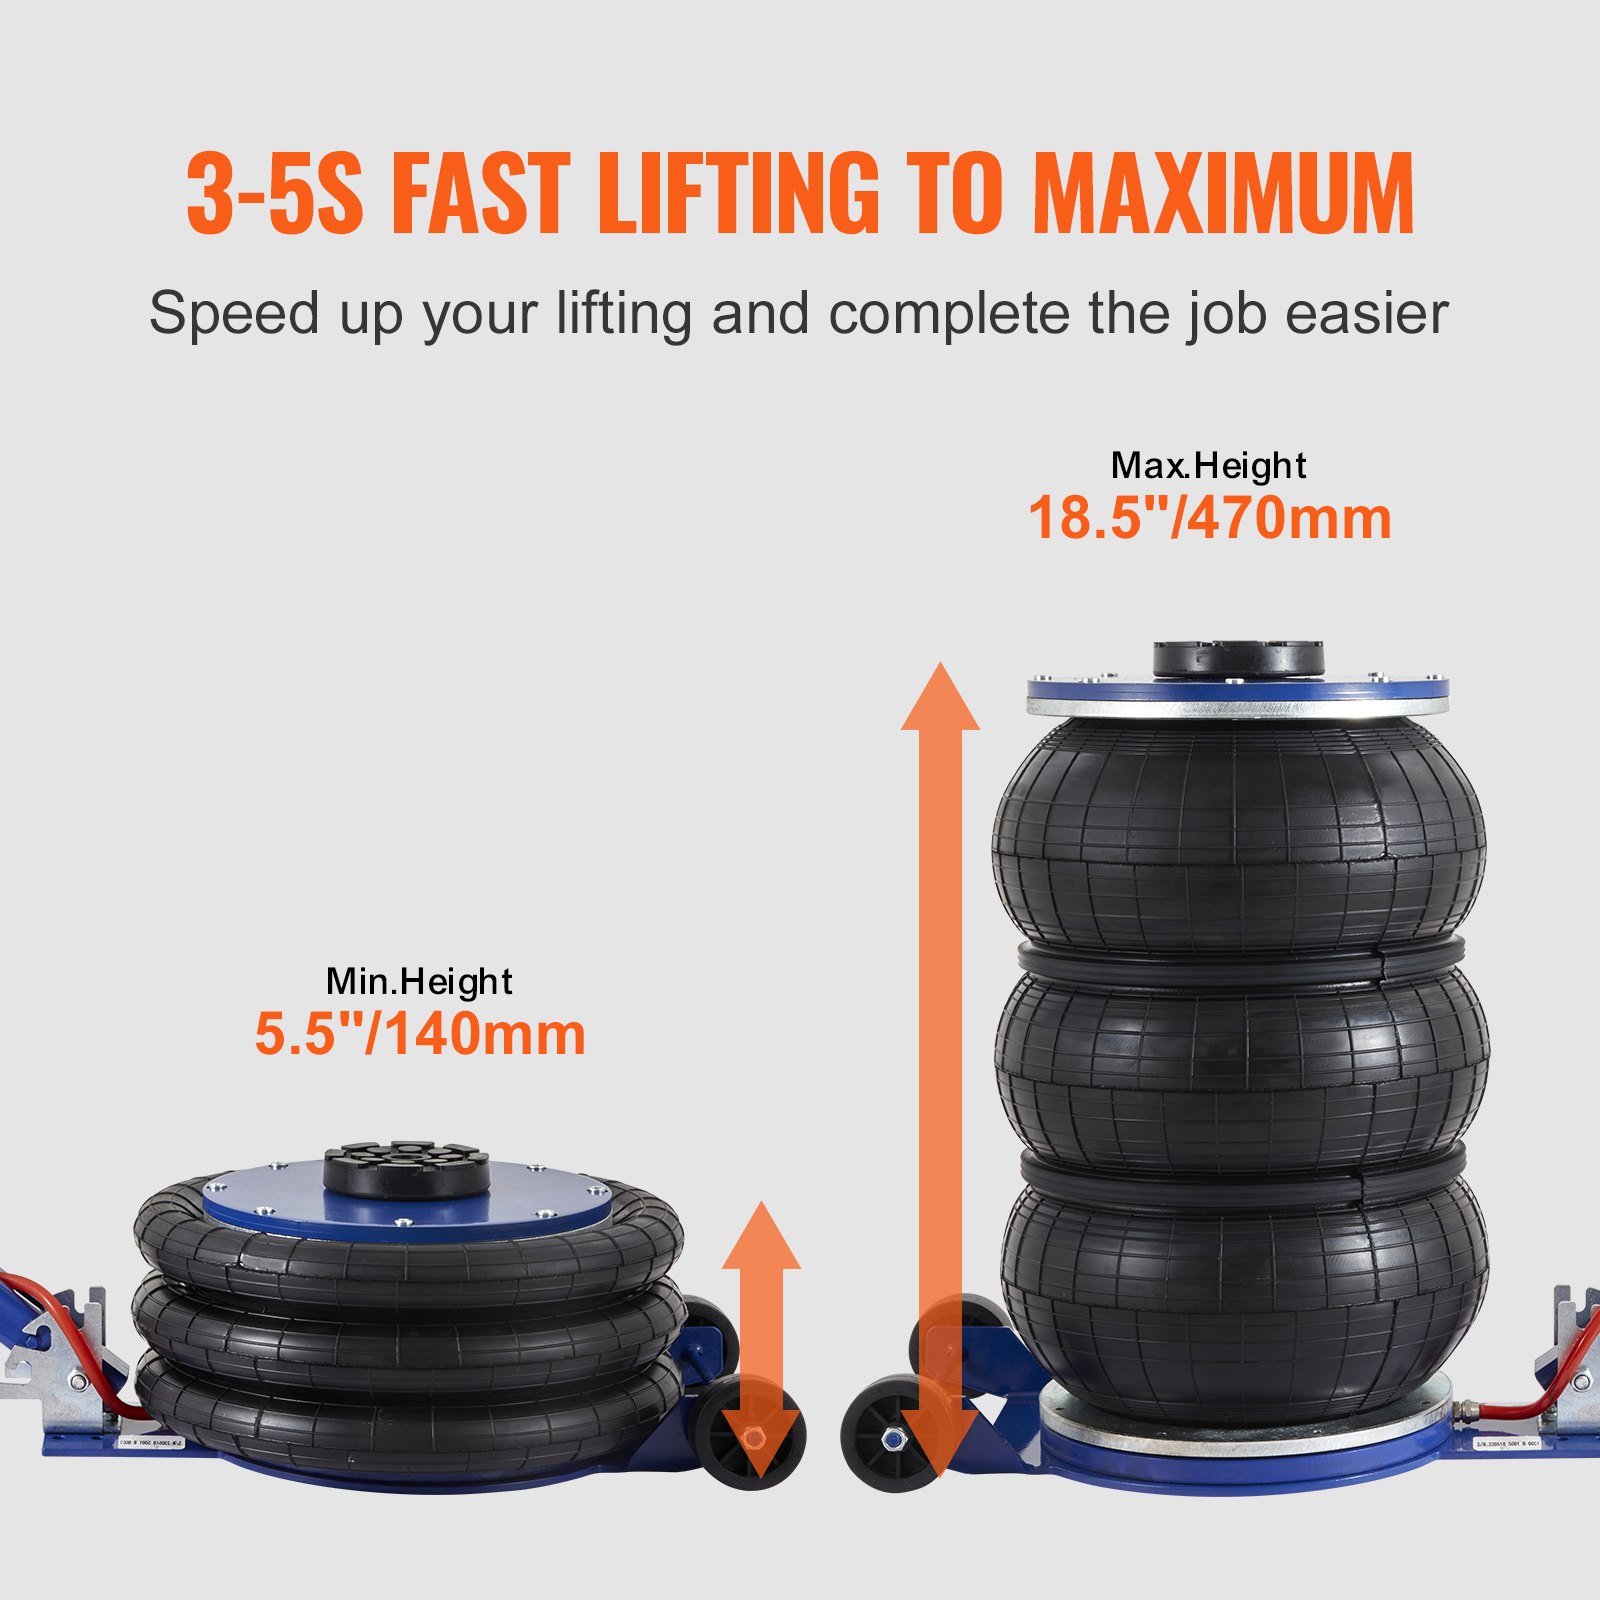
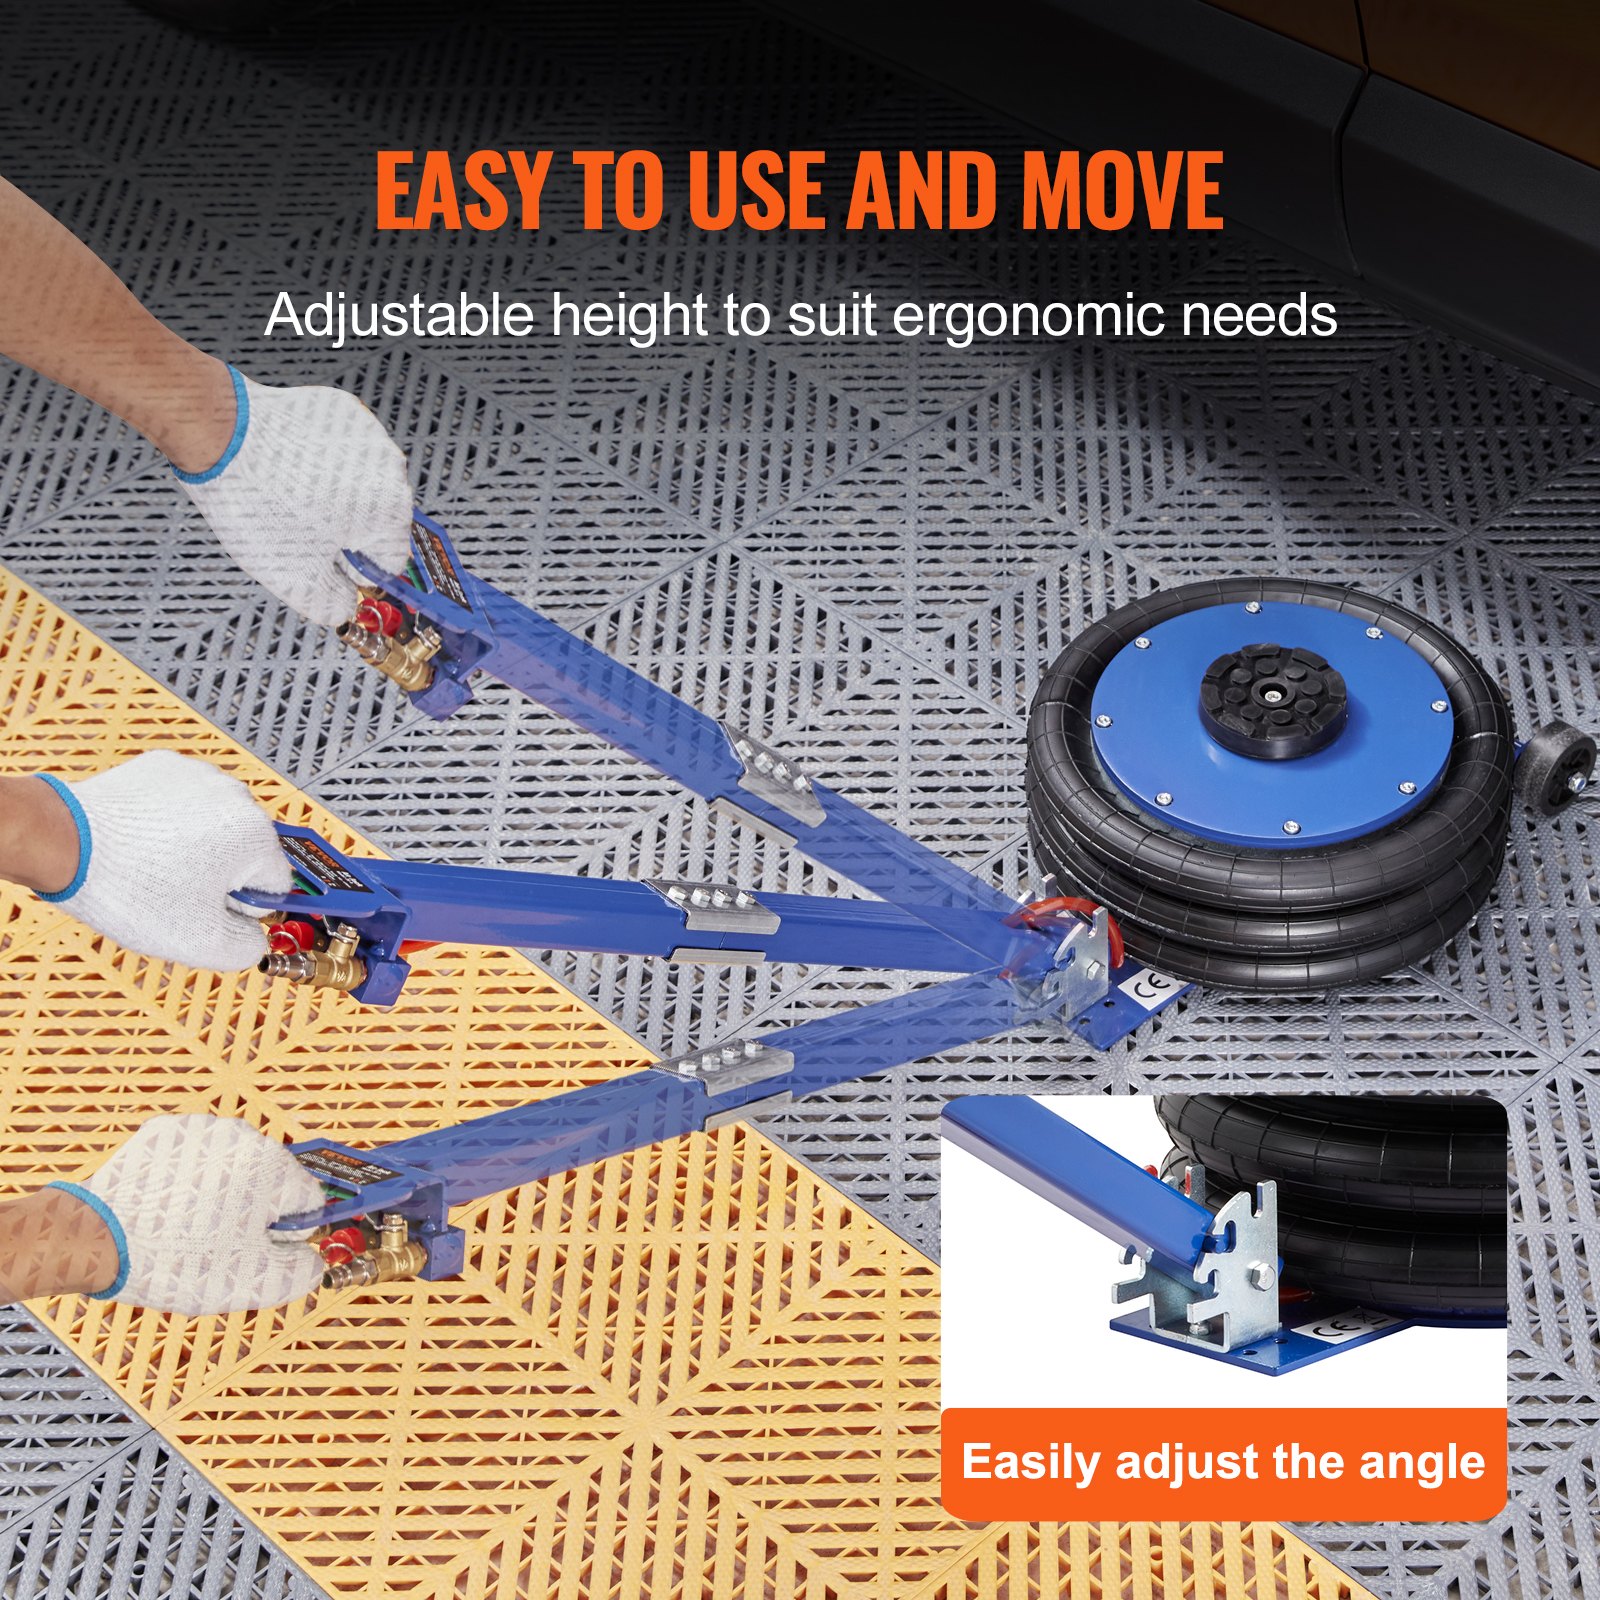
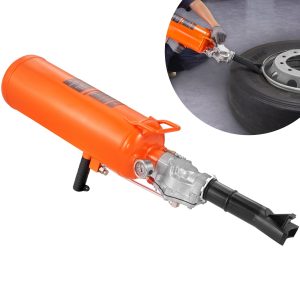
Unlock the full potential of your VEVOR Air Jack with our comprehensive product manual download. Designed to offer complete guidance for the 5 Ton/11,000 lbs Triple Bag Air Jack, this manual is your go-to resource for setup, troubleshooting, and optimization. Our airbag jack is indispensable for car, garage, and repair applications with a lifting capacity of up to 18.5 inches/470 mm and a fast lifting time of 3-5 seconds.
The manual features instructions, safety guidelines, and maintenance tips to ensure seamless operation. Whether you’re a seasoned mechanic or a DIY enthusiast, the step-by-step guidance will be invaluable for maximizing the efficiency and lifespan of your pneumatic jack. The adjustable handle and six steel pipes make it versatile and user-friendly, and our manual makes it even easier to navigate these features.
Download now to ensure you’re fully equipped to handle any lifting task easily and precisely.
Important Safeguards
WARNING: Please read these instructions carefully before using your jack. Proper use and care of the jack will be helpful to assure you of continuous, safe, trouble-free use.
- The air jack is specially designed for work requiring heavy lifting. It cannot be used as a support element for permanent positioning. If you need to support the vehicle for a long time, please use a bracket to
support it. - Do not exceed the maximum lifting load. It is forbidden to lift people or animals.
- The air jack is only used to raise and lower the vehicle. Before working on the vehicle, use additional safety devices (such as supports) to support the raised vehicle.
- Please ensure the ground can support the weight you are lifting. The jack must be placed on relatively level, solid ground. It shall be placed under the lifted axle box to support the load on the middle part of the jack.
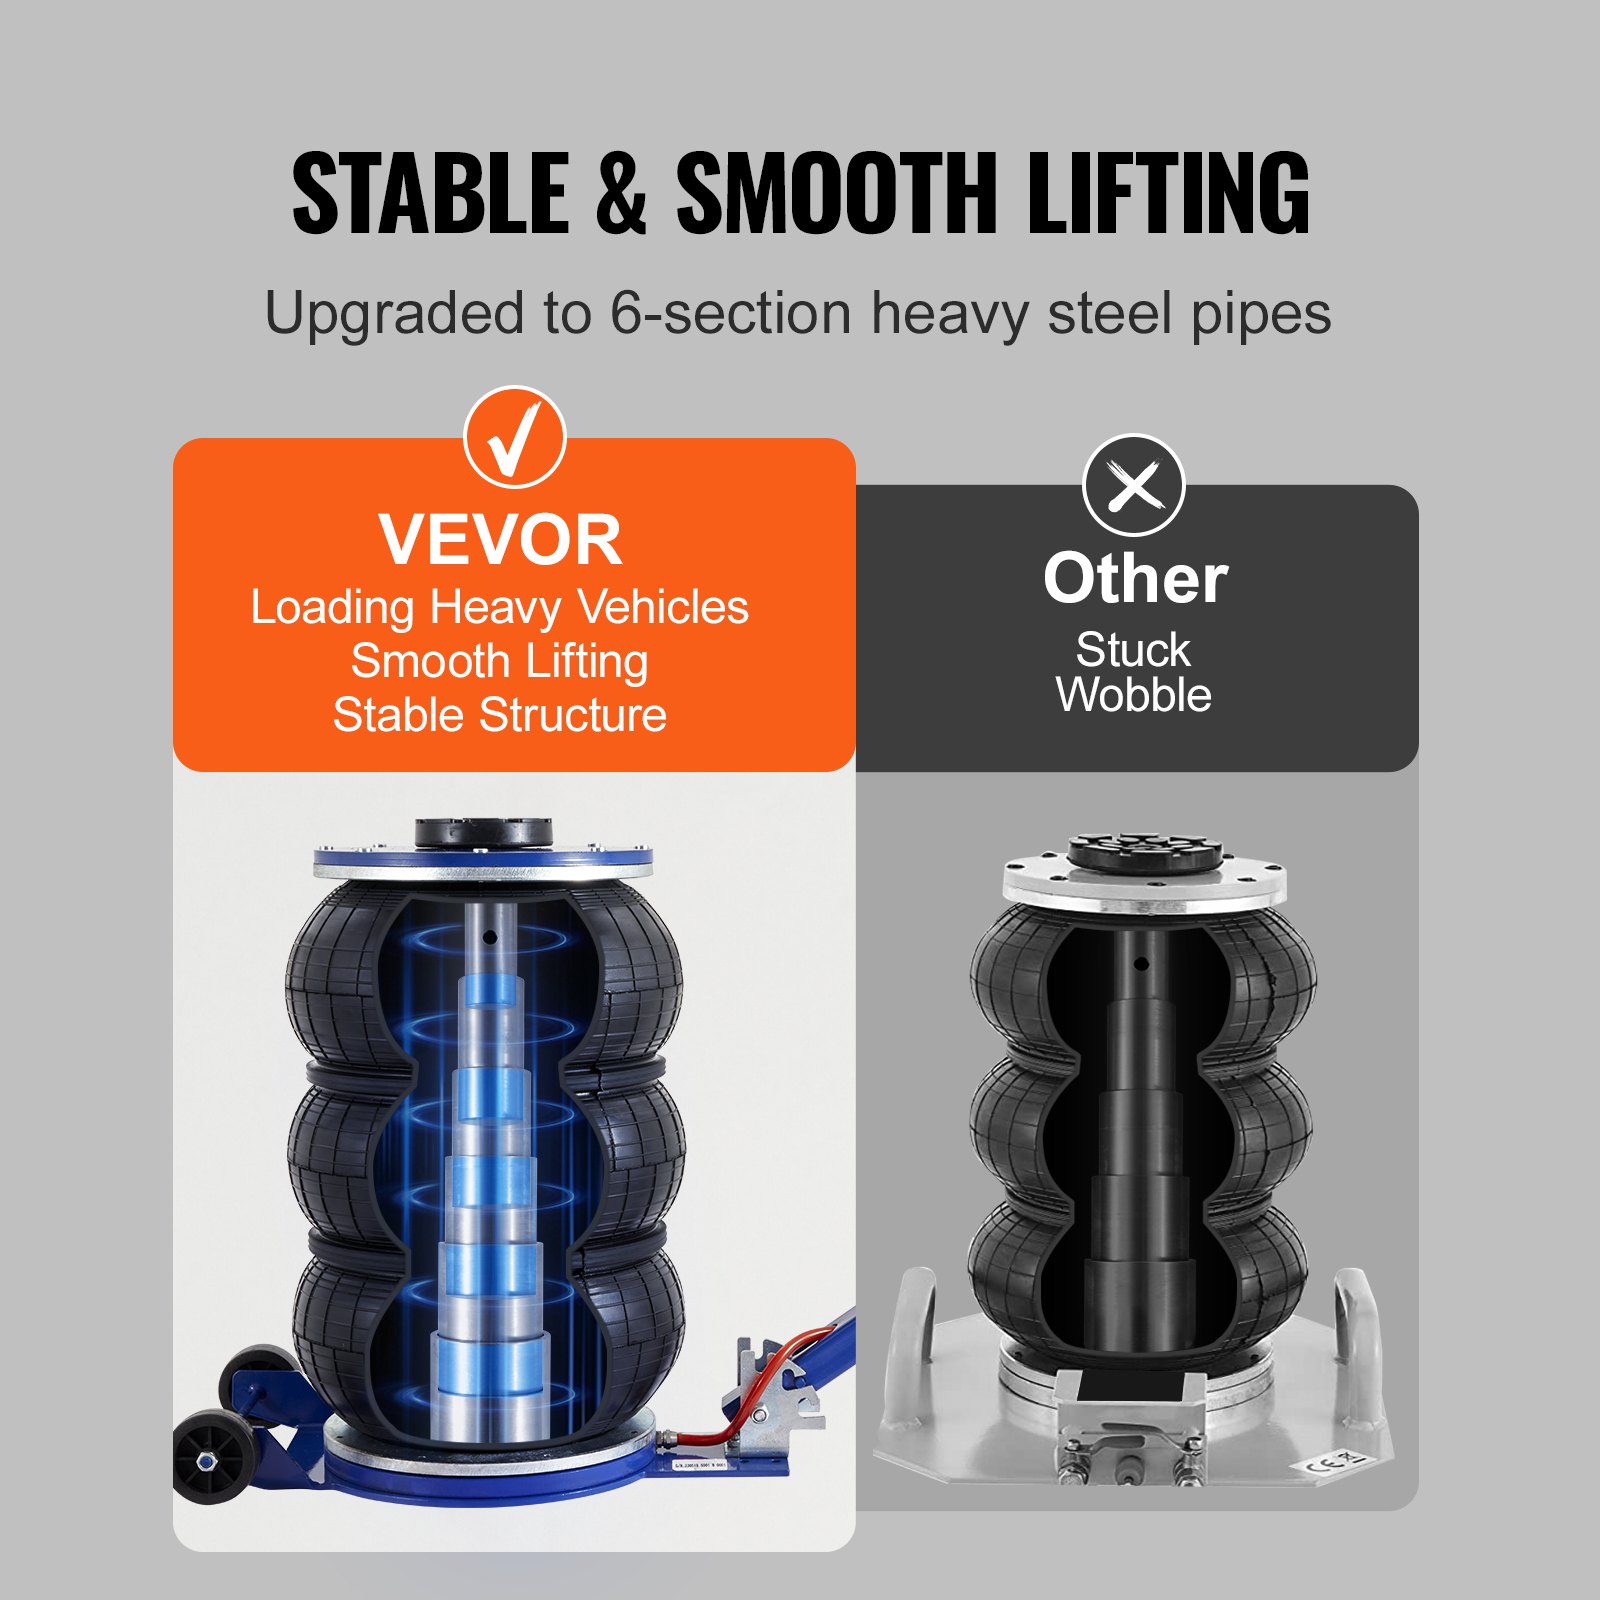
- Never adjust the safety valve.
- Please place a triangle block under the car dependency wheel.
- The standard operating pressure is in the range of 0.8- 1.0MPa.
- Compressed air should be clean and contain no water.
- There is no need to raise the balloon to the maximum, as long as it is to the desired height (such as to clear the ground). That is to say, close the ball valve switch, stop the gas supply, install the safety bracket, and then work.
- Remember that if the balloon rises to the maximum (Stop to rise), immediately shut off the valve switch and stop the supply.
- When used, the jack should be placed outside the center for 10-20cm and put under the car just a little.
- When not in use, it should be placed indoors and must not be placed outdoors. Please use the supplied accessories.
- Disassembling the jack balloon subject is strictly prohibited.
- Do not exceed the rated capacity, or loss of load may occur.
- When inflating the air jack, an air compressor with an air reservoir and a specification of 0.8- 1MPa is necessary.
WARNING:
DO NOT USE THE JACK TO SUPPORT OR STABILIZE A LOAD.
- Using the jack to support or stabilize a load may result in unexpected movement and may cause serious injury, being crushed, or death. Always securely chock and block (stabilize) the load to be lifted. Never place any part of the body under a raised load without properly chocking and supporting the load.
- Never use the jack on curved or tubular vehicle Bumpers; this could cause the vehicle to slip off the jack and fall, causing serious injury or death. Instead, use a bumper lift for vehicles with curved or plastic bumpers.
- Do not move or dolly the vehicle while the jack is in use.
Lifting Cautions
- Before any work or inspection on the vehicle, the weight must be supported by a set of jack stands rated at the proper capacity. Don’t exceed the rated capacity, or loss of load may occur.
- Always firmly apply the parking brake.
- This jack is designed for use on hand. Only use for level surfaces; on uneven, unstable surfaces, it could result in instability and possible failure to support the load.
- Place wheel chocks at the front and rear of the tires that won’t be lifted before proceeding
- Always center the jack under the axle of a flat reinforced or frame surface.
SAVE THESE INSTRUCTIONS
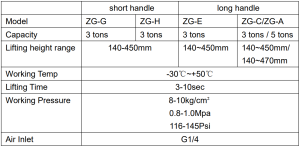
Technical Data
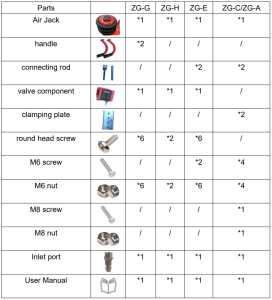
Packing List
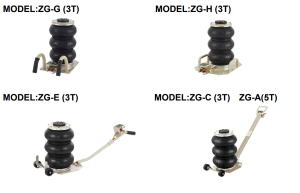
Air Jack Installation Steps
ZG-G (3T)
- Fix the valve component.
- Fix the 2 handles.
- Connect the inflation hose securely.
ZG-H (3T)
- Fix the valve component.
- Connect the inflation hose securely.
ZG-E(3T)
- Fix the valve component.
- Connect the handle and fix it.
- Fix the bottom of the handle.
- Connect the inflation hoses securely.
ZG-C (3T) and ZG-A(5T)
- Connect the handle and fix it.
- The bottom of the handle is fixed on the card slot.
- Connect the inflation hoses securely.
Instructions For Using the Air Jack
When inflated, the jack will rise, and vice versa.
- Assemble the product. Connect the inflation hose to the corresponding socket.
- Insert the line with compressed air in the proper gas nozzle, and close the left switch.
- Open the right ball valve switch, which can be used when the gas bag rises.
- To lower the jack, please open the left switch.
Made in China.
Recommended For Your Project
VEVOR Air Jack, 5 Ton/11000, lbs Triple Bag Air Jack Lift up to 18.5 inch/470 mm Manual
Reviews
There are no reviews yet.