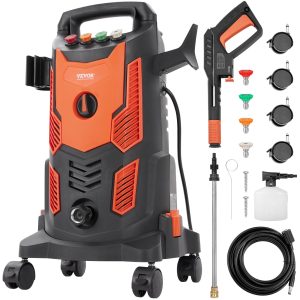
Unlock the full potential of your VEVOR gas pressure washer, 4400 PSI 4.0 GPM, gas-powered pressure washer with copper pump, spray gun and extension Wand, and 5 Quick Connect Nozzles with our comprehensive product manual. This detailed guide is your go-to resource for setup, troubleshooting, and optimizing performance.
Whether cleaning cars, homes, driveways, or patios, this manual ensures you get the most out of your pressure washer. Easy-to-follow instructions, step-by-step setup guidance, and troubleshooting tips make it simple for beginners and seasoned pros.
Download now to enhance your cleaning experience and keep your equipment running smoothly.
G250A
Gas Pressure Washer Safety Guidelines/Definitions
This manual contains information that is important for you to know and understand. This information relates to protecting YOUR SAFETY and PREVENTING EQUIPMENT PROBLEMS. Please read the manual and attend to these sections.
- CAUTION Indicates an imminent hazardous situation which, if not avoided, will result in death or serious injury.
- WARNING indicates a potentially hazardous situation which, if not avoided, could result in death or serious injury.
- AUCTION indicates a potentially hazardous situation that may result in minor or moderate injury if not avoided.
- NOTE used without the safety alert symbol indicating a potentially hazardous situation, which, if not avoided, may result in property damage.
Important Safety Instructions
WARNING
Read the operation manual. Do not operate equipment until you have read the operation manual for safety. Assembly, operation, and maintenance instructions:
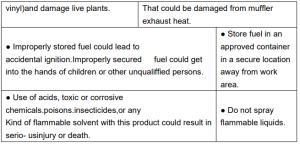
Hazard Risk of Explosion or Fire

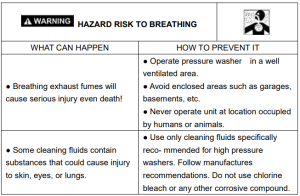
Hazard Risk to Breathing
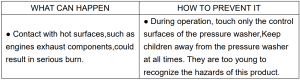
Hazard Risk of Hot Surface
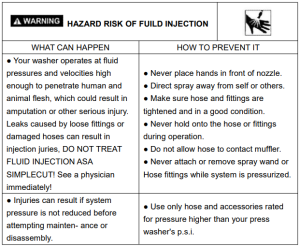
Hazard Risk of Fluid Injection
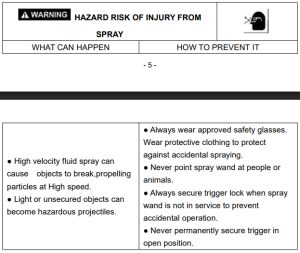
Hazard Risk of Injury From Spray
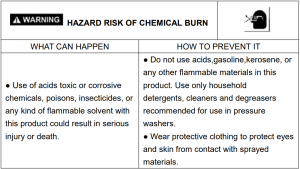
Hazard Risk of Chemical Burn
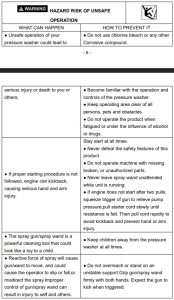
Hazard Risk of Unsafe Operation
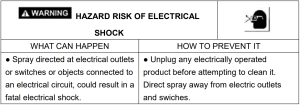
Hazard Risk of Electrical Shock
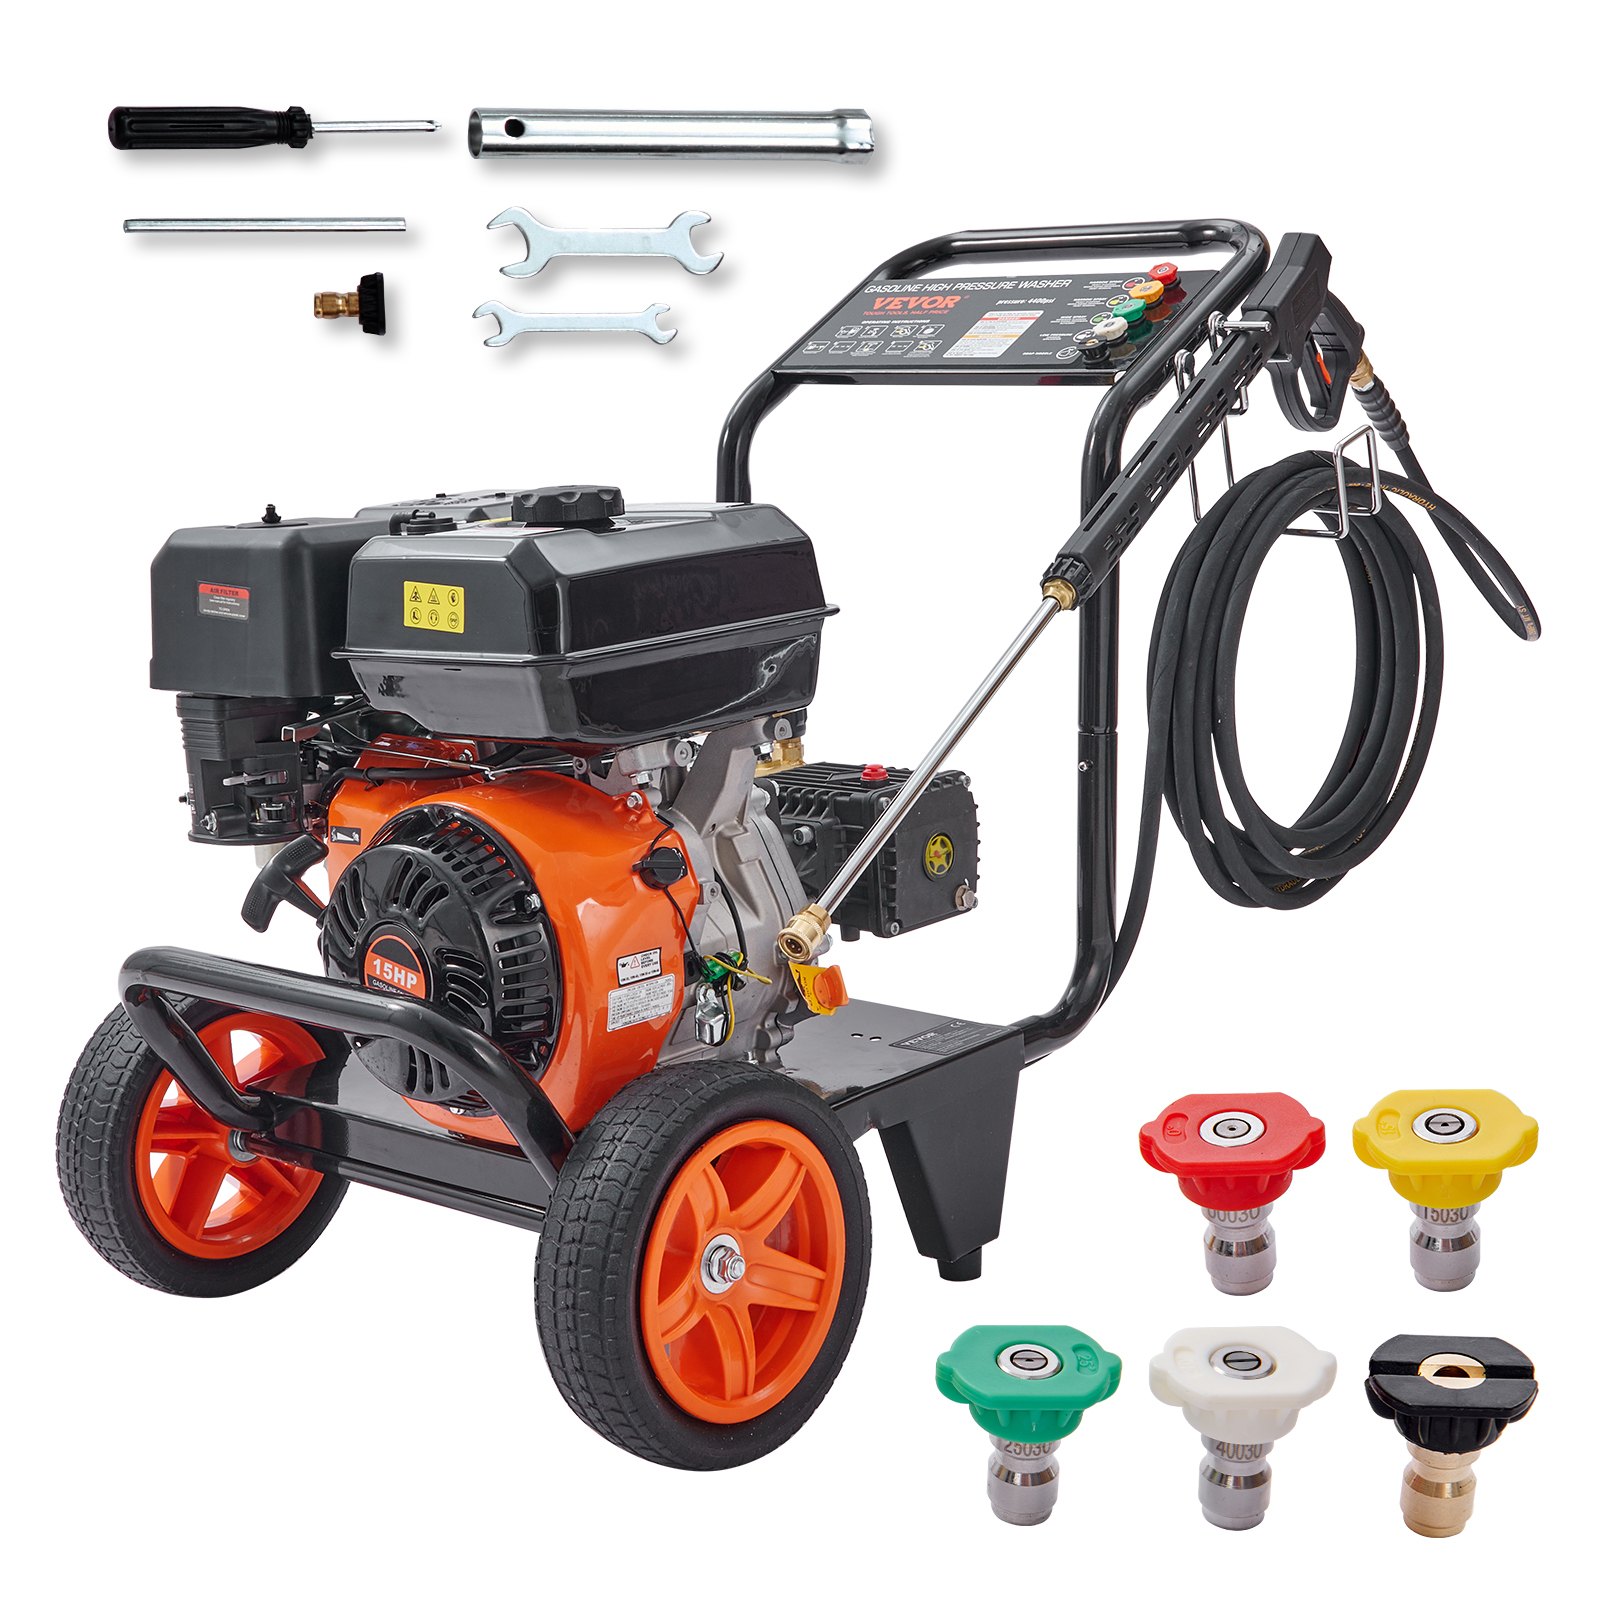
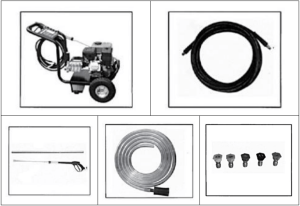
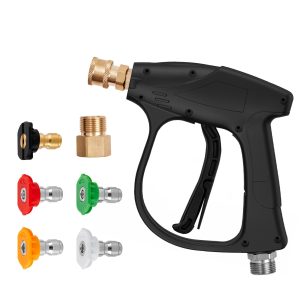
VEVOR Gas Pressure Washer Package Contents
Note: photographs and line drawings used in this manual are for reference only and do not represent a specific model.
Manuals: Engine Manual, pressure washer operation manual.
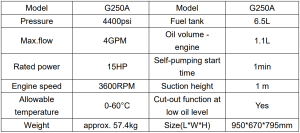
Pressure Pump Technical Parameter
PRESSURE PUMP TECHNICAL PARAMETERS AND PERFORMANCE
Pressure Washer Operating Instructions
1. Attach a high-pressure hose to the gun. Tighten securely.
2. Connect the spray lance to the gun. Tighten securely.
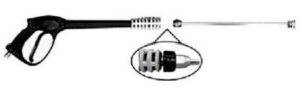
3. Assemble the grommet kit and quick-connect nozzles as described in the instructions supplied.
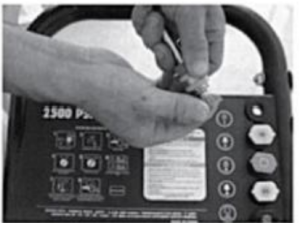
4. Add engine oil (supplied) to the engine. Refer to the engine owner’s manual provided by the engine manufacturer for the correct procedure. A slight amount of oil will remain in the engine from factory testing. The shipping plug must be removed and replaced with the dipstick/oil plug before operating the pressure washer.
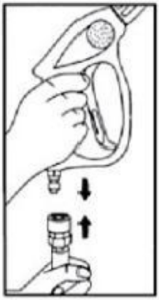
5. Using a 17 mm wrench, remove the shipping plug from the pump by turning it
counterclockwise. Discard plug.
6. Remove the dipstick/oil plug from the plastic bag, install it into the pump, and tighten it securely.
READ THIS OWNER’S MANUAL AND SAFETY RULES BEFORE OPERATING YOUR UNIT.
Compare the illustrations with your unit to familiarise yourself with the location of various controls and adjustments.
Save this manual for future reference.
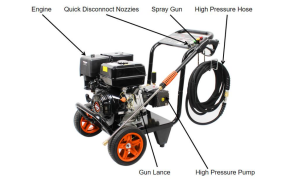
Basic Elements of a Gas Pressure Washer
High Pressure Pump: Increases the pressure of the water
Engine: Drives the high-pressure pump.
High Pressure Hose: Carries the pressurized water from the pump to the gun and spray lance.
Spray Gun: Connects with spray lance to control water flow rate, direction, and pressure.
The Quick Connect Spray Lance has a female quick-connect coupler at the end. This allows the user to quickly change out the high-pressure nozzle for different spray patterns and the soap nozzle for low-pressure and chemical /soap applications. See the paragraph in this section on how to use the spray lance.
Chemical Hose: This hose feeds cleaning agents into the pump to mix with the pressurized water. This manual section explains how to apply chemicals or cleaning solvents.
BASIC ELEMENTS OF THE ENGINE
Refer to the engine manual for the location and operation of the engine.
Choke Control Lever: Controls engine speed.
Starter Grip: Pulling the starter grip operates the recoil starter to crank the engine.
Fuel Valve Lever: Opens/closes the connection between the fuel tank and the carburetor.
Engine Switch: Enables and disables the ignition system.
PRESSURE WASHER TERMINOLOGY
- PSI: Pounds per square inch. The unit of measure for water pressure, also used for air pressure, hydraulic pressure, etc.
- GPM: Gallons per minute, the unit of measure for the flow rate of water
- CU: Cleaning Units. GPM multiplied by PSI
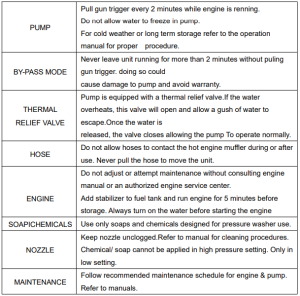
- Bypass Mode: In bypass mode, the pump recirculates water because the spray gun trigger is not pulled. If the unit is left in bypass mode for more than two (2)minutes, the water temperature will rise to a dangerous level and could damage internal components of the pump. Any damage to the pump due to these causes will not be covered under warranty.
- Warning: Do not allow the unit to operate in bypass mode for more than two minutes at a time. Overheating the pump can damage it.
- Thermal Relief Valve: Pumps have a thermal relief valve to prevent extreme damage. This valve opens when the temperature inside the pump rises too high. It then releases a gush of water to lower the temperature inside the pump. Immediately after this occurs, the valve closes.
- Chemical Injection System: Mixes cleaners or cleaning solvents with the pressurized water to improve cleaning effectiveness.
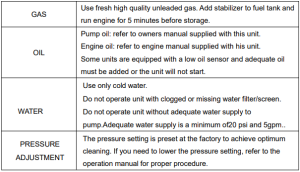
- Water Supply: All pressure washers must have a water source. The minimum requirements for a water supply are 20 PSI and 5 gallons per minute.
Gas Pressure Washer Operating Features
Pressure Adjustments
The pressure setting is preset at the factory to achieve optimal pressure and cleaning. If you need to lower the pressure. It can be accomplished by these methods;
- Back away from the surface to be cleaned. The further away you are, the less the pressure will be on the surface to be cleaned.
Warning: Do not attempt to increase pump pressure. A higher pressure setting than the factory-set pressure may damage the pump.
- Reduce the speed of the gasoline engine (RPM). Slowing the engine down will reduce the water Pressure.
- Change to the 40°white nozzle. This nozzle delivers a less powerful stream of water and a wider spray pattern.
- Adjust the pump’s pressure regulator. Turn the knob counterclockwise to lower the pressure. Once you have finished using your pressure washer, turn it clockwise to return it to its original position.
Warning: Do not try to turn pressure regulator knob past thebuilt-instopordamage to pump will result.
To Use Spray Wand
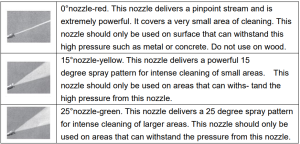
Your pressure washer is equipped with up to five spray nozzles. Each nozzle is color-coded and delivers a specific spray pattern for cleaning. The nozzle’s size determines the fan spray’s size and the pressure out of the nozzle. The0°,15°,25°, and 40°nozzles are high-pressure nozzles; the chemical nozzle is a low-pressure nozzle.
The nozzles are housed in receptacles on the panel of the pressure washer handle. The panel’s colors identify the nozzle location, spray pattern, and the risk of injection or injury to a person. Do not direct discharge toward persons, unprotected skin, eyes, or pets or animals. Serious injury can occur.
Changing Nozzles
Warning: DO NOT attempt to change nozzles while the pressure washer is running. Turn the engine off before changing nozzles.
- Pull the quick-connect coupler back and insert a nozzle.
- Release the quick-connect coupler and twist the nozzle to make sure it is secure in the coupler.
Warning: Risk of injury. Ensure nozzle is completely inserted in QC socket and QC snap ring is fully engaged (forward) before squeezing gun trigger
How to Apply Chemicals and Cleaning Solvents
Warning: Applying chemicals or cleaning solvents is a low-pressure operation.
Warning: Use only soaps and chemicals designed for pressure washer use. Do not use bleach.
To apply chemicals
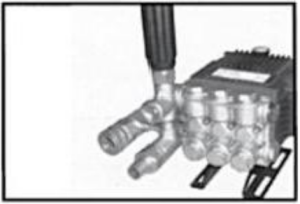
Press the chemical hose onto the barbed fitting near the pump’s high-pressure hose connection, as shown.
Place the other end of the chemical hose with a filter on it into the container holding the chemical/cleaning solution.
Note: The chemical/water ratio is 7:1; for every 7 gallons of water pumped, 1 gallon of chemical/ cleaning solution will be used.
Install a low-pressure (black) nozzle into the quick-connect fitting of the spray wand, see the ” How to Use Spray Wand paragraph in this section.
After the chemicals are used, place the chemical hose into a container of clean water and draw clean water through the chemical injection system to rinse the system thoroughly. If chemicals remain in the pump, it could be damaged. Pumps damaged due to chemicals will not be covered under warranty.
Note: Chemicals and soaps will not siphon when the spray wand is in the high setting.
READ AND UNDERSTAND ALL WARNINGS BEFORE STARTING OPERATION.
Danger: When using the high-pressure setting. Do not allow the high-pressure spray to contact unprotected skin, eyes, pets, or animals. Serious injury can occur.
Your washer operates at fluid pressures and velocities high enough to penetrate human and animal flesh, which could result in amputation or other serious injury. Leaks caused by loose fittings or worn or damaged hoses can result in injection injuries. DO NOT TREAT FLUID INJECTION AS A SIMPLE CUT! See a physician immediately!
Warning: NEVER fill the fuel tank when the engine is running or hot. Do not smoke when filling the fuel tank.
- NEVER fill the fuel tank completely. Fill the tank to 1/2 below the bottom of the filler neck to provide
Space for fuel expansion. Wipe any fuel spillage from the engine and equipment
before starting the engine. - NEVER run the engine indoors or in enclosed, poorly ventilated areas. Engine exhaust contains carbon monoxide, an odourless and deadly gas.
- DO NOT let hoses come in contact with a very hot engine muffler during or immediately after use of your pressure washer. Damage to hoses from contact with hot engine surfaces will NOT be covered by warranty.
Caution: NEVER damage the pull water supply hose when moving the pressure washer. This could be a hose and pump inlet. DO NOT use hot water; use cold water only.
Never shut off the water supply while the pressure washer engine is running, as this can damage the pump.
DO NOT stop spraying water for more than two minutes at a time. The pump operates in bypass mode when the spray gun trigger is not pressed. If the pump is left in bypass mode for more than two minutes, its internal components can be damaged.
Starting
Before starting, refer to your engine manual for proper starting procedures for your engine type.
- In a well-ventilated outdoor area, add fresh, high-quality, unleaded gasoline with a pump octane rating of 86 or higher. Do not overfill. Wipe up spilled fuel before starting the engine. Refer to the Engine Owner’s Manual for the correct procedure.
- Check engine oil level. See the Engine Owner’s Manual for the correct procedure.
Note: There will be a slight amount of oil in the engine from factory testing.
- Verify the filter screen is in the water inlet of the pump.
Note: The cone side faces out.
- Connect the water source to the pump inlet. The water source must provide a minimum of 5 gallons per minute at 20 p.s.i.
- Connect the high-pressure hose to the pump outlet.
- If applying a chemical or cleaning solution, see How to Apply Chemicals/Cleaning Solvents in the Operation section of this manual.
- Turn the water source on.
Caution: Failure to do so could cause damage to the pump.
- Start the engine. See the Engine Owner’s Manual for the correct procedure.
Note: Pull the trigger to relieve the pressure if the engine does not start after two pulls.
- Depress the trigger on the gun to start the water flow.
Stand on a stable surface and firmly grip the gun/spray wand with both hands. Expect the gun to kick when triggered.
Release the trigger to stop the water flow.
Adjust the spray for the task being performed by changing the quick-connect nozzle.
See the ” How to Use Spray Wand instructions in this section.
Shutting Down
- After each use, if you have applied chemicals, place the chemical hose into a container of clean water and draw clean water through the chemical injection system to rinse the system thoroughly.
Note: Failure to do so could cause damage to the pump.
- Turn the engine off. See the engine owner’s manual.
Note: NEVER turn the water off while the engine is running.
- Turn the water source off.
- Pull the trigger on the spray gun to relieve water pressure in the hose or spray gun.
- For proper storage procedures, see the storage section in this manual.
Maintaining the Gas Pressure Washer
When performing maintenance, you may be exposed to hot surfaces, water pressure, or moving parts that can cause serious injury or death!
Before performing any maintenance or repair, disconnect the spark plug wire, let the engine cool, and release all water pressure. The engine contains flammable fuel.
DO NOT smoke or work near open flames while performing maintenance. Prepare and follow a routine maintenance schedule to ensure efficient operation and a longer life for your pressure washer. More frequent maintenance checks will be required if the pressure washer is used in unusual conditions, such as high temperatures or dusty conditions.
Engine
Consult the engine owner’s manual for the manufacturer’s recommendations for all Maintenance.
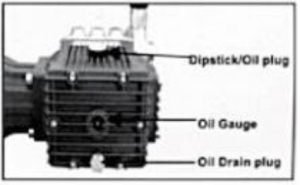
To Check Oil
- Remove the dipstick/oil plug from the pump and wipe it clean.
- Insert the dipstick/oil plug into the pump, then remove it.
- The oil level is correct when oil covers the lower half-inch of the end of the dipstick/oil plug.
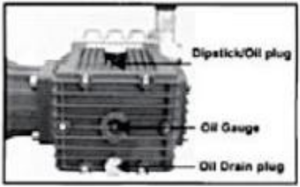
How to Change Pump Oil
- Loosen dipstick/oil plug.
- Place a container under the oil drain plug.
- Remove the oil rain plug.
- After the oil is drained, replace the oil drain plug. Tighten securely.
- Remove the dipstick/oil plug and fill it with the recommended oil. See the pump oil chart for the correct amount and type of oil.
- Replace dipstick/oil plug and tighten securely.

Spray Lance
Excessive pressure may develop if the nozzle becomes clogged with foreign materials such as dirt. The pump pressure will pulsate if the nozzle becomes partially blocked or restricted. Clean the nozzle immediately using the nozzle kit supplied and the following instructions:
- Shut off the pressure washer and turn off the water supply.
- Pull the trigger on the gun handle to relieve any water pressure.
- Disconnect the spray lance from the gun.
- Remove the high-pressure Nozzle From the spray wand. Remove obstructions with the nozzle cleaning tool provided and backflush with clean water.
- Direct water supply into the spray wand end to backflush loosened particles for 30 seconds.
- Reassemble the nozzle to the spray wand.
- Reconnect the spray wand to the gun and turn on the water supply.
- Start the pressure washer and place the wand into the high-pressure setting to test.
How to Clean the Water Inlet Filter
This screen filter should be checked periodically and cleaned if necessary.
- As shown, remove the filter by grasping the end and removing it from the pump’s water inlet.
- Clean the filter by flushing it with water on both sides.
- Re-insert the filter into the pump’s water inlet. Note: the cone side faces out.
NOTE: Do not operate the pressure washer without a filter properly installed.
VEVOR Gas Pressure Washer Storage
Engine
Consult the owner’s manual for the manufacturer’s recommendations for storage.
Pump
- Drain all water from the high-pressure hose, coil it, and store it in the cradle of the pressure washer handle.
- Drain all water from the spray gun and wand by holding the spray gun vertically with the nozzle end pointing down and squeezing the trigger. Storeingun/hoseholder.
- Store chemical hoses, high-pressure hoses, and spray lances to protect them from damage, such as being run over.
It is recommended that you follow these steps to protect the internal seals of the pressure washer when STORING THE UNIT FOR MORE THAN 30 days and/OR WHEN FREEZING TEMPERATURES ARE EXPECTED.
- Obtain a funnel, six ounces of RV antifreeze, and approximately 36 inches of garden hose with a male hose connector attached to one end.
CAUTION: Use only RV antifreeze. Any other antifreeze is corrosive and can damage the pump.
- Disconnect the spark plug wire.
- Connect 36 36-inch length of hose to the water inlet of the pump.
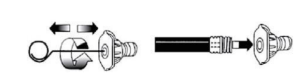
- Add RV antifreeze to the hose as shown.
- Pull the engine starter rope slowly several times until antifreeze comes out of the pump’s high-pressure hose connection.
- Remove the short hose from the water inlet of the pump.
- Reconnect the spark plug wire.
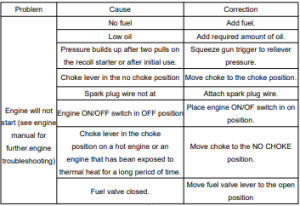
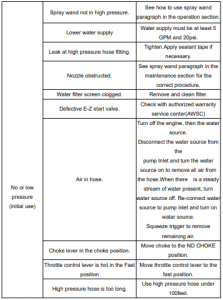
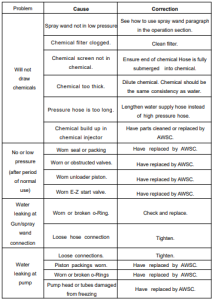
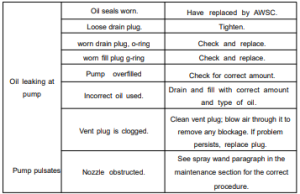
Gas Pressure Washer Troubleshooting Guide
 FIND A LOCAL AUTHORIZED SERVICE CENTER NEAR YOU FOR REPAIRS AND SERVICE PART PURCHASES
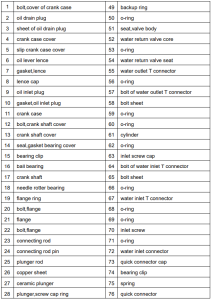
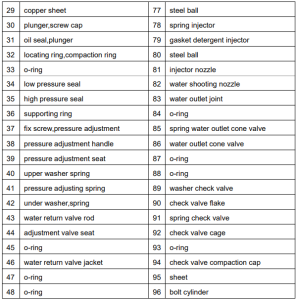
Exploded View of the Pump

Recommended For Your Project
VEVOR Gas Pressure Washer, 4400 PSI 4.0 GPM, Gas Powered Pressure Washer Manual
Reviews
There are no reviews yet.