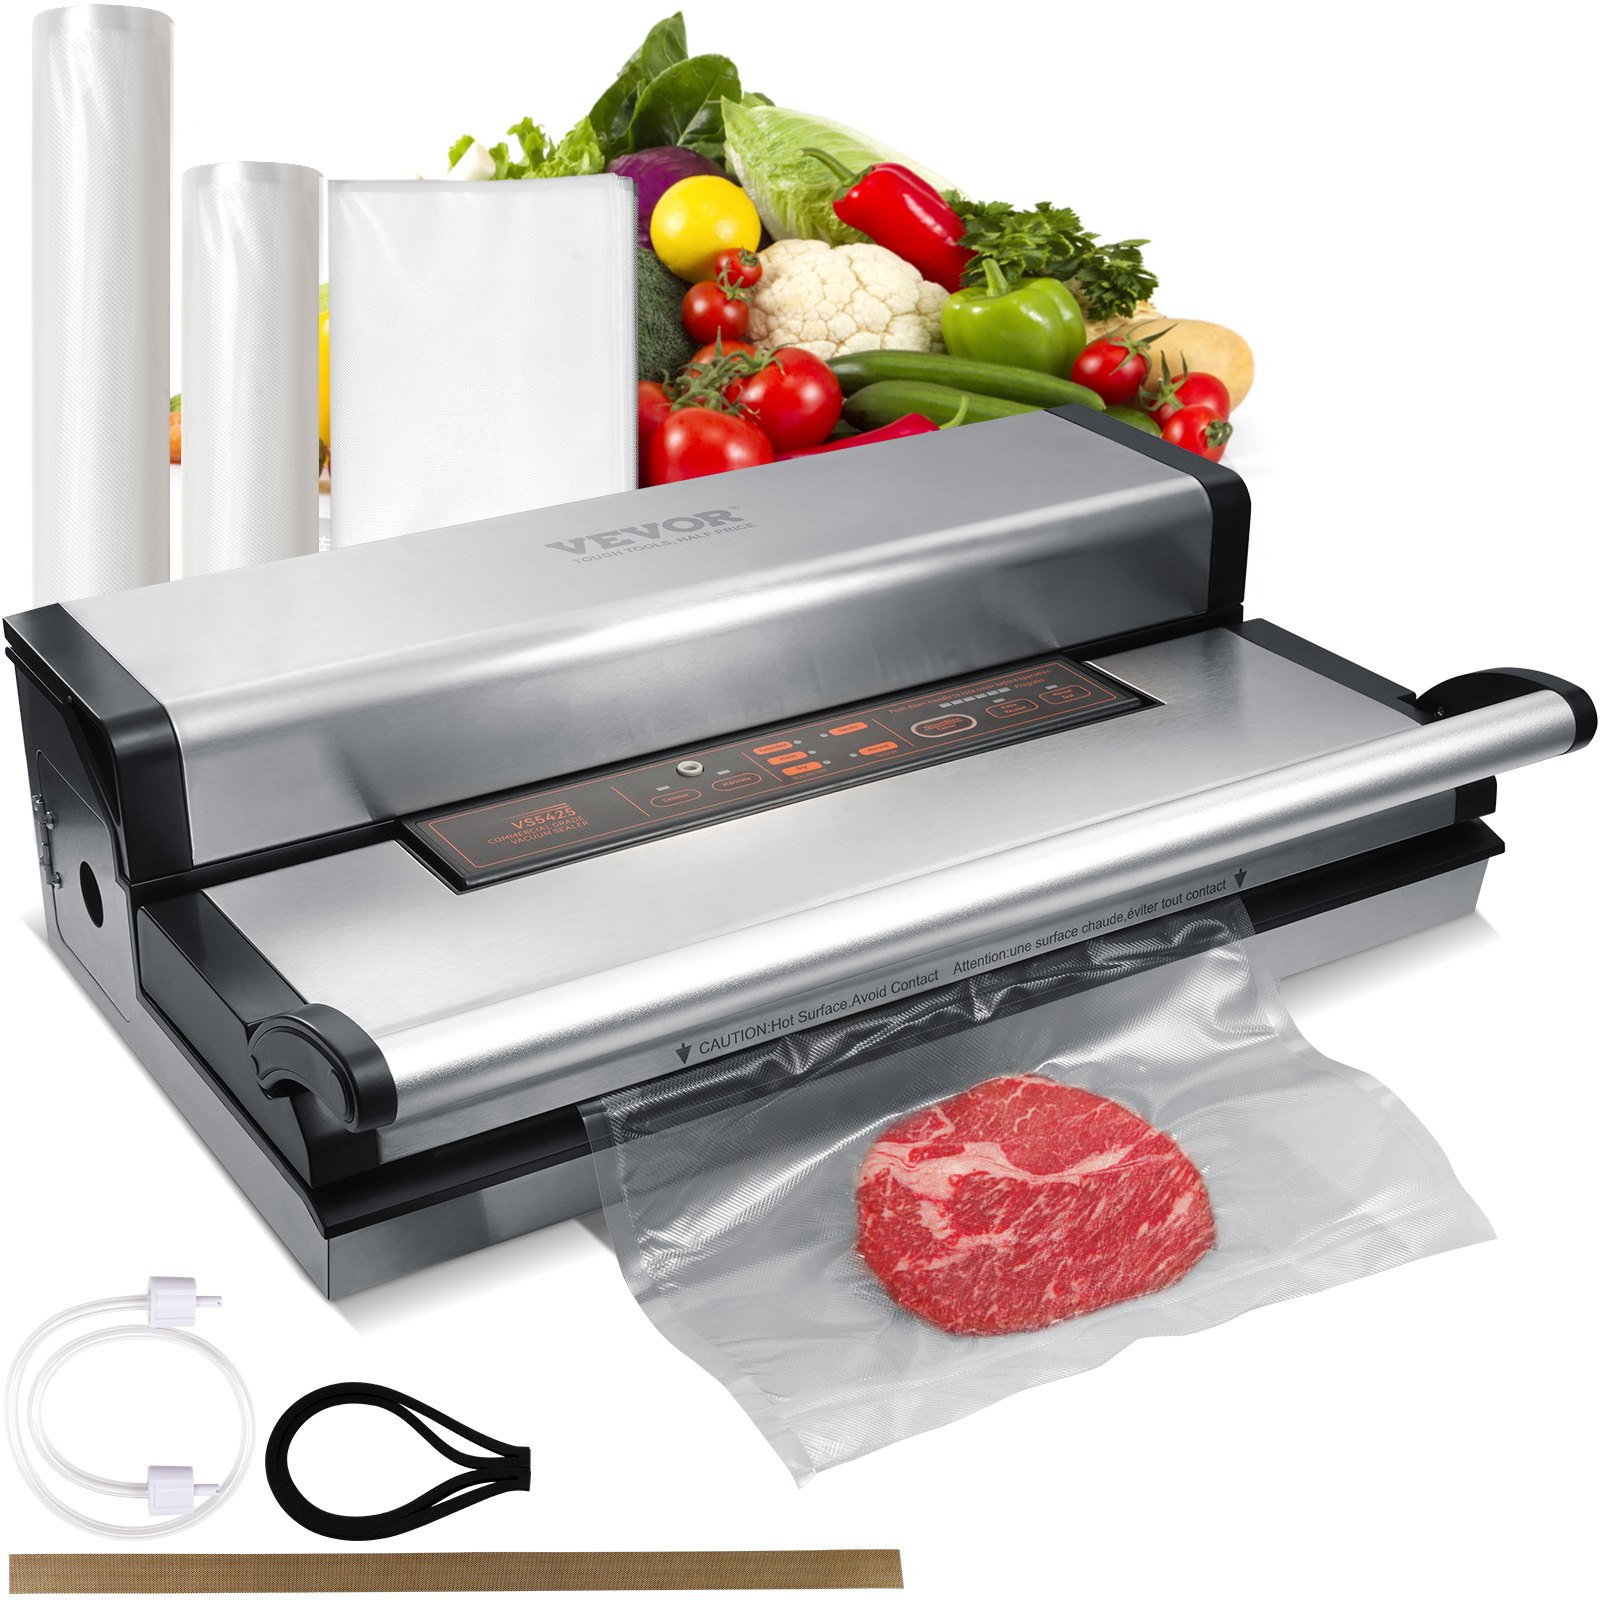
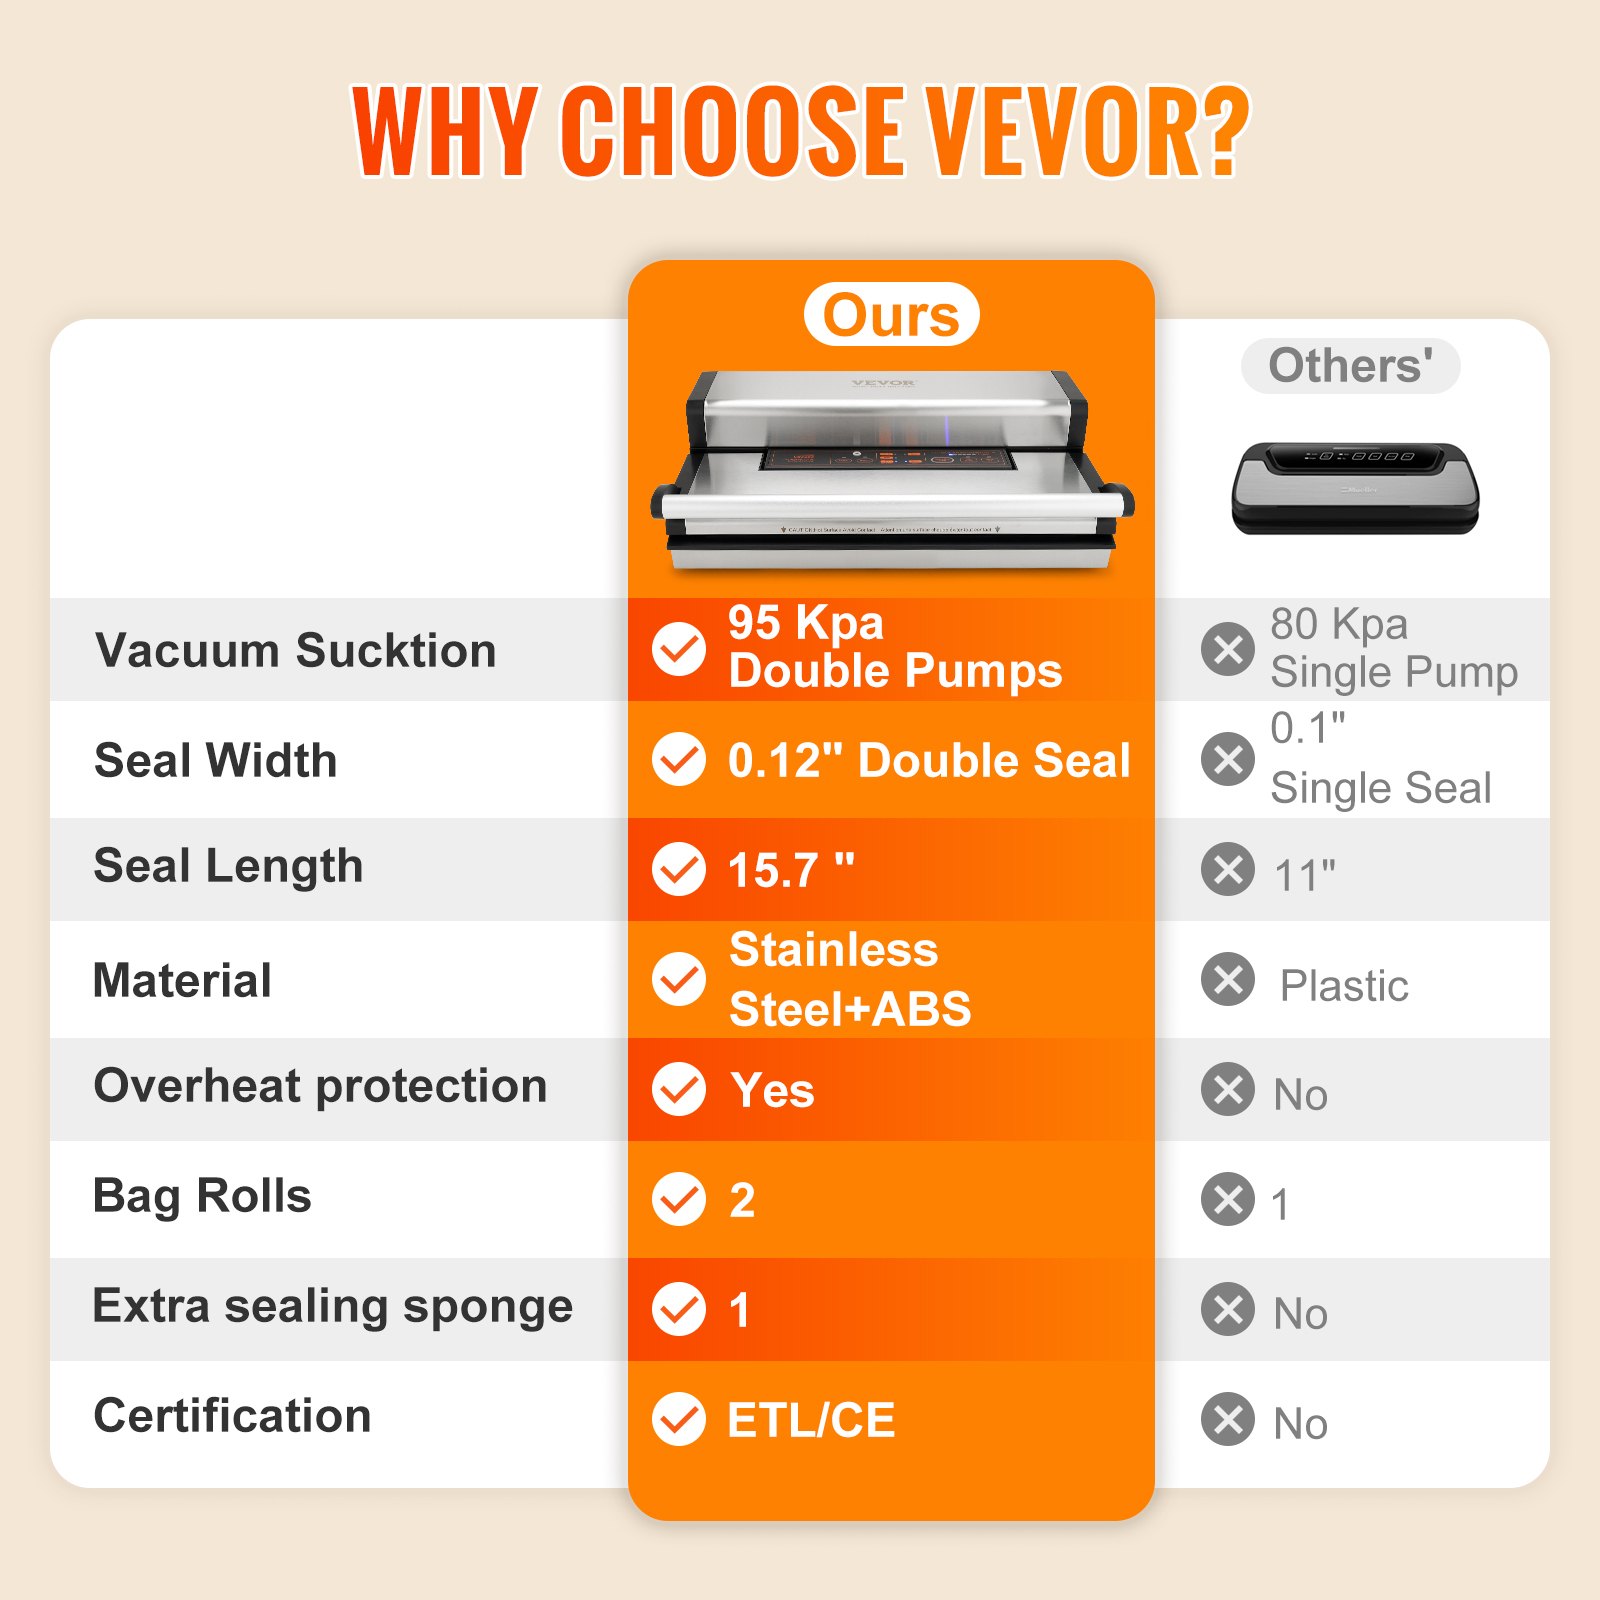
Unlock the full potential of your VEVOR Vacuum Sealer Machine with our comprehensive product manual download. This detailed guide covers every aspect of the 95 Kpa 350W powerful dual pump and dual sealing system, making it easy for you to master both dry and moist food storage.
The manual provides step-by-step instructions for setup, troubleshooting, and optimization, ensuring you get the most out of your automatic and manual air sealing system with a built-in cutter, seal bag, and external hose.
Whether you are a beginner or an experienced user, our manual is designed to be user-friendly and easy to follow, helping you achieve perfect results every time. Download now and simplify your food storage process with expert guidance right at your fingertips.
Vacuum Sealer Machine
Model: VS-5425
Important Safeguards
When using this electrical appliance, safety precautions should always be observed, including the following:
READ ALL INSTRUCTIONS
- Carefully read the instructions before using this appliance and save them for future reference.
- Before plugging the cord into a wall outlet or disconnecting, ensure the machine’s cover is unlocked, and unplug from the outlet when not in use or before cleaning.
- This appliance is not a toy. When used by or near children, close attention is necessary, and this appliance should be stored in a safe place, out of the reach of children.
- Please do not use any bags or attachments that are not recommended or approved, and do not use this appliance for a purpose other than its intended use.
- Stop using the machine immediately if the cord is damaged and have it replaced professionally.
- Keep away from moving parts.
- Do not contact the hot sealing element located on the edge of the top cover of this machine. It is hot and may get burned.
- Do not try to repair this appliance by yourself.
- Don’t use the appliance if it has fallen or appears to be damaged.#
Caution
- Avoid pulling or carrying by the cord, using the cord as a handle, closing the door on the cord, or pulling the cord around sharp edges or corners. Do not operate the appliance over a cord or when the cord/plug is wet.
- Avoid hot gas, heated oven, electric burner, or other hot surfaces. Do not use this appliance on a wet or hot surface or near a heat source.
- It’s better not to use an extension cord with this unit. However, if one is used, it must have a rating equal to or exceeding the rating of this appliance.
- When disconnected, to avoid any injury, please unplug by grasping the plug, not the cord.
- Before plugging the appliance in or operating, ensure your hands are dry and safe to perform the actions.
- When it is in “ON” or working position, always be on a stable surface, such as a stable surface or counter.
- It’s unnecessary to use any lubricant, such as lubricating oils or water, on this appliance.
- Do not immerse any part of this appliance, power cord, or plug in water or other liquid.
- Please do not use this appliance outdoors or on a wet surface; it’s recommended for household, indoor use only.
- This vacuum sealer machine is not intended for use by persons (including children) with reduced physical, sensory, or mental capabilities or a lack of experience and knowledge unless they have been given supervision or instruction concerning its use by a person responsible for their safety.
- Children should be supervised to ensure they do not play with the appliance.
- If the supply cord is damaged, the manufacturer must replace it, its service agent, or similarly qualified persons, to avoid a hazard.
- Children shall not perform cleaning and user maintenance without supervision.
CAUTION: SAVE THESE INSTRUCTIONS FOR HOUSEHOLD USE ONLY
AB: 1 MIN PER CYCLE
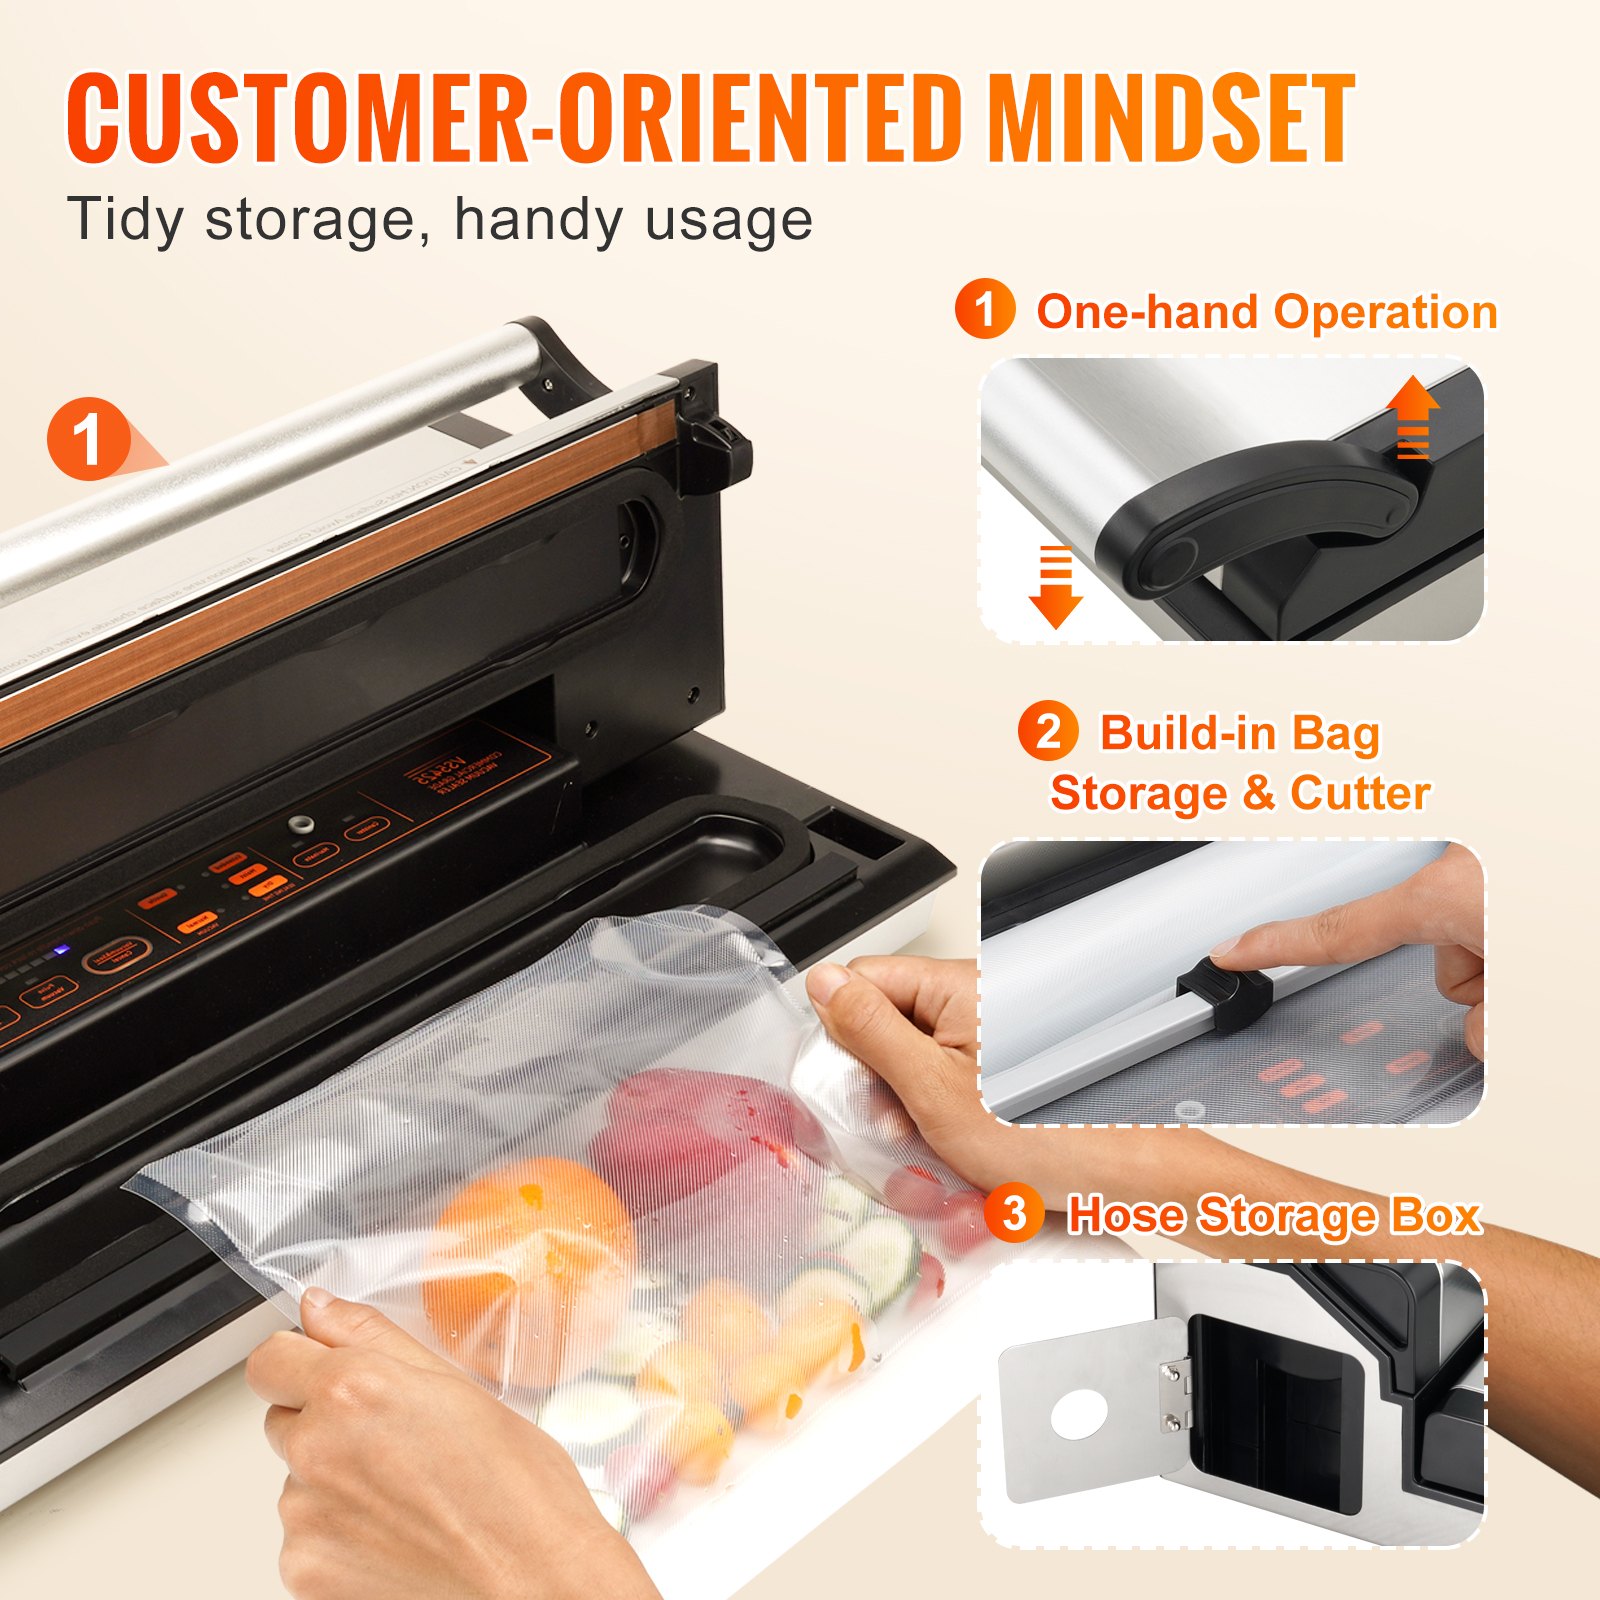
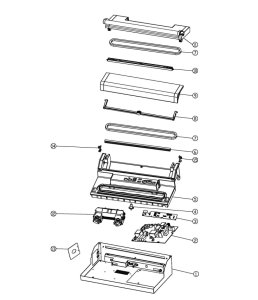
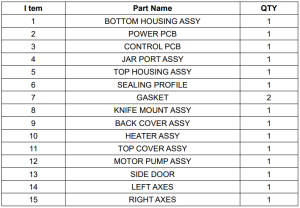
Vacuum Sealer Machine Construction and Functions
1. Vacuum & seal/Cancel
This button has two functions depending on the machine status:
- In a standby condition, it starts the automatic operation of vacuuming the bag and then automatically seals it when vacuuming is complete.
- It stops the machine from working (vacuuming or sealing operations).
2. Vacuum
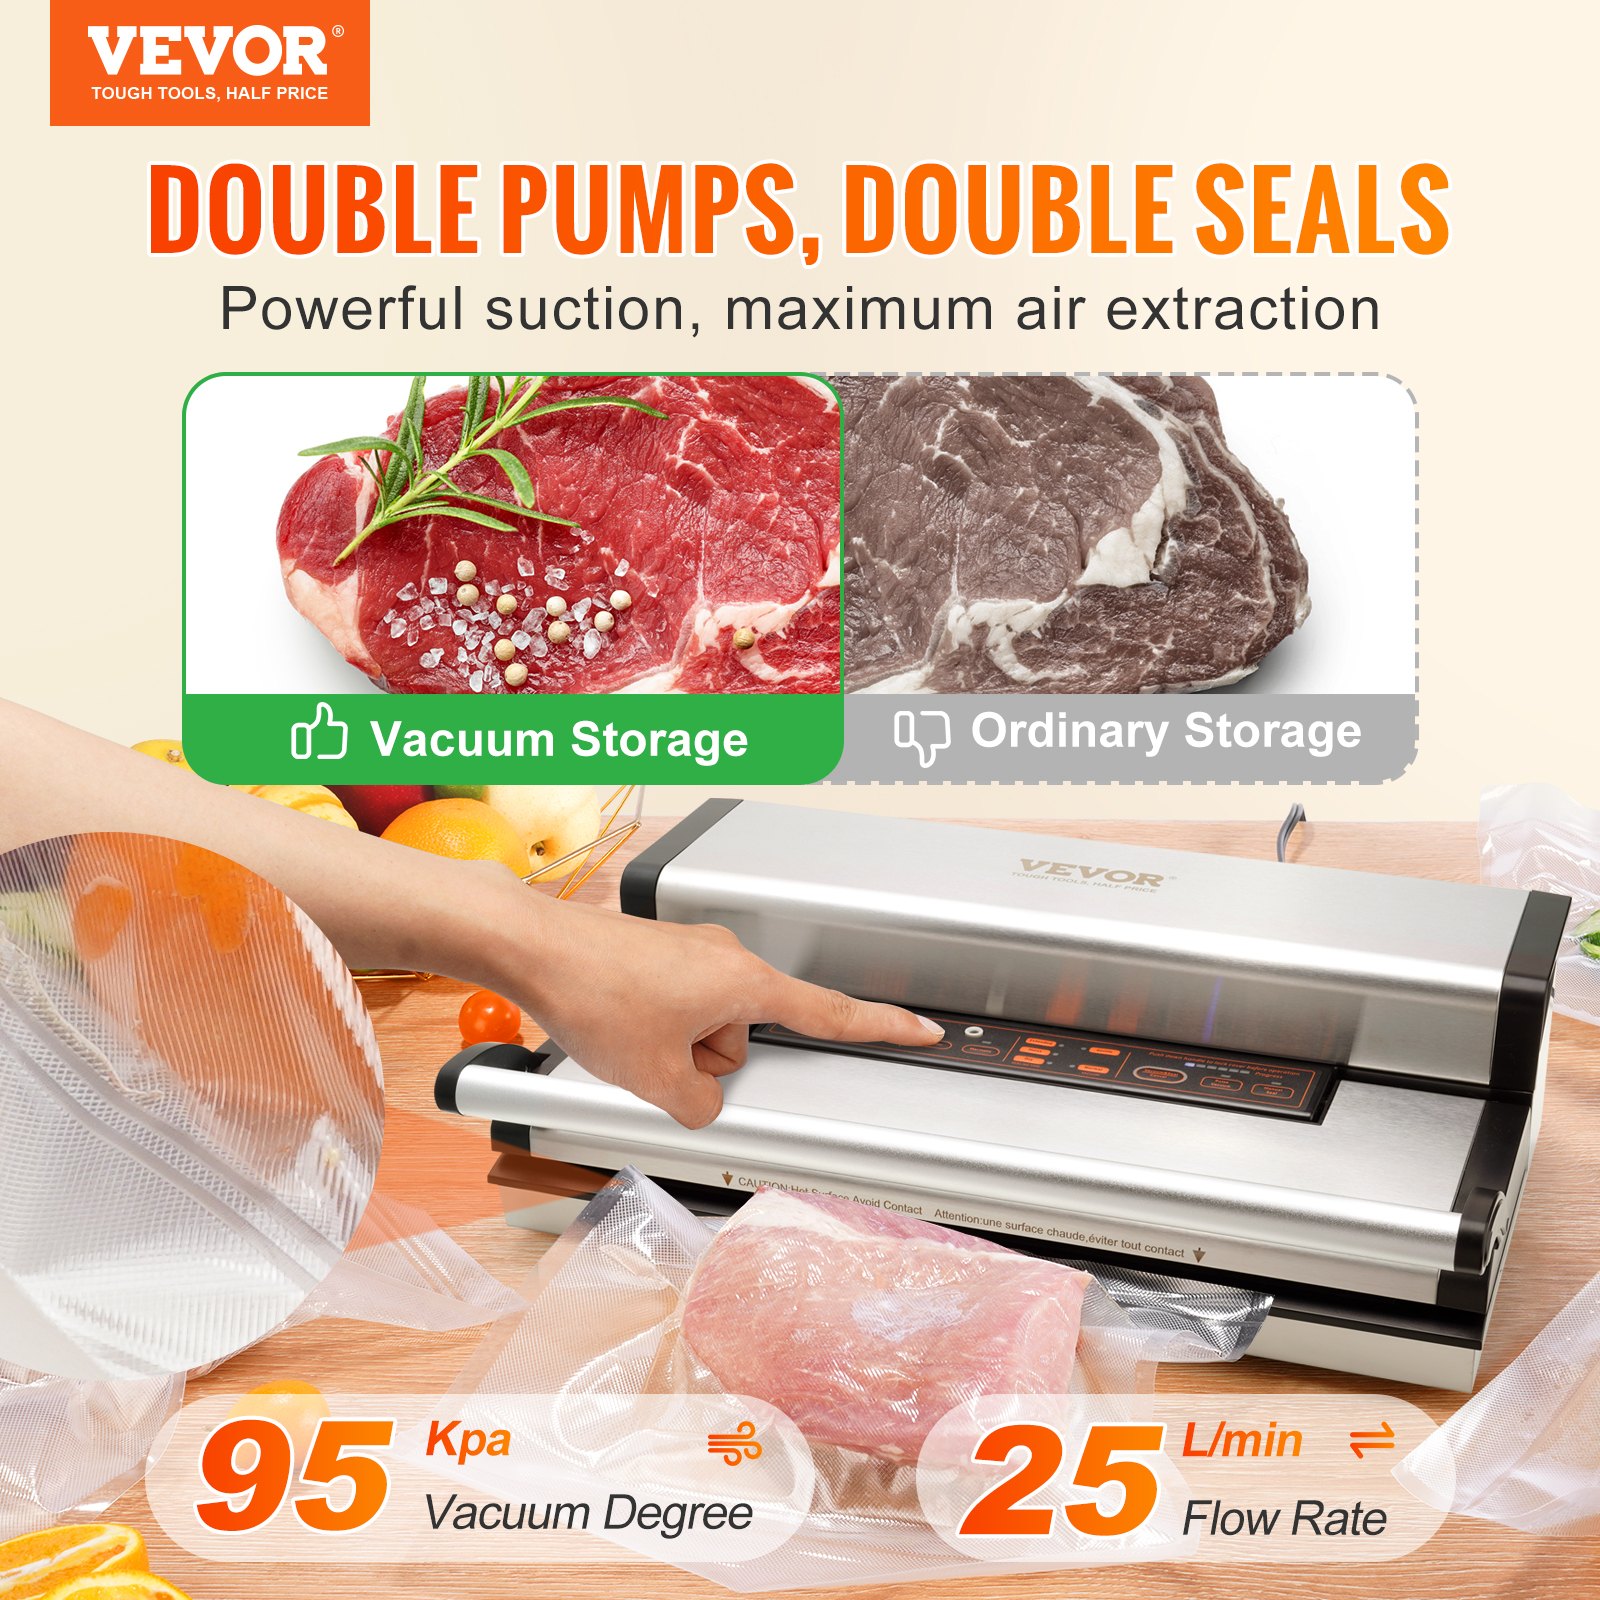
There are two buttons for the choice of different vacuum pressures:
- Standard button: For regular items, store them in normal vacuum pressure.
- Gentle button: less vacuum pressure is desired for some soft & crushable items storage.
The default setting is normal and high vacuum pressure.
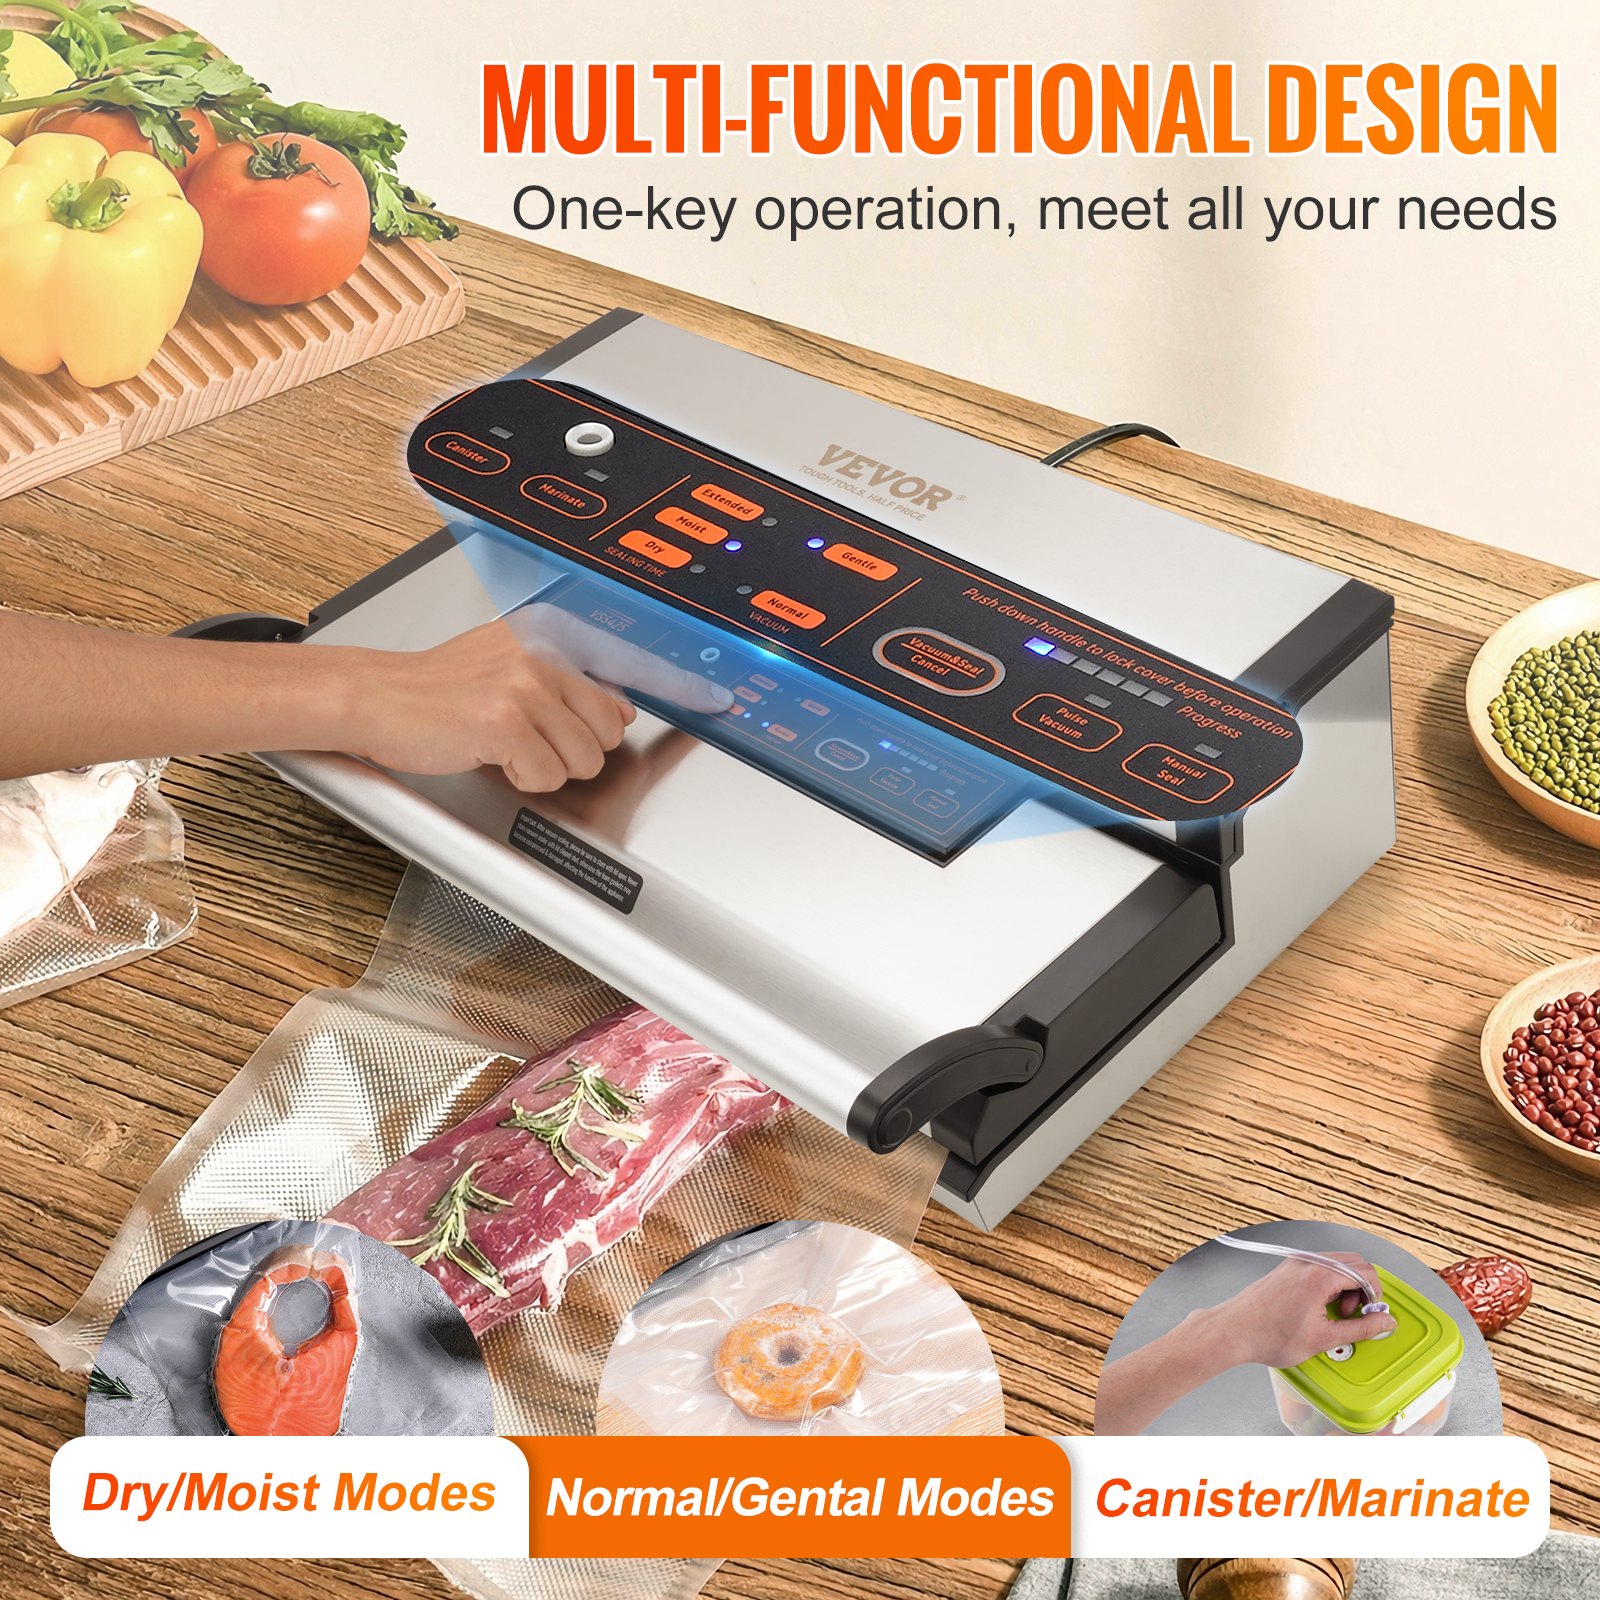
3. Sealing time
Three buttons for choosing the best bag seal time
- Dry button: for dry bags and items without moisture, with a shorter heat sealing time;
- Moist button: for wet bags or foods with moisture, with normal heat sealing time.
- Extended button: for wet bags or foods with very high moisture, with an extended heat sealing time.
The default setting is for dry bags and shorter sealing times.
4. Canister
To start vacuuming for canisters, jar lids, wine stoppers, or other accessories through a hose.
5. Marinate
Press to marinate food with the marinator bowl.
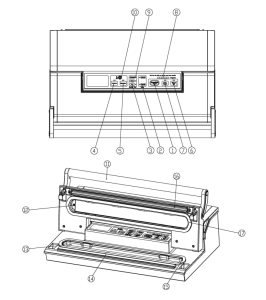
6. Manual Seal
This button provides two functions:
- To seal the open end of a bag without vacuuming air suction, used to make a bag from a bag roll.
- This button stops the motor pump when the automatic “Vacuum &seal” function is in operation. It immediately starts to seal the bag so that the operator can control less vacuum pressure inside the bag to avoid crushing delicate items.
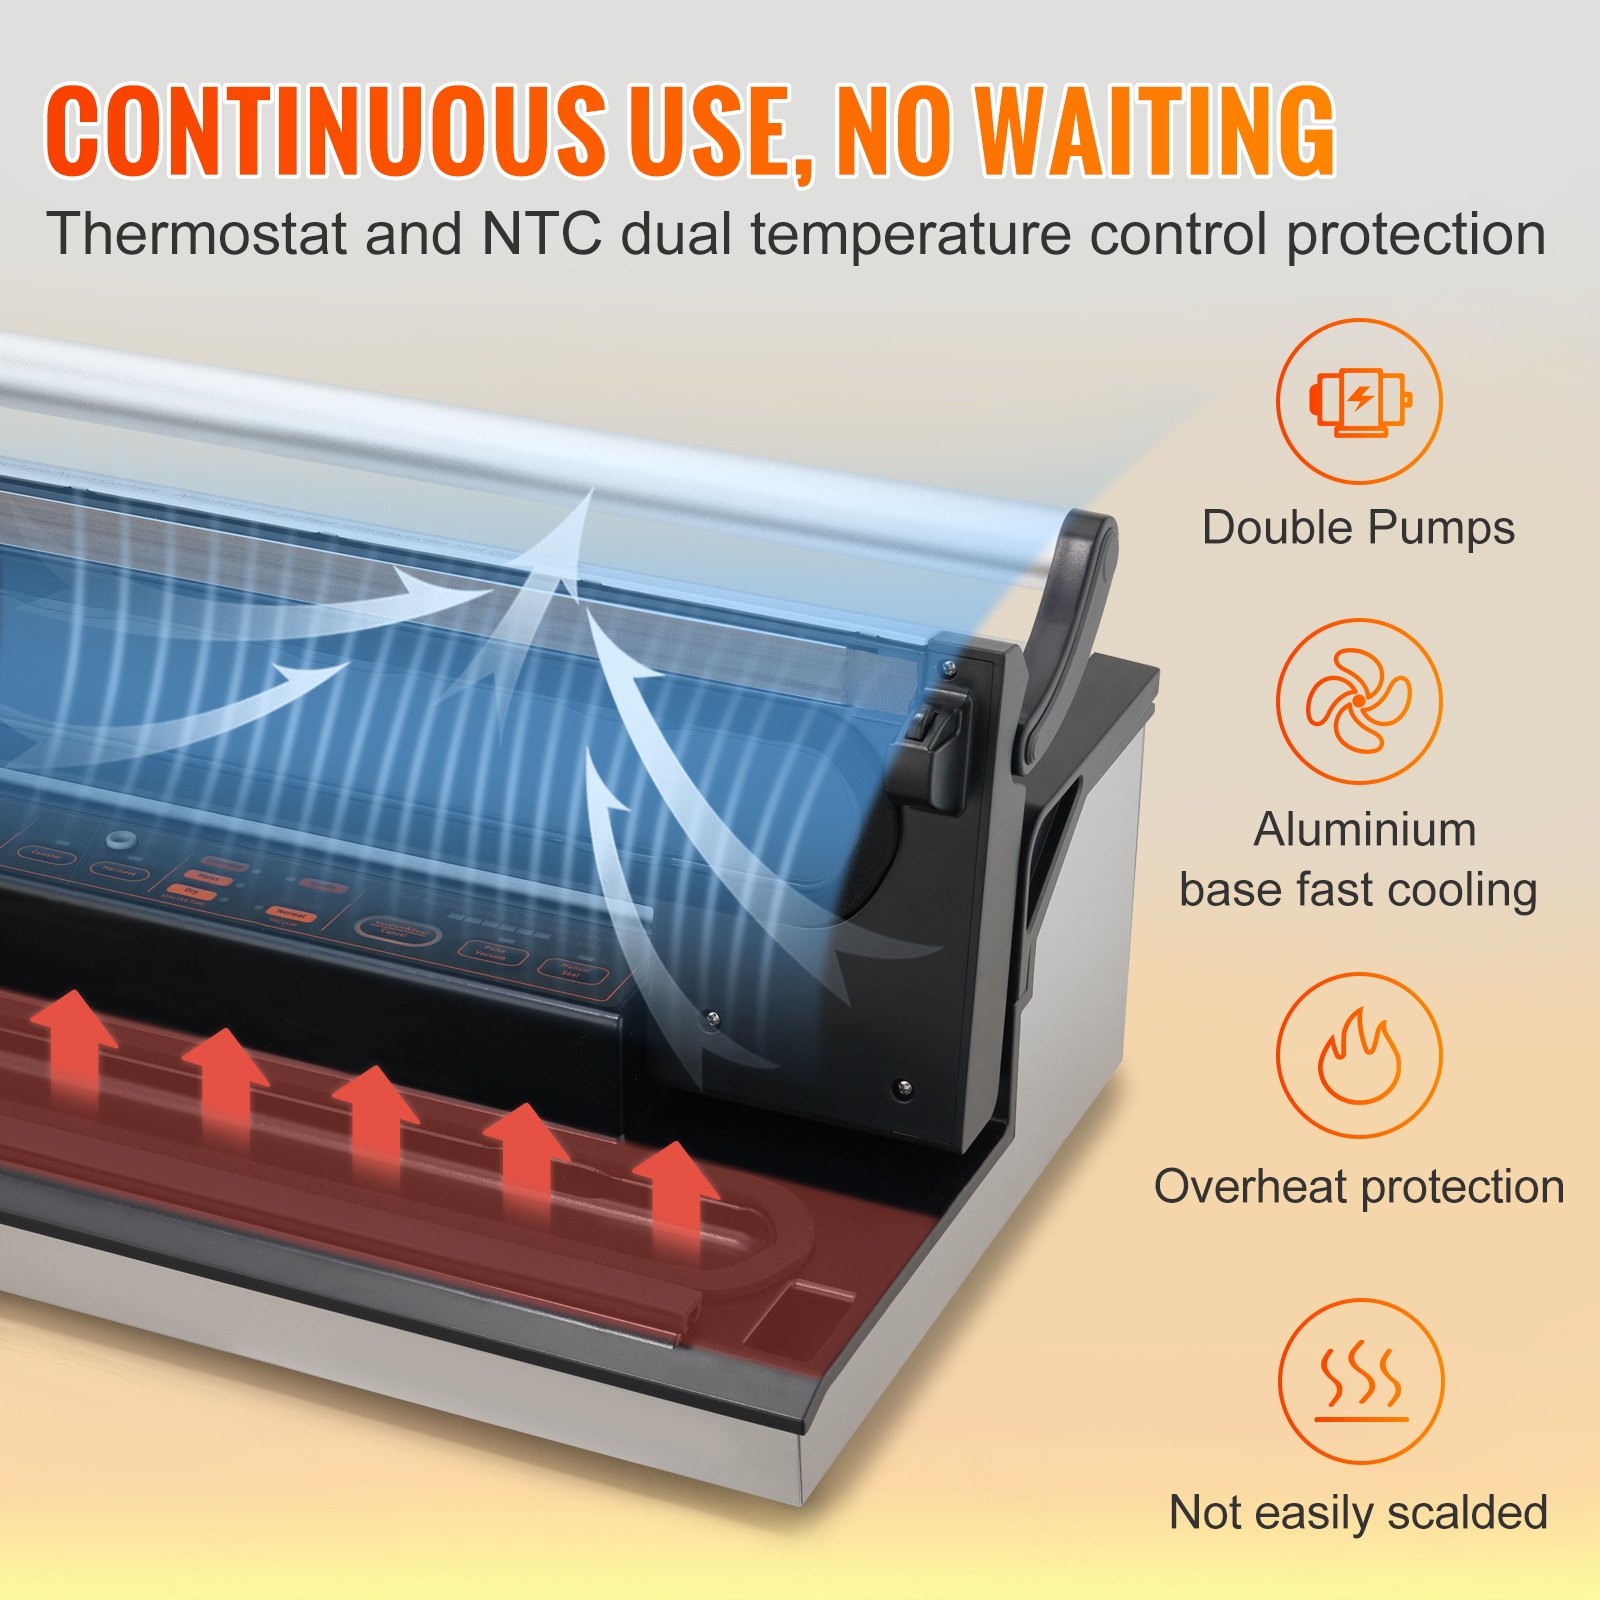
After finishing one sealing cycle, please let the machine cool down for 15 seconds.
7. Pulse vacuum
Press this button, and the vacum sealer starts vacuuming; undo, it will stop. This process can be repeated. Then, press “manual seal” when you meet the desired pressure, and turn to seal. Different pressures, according to the type of food, can be chosen.
8. Progress LED indicators
Indicators of the progress of the entire working process.
9. LED Indicators
Indicates the status of the vacuum or seal process and the status of the machine settings.
10. Hose port
To insert the hose for the canister and wine stopper before “marinates” or “canister” operations.
11. Front handle
Press down to lock the cover. And lift to open the cover.
12. Air intake
Air intake connects with the vacuum chamber and the pump. Do not cover this air intake when placing the vacuum and seal operations bag.
13. Vacuum chamber
Position the open end of the bag inside the chamber, draw air out of the bag, and catch liquid overflow.
14. Sealing strip
Place the bag to be sealed over this strip. Clean and dry it or replace it when distorted or broken.
15. Lower gasket
Keep air away by forming a vacuum chamber with an upper gasket in the vacuum chamber. Clean and dry it or replace it when it is distorted or broken.
16. Sealing element
A teflon-coated heating element that is hot and seals the bag.
17. Upper gasket
Keep air away by forming a vacuum chamber with a lower gasket. Clean and dry it or replace it when distorted or broken.
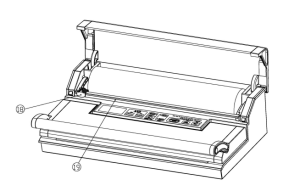
18. Bag Cutter
Press and slide in one direction to cut bags to a desired size.
19. Cutter rack
Support the cutter to slide along
Vacuum Sealer Operating Instructions
Making a bag with a bag roll
- Plug the vacuum sealer machine into a power source; Turn the switch to “Ⅰ”.
- Open the top cover.
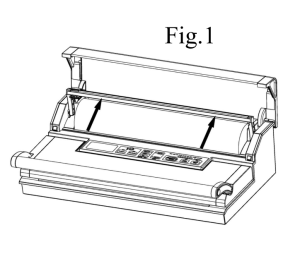
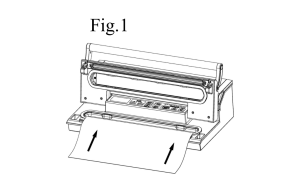
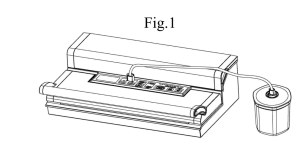
- Make sure the bag cutter is on one end of the cutter rack, then put the cutter rack to the back– Fig.1
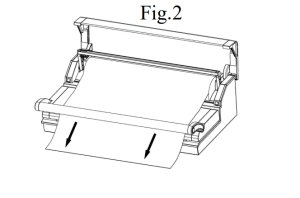
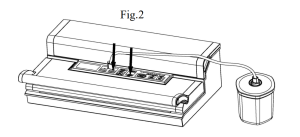
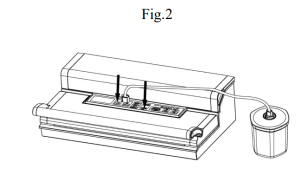
- Pull out the bag to the suitable length you want– Fig.2
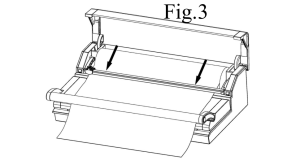
- Put down the cutter rack and make sure it is in the right place for the bags, then slide the cutter from one end to the other end to cut the bag– Fig.3
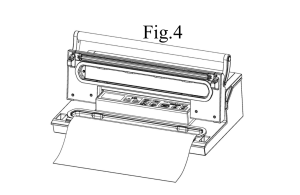
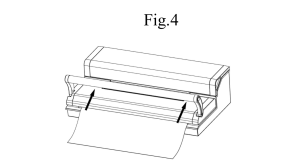
- Put one end of the bag on top of the sealing strip, but do not enter the vacuum chamber–Fig.4
- Close the upper lid and press tightly till you hear it click in place on both sides–Fig.5

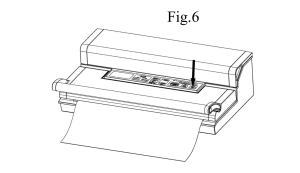
- Press the “Manual Seal” button to seal the bags -Fig.6
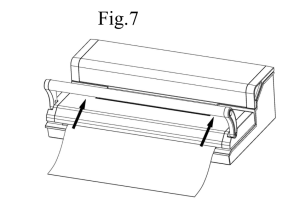
- Lift the front handle to open the cover and remove the bag from the machine. The bag is then done and is ready for vacuum sealing -Fig.7
Vacuum packaging with a bag
- Put the items inside the bag. Use only the specially designed vacuum bags we supply with vacuum channels.
- Clean and straighten the bag’s open end, ensuring no dust, wrinkles, or ripples.
- Place the open end of the bag within the vacuum chamber area. Make sure the bag does not cover the air intake. – Fig. 1
Put the cover down and press the front handle to lock the cover. – Fig.2

- Check the LED status of “vacuum” and the “sealing time” to confirm sealing time depending on the moisture status of packed items (extended/moist/dry) and desired vacuum pressure (Normal/Gentle) according to the type of food;
- Then press the Vacuum & Seal button, the unit starts to vacuum and will seal the bag automatically – Fig 3

NOTE: This product provides very high vacuum pressure during vacuum packaging with a bag. To avoid crushing delicate items with high vacuum pressure, observe the status of the vacuum pressure inside the bag and switch the “ MANUAL SEAL” button immediately when the desired vacuum pressure is achieved. The pump will stop and change to heat-seal the bag.
- The vacuum packaging is done. Lift the handle to open the cover and take out the packed bags – Fig. 4
NOTE:
- For the best sealing effect, it is better to let the appliance cool down for 1 minute before using it again. Wipe out any excess liquid or food residue in the vacuum chamber after each bag is packaged.
- Do not seal one after another continuously to avoid overheating the sealing element. The machine will reject if this “seal” button is activated within 15 seconds of the last activation.
- Your appliance can work only on the specific bags we provide. Do not attempt to use other bags that are not intended for vacuum packaging.
- Cut the bag straight across with scissors to open a sealed bag.
Vacuum package in a Canister & Vacuum Bowl
- Wipe the canister cover and base to ensure they are clean and dry.
- Put the items into the canister, but do not fill it up too full so the cover can make good contact with the canister bowl rim. Clean the canister’s cover rim and bottom seal gasket.
- Insert one end of the hose into the air intake and another end of the hose into the center hole of the canister cover– Fig. 1
Check the LED status of “vacuum” and ensure it is in the “Normal” setting.
Press the canister button to start vacuuming (Fig.2). At the beginning of the vacuuming work, use your hand to push down the cover to ensure no air leaks between it and the canister. The machine will stop automatically when enough vacuum pressure is achieved.
Immediately remove the hose tube from the canister or bowl after completing the job. Note: When moist food is under vacuuming, moisture will be stored in the adaptor. Remember to clean up the adaptor if there is water before vacuuming.
Open the Canister after vacuum packaging.
To open the canister, you need to press the “Release “button on the canister cover.
Marinate the Meat with a Marinate Bowl
- Take out the hose accessory from inside the cover, insert it into the canister port on the unit, and the center hole of the canister cover– Fig. 1
- Check the LED status of “vacuum” to confirm the desired vacuum pressure (Normal/Gentle) according to the type of food. The default option is Normal mode.
- Press the Marinate button to start working—Fig. 2. The indicator light has been on during the course. It will release air automatically after vacuuming. This machine will work for five cycles. Each working cycle will take about 75 seconds and about six minutes to finish the marinating process.
When the indicator light turns off, the marinating process is completed. Pull off the hose accessory from the canister port and the canister cover.
Cord storage box
When not using the machine, put the power cord into the storage box in the back of the machine. Do not wrap the cord around the appliance.
Vacuum Sealer Machine General Safety and Accident Prevention
- Do not touch the machine with wet hands.
- Do not touch the vacuum sealer machine when barefoot.
- In case of breakdown or malfunction, please switch off the machine and unplug it.
- Please do not leave the machine exposed to atmospheric agents & put it in water.
- Always unplug the machine before carrying out any operation other than vacuum packing.
- Switch the machine off and unplug it when not in use.
- Do not pull the power cord to unplug the machine.
- Frequently check the condition of the power cord; If necessary, have it replaced by only an authorized Technical Assistance Centre.
- In case of repair or replacement parts, only use original spare parts.
- If the power plug is incompatible with your socket, have it replaced by an authorized Technical Assistance Centre.
Storing Your Vacuum Sealer Machine
- Keep the unit in a flat and safe place, out of the reach of children.
- Remember to ensure the appliance’s lid is unlocked when not in use and when in storage. Keeping the cover locked will distort the foam gaskets, causing leaking.
- Unplug the machine before cleaning it or carrying out any maintenance work.
- For any repairs, if possible, contact an authorized Technical Assistance Center.
- Only use the manufacturer’s original spare parts.
Note: The foam gaskets around the vacuum chamber should be dried thoroughly before reassembling. When reassembling, be careful to prevent damage and assemble in the original position to ensure no vacuum leaks.
IMPORTANT: To avoid possible illness, do not reuse bags after storing raw meat, raw fish, or greasy foods. Do not reuse bags that have been microwaved or boiled.
Troubleshooting the Vacuum Sealer Machine
Nothing happens when I try to vacuum package.
- Check the power cord to see if it is firmly plugged into an electrical outlet.
- Check the switch to see if its setting is “o”.
- Examine the power cord for any damage.
- See if the electrical outlet is operative by plugging in another appliance.
- Twist the Fuse Cap off, then look at the clear tube to see if the Fuse is darkened. If it is, it must be replaced with a standard 10-amp Buss Fuse.
- If your appliance has a mode switch, ensure it is set to the correct mode. Refer to the above operating instructions.
- Ensure the bag is placed correctly inside the Vacuum chamber and beneath the air intake.
Air is not removed from the bag completely.
- To seal properly, the open end of the bag should be resting entirely inside the vacuum chamber area.
- Check the sealing strip and the foam gasket beneath the lid for debris and position. Ensure the foam seal gaskets on the cover and the base around the vacuum chamber are not breaking or distorting. Wipe clean and smooth them back into place.
- The vacuum bag may leak. To test, seal the bag with air, submerge it in water, and apply pressure. Bubbles indicate a leak. Reseal or use another bag.
- Uses only the specific vacuum bag with vacuum channels provided by the manufacturer.
- Wrinkles, debris, crumbs, grease, or liquids can cause leaks along the seal. Reopen the bag, wipe the top inside, and smooth it along the sealing strip before resealing.
The machine does not turn to seal after Vacuuming
- This machine has a built-in vacuum pressure sensor. The machine will not turn to seal automatically if the vacuum pressure inside the bag cannot reach the predetermined vacuum pressure. Check the sealing strip and the foam gasket beneath the lid for debris and correct position. Wipe clean and smooth them back into place, and try again.
- Ensure the foam seal gaskets on the cover and the base around the vacuum chamber are not breaking or distorting. Remove them from the groove, wash and dry them thoroughly, or replace them with a new foam gasket (get it from where you bought it or your nearest service center).
- The vacuum bag may leak. To test, seal the bag with air, submerge it in water, and apply pressure. Bubbles indicate a leak. Re-seal or use another bag.
- Wrinkles, debris, crumbs, grease, or liquids in the bag can cause leaks along the seal. To prevent leaks, reopen the bag, wipe the top inside, and smooth it out along the sealing strip before resealing.
Air has re-entered the bag after being sealed.
Wrinkles, debris, crumbs, grease, or liquids can cause leaks along the seal. Reopen the bag, wipe the top inside, and smooth it along the sealing strip before resealing.
Foods (such as fresh fruits and vegetables) may release natural gases or ferment. Open the bag, and if you think the food has begun to spoil, discard it. Lack of a refrigerator or fluctuating temperatures can cause food to spoil. If the food is not spoiled, consume it immediately.
Check the bag for a puncture or hole that may have released the vacuum. Do not vacuum-pack hard items with sharp points (like bones or cracks of nut shell). Cushion sharp edges in the contents of the bag with paper towels.
The Bag Melts
- Should the sealing strip or sealing element be overheat and melt the bag, it may be necessary to lift the lid and allow sealing strip or heating element to cool down for a few minutes.
- Only use the manufacturer-recommended vacuum bags.
The canister will not vacuum
- Make sure the adaptor is well connected both to the appliance and the canister firmly.
- Check if the knob of the canister was on the position of “seal”.
- Press the lids OR the hose adaptor at the beginning of vacuuming to prevent water from leaking from the cover seal.
- Check for significant damages or smashes; if any, replace with a new one.
- Check the function of the vacuum sealer.
- Make sure the rim of the canister is clean enough. If all the above situations are excluded, please contact the appointed service agency.
Disposal of the Vacuum Sealer Machine
Protection of the Environment
At the end of the life of your product, it should go to a specially adapted waste-recycling center.
Environmental Protection First
- The product’s symbol or packaging indicates that this product may not be treated as household waste. Instead, it should be handed over to the applicable authority. The collection point is for the recycling of electrical and electronic equipment.
- By ensuring this product is disposed of correctly, you will help prevent potential negative consequences for the environment and human health that could otherwise be caused by inappropriate waste handling.
- For more detailed information about recycling this product, contact your local council office or your household waste disposal service.
WIRING INSTRUCTIONS – FOR U.K. ONLY. SAFETY NOTES
FOR REWIREABLE OR MOLDED PLUG.
The mains lead of this appliance may already be fitted with a BS 1363 13 A plug. Should the fuse need to be replaced, a 13 AASTA-approved BS 1362 fuse must be used.
If your socket outlet is unsuitable for the plug, then the plug must be removed(cut off if it is a molded plug) and fitted appropriately.
Warning: Do not dispose of a plug cut from the power supply cord, as such a plug is hazardous if inserted in a live 13 A socket outlet elsewhere in the house. Always replace the fuse cover after fitting a fuse. The plug must NOT be used if the cover is omitted or lost until a replacement is obtained – make sure that only the correct fuse cover is used and fitted.
For plugs with a detachable fuse cover, the replacement must be the same color as the insert in the plug’s base, or as directed by the embossed wording on the base.
U.K. ONLY – FITTING A PLUG
Important: the wires in this lead are colored per the following codes: Blue, Neutral, Brown, live. Please read the instructions given below before connecting the cord to a plug. If in doubt, please consult a qualified electrician. As the colors of the wires in the mains lead of this appliance may not correspond with the colored marking identifying the terminals in your plug, proceed as follows:
The wire, which is colored blue, must be connected to the terminal marked with the letter “N” or colored black.
The wire, which is colored BROWN, must be connected to the terminal marked with the letter “L” or colored RED. Neither core is to be connected to the earth terminal of a three-pin plug. This appliance requires a 3-fuse ASTA approved to BS 1362.
Recommended For Your Project
VEVOR Vacuum Sealer Machine, 95Kpa 350W Powerful Dual Pump and Dual Sealing Manual

Reviews
There are no reviews yet.