Unlock the full potential of your VEVOR Electric Stapler Rapid 106 Automatic Saddle Binding Machine with our comprehensive product manual download. This detailed guide is designed to help you easily navigate the setup, troubleshooting, and optimization of your heavy-duty flat and book binding machine.
Whether binding 2 sheets or up to 50 sheets, our manual provides step-by-step instructions, practical tips, and expert advice to ensure you get the most out of your 110V electric stapler.
Perfect for both beginners and professionals, this user-friendly manual covers all aspects of the VEVOR Electric Stapler Rapid 106, making it an indispensable resource for efficient and hassle-free binding. Download now and streamline your binding process with confidence.
ELECTRIC STAPLER RAPID MANUAL
IMPORTANT SAFETY INSTRUCTIONS
- Read all of these instructions
- Save these instructions for later use
- Follow all warnings and instructions marked on the Rapid Electric Stapler.
- Unplug this product from the wall outlet before cleaning. Do not use liquid cleaners or aerosol cleaners. Use a damp cloth for cleaning
- Do not use this Rapid electric stapler near water.
- Do not place this product on an unstable cart, stand, or table. It may fall and break.
- This electric stapler rapid is equipped with a 3-wire grounding-type plug with a third(grounding)pin. This plug will only fit into a grounding-type power outlet. This is a safety feature. If you cannot insert the plug into the outlet, contact your electrician to replace your obsolete outlet. Do not defeat the purpose of the grounding-type plug.
- Do not attempt to service the electric stapler by yourself, as opening or removing covers may expose you to dangerous voltage points or other risks. Refer all servicing to service personnel.
- Unplug this product from the wall outlet and refer servicing to qualified service personnel under the following conditions:
1. When the power cord or plug is damaged or frayed.
2. If liquid has been spilled into the product.
3. If the stapler has been exposed to rain or water.
4. If the product does not operate normally when the operating instructions are followed, adjust only those controls that are covered by the operating instructions. Improper adjustment of other controls may result in damage and will often require extensive work by a qualified technician to restore the product to normal operation.
5. If the product has been dropped or the cabinet has been damaged.
6. If the product exhibits a distinct change in performance, indicating a need for service.
- Disconnect the electric power to the electric stapler before cleaning, adjusting, or moving it.
- Do not allow children to use this product unless under the supervision of a responsible adult.
LIST OF TERMS
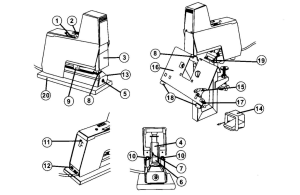
- Main switch
- Impact control
- Sight-shield
- Insert stapler
- Screw
- Magazine
- Magazine release
- Anvil
- Trigger(adjustable)
- Adjustment knob, stapling depth(trigger)
- Socket for opto cable
- Socket, foot control
- Looking plate
- Foot control
- Fixing knob-table
- Table
- Paper gauges
- Paper gauges
- Catch-plate
- Base
DESCRIPTION OF THE PRODUCT
Several units can be connected for simultaneous use; The connection is by optical cable. Minimum center
distance 60mm.
- Each unit is prepared with an independent double-sided trigger. The adjustment of the stapling depth from 0-105mm, divide 5 scale.
- Stapling occurs automatically when the stapling material is inserted. A foot control is incorporated in XDD 106 and is available as an extra accessory to XDD 105.
- The units have easily exchangeable insert staplers.
A radio interference suppression device is provided
XDD 105
- Length: 250mm (incl base 255mm)
- Width: 60mm (incl base 100mm)
- Height: 238mm (incl base 245mm)
- Weight: 3,6kg
XDD106
- Length: 250mm
- Width: 60mm (Anvil: 84mm)
- Height: 438mm
- Weight: 4,2kg (control: 0.5kg)
c. Original Rapid staples 66/6and 66/8,210 staples per magazine.
d. Opto cable is used to connect two or more units.
e. Foot control
f. Vice for adjustable fixing to the tabletop.
g. Multi base for adjustable fixing of up to 4 staplers together,(size 145-300mm). Two devices for the fixture are included
EXTRA ACCESSORIES FOR XDD 106
h. Narrow table (60mm) with exchange anvil, provided with paper gauges which can also be used for the fixing of coupled units.
i. Runner with accessories for saddle stapling for one or more staplers.
j. XDD252-116 insert stapler for loop staples (XDD66/6)
k. Loop staple type XDD66/6
Electric Stapler Rapid Power Supply Connection
- The voltage is specified on the identification plate (ringed in the picture). Before connecting the unit, make sure that the socket has the correct voltage. Switch off the main switch when not in use. If the stapler is connected to the same mains outlet as appliances drawing heavy current, such as photocopiers, they may give rise to such a heavy voltage drop when in operation that stapling is disturbed.
- Use only original XDD staples 66/6 or 66/8. Using the wrong type of staples can damage the unit or result in bad stapling.
Loading the Electric Stapler Rapid
- Lift the sight-shield(3)-stapling is now prevented.
- Depress the magazine release (7) on the front of the insert stapler and pull out the magazine (6). Load with staples Rapid66/6 for goods of between 0 and 2 mm’s thickness (equals up to about 20 sheets of copying paper 80g) or Rapid 66/8 for goods of 2-5 mm’s thickness (up to about 50 sheets).
- Push the magazine into the locked position.
- Lower the sight, and the shield will activate.
ADJUSTING THE THROAT DEPTH
The unit is provided with a double-sided trigger. Each trigger can be used independently.
- Lift the sight-shield(3)
- Turn one of the knobs (10) anticlockwise and move the trigger (9) to the desired position.
- Let go the knob. The trigger is now set.
- The trigger first touched by the stapling goods will activate.
- When several units are connected, the triggers on the “slave” units can be used as supports for the stapling goods (they will not activate) and are adjusted as shown.
- Lower the sight-shield.
- Start stapling by pushing the stapling goods against the trigger(9).
ADJUSTMENT OF STAPLING IMPАСТ
- Choose stapling or nailing by pushing the anvil (8) forwards or backwards, respectively. (Only XDD 105)
- Turn main switch(1)to positions. The pilot light in the button comes on.
- Do a trial stapling by pushing the stapling goods towards the trigger(9).
- Examine the result. If the impact force is too weak, the staples will be insufficiently folded. Turn the impact control (2) to a higher figure. Too high an impact force will make unnecessary noise and increase wear. Correct adjustment will give efficient stapling and minimum noise.
- Never staple without stapling goods; staples will get stuck in the outlet. Never staple over previous staples-the staple could jam in the outlet. Caution! Keep fingers away from the stapling area.
USING A FOOT CONTROL
- Turn the main switch off (1)or lift the sight-shield(3)
- Plug the foot control into the socket (12) on the back of the unit.
- The triggers(9) can now be used as paper gauges for the stapling goods. When the foot control is plugged in, they will not activate. Adjust to the desired stapling depth as described.
- Lower the sight-shield (3), turn the main switch on. (1).
- Operate the foot control(14)
CONNECTION OF SEVERAL UNITS
- Turn the main switches off (1) or lift the sight shields (3)
- Place the units as required.
- Plug all the units into the mains.
- Decide which unit is to be the head unit (= will activate stapling). Push down the flap (11) and connect the opto cable (extra accessory)to the main unit’s upper socket. This is marked with an arrow pointing away from the socket (=outgoing signal)
- Connect the cable’s other plug to the adjoining “slave” unit’s lower socket after the flap(11) is pushed down. The socket is marked with an arrow pointing inwards (= ingoing signal). Neither the trigger nor the foot control on the “slave” stapler will activate stapling.
- The next “salve” unit is connected with an optic cable from the previous unit’s upper socket(11) to its lower socket(11)and so on.
- When the head unit is operated by the trigger or foot control, stapling will occur first at the head unit and then, with a brief interval, at the “salve” units in the order in which they are connected. (This is to avoid overloading of the power supply).
- The “salve” units’ triggers can now act as gauges for the stapling goods.
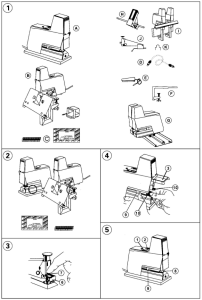
XDD 105-MOUNTING ON A WORK SURFACE
1. Remove the base (20)from the machine and the spring plate (22)from the base.
2. Turn the spring plate a half-turn so that the end with the hole (24) comes out in front of the unit. Screw the spring plate flatly against the underside of the unit using the tour screws. Attention! The screws are self-tapping.
3. Fix a screw to the work surface so that the runner (23)of the spring plate can be pushed in under the screw head. Fix the unit by a screw in the front hole (24) of the spring plate.
XDD 106-USING THE TABLE
- Place the unit in position and secure it firmly (21). The current should be off.
- After loosening the fixing knob (15) choose the flat or saddle-stapling position on the table (16). When the table is reset, the triggers(9) must be pushed back to their innermost position. Check that the table is correctly placed on the anvil (8) and in the catch-plate(19)
- The table (16) has four gauges that can be adjusted sideways. The two gauges (18) on the front edge are moved by pressing the lower part. When not in use, the gauges can be moved out of the way by pushing them to the outer edge and turning. The two paper gauges (17) on the short sides of the table can be moved sideways if first turned.
Rapid Electric Stapler Maintenance
1. Remove dust, loose staples, and other particles that may have collected in the unit.
2. Lubricate the insert stapler with a few drops of thin oil after about 10,000 staplings, as shown in the sketch. Wipe off excess oil.
BREAKDOWNS
a. Test the function of the insert stapler by hand
- Remove staples stuck in the outlet. Check that the correct staples have been used and that the staple outlet is undamaged.
- Change the insert stapler when it is damaged or worn.
b. The operating system. Check that:
- The unit receives current, and the switch is on (the pilot light comes on).
- The sight shield is down.
- The correct method of activation is used. The trigger will not operate if the foot control or opto cable is connected.
- The triggers return forward easily after activating. Both must return to “stop” before the next stapling.
- The correct impact force has been chosen. If the faults remain, return the unit to your supplier or to an authorized service man. Do not use a machine with a faulty connecting cable or plug.
HANGING THE INSERT STAPLER-XDD 105
- Remove the locking plate(13)with its screw.
- Change the insert stapler. Press the plunger(28) upward when inserting the new stapler.
CHANGING THE INSERT STAPLER-XDD 106
- Remove the fixing knob(15)with screw and remove the table(16)
- Loosen the two screws(26)and pull out the insert stapler. Press up the plunger (28) and remove the insert stapler.
- Fit the new insert stapler by first inserting the catch-plate(19)in the up position over the anvil(8).
- Press up the plunger(28)and lower the catch plate (19), with the narrow part pointing into the machine.
- Push in the insert stapler while holding up the plunger. Important! Make sure that the narrow part of the catch plate enters its guide hole.
- To maintain perfect stapling, it is necessary to adjust the position of the insert stapler towards the anvil. This adjustment is achieved using the guide plate (27) enclosed with the machine. Open the magazine and insert the guide plate from underneath in the magazine outlet. Insert magazine. Press down the insert stapler and ensure the guide plate fits nicely into the anvil. Keep insert stapler pressed to the anvil and tighten the mounting screws(26). Remove the guide plate from the magazine and do a few trial staplings to check proper function.
- Fit the table in place. The table’s strut, screw and fixing knob(15)must be positioned in front of the tubular stand. Equivalent noise level at maximum capacity and power. Except 1440 staples per 8 hours give (106A). Noise measurement made according to ISO7779 with supplement proposal, electrical staplers noise test code.
Our products ‘ purpose is to strive for perfection. Sorry, not to notify you if specifications changed.
Recommended For Your Project
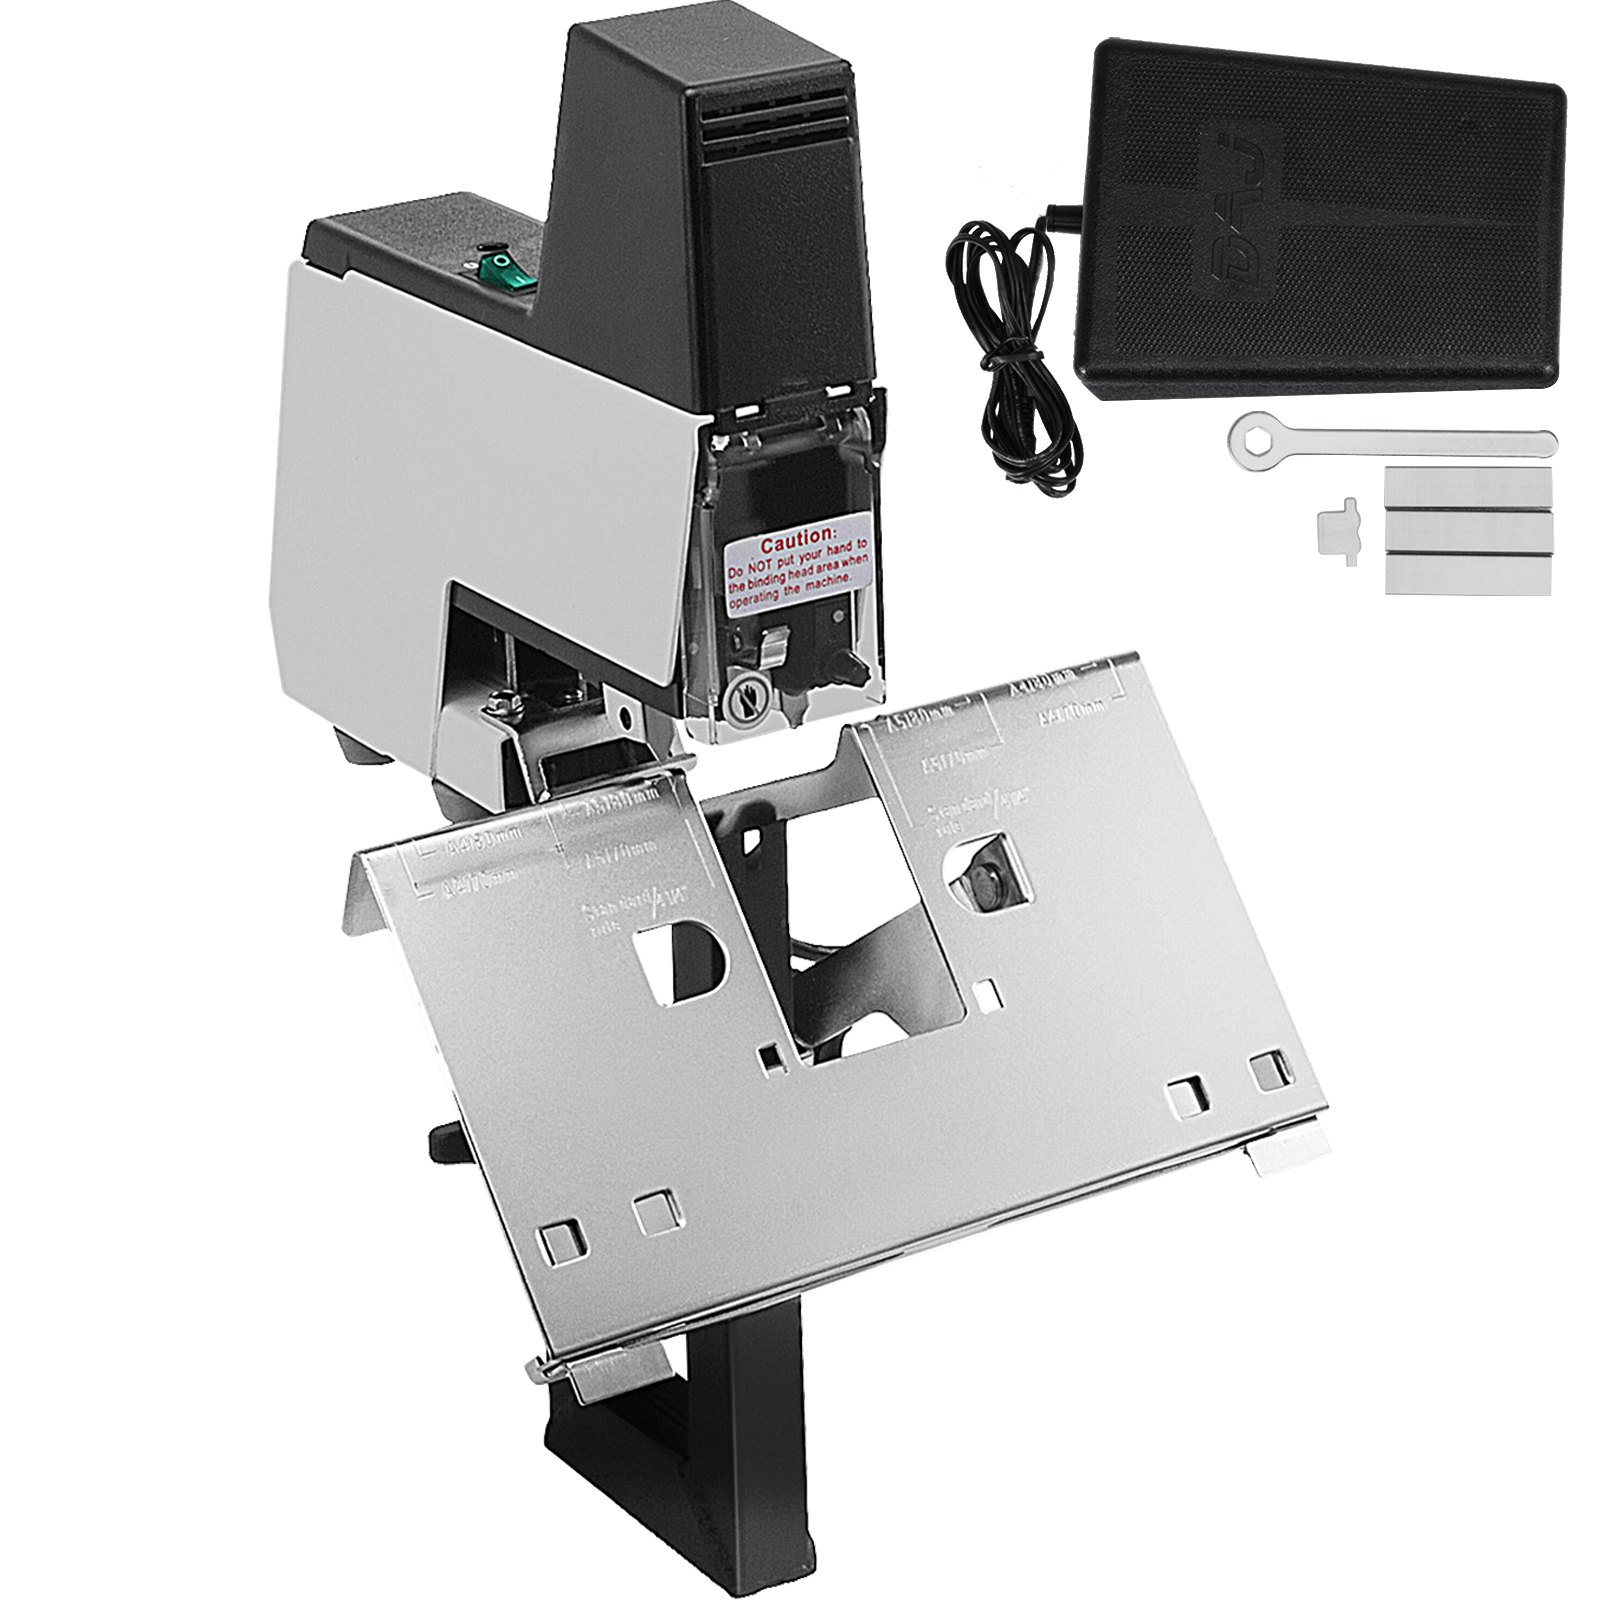
VEVOR Electric Stapler Rapid 106 Automatic Saddle Binding Machine 2-50 Sheet 110V Manual
Reviews
There are no reviews yet.