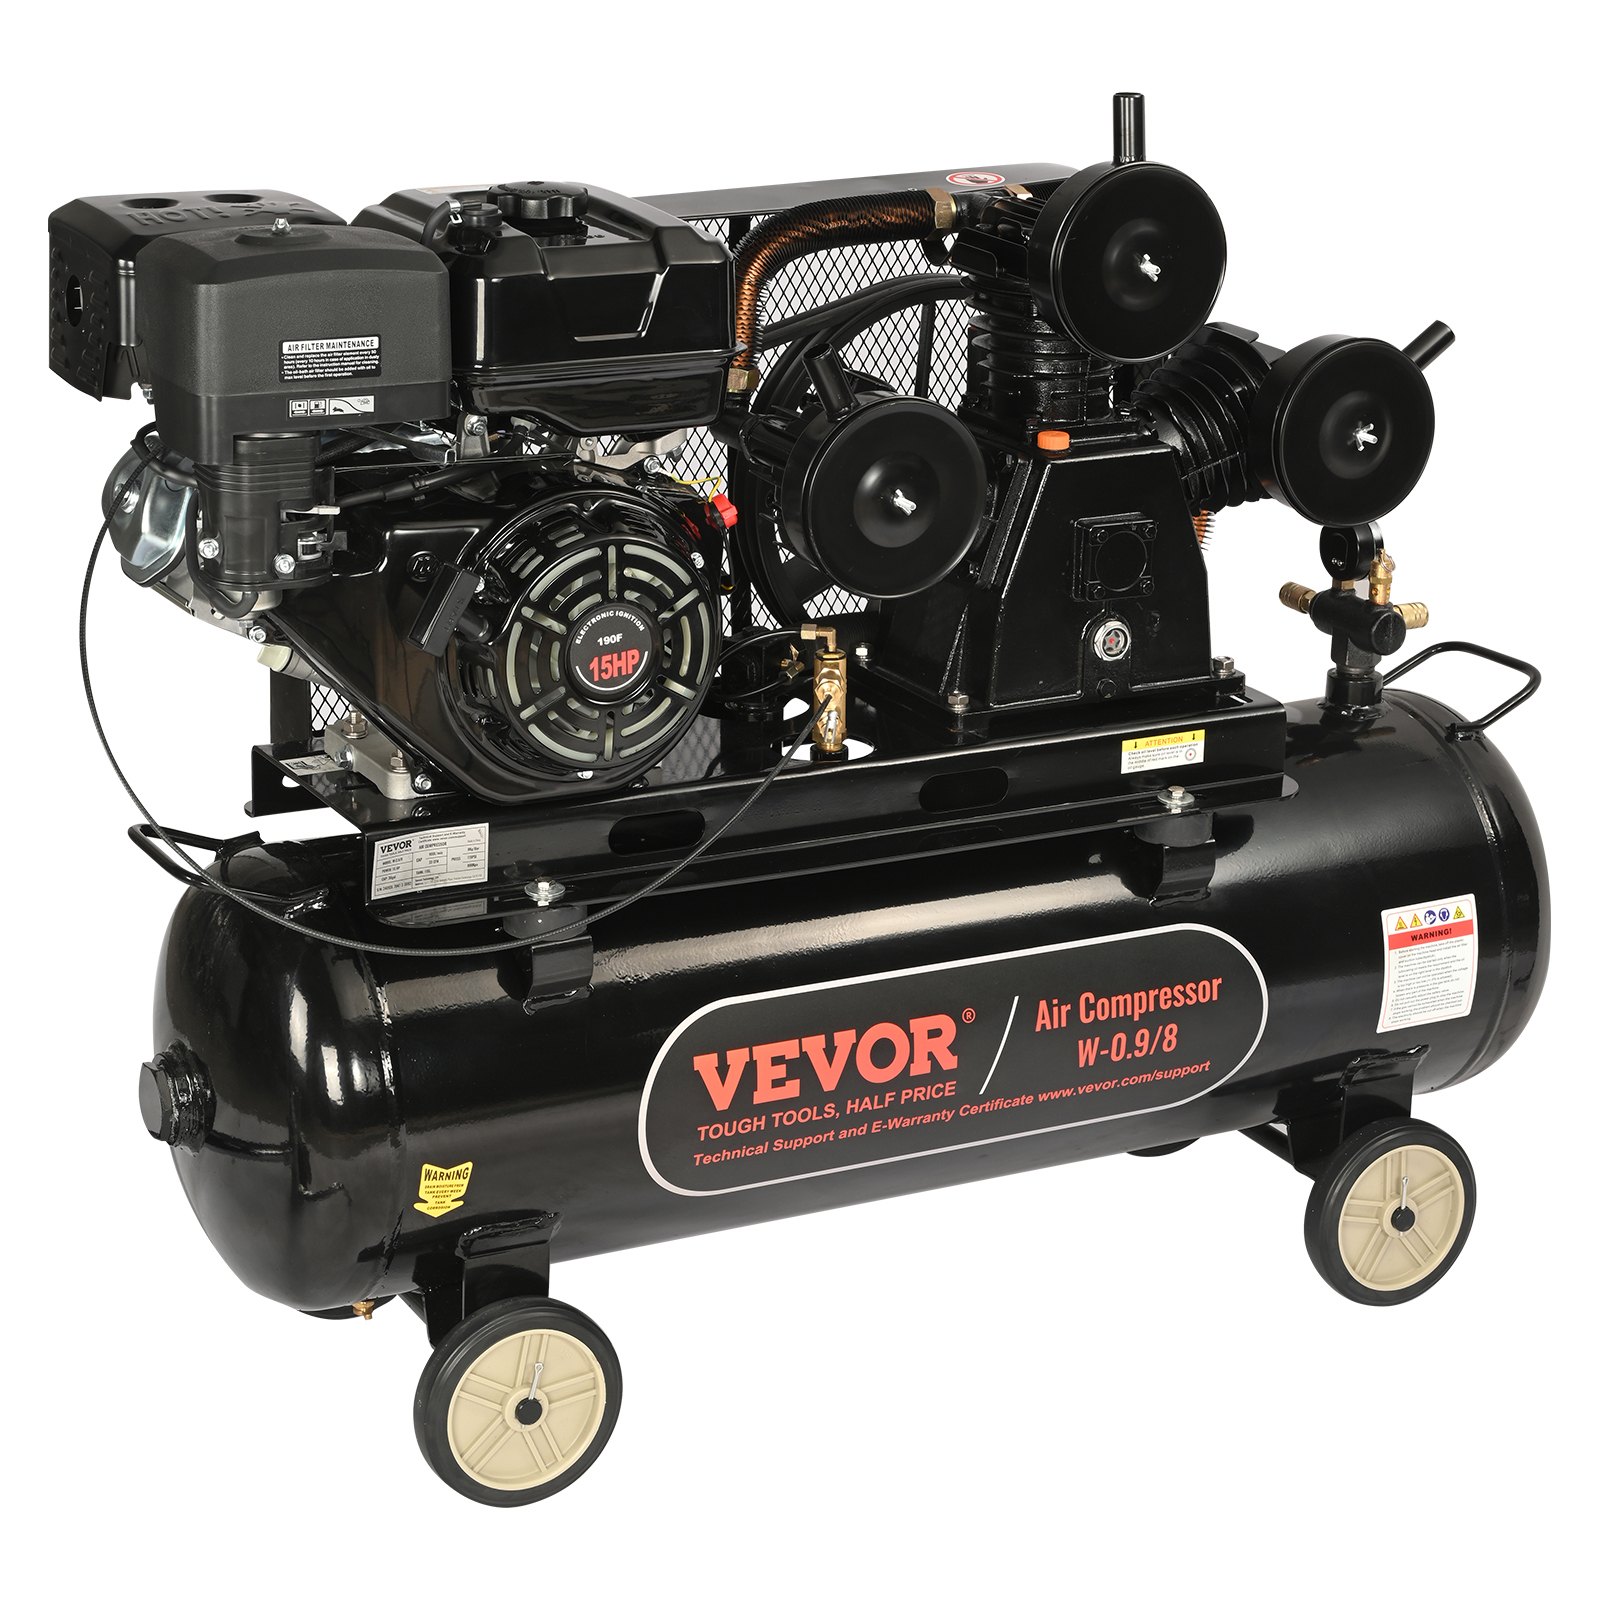
Unlock the full potential of your VEVOR 15HP Gas Powered Air Compressor with our comprehensive product manual. This essential guide is designed to provide you with all the information you need to set up, troubleshoot, and optimize your 30 Gallon Horizontal Air Compressor Tank. Whether you’re using the 33CFM@115PSI Gas Driven Piston Pump Air Compressed System for construction sites, workshops, or other demanding environments, our manual ensures you get the most out of your equipment.
The VEVOR manual is meticulously detailed, making it easy to understand and follow even for first-time users. It covers everything from initial assembly and safety precautions to maintenance tips and advanced troubleshooting techniques. With the manual at your side, you can confidently operate your air compressor, knowing you have the expertise to handle any situation that arises.
Download the VEVOR 15HP Gas Powered Air Compressor manual today and take the first step towards mastering your air compressor system. Enjoy the ease of use, enhanced performance, and peace of mind that comes from having a reliable guide at your fingertips.
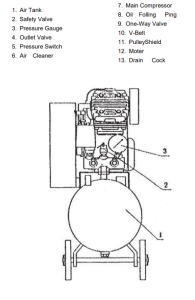
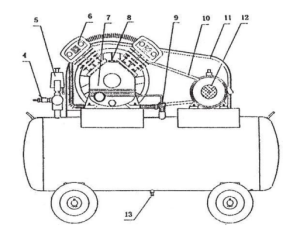
GAS POWERED AIR COMPRESSOR
MODEL:V-0.25/8/V-0.25/8D/W-0.9/8
INSTRUCTIONS
Your expected Air Compressor has been delivered to you. Perhaps you have already got acquainted with it. However, for it forever does you good service, under good conditions, please spare a little time and read over the instruction manual written through years of experience.
Check up the machine as you received it.
- Whether it is the right type and specification, as you have ordered.
- Check whether the accessories are complete, based on the stock list attached to the machine.
- Whether there is damage made jot any screw loosen during Shipping. If any of the above cases happen, don’t hesitate to contact the seller, who will provide a satisfactory solution.
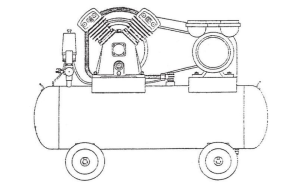
AIR COMPRESSOR & MOTOR INSTALLATION AND PREPARATION
Air Compressor installation-site selection:
- A place that is not humid, has little dust and dirt, clean air, and good ventilation will be suitable. With increased efficiency, the machine’s life will last longer.
- The place is full of light, suitable for oiling.
- The place is easy to access for removing or checking the machine. The machine must be placed as low as possible. The machine must be able to be placed at the level as possible. The side should be on the wall side, but not too close to affect the fan’s function. (space above 30cm should be kept)
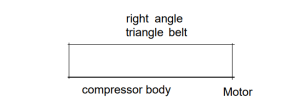
Motor installation
- If you buy the motor yourself, please buy one that has the same horsepower (HP) as the compressor uses.
- Following the main points as shown in the diagram, install the triangle belt:
- Adjust the tightness of the belt to a suitable condition. The method is to press down the belt at the middle between the two wheels to 10- 15 mm as shown in the following figure:
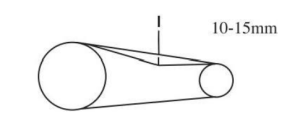
Because (1) if the belt is too tight, loading will in erase, the motor jigseasilygettingheated and consume nore electricity, while the belt will be easily brokensthebeltstrains too much, (2) if the triangle belt is too loose, it slips easily andgenerateshigh temperature which breaks the belt and makes revolving number unsteady, Oiling
1. Generally speaking, the lubricants used in the compressor that are high in oiliness, comprise an antioxidant, are not apt to thicken or foam, have low carbon remnant, and have high sparking points would be more ideal.
They may generally include:
- Kuo juang special class revolving lub oil R68, R44, & R47 of China Petroleum Corp.
- Teresso 52 and 65 or Esstic 55 or 56 of American Standard Oil (ESSO).
- D.T.E Oil 103 or 105 of MEIFG Company (Mobil). A compressor with small HP can use SAE 30 oil as a substitute. However, the above revolving oil or oil of the same class is preferred for those with medium to large horsepower.
2. Please keep the oil gauge’s oil level in the red area. Too much oil will waste lubricating oil and allow carbon to stick to the valve easily. Too little oil will burn or wear out easily due to poor lubrication, so the oil level should always be kept in the red area.
3. When oil becomes dark or polluted (after approx. 500 hours), replace it.
4. Use a cardboard or other utensil to guide out the polluted oil, inclining the compressor forward until all the contaminated oil is let out. Replace the oil plug tightly (it is better to apply some stoppage glue or stoppage paste on the teeth of the oil plug to avoid oil leaking). Open the oiling cover and fill in new oil until it reaches the middle of the red circular area.
5. Please don’t fill new oil when the gas-powered air compressor is running.
6. Don’t use thick lubricant or wasted oil.
NOTICES TAKEN IN OPERATION
1. Check every part of the bolts and nuts to see whether they are loose.
3. Check to see whether the pipelines are normal.
4. Check whether the circuit wires and electric switches follow the rules and the wiring connections are correct.
5. Check to see whether each of the wheel foot supports is packed firmly or level.
6. Check to see whether the belt pulley of the compressor can be easily turned by hand.
7. Before start, if there is compressed air in the tank, for preventing the motor from over loading and burnt out, in model 1/4HP, the conter knob of the cylinder is first turned to the place in the groove, so that it stars without loading. Then lift upon the cotter knob and turn to place it on the upper edge of the groove and enter into the regular operation, as in Fig. A:
For the semi-auto 1/2HP, lift up the auto unloading valve handler, handle it to let it start without loading, then put down the handle ring and enter into the normal compression operation.
8. Check the revolving direction and see whether it is the same as the arrow indicated. If not, in a 3-phase motor, please cross-change any two of the three power wires, and it will be OK.
9. The air cleaner should be checked to see whether dirt needs to be removed. The cleaning cotton should be removed and cleaned(with gasoline) or replaced to maintain a good air cleaning effect.
10. Each day after the air compressor is used, the water draining valve should be turned open to let out the coagulated water vapor and greasy filth, which must be thoroughly cleaned.
11. The cylinder head of the compressor and the copper tube will become hot for air compressors, the temperature runs high. This is nothing abnormal.
12. When the compressor runs, the electric power goes off in the middle or after operation. Remember to shut off the power supply to assure safety.
SAFETY CALVE AND AUTO UNLOADING CALVE ADJUSTMENT
1. When raising operating pressure is desired, please turn left loose the number(1) lock-tight nut first, then turn right tight (2) the pressure adjustment nut, the pressure will rise high, after a desired pressure is reached, fix the lock-tight nut.
2. When lower operating pressure is desired, turn left loose (1) the lock-tight nut and (2) the pressure adjustment nut; the pressure will drop low, till the desired pressure is reached, then turn right tight (1) the lock-tight nut.
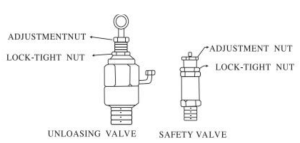
3. Except 1/4HP Model adjusts operating pressure by using a safety valve, the acting pressure on the safety valve of another type must be higher than the acting pressure of the checking pressure system from 1-2kg/cm².
PRESSURE ADJUSTMENT METHOD OF THE AUTO PRESSURE ADJUSTMENT COCK
1. Pressure up-down adjustment: turn (1) the pressure-adjustment screwright, the pressure will raise up., On the contrary, the pressure will drop, but the pressure difference does not change.
2. Pressure difference adjustment: Turn (2) the pressure difference adjusting screw right, the pressure difference width, which shuts off the electricity, will be increased; conversely, turn it left, the width decreases.
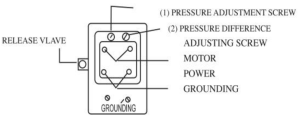
3. When the gas-powered air compressor runs to a set pressure, the saturation draining valve will let off the gas from within the tube. This is a normal condition, not leakage.
4. If a 3-phase power supply is used, pick any of the three wires to connect with the motor.
5. The adjusting screws (1) and (2) have related to each other, please adjust them accordingly.
Gas-Powered Air Compressor Troubleshooting
The compressor isn’t able to revolve.
1. The revolving direction is not right-motor with wrong wiring, but correct wiring
- The operating pressure is too high; lower the pressure
- The inlet tube is too small and too long- change to a larger and shorter one
- The air cleaner or the valve is blocked by accumulated carbon- remove it and clean up.
- The valve assembly is broken or incorrectly positioned; repair that.
- The packing is giving leakage – change to a new one.
- The unloading system is damaged and out of order—change it to a new one.
- The piston ring is worn out—send it to the technical shop for repair.
2. Parts of the compressor are getting too hot
- Readjust the belt if it is too tight or the central line if it is out of alignment.
- The revolving speed is too high; lower the speed, or use the proper lubrication, as instructed.
- The temperature is too high, or there is poor ventilation in the surroundings – move to a place with good ventilation.
3. Revolving slowly
- The voltage descended, contact the power company to correct
- The connecting wires are too fine or too long- change to bigger or shorter wires
- The belt is too loose; adjust the belt
- The motor is out of order- send it to the electric mechanic shop for repair
4. Revolving with drastic vibration
- Discharging pressure is too high; lower the discharging pressure
- The speed is too high; lower the speed.
- The V-belt is being improperly mounted, or the fly pulley is being loosened. Readjust it
- The crankshaft is out of shape; send it to the technical shop to repair.
5. Create a disturbing noise while revolving
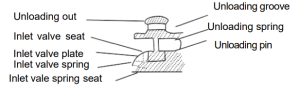
- The valve seat vein loosens the seat tightly
- The piston pounds the cylinder cover, thickening the packing
- The connecting bearing alloy is being worn out; repair or change the bearing alloy.
- The flu pulley or wheel key is dropping off the plug, which is tight.
6. Pressure can not be raised or reached a specified pressure. Poor function of the valve plate- grinding to correct or change (Valve plate leakage)
- The valve seat ring is out of order; change to a new one.
- If the valve plate is stuck with carbon, varnish, etc., remove and clean it, or replace it with a new one.
- If the safety valve or the auto-unloading valve is leaking, remove and clean it, or replace it with a new one.
- The air valve, draining valve, tube connection, or screw-having a leakage-repair and lock-tight or replace it.
- The piston ring is worn out – replace the piston ring
7. The pressure gauge is incorrect – replace it
8. The belt is slippery
- The belt is loose for extension; replace the belt.
- The operating pressure is too high; lower it.
- The belt is too old; replace it.
9. The lob oil consumed too much
- Oiling too much, adjusted the oil lever
- The piston ring is worn out, replace it (The cylinder is worn out)
10. The motor is overheating
- The pressure being adjusted too high resulted in overloading, and lowering the pressure.
- If the electric voltage is too low or the wire is too long, contact the power company, check the connection, or replace it with heavy cables.
- The discharge valve is in trouble- replace it with a new one. The bearing is burnt.
- The piston is being burned; replace or repair it.
11. The output wind is less
- The wind demand is more than the wind specified; change the compressor to a larger HP
- The output pressure larger than the specified pressure results in a lower operating pressure.
- The inlet tube is too small and too long, so change to a bigger and shorter one.
- The air cleaner is too small and too long. Change to a bigger and shorter one.
- If the valve assembly is damaged or not correctly positioned, send it to a technical shop for repair.
- The packing is damaged- replace it with a new one.
- If the piston ring or the cylinder is worn out, replace it.
- The triangle belt is loose; readjust it.
- The unloading pin cannot slip off; adjust it.
- The discharge tube leaks; replace it with a new one.
12. The unload action is out of order
- The unloading valve holder is being worn out at the top end, or other parts are damaged; replace or repair
- The unloading pipeline is blocked or leaking. Remove and clean or replace it.
- The unloading valve stuck dead. Remove, repair, or replace it.
13. The air tank pressure being too high or the safety valve whistling
- The output pressure is higher than the set pressure; adjust to lower the pressure
- If the unloading system is damaged or out of order, replace or repair it.
- The unloading set pressure is too high. Lower the set pressure
- The pressure gauge is damaged; replace or repair it
- The unloading air pipeline has a leakage; repair or replace it
- The safety valve set pressure is too low or damaged. Adjust to heighten the safety valve pressure, or replace a new one.
14. The valve assembly is worn or broken.
- The valve assembly is dirty; remove and clean.
- The pressure is too high or too low; check the operating pressure.
- The valve seat is too hot, check to see if the discharge pipeline is smooth and clean it
- The valve seat is loose- relock it tightly
- Dirt, rust getting into the valve seat, remove and clean
- The valve plate is broken; replace or repair it.
The Air Compressor cannot revolve.
1. When silence
- Stop electricity supply- consult the electric power company – The supply wire or fuse is broken- replace or repair
- The motor is out of order. Please send it to the electrician’s shop to repair
2. The motor is grumbling without starting
- The supply wire or fuse is broken- replace it with a new one. The voltage is dropping, low – consult the electric power company for repair.
- The discharge valve leaks. Remove the valve and repair.
- The supply wire is wrong. Replace the wire.
- The motor is out of order- send it to the mechanic’s shop for repair.
- The motors are being overloaded. Lower the loading.
- The crankshaft is too tight. Remove and repair.
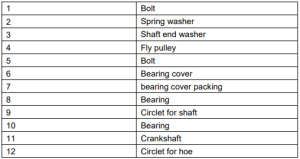
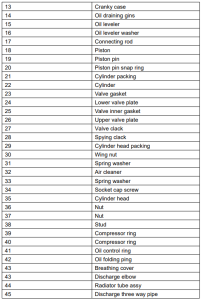
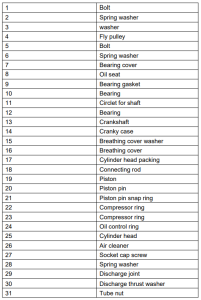
Gas-Powered Air Compressor Parts List
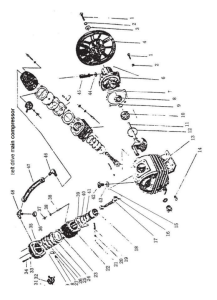
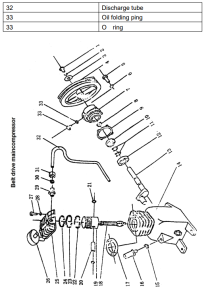
Belt Drive Air Compressor
Recommended For Your Project
VEVOR 15HP Gas Powered Air Compressor, 30 Gallon Manual
Reviews
There are no reviews yet.