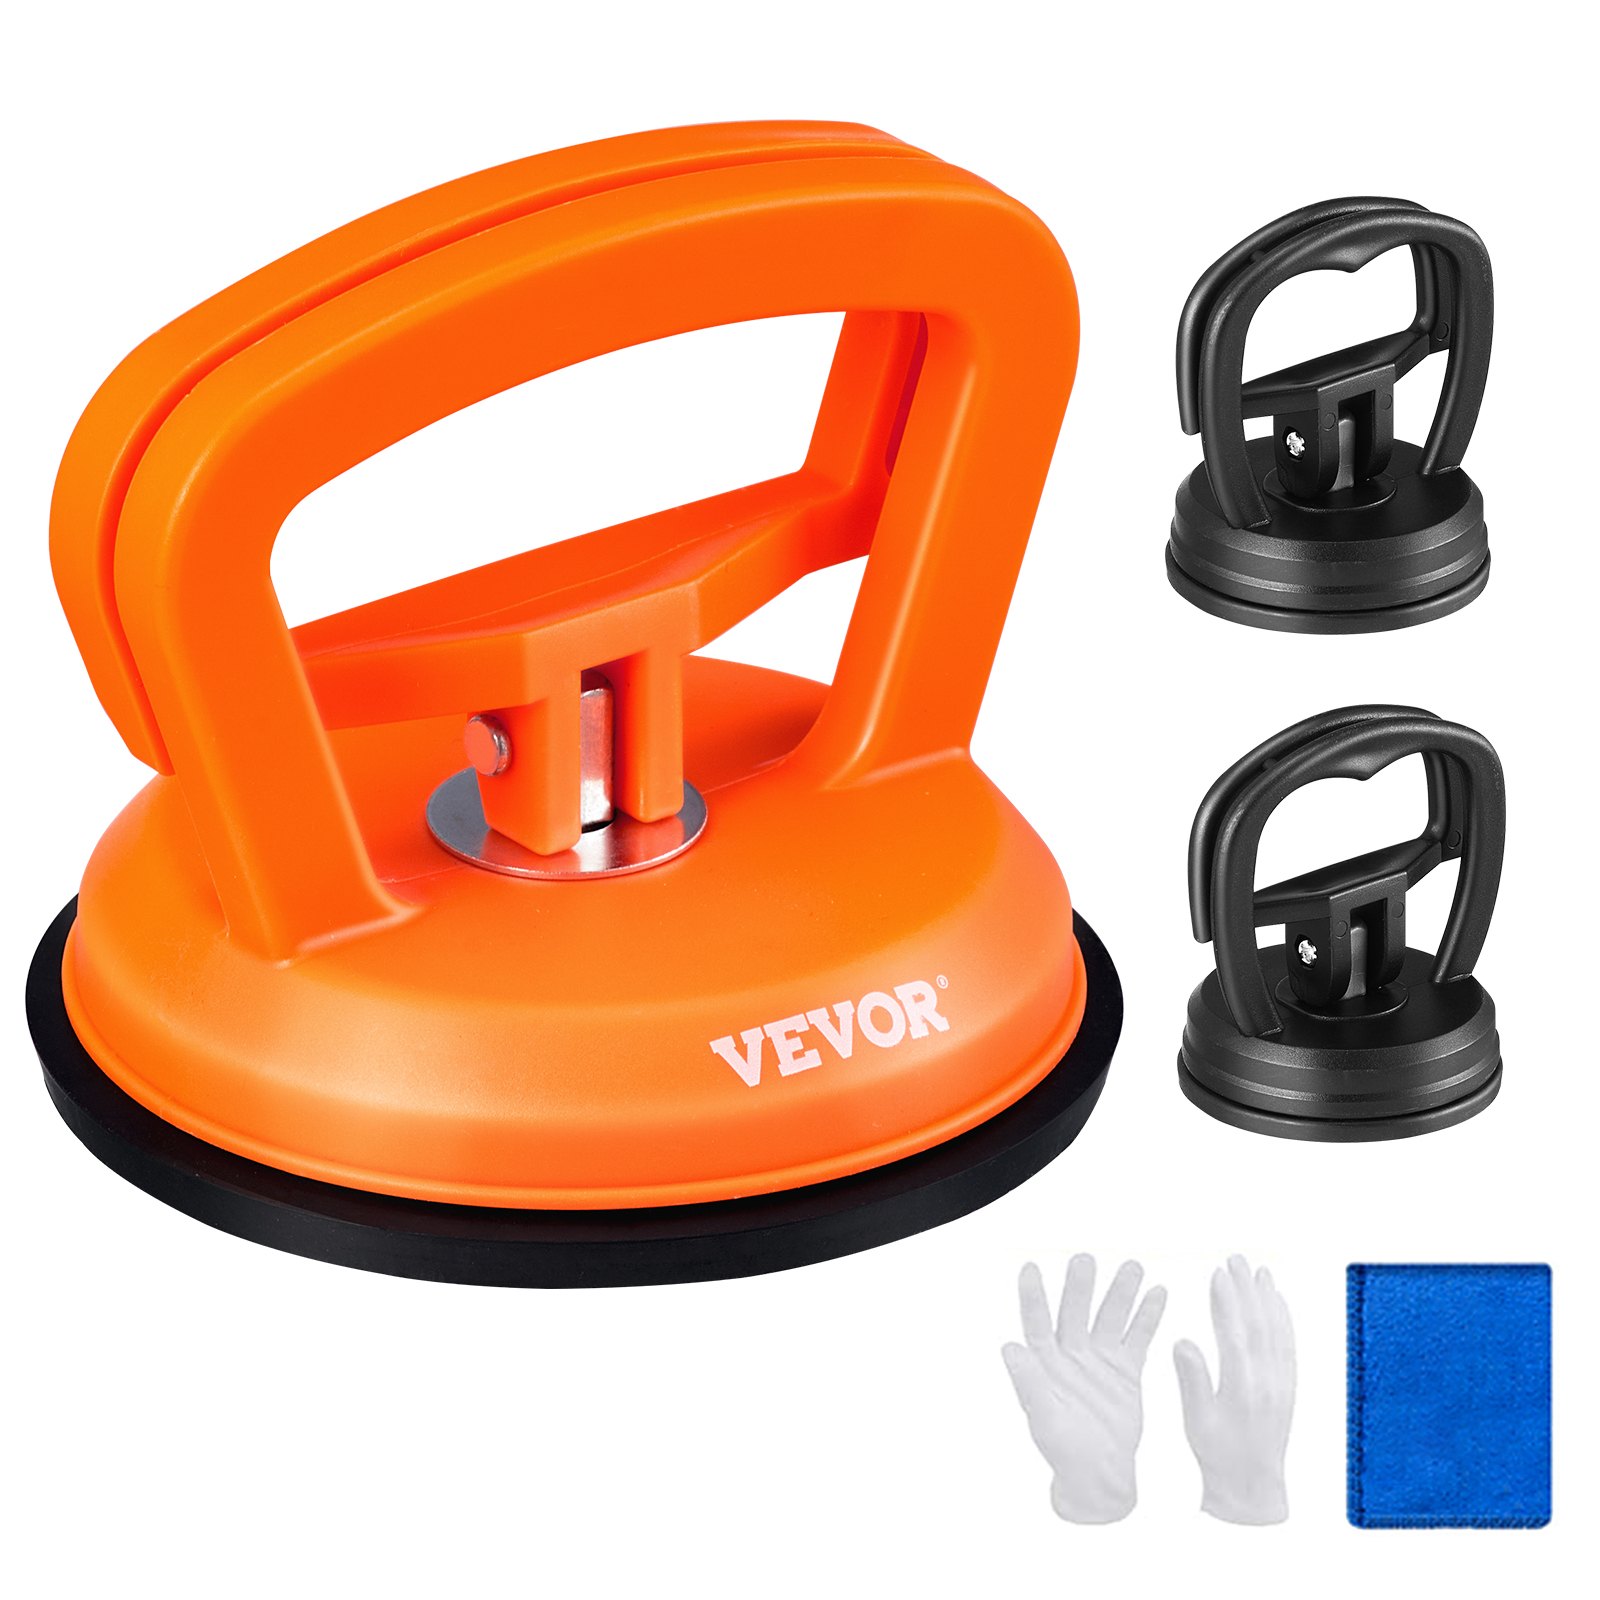
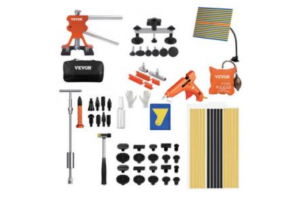
Unlock the full potential of your VEVOR Dent Removal Kit with our comprehensive product manual download. This detailed guide covers everything you need to know about using the 3-Pack Suction Cups, Dent Puller Handle Lifter with Gloves and Cloth. Whether you’re tackling car dent repair, glass, tiles, or mirror lifting and moving, our manual provides step-by-step instructions for setup, troubleshooting, and optimization.
Designed for both beginners and professionals, the manual emphasizes ease of use, ensuring you can achieve professional results without damaging your vehicle’s paint. The VEVOR Dent Removal Kit manual contains tips and tricks for effective dent removal, making it an invaluable tool for any DIY enthusiast.
Download now to ensure you get the most out of your dent puller and accessories, and confidently tackle any dent repair project.
Dent Removal Kit User Manual
Note: The picture of the manual is for reference only, the specific number of parts, appearance and color are subject to the actual!
Dent Removal Kit Safety Instructions
Save these instructions. Read all precautions and instructions.
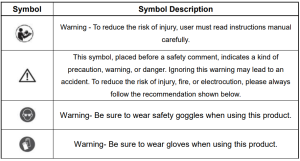
Important Safety Information
- Wear ANSI-approved safety goggles and heavy-duty work gloves during use.
- Contains glue; keep away from children—this product is not a toy. Do not allow children to play with or near this item.
- Use as intended only.
- Inspect before every use; do not use the Dent Removal Kit if parts are loose or damaged.
- Maintain product labels and nameplates. These carry important safety information. If unreadable or missing, contact VEVOR for a replacement.
Read the entire Important Safety Information section at the beginning of this document, including all text under subheadings therein, before setting up or using this product.
Dent Repair Puller
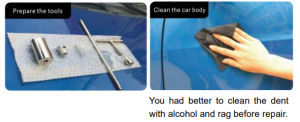
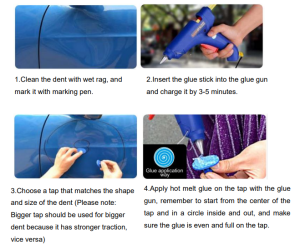
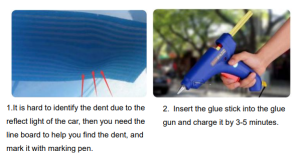
- Find the dent and clean it with rag and alcohol.
- Observe the shape and size of the dent, estimate where to pull it out, and mark it with a marking pen.
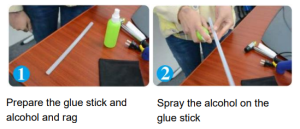
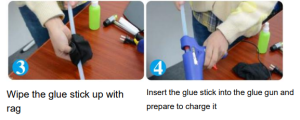
- Then clean the glue stick with alcohol to remove the grease on its surface.
- Insert the glue stick into the glue gun and connect the power supply, then heat it for about 2-3 minutes till the hot melt glue starts to spill out from the gun.
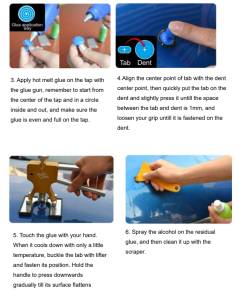
- Choose a tab that matches the shape and size of the dent; apply hot melt glue on the tab with the glue gun, remember to start from the centre of the tab and in a circle inside and out, and make sure the glue is even and full on the tab. (Please note: A Bigger tab should be used for a bigger dent because it has more substantial traction, vice versa)
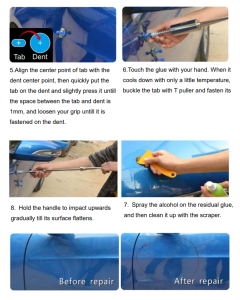
- Align the center point of the tab with the dent center point, then quickly put the tab on the dent and slightly press it. (Wait 3-5 minutes till it cools down to only a little temperature when it has the strongest viscosity.)
- Buckle the puller till it is fastened, hold the handle of the puller, impact upwards, gradually increase the force, repeat several times until the surface ofe of the dent flattens or slightly bulges (do not impact fiercely to avoid the tab ofboff the car body)
- If the center of some minor dents is deeper than around, please use the rubber hammer to tap on the surrounding part that will make the dent smoother to process.
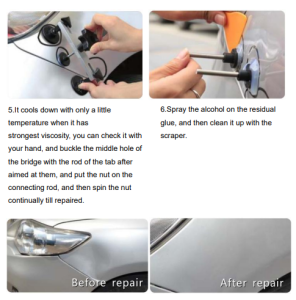
- After repair, spray alcohol on the part covered by glue and remove it with a scraper.
- Check the result, if not ideal, repeat the above steps till you get what you want.
Glue sticks
Select the correct glue sticks:
- Transparent glue stick: This is for Japanese cars that have thin paint.Used for all natural temperatures
- Yellow glue stick: European and American cars with thick paint. And it is a better choice for dealing with minor dents.
- Black glue stick: For all vehicles. And the effect is better at temperatures of 20℃-28℃.
Dent Repair Lifter
- Find the dent and clean it with a rag and alcohol.
- Observe the shape and size of the dent, estimate where to pull it out, and mark it with a marking pen.
- Then clean the glue stick with alcohol to remove the grease on its surface.
- Insert the glue stick into the glue gun and connect it to the power supply, then heat it for about 2-3 minutes until the hot melt glue starts to spill out from the gun.
- Choose a tab that matches the shape and size of the dent; apply hot melt glue on the tab with the glue gun, remember to start the tab and in a circle inside and out, and make sure the glue is even and full on the tab. (Please note: A Bigger tab should be used for a bigger dent because it has more substantial traction, vice versa)
- Align the centre point of the tab with the dent centre point, and then quickly put the tab on the dent and slightly press it. (Wait 3-5 minutes, and it cools down with only a little temperature when it has the strongest viscosity.)
- Buckle the lifter til it is fastened, hold the handle downwards, gradually increase the force, repeat several times until the surface of the dent flattens or slightly bulges. Deal with this slowly and carefully.
- If the centre of some minor dents is deeper than the surrounding area, please use the rubber hammer to tap on the surrounding area, making the dent smoother.
- After repair, spray alcohol on the part covered by glue and remove it with a Scraper.
- Check the result; if not ideal, repeat the above steps till you get what you want.
Dent Repair Bridge
- Find the dent and clean it with a rag and alcohol.
- Observe the shape and size of the dent, estimate where to pull the dent out, and mark it with a marking pen.
- Then clean the glue stick with alcohol to remove the grease on its surface.
- Insert the glue stick into the glue gun and connect the power supply, then heat it for 2-3 minutes until the hot melt glue starts to spill from the gun.
- Choose a tab that matches the shape and size of the dent; apply hot melt glue on the tab with the glue gun, remember to start the tab and in a circle inside and out, and make sure the glue is even and complete on the tab. (Please note: A Bigger tab should be used for a bigger dent because it has more substantial traction, vice versa)
- Align the center point of the tab with the dent center point, the tab on the dent and slightly press it. (Wait 3-5 minutes till it cools down with only a little temperature when it has the strongest viscosity.)
- Buckle the nut, screw it till the surface of the dent flattensor slightlybulges. Deal with this slowly and carefully.
- If the center of some small dents is deeper than around, please use the rubber hammer to tap on the surrounding part that will make the dent smoother to process.
- After repair, spray alcohol on the part covered by glue and remove it with a scraper.
- Check the result; if it’s not ideal, repeat the above steps till you get what you want.
Notice:
- If the dent is on the engine hood, do not use car charge glue gun. Because you need to start the car, it will cause a high temperature, influencing the glue stick’s effect.
- Do not repair under the blazing sun because high temperature of car body will influence the effect of the glue stick.
- When applying the glue, remember to start from the center of the tab and work in a circle inside and out, and make sure the glue is even and full on the tab.
Tabs
There are two kinds of tabs on the Dent Removal Kit.
Plastic tabs
To dissolve the attached impurity, the plastic tabs should be soaked for 3 hours with alcohol before using.
Heat the glue sticks with the glue gun, and apply hot melt glue on the table evenly with proper amount depending on its viscosity and the car body condition.
Put the tab with glue on the dent, slightly press it. Do not press fiercely to ensure a certain thickness of glue.
Choose the right tabs by observing the shape and size of the dent. Choose thin tabs for cars with soft body and thin paint, and thick tabs for vehicles with hard bodies and thick paint.
Metal tabs
The quality is the best; adhesive ability is the strongest; it can be used repeatedly; 6 sizes and shape is available.
Features
A complete range of shapes and sizes is available for all kinds of dent, and it applies to all car body types.
Glue Gun
- There are two types of glue guns: a vehicle glue gun and a 220V glue gun. The difference is the connector. The connector of the vehicle glue gun can directly connect with the car, while that of the 220V glue gun cannot.
- The voltage of the vehicle glue gun is 12V; you can directly insert it into the cigarette lighter, insert the glue stick, and then turn on the switch to start. Wait 2-3 minutes until the glue stick melts and the temperature inside reaches 160℃.
- The 220V glue gun needs to be connected to a power supply, insert the glue stick and then turn on the switch to start.
Features
The 12V vehicle glue gun is our independent design. It is durable. The appearance is elegant, and the nozzle is bronze. The glue stick can melt fast. The power line is 2 meters long, which is 0.5 meters longer than ordinary wires.
Dent Removal Kit Q&A
Q: Which dent can be repaired and which cannot?
A: The smooth and hail dent can be 100% repaired, and the angular part needs more patience with different tools. The tiny dent caused by a sharp object is difficult to repair. If the part with a tiny dent can be removed or the back side of the dent can be contacted directly, you can deal with it with a direct dent tester-LED line board or an ordinary line board, a tapdown pen, and a tapdown hammer. Remember never to use an iron hammer or other complex objects to repair it because the paint will be damaged.
Q: To what degree can the tool reach?
A: This repair tool can repair 70%-80% of dents. The smooth and hail dent can be well-repaired. The angular, line, and dent caused by sharp objects are challenging to repair. But you can still fix it by first knocking the dent with a rubber hammer. But it doesn’t work if the paint has been damaged.
Q: Is the operation easy?
A: It is very easy. Even beginners without experience can handle it if they read and observe our image-text and video tutorials carefully.
Q: The viscosity is insufficient if the glue doesn’t work well. How do we solve it?
A: 1. The glue works better on a sunny day and at a temperature of 20℃-28℃. 2. The humidity and temperature influence the viscosity of the glue. Generally, the hot melt glue will dry within 2-5 minutes in summer and 1- 3 minutes on a cold day. It depends on the actual situation; sometimes, 20 seconds is enough. 3. If the tab is off in the process of operating, it may be because the amount of glue is not enough, the temperature of the car body is too high, or your operation is incorrect. The problem will be gone if you apply more glue, turn off the car engine, and then repeatedly operate.
Warm tips:
If the glue becomes fragile on a freezing day, you can apply hot water on the dent first, and then use the glue.
Attention:
- Glue sticks or repair tools bought from some local stores may fail to do the job as expected. They can’t guarantee a good repair effect and may damage the paint. Our tools and glue sticks are professionally designed and applied to car body with years of practical experience. The paint won’t be damaged, and the repair effect is pretty good if you operate correctly.
- If your car’s paint is not original, we suggest you not buy our tools as it may damage the paint.
Notes:
If the Dent Removal Kit you received has quality problems, is broken when you received it, or you find a shortage in number, please do not hesitate to tell us via photos or e-mails, and we will reply in time. Please read the instructions carefully before you use our product, and follow the instructions to operate it. If you have any questions, don’t hesitate to contact us, and we will arrange for our technical staff to help you.
Please give us reasonable and fair feedback if you think our product is practical, as it is invaluable to other people when they want to buy this product.
You can not use the vehicle glue gun when there is dent on the hood that needs to be repaired, because the vehicle glue gun needs to start the car to charge it. This action will cause the hood gets hot, if the hood gets hot, the glue will be soft, and if the glue is smooth, the viscosity will be weak, except in places where the weather is freezing.
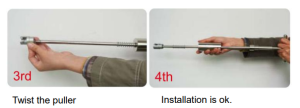
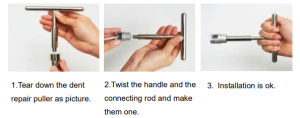
How to operate the dent repair puller
The assembly process for the slide hammer dent puller

The assembly process for short T
The cleaning process for Glue Stick
 Remark: Dent repair puller herein after referred to as “T puller”
 Kindly reminder:
If it is still unrepaired after the above steps, repeat them several times until it is well-repaired.
If the dent is repaired, but there’s a bump on it, you can do the following steps:
- Press the bump with your thumb continually till it flattens.
- If you fail after the first step, you can use a tap-down pen and aim at the bump, then knock it slightly with a rubber hammer. You can repeat till success (Please do not knock with too much force).
Remark: Dent repair lifter hereinafter referred as“lifter”

Kindly reminder:
If it is still unrepaired after the above steps, you can repeat them several times until it is well repaired.
If the dent is repaired, but there’s a bump on it, you can do the following steps:
- Press the bump with your thumb continually till it flattens.
- If you fail after the first step, you can use a tap-down pen and aim at the bump, then knock it slightly with a rubber hammer. You can repeat till success(Please do not knock with too much force)
Remark: Dent repair bridge hereinafter referred to as “bridge”

 Kindly reminder:
If it is still unrepaired after the above steps, repeat them several times until it is well-repaired.
If the dent is repaired, but there’s a bump on it, you can do the following steps:
- Press the bump with your thumb continually till it flattens.
- If you fail after the first step, you can use a tap-down pen and aim at the bump, then knock it slightly with a rubber hammer. You can repeat till success(Please do not knock with too much force).
Recommended For Your Project
VEVOR Dent Removal Kit, 3 Packs Suction Cups, Dent Puller Handle Lifter Manual
Reviews
There are no reviews yet.