


Discover the comprehensive VEVOR Sauna Heater 9KW 220V Electric Sauna Stove manual, designed to simplify your sauna experience. This detailed guide covers everything from initial setup and installation to troubleshooting and optimizing your sauna heater. With easy-to-follow instructions and clear illustrations, this manual ensures you maximize the performance and longevity of your VEVOR sauna heater.
Whether you’re setting up your sauna heater for the first time or looking to maintain its peak performance, our manual is an invaluable resource. It provides step-by-step guidance for using the external digital controller, setting the 3-hour timer, and adjusting the temperature for the perfect sauna session. This manual is essential for both home users and professionals in hotels, spas, and shower facilities, ensuring your sauna heater operates safely and efficiently.
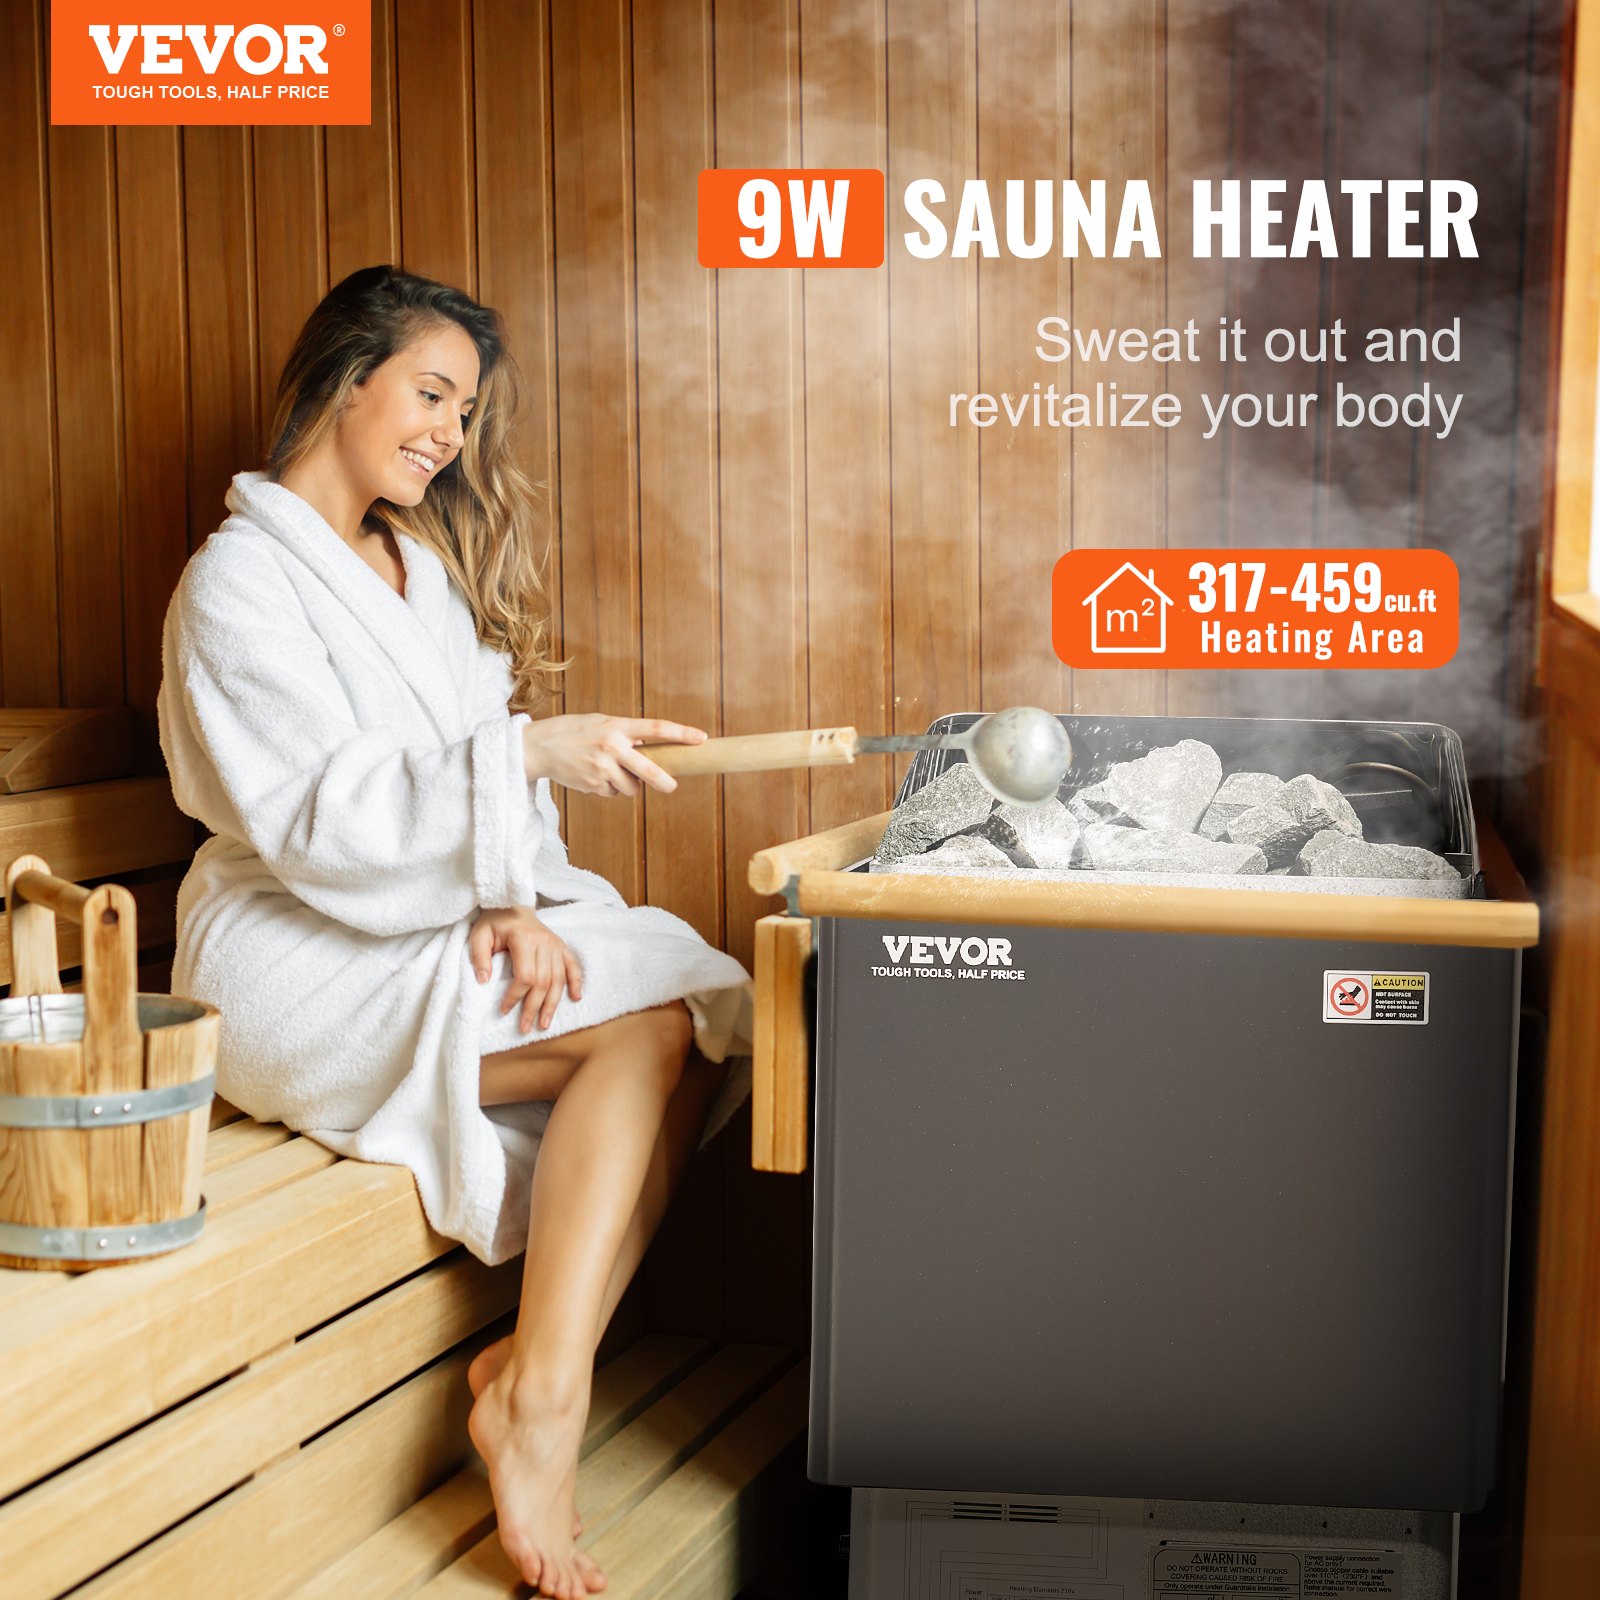
Our VEVOR Sauna Heater manual is user-friendly and professionally crafted to meet FCC certification standards. Download it today to ensure your sauna heater is always running at its best, providing you with a superior steam bath experience in spaces ranging from 317 to 459 cubic feet.
SAUNA HEATER MANUAL
MODEL: SCA-90BW
BEFORE INSTALLATION
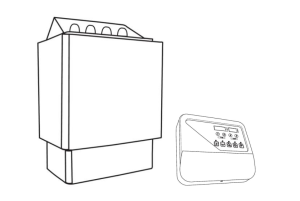
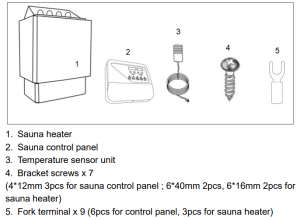
Parts
Check that the following parts are included in the packaging:
WARNING
Electrical shock hazard – To avoid electrical shock hazard, all installations and relevant services shall be performed by qualified personnel.
Sauna bath time should be less than half an hour. Bathing too long may cause the heart to beat too fast, heartache, feeling weak or dizzy. Users should stop sauna bathing immediately as soon as the above symptoms occur.
Sauna bath may cause tension for bathers. Thus, those who have one of the symptoms below should take a sauna bath under the direction of a physician:
- Being pregnant
- Having heart disease
- Having high blood pressure
- Having a circulation system disease
- After drinking
- After taking medicine
- Diabetes
- Not feeling well
Children must be under the company of adults during sauna bath.
Risk of scald: Must not touch or move the sauna heater during heating. Stay at least 30cm away from the hot heater.
Use ordinary drinking water only. Pouring water with other materials into the stone compartment may damage the heating elements, which is beyond our guarantee.
Odors may occur during the first sauna bath as the anti-rust oil for heating elements, which will disappear after the sauna heater powers on when the sauna door is opened, about 10- 15 minutes.
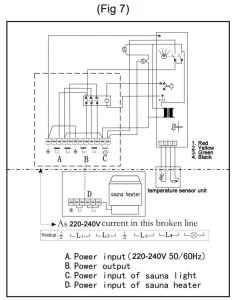
INSTALLATION DIAGRAM OF TEMPERATURE SENSOR AND SAUNA HEATER
The temperature sensor and sauna heater must be installed strictly according to the following diagrams. (See Fig3 and Fig4)
The control panel includes a 3-meter heat-resistant cable, which can be extended to the outside of the sauna room by normal weak current cables.
Failure to follow these causes too high temperature and a fire hazard (Unit: mm).
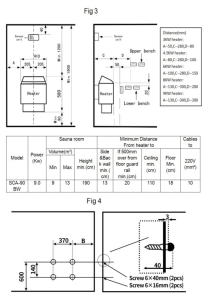
Remark: 1. The upper screws must be fastened tight, theminimumdistances between screw head and wall is 3mm.
Remark: 2. The wall behind the heater cannot be covered by materials like asbestos cement, asbestos board and so on, because this covering layer could cause high temperatures and a risk of burn.
Remark: 3. Must use qualified materials for the walls and ceiling.
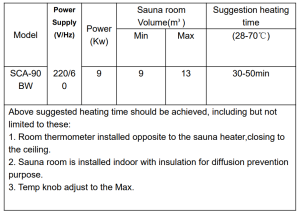
SPECIFICATIONS
INSTALLATION OF TEMPERATURE SENSOR
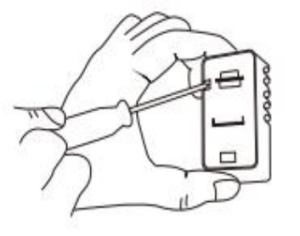
1. Carefully unload the low cover at the neck position by the edge of the circuit board with a screwdriver.

2. Fasten the circuit board with the bolt to the wall straight over the sauna heater. Check the diagram for the minimum distance (See Fig. 3).
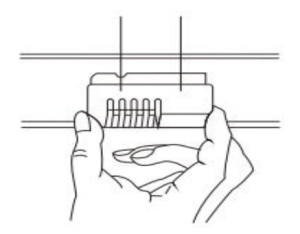
3. Fix the cover to the temperature sensor.
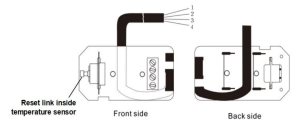
LIMIT CONTROL
Fitted as a safety feature is an overheating controller that prevents the heater from operating in case of a fault, such as a problem with the thermostat.
Should the sauna room temperature reach too high, the spare link in the sensor unit automatically cuts off the electricity.
The spare link will automatically return to its position when the temperature returns to normal.
GUARD RAIL
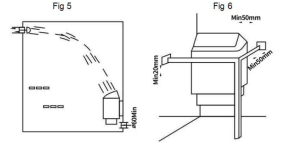
Please follow the minimum distance requirements in Figure 6 if a guardrail is desired for the heater.
OPERATION OF CONTROL PANEL
The control panel is splash-proof and can be installed in a sauna room. The temperature sensor unit must be installed on the wall inside the sauna room.
Please follow the minimum safety distance of the sauna heater during installation(See fig3), which is included in the installation diagram.
Failure to follow these may cause a burn to the wooden wall.
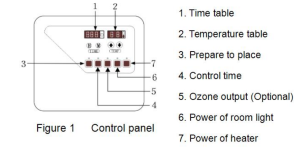
1. Adjust present time:
Press “H” to adjust the hour until the figure comes stable, then press “M” to adjust minutes
2. Set temperature:
Press “P” to set temperature, then press“▲” or “▼” to control the temperature until the figure comes stable after about 3 seconds (setting range 35-110℃/95-230℉, default temp is 60℃/140℉)
3. Work mode:
3.1 Normal working mode
Press “P” to start the sauna heater directly; its operation can last 4 hours. 3.2 Preset working mode
A. Auto-start setting (Max 24 hours):
Press “Prepare to place” to fix the time, then press “H” and“M” to set time before “P” to finish.
B. Auto-Stop setting (Min 10mins, Max 4hours):
Press “Control time” to adjust the time, then press “H” and“M” to set time, before the timetable finishes blinking.
Remark: Steps 1, 3.1, and 3.2 A must be operated while working on the sauna heater; Steps 2 and 3.2. B must be operated while the sauna heater is working.)
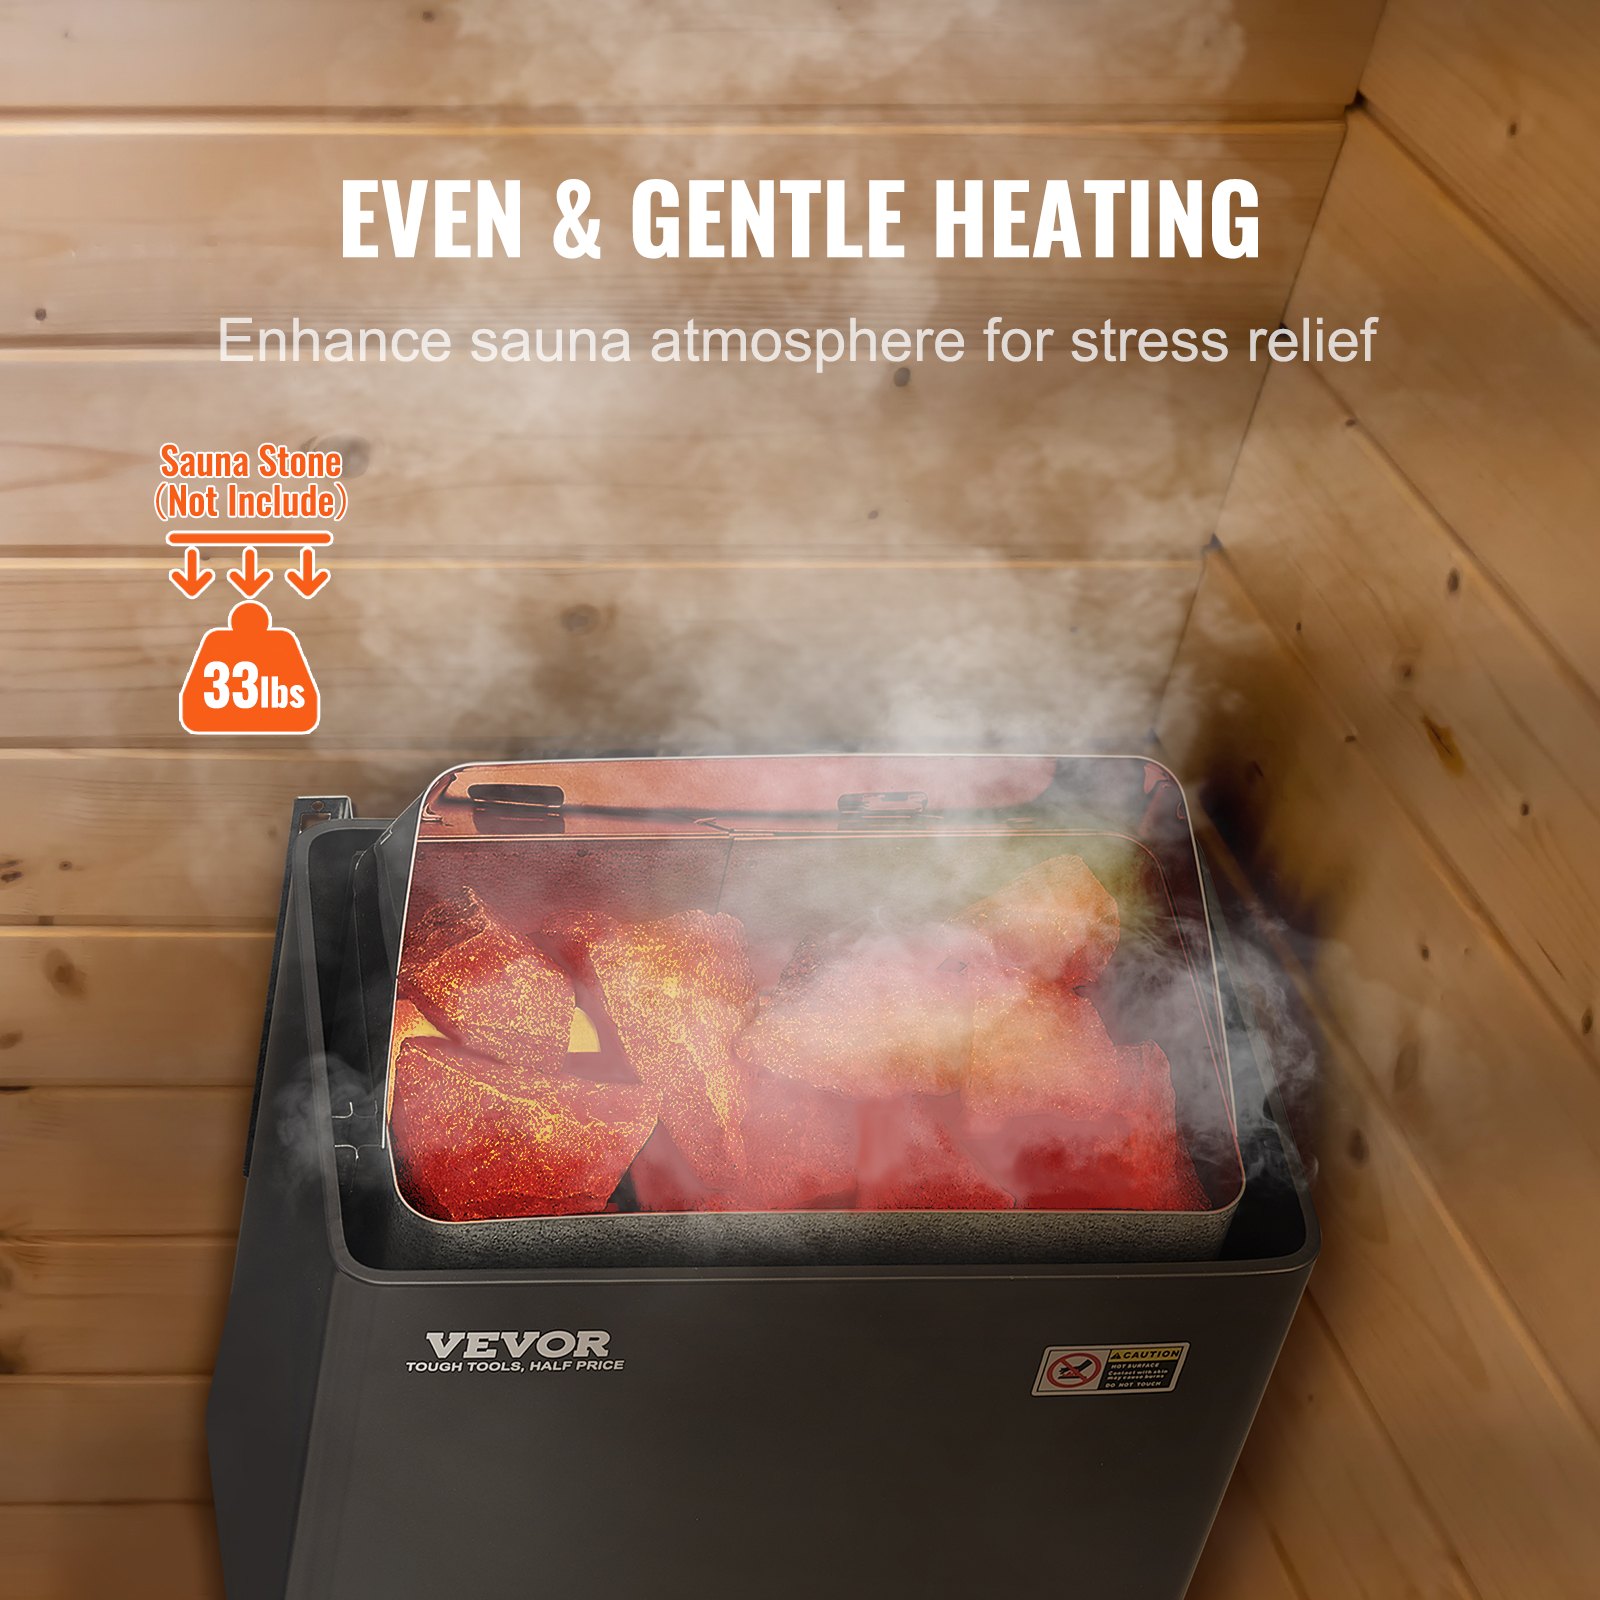
SAUNA ROCKS
After installing the sauna heater and controller, load sufficient sauna rocks(10-15kg) into the sauna heater.
ATTENTION: Sauna rocks must be of best quality because the temperature inside sauna heater is exceptionally high. Rocks of inferior cant withstand heat and they may be easily broken or crumble because of the huge heat changes, which may damage heating elements.
Or these stones may counteract the heat circulation because they are easily oxidized, the sauna heater may be damaged while the stone is being poured with water to make vapors.
VENTILATION
To have a soothing sauna bath, there should be a proper mixing of hot and cold air inside the sauna room. Another reason for ventilation is to draw air around the sauna heater and move the heat to the farthest part sauna room. The inlet vent with a more than 6cm diameter should be installed directly below the sauna heater. (See fig 5)
The outlet vent should be installed diagonally opposite the inlet; it is suggested that it be placed under the platform inside the sauna room as far as possible from the inlet vent. The diameter of outlet vent should be twice as big as the inlet, it may be installed far away from the floor and under the bottom of the upper bench.
GUARANTEE
The following situations are not guaranteed:
- Installation or disassembly of the inside structure by unprofessional personnel;
- Supply voltage fluctuation range>±10%;
- Unqualified rocks on sauna heater’s operation;
- Installation without following the dimension instructions in the manual.
TROUBLESHOOTING
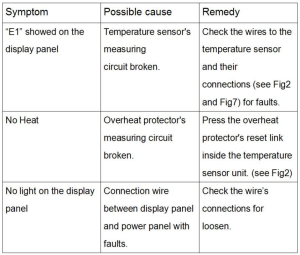
Attached Diagram
Recommended For Your Project
VEVOR Sauna Heater, 9KW 220V Electric Sauna Stove Manual
Reviews
There are no reviews yet.