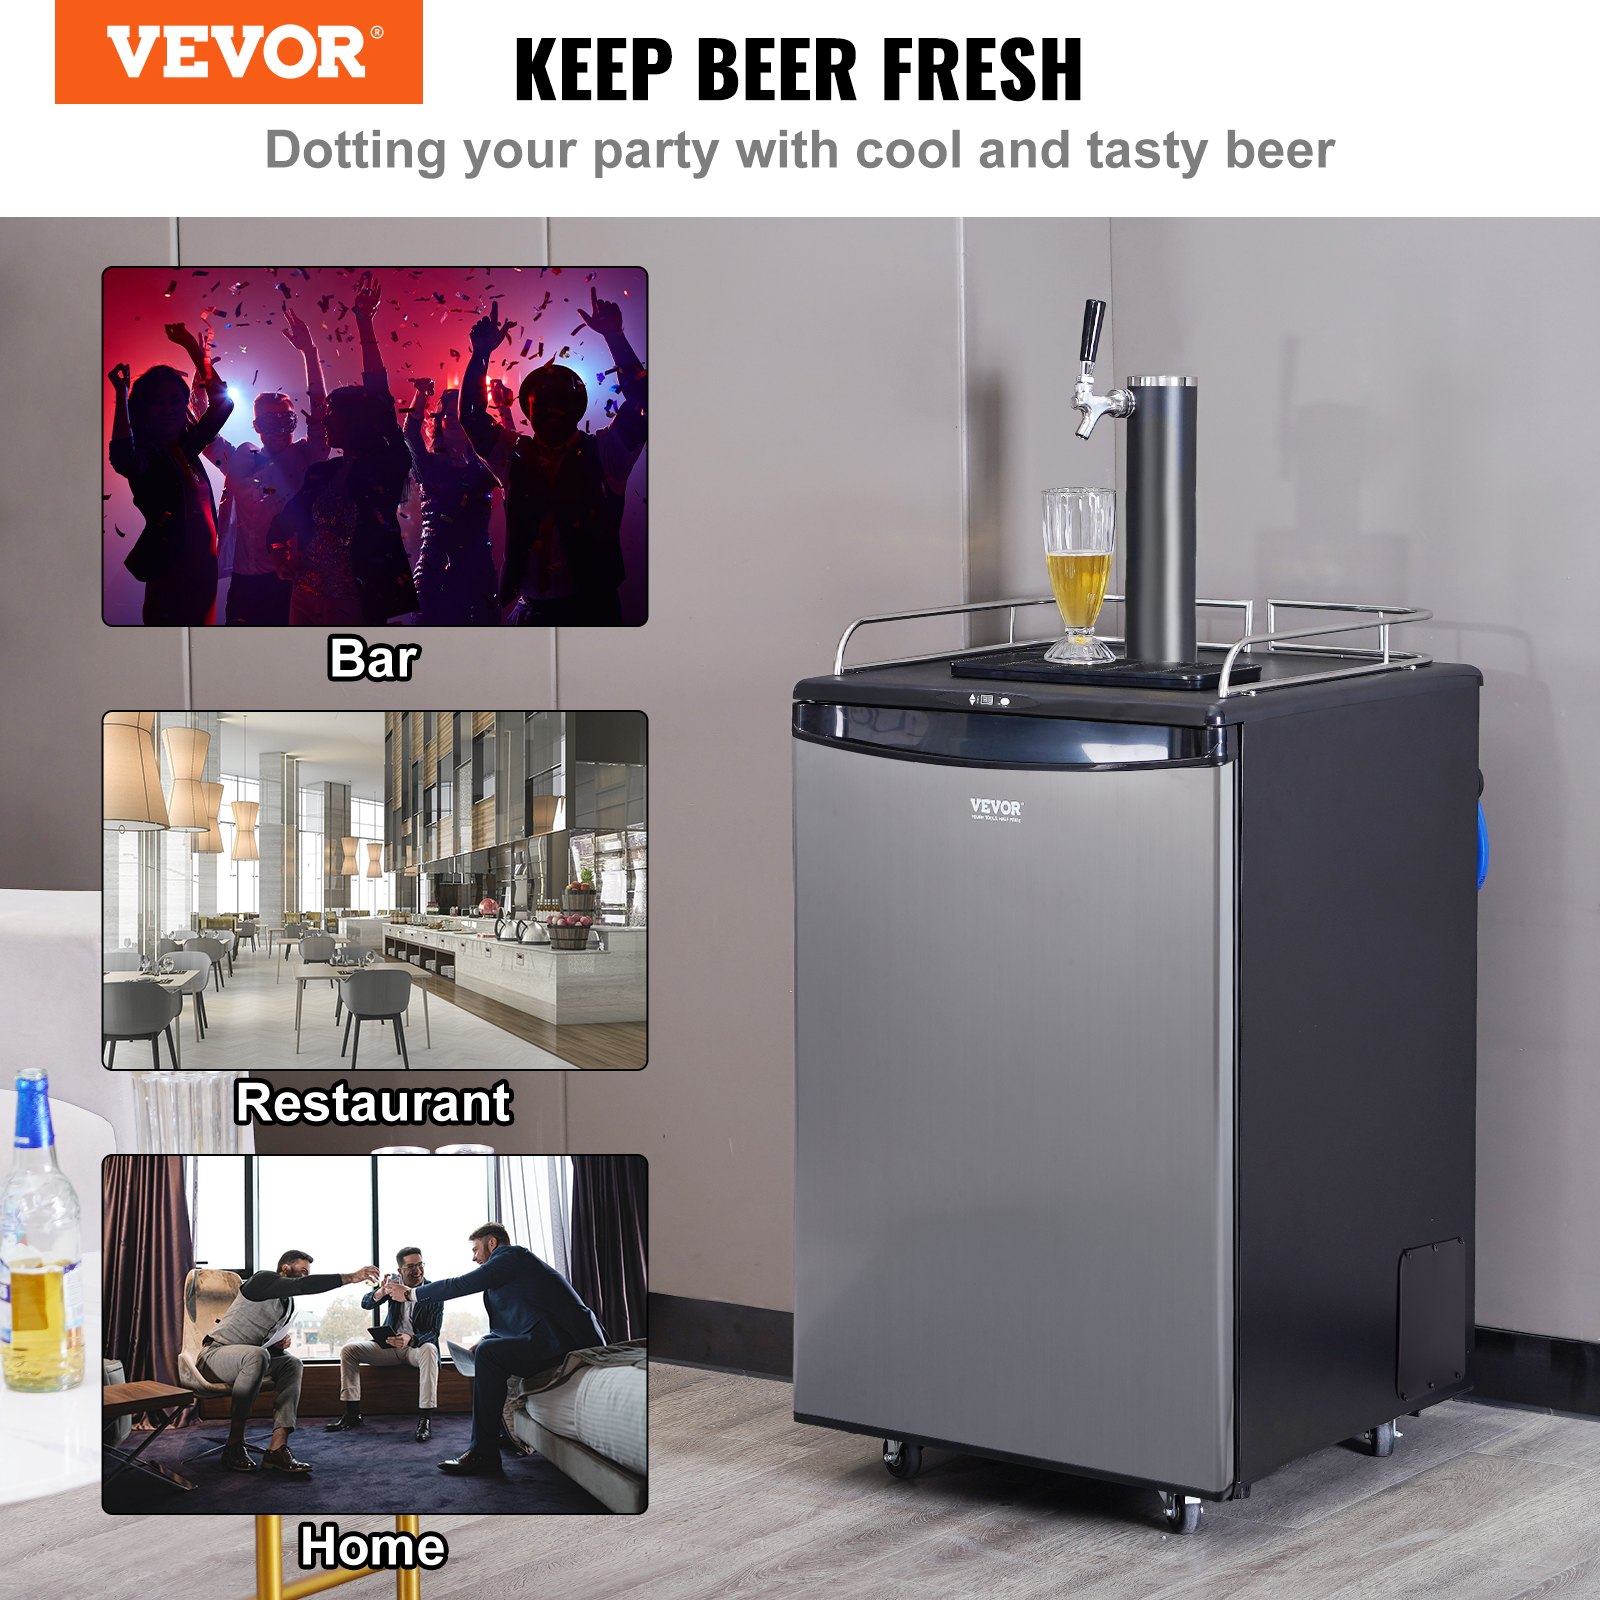

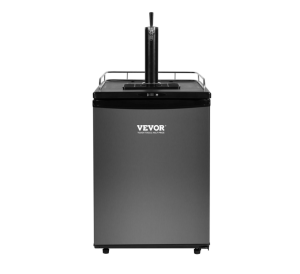
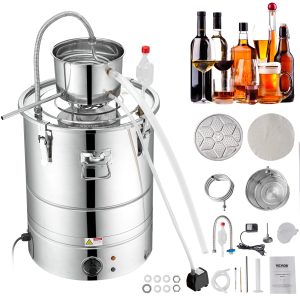
Unlock the full potential of your VEVOR Beer Kegerator, Single Tap Draft Beer Dispenser, with our comprehensive product manual. This detailed guide ensures you effortlessly set up, optimize, and troubleshoot your Full Size Keg Refrigerator with Shelves, CO2 Cylinder, Drip Tray & Rail.
Whether you’re a homebrewing enthusiast or a first-time user, our manual covers everything from the 32°F- 75.2°F Temperature Control to holding various barrel sizes like 1/6, 1/4, and 1/2 barrels.
This user-friendly manual is designed to be your go-to resource for maintaining optimum performance and enjoying a seamless draft beer experience. Download now and make the most out of your black VEVOR Beer Kegerator.
BEER KEGERATOR OPERATING INSTRUCTIONS
MODEL: BF163A/BF163B
Thank you for purchasing and using the beer kegerator produced by this company. Please carefully read this manual before installing and operating this product, and follow the requirements for operation given in this manual.
The operation instructions in this Manual are essential for keeping this product in good condition. Please keep this Manual properly. Carefully complete the warranty card at purchase and keep it at hand when applying for warranty service.
Safety Tips
Before using this appliance, it must be appropriately positioned and installed as described in this manual, so please read carefully. To reduce the risk of fire, electrical shock or injury when using the appliance,
follow these basic precautions. This appliance is intended to be used in household and similar applications such as:
- Staff kitchens in shops, offices, and other working environments
- Farm houses and by clients in hotels, motels, and other residential-type environments
- Bed and breakfast-type environments
- Catering and similar non-retail applications.
Danger
- Risk of child entrapment. Before you throw away your old refrigerator or freezer:
1. Take off the doors.
2. Leave the shelves in place so children cannot easily climb inside.
- Plug into a grounded 3-prong outlet. Under no circumstances cut or remove the third ground prong from the power cord supplied, do not use an adapter, and do not use an extension cord.
- It is recommended that a separate circuit, serving only your appliance, be used. Do not use outlets that a switch or pull chain can turn off.
- Never clean the kegerator parts with flammable fluids, and do not store or use gasoline or other flammable vapors and liquids near this or any other appliance. The fumes can create a fire hazard or an explosion.
- Unplug the appliance or disconnect power before cleaning or servicing. Failure to follow safety procedures can result in electrical shock or death.
- Do not attempt to repair or replace any part of your appliance unless it is specifically recommended in this manual. All other servicing should be referred to a qualified technician.
Warning
- The refrigerator must be disconnected from the source of electrical supply before attempting the installation, and the accessory is intended for use only with a fridge marked to indicate such use.
- Use two or more people to move and install the appliance. Failure to do so can result in back or other injury.
- The front of the unit must be completely unobstructed to ensure proper ventilation for your appliance. Choose a well-ventilated area with temperatures above 60°F(16°C) and below 90°F (32°C). This unit must be installed in an area protected from the elements, such as wind, rain, water spray, or drips.
- The appliance should not be located next to ovens, grills, or other high heat sources or in areas of extreme cold.
- The appliance must be installed according to state and local codes. It also requires a standard electrical supply (115 V AC only, 60 Hz), properly grounded according to the National Electrical Code and local ordinances.
- Do not kink or pinch the power supply cord of appliance.
- The fuse (or circuit breaker) size should be 15 amperes.
- The appliance must be leveled to work correctly. You may need to make several adjustments to level it.
- Never allow children to operate, play with, or crawl inside the appliance. Child entrapment and suffocation are not just problems of the past; junked or abandoned appliances are still dangerous. When no longer using your old kegerator, remove the door and leave the shelves in place so children may not climb inside easily.
- Do not use solvent-based cleansers or abrasives on the interior as they may damage or discolor it.
- Because of potential safety hazards under certain conditions, it is strongly recommended not to use an extension cord with this appliance. However, suppose you must use an extension cord. In that case, it must be a UL/CUL-listed, 3-wire grounding-type appliance extension cord with a grounding-type plug and outlet, and the electrical rating of the cord must be 115 volts and at least 10 amperes.
- If the appliance will be used in an area prone to power surges/outages, you should use a power surge protector. The surge protector you select must have a surge block high enough to protect the connected appliance. Damages due to power surges are not considered manufacturer-covered defects and will void your product warranty.
- To prevent accidental injury, the cord should be secured behind the appliance and not left exposed or dangling. Never unplug the appliance by pulling the power cord. Always grip the plug firmly and pull straight out from the receptacle. Repair or replace immediately all power cords that have become frayed or otherwise damaged. Do not use one with cracks or abrasion damage along its length or at either end. When moving the appliance, be careful not to damage the power cord.
- Do not use this apparatus for anything other than its intended purpose.
- California Proposition 65 Warning: This product contains a chemical known to the State of California to cause cancer and birth defects or other reproductive harm. Failure to heed these safety warnings may result in extensive product damage, severe personal injury, or death.
Other Important Safety Instructions
- This appliance is not intended for use by persons (including children) with reduced physical, sensory, or mental capabilities or lack of experience and knowledge unless they have been given supervision or instruction concerning its use by a person responsible for their safety.
- Children should be supervised to ensure they do not play with the appliance.
- Do not use extension cords or ungrounded (two-prong) adapters;
- If the supply cord is damaged, it must be replaced by the manufacturer, its service agents, or a similar qualified person to avoid a hazard.
- Do not store explosive substances such as aerosol cans with a flammable propellant in this appliance.
- WARNING: Keep ventilation openings in the appliance enclosure or the built-in structure clear of obstruction.
- WARNING: Do not use mechanical devices or other means to accelerate the defrosting process, other than those recommended by the manufacturer.
- WARNING: Do not damage the refrigerant circuit.
- WARNING: Do not use electrical appliances inside the food storage compartments of the appliance unless they are of the type recommended by the manufacturer.
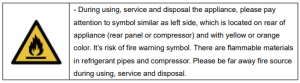
- This appliance contains flammable refrigerant R600a and foaming agent cyclopentane. Please avoid contact when you transport and use it. Please ask a professional to service the machine when it breaks down. Please send it to your local appointed disposal station when you discard it.
Beer Kegerator Installation Instructions
BEFORE USE:
- Remove the exterior and interior packaging.
- Before connecting the unit to the power source, let it stand upright for approximately 2 hours. This will reduce the possibility of a malfunction in the cooling system from handling during transportation.
- Clean the interior surface with lukewarm water using a soft cloth.
- This appliance is designed for free-standing installation.
- Place the unit on a flat, solid floor strong enough to support it when fully loaded. Adjust the front leveling leg at the bottom of the appliance to level it.
- Please do not incline your kegerator more than 45 degrees when moving it.
- Locate the appliance away from direct sunlight and heat sources (stove, heater, radiator, etc.). Direct sunlight may affect the acrylic coating, and heat sources may increase electrical consumption.
- The kegerator should be placed where the ambient temperature is less than 90 degrees Fahrenheit and higher than the lowest temperature you want to store your kegs at. If the ambient temperature is lower than the set temperature, the internal temperature will match the ambient temperature.
- Avoid locating the unit in damp areas.
- Plug the kegerator into an exclusive, properly installed, grounded wall outlet. Do not, under any circumstances, cut or remove the third (ground) prong from the power cord. Any power and/or electrical grounding questions should be directed to a certified electrician or authorized products service center.
- After plugging the appliance into a wall outlet, allow the unit to cool down for 3 to 4 hours before placing a keg or any other items in the appliance.
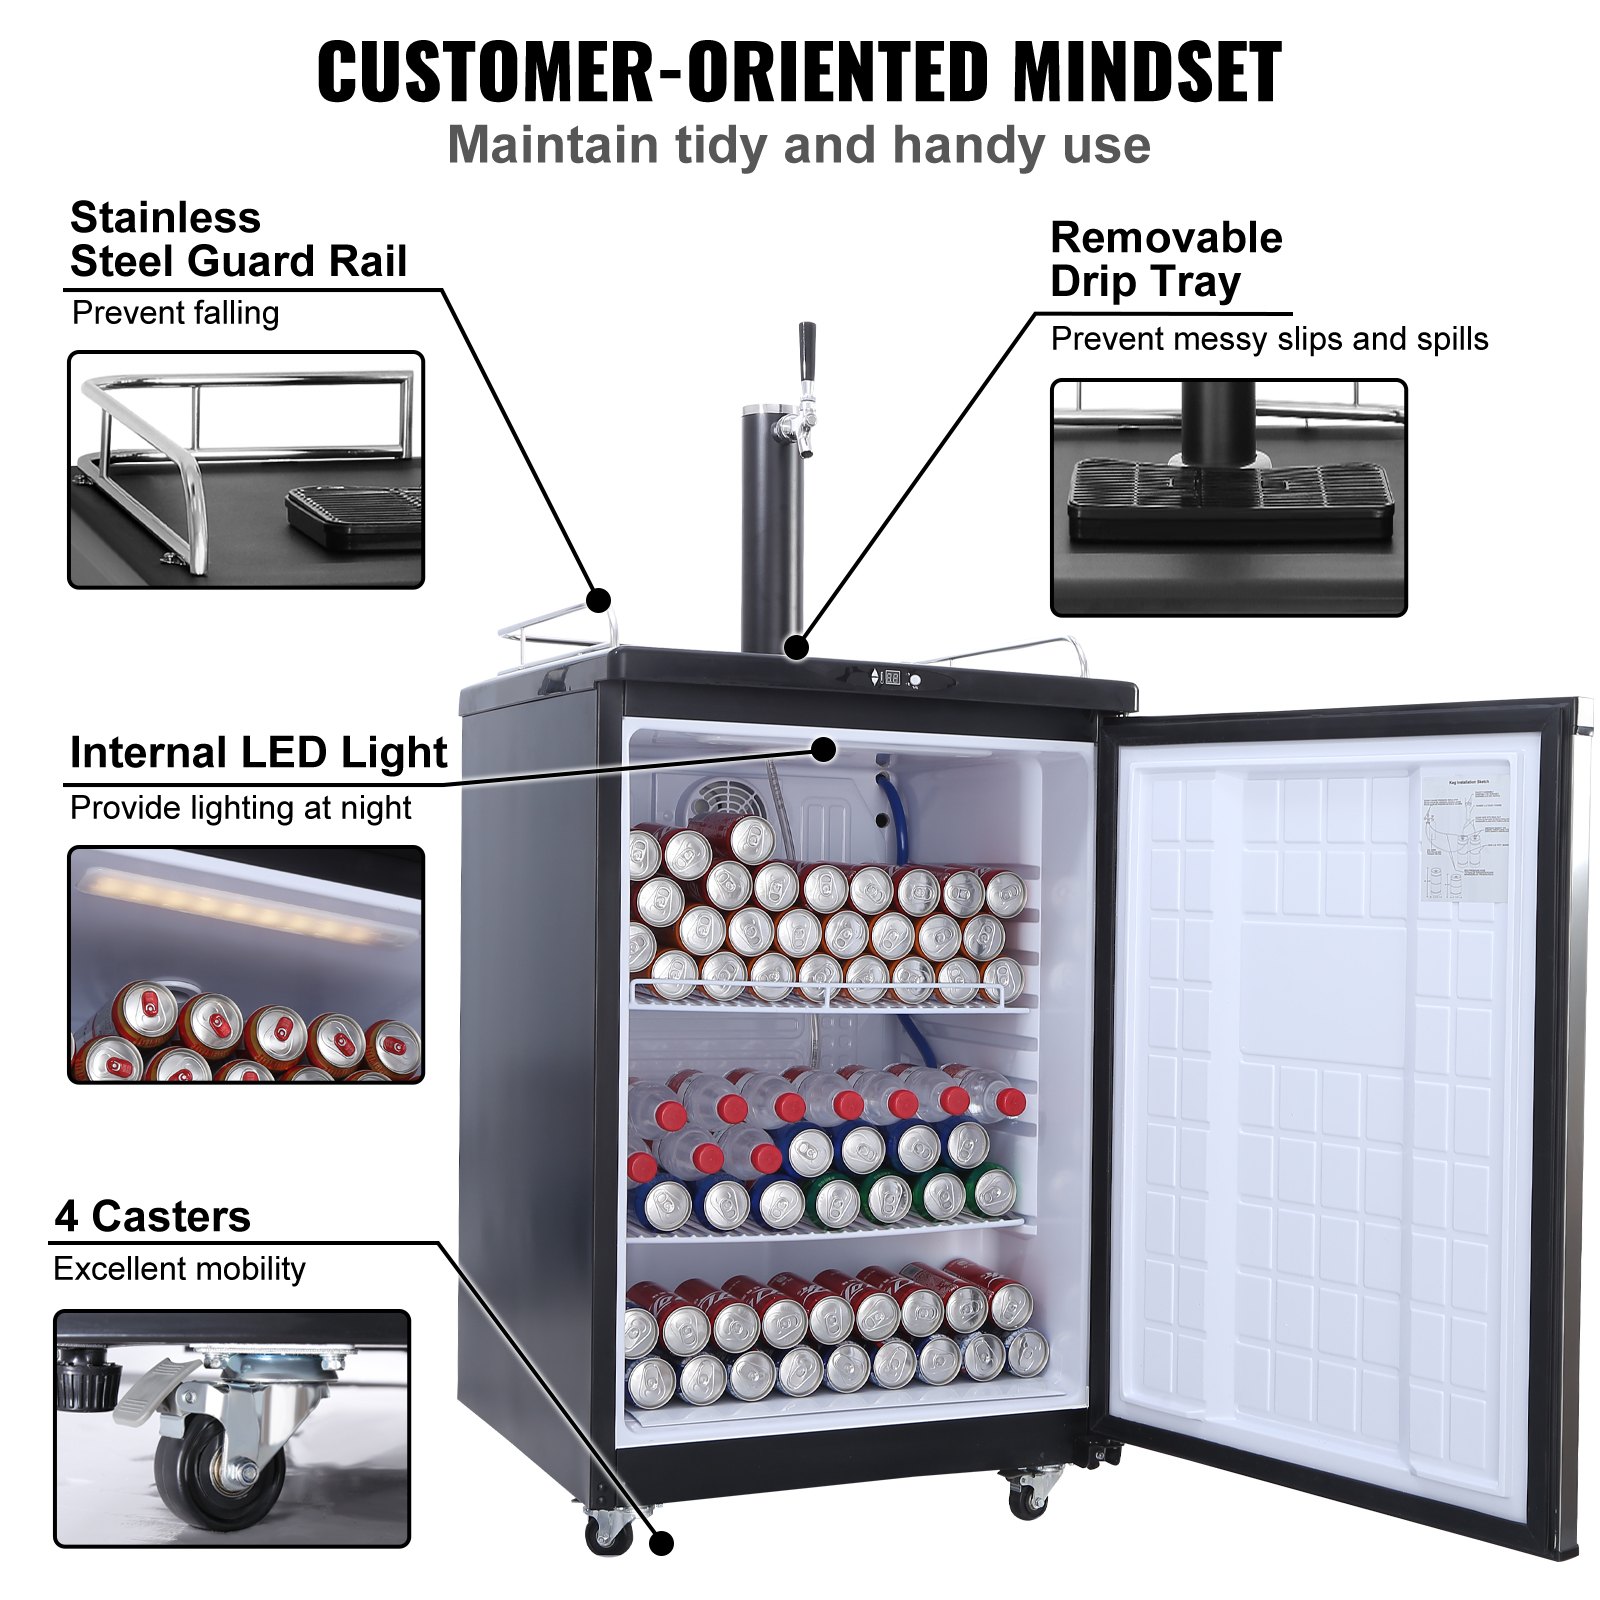
Caster Installation
Step 1: Lay the unit on its back.
Step 2: Remove the four adjustable feet.
Step 3: Insert the screws through the holes in the casters, align them with the holes in the unit, and tighten the screws. The locking swivel casters should be installed in the front of the unit for easy access.
Changing Door Swing Direction
Step 1: Lay the unit on its back.
Step 2: Remove the kickplate by removing the three retaining screws (FIG. 1).
Step 3: Remove the four screws located on the lower door hinge (FIG. 2).
Step 4: Pull the door downward until it releases from the upper hinge pin.
Step 5: Remove the plastic screw cap from the top left-hand side (FIG. 3) and install it on the top right-hand side of the door frame.
Step 6: Unscrew the upper door hinge pin (FIG. 4) from the right side of the countertop and install it on the left side.
Step 7: Position the door back on the cabinet and push up until the top hinge pin is inserted into the top of the door.
Step 8: Remove the lower support pin from the door and reposition it on the lower hinge(FIG. 5).
Step 9: Reinstall the lower support pin on the right side of the door.
Step 10: Align the door and cabinet before fastening the lower hinge screws to the cabinet.
Step 11: Reinstall the kick-plate.

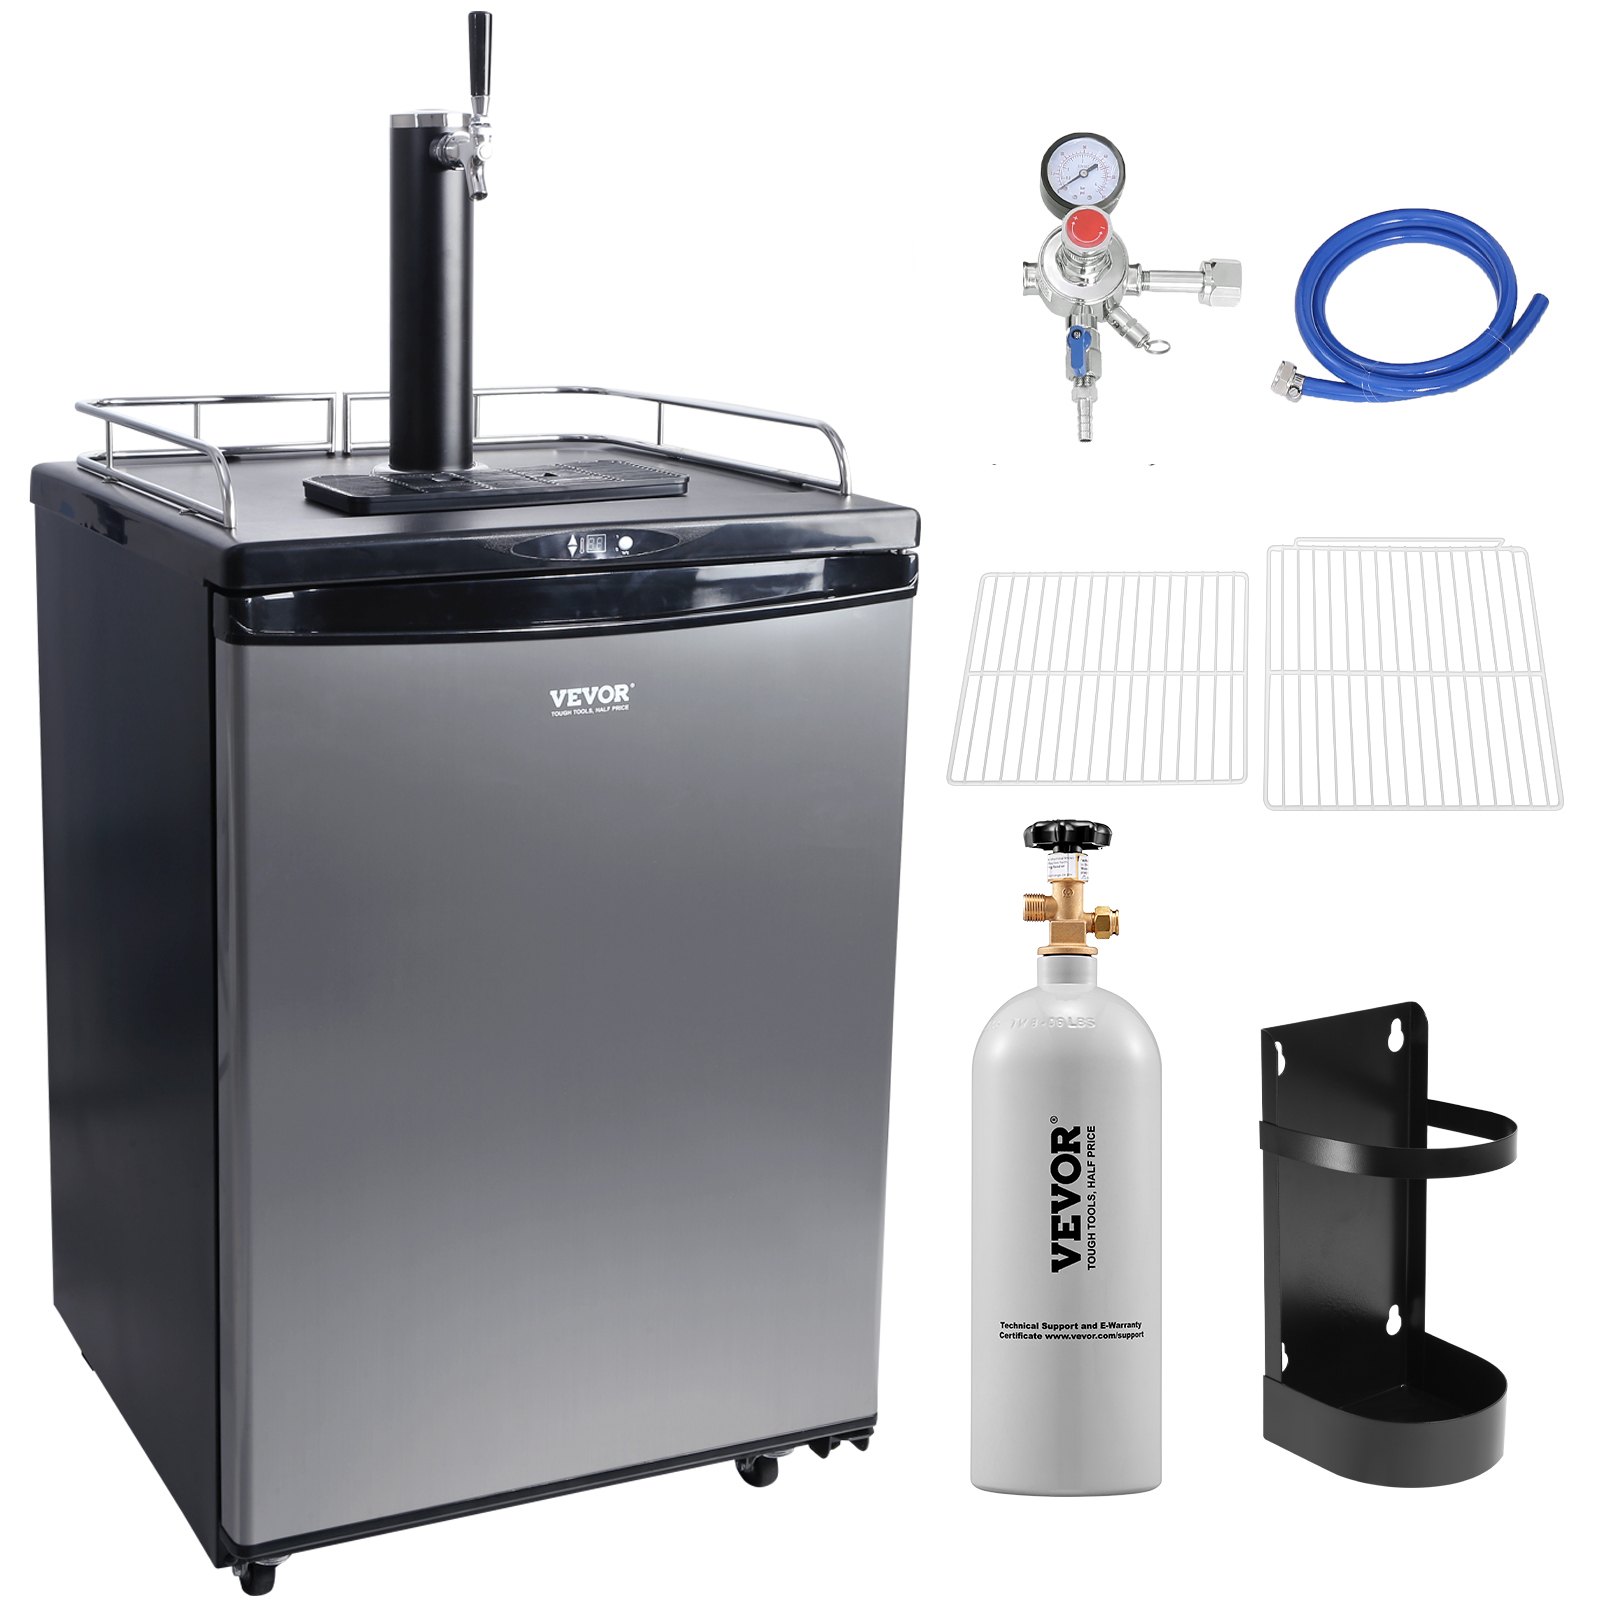
Beer Kegerator Assembly Instructions
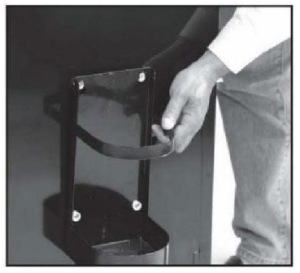
CO2 Cylinder Support Installation
Install the cylinder support onto the four studs located on the cabinet’s exterior back wall. No tools are required; simply align the holes in the cylinder support with the studs and push down firmly.
Tower Gasket Installation
Before installing the beer tower, position the rubber beer tower gasket directly on top of the cabinet, aligning the four holes in the gasket with the four holes on the cabinet.
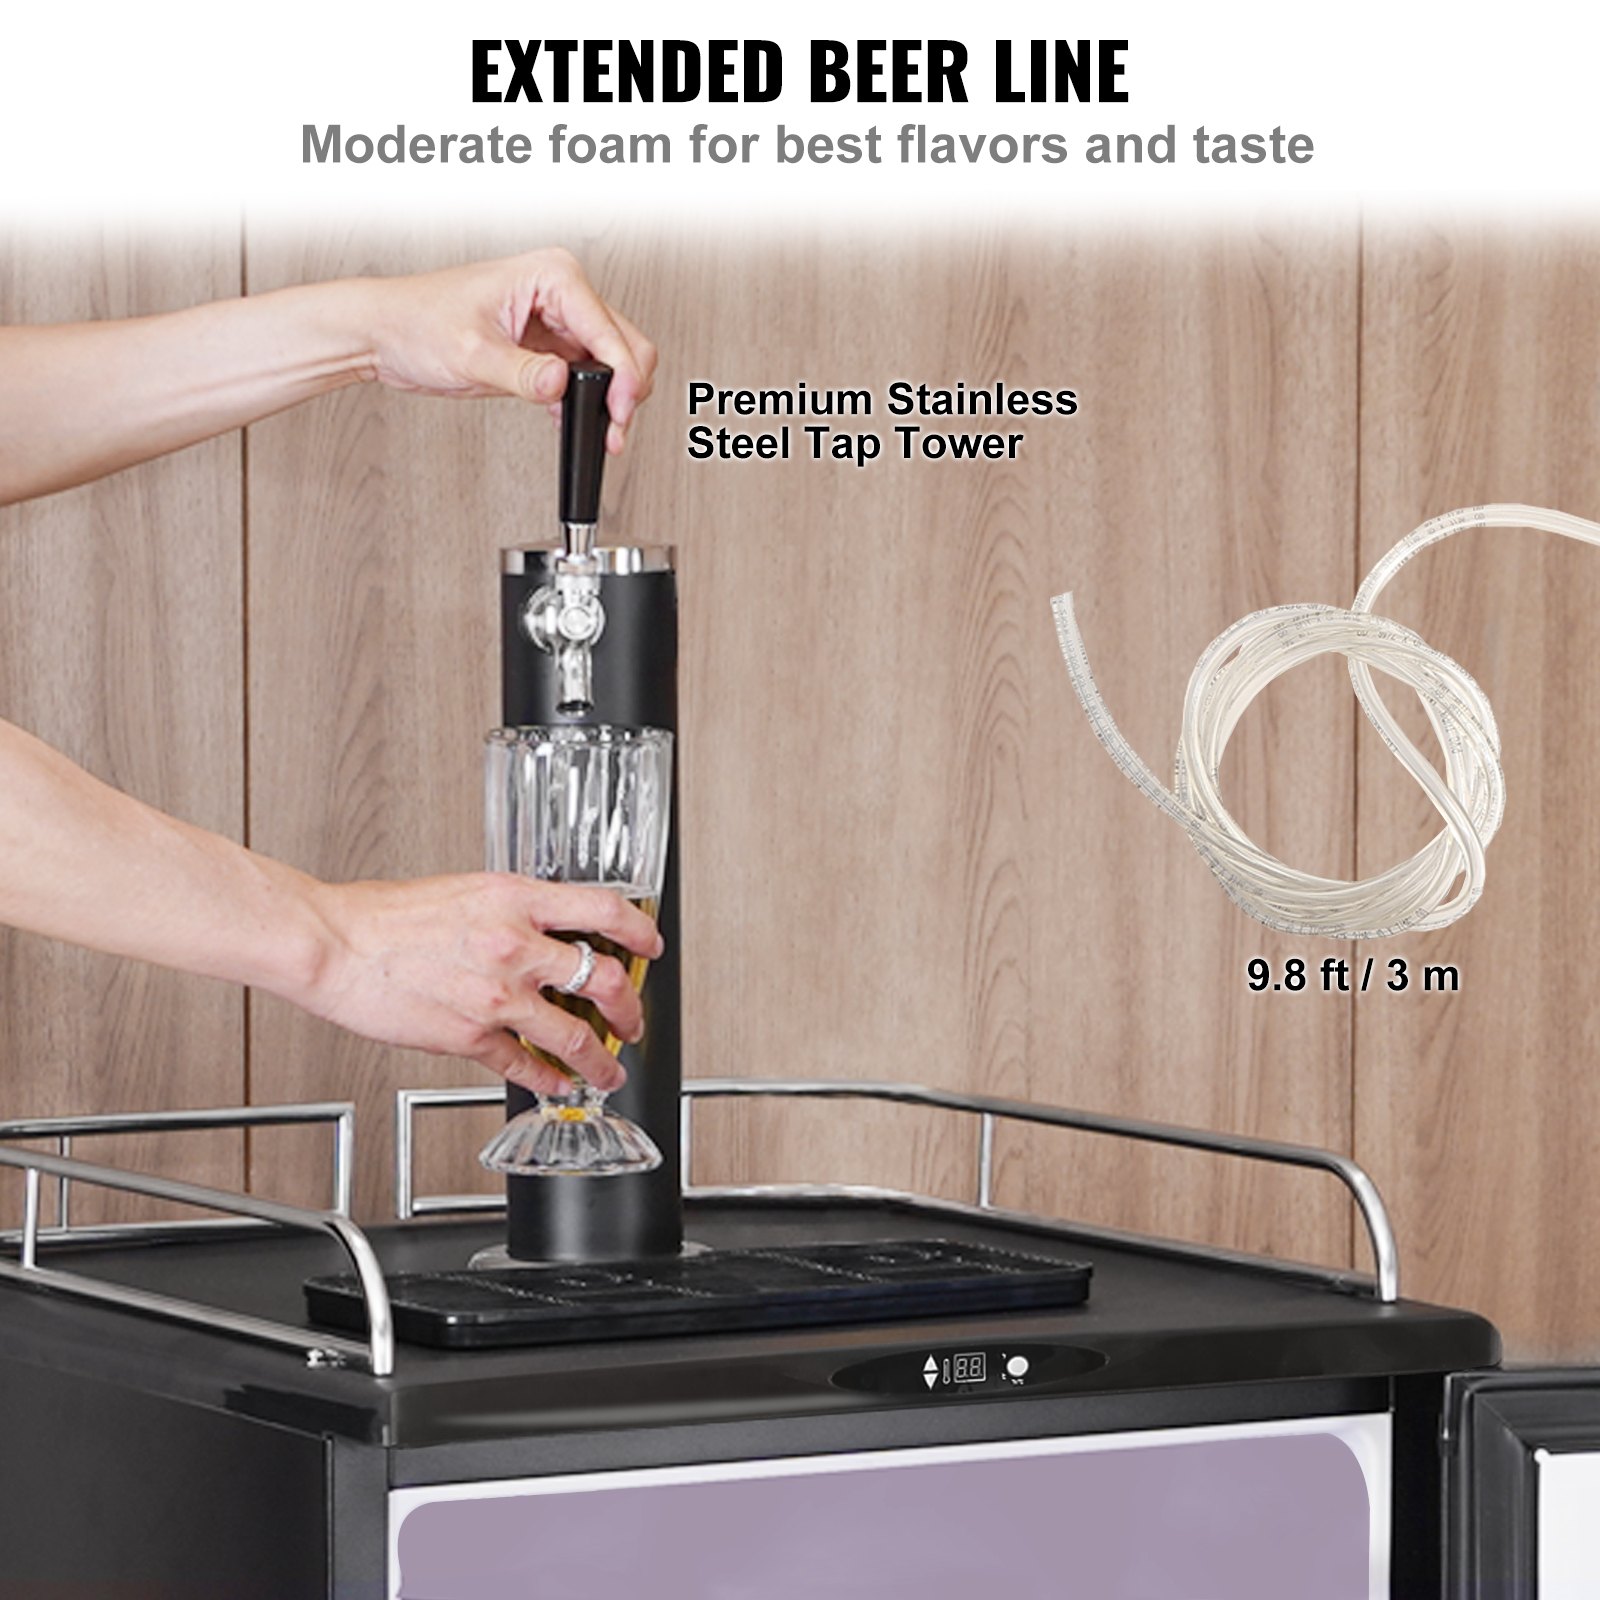
Beer Tower Installation
After installing the tower gasket, unravel the beer line hose from the tower and insert the beer line and nut through the gasket and into the tower. Align the four holes in the base of the beer tower with the gasket and the bayonet. The beer faucet should be facing the front of the cabinet. Using a Phillips screwdriver, attach the beer tower to the cabinet with the four mechanical screws provided. Tighten firmly.
Protective Plate (Pre-Installed)
The protective plate should always be installed when the keg stand is being used to prevent the floor of the keg cooler cabinet from being unnecessarily damaged. The plate also makes installing and removing the keg and the keg stand easier.
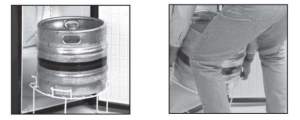
Installing the Beer Keg and Beer Keg Stand
The keg stand requires only 30 liters (1/4 barrel) of “pony” style kegs. To install, position the keg stand directly before the open kegerator cabinet. Then, using the proper lifting technique, carefully lift the beer keg by the handles and place it onto the kegstand.
Brace your knees behind the keg stand and grasp the handles. Lift the front of the keg stand so that its front edge rests on the keg cooler’s front edge. Grasp the front keg stand handles and carefully slide the keg stand into the keg cooler.
Operation Instructions
The kegerator should be placed at an ambient temperature between 32 and 100 degrees Fahrenheit. The unit’s performance may be affected if the temperature is above or below this range.
For example, placing your team in extremely cold or hot conditions may cause the interior temperatures to fluctuate.
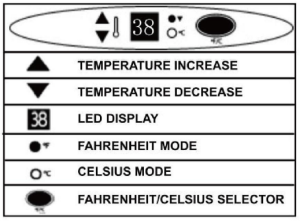
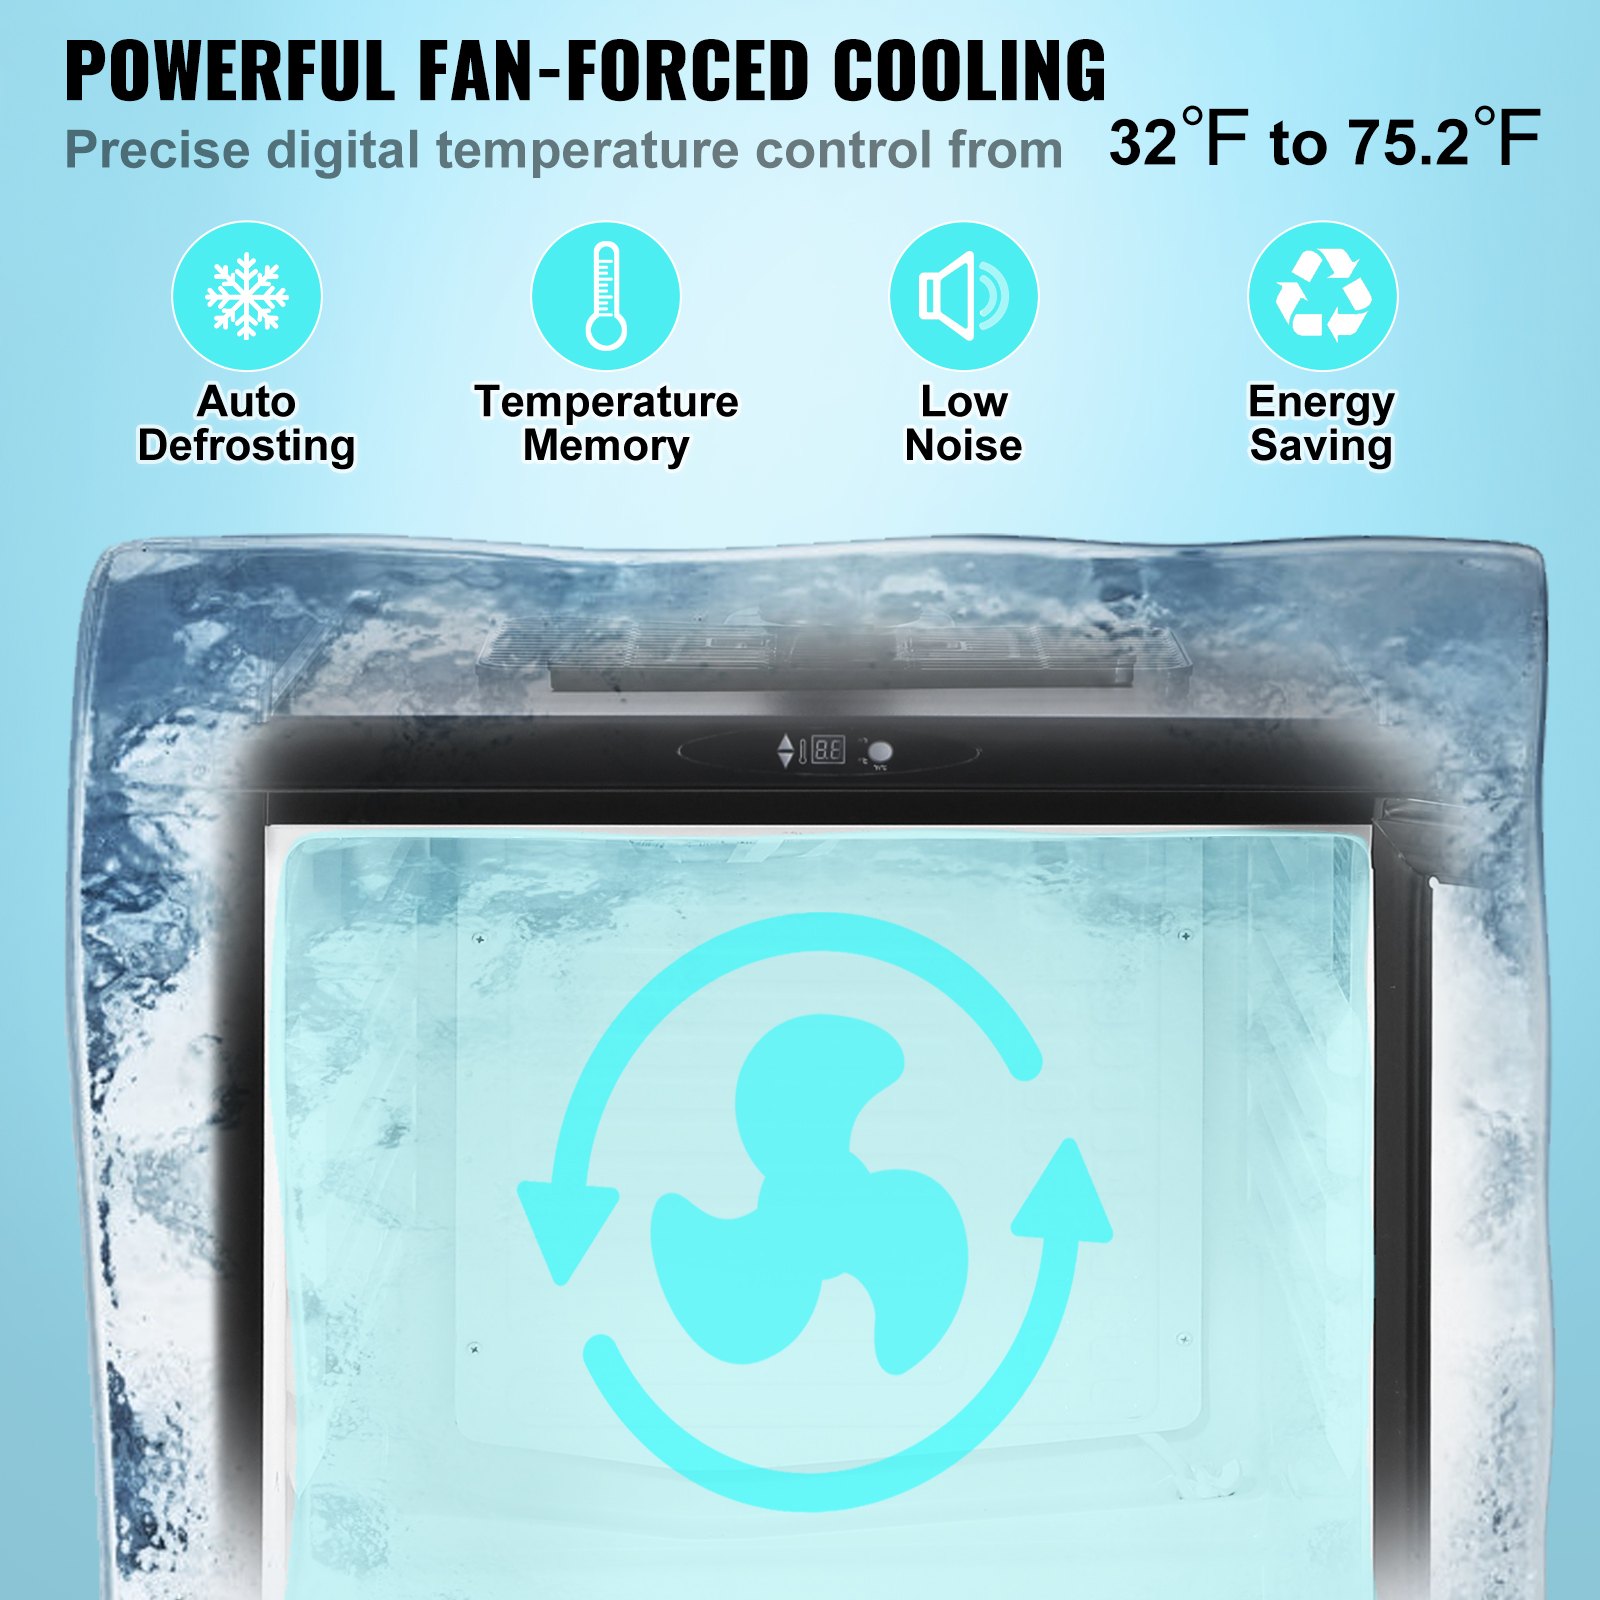
When you first plug in your kegerator, the LED display will show the “live” cabinet temperature in Fahrenheit, and the thermostat will be set to 41 degreesFahrenheit(5 degrees Celsius). The operating panel includes several other features to operate and control the temperature of the kegerator:
Press either ▲▼button once and release to enter the SET mode; the LED display will flash and show the previous temperature setting, signifying that the temperature is ready to be adjusted. Each depression of either ▲▼button will increase or decrease the temperature incrementally by one degree Fahrenheit or Celsius until the desired temperature is reached between 36 and 46 degrees Fahrenheit (2-8 degrees Celsius)
NOTE: After a button is pressed, the display will flash for 5 seconds before returning to displaying the internal temperature of the cabinet
Press the temperature button to alternate the display between Fahrenheit and Celsius; the corresponding pilot light adjacent to the selector will illuminate to signify which temperature mode has been selected for display.
If you are going on vacation, you may leave the kegerator operating during vacations of less than three weeks. If the appliance will not be used for several months, you should remove all items and turn off the appliance. Clean and dry the interior thoroughly. To prevent mold growth, leave the door open slightly, blocking it open if necessary.
PLEASE NOTE: In the event of a power failure, any modified settings will be lost, and the default settings will be restored once the power resumes.
Beer Temperature
Correct and consistent temperature is critical when storing and dispensing draft beer. Beer will start to freeze at 28 degrees Fahrenheit (-2 degrees Celsius), so selecting and maintaining proper operating temperatures inside the kegerator cabinet is essential. The optimum temperature range for serving cold beer is between 36 and 40 degreesFahrenheit(2-4 degrees Celsius).
Temperatures that are too warm or too cold can cause flavor loss,off-tastes, and dispensing problems.
Periodically monitor the temperature inside your kegerator and adjust as necessary, and keep the keg cooler door closed as much as possible to avoid temperature fluctuations.
Beer Kegerator Cleaning and Maintenance
Kegerator maintenance
- Ice build-up will defrost automatically, so there is no need to defrost the refrigerator.
- Defrost water that collects inside the drain trough passes through a drain outlet in the interior wall into a drain pan above the compressor, where it will evaporate.
- If you do not intend to use the appliance for long periods, disconnect the power cord, clean the appliance, and leave the door slightly open to help prevent mold and mildew from accumulating inside the cabinet.
Cleaning your kegerator
- Turn off the power, unplug the beer kegerator, and remove all items.
- Wash the inside surfaces with warm water and baking soda solution. The solution should be two tablespoons of baking soda to a quart of water.
- Wash the shelves with a mild detergent solution.
- Wring excess water out of the sponge or cloth when cleaning the area of the controls, or any electrical parts.
- Wash the outside cabinet with warm water and mild liquid detergent. Rinse and wipe with a clean, soft cloth.
- Dust the front grill and back of the unit twice yearly. Make sure the power is off before cleaning.
- It is recommended that the unit be cleaned completely inside and out yearly to maximize the product’s longevity.
Moving your kegerator
- Remove the keg and any other items you may have inside the unit.
- Securely tape down all loose items (shelves) inside your appliance and shut the door.
- Turn the adjustable leg up to the base to avoid damage.
- Be sure the appliance stays secure and in an upright position during transportation.
- Protect the outside of the appliance with a blanket or similar item.
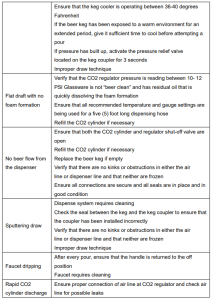
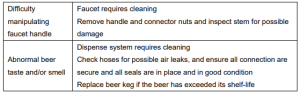
Beer Kegerator Troubleshooting
You may experience many common issues with your kegerator that can be solved easily, without a service call. Try the tips below to troubleshoot your unit should you experience any problems:
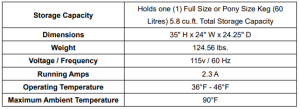
 Technical Specifications
Recommended For Your Project
VEVOR Beer Kegerator, Single Tap Draft Beer Dispenser Manual


Reviews
There are no reviews yet.