
Discover the ultimate guide to mastering home distillation with the VEVOR Alcohol Still 15 Gal 50L Water Alcohol Distiller Manual. This comprehensive manual is designed to help you set up, troubleshoot, and optimize your home distillery kit with ease. Whether you’re a novice or an experienced distiller, our manual breaks down complex processes into simple, step-by-step instructions, ensuring a seamless experience from start to finish.
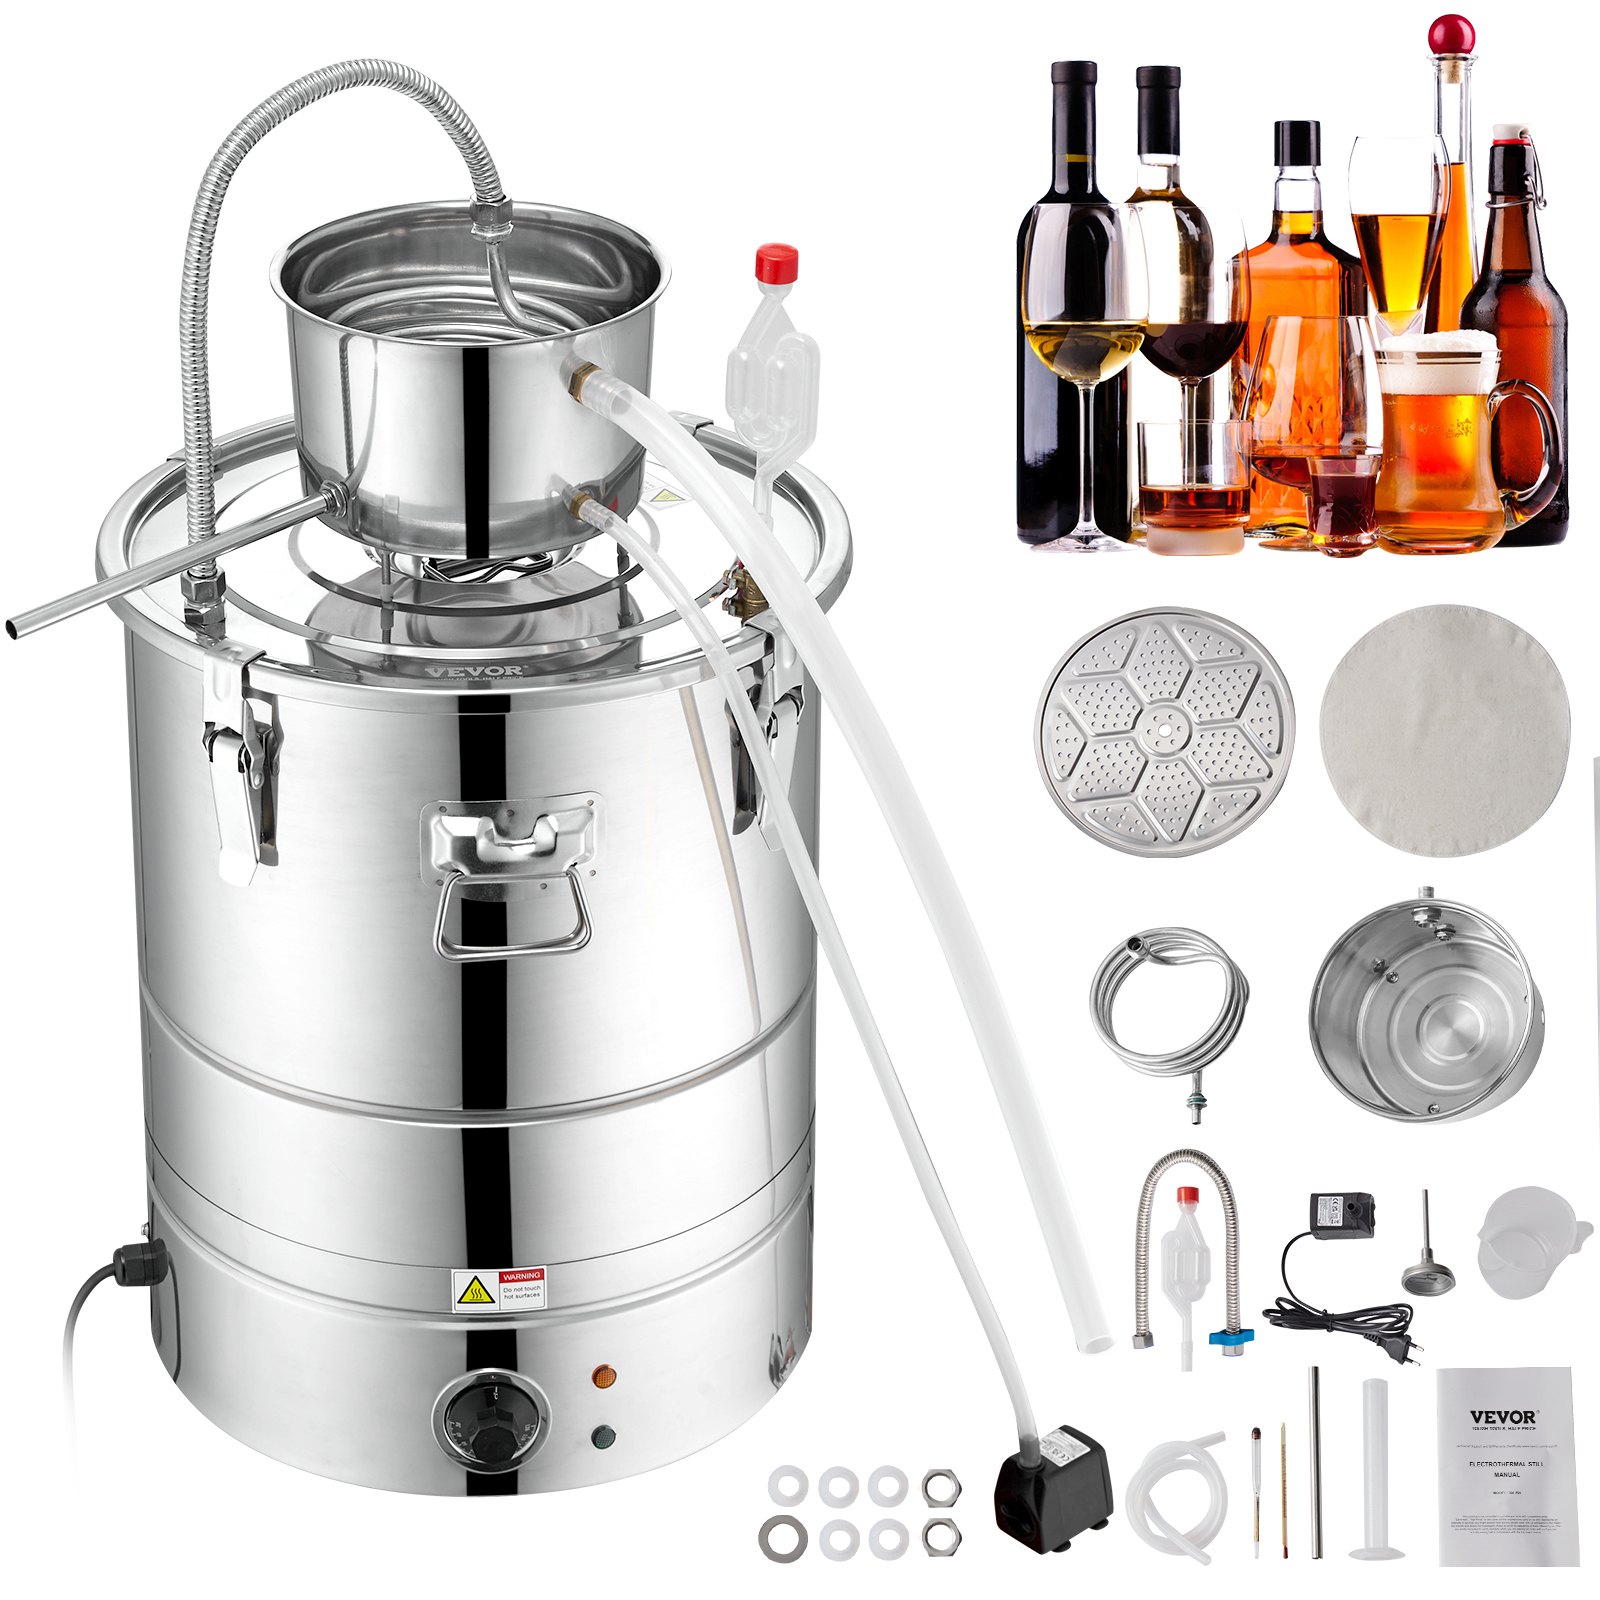
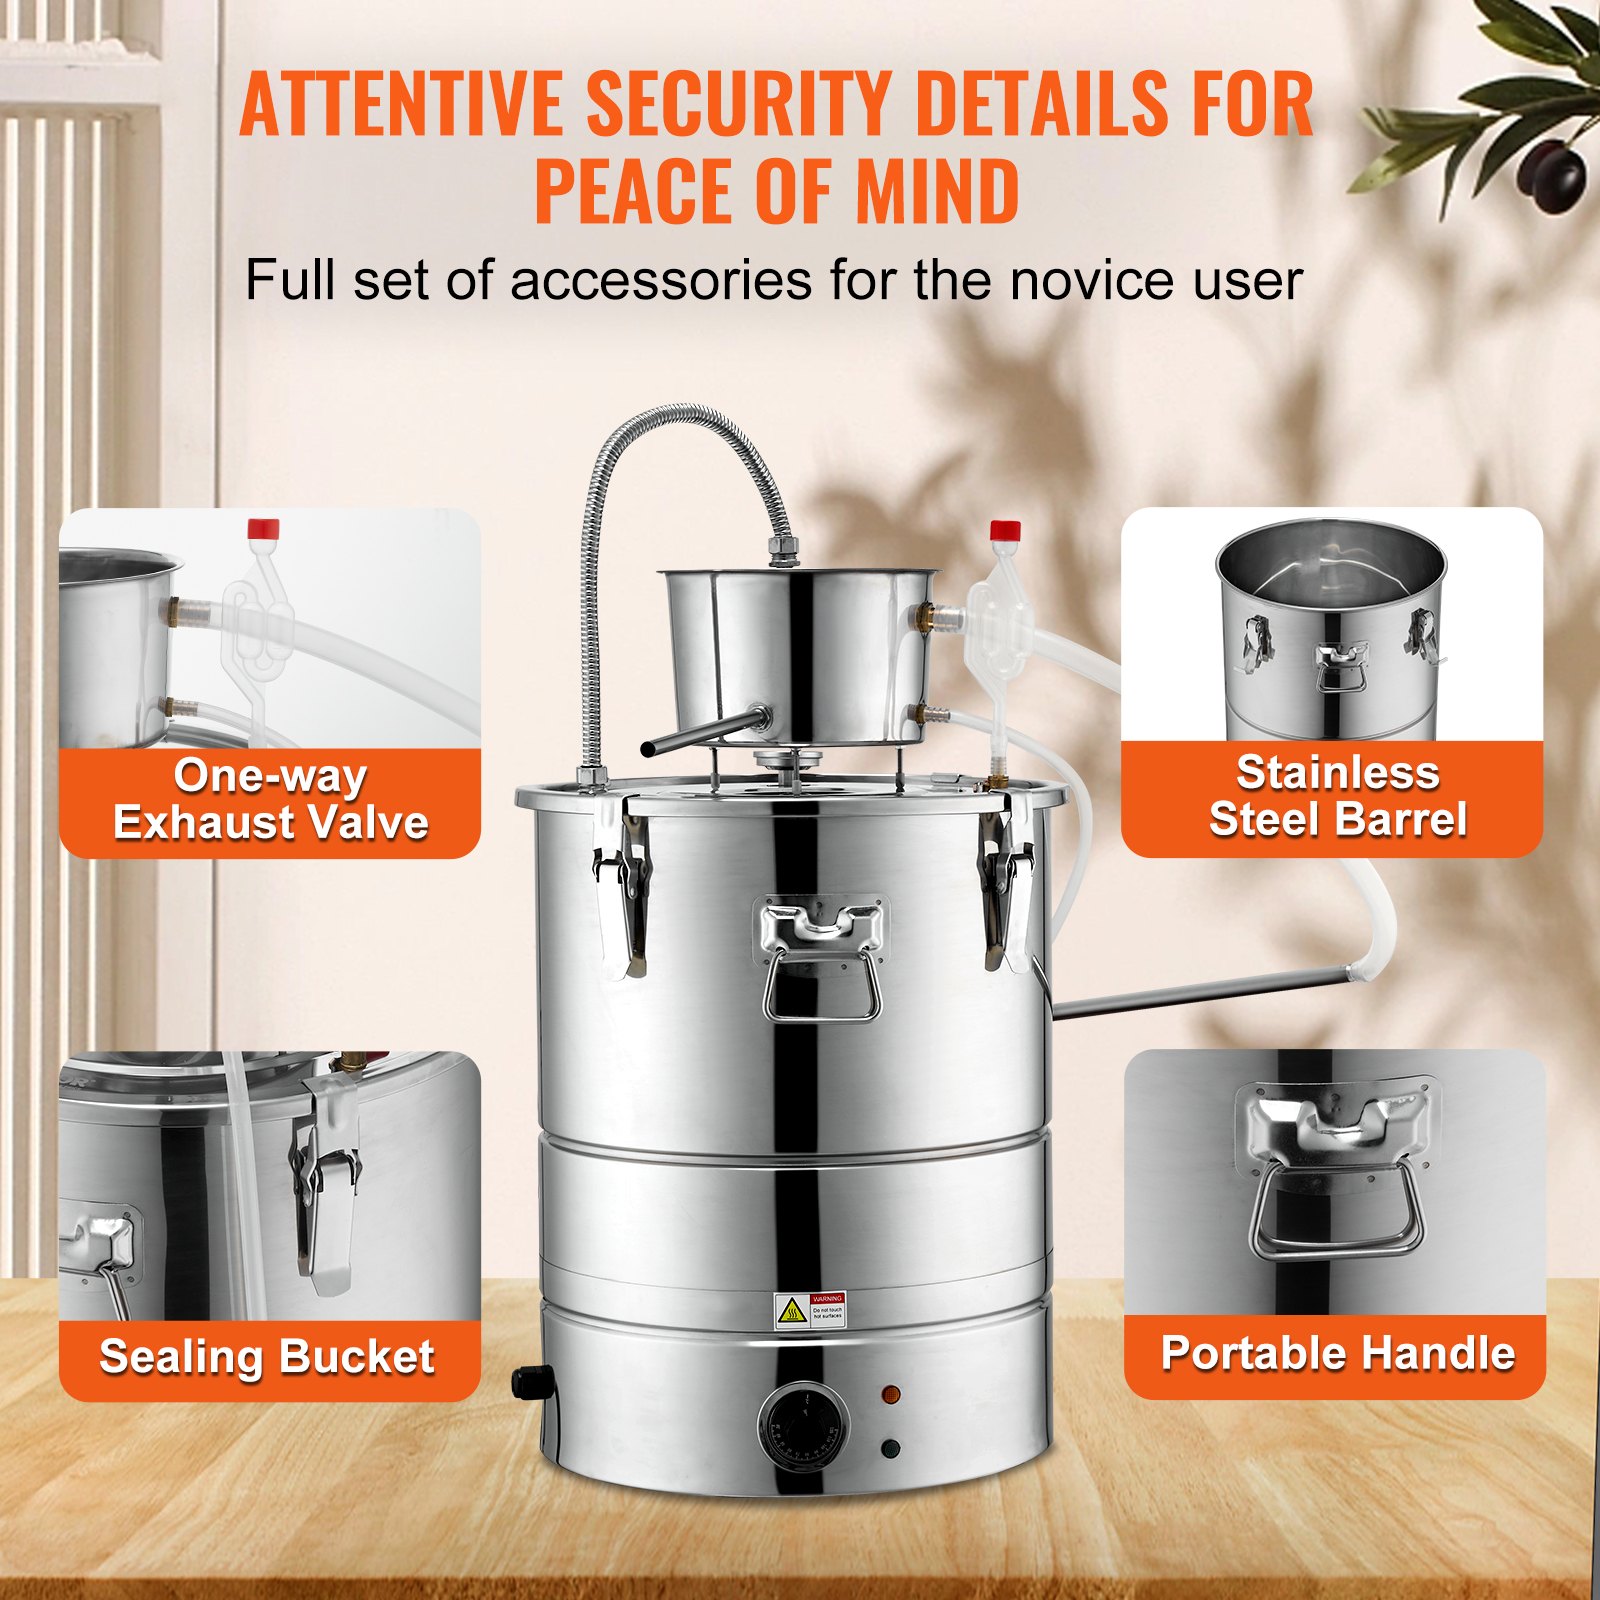
The VEVOR Alcohol Still Manual covers everything you need to know about your Home Distillery Kit, which includes a Stainless Steel Tube, Pump, One-way Exhaust Valve, and Thermometer (30-120℃). Learn how to efficiently use each component to produce high-quality whisky, wine, and brandy right from your home. The detailed troubleshooting section helps you quickly resolve any issues, while optimization tips ensure you get the best results every time.
Our user-friendly manual is packed with diagrams and illustrations to support your learning journey, making it the perfect companion for both beginners and experts. Download your VEVOR Alcohol Still Manual today and unlock the full potential of your home distillation setup.
VEVOR ALCOHOL STILL USER MANUAL
Model Number: EZL-EH-30S-E EZL-EH-30S-U EZL-EH-50S-EEZL-EH-50S-U
Capacity: 30L/50L
Safety instructions
Our pump’s manipulation and utilization are straightforward and convenient. The user just needs to pour a suitable amount of water, link the pump with the outlet water pipe, and then connect the pump with the power supply per the mark on the label. Thus, the pump can run well.
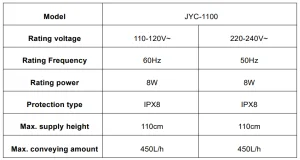
TECHNICAL DATA
To reduce the risk of electric shock
- Always unplug the pump from the electric outlet before cleaning and handling.
- Use with clean water only. Do not place it in other liquids. Never let the pump run dry.
- OPTION—The pump has a grounded conductor and a grounding-type attachment plug. It must be connected only to a proper ground outlet to reduce the risk of electric shock (European standard only).
- The use of liquid temperature can not be higher than 35℃.
- Prevent the water from running into the electrical outlet down the cord.
- Do not lift, carry, or pull the pump by the power cord.
- Do not replace the pump cord. Stop using the pump if it sustains damage (Option for a pump with a safe low voltage).
- Always use the transformer provided to run the water pump or consult with your electrician before another transformer is connected.
- Do not connect the transformer provided to other appliances. Always unplug the power transformer from the electrical outlet before cleaning and handling it.
- Indoor use only. Place the transformer away from fire, moisture & direct sunlight. (Option for pump with light)
- The supply cord cannot be replaced. If the cord is damaged, the appliance should be scrapped.
To clean the pump
Unplug the pump from the electrical outlet. Use a small soft brush or place it under a water stream to remove debris.
To keep water clean
Periodically change the water to prevent it from becoming sticky and forming microorganisms.
Troubleshooting
- If the pump fails to run, the following should be checked:
- Check the circuit breaker, or try a different outlet to ensure the pump gets electrical power.
- NOTE: Always disconnect the pump from the electrical outlet before checking.
- Check the pump discharge and tubing for kinks and obstructions.
- Algae buildup can be flushed out with a garden hose.
WARNING !!! The water pump must be fully soaked, or it will be damaged!
Disposal information
This product is subject to European Directive 2012/19/EC provisions. The symbol showing a wheelie bin crossed through indicates that the product requires separate refuse collection in the European Union: this applies to the product and all accessories marked with this symbol.
Products marked as such may not be discarded with regular domestic waste, but must be taken to a collection point for recycling electrical and electronic devices.
This user manual applies to electrothermal still series products.
Please read this manual carefully before using the product.
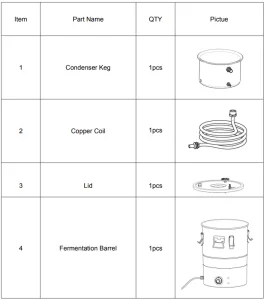
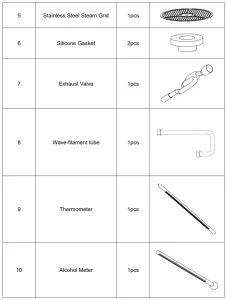
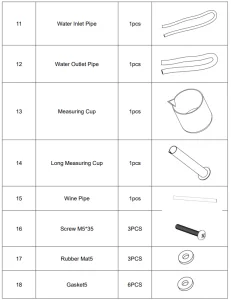
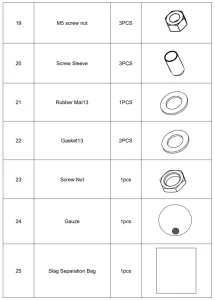
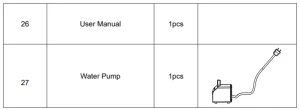
BOM
Product Information
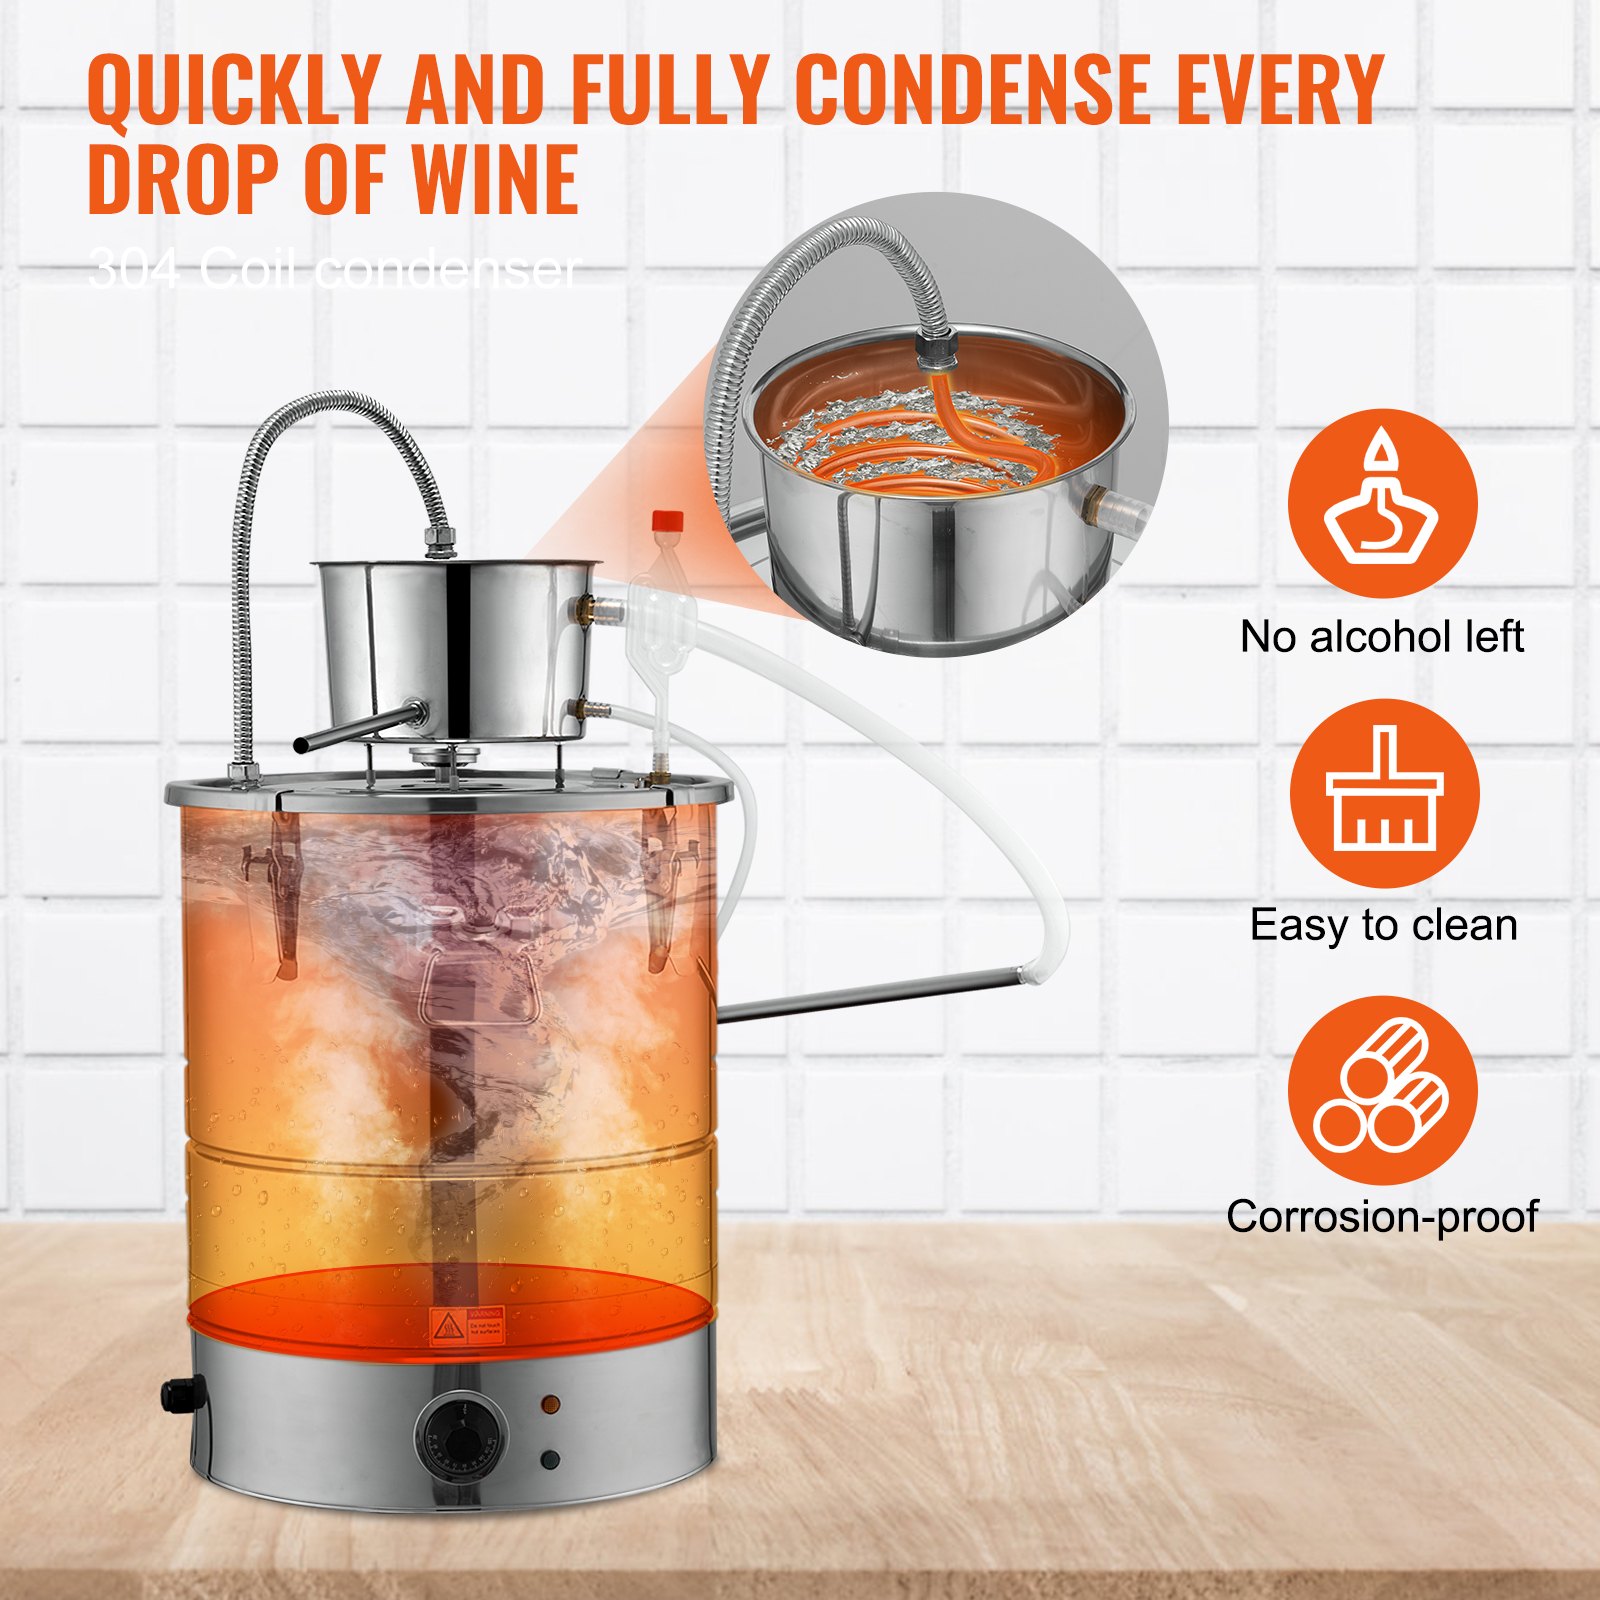
Stainless steel fermenters concentrate steam by heating to a boil and then cooling. In addition, the entire alcohol distillation unit is made of 304 food-grade stainless steel, which is durable and easy to clean.
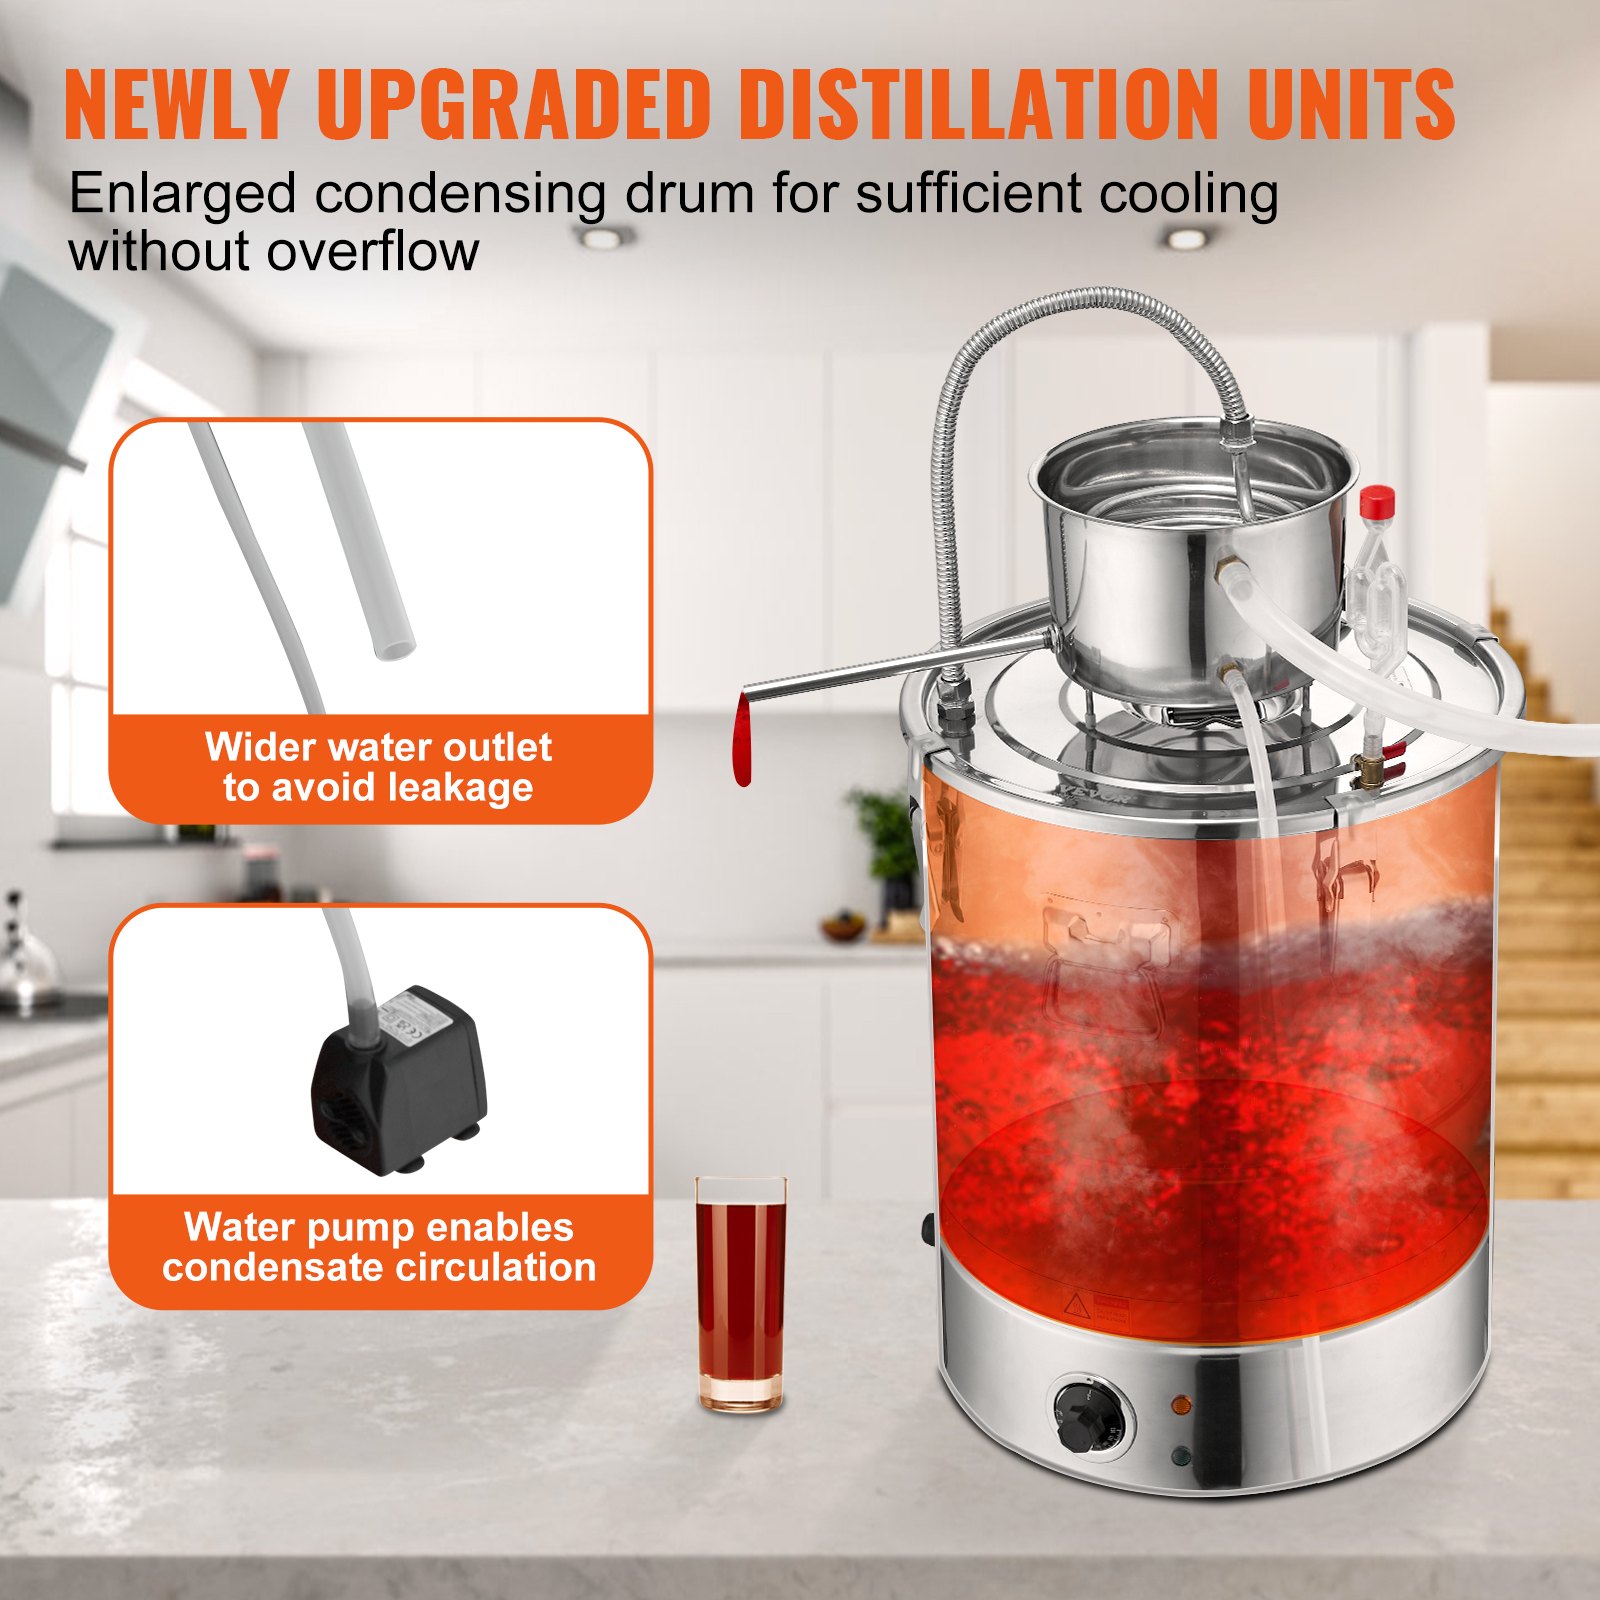
- Efficient condensation treatment: The alcohol distiller adopts a stainless steel spiral tube, which has fast thermal conductivity and ensures good cooling performance. At the same time, it has a large contact area with the Condenser Keg and provides a relatively low distillation temperature.
- Complete Set of Accessories: The set comes with a thermometer (0-150°C/32-302°F) for easy real-time monitoring of alcohol temperature. It also includes a one-way vent valve and adds 2/3 of water to help release air (only gas out) when the grain is fermented. Our distillation kits include an alcohol meter kit for accurately measuring wine strength.
- Versatile Application: Our alcohol still kit can be used in many ways. You can make whiskey, wine, brandy, rum, tequila, vodka, water distillation, ethanol, and essential oils according to your preferences.
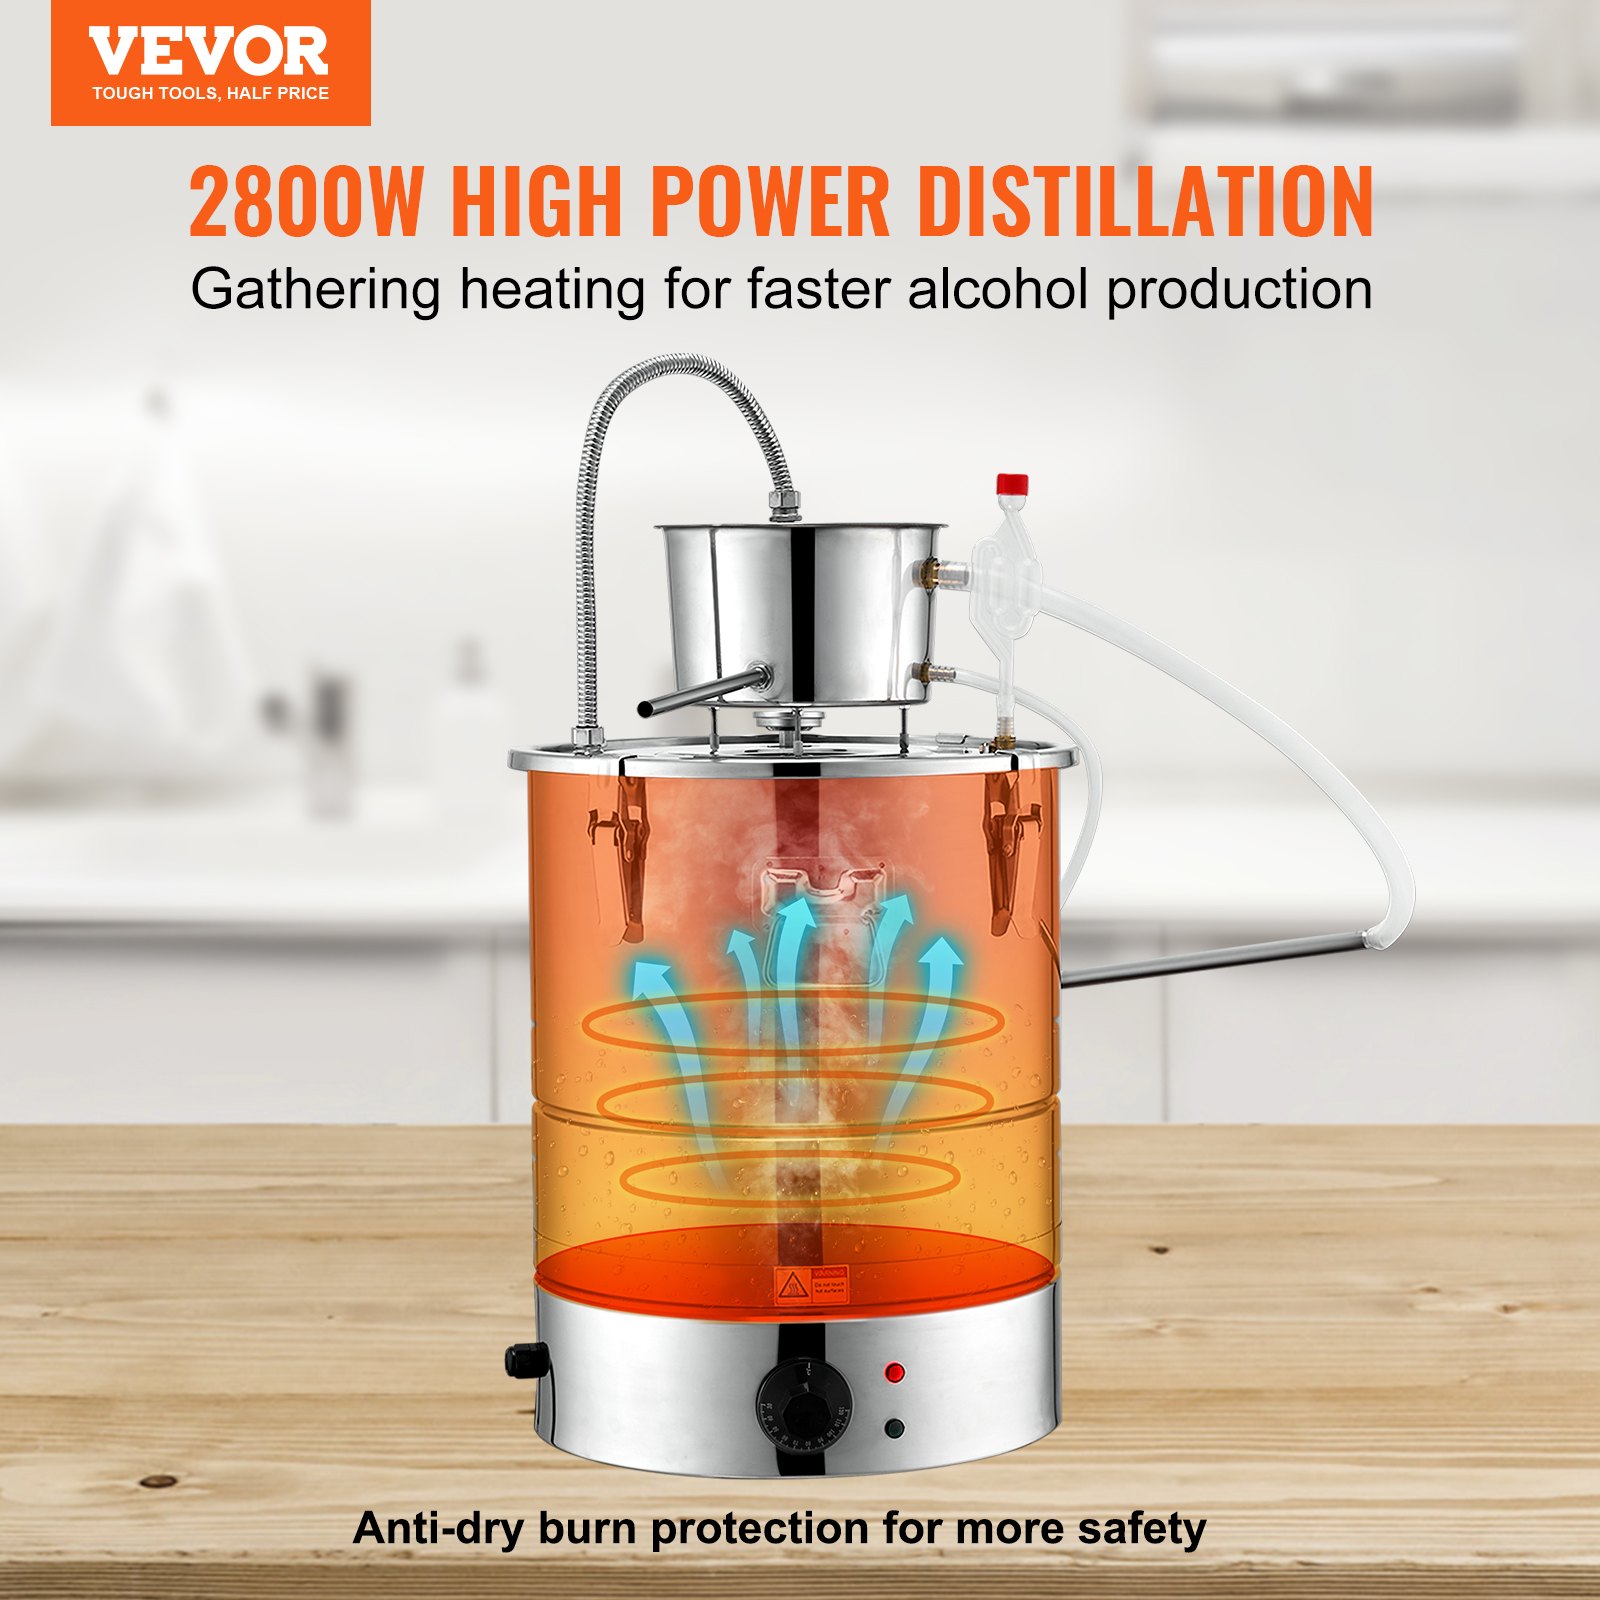
- Temperature control: The difference from ordinary ones is that the temperature is adjustable, which can be controlled conveniently and effectively. You absolutely need it. The heating process is safer and more stable, and the heat conduction effect is better. Automatic constant temperature, durable.

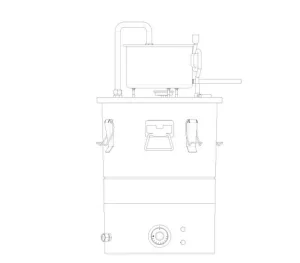
 Installation and Use of Distiller Equipment
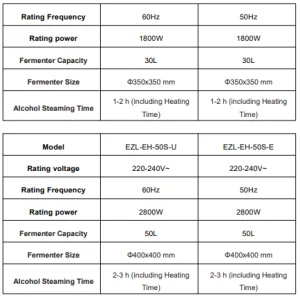
The condenser keg components are installed as follows:
1. As shown in Figure 1, insert the gasket 5 and rubber pad 5 into the screw in order.
2. As shown in Figure 2, pass the screws with rubber pads and gaskets through the holes of the condenser keg.
3. Put in the gasket 5 as shown in Figure 3, and lock the screw with the M5nut, and then insert the screw sleeve
4. As shown in Figure 4, first install the gasket 13 at the end of the cooling pipe’s small thread, then install the rubber gasket 13.
5. As shown in Figure 5, pass the cooling pipe through the cooling tower’s hole, install gasket 13, and lock it with the G1/4 nut.
6. Make sure that all parts are assembled tightly without air leakage
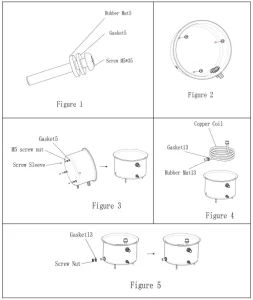
The electric still equipment is installed in the order from bottom to top as follows:
- Put the filtered wine mixture into the bucket according to the appropriate capacity, cover the lid, and buckle the lid with a tool
- Place the condenser keg on top
- Adjust the position of the condenser barrel, and put silicone pads on both sides of the connection.
- Rotate the joint clockwise to tighten.
- Install a one-way exhaust valve and other accessories.
- Connect the wine outlet pipe to the condensation tower’s wine outlet, one end of the water inlet pipe to the water pump, and the other to the water inlet, and the outlet pipe to the water outlet.
 Please fix the lid on the barrel and secure it with iron clips. Adjust the position of the cooling tower on the barrel cover, and cover the connection with a silicone pad.
Install and fix the one-way exhaust valve and other accessories, tightly connect the condensation tower and the wine outlet pipe, and install the water inlet and outlet pipes in sequence. The whole device requires correctness and firm installation.
All container parts should be tightly assembled without air leakage except for the gap between the liquid pipe and the receiving bottle.
Operating Instructions for Electrothermal Still Heating
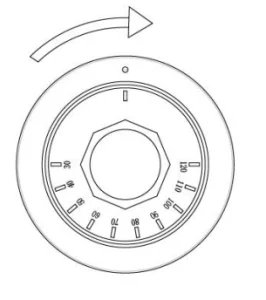
- After installing the product, the temperature control switch knob is in the positionshowninthe picture, ready for work.
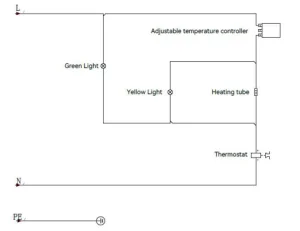
- Turn on the power, the green light is on, indicating that the product is on standby.
- Turn the temperature control switch clockwise until the yellow light is on, indicating that the heating plate is working and heating starts, and then turn the temperature control switch knob to the required temperature.
- After the temperature reaches the set temperature, the yellow light goes out, and the automatic constant temperature is within the set temperature range.
- After the work is completed, turn the temperature control switch knob to turnoff, andunplug the power.
Alcohol Still Cleaning and Maintenance
- The distiller must clean the inside of its pot, condenser, and other components before or after each use and drain all the impurities inside it. After we have used the distilled water dispenser, we need to clean it every once in a while. Please pay attention to cleaning the inner wall of its evaporation pot, the inner wall of the condenser, the surface of the condenser tube, and the scale in the outlet pipe of the condenser. Avoid affecting its use.
- Before starting the machine, please check whether the voltage of the power supply used is consistent with the voltage of the machine used, to ensure that the contact between the socket and the machine meets the safety standards. The leakage protection switch and ground wire are installed, and everything must meet the electricity requirements.
- The product’s bottom is equipped with electrical parts. Do not place the instrument in water or places with excessive humidity.
- When using the distilled device, pay attention to observing the liquid level. If the fluid level drops, turn off the power first and check whether the return water is unblocked. If the water is cut off or the water level is lower than the heating tube, it will cause the heating tube to explode and leak electricity, which will pose a danger. If the water level continues to rise and boil, first turn off the power and water source. The preliminary judgment is that the heating tube is burnt out, and the professional should be notified for maintenance.
- For some newly purchased stills, we need to clean them first and pass them under electricity for more than 2 hours to evaporate until the obtained distilled water meets the requirements. Remember not to cut off the water during use.
- When the Electrothermal is still working, its surface temperature will be very high, so be careful not to touch it to prevent burns. Please wait for the temperature to drop to normal before washing.
- Do not touch the plug or wire when your hands are wet to avoid an electric shock.
- Cleaning agents are not allowed during cleaning to prevent them from remaining on the machine and being eaten by mistake.
- To avoid affecting the regular operation of the distiller, it is recommended not to exceed 70% of the rated volume during distillation.
The Important Functions of the Exhaust Gas Path
- The exhaust gas channel can discharge graded impurities and improve the quality of wine. For example, methanol, acetaldehyde, ethyl acetate, ethyl formate, etc., have lower boiling points than ethanol, so they are relatively difficult to liquefy and will be discharged upward with the exhaust gas to avoid blowing into the finished wine.
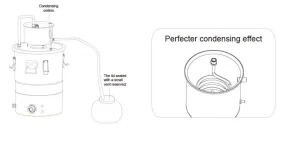
- The exhaust gas path can help load the wine analytically to improve quality. The lid is sealed, and a small vent is reserved.
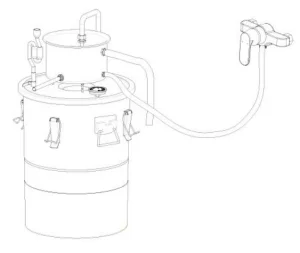
Pipe Connection Diagram for Tap Water.
If tap water is used for direct cooling, lower water flow can be controlled. Water flow can also ensure that the liquor temperature is close to the cooling water temperature.
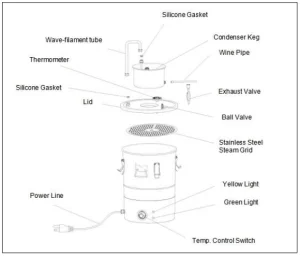
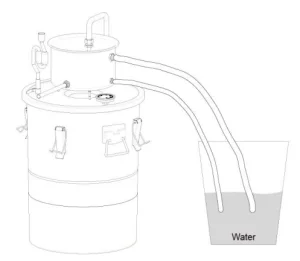
Pipe Connection Diagram for Circulating Water via a Water Pump
If the water temperature exceeds 35 °C, changing the water when using circulating water is recommended. The maximum temperature cannot exceed 40 °C, as the input cooling water temperature determines the production fluid temperature.
How to Use
Distill Liquor
1. Choose good common rice for steaming. Add the steamed rice in the ratio of 500 g grain, 1kg water, and 5g distilled yeast, mix well, and then carry out liquid fermentation.
2. Fermentation temperature of 20-25 °C, stirring once a day, fermentation 10- 20 days.
3. Fill the fermented grain into the matching filter bag and pour the liquid produced during the fermentation process directly into the barrel. Then, place the bag containing the grain directly on the grate (to prevent gumming up the pot). After installation, the distillation starts, and the pre-prepared submersible pump is connected to the power supply for cooling water circulation when there is heat at the outlet.
Distill Hydrolat
1. Choose the petals or other plants you like.
2. Soak the petals in pure water for 3-5 cm for 8 hours (only for dried petals).
3. Take out the petals and place them in a matching strainer bag. Then, place the filter bag with the petals on the grate, pour the soaked water into the bucket, install it, and start distilling.
Distill Brandy
1. Crush the grapes and add ingredients such as pectinase, yeast, fermentation promoter, and tannin in the proper order.
2. Add white sugar on the next day of fermentation, and generally separate peels and residues after fermentation for 7-10 days.
3. Add bentonite into the separated wine for ageing and clarification.
4. Put the separated peel and residue into a filter bag, put the bag on the grate, and add water at the bottom of the barrel. The distilled spirit is brandy.
Ferment Wine
1. Crush grapes, and add sulfur regulating tablets to prevent microbial contamination.
2. Add pectinase to decompose pectin and increase juice yield.
3. Add yeast, ferment for 7-10 days, and increase juice yield.
4. Add bentonite for clarification after filtration, brew for about 1 month, and put the wine in a bottle.
Store the wine in a cool place after bottling.
Alcohol Still Wiring Diagram
Recommended For Your Project
VEVOR Alcohol Still, 15 Gal 50L Water Alcohol Distiller Manual


Reviews
There are no reviews yet.