
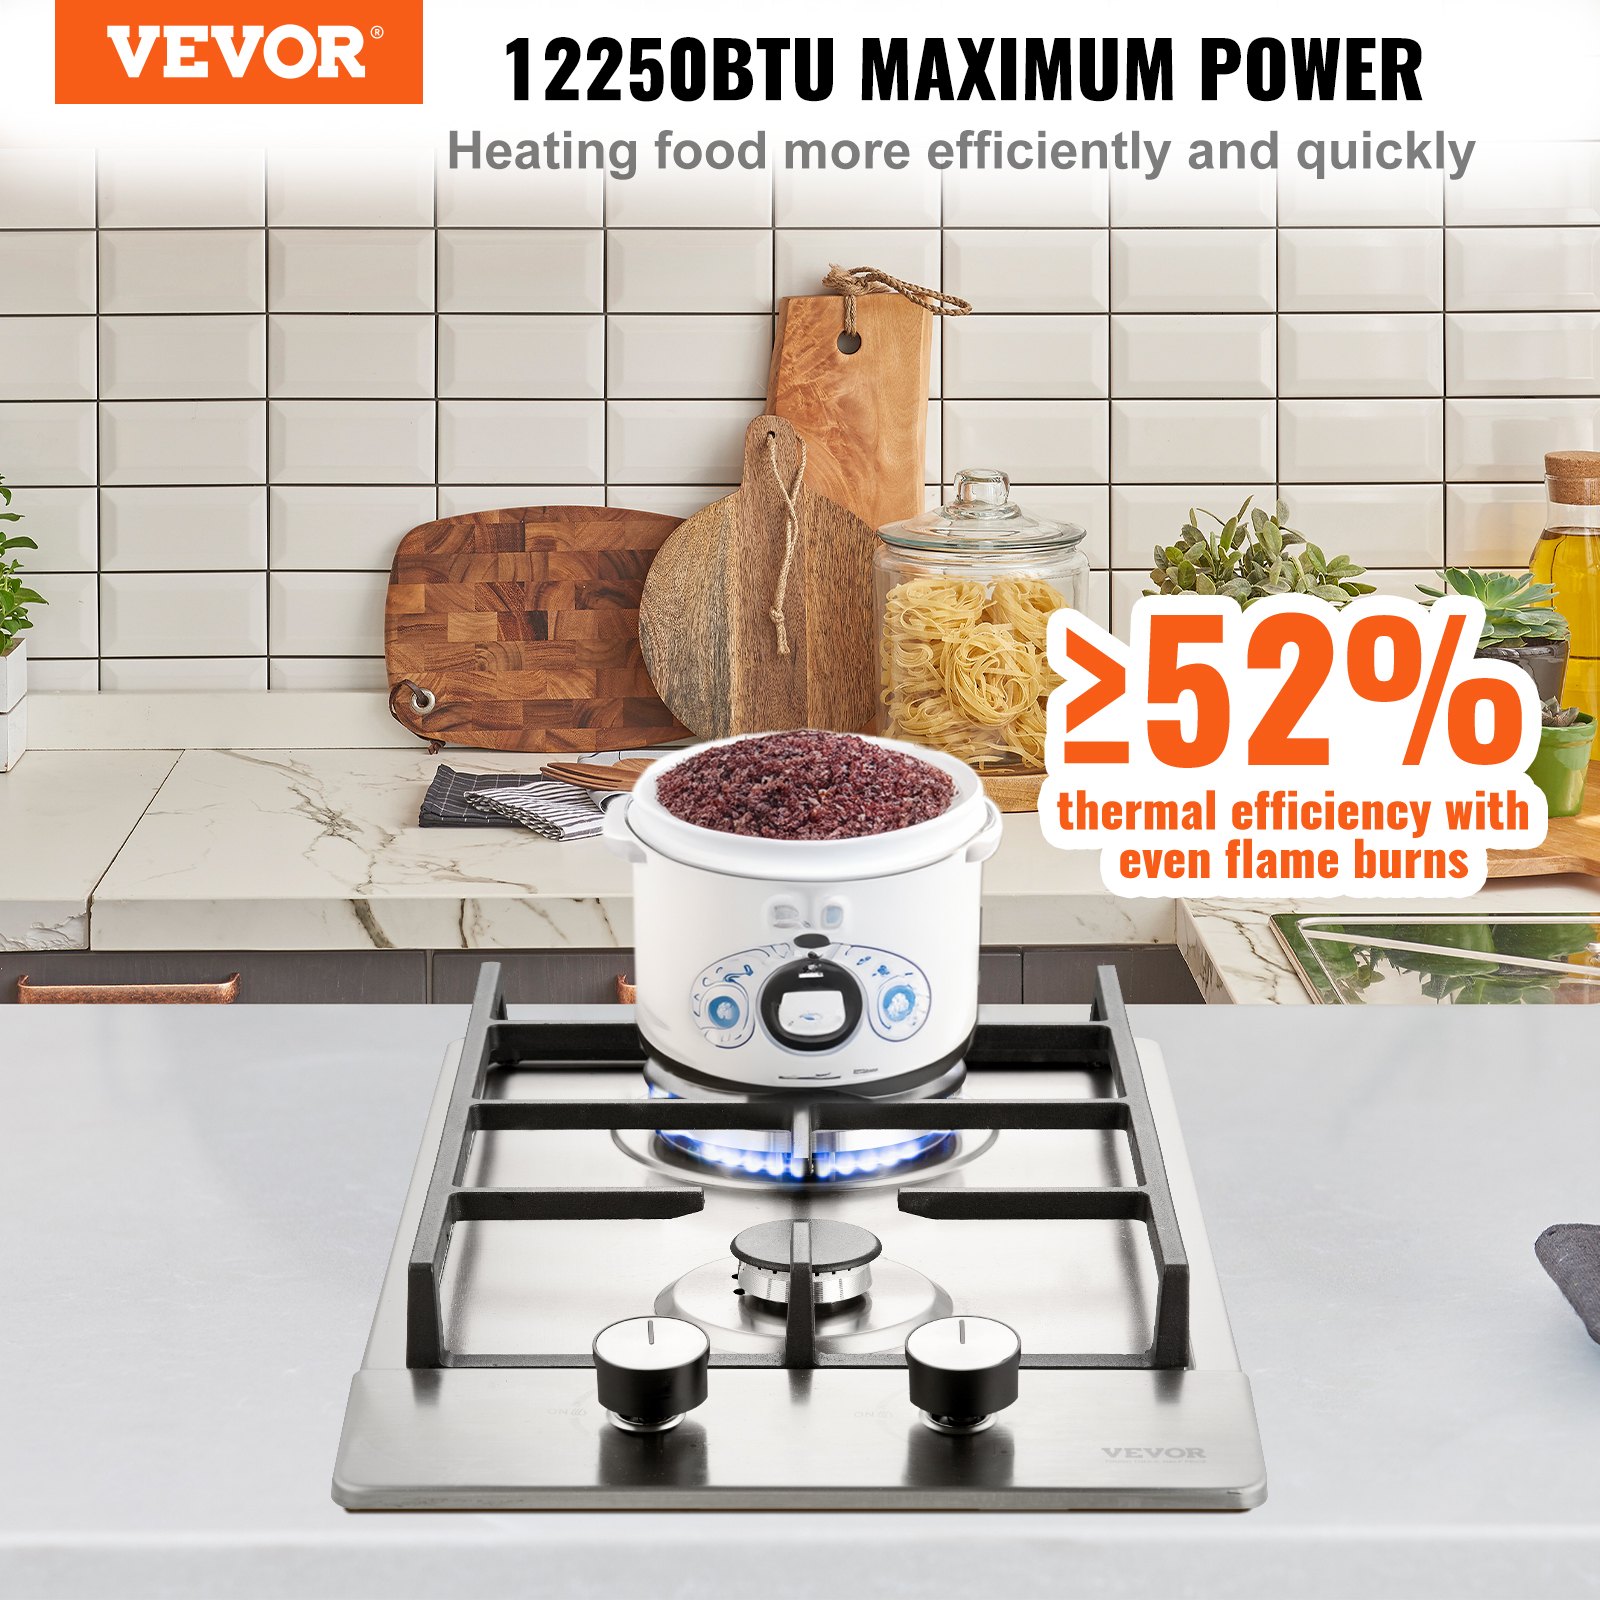


Unlock the full potential of your VEVOR gas cooktop 12 inch, Max 12250BTU 2 Burners Built-in stainless steel gas stove top with our comprehensive product manual. Whether you’re setting up your LPG/NG Convertible Dual Fuel Natural Gas Hob for the first time or troubleshooting common issues, this detailed guide is your go-to resource.
Our manual, packed with step-by-step instructions, safety tips, and optimization techniques, ensures you get the most out of your gas cooktop.
Designed with user-friendliness, it covers everything from basic installation to advanced features, including the thermocouple protection system. Download now and experience hassle-free cooking with the ultimate support at your fingertips.
VEVOR GAS COOKTOP USER MANUAL
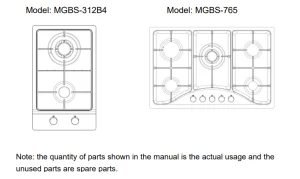
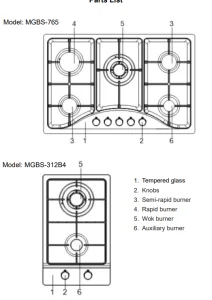
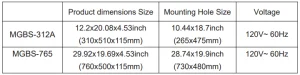
Model: MGBS-312B4, MGBS-765
IMPORTANT SAFEGUARDS
Thank you for using this product. To ensure you can operate the machine correctly, read these instructions carefully before operation and keep them properly for future reference. Please read this page’s precautions and safety rules to ensure your safe use.
This manual will outline safety warnings and precautions, as well as operating, maintenance, and cleaning.
The warnings and instructions reviewed in this manual cannot cover all possible conditions and situations that may occur. Caution and common sense are not built into this product, since we believe the users will comply with these codes.
Please read ALL the instructions before using your machine.
- Do NOT let children and minors get close to or touch the machine.
- Do NOT touch the hot surface directly with your hands. Always operatewithknob.
- Do NOT immerse the appliance in water or any other liquid.
- Cool down the HOT parts before operation.
- Using accessories or attachments not provided or recommended by the manufacturer may cause injury.
- Prior to installation, ensure that the local distribution conditions (NG/LPG gas and gas pressure) and the appliance’s adjustment are compatible.
- The adjustment conditions for this appliance are stated on the label.
- This appliance is not connected to a combustion products evacuation device. It shall be installed and connected per current installation regulations, with particular attention to the relevant ventilation requirements.
- Do not use it in poorly ventilated places or for commercial purposes.
- This appliance must be installed and serviced by a competent person.
- This appliance shall be installed following the regulations and only used in a well-ventilated space.
- Ensure that the gas supply complies with the type stated on the rating label.
- Do not attempt to modify the machine in any way.
- If the machine is not used for an extended period, clean and cover it, and store it in a dry and safe place.
- KEEP IT OUT OF CHILDREN’S REACH.
- Never leave it unattended while in use.
- Avoid using it in flammable liquids, gases, dust, or other explosives.
- Extreme caution must be taken when moving an appliance containing hot oil or other hot liquids.
- Children shall not play with the machine alone. Children shall not perform cleaning and user maintenance without supervision.
- The machine must never be left unattended during operation or cleaning.
- Always place the machine on a firm, level, and fire-resistant surface away from combustibles.
- The machine should be located in an open area with good ventilation, away from trees and fences.
- While every effort has been made to manufacture your machine to remove sharp edges, you should handle all components carefully to avoid accidental injury.
- If the fire flares up due to dripping fat, then douse the flames lightly with a fine water spray.
- Keep a fire extinguisher within a safe and accessible distance and ensure those operating the machine are trained to use it.
- Avoid flammable material and fluids such as petroleum, alcohol, diesel fuel, kerosene, and charcoal lighter fluids or vehicles while in use. Do not use these materials to light or relight.
- DO NOT CLEAN IT WITH ANY ABRASIVE MATERIAL.
- DO NOT use the machine in high wind.
- Do NOT store the machine until the fire is entirely out and surfaces are cold;also, do not store the machine with ashes or combustible materials inside.
- Do NOT overload or use this machine to burn leaves, household waste, or paper.
- DO NOT wear loose clothing, and ensure that long hair is tied back when around the machine when it is hot or in use.
- DO NOT use this gas cooktop as a furnace.
- Ensure the gas cooktop is positioned on a permanent, flat, level, heat-resistant, non-flammable surface, always away from flammable items, including wooden fences or overhanging trees.
- Ensure the product has a minimum of 2 meters overhead clearance and has a minimum of 2 m clearance from other surrounding items.
- NEVER leave a burning fire unattended.
- This machine is intended for domestic cooking only. It is not designed for commercial or industrial purposes.
- This appliance is not connected to a combustion products evacuation device. It must be installed and connected under the current installation regulations. Particular attention shall be given to the relevant ventilation requirements.
- A gas cooking appliance will produce heat and moisture in the room where it is installed. To ensure a continuous air supply, keep air vents in good condition or install a cooker hood with a venting hose.
- When using the gas cooktop for an extended period, the ventilation should be improved by opening a window or increasing the extractor speed.
- Do not use the machine if it is in contact with water. Do not operate the gas cooktop with wet hands.
- Ensure the control knobs are in the closed position when not inuse.
- When using other electrical appliances, ensure the cable does not come into contact with the hot surfaces of the cooking appliance.
- Unstable or misshapen pans should not be used on the machine, as unstable pans can cause an accident by tipping or spillage.
- Never leave the gas cooktop unattended when cooking with oil and fats.
- Never use plastic or aluminium foil dishes in the machine.
- Perishable food, plastic items and aerosols may be affected by heat and should not be stored above or below the machine unit.
- Only an authorised Service Engineer should repair or service the machine; only genuine approved spare parts should be used.
- Ensure the gas cooktop supply cable does not contact surfaces with temperatures above 50°C.
- The gas cooktop cannot be used for barbecuing.
- Do not place clothes above the machine; avoid using it as a clothes dryer.
- This gas cooktop cannot be used for other purposes.
- Not suitable for commercial use.
- Use only a rubber hose. Do not use a vinyl plastic hose, as this can be dangerous.
- In the event of a burnback. (i.e., where the gas burns back on the jet), Turn off the valve and light again. If the problem persists, return the unit to your dealer for checking.
WARNING!
- This gas cooktop will become very hot; do not move it during operation.
- In case of the danger of carbon monoxide poisoning, do not use the product rotisserie grill indoors.
- Do not use the barbecue in a confined and/or habitable space, such as a house, tent, caravan, motor home, or boat.
- Remove all packaging materials and keep them for future use. Packaging materials are not a toy.
- Don’t let children play with the packaging materials. If they swallow them, they will suffocate!
- Do not use spirit or petrol for lighting or relighting!
- Keep children and pets away. Children must not operate or play near this machine.
- Failure to follow instructions could result in death, serious bodily injury and/or property loss.
- After installation, please check for air leaks and ensure no leaks before use.
- If a gas leak is found, close or open the main valve, leave the house, and call your dealer. Do refrain from turning an electric switch on or off. Don’t light a match! DO NOT use a lighter!
PRODUCT COMPONENTS
- Please carefully dispose of all plastic bags and keep them away from children.
- Check all components provided according to the list in this manual.
- Make sure you have all of the parts listed. If not, contact your local store, which can help you.
ATTENTION!
While every care is taken in manufacturing this product, care must be taken during assembly in case sharp edges are present.
VEVOR ELECTRIC COOKTOP PARTS LIST
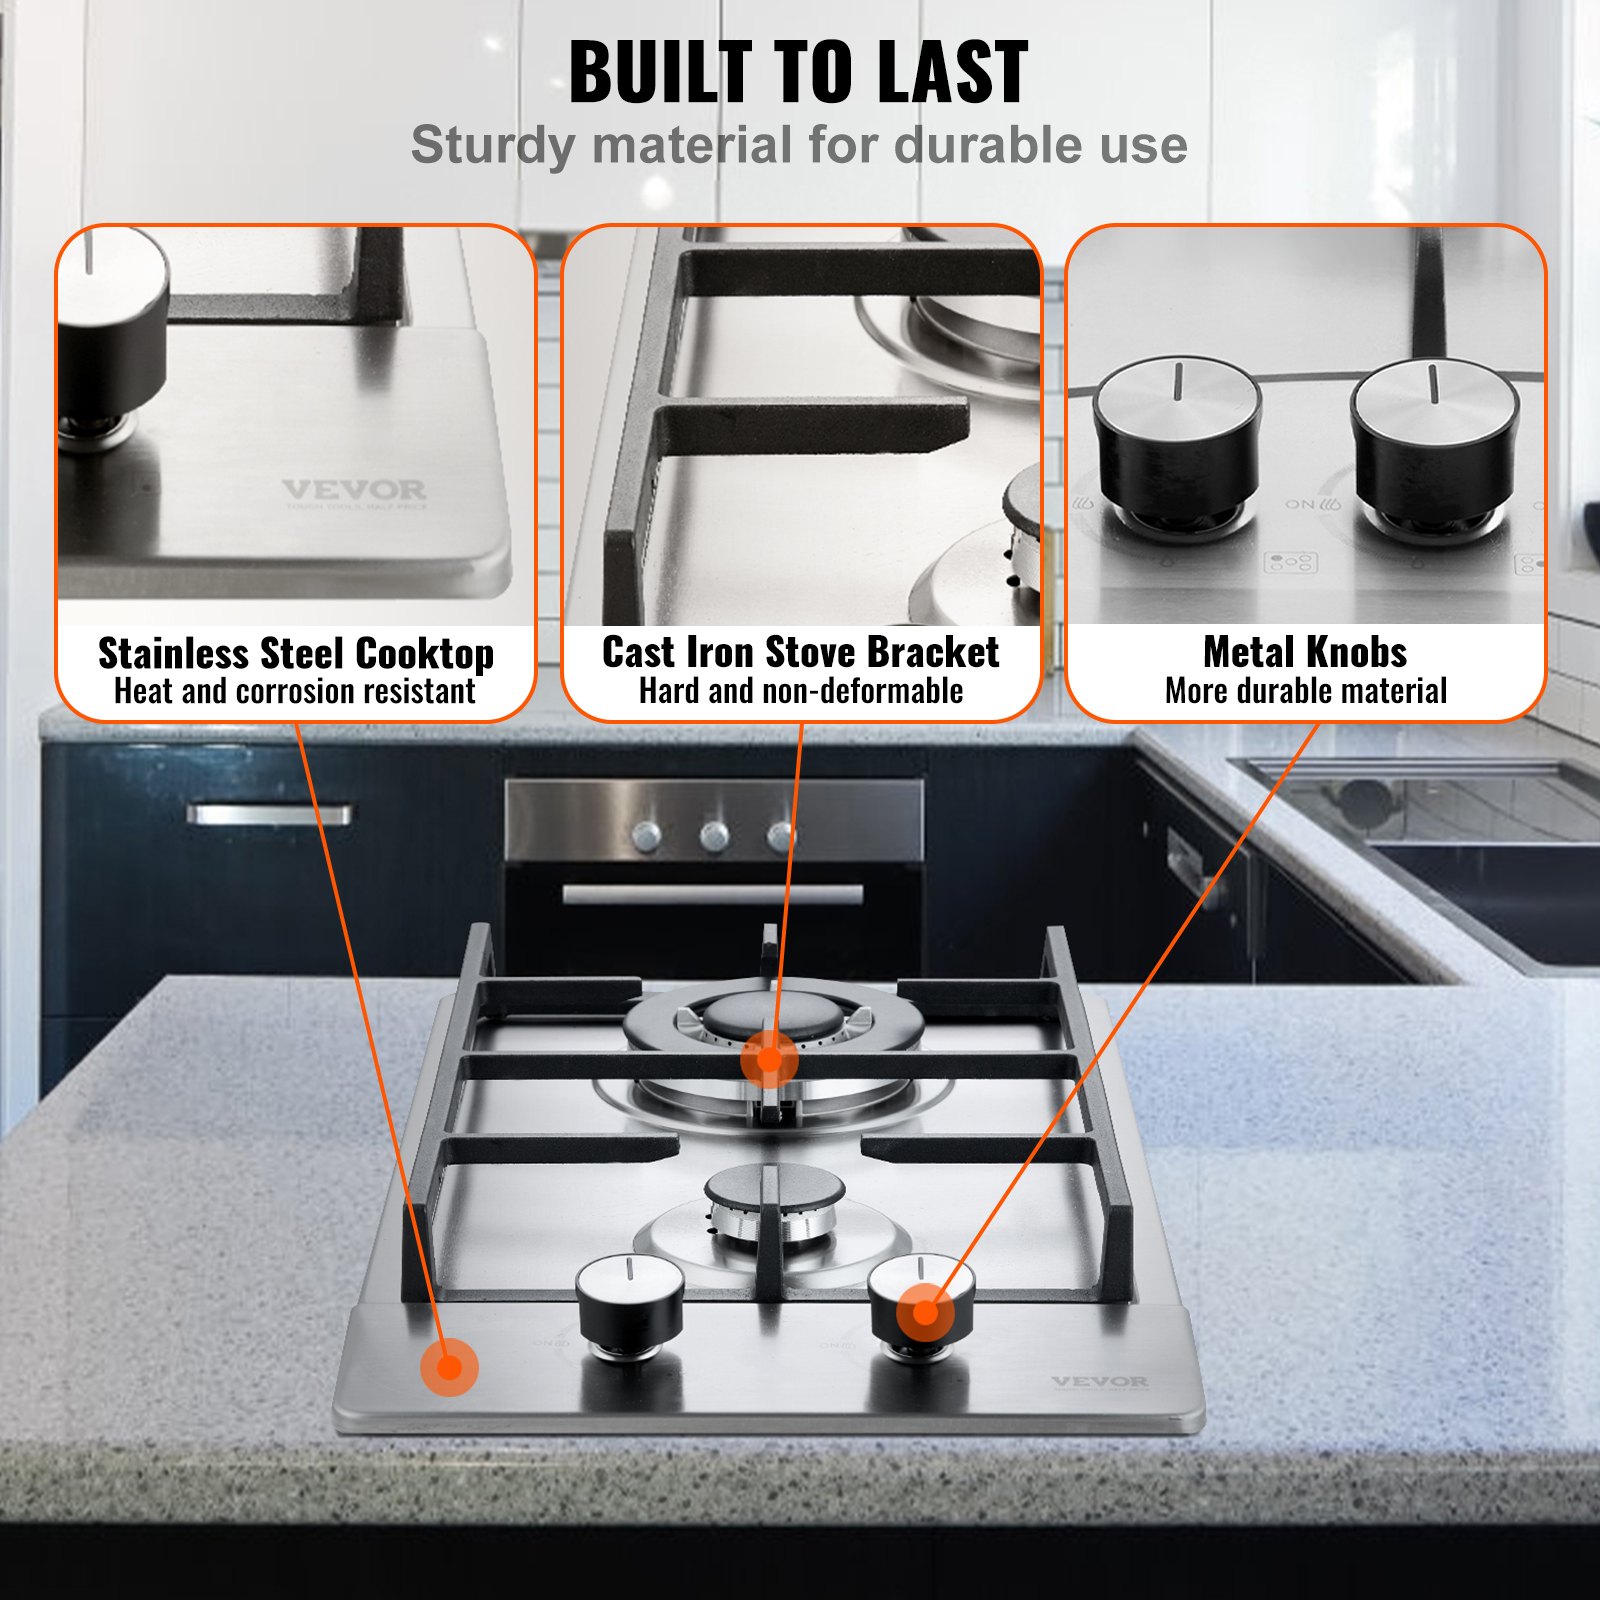
GAS COOKTOP TECHNICAL DATA
Burner Configuration
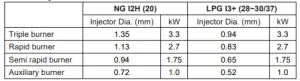
NOTE: Ensure that the local distribution conditions(NG/LPG gas and gas pressure) and the appliance adjustment are compatible before installation.
OPERATING INSTRUCTIONS
Before using the gas cooktop for the first time, peel off any promotional and packaging materials and check that the machine is clean and dust-free. If necessary, wipe them over with a damp cloth. Spread with an absorbent kitchen towel and wipe off any excess oil. When your product is heated for the first time, it may emit slight smoke or odor, which is normal for many heating appliances. It will not affect the safety of your appliance.
- Confirm that you have the right model for your type of gas supply: NG or LPG.
- Press the knob in, turn anticlockwise to maximum and the burner will ignite. Before releasing knob, ensure a flame is established, if theburner failstoignite, put into off position and try again.
- The device shall not be operated for more than 15 seconds. If the burner has not lit after 15 seconds, stop operating the device, open the compartment door, and/ or wait at least 1 minute before attempting to ignite the burner again.
- If the burner flames are accidentally extinguished, turn off the burner control and do not attempt to re-ignite the burner for at least 1 minute.
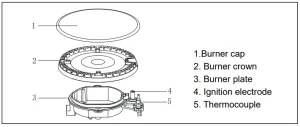
- If you cannot light the flame even after several attempts, check that the”cap” and“crown” (see diagram below) are in the correct position. To put the flame out, turn the knob.
Please read and follow this advice when cooking on your product
- When switching on the mains, it is standard for the spark generator to be activated automatically after installation or a power cut.
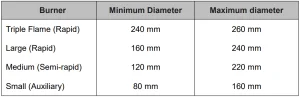
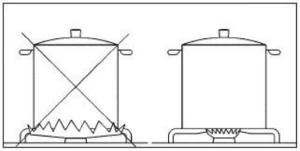
- To ensure maximum burner efficiency, you should use pots with flat bottoms that fit the burner size (see table).
- If you use a saucepan smaller than the recommended size, the flame will spread beyond the bottom of the vessel, causing the handle to overheat.
- When using one pan with concave or convex bases, you can put one accessorial pan support on the pan support. And use an appropriate pan on the accessorial pan support.
CAUTION:
- The overheated splashes could easily ignite when frying food in hot oil or fat.
- Warning: The user is warned against using cooking vessels on the hotplate that overlap its edges.
- As soon as a liquid starts boiling, turn down the flame so that it will barely keep liquid simmering. If the control knobs become difficult to turn, don’t hesitate to get in touch with your local service centre.
CAS COOKTOP CLEANING MAINTENANCE
- Before any maintenance or cleaning can occur, you must turnoff thepower, unplug, and turn off the air source.
- The machine is best cleaned while it is still warm, as spillage can be removed more easily than if it is left to cool.
- The machine Panel:
Regularly wipe over the machine top using a soft cloth well wrung out in warm water to which a little washing up liquid has been added. Avoid using the following: household detergents and bleaches; impregnated pads unsuitable for non-stick saucepans; steel wool pads; and bath/sink stain removers.
For stainless steel machines, use a proprietary stainless steel cleaner.
- Pan Supports:
The pan supports are dishwasher-proof. If washing them by hand, take care when drying them as the enamelling and drying process occasionally leaves rough edges. If necessary, remove stubborn stains using a paste cleaner.
- The Burners
The burner caps and crowns can be removed for cleaning. Wash the burnished caps and crowns using hot soapy water, and remove marks with a mild paste cleaner. A well-moistened soap-impregnated steel wool pad can be used cautiously if the marks are difficult to remove. After cleaning, be sure to wipe with a soft cloth.
- Ignition electrode
Electric ignition is obtained through a ceramic “electrode” and a metal electrode (see diagram on pages 3 – 4). Keep these components very clean to avoid lighting difficulties, and check that the burner crown holes are not obstructed.
- Thermocouple
The thermocouple is crucial for cutting the gas supply in case of a flameout during cooking. Be sure to keep it in the best condition.
INSTALLATION PREPARATION
1. Provision for ventilation
The gas cooktop should not be installed in a bedroom under 20 m3. If it is installed in a room of volume less than 5 m3, an air vent of an effective area of 110 cm2 is required. If it is installed in a room of volume between 5 m3 and 10 m3, an air vent of effective area of 50 cm2 is required, while if the volume exceeds 11 m3, no air vent is required.
However, if the room has a door that opens directly to the outside, no air vent is required, even if the volume is between 5 m3 and 11 m3.
If other fuel appliances exist in the same room, B.S. 5440 Part 2 Current Edition should be consulted to determine the requisite air vent requirements.
2. Location
The gas cooktop may be located in a kitchen, a kitchen/diner or a bedsitting room, but not in a bathroom, shower room or garage. Before making the outlet in the worktop, ensure a minimum distance of 55 mm between the edge of the machine and the wall. A minimum distance of 100 mm must be left between the side edges of the machine and any adjacent cabinets or walls.
The minimum distance combustible material can be fitted above the machine, with the machine’s edges being 400 mm. If it is fitted below 400 mm, a space of 50 mm must be allowed from the machine’s edges. The minimum distance combustible material can be fitted directly above the machine is 700mm.
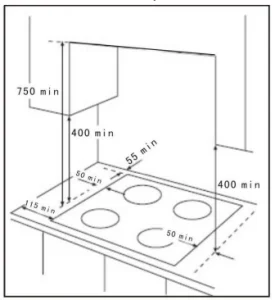
Warning: Using a gas cooking appliance produces heat and moisture in the room in which it is installed. Ensure the kitchen is well-ventilated: open natural ventilation holes or install a mechanical ventilation device.
Prolonged intensive use of the appliance may call for additional ventilation, such as opening a window or more effective ventilation, such as increasing the level of mechanical ventilation where present.
IMPORTANT: A competent person must install the gas cooktop according to the relevant gas standards.
Please ensure that once the machine is installed, it is easily accessible for the engineer in case of a breakdown.
Installed Gas Cooktop
Before using the appliance for the first time, peel off any promotional and packaging materials and check that the machine is clean and dust-free. A competent person must carry out any gas installation. The manufacturer will not accept liability should the above instructions or any other safety instructions incorporated in this book be ignored.
1. Put the seals supplied with the machine on the edges of the cutout so that the seals meet without overlapping;
2. Place the machine in the cutout, ensuring it is centred.
3. Fix the machine with the relevant fixing clamps and screws, as shown in the diagram. When the screws have been tightened, the excess seal can be removed.
4. At the end of the shaft, which includes the GJ 1/2″ threaded elbow, the adjustment is fixed to fit the washer between the components as shown in the diagram. Screw the parts together without using excessive force.
Gas Connection: Connection to the gas supply should be with either rigid or semi-rigid pipe, i.e. steel or copper. The connection should be suitable for connecting to RC 1/2 (1/2 BSP male thread). When the final connection has been made, a thorough leak test must be carried out on the machine and during installation. Ensure that the main connection pipe does not strain the gas cooktop.
When a flexible tube is used, ensure it cannot contact the movable part of the housing unit and does not pass through any spaces susceptible to congestion.
5. This machine is designed to be connected to a 120V~ 60Hz electrical supply. Important: It is advisable to isolate the appliance from the furniture below with a separator, leaving a depression space of at least 10mm. If the machine is installed on the top of an oven, precautions must be taken to guarantee an installation per current accident prevention standards.
Pay particular attention to the position of the electric cable and gas pipe, they must not touch any hot oven parts. Moreover, suppose the machine will be installed on top of a built-in oven with forced cooling ventilation. Proper air vents must be installed to guarantee adequate ventilation, with lower air entering and higher air exiting.
Important: It is essential to install the elbow correctly, with the shoulder on the end of the thread, fitted to the machine connecting pipe. Failure to ensure the correct assembly will cause gas leakage.
Important: Before switching on, ensure the electricity supply voltage is the same as the machine rating label indicates.
ADJUST THE GAS PRESSURE
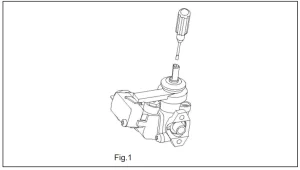
If, after the conversion from NG to LPG, the flame is down on the minimum position, adjust the gas pressure as follows: (Fig.2)
1. Place the knob of the defect burner on medium position so that theflameremain stable.
2. Take out the knob, and with a skinny screw driver, turn the by pass situated in the centre tap control shaft in position maximum. Turn the knob on position minimum. The flame will be too big.
3. Remove again the knob and reduce the pressure (turning the bypass) until convenient size of the flame. It means the flame is not going down anymore, but also not too big.
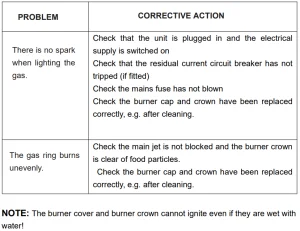
Gas Cooktop Troubleshooting
Recommended For Your Project
VEVOR Gas Cooktop 12 inch, Max 12250BTU 2 Burners Manual

Reviews
There are no reviews yet.