
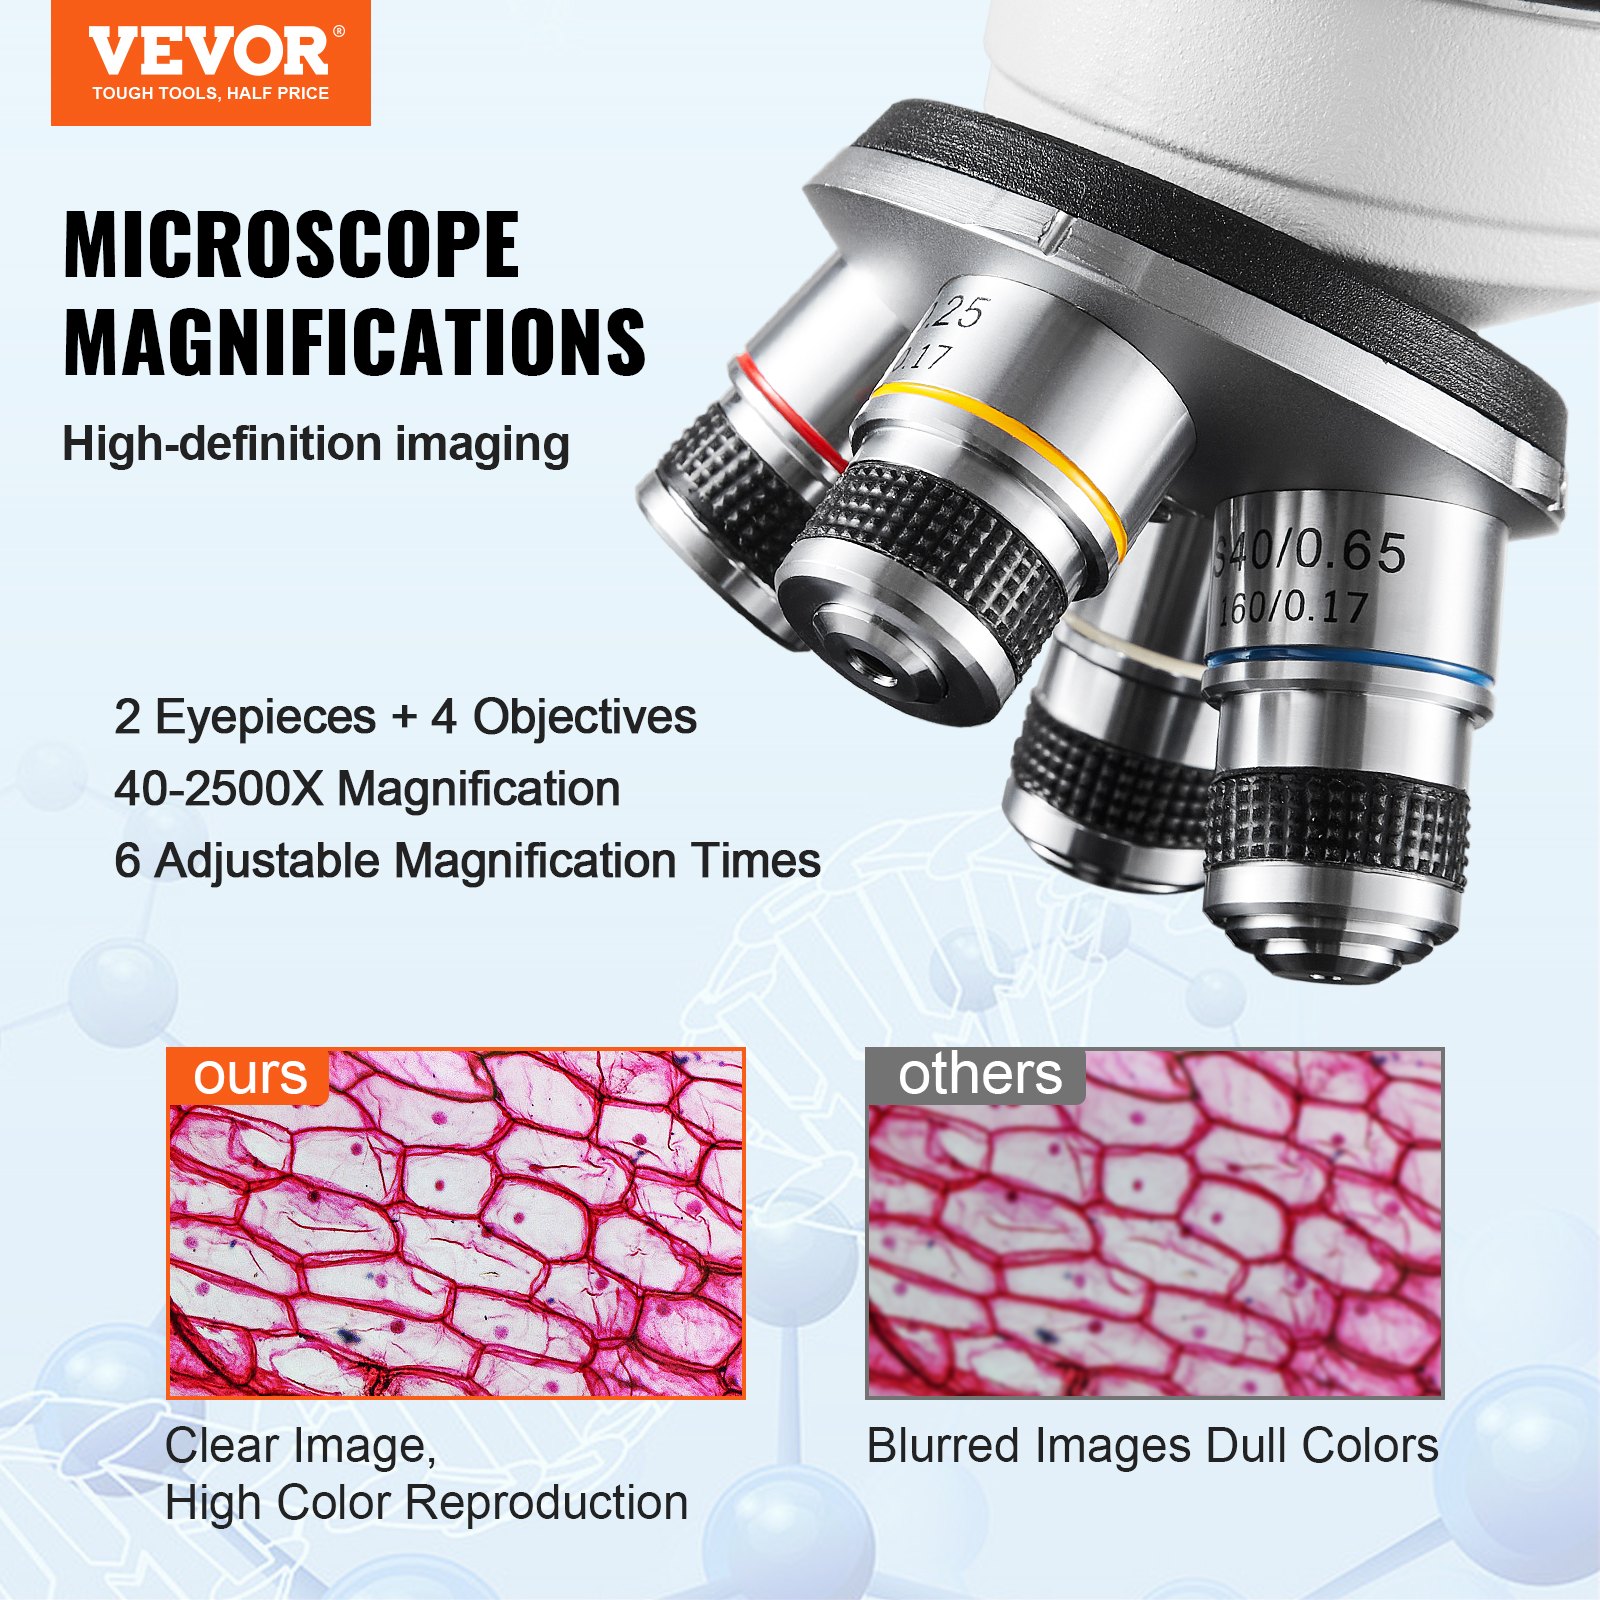


Unlock the full potential of your VEVOR Binocular Compound Microscope with our comprehensive product manual download. Designed for beginners and experienced users, our manual provides step-by-step instructions to help you easily set up, troubleshoot, and optimize your microscope. The VEVOR Binocular Compound Microscope, featuring 40X-2500X magnification, LED illumination, and a two-layer mechanical stage, is a powerful tool for any lab.
Our manual ensures you get the most out of its advanced features, including the phone holder and microscope slides. Whether you’re conducting intricate lab work, educational demonstrations, or personal explorations, this guide will enhance your microscopy experience.
Download now and master your VEVOR Binocular Compound Microscope today!
VEVOR Binocular Compound Microscope
Model: XSP-36, XSP-36TV
Safety Tips
- This microscope is only for micro observation. It cannot be used for anything other than what it is designed for, or the instrument will be damaged.
- Disassembling other parts except the detachable parts mentioned in this manual is strictly prohibited. Otherwise, it may reduce the instrument’s capability and result in electric shock, injury, or damage to the instrument. If you have any problems, please get in touch with the nearest agent.
- The input voltage is indicated on the plate behind the microscope. Ensure the input voltage is consistent with the output voltage of the charging adapter used. If not, do not use the microscope and contact the nearest agent. Using the wrong input voltage will cause damage to the electric appliance, which will damage the microscope.
- Using improper light source accessories may lead to instrument damage or an instrument fire disaster.
- To prevent electric shock or fire, the power supply must be turned off before installing the microscope, replacing the light source accessories, and plugging or unplugging the power supply switch. Flip the switch to “O” to turn off the power switch.
- Do not place the microscope in a humid area to prevent short circuits or other failures.
* If water is spilled on the microscope, immediately turn off the power switch (flip the switch to “O”), unplug the power cord, and wipe the water with a dry cloth.
* When unidentified objects enter or drip into the microscope, please stop use and contact the nearest sales agent.
- The stage rack extends out when moving the stage. When operating the microscope, please avoid hurting your hands or other body parts with the rack.
- This microscope is a precision optical instrument; if used or kept improperly, it will damage the instrument or adversely affect its accuracy. When choosing a place to use it, please consider the following conditions. Otherwise, the instrument may decline in function or malfunction.
* Avoid placing the microscope in direct sunlight, indoor vertical lighting, and other bright fields.
* If the room temperature of the use environment and place is 0° C -40° C and the maximum relative humidity is 85%, do not place the microscope in high-temperature and high-humidity places. Otherwise, the lens will fog or mold, damaging the microscope and shortening its service life.
* Impurities and dust will reduce the optical performance of the microscope, which should be avoided.
* Strong electromagnetic noise will interfere with the output signal of the microscope, so avoid approaching instruments and equipment that emit electromagnetic waves.
* Place the microscope on a sturdy table that can support the instrument’s weight and level it.
- This microscope is a precision optical instrument, so be careful when carrying it. Heavy impact and rough operation can damage instruments, and vibrating the objective lens will reduce the imaging accuracy.
- Do not simultaneously rotate the left and right focusing handwheels in opposite directions. When the stage has reached the limited movement position, please do not continue to rotate the coarse tuning handwheel. These operations will damage the focusing mechanism.
- Only a small amount of oil is needed for oil immersion observation. Excess oil can pollute the stage and condenser and degrade the instruments’ performance. When replacing the objective lens or ending the observation, the oil should be cleaned in time to avoid dirtying other lenses. Wiping out after the oil has dried will be challenging.
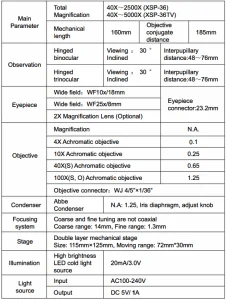
Technical Parameters
Technical Specification
Binocular Compound Microscope Parts List
Microscope Structure and Characteristics

 Installation and Use
Instrument Installation
- Place the microscope on a stable workbench. When moving the instrument, especially the optical parts, you should avoid touching the lens surface with your hands or objects with oil stains. Finger marks or oil stains on the surface of the lens will affect the imaging quality.
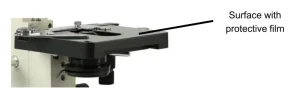
- During transportation, the platform surface is covered with a protective film. This film should be torn off before using the microscope (see picture 1).
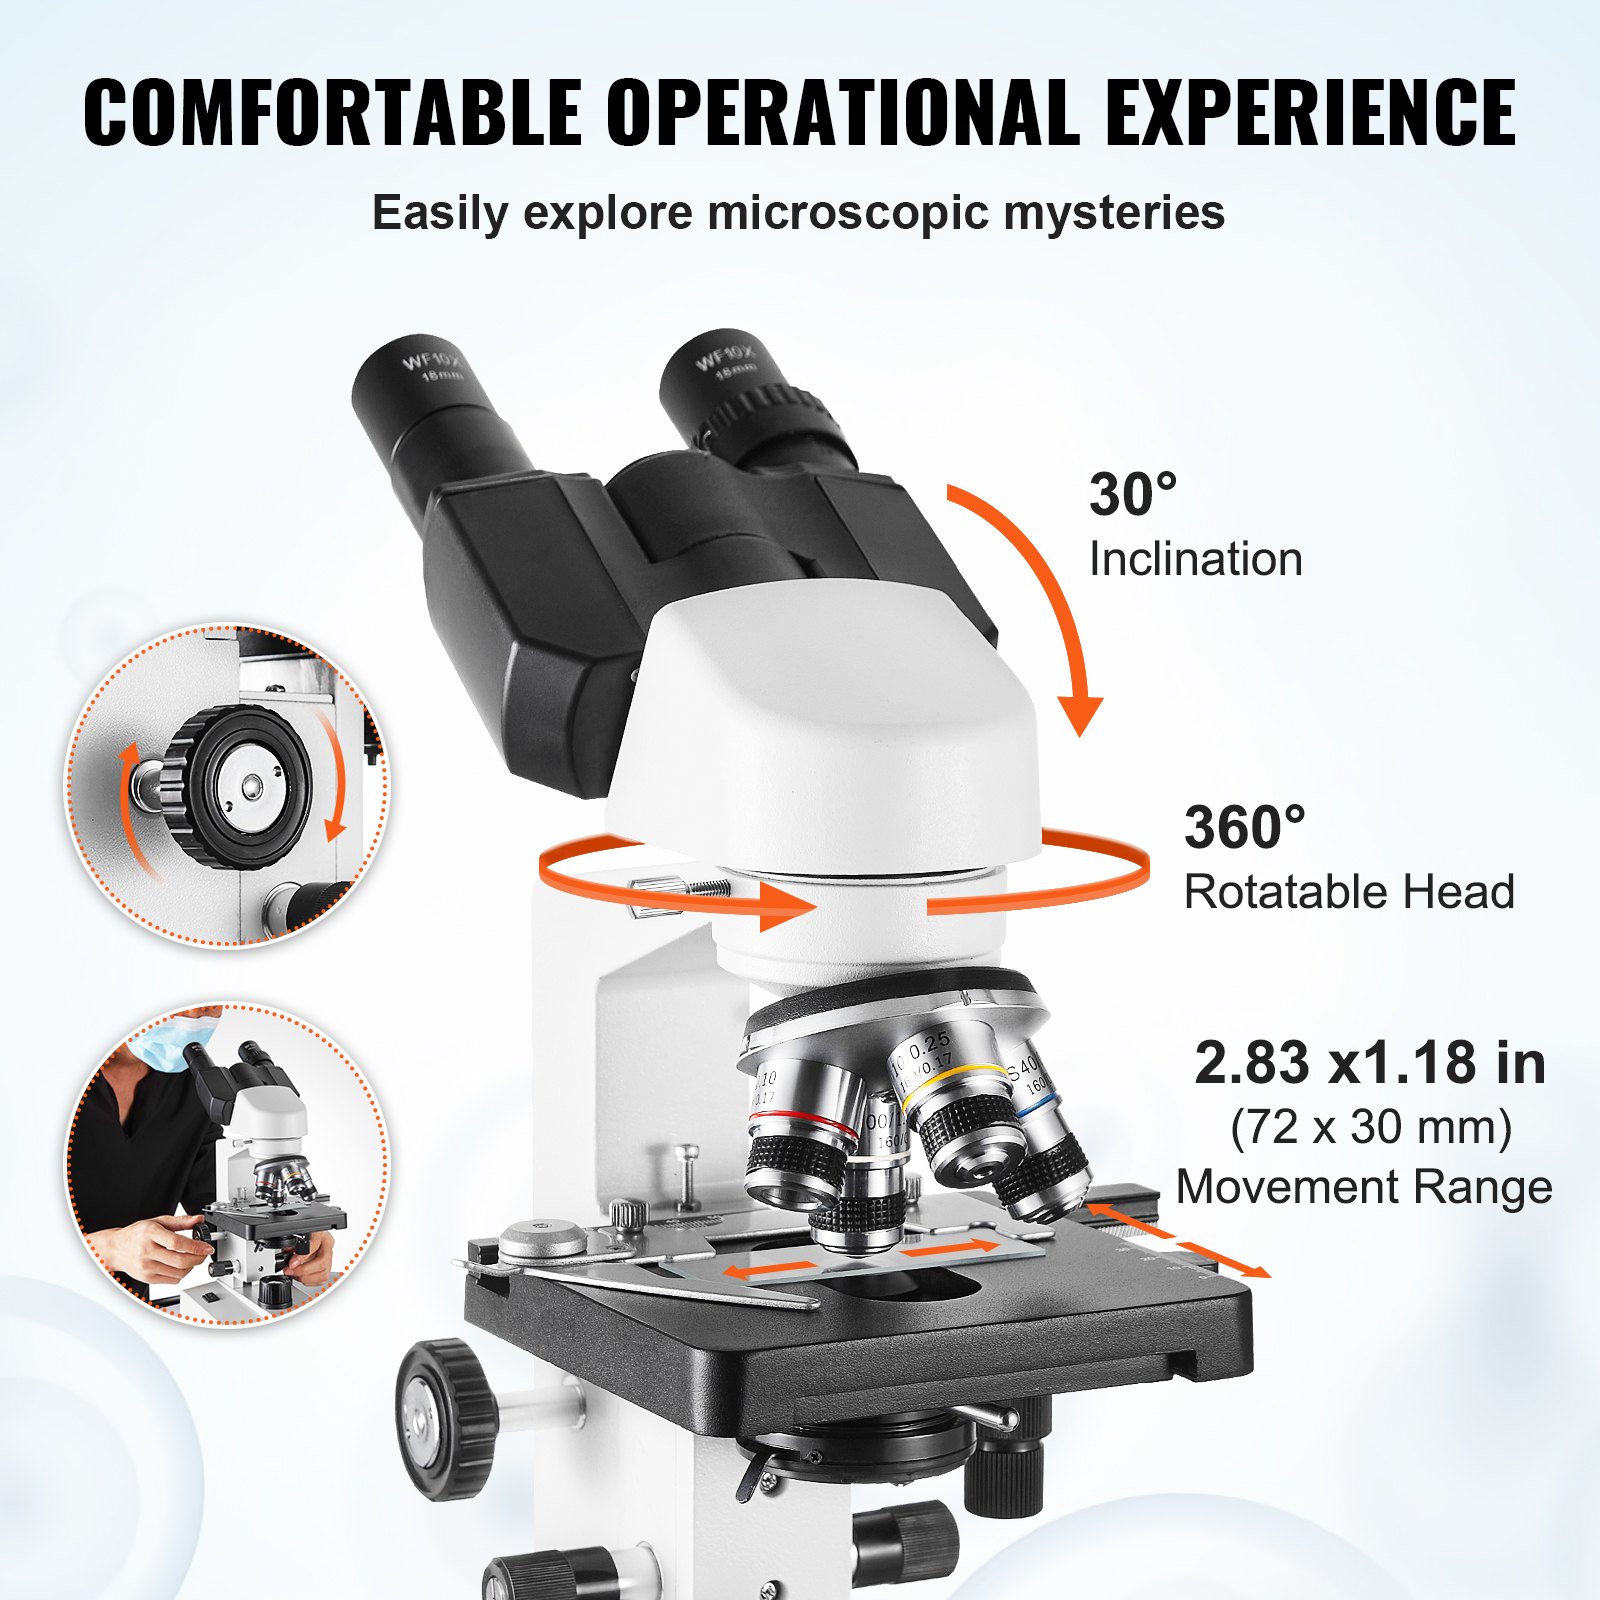
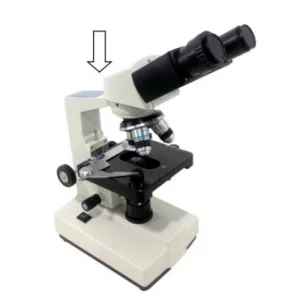
- Place the observer gently in the mounting hole of the frame, gently press the upper part of the observation body with one hand and tighten the fixing screw on the head of the frame with the other hand. When installing, ensure that the observation head is in place and not loose (see picture 2).
- After the microscope is installed, insert the DC plug into the power socket in the base and connect it to the external power supply, ensuring that the supply voltage is consistent with the instrument’s rated voltage.
- Finally, insert the eyepiece into the microscope eyepiece tube.
Binocular Compound Microscope Operation
Electric illumination
Turn on the power switch (flip the switch to “-“) to turn on the bulb.
Rotate the brightness adjustment knob to adjust the field of view brightness.
Install the specimen
Open the section holder gently with your finger, place the specimen in, cover the glass, release your finger, and secure the section.
Adjust the platform’s handwheel so the observed area is directly under the objective lens. Make sure it’s easy to observe and adjust.
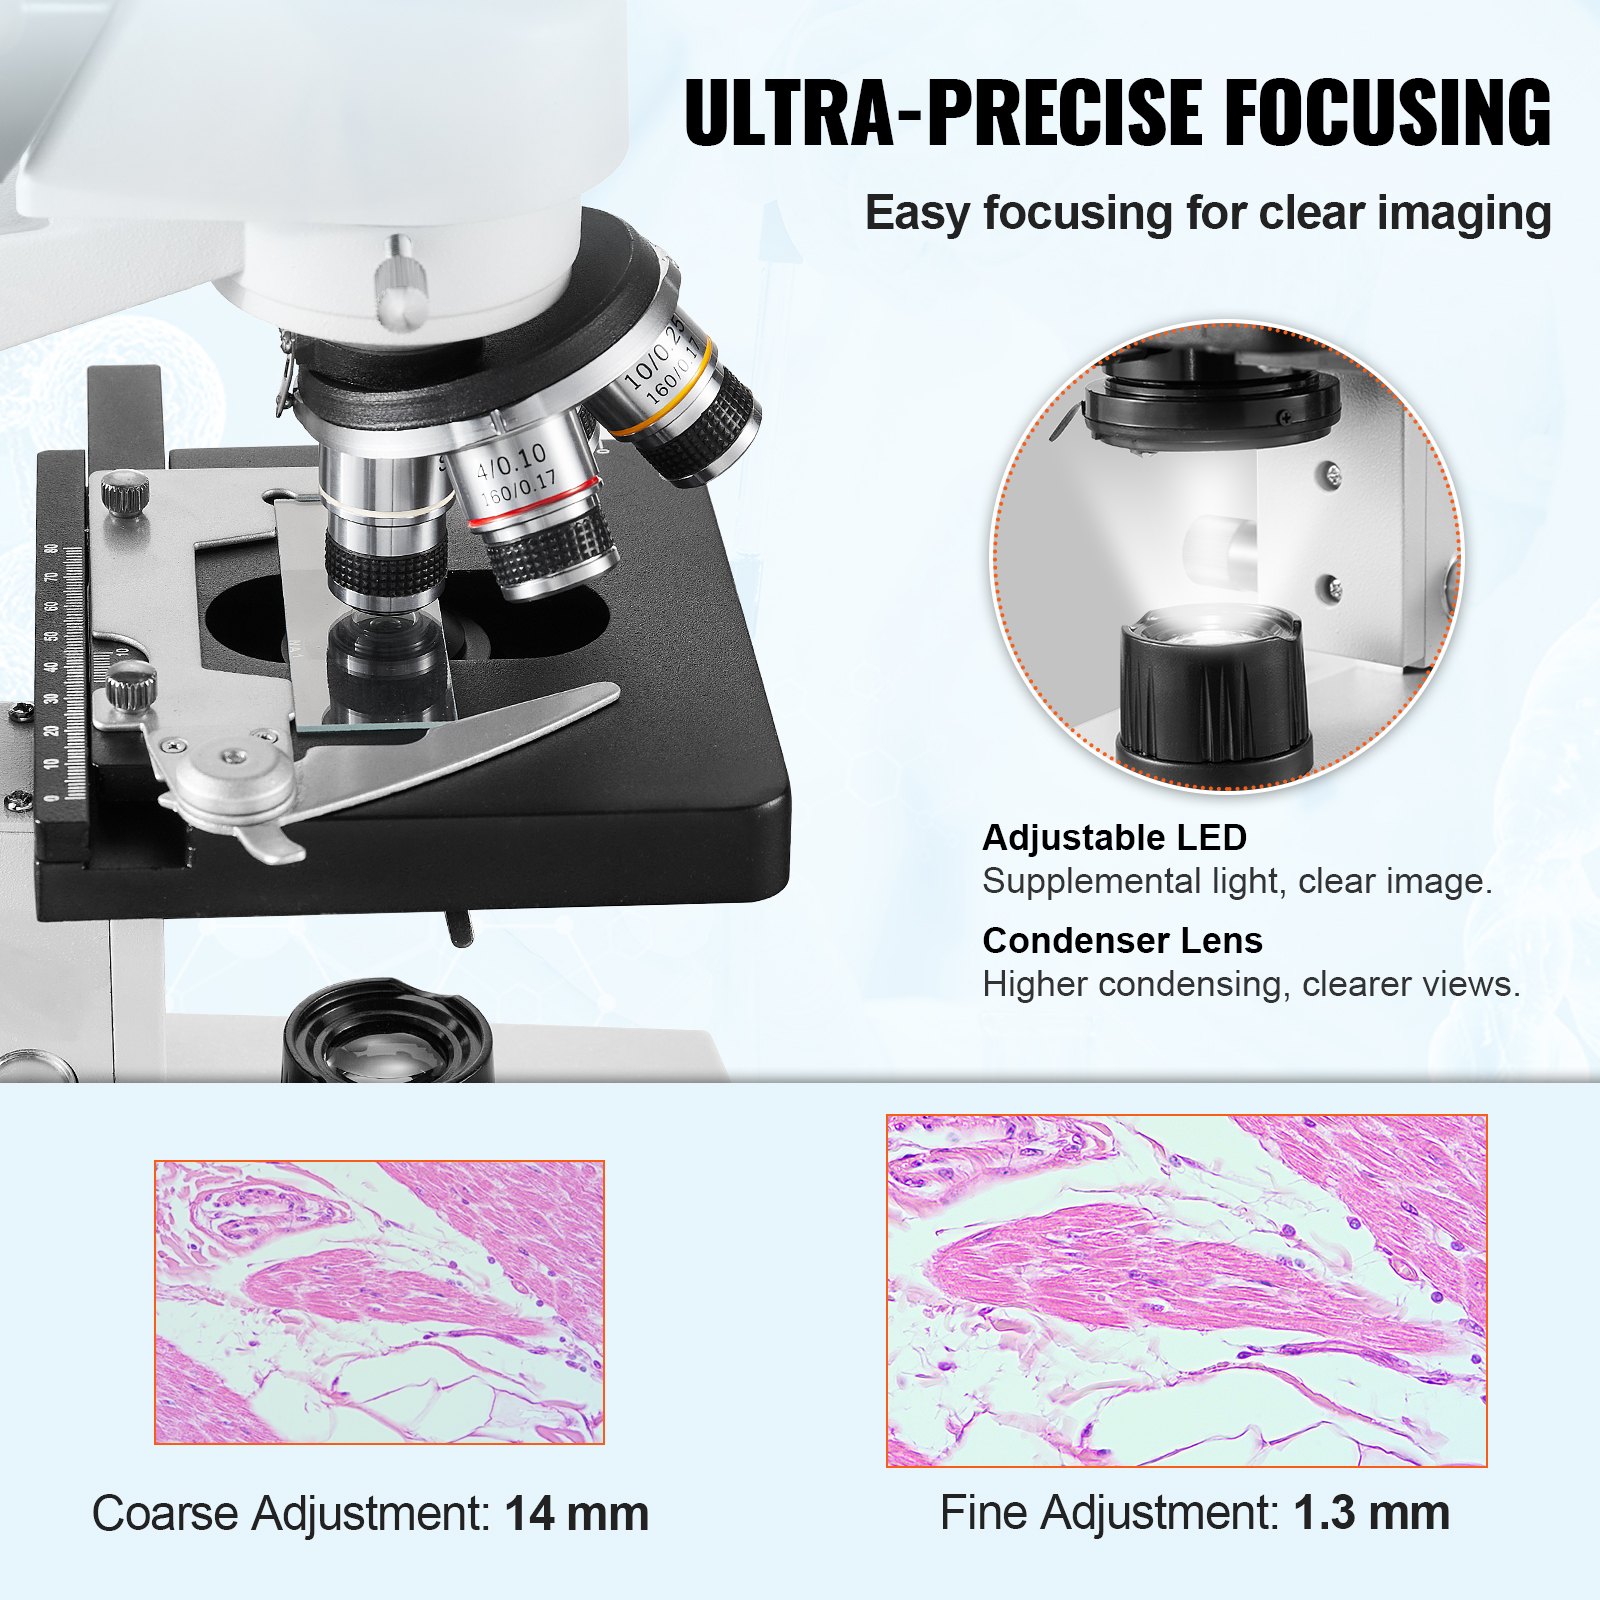
Focus with 10X objective.
- Rotate the objective converter to turn the 10X objective into the light path (the aim will be automatically snapped when rotated in the right place)
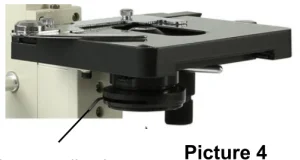
- Rotate the coarse-adjustable hand wheel. Move the stage to the highest position (see picture 3).
- Observe through the eyepiece and slowly rotate the coarse hand wheel to lower the stage. Stop rotating when the image appears (see picture 3)
Rotate the fine hand wheel for precise focusing.
- When you want to observe with a high-magnification objective, first focus with the 10X or 4X objective, then replace the high-magnification objective and rotate the fine hand wheel for precise focusing.
- Confirm the direction of rotation when rotating the coarse hand wheel for focusing, which can only lower the direction of the stage.
- When using coarse-adjustable hand wheels to raise the stage, pay attention to the distance between the specimen surface and the lower end face of the objective.
- Since the working distance is farther for the 10X and 4X objectives, as long as the standard thickness of the slide and cover glass is used (1.2mm and 0.17mm, respectively), even if the stage is moved to the highest position, the objective lens will not touch the specimen.
Select Objective
Rotate the objective Converter. Select the desired objective magnification (the objective can be automatically snapped when rotated in the right place)
Adjust the diaphragm adjusting knob makes the aperture diaphragm meet the observation requirements (see picture 4).
After the observation is finished, turn off the power switch.
Installation and use of accessories (optional)
Installed external CCD camera accessories
ATTENTION:
For the parameters and usage of the CCD camera and digital viewer, please refer to the instruction manual in the CD-ROM supplied with the CCD camera or digital viewer.
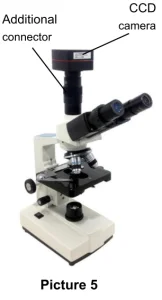
Trinocular observation viewer:
Take out the CCD camera, screw the lens end on the additional connector, and insert the interface into the third eyepiece. Use the provided hex hook wrench to hold the screw fixing the additional connector tight. Use the supplied USB cable to connect the video output end of the CCD camera to the video input end of the computer. Plug in the microscope power plug, turn on the microscope, and turn on the computer switch.
According to the focusing method described in the operation manual, the image is adjusted by clearly adjusting the adjustable viewing tube on the additional connector until a clear image appears on the computer screen and video observation is available (see picture 5).
The installation of frosted glass
When using LED lighting, frosted glass is necessary. First, turn out the ground glass bracket, smoothly insert the frosted glass into the bracket slot, and then turn the frosted glass bracket back to its original position (see picture 6).
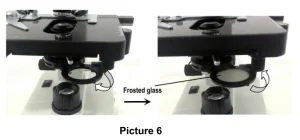
Attention: When you observe with a 4X objective lens, it is necessary to install frosted glass, and it is also recommended to use frosted glass to ensure uniform lighting when observed with a 10X.
Binocular Compound Microscope Maintenance
- When the microscope is finished observing or suspended, cut off the power supply to prevent the electrical components from remaining in the instrument’s working state. When not used for a long time, the power plug should be removed from the power socket, and all transmission wires should be kept appropriately.
- Clean lens: Use a blower or a soft brush to remove the dust. Heavy dirt and fingerprints can be gently wiped by lens paper or a soft cloth dipped in some alcohol and ether mixture (about 20 to 30% alcohol, 70 to 80% ether).
- Clean instrument surface: Wipe with a clean, soft cloth; scrub heavy dirt with a neutral cleaner.
ATTENTION
Do not use organic solvents (such as alcohol, ether, and their diluents, etc.) to wipe the instrument to prevent paint from slipping off it.
- Storage: If you do not use the microscope for a long time, please turn off the instrument’s power supply, fully cool the bulb, put the dust-proof cover on the microscope, and put it in the packing box. Store in a dry, ventilated, clean, and acid-alkali vapor-free place to avoid mold.
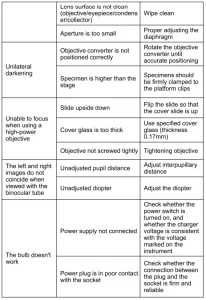
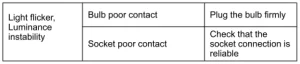
Troubleshooting Guide

 Warranty policy
Warranty period
From the date of purchase, the company provides a one-year warranty service for the host
Non-warranty policy
The following circumstances (but not limited to the following circumstances) are not covered by warranty and require payment of maintenance fees:
- The warranty period has expired.
- Damage caused by a force majeure factor.
- Damage caused by human error or improper use of the customs declaration.
- Any damage caused by failure to use, maintain, and adjust according to the instructions, unauthorized personnel dismantling, repairing, or modifying, misuse, abuse, liquid intake, accidents, use of non-original parts caused by failure or damage, malicious damage to the warranty card content, tear, tamper, etc.
- Other failures and damage are caused by problems other than the product’s design, manufacturing, and quality.
After Sales Service
- If the product you received has other problems, such as usage problems, please feel free to contact us and reply to online customer service within 24 hours so that we can serve you.
- Our products support 90 days for no reason to return or exchange.
- Wishing you a happy online shopping.
CORRECT DISPOSAL
This product is subject to European Directive 2012/19/EC provisions. The symbol showing a wheelie bin crossed through indicates that the product requires separate refuse collection in the European Union. This applies to the product and all accessories marked with this symbol.
Products marked as such may not be discarded with regular domestic waste, but must be taken to a collection point for recycling electrical and electronic devices.
Made In China
Recommended For Your Project
VEVOR Binocular Compound Microscope, 40X-2500X Magnification Manual


Reviews
There are no reviews yet.