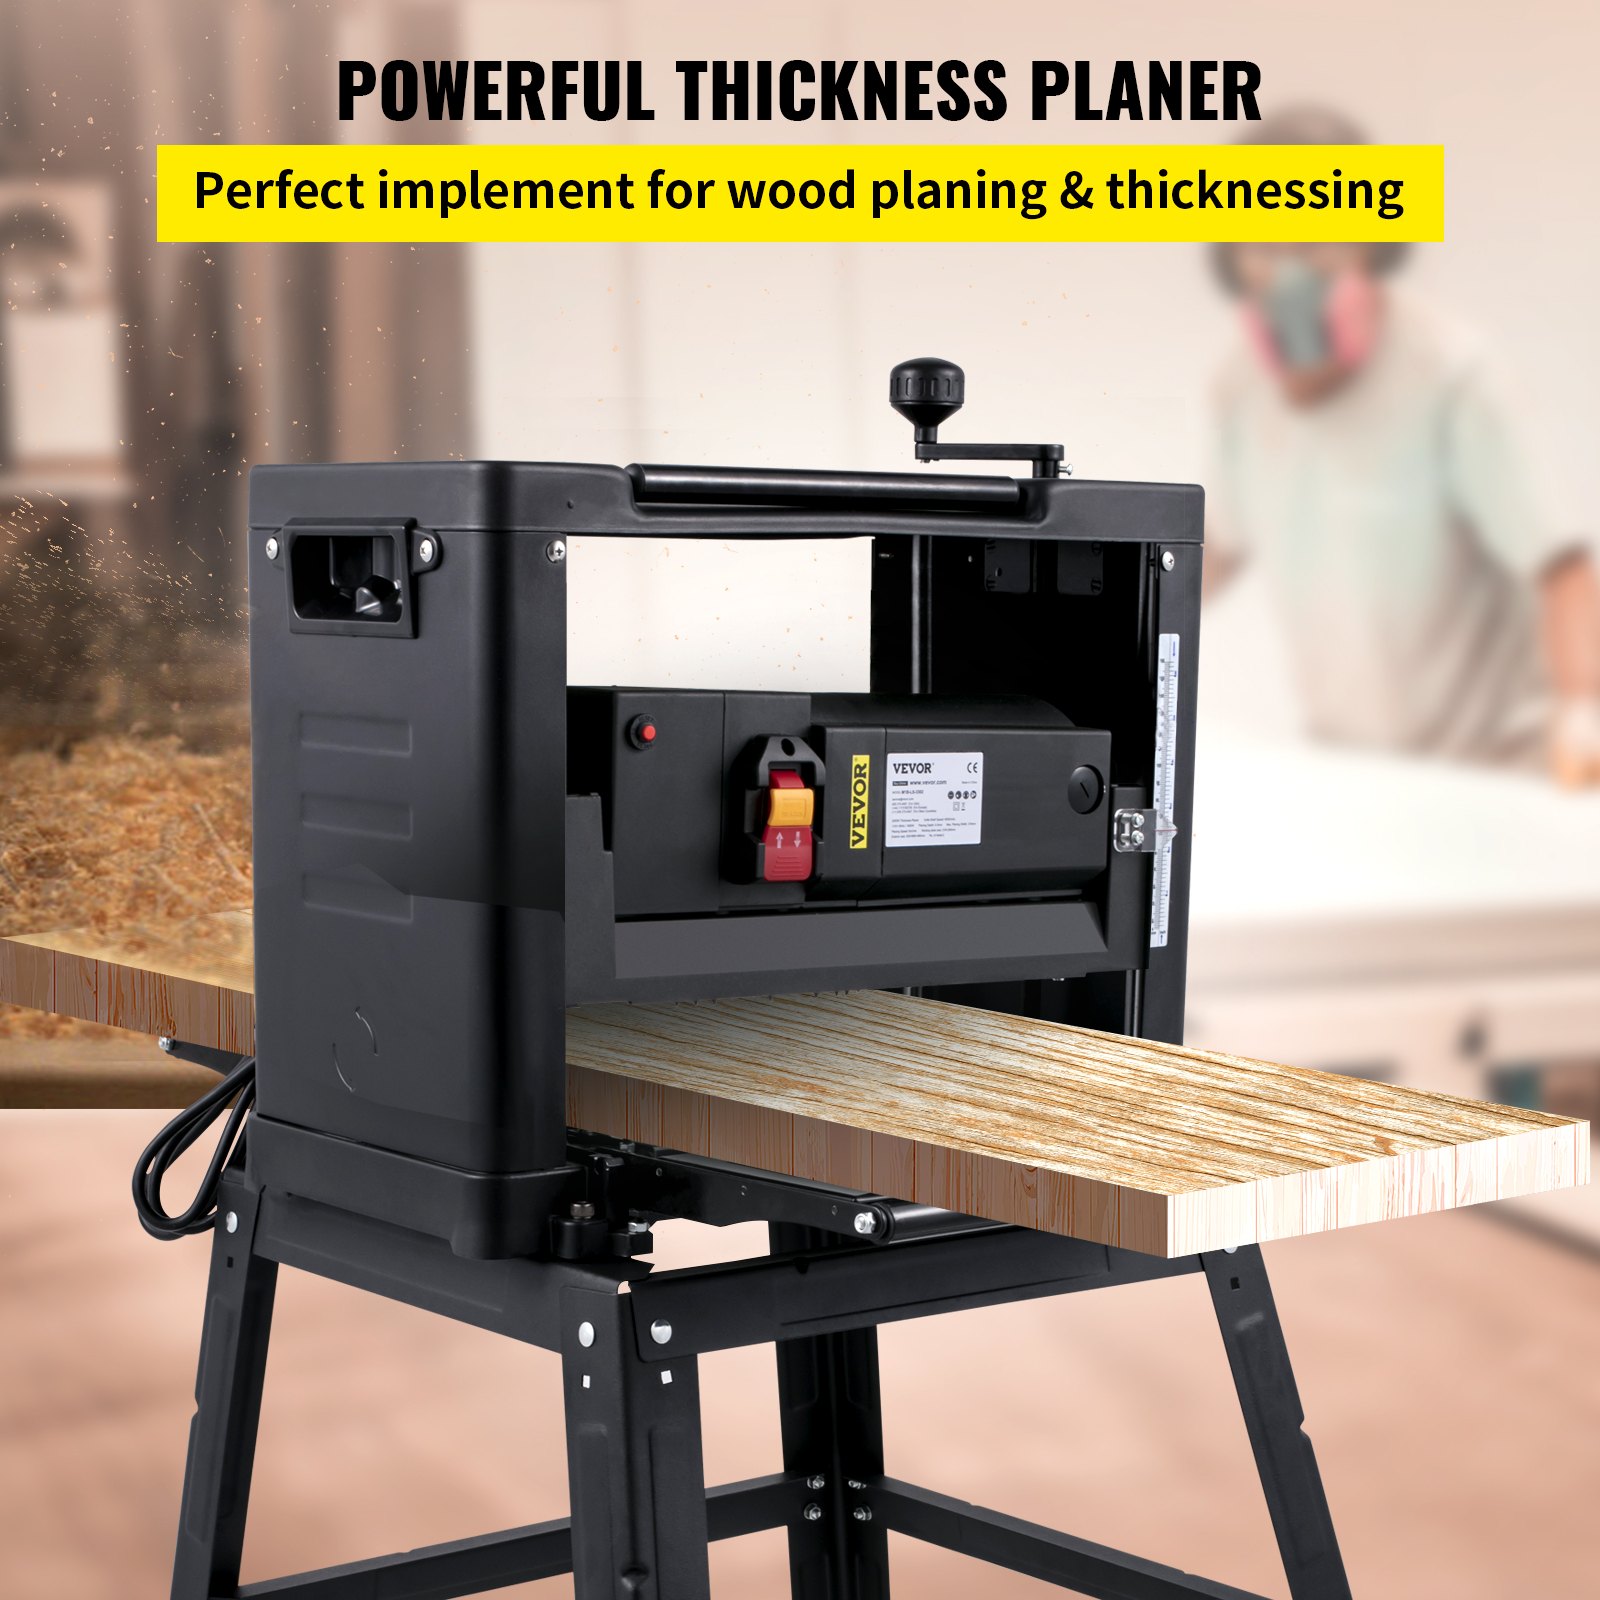
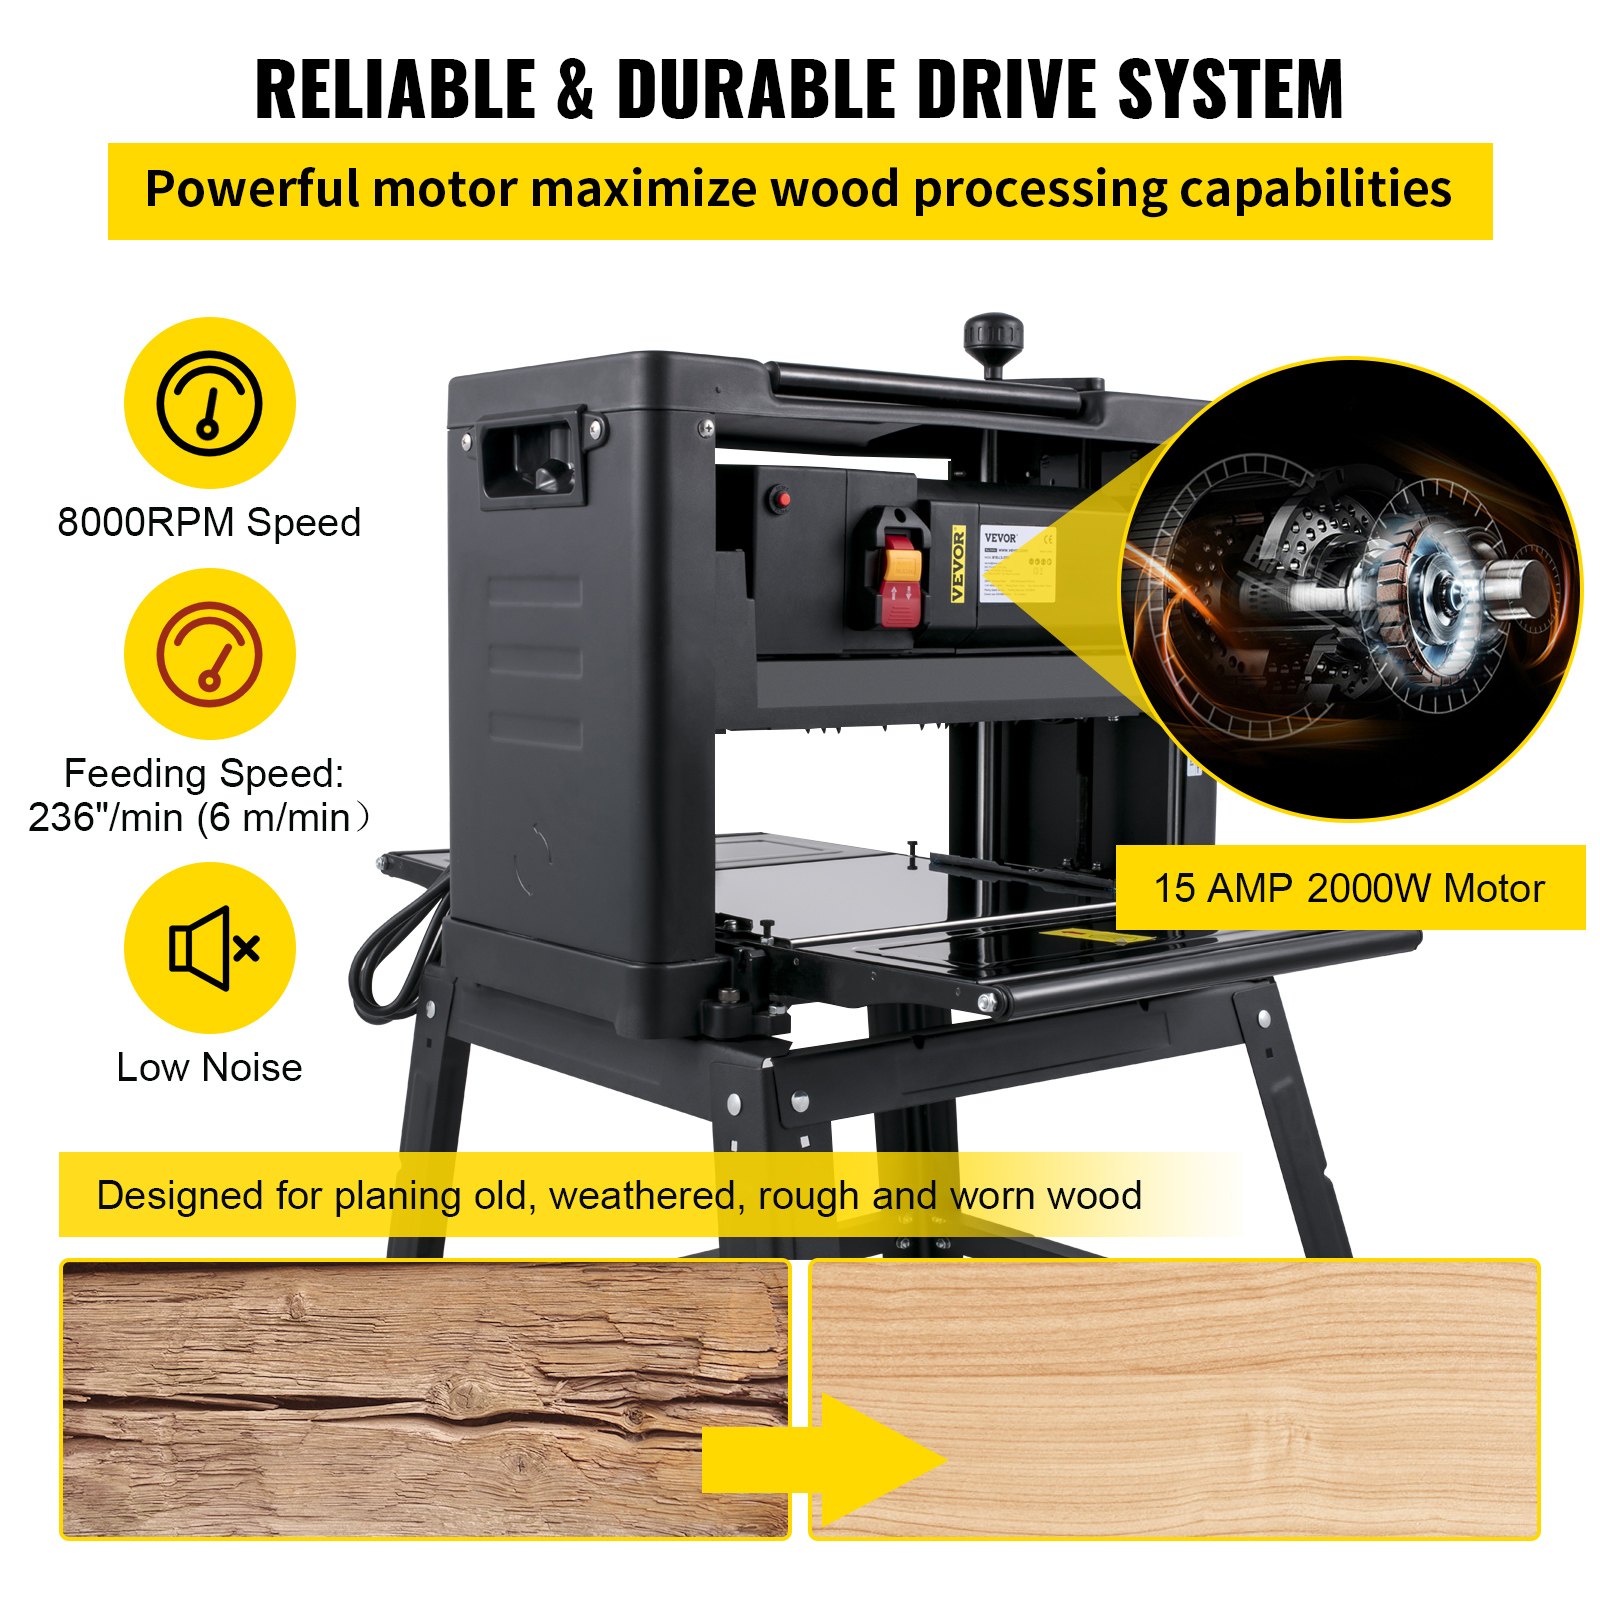
Unlock the full potential of your VEVOR Benchtop Planer with our comprehensive product manual download. This detailed guide is designed to help you master the 13″ Thickness Planer, featuring a powerful 1800W motor and an impressive 8000,RPM speed. Whether you’re a woodworking novice or an experienced craftsman, our manual will assist you in setup, troubleshooting, and optimizing your tool for the best results.
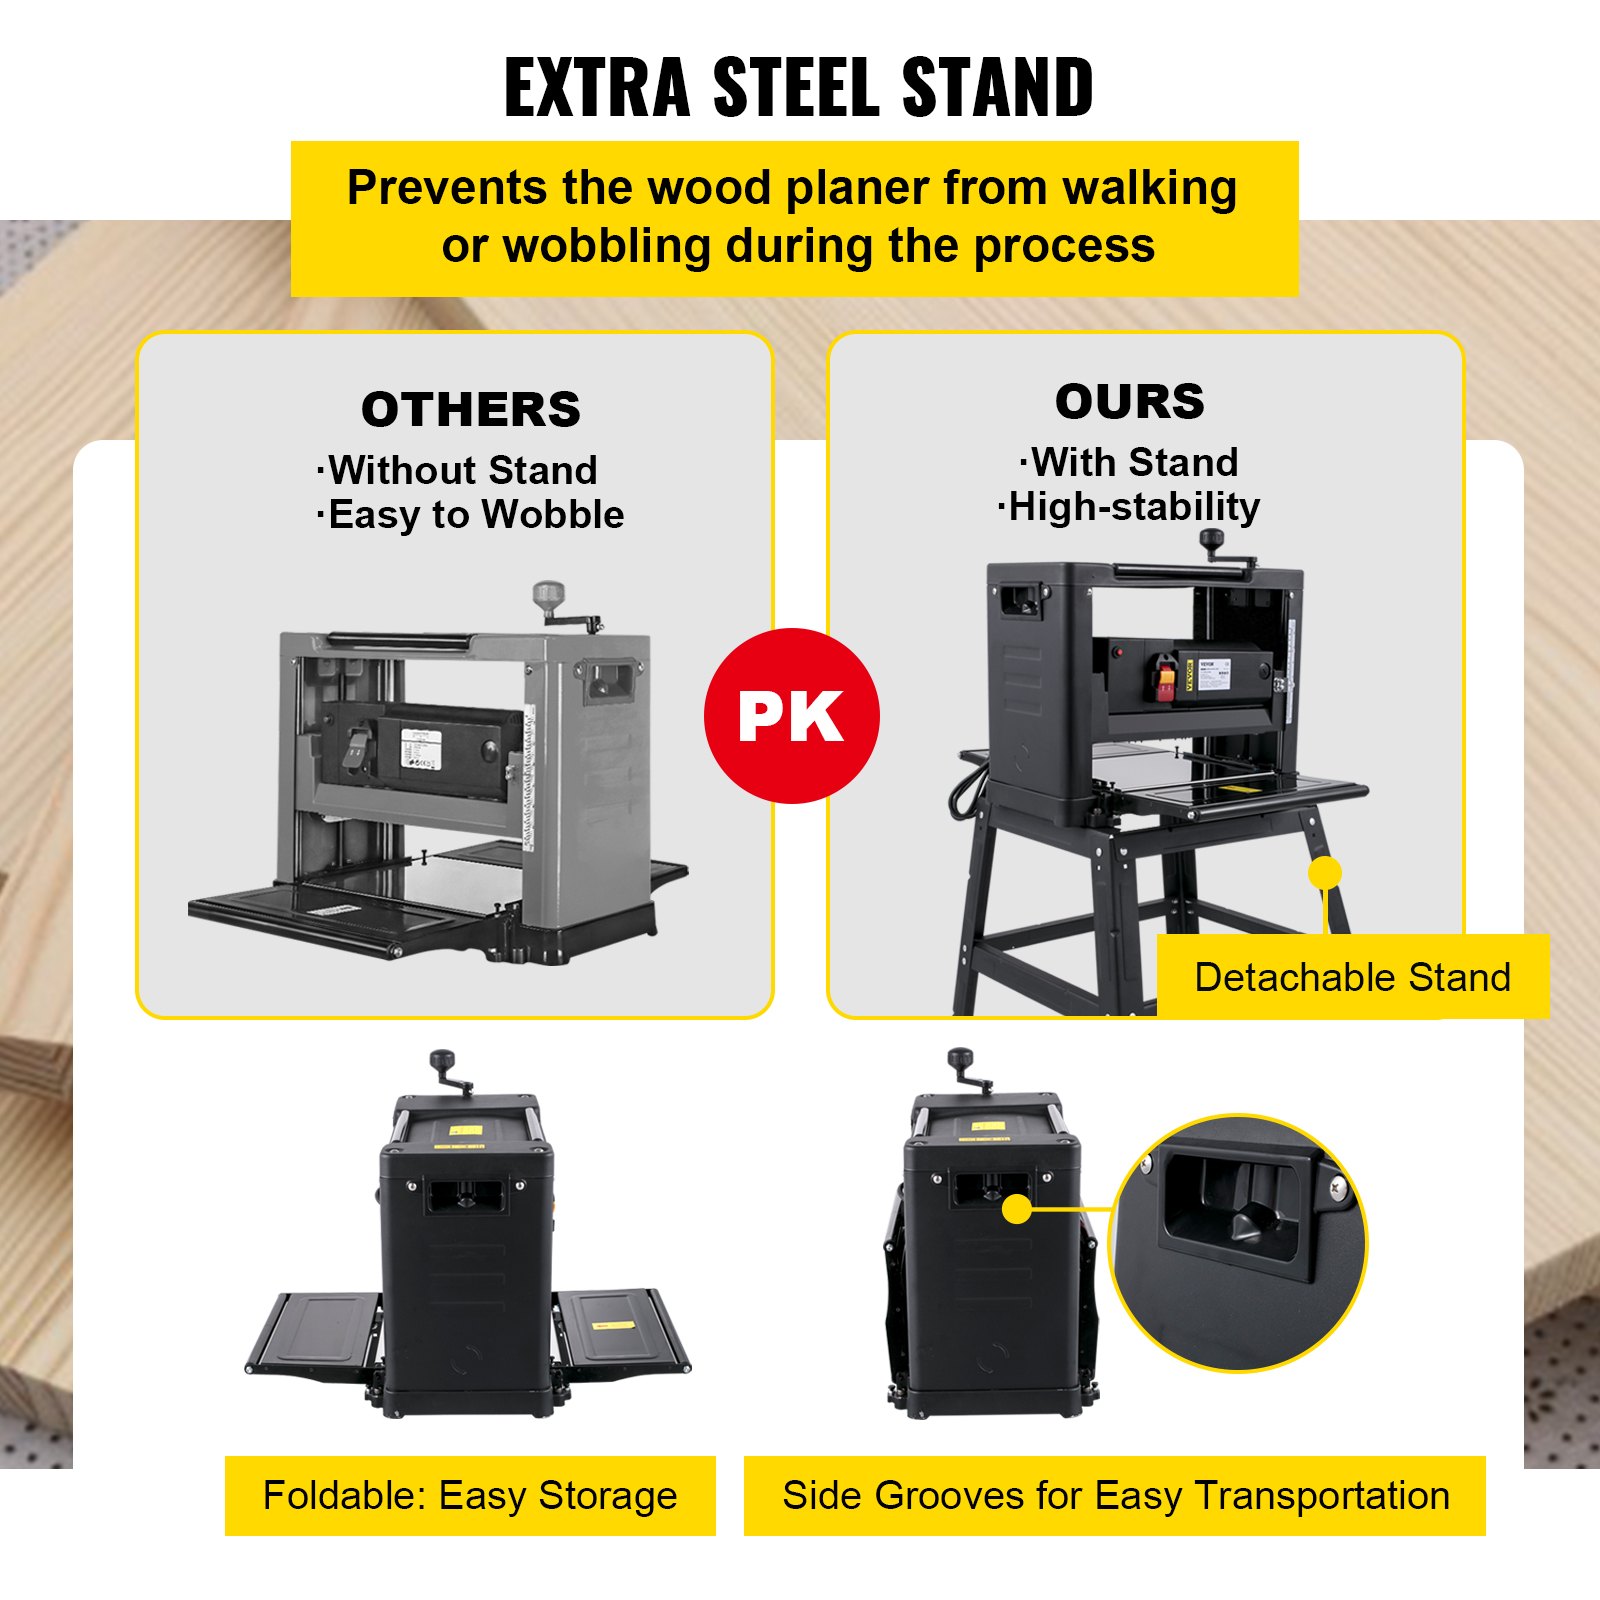
Inside, you’ll find step-by-step instructions, detailed diagrams, and valuable tips for maintaining your planer, ensuring you achieve a consistent 6m/min planing speed. The manual also covers essential aspects like using the iron stand and dust exhaust system, making your woodworking experience more efficient and enjoyable. Download our user-friendly and professionally crafted manual to enhance your woodworking projects and keep your VEVOR Benchtop Planer in top condition.
Thickness Planer Manual
Please keep this manual for future reference.
SAFETY INSTRUCTIONS
IMPORTANT: Carefully read the instructions in this manual and the general safety instructions before using this tool. Keep the packaging material out of the reach of children — risk of suffocation.
WARNING! Always take basic safety precautions when using power tools to safeguard against the risk of fire、electric shock, and /or personal injury.
- For safe operation. We recommend that you take appropriate measures for the protection of your hearing if the sound pressure of 85dB (A) is exceeded
- Keep the work area clean. Cluttered work areas increase the risk of accidents and injuries.
- Keep the workplace environment safe. Do not use power tools in damp areas, do not expose them to rain, make sure the work area is well lit, or use them in explosive environments, such as in the vicinity of flammable liquids、gases, or dust.
- Protect against the risk of electric shock. Avoid body contact with earthed surfaces, Such as pipes, radiators, cookers and refrigerators.
- Keep children at a safe distance. Do not allow onlookers to touch the tool or the extension cord. Onlookers should be kept away from the work area.
- Put away tools that are not being used. When not in use, store the tool in a dry place out of the reach of children.
- Do not force the tool. The tool does the job better and safer when used at the rate for which it was designed.
- Use the correct machine. Do not force small machines or accessories to perform jobs that require a powerful machine. Use tools only for their intended purpose. (Don’t use a circular saw to cut tree branches.)
- Wear suitable clothing. Do not wear loose clothing or jewellery. They can be caught in moving parts. Non-slip shoes are recommended when working outdoors. Wear a hair net if you have long hair.
- Wear safety glasses. Wear a dust mask if the work generates dust.
- Be careful with the cord. Never carry the tool by the cord. Do not pull the power cord to disconnect the plug from the mains socket. Keep the power cord away from heat, oil, and sharp edges.
- Secure the workpiece. Secure the workpiece with a clamp, vice, or clips. This is safer than using your hands and leaves both hands free to operate the tool.
- Do not overreach. Always maintain a firm footing and good balance.
- Maintain the tool in good condition. Keep cutting tools sharp and clean for better, safer work. Follow the instructions for lubricating and replacing accessories. Check power cords regularly. If damaged, they must be replaced at an authorised service centre. Check extension cords at regular intervals and replace them if they are damaged. Keep the handles clean, dry, and free from oil and grease.
- Always unplug the power cord when the tool is not being used, and before carrying out service work or changing accessories, such as blades, bits or discs.
- Remove the adjuster keys/spanners and other assembling tools before starting the power tool.
- To avoid accidental starting, never carry a power tool with your finger on the switch when connected to the mains. Make sure the power switch is in the OFF position before plugging in the power cord.
- Only use an extension cord approved for outdoor use if using the tool outdoors.
- Stay alert. Always be careful when using the equipment. Use your common sense. Do not use the tool if you are tired.
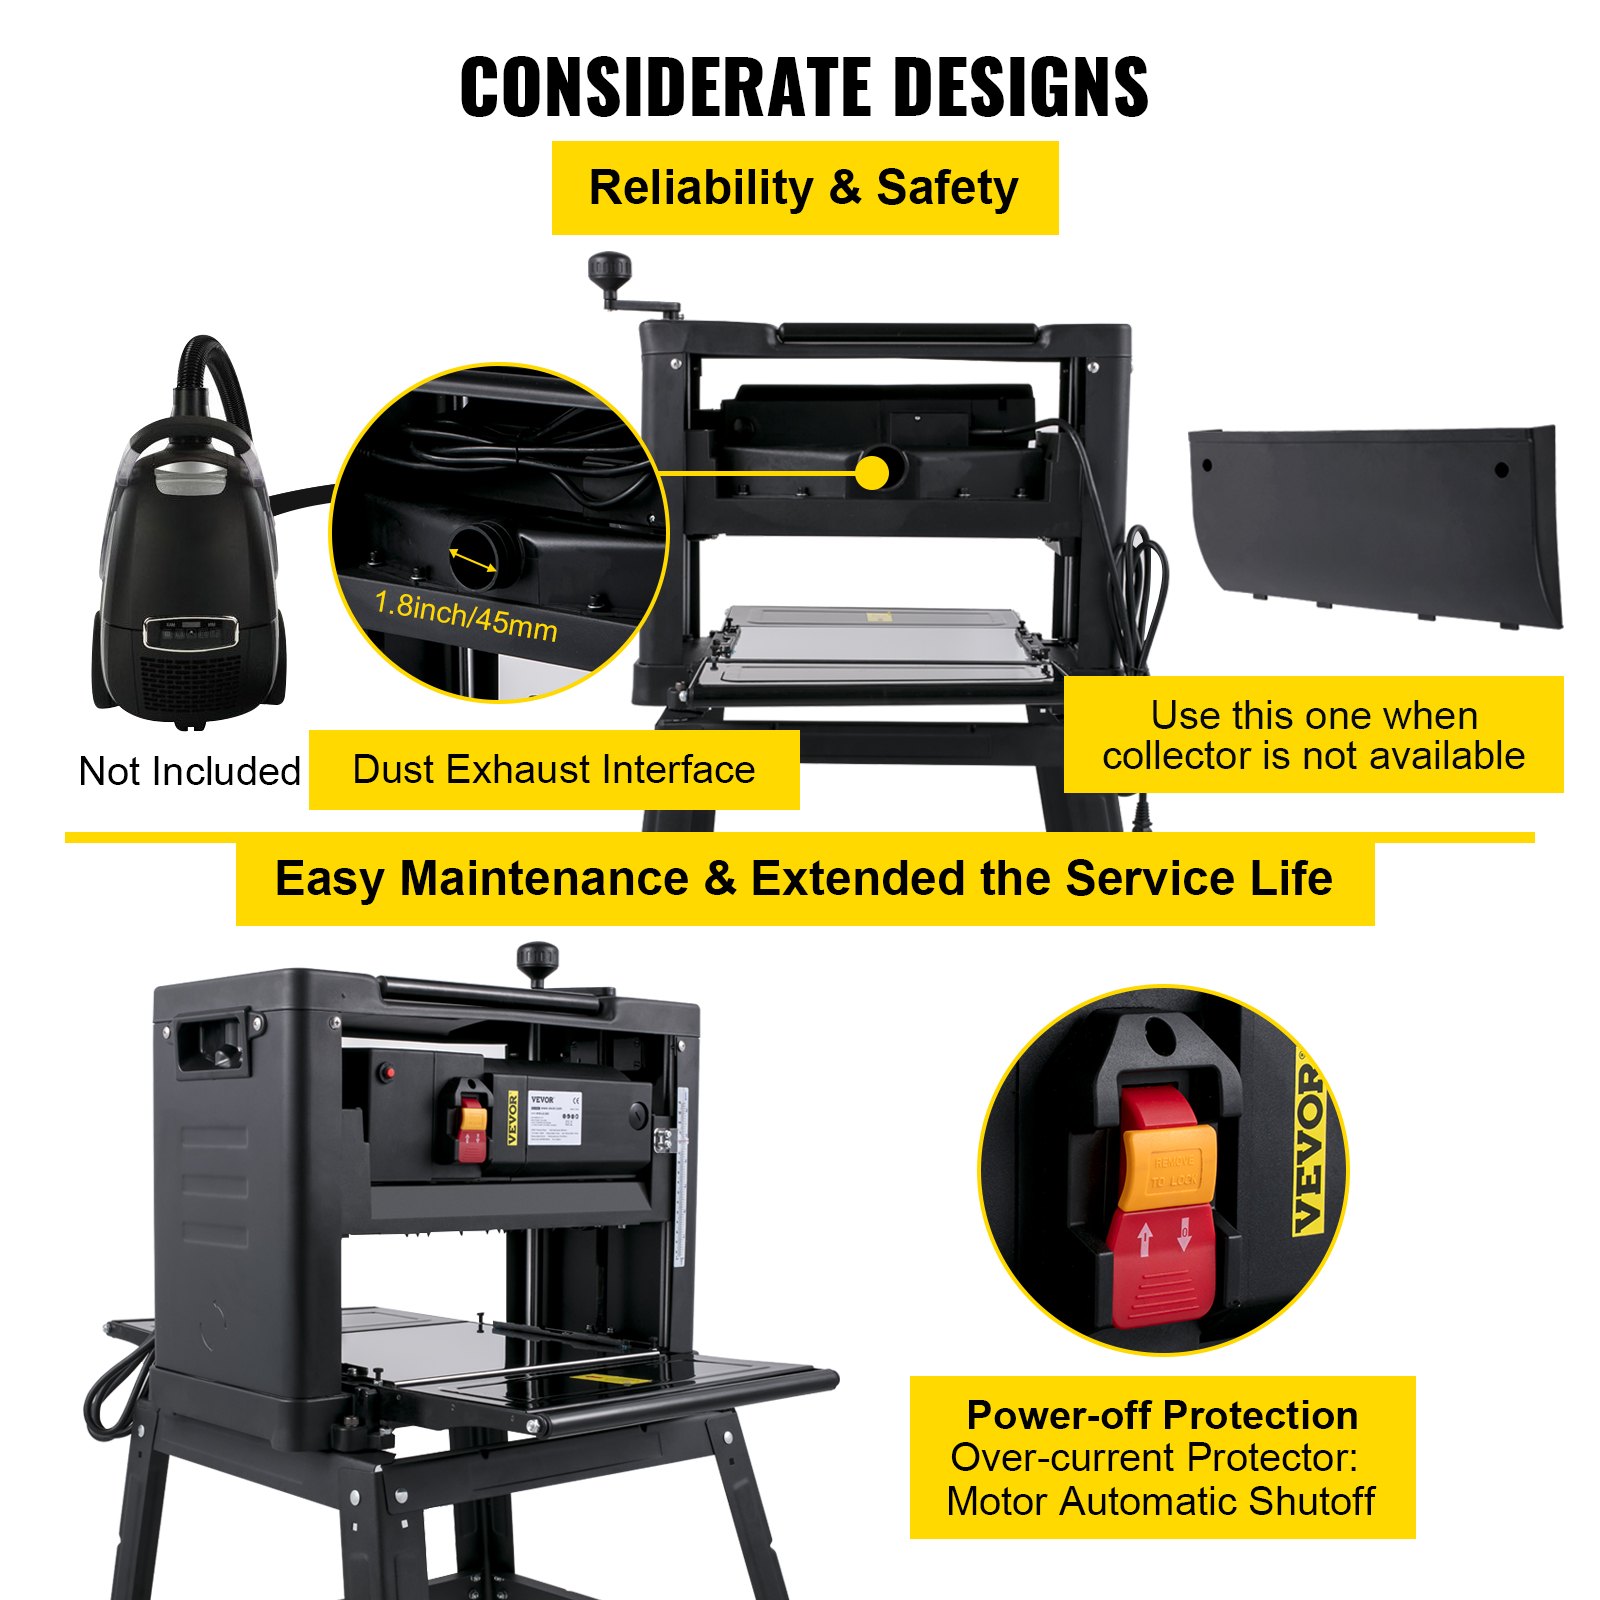
- Connect the dust extraction equipment. If dust extraction and dust collection equipment are provided. This should be connected and used correctly.
- Check for damaged parts. If a guard or some other part has been damaged, check carefully before using the tool to ensure it will operate correctly and as intended. Make sure that moving parts are properly adjusted, do not jam, and that no parts are incorrectly fitted or damaged. Check for any other factors that could influence functionality. Guards or damaged parts must be repaired or replaced by an authorised service centre. Unless otherwise specified in these instructions. If the power switch does not work, it must be replaced by an authorised service centre. Do not use the tool if it cannot be switched on and off using the power switch.
WARNING! Using accessories or attachments other than those recommended in these operating instructions can result in personal injury. Repairs must only be carried out by qualified personnel.
This power tool has been manufactured per current safety standards and requirements. Repair may only be carried out by qualified personnel using identical spare parts. Failure to carry out repairs correctly can result in the risk of personal injury/death or material damage.
NOTE: A temporary voltage drop can occur when starting the machine, which could affect other equipment. If the main supply’s impedance Zmax is lower than 0.206ohms, this kind of interference is common.
Contact your electricity supplier for more information.
IMPORTANT SAFETY INSTRUCTIONS
- Wear safety glasses. Don’t cram wood into the outfeed side.
- Before use, check that all screws connections are appropriately tightened.
- Do not force the tool. Let the feed mechanism do the work. Never insert objects or body parts in the outfeed.
- Check regularly that the rubber roller and iron roller are clean. If the rollers are contaminated, the workpiece will not infeed correctly, posing a risk of personal injury.
- Do not machine workpieces with many knots or sprigs.
- The operating position is in front of the machine. Stand by the side of the infeed table.
- Remove any nails, screws and other metal objects from the workpiece before machining.
- Check that the blades are correctly installed.
- Handle the knife blades carefully. Risk of personal injury and/or property damage.
- Never start to planer until the blade holder has reached full speed.
- Never use blunt blades. Risk of kickback.
- Always replace or sharpen both blades at the same time. Both blades must be of the same size and weight.
- Never insert your fingers or other body parts in the chip outlet. Risk of personal injury – DANGER.
- Pls check the recoil claw is in the correct position.
- If infeeding the wood is not smooth, please don’t force the wood; check if the machine has a problem.
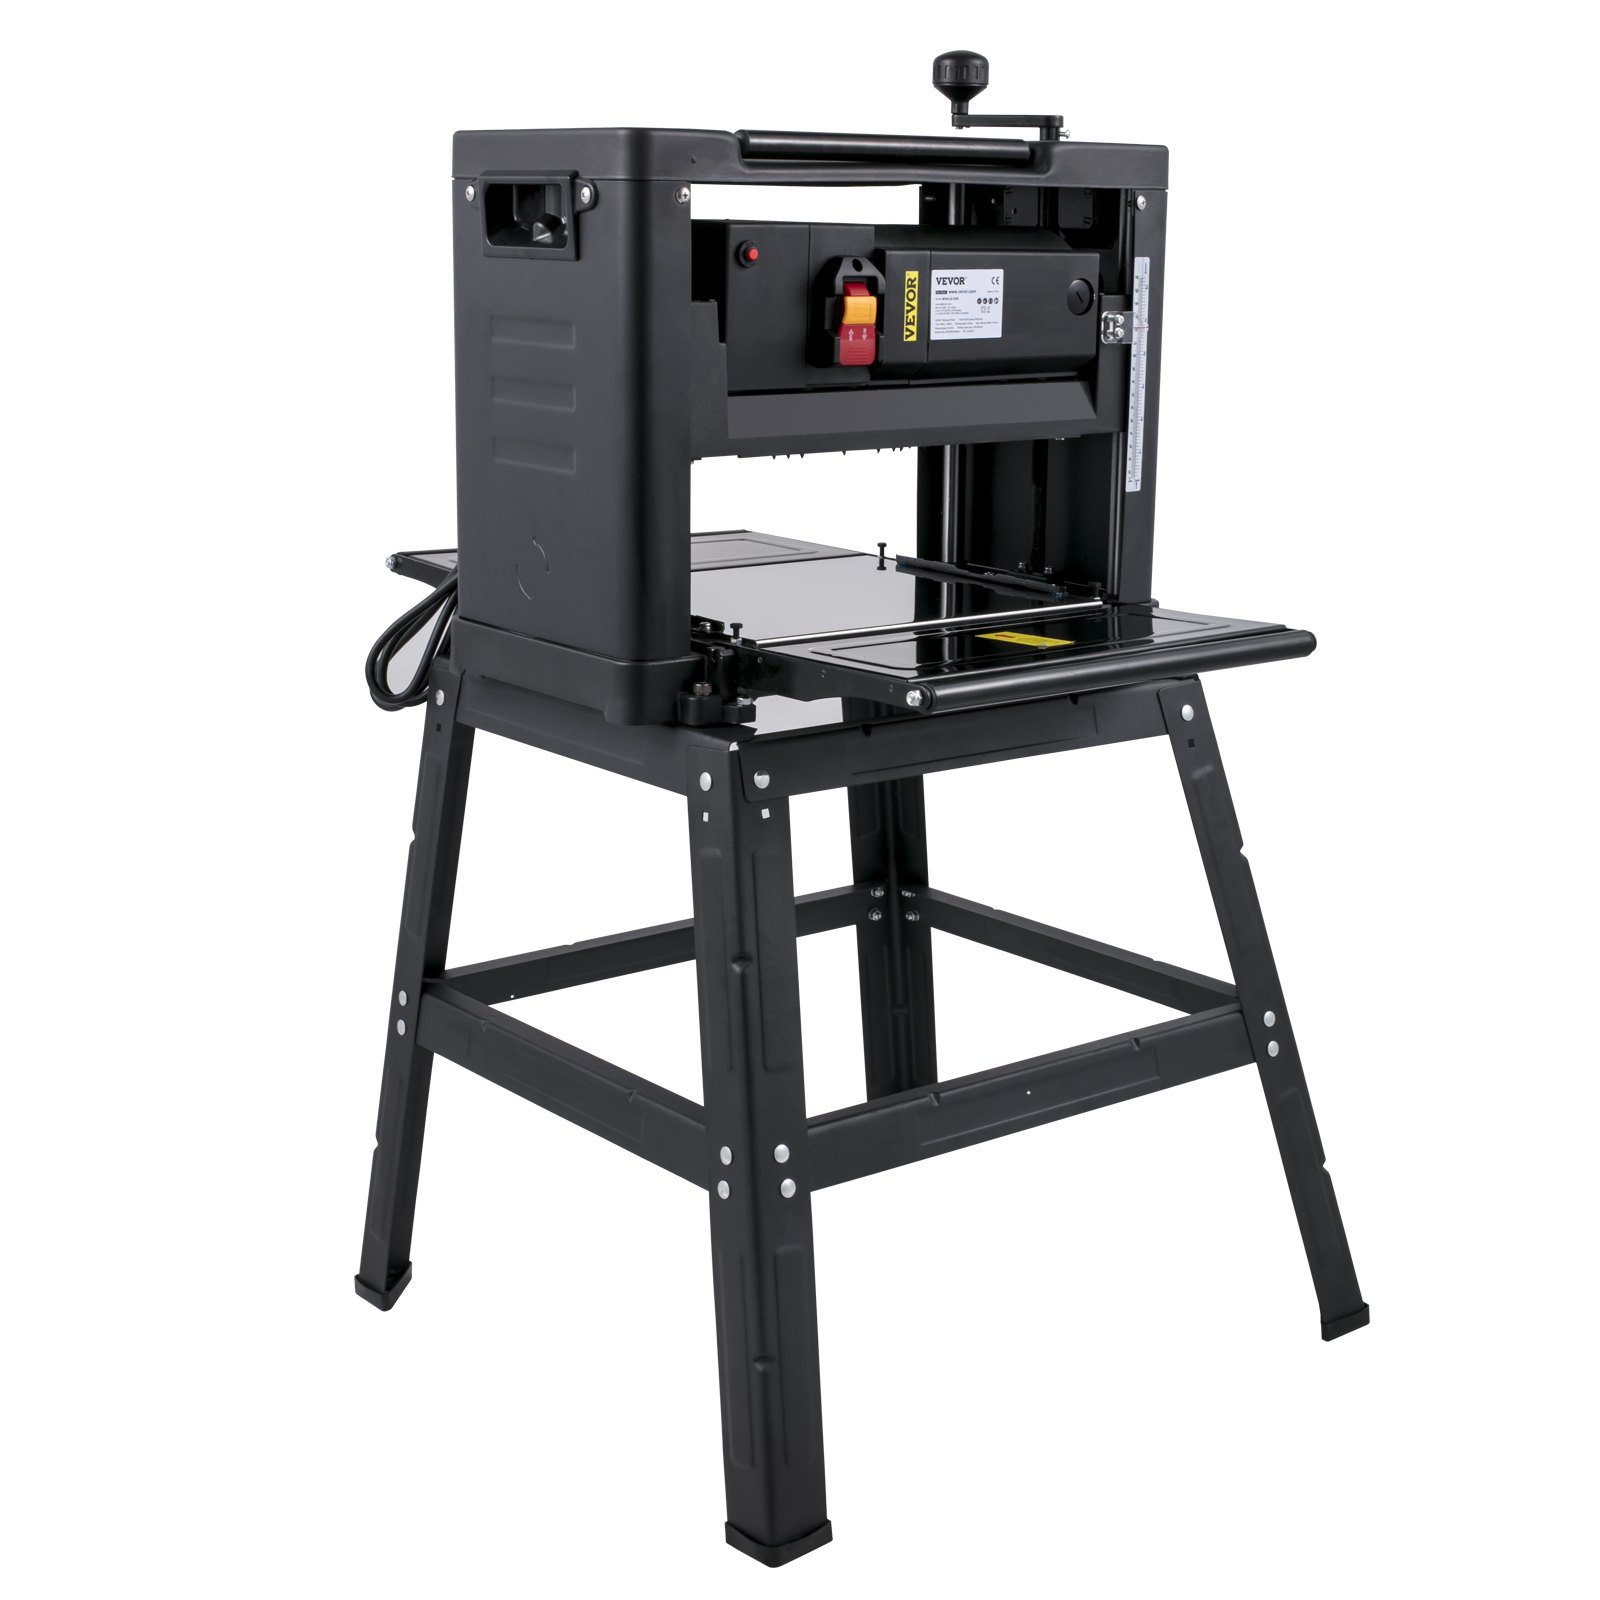
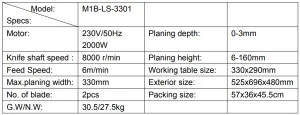
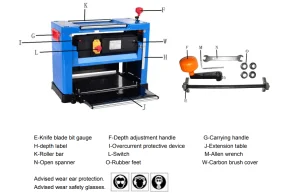
Benchtop Planer Technical Data
DESCRIPTION
- The tool is designed for planning wooden planks and dry wood. It is forbidden to plane other materials, such as metals, plastics, branches, tree trunks, and wet wood.
- The tool is intended for household and professional use.
- Please use this machine in the correct operation. If you don’t know how to use it, please get in touch with the factory.
OPERATION STEPS
Unpacking
Carefully unpack the machine. The packaging must be recycled per local regulations.
WARNING! Turn off the machine and unplug the power cord before cleaning、performingmaintenance and adjustment.
Assembly
Before using the machine, follow the assembly requirements.
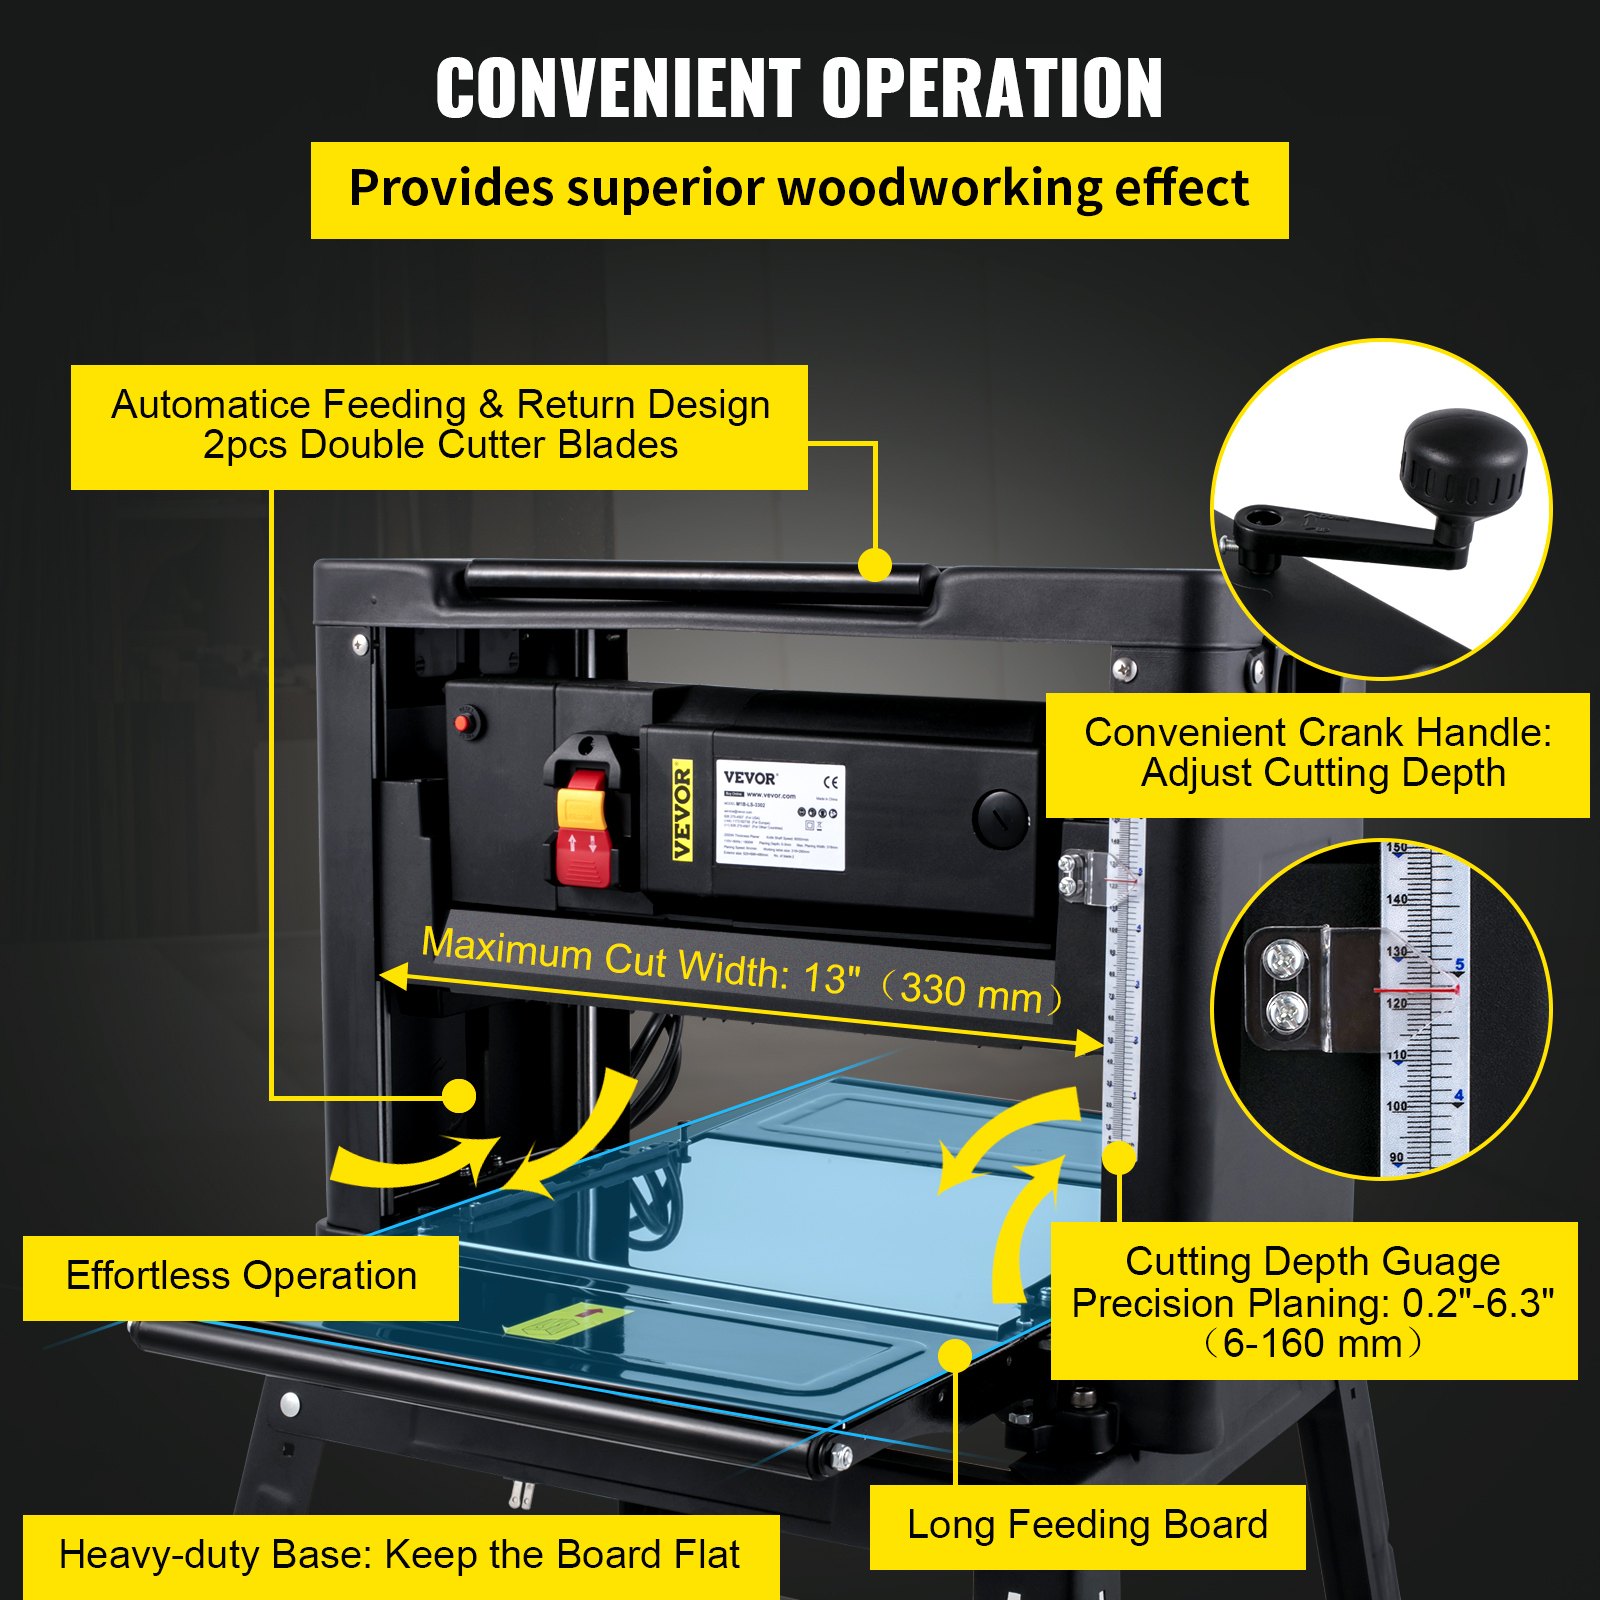
Install the depth Adjustment handle.
Place the depth adjustment handle (F) on the protruding shaft to the right of the machine’s top surface. Push on the handle firmly and lock it with the supplied screw.
Adjust the depth of the planer.
The user must know how to adjust this machine correctly to operate it safely. This is very Important!!!
Rotate the depth adjustment handle(F) a circle, and the machine depth can be raised or lowered by 1.5 mm. Before using, please plan the wood a few times so that the surface is completely horizontal in later use.
Please refer to the correct wood width range to adjust the depth of the one-time planer:
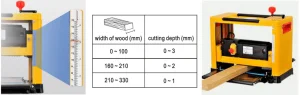
At first, the user needs a ruler to measure the thickness of the wood to be planed, and then the observation depth label (H) is used to adjust the depth label to the thickness of the planer required by the user.
For example, if the thickness of wood is 200mm and the user wants to plane 2mm, the depth label pointer is at 198mm. In this way, the thickness required by the user can be reached during the one-time working process.
Please note: The distance between the bottom of the machine and the knife shaft is the thickness of the wood when it is planed; the difference between the thickness of the wood when it comes out of the machine and the thickness when it comes in is the thickness of the wood that was shaved off.
Warning! It is forbidden to plan the thickness above 2.5mm at one time. The length of the wood must not be less than 153mm. The thickness of the wood must not be less than 125mm.
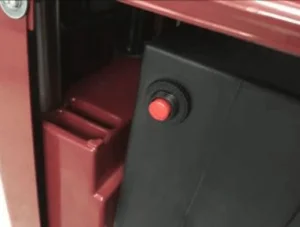
Operate the switch (power ON/OFF)
Plug the power cord into the mains supply. If you are using an extension cord, the cross-section of the conductors must be sufficient for the tool’s power supply. Avoid inappropriate use of cable, as this can lead to a voltage drop and cause power loss and overheating.
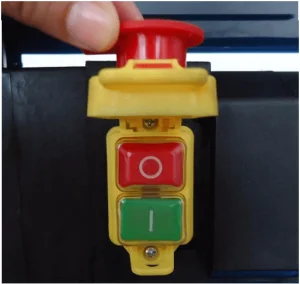
This planer is equipped with an electromagnetic switch. To start the machine, press the green button marked “I.” To stop it, press the red button marked “O.”
Overcurrent protective device correct use and replacement (I)
When the load power is too large, the current exceeds the load so that the overcurrent protective device will jump!
- When the overcurrent protective device jumps, first disconnect the power supply of the machine, then press the protective button to reset it
- When you press the protective button to reset it, don’t reboot immediately. Wait for the machine’s temperature to cool before starting to use it.
- If the overcurrent protective device jumps frequently. Pls make a replacement.
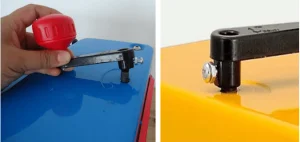
ADJUST TABLE EXTENSION (J)
Attention: This adjustment is already factory set, to avoid affecting the benchtop planer’s function.
- Put the blade holder riser to a suitable height, so it is easily assembled.
- Place a horizontal rule on the main worktable, and use the rule to measure the table extension(J)
and the main worktable’s level. - If the table extension (J) are not flush with the main worktable, loosen the nut (P) andturnthe screw (Q) until table extension’s rollers and the main worktable touch the ruler, Adjust both the left and right -hand table extensions (J).

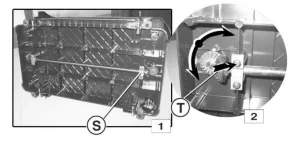
PARALLELISM ADJUSTING
ATTENTION: This adjustment is already factory set. You need to check again to avoid affecting the machine’s function. Misaligned blades usually cause poor parallelism. Always check that the blade holder and the work table are parallel before adjusting the parallelism setting.
- Place the machine on its side and rotate the cross rod bearings (S) fig.1 .
- Move the conical gear wheel (T) towards the clamp until it runs freely from the second gear wheel (fig.2).
- Turn the second gear wheel to adjust the height of the blade holder on the side where the gear wheels are located. Shifting one tooth anti-clockwise raises the blade holder 0.1mm(H).
Replacing and Adjusting the Blades
WARNING! Turn off the machine, unplug the power cord and wait until all moving parts have stopped completely before replacing or adjusting the blades.
Dismantling the knife blade
- Use an Allen wrench (N) to remove the dust hood (V) by loosening the screws (U); see the picture below.
- Use the double open wrench (N) to loosen the blade locking plate (B) and knife blade(C) by turning the outer hexagon bolt (A) clockwise. The knife blades are spring-loaded (D) and can be removed when the blade locking plate is removed.
- Remove the knife blade and blade locking plate.

Install the knife blade.
- Place the knife blade against the blade locking plate, in the correct position relative to the pins.
- Insert the knife blade and knife locking plate in the slot and lock in position by turning the outer hexagon bolt (A) anticlockwise. Ensure that the blades face in the right direction (see picture).
- Set the height of the knife shaft of the knife blades to 1mm with the bit gauge. The two support blocks on the left and right sides of the blade are pressed against the knife blade. (Loosen, if necessary, the clamping screws to move the blade to the correct position.) When the knife blade is positioned correctly. Hold it firmly in place and tighten all outer hexagon bolts (A).
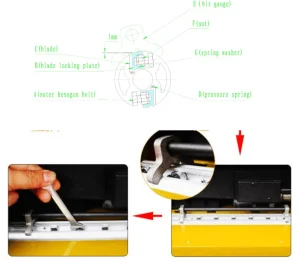
Warning! Check that total 18 screws are tightened. Turn the blade holder by hand to ensure it rotates easily and smoothly. Handle the blades cautiously to avoid personal injury and/or damage to property.
Benchtop Planer Operation
Coarse PLANING
Coarse planing is used to provide a reference surface for machining.
- Set a small removal setting for the best surface finish.
- Process where possible along he grain.
Note: the surface finish is affected by various factors.
- The wood’s hardness, moisture content, and fibre structure, etc.
- Blade sharpness, machining direction, material removal per pass, etc.
- Perform test machining to find the best setting.
PLANING
Planning involves removing material from the workpiece to the desired thickness and machining the surface opposite a coarse-planed reference surface. The maximum material removal per pass is 2.5mm, and Multiple machining passes may be needed.
Benchtop Planer Maintenance
WARNING: Turn off the benchtop planer and unplug the power cord before cleaning and maintenance. Do not use water or other liquids to clean electrical parts.
CHECK AND REPLACE THE CARBON BRUSH
- Turn off the machine, unplug the power cord, and wait until all moving parts have stopped completely.
- Dismantle the carbon brush cover (W) as illustrated using a screw driver.
- Replace the carbon brush; the minimum length of each brush should be 6mm.
- Fit the new carbon brushes. Always replace both carbon brushes at the same time.
- Replace the carbon brush cover (W).
Benchtop Planer Lubrication
- Regularly remove shavings from the depth setting chains, reduction drive, and liftingscrews for the blade holder.
- Remove chips with a cloth and brush, and lightly grease with a clean brush dipped in oil.
- Never pour oil directly on the components. Too much oil can cause dust to stick and impair lubrication, shortening component life.
- The blade holder’s bearings are sealed and must not be lubricated.
Benchtop Planer Maintenance
- Keep the machine clean and free of dust and chips.
- Clean reapplied materials from the blade holder and tongues and carefully lubricate with a clean brush dipped in oil.
- Remove resin from the rollers and work table with a non-flammable solvent.
- Clean plastic parts with a damp cloth and mild detergent. Never immerse the tool in water or any other liquid, and never use detergents or alcohol.
- Ensure all guards and other components are correctly fitted before use. Unless otherwise specified in these instructions, guards or other damaged parts must be repaired or replaced by an authorised service centre.
THE ENVIRONMENT
Preserve the health of people by safeguarding natural resources and the environment.
Recommended For Your Project
VEVOR Benchtop Planer, 13" Thickness Planer Manual

Reviews
There are no reviews yet.