Discover the ultimate guide to using your VEVOR Bottled Water Dispensing Pump System with our comprehensive product manual. This detailed manual is designed to provide everything you need to know about the 110V 20ft US Plug High Flow Bottled Water Pump with Single Inlet. Whether you’re setting up the bottled water system for your home, kitchen, office, bar, coffee brewer, ice-maker, or refrigerator, our manual ensures a smooth and hassle-free experience.
Our user-friendly manual covers every aspect of the VEVOR Bottled Water Dispensing Pump System, from initial setup to troubleshooting common issues, and optimizing performance. With clear instructions and helpful tips, you can easily install and maintain your bottled water system, ensuring reliable and efficient operation.
The manual is indispensable for anyone seeking to maximize the value of their VEVOR Bottled Water Pump System. Download the manual now to ensure you have all the information at your fingertips, making your bottled water system setup and maintenance a breeze.
VEVOR Bottled Water Dispensing Pump

HOW THE SYSTEM WORKS
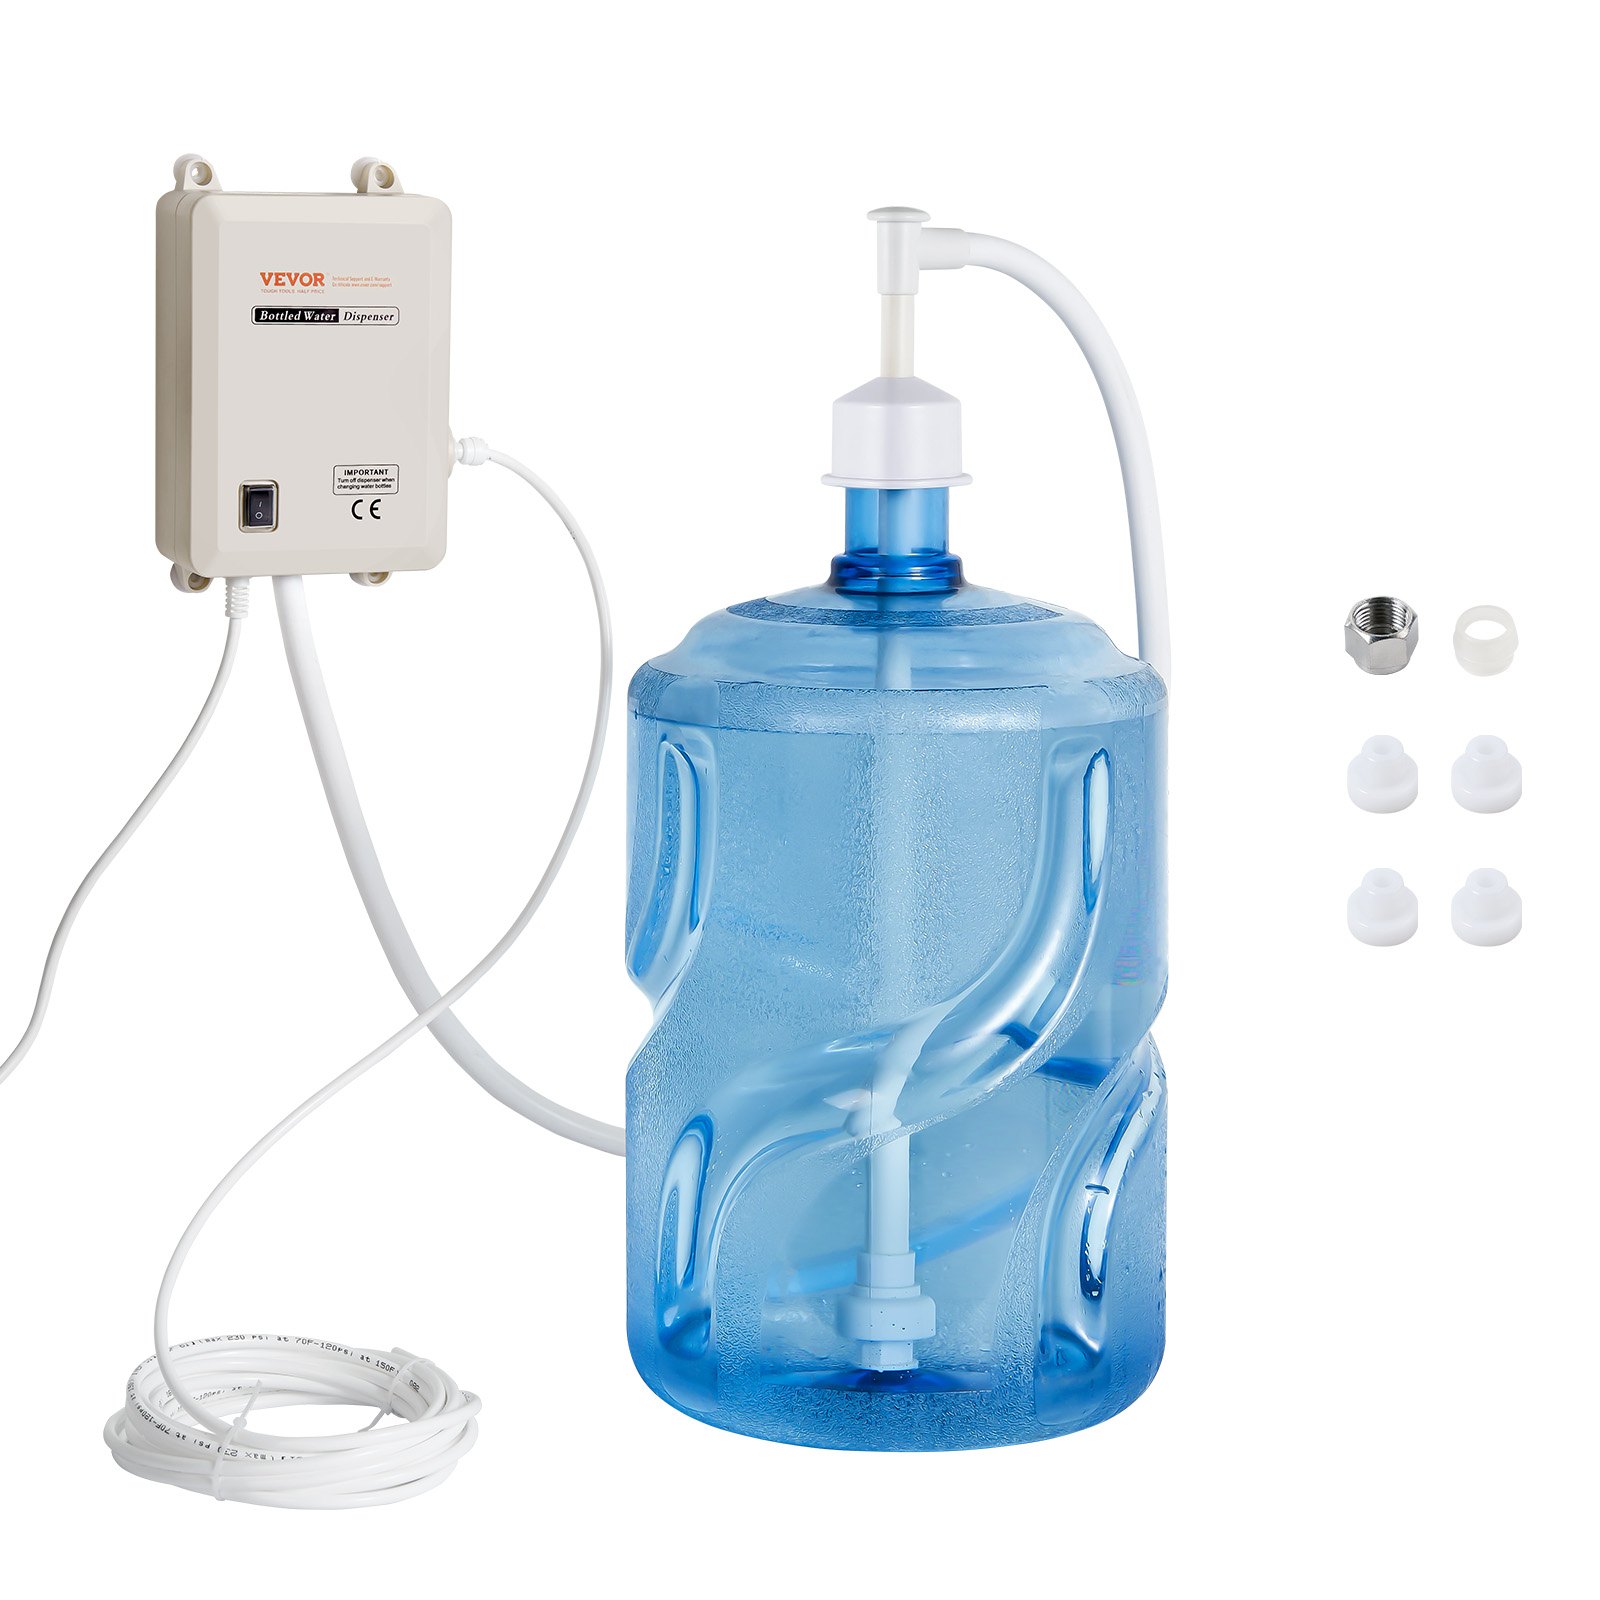
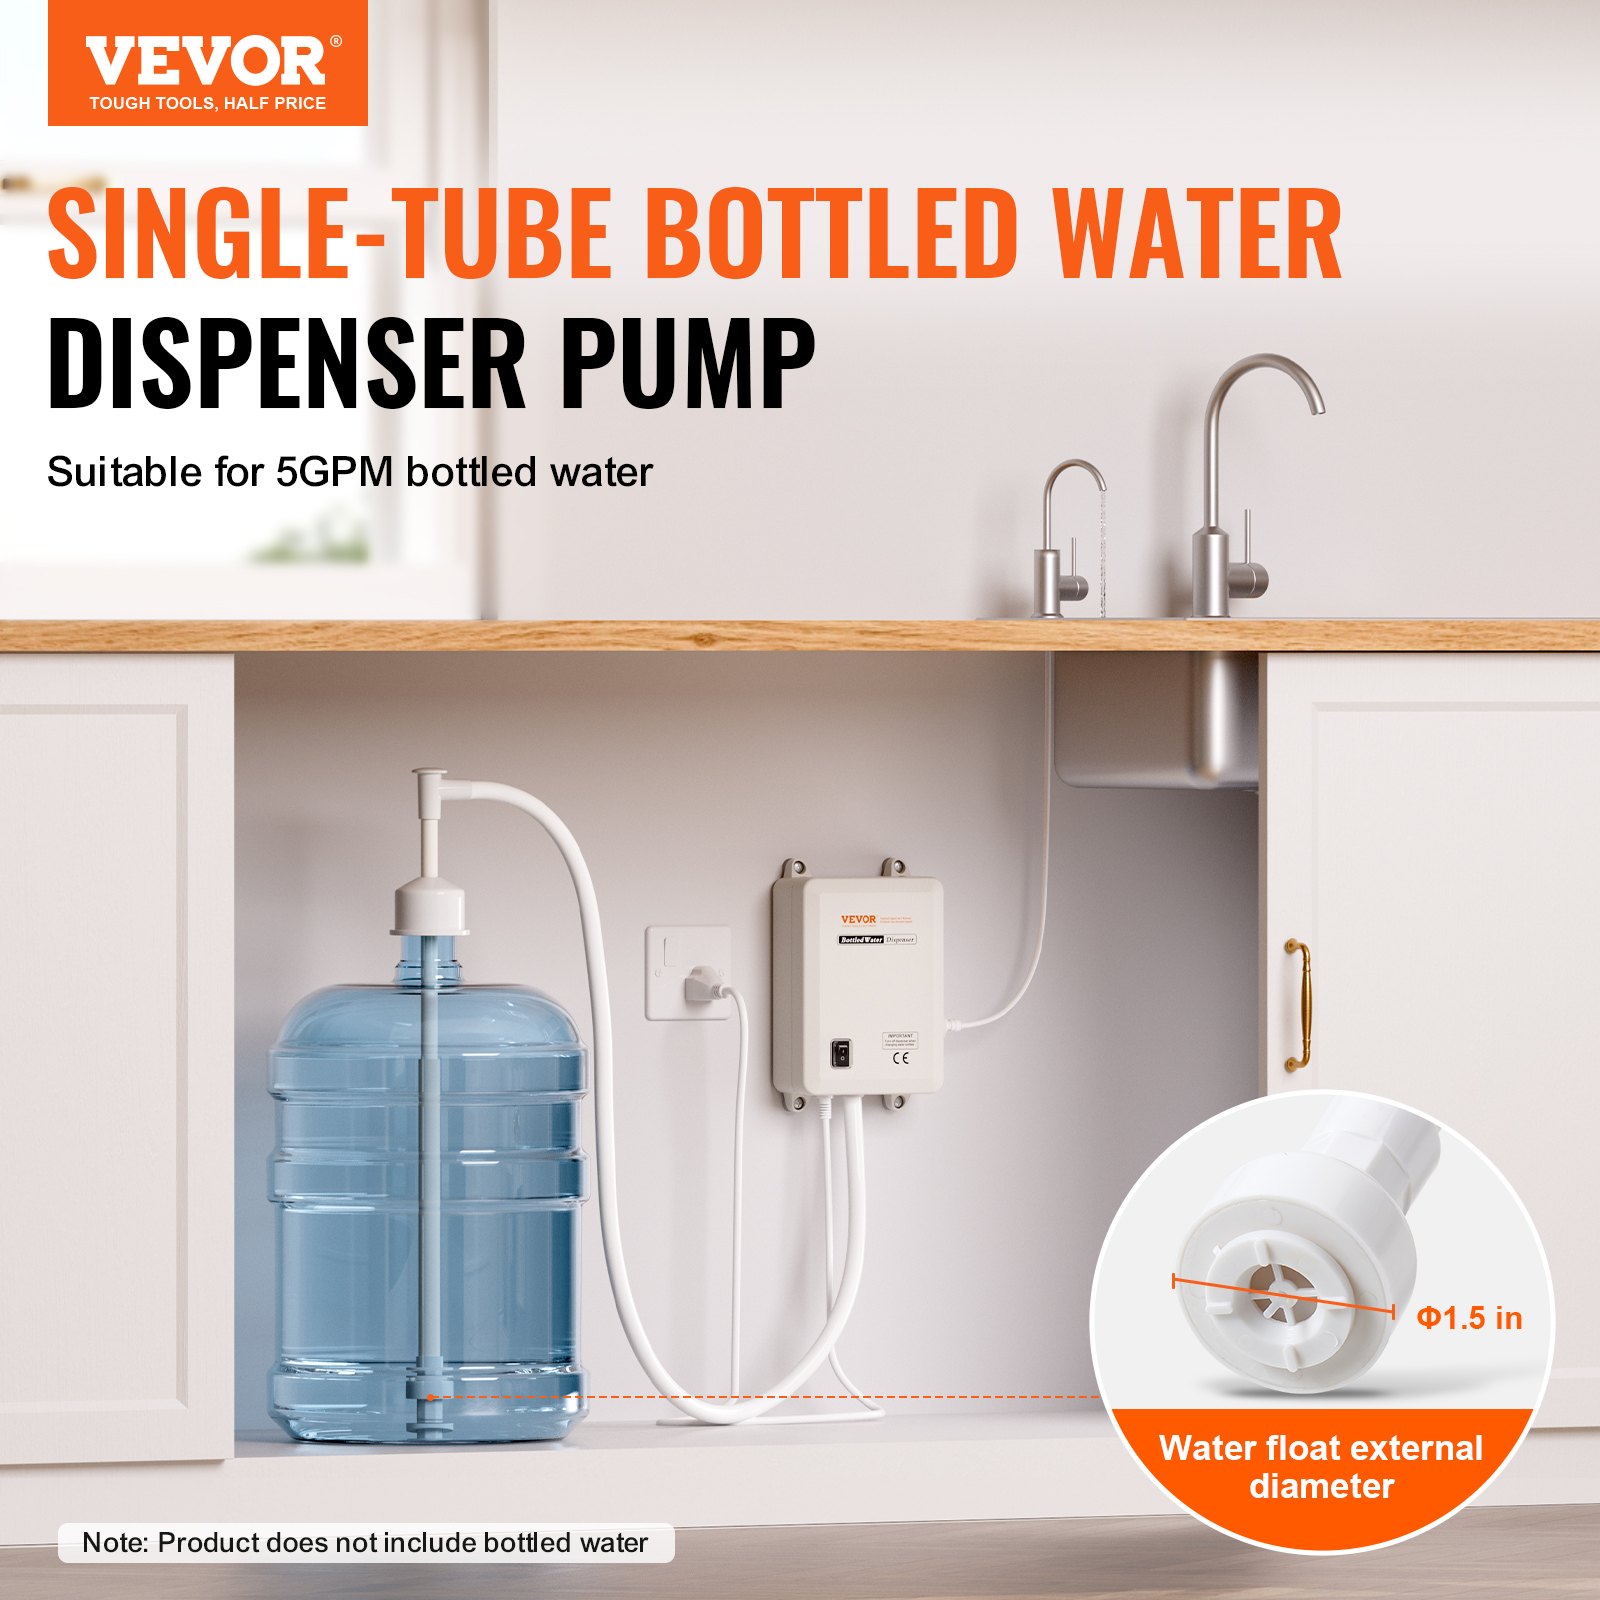
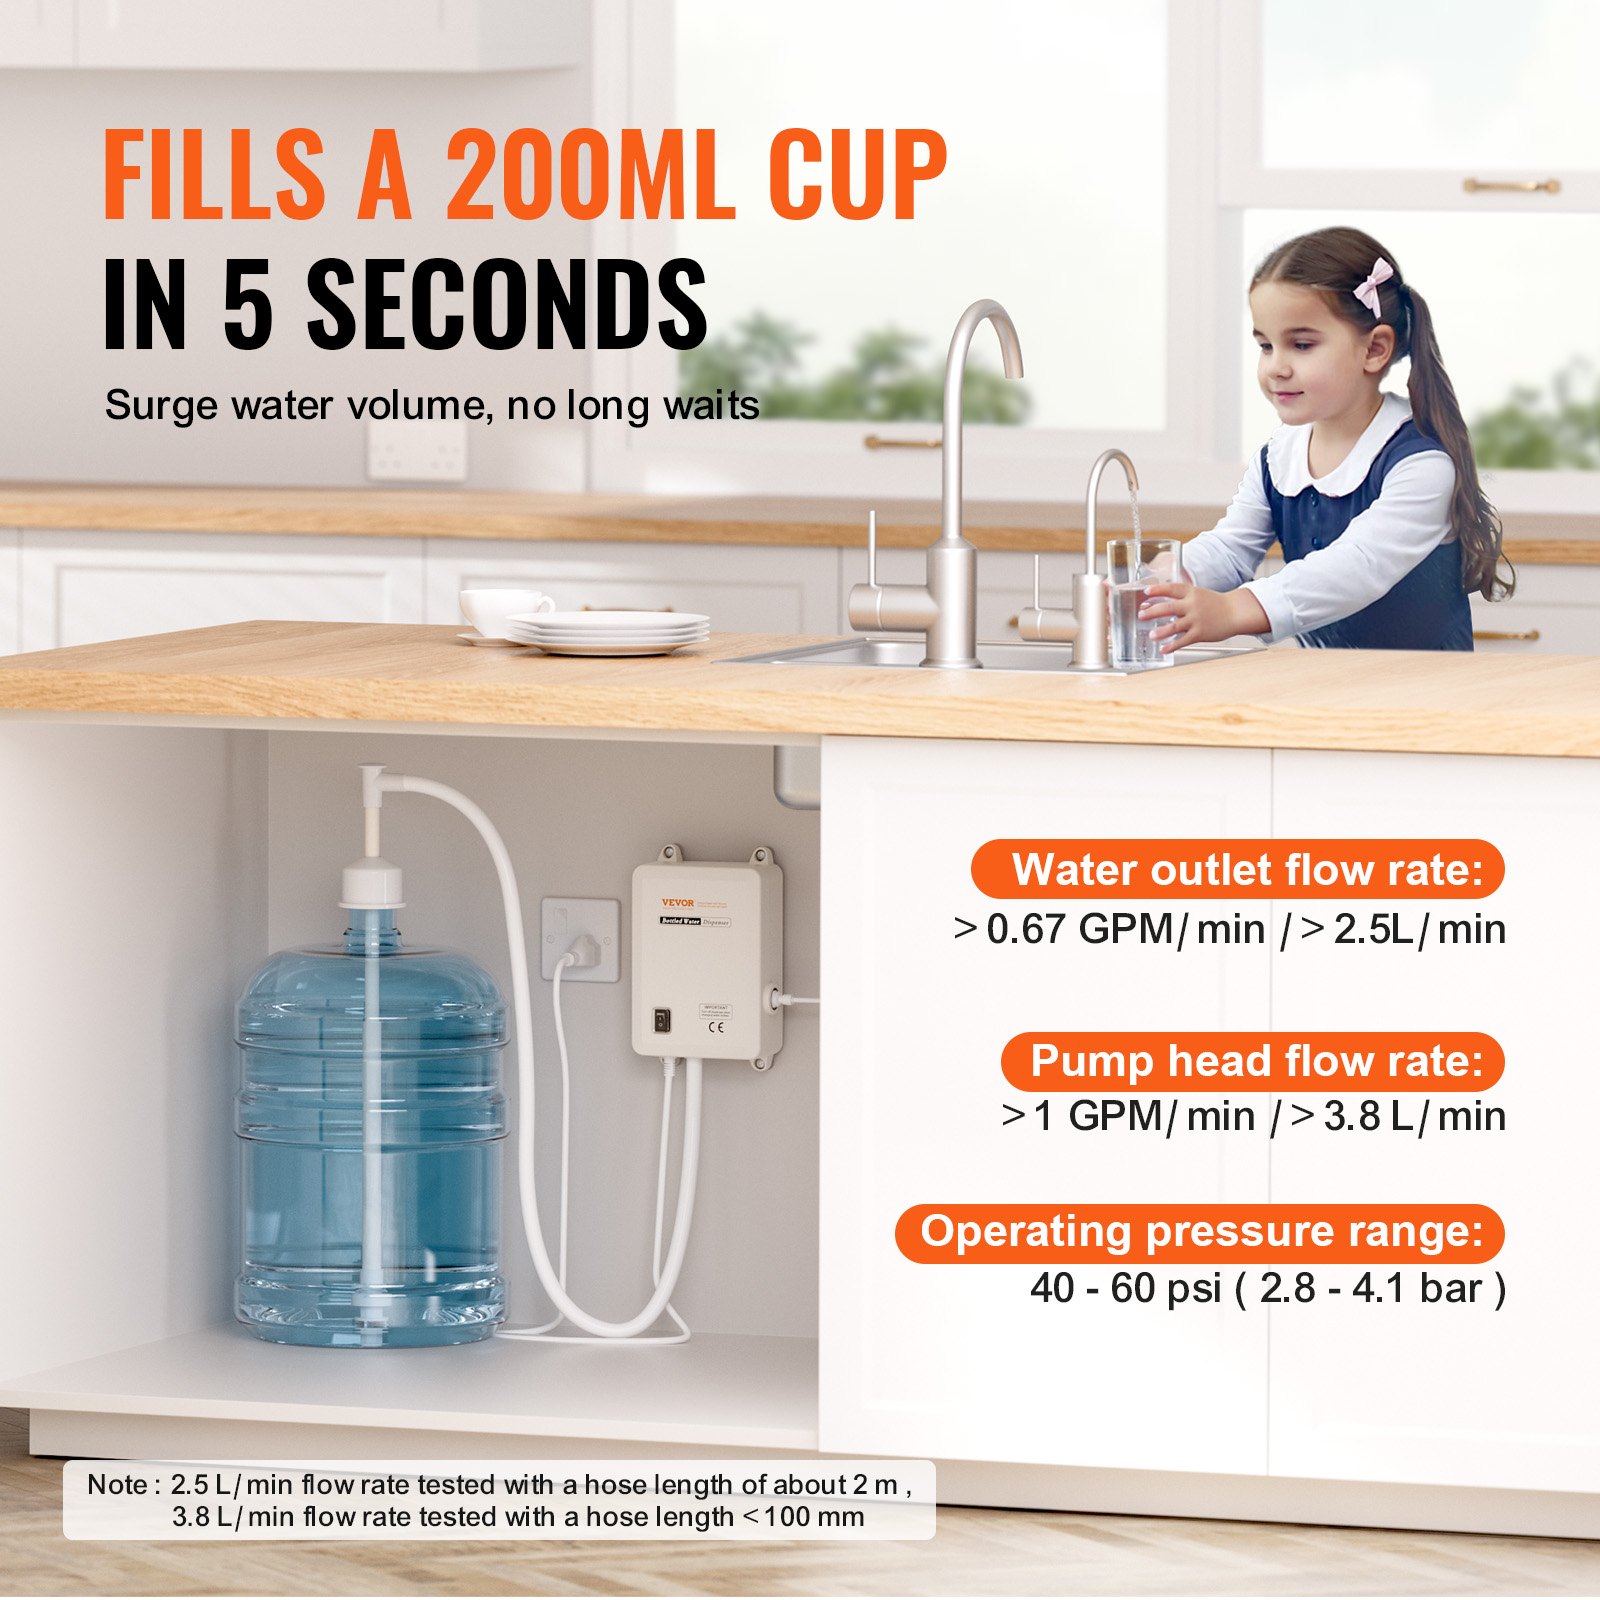
The Bottled Water Dispensing System was designed to pump water from a commercially available 5-gallon water bottle. The system will deliver the water under pressure to an individual drinking water faucet, the water inlet of a refrigerator to the icemaker, and chilled drinking water tap, and to certain commercial coffee/ tea brewers.
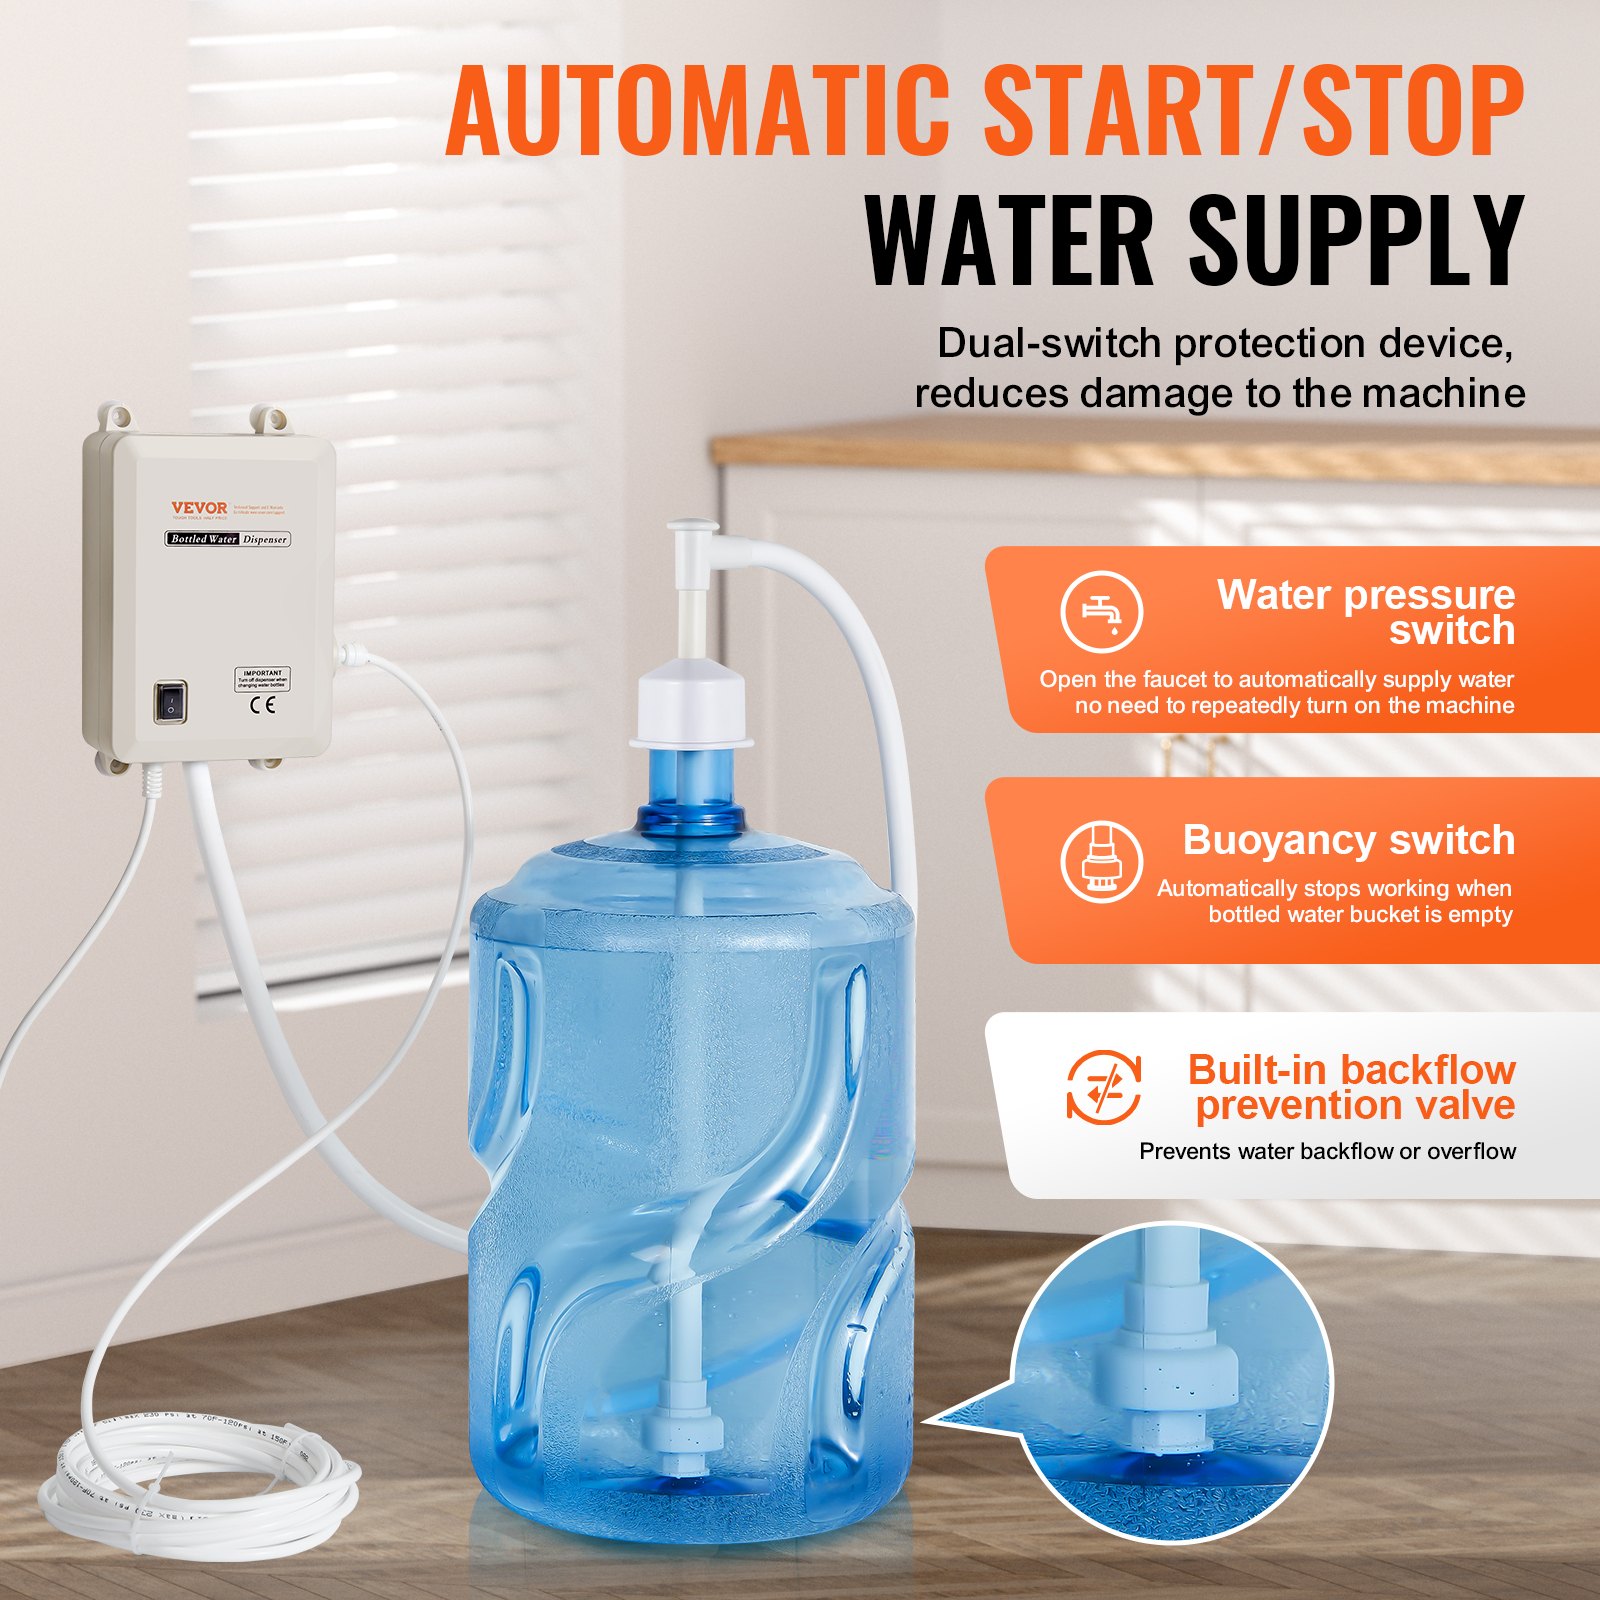
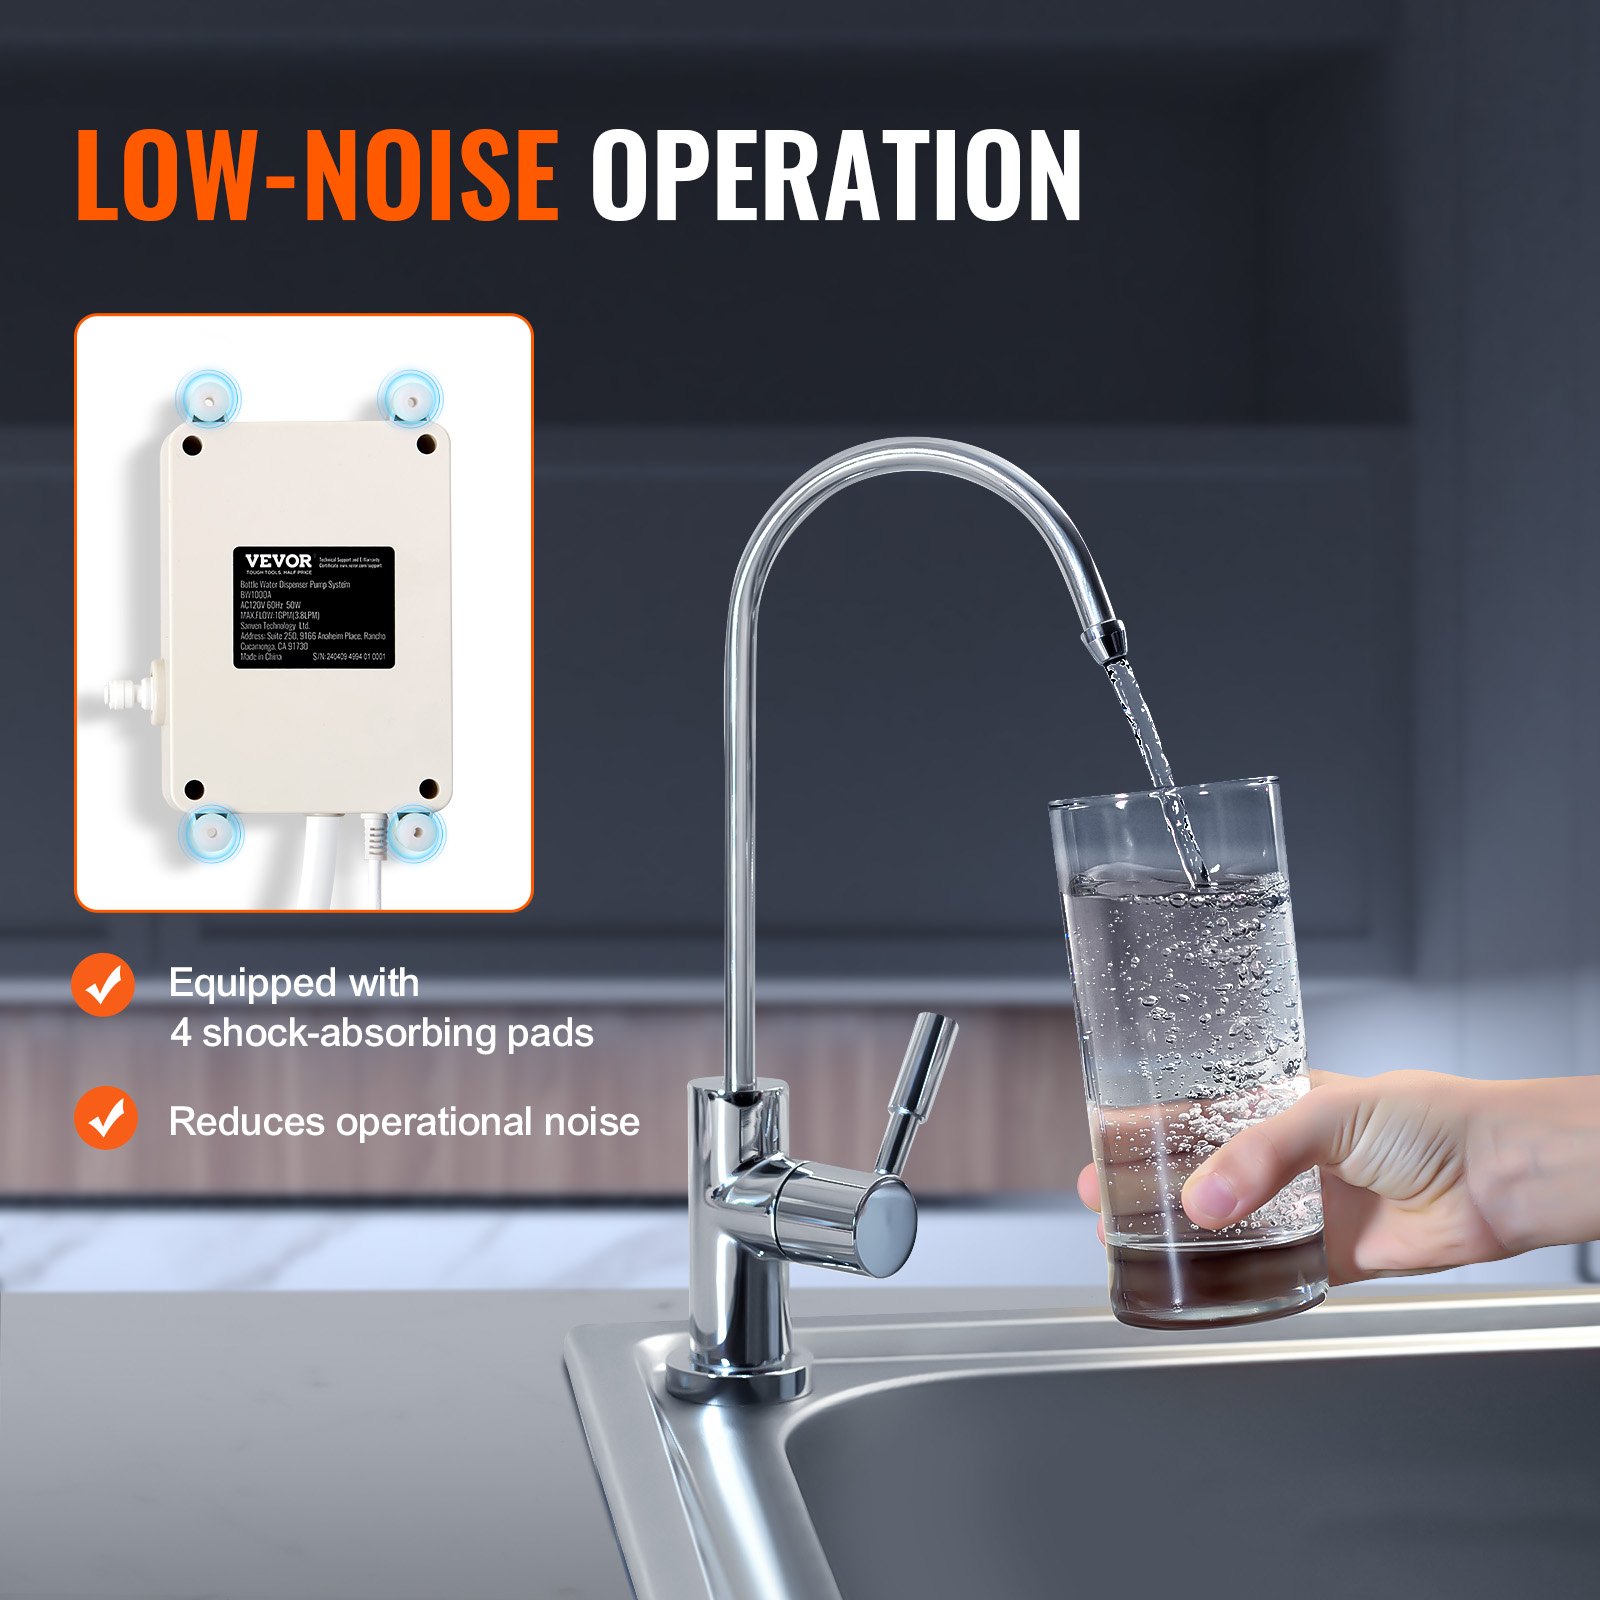
When the suction wand is inserted into the 5-gallon bottle, it will activate the float switch on the end of the wand and turn on the pump. This same float switch shuts off the system when the bottle is empty. The wand has a built-in back-flow preventor valve that prevents water in the system from flowing back into the bottle or spilling while changing bottles.
The heart of the system is the pump module that automatically adjusts the flow and pressure to fill an appliance or faucet, and stops automatically.
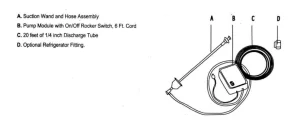
INVENTORY OF SYSTEM COMPONENTS
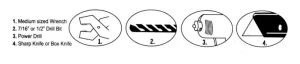
TOOLS REQUIRED TO INSTALL SYSTEM
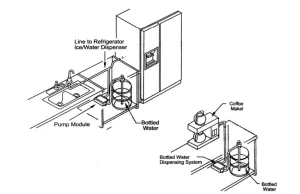
MOUNTING OF SYSTEM
Select a large cabinet to accommodate the 5 gallon bottle and suction wand assembly. Place the Pump Module on the cabinet floor with on/off switch and suction tube facing out toward the cabinet doors. Position as close as possible to a grounded electrical outlet and place the five gallon bottle close to the Pump Module without kinking the suction hose.
The Bottled Water Dispensing System may also be placed in a pantry, closet, cellar or other location where a grounded electrical outlet is available.
PLUMBING
There is 20 feet of 1/4″ O.D. polyethylene tubing supplied with the Bottled Water Dispensing System. Carefully measure the distance between the pump module outlet and the appliance water inlet or optional faucet, and cut the tubing clean and square to prevent fitting leaks. If the refrigerator and optional faucet are being connected, use the 1/4″ tube “T” fitting and place it in an accessible location.
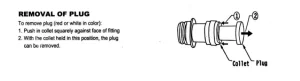
Remove the plug from the pump module outlet port by pushing the collet against the body while sliding the plug out of the fitting. See removal of plugs (Page 2). Push the cleanly cut tubing end into the pump module outlet port, past the o-ring to the tube stop. Route tubing to the refrigerator water valve and connect it to the water inlet valve in the back of the refrigerator by using the tube connecting fitting. First, slip the nut over the tube, place the ferrule over the tube, install it onto the refrigerator water valve fitting, and tighten.
For installation and use with commercial coffee and tea brewing equipment: Many commercial coffee and tea brewing machines can be connected to a water supply line. Ensure you have a 1/4″ I.D. connection fitting at the water inlet that can accept the supplied 1/4″ O.D. tubing. These brewing machines have a factory-installed device that restricts incoming water to a safe pressure that won’t damage the machine. This device is usually referred to as an inlet pressure regulator or flow restrictor, and limits incoming water pressure to approximately. 90-100 psi.
If you intend to use the system with one of these brewing machines, remove the inlet restrictor device. Consult the brewing machine manufacturer for details. Failure to remove the brewing machine’s restrictor may cause the series pump to cycle itself off and on repeatedly, leading to premature motor failure of the unit This type of failure is not covered under warranty. Use of filter devices with your commercial brewer is unnecessary; see below
For installation on refrigerators with ice-making and/or water dispensing functions: Do not use any external filtration devices. These will cause the pump to over-cycle, possibly causing premature pump failure, not covered under warranty. If your refrigerator has factory-installed internal filtration that must remain in place as part of the water line, this too may cause over-cycling resulting in pump failure. Contact the refrigerator maker and inquire about obtaining an empty or dummy filter housing for use instead of the standard filter model. If none is available, a small accumulator tank will be necessary.
Bottled Water Dispensing Pump System Electrical Precautions
WARNING: Risk of Electrical shock!
Specific CBW models are available without an electrical plug; this allows for direct connection to the power source, or the addition of a particular plug type not available from. Additionally, it may become necessary to replace a damaged plug. Observe these instructions when connecting your CBW unit to a plug or power source.
PRESSURE WARNING: Maximum total head is 28m when the pump switch cutoff occurs.
- Make sure the power source conforms to the pump voltage
- Ensure all power is disconnected before connecting the CBW unit to the power source.
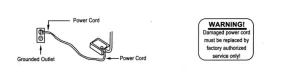
For 115V AC models with plugs: Plug the power cord into a grounded outlet after moving the pump system’s rocker switch to the OFF position.
For 115V AC models without plugs: Black wire lead is common, White wire lead is neutral, and Green/Yellow wire lead is ground. If adding a plug, plug into a grounded outlet after moving the pump system’s rocker switch to the OFF position.
For 230V AC models with plugs: Plug the power cord into a grounded outlet after moving the pump system’s rocker switch to the OFF position. Make sure supplied plug matches the outlet configuration.
For 230V AC models without plugs: Brown wire lead is live, Blue wire lead is neutral, and Green/Yellow wire lead is ground. If adding a plug, plug into a grounded outlet after moving the pump system’s rocker switch to the OFF position.
WARNING: Never connect the Green/Yellow wire lead to a common or live terminal!
For 12V DC models: Connect the Red wire lead (positive/+) to a minimum 4 amp circuit and connect the Black wire lead (negative/-) to the battery ground or chassis. For runs to 20 feet, use 18 or 16 AWG; for 50 feet, use 16 or 14 AWG.
SYSTEM START-UP
Before the Bottled Water Dispensing System is put into service, the system should be sanitized by following the maintenance and sanitation clean-in-place procedure on page five (5).
After the Bottled Water Dispensing System has been mounted in a suitable location with the suction wand installed into the bottle and the discharge tube routed to the appliance water inlet (or to the optional drinking water faucet), the 115-volt AC and 230-volt AC systems must be plugged into a grounded outlet. As outlined in the electrical section, the 12-volt DC system must be hard-wired to the vehicle or boat.
Turn the dispensing system on by placing the on/off switch in the on position and operating the appliance dispensing valve or the drinking water faucet to vent all the air from the Bottled Water Dispensing System. After air is evacuated from the system, close the appliance dispensing valve or the water faucet, and the pump will stop automatically until you open the water dispenser valve or faucet. Follow the manufacturer’s plumbing and operating instructions with commercial coffee and tea brewers.
The seal at the icemaker connection should be loosened or disconnected for refrigerators with an icemaker only to vent the trapped air in the system. When water is present at the connection, reconnect, tighten, and check for leaks.
Once the system is vented, it will not require venting again even after bottle changes.
SUCTION WAND INSTALLATION

To install the suction wand into a standard 5-gallon bottle, place the bottle close to the system and remove the bottle cap, then install the suction wand into the bottle. (Note: If the bottle is overfilled, dispense enough water to install the suction wand to the bottom of the bottle.)
Push the suction wand bottle cap over the bottle and push the wand to the bottom center.
SUCTION WAND REMOVAL AND CHANGING BOTTLES
Before removing the suction wand from the empty bottle, move the bottle to an open area outside of the cabinet. Put the new bottle next to the empty bottle, clean the neck and cap area with detergent, and remove the cap.
Remove suction wand from empty bottle by lifting wand cap with a rocking motion, pull cap off bottle, slide suction wand out of the bottle, and place directly into new bottle while sliding cap over new bottle neck.
Do not attempt to remove the suction wand by pulling on the soft plastic tube, which can permanently break the suction wand.
Bottled Water Dispensing Pump System Maintenance and Sanitation
Equipment Required
- Two (2) 2 ½ Gallon Household Pails.
- One (1) Roll of Paper Towels.
- One (1) Small Container of Household Bleach.
Clean In-Place Procedure
Using the on/off switch on the front of the enclosure, turn the Bottled Water Dispensing System off by putting the switch in the off position.
Fill a clean pail (A) with two (2) gallons of hot tap water (135°F/57.2°C), adding one (1) ounce of household bleach.
Remove the suction wand from the pure water bottle and submerge the bottle cap end into pail (A), taking care to ensure that the metal hose clamp connecting the hose to the suction wand is totally immersed in the water/bleach solution, for ten minutes and then wash underside of cap and suction tube exterior with a clean paper towel. If using the optional faucet, disconnect the tubing.
Remove the faucet, immersing it in the water/bleach solution for ten minutes.
Wash the faucet exterior with a clean paper towel; install the faucet and reconnect the tubing. Place the suction wand into a clean, empty pail (B) and dispose of the solution in pail (A).
Refill the cleaned pail (A) with two (2) gallons of hot tap water (135°F/57.2°C), adding one (1) ounce of household bleach, and place the suction wand into the pail with the bottle cap up.
Disconnect the discharge tube from the faucet or the refrigerator and place it into the empty second pail (B). (Do not use a pail with clean water and chlorine solution.)
Turn the dispensing system on by placing the on/off switch in the on position and dispense all chlorine solution into pail (B). Place the discharge tube into pail (A), dispose of the bleach, and rinse pail (B). Replace the tube in the pail (B).
Refill pail (A) with two (2) gallons of hot tap water (135°F/57.2°C), adding one (1) ounce of household bleach. Dispense bleach as in step #6.
Reinstall the suction wand to a new bottle of pure water and reconnect the discharge tube to the refrigerator or faucet and dispense 12 to 18 ounces of water, or until the bleach taste is removed.
Cleaning should be performed at least four (4) times per year.
CAUTION
- Do not place the Bottled Water Dispensing System into a dishwasher as it will cause electrical failure of the pump and controls.
- Ensure that the metal hose clamp is immersed in water/bleach solution.
Bottled Water Dispensing Pump System Troubleshooting
System Will Not Dispense Water
- Check the on/off switch position.
- Check the power to the dispensing system.
- Check the location of the suction wand in the bottle.
- Check for an empty water bottle.
- Check for air in the system.
Discharge Tube Leaks At Fitting
- Push the tube into the tube stop.
- Remove the tube and cut ¼’’ off the end, square, and reinstall.
- Check the correct tube size in the fitting; the tube size is ¼’’ OD. Fitting should be ¼’’ I.D.
The system will not shut
- Check for leaks in the tubing system.
- Check for leaks at tube fittings.
- Check for leaks at the faucet, ice maker, or refrigerator water valve.
- Check the pressure switch by turning the faucet off and on.
- Check the float switch position in the bottle.
The system continually turns off and on while in use
- Check for a restriction device at the appliance inlet.
- Check for the filter unit in line.
Recommended For Your Project
VEVOR Bottled Water Dispensing Pump System,110V 20ft US Plug Manual
Reviews
There are no reviews yet.