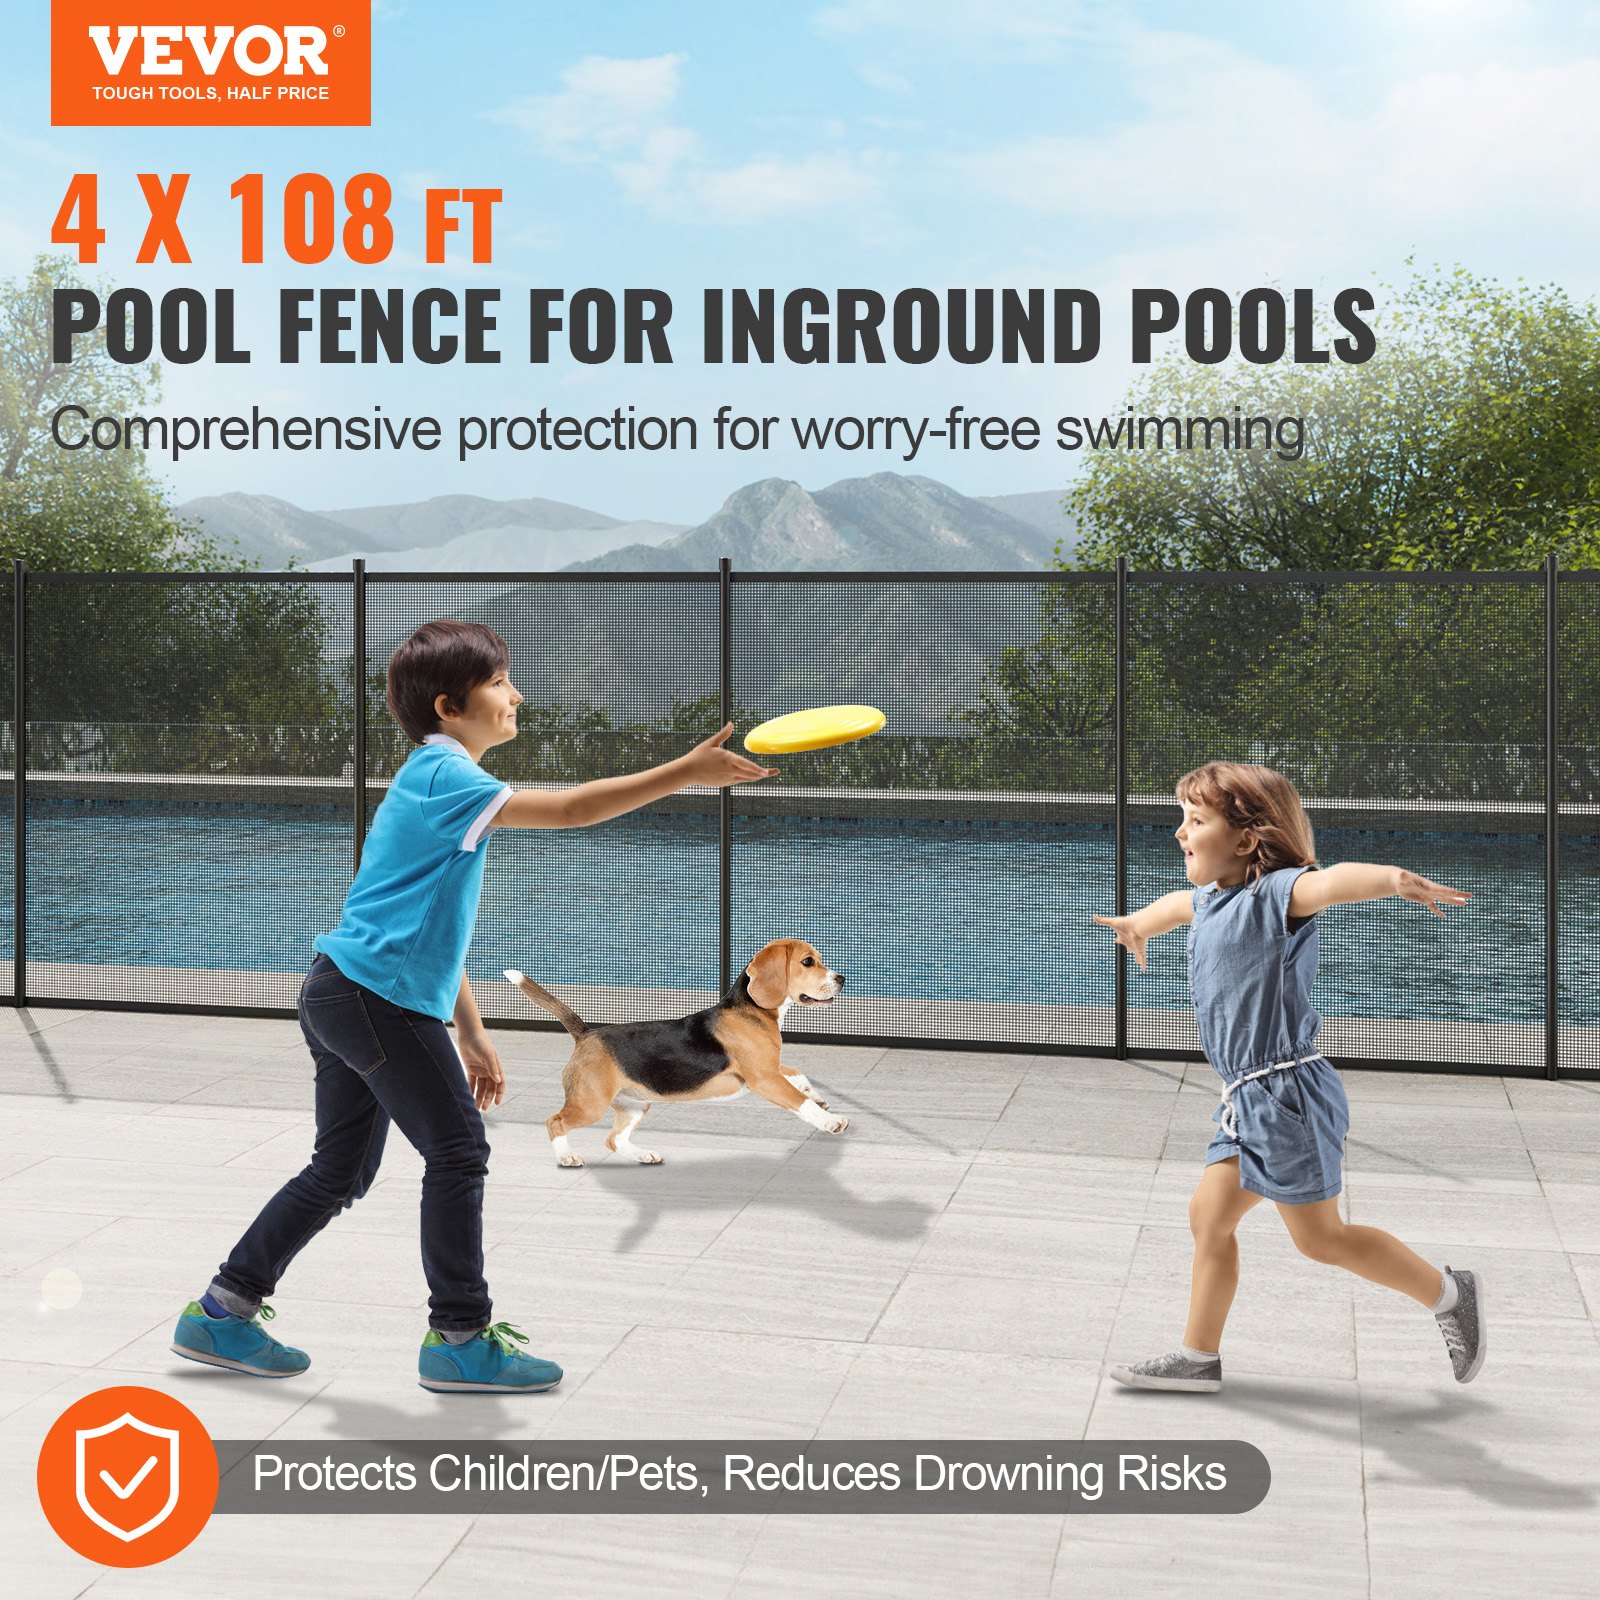
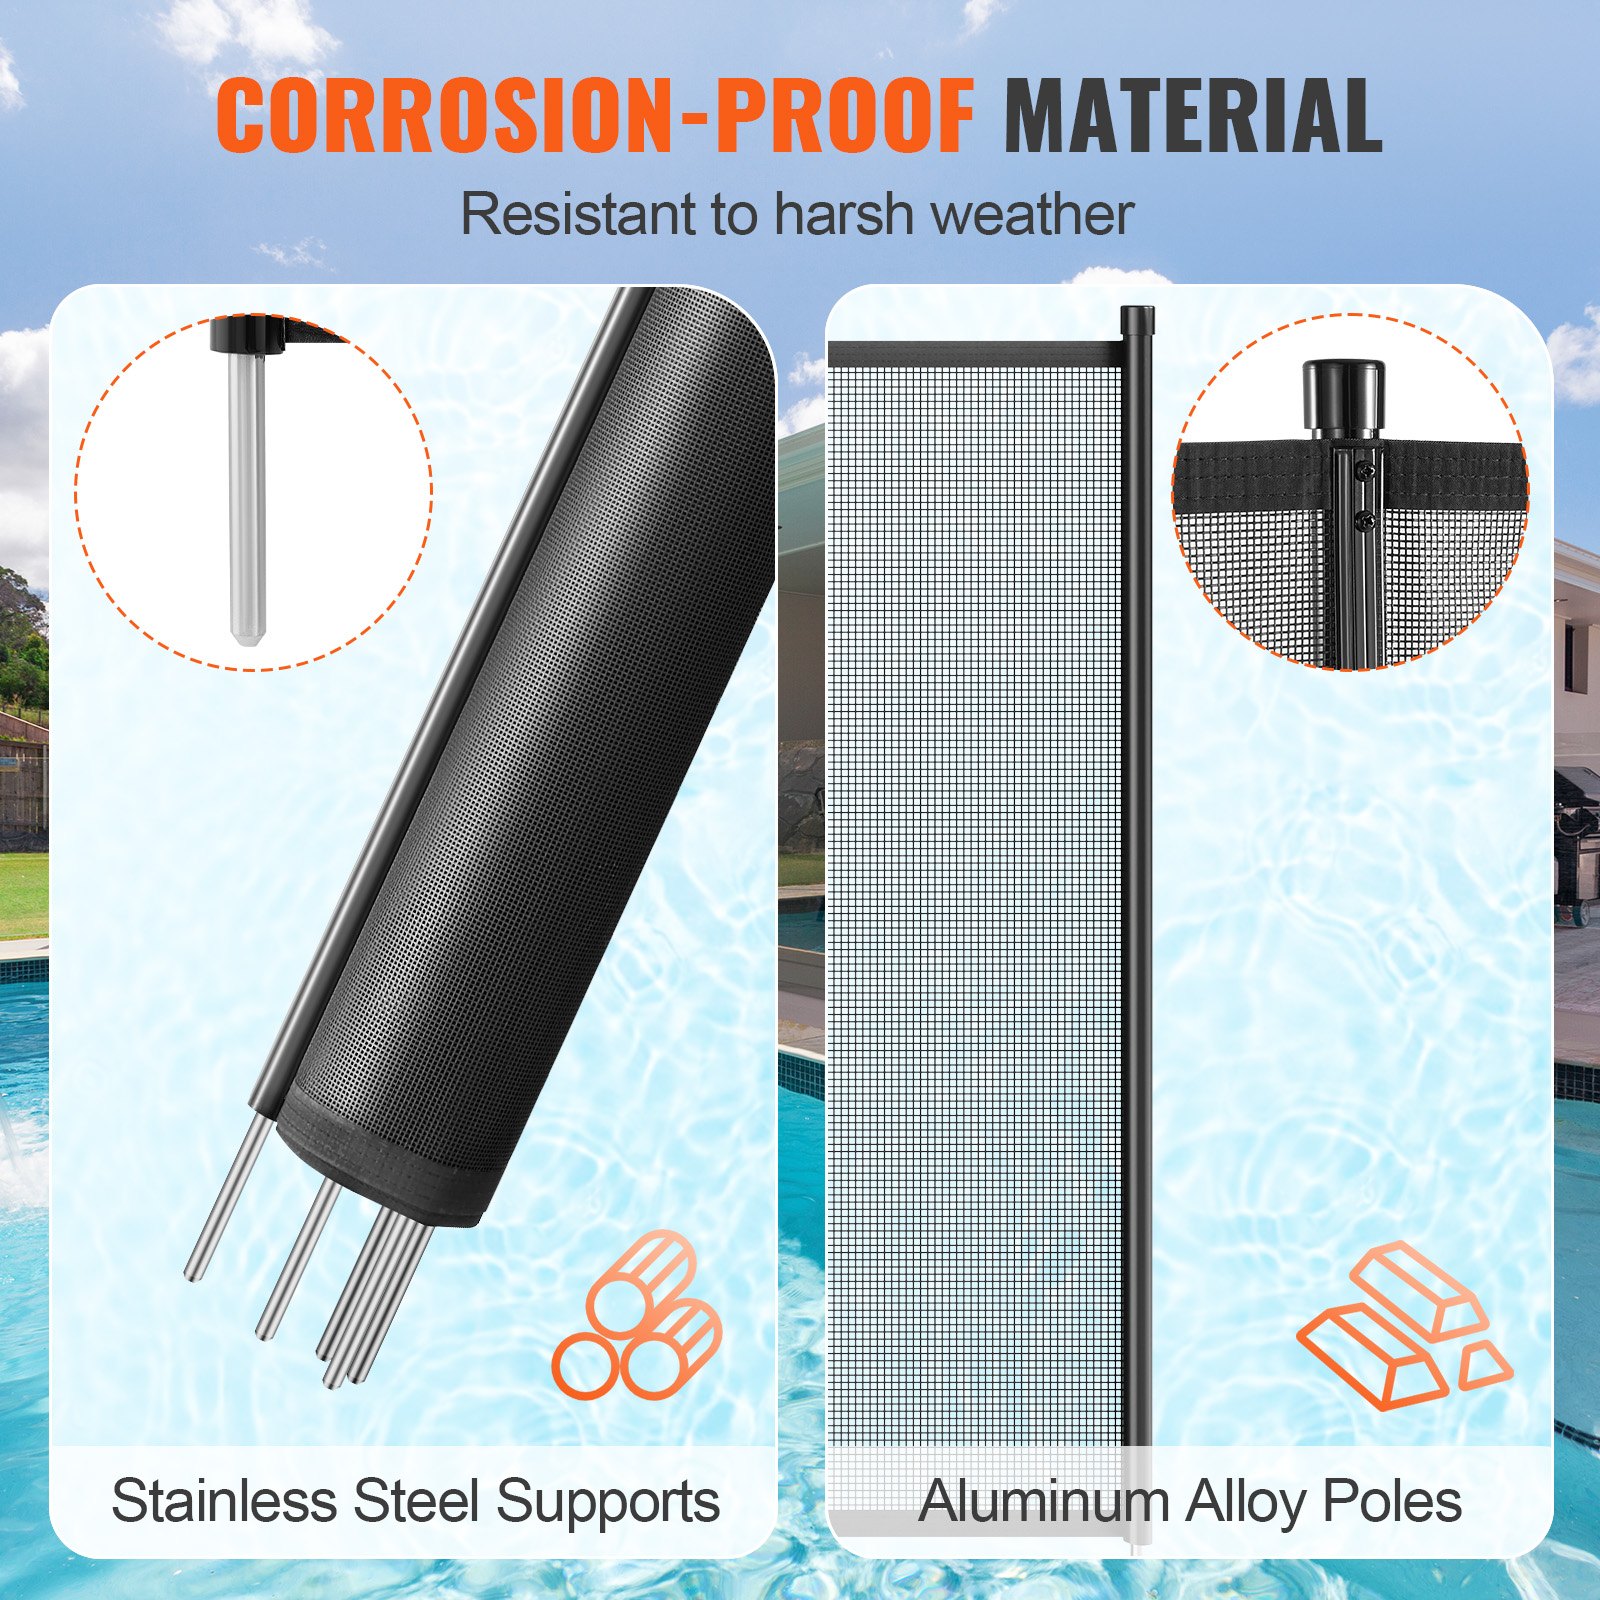
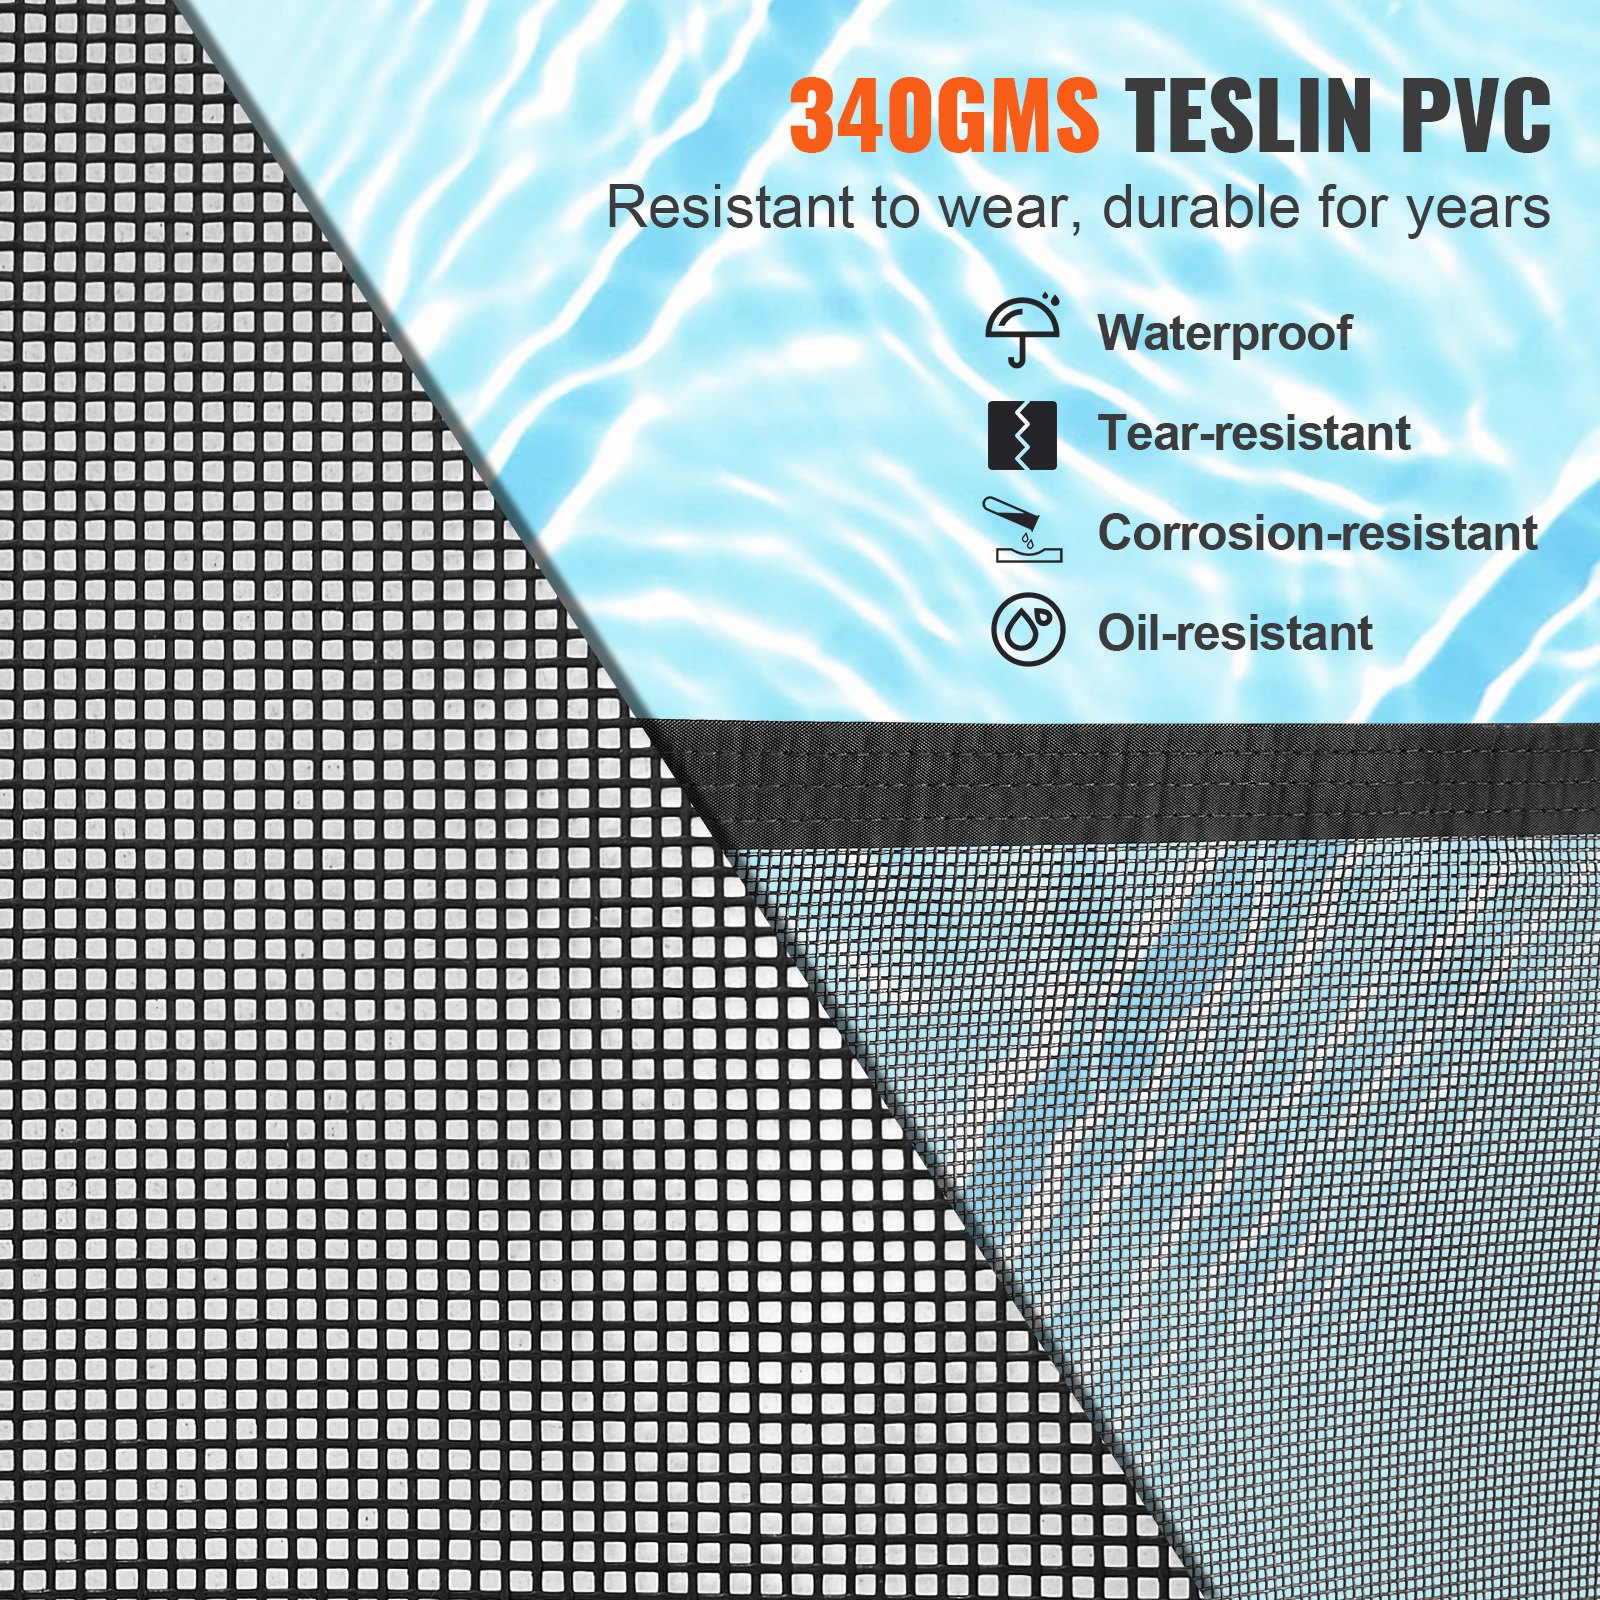
Discover the ultimate guide to ensuring safety around your pool with the VEVOR Pool Fence manual. Our comprehensive guide covers everything you need about the 4 x 10⁸ FT Pool Fences for Inground Pools. Designed with your convenience, this manual provides detailed instructions for the easy DIY installation of our removable child safety pool fencing. Made from high-quality 340 gms Teslin PVC pool fence mesh, our fence protects kids and pets and adds an extra layer of security to your swimming pool area.
Our manual is user-friendly and packed with step-by-step instructions, troubleshooting tips, and optimization advice to help you get the most out of your VEVOR Pool Fence. Whether you’re a first-time installer or a seasoned pro, our guide ensures you can set up your fence with ease and confidence. Download the VEVOR Pool Fence manual today and safeguard your pool with the best in safety and durability.
VEVOR Pool Fence User Manual
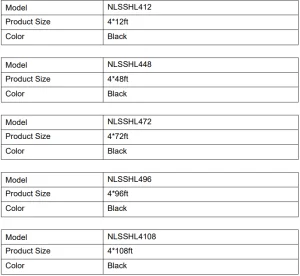
Model: NLSSHL412, NLSSHL448, NLSSHL472, NLSSHL496, NLSSHL4108
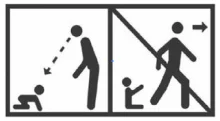
THIS SAFETY FENCE IS INTENDED TO LIMIT THE POOL’S ACCESS TO CHILDREN UNDER FIVE YEARS.
THIS FENCE IS INTENDED FOR INDIVIDUAL USE ONLY.
Important recommendations
Before starting, knowing which rules must be followed when installing the barrier is essential.
- The barrier must isolate the pool and all its points of access completely.
- All sides of the pool must be protected, whether with the barrier itself or a fixed element such as a wall, a panel or any other type of fence, as long as this element complies with the NF P 90 -306 standard (particularly with the part stating that said element must never have a clearance height inferior to 1.10m).
- If the barrier must be connected to another element, it should be firm enough to provide a stable point of attachment.
- Do not install the barrier on an unstable surface such as grass, sand.
- WARNING: Maintaining a corridor of at least 1.10 m between the barrier and any fixed or movable point of attachment (on each side of the barrier) is imperative.
- We recommend installing the barrier at a minimum distance of 2’ above the water level. In private pools for individual use, we recommend installing the barrier not too far from the pool itself so that its efficiency is not reduced.
- However, consider the minimum distance required for maintenance tasks such as vacuuming when calculating the distance between the pool and the barrier. Do not leave a small distance that could impair maintenance tasks.
- Before installing this product, please read and follow all the warnings and instructions accompanying it. Failure to comply with the safety warnings and instructions could cause injuries, death, or material damage.
- Please keep this instruction manual for future consultation.
- We reserve to change all parts of the articles or contents of this document, without prior notice.
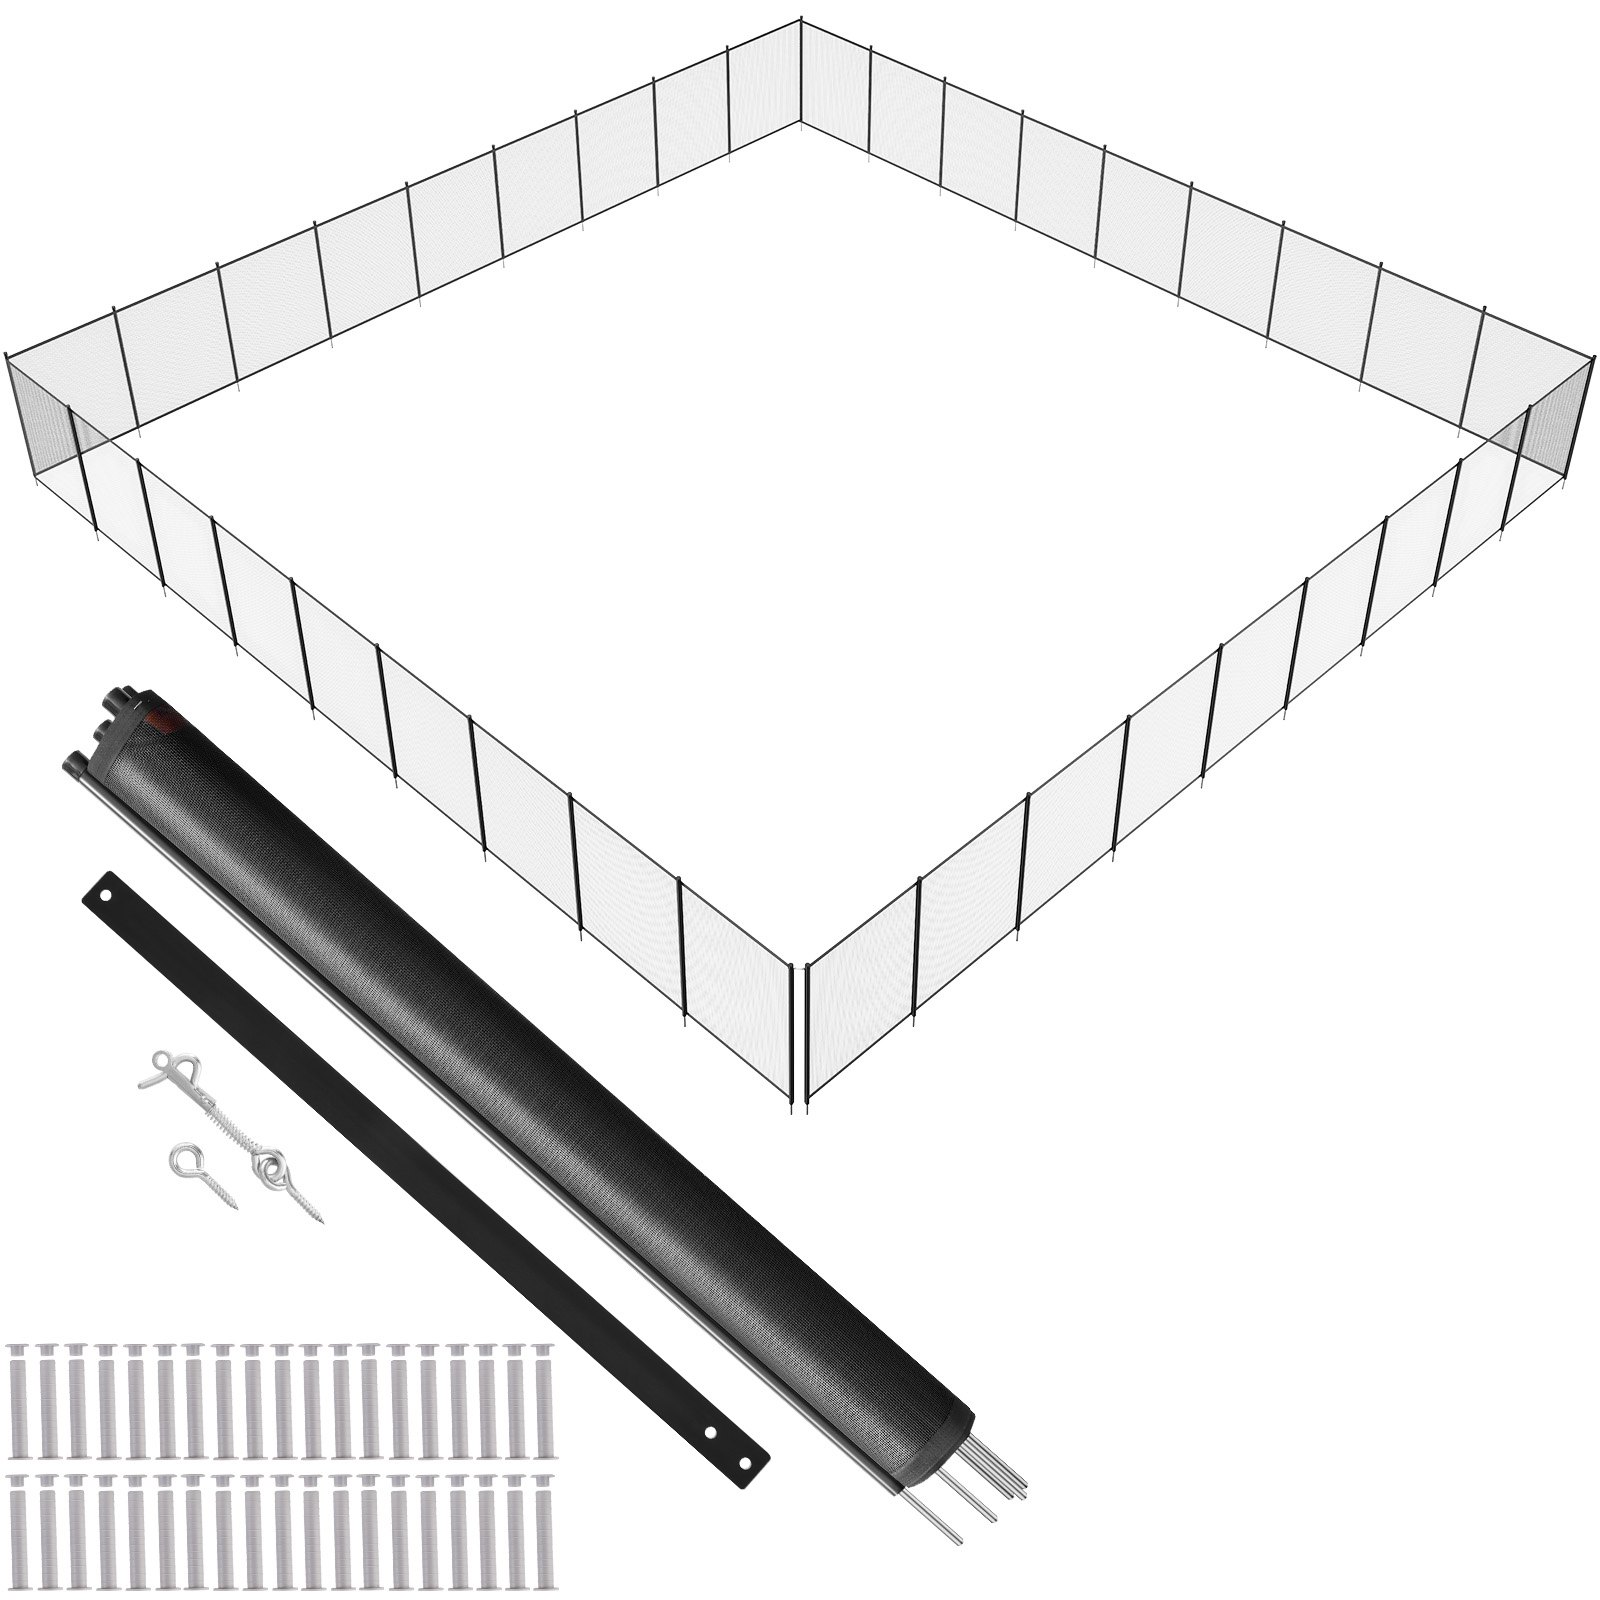
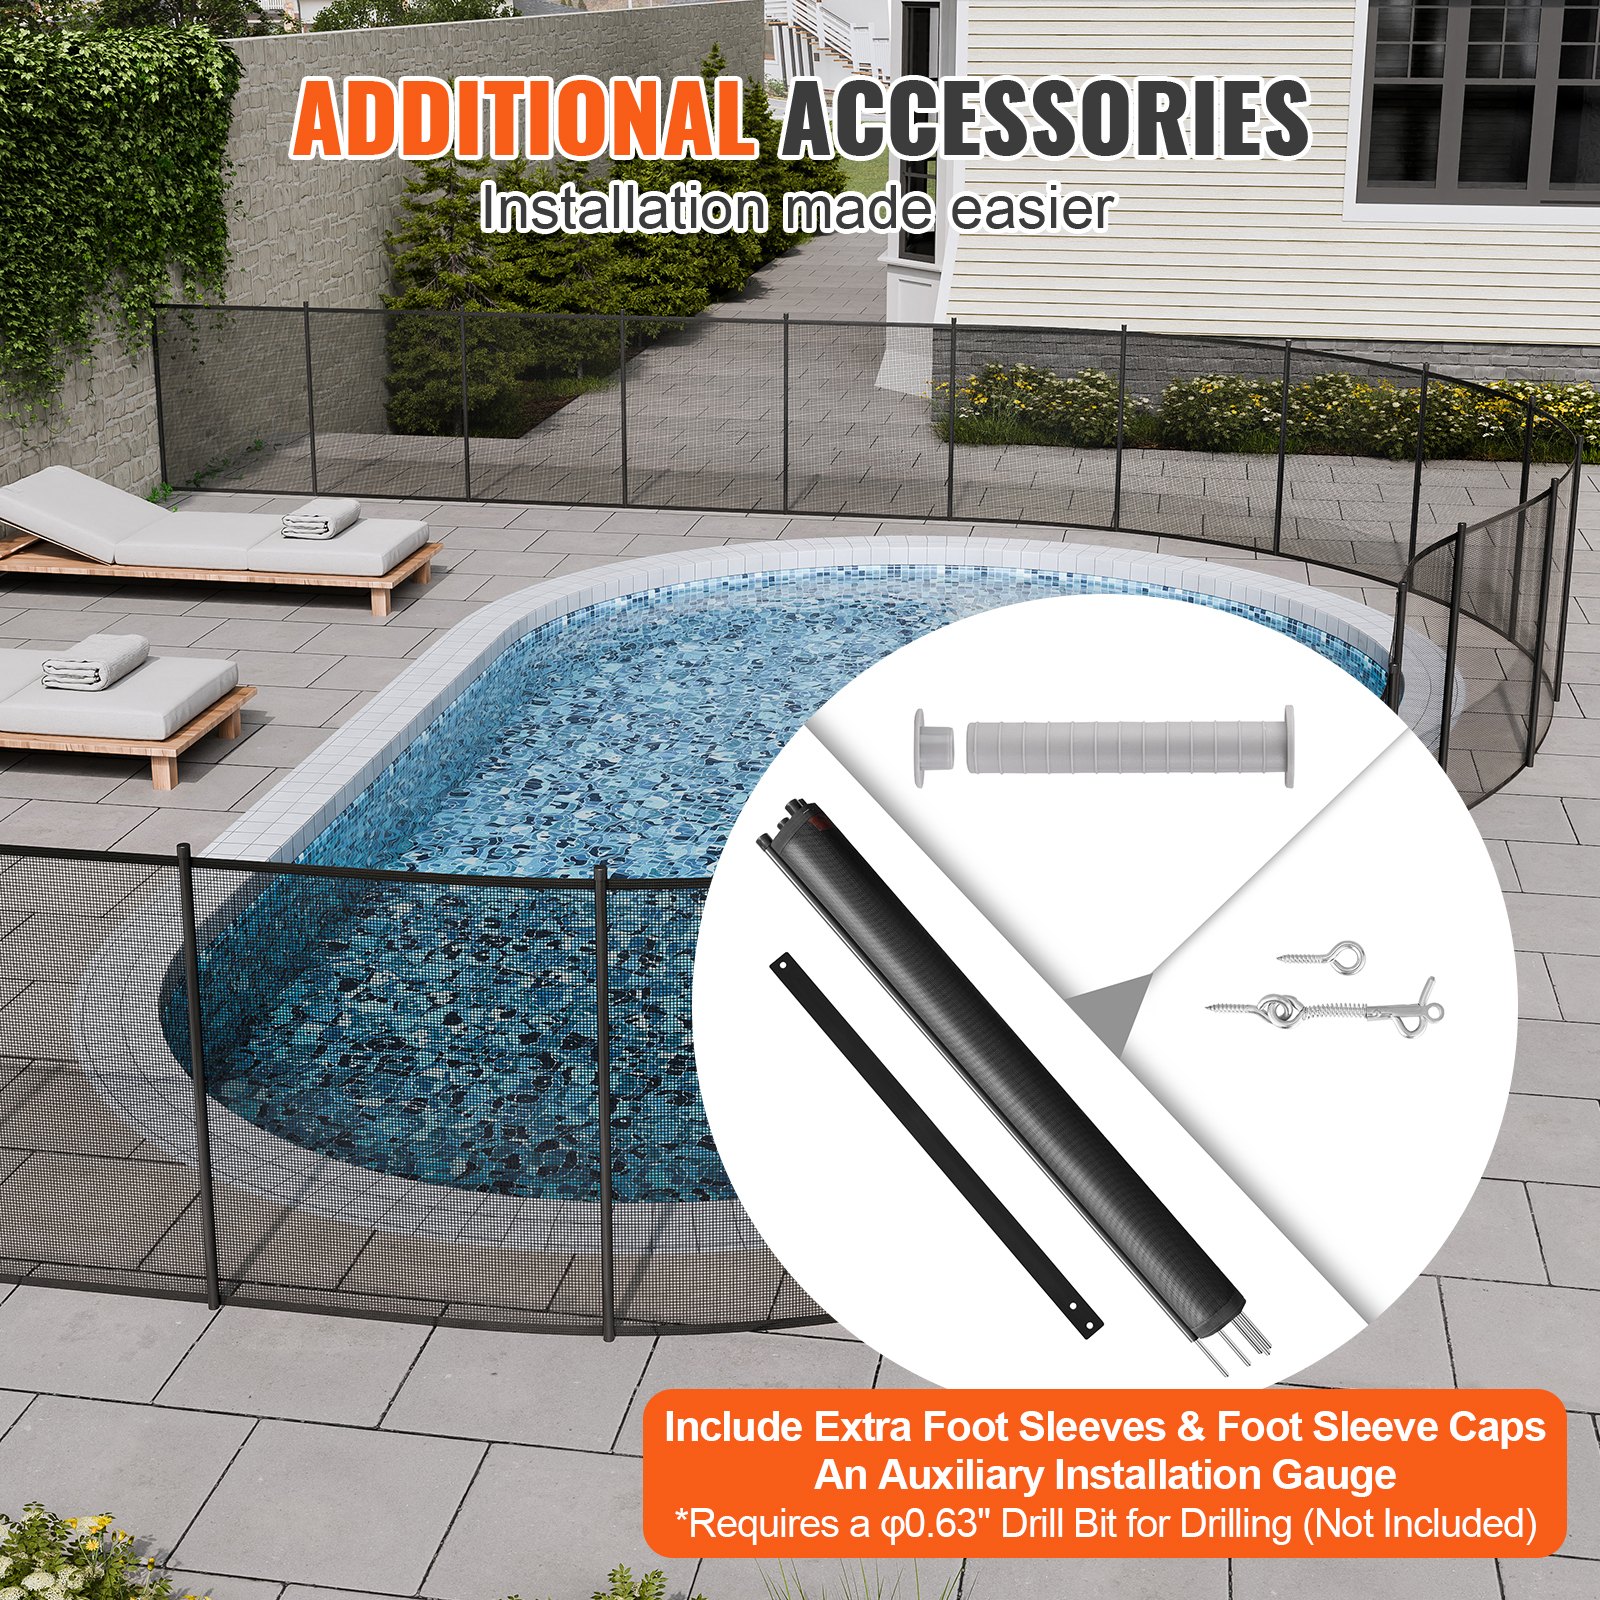
VEVOR Pool Fence Specifications
VEVOR Pool Fence Parts List
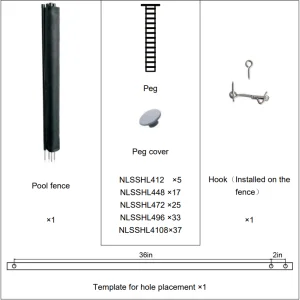
Required Tools

NOTE: This manual takes NLSSHL412 as an example for installation instructions; other models are only different in length, and the installation method is the same.
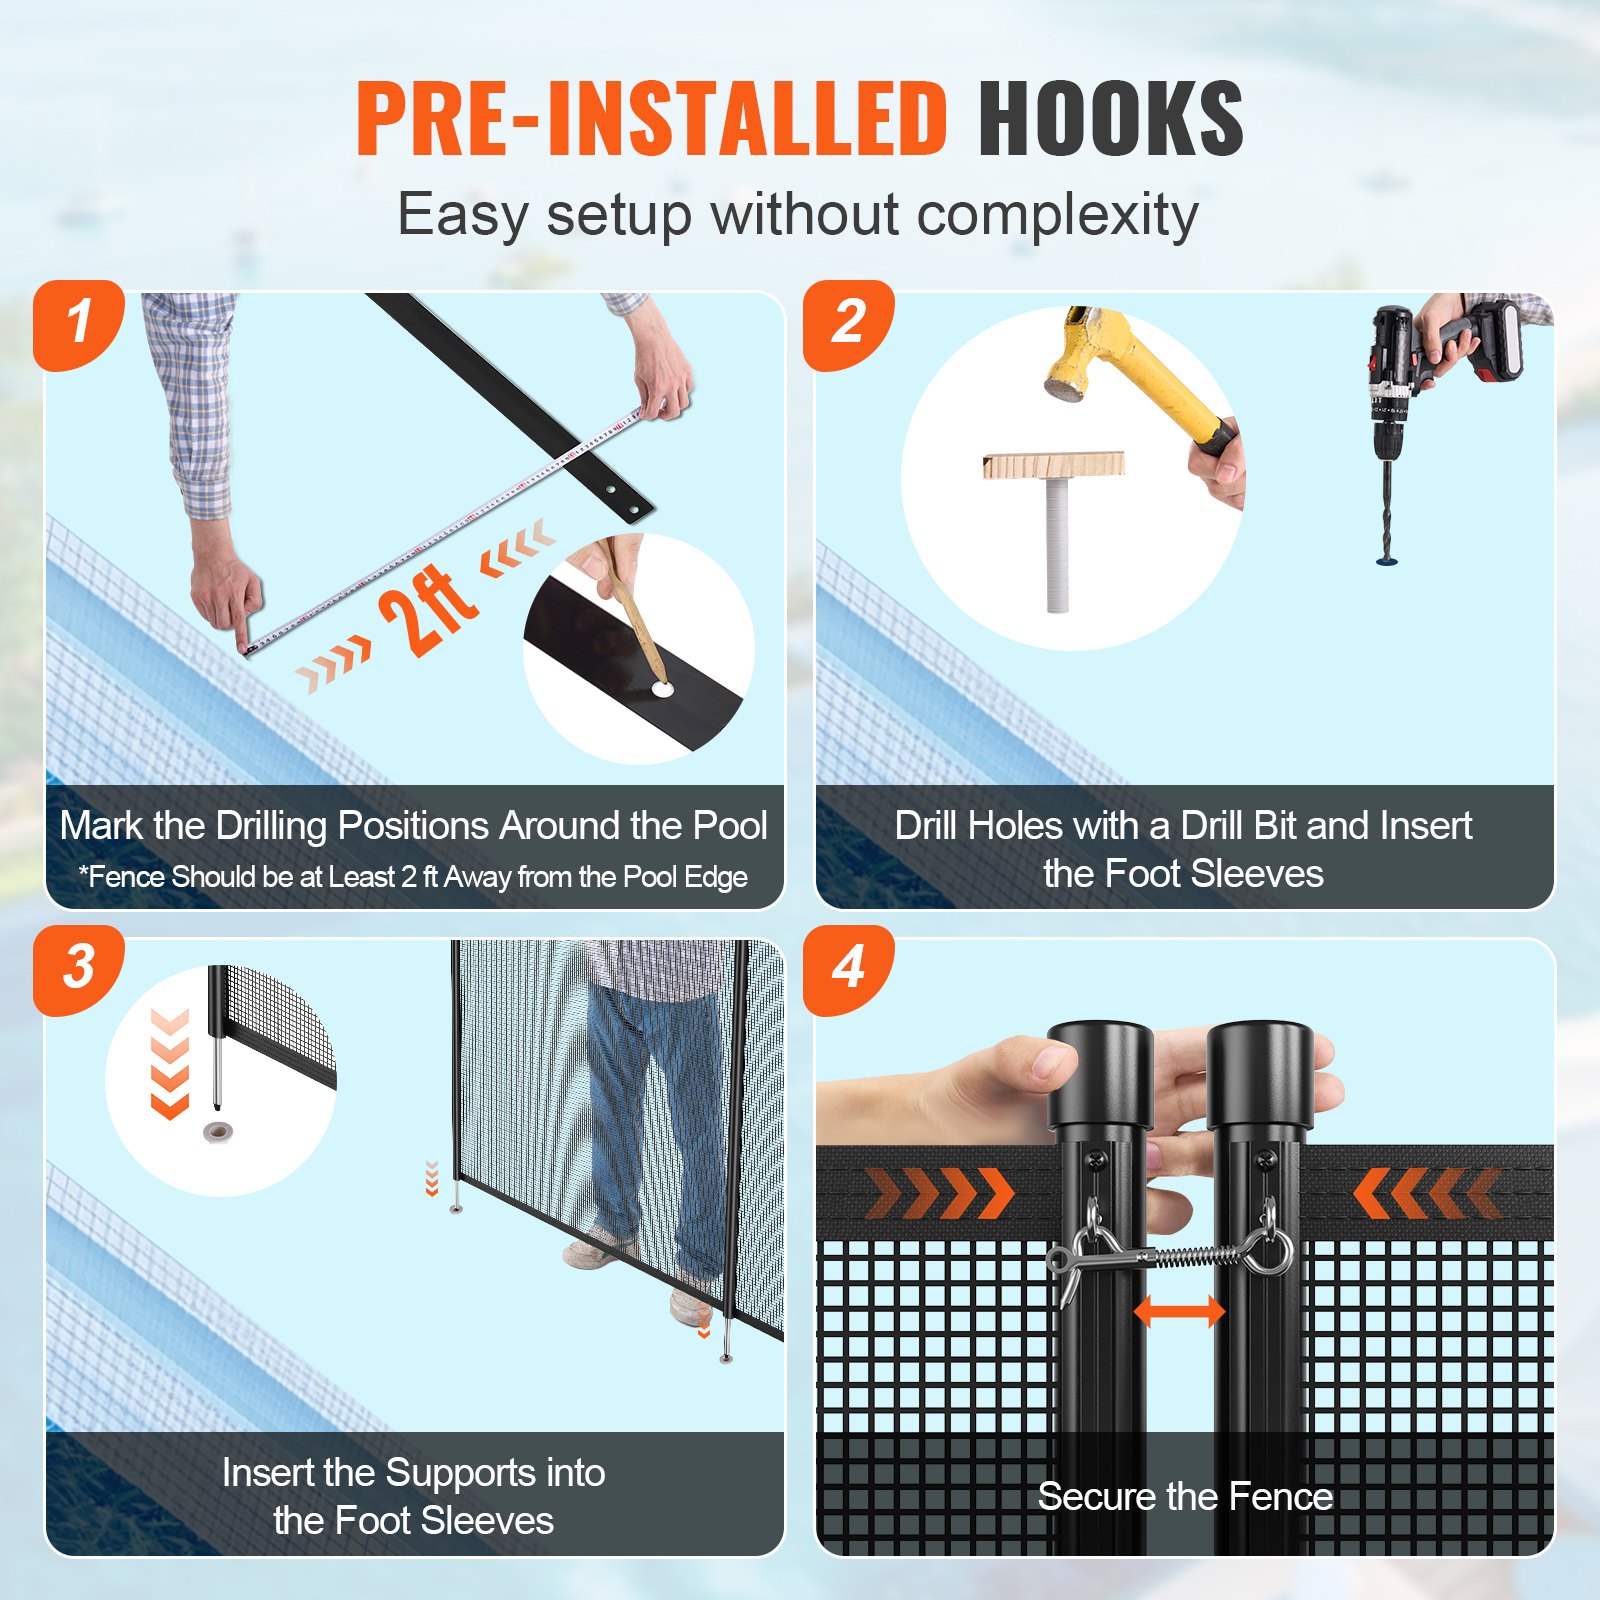
Installation
Step 1: Layout & Mark-Out
Layout
- The fence should be a minimum of 2’ off the pool edge. See Fig. 1& Fig. 2.
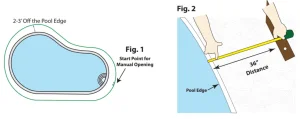
- Start Point: This is the manual opening to enter the pool area. See Fig. 1.
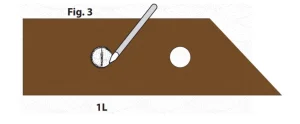
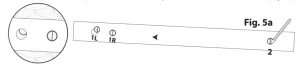
- Use the double hole on the section template provided and mark your first hole 1L. Fig. 3. 1 L is for the 1st pole of the full section going to the left side of the pool.
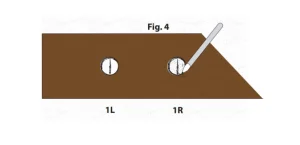
- Now, place the template over mark 1L and mark your next hole, 1R. Fig. 4. 1r is for the first pole of the full section going to the right side of the pool.
Mark-out
- Once both holes of the start point (1L & 1R) are marked, place the template provided over 1R Fig. 5.
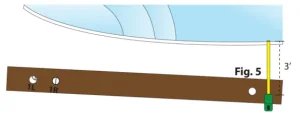
- Then place the template over 1R and mark your second hole for that section (Fig.5a).
- Now repeat until the 5th pole of the section, Fig. 6-7a
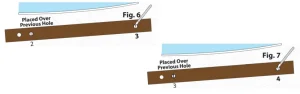
- Mark your last hole for that section, (hole 5) Fig. 7a
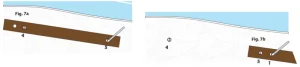
Then, align the double hole on the template over the 5th hole you marked in Fig. 7b. Mark the first hole of the next connecting section to the right (hole 1). Repeat these steps on both pool sides until you reach the cut section.

- Custom Cut: This is when the last piece is less than the 36″ template. Marking your custom cut is just like marking out a full 3-foot panel, only the last panel is usually shorter than 3 feet. This is the custom cut you will make later. This section is the last one marked out, usually in the back of the pool, where you will not notice it. The last piece will most likely have fewer poles in it. This example depicts a two-pole cut.
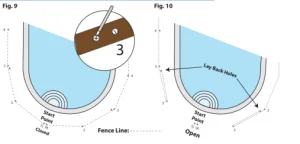
- Lay Back Holes: are needed for the manual opening and are used to place the endpoles of the section into when using the pool. See Figs 9 & 10.
Step 2: Understanding How to Drill
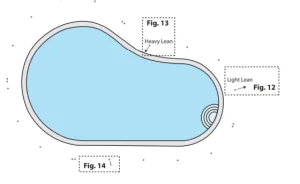
- Angle & Level Holes: Before drilling, you need to survey all the holes and mark the direction in which they will be drilled. Should it be a Light Lean Angle, Heavy Lean Angle, or a Level Hole? Should the pole lean toward or away from the pool or be level? See the diagram below.
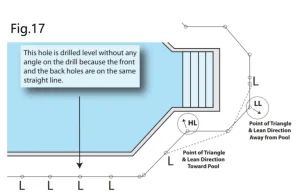
- Mark an arrow on the deck surface to avoid making a mistake. Angles are needed to ensure proper tension and aesthetics. Fig. 12 shows a light leaning away from the pool. Fig. 13 shows a Heavy Lean toward the pool. Level holes are drilled perpendicular to the deck surface or are not leaning. See Fig. 14
- Understand the Angle to be Drilled: See Fig. 15a-17
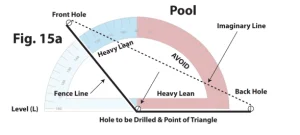
PRO NOTES: Any hole to be drilled will have a hole in front of it and one in the back of it, as shown in Fig.15a. If the hole to be drilled is in the heavy lean range, it will require a Heavy Lean. If the hole drilled is in the light lean range, it will require a Light Lean. See Fig. 15b
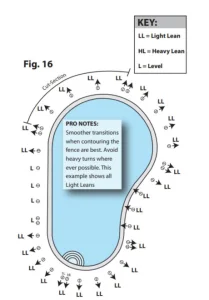
PRO NOTES: To determine the lean of a hole, stand over the hole you are about to drill and look at the hole in front of you and the hole behind you. If you connected all three holes with imaginary lines, it would make a triangle. The point of the triangle indicates the direction of lean. The further away from the imaginary line, the more of a lean.If it doesn’t make a triangle, then it is level.
Step 3: Drilling and Inserting Ground Sleeves
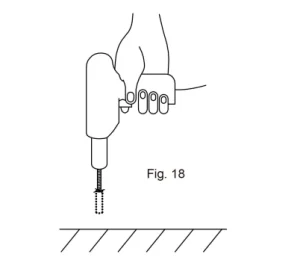
- The holes must be made with a drill bit ø16. If the initial hole is made using the drill bit ø10then it may be easier to carry out the definitive drilling with ø16.
- With the help of a spirit level, mark the holes following the instructions above.
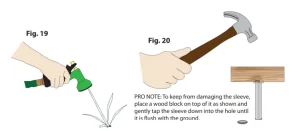
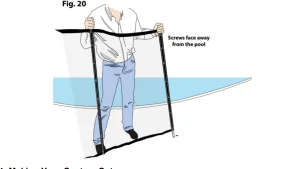
- Sleeving: Once drilling is completed, flush out the debris fromthe holes using a garden hose Fig. 19. Next insert the plastic sleeves in the holes and tap down completely Fig.20.
- Installing Sections: Start at a double hole (where sections connect) and put your first pole in. You should always lean the pole you are leading with back as shown below in Fig. 20 to get it started in the hole. Then push the pole forward along the fence line and down into the hole until the bottom of the wall is flush with the deck sleeve.
- Repeat this until all of your complete sections are installed.
Step 4: Making Your Custom Cut
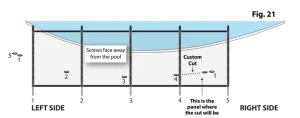
Measuring Your Custom Cut: Your custom section is the one that doesn’t fit. The first step is to measure your custom cut. Note whether you will be cutting from the right side or the left side of the full section. See Fig. 21 below.
PRO NOTE: When measuring for a custom cut or cutting fence, you should never forget that the moldings face out away from the pool. When measuring your cut section, always face the pool.
Measure the outside centerline of the odd panel. Next, count the number of poles in the odd section and double-check whether it is a cut to the right or a cut to the left. See Fig. 22-23.
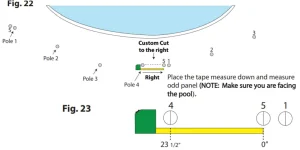
- In Fig. 22, our example custom cut is a 4-pole, and then a cut to the right. This cut is a 4-pole 23 1/2″ to the right. When you measure, make sure you are measuring between the two centerlines of either hole. Fig. 23 illustrates the scribelines, but when you are ready to measure for your cut, you will be dealing with drilled holes in the concrete, and no scribe lines will be drawn across the holes.
- The scribe lines in the figure are to remind you that if your cut happens to fall on a turn, you must remember that your center line turns as well.
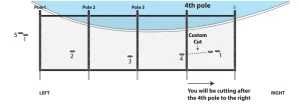
- Make Your Cut: Now you have the measurement and can make the cut. Roll out your full section (screws facing up) in front of the custom-cut area and face the pool. Looking at the complete section count, the poles are over until you reach the panel that needs to be cut. Our example cut is a 4-pole 23 1/2″ to the right.
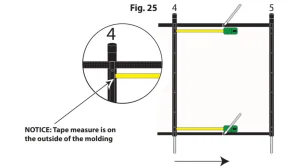
Hold your tape measure on the OUTSIDE OF THE MOLDING as shown in Fig. 25, and mark the border at the top and bottom of the fence with a marker.
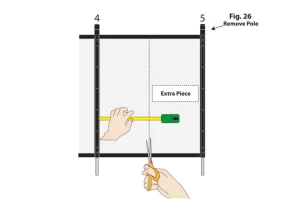
Using your scissors, you can proceed to cut the mesh. Slide your ruler up against the molding to make sure you are cutting at exactly the measurement you took. See Fig. 26. Make sure the mesh is tight and remove the extra pole from the extra piece.
Your cut has been made, and you now have to attach the border material included. Place the mesh between both flaps of the border and slide the strip of border down the mesh, then staple it on. Staples should be 1/4″ off the line of the mesh in the border. See Fig. 27-28. Make sure the mesh is fully inserted inside the border material included.

Now your border has been attached to the cut side of the mesh. Cut off the excess border. Your next step is to attach the pole you removed in Fig. 26 to the cut side.
The best way to attach your pole to the cut is as follows:
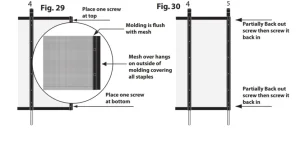
- Lay your molding strip on top of the border you just attached. Fig. 29
- Line up the molding so that it’s flush with the bottom and flush with the line of mesh. Make sure all the staples are covered by molding (Fig. 29).
- Screw one screw into the molding at the top until it comes completely through the molding mesh and border.
- Then put one screw into the molding at the bottom until it comes through to the other side of the molding and mesh. Your molding should now be attached with two screws to the cut piece of the fence.
- Slide your pole underneath the molding & mesh, and align the screws that come through the other side to the corresponding holes of the pole. Partially back out your top screw while keeping pressure on the molding and the pole to keep it from moving.Then, slowly drive the screw back down into the pole. Repeat this stepfor thebottomscrew. See Fig. 30
- Finally, place the rest of the screws into the pole and slowly screw them down. Your end pole is now attached.
Step 5: Finishing & Latching Your New VEVOR Pool Fence D.I.Y.
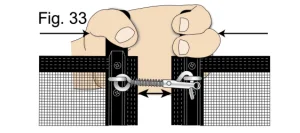
You must squeeze the poles together and press the spring to remove and replace the latch.
WARNING: THE POLE CANNOT BE REMOVED IF YOU PULL WITHOUT TURNING IT AT THE SAME TIME. ACCESS POINTS MUST BE CLOSED AT THE END OF THE SEASON OF SUPERVISED SWIMMING.
VEVOR Pool Fence Maintenance
Try to monitor all safety fence components regularly. If any components should be damaged, especially those relating to closing, don’t hesitate to contact the shop where you purchased the barrier immediately to obtain a replacement part. Replacing the damaged elements or groups as soon as possible is imperative.
Do not use parts not officially approved by the PROVIDER/ INSTALLER. SAFETY PRECAUTIONS
- THE SWIMMING POOL CAN BE A HAZARD TO YOUR CHILDREN. DROWNING MAY HAPPEN VERY QUICKLY. WHEN CHILDREN ARE NEAR THE POOL, THEY REQUIRE CONSTANT AND ACTIVE SUPERVISION, EVEN IF THEY CAN SWIM.
- THIS BARRIER DOES NOT REPLACE COMMON SENSE OR INDIVIDUAL RESPONSIBILITY. THE BARRIER CANNOT REPLACE SUPERVISION CARRIED OUT BY RESPONSIBLE ADULTS, WHICH STILL REMAINS THE KEY FACTOR IN PROTECTING SMALL CHILDREN.
- POINTS OF ACCESS MUST BE CLOSED SYSTEMATICALLY WHEN NO ONE IS HOME, EVEN IF IT IS FOR A SHORT PERIOD.
- WARNING! SAFETY IS GUARANTEED ONLY WHEN POINTS OF ACCESS ARE LOCKED.
- CHECK WHETHER THERE ARE ELEMENTS NEAR THE BARRIER THAT COULD ENABLE OR FACILITATE CLIMBING THE FENCE.
- CLOSING POINTS OF ACCESS THROUGH AUTOMATED CLOSING SYSTEMS SHOULD BE CHECKED SYSTEMATICALLY.
- WHEN THE BARRIER IS BROKEN OR DAMAGED AND REQUIRES REPAIR WORK, IT IS VERY IMPORTANT TO INCREASE SUPERVISION TO PREVENT SMALL CHILDREN FROM ACCESSING THE POOL.
- LEARN RESCUE TECHNIQUES (CARDIOPULMONARY RESUSCITATION) AND UPDATE YOUR KNOWLEDGE PERIODICALLY. IT COULD SAVE A LIFE IN AN EMERGENCY.
- THE PRESENCE OF PARENTS AND/OR OTHER RESPONSIBLE ADULTS IS REQUIRED WHEN THE POOL IS ACCESSIBLE. MEMORIZE AND DISPLAY NEAR THE POOL THE FIRST AID NUMBERS. FIREFIGHTERS
EMERGENCY MEDICAL SERVICES
POISON CONTROL CENTER
Recommended For Your Project
VEVOR Pool Fence, 4 x 10⁸ FT for Inground Pools Manual
Reviews
There are no reviews yet.