


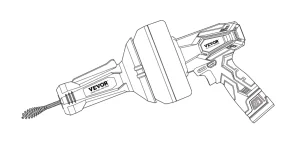
Unlock the full potential of your VEVOR 12V Electric Drain Auger with our comprehensive product manual download. This detailed guide is designed for novice and seasoned users, providing step-by-step instructions for setup, troubleshooting, and optimizing your 25FT Cordless Plumbing Snake Auto Feed.
With an easy-to-follow format, our manual ensures you can efficiently clear pipeline clogs in 3/4″-2″ pipes using the powerful 2.0Ah battery and charger included.
Whether tackling minor blockages or stubborn clogs, this manual covers all aspects to help you operate your drain auger with confidence and precision. Download now to streamline your plumbing tasks and maximize the lifespan and efficiency of your VEVOR 12V Electric Drain Auger.
VEVOR Drain Auger User Manual
Model: CDC504-12
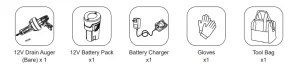
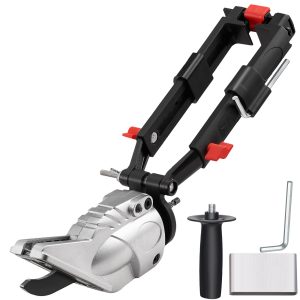
What’s in the Box?
Electrical Safety Warnings
WARNING! Basic safety precautions should always be followed when using mains-powered tools to reduce the risk of fire, electric shock, personal injury, and material damage.
Before operating the unit, carefully read the entire manual and be certain you know how to turn it off in an emergency.
Save these instructions and any other documents supplied with this unit for future reference.
- VEVOR cordless tools are interchangeable in the United States and Canada.
- A 30mA ground fault circuit interrupter or earth leakage circuit breaker must protect the power outlet used for the power tools/charger. If the supply cord is damaged, it must be replaced by an electrician or a power tool repairer to avoid a hazard.
- Double insulation does not replace standard safety precautions when operating this tool. The insulation system is added to prevent against potential injury should an electrical failure occur with the tool.
General Power Tool Safety Warnings
WARNING! Read all safety warnings and all instructions. Failure to follow the warnings and instructions may result in electric shock, fire, and/or serious injury.
Please save all warnings and instructions for future reference. The term “power tool” in the warnings refers to your mains-operated (corded) or battery-operated (cordless) power tool.
Work area safety
- Keep work area clean and well lit. Cluttered or dark areas invite accidents.
- Do not operate power tools in explosive atmospheres, such as in flammable liquids, gases, or dust. Power tools create sparks, which may ignite the dust or fumes.
- Keep children and bystanders at a safe distance while operating a power tool. Being distracted while using the tool may injure the operator or bystanders if not exercising proper safety.
Electrical safety
- Power tool plugs must match the outlet. Never modify the plug in any way. Do not use any adapter plugs with earthed (grounded) power tools. Unmodified plugs and matching outlets will reduce risk of electric shock.
- Avoid bodily contact with earthed or grounded surfaces, such as pipes, radiators, ranges and refrigerators. There is an increased risk of electric shock if your body is earthed or grounded.
- Do not expose power tools to rain or wet conditions. Water entering a power tool can cause an electric shock.
- Do not abuse the cord. Never use it to carry, pull, or unplug the power tool. Keep the cord away from heat, oil, sharp edges, or moving parts. Damaged or entangled cords increase the risk of electric shock.
- When operating a power tool outdoors, use an extension cord suitable for outdoor use. This reduces the risk of electric shock.
- If operating a power tool in a damp location is unavoidable, use a ground fault circuit interrupter (GFCI) protected supply with a rated leakage current of 30 mA or less. Use of a GFCI reduces the risk of electric shock.
Personal safety
- Always pay close attention to what you do when operating a power tool. Do not use a power tool when you are tired or under the influence of drugs, alcohol, or medication. A moment of inattention while operating power tools may result in serious personal injury.
- Use personal protective equipment. Always wear eye protection. Under the appropriate conditions, protective equipment such as a dust mask, non-skid safety shoes, a hard hat, or hearing protection can reduce personal injuries.
- Prevent unintentional starting. Ensure the switch is off before picking up or carrying the tool or connecting the unit to a power source/battery pack. Carrying power tools with your finger on the switch or energizing power tools with the switch on may lead to accidents.
- Remove any adjusting key or wrench before turning the power tool on. A wrench or a key left attached to a rotating part of the power tool may result in personal injury.
- Do not overreach. Keep proper footing and balance at all times. This enables better control of the power tool in unexpected situations.
- Dress properly. Do not wear loose clothing or jewelry. Keep your hair, clothing and gloves away from moving parts. Loose clothes, jewelry or long hair, can get caught in moving parts resulting in serious injury.
- If devices are provided for connecting dust extraction and collection facilities, ensure these are connected and properly used.
Electric Drain Auger use and care
- Do not force the power tool. Use the correct power tool for your application. When used for its designed purpose, the correct power tool will do a better and safer job.
- Do not use the power tool if the on/off switch is malfunctioning. Any power tool that cannot be controlled with the switch is dangerous and must be repaired.
- Disconnect the plug from the power source and/or the battery pack from the power tool before making any adjustments, changing accessories, or storing power tools. This helps reduce the risk of accidentally starting the power tool.
- Store idle power tools out of the reach of children. Do not allow persons unfamiliar with the power tool to operate it without first reading these instructions. Power tools are dangerous in the hands of untrained users.
- Properly maintain power tools. Check for misalignment or binding of moving parts, breakage of parts, and any other condition that may affect the power tool’s operation. If damaged, have the power tool repaired before use. Poorly maintained power tools cause many accidents.
- Keep cutting tools sharp and clean. Properly maintained cutting tools with sharp cutting edges are less likely to bind and are easier to control.
- Follow these instructions to use the power tool, accessories, tool bits, etc., considering the working conditions and the work to be performed. Using the power tool for operations different from those intended could create a hazardous situation.
Service
- Have a qualified repair person service your power tool using only identical replacement parts. This will ensure that the power tool is safely and adequately maintained.
- If the supply cord is damaged, it must be replaced by the manufacturer, service agent, or similarly qualified persons to prevent any potential hazard.
Drain Cleaner Safety Warnings
WARNING! Read all safety warnings and instructions listed below. Failure to follow the warnings and instructions may result in Serious injury.
- Maintain the tool’s labels and nameplates. These carry important safety information. If they are unreadable or missing, contact Populo Tools for a replacement.
- Do not put the motor or cord in water or other liquids to reduce the risk of electrical shock.
- Do not wear cloth gloves or loose clothing, or grasp the cable with a rag to prevent entanglement.
- Use appropriate personal protective equipment while handling and using the drain cleaner. Drains may contain chemicals, bacteria, and other substances that may be toxic. Infectious, cause burns or other issues. Appropriate personal protective equipment always includes ANSI-approved splash-resistance safety glasses under a face shield, NIOSH-approved dust mask/respirator, and heavy-duty LEATHER work gloves, and may include equipment such as latex or rubber gloves under leather work gloves, protective clothing, and steel-toed boots.
- Do not use in a pipe containing drain cleaning chemicals.
- Do not use in a pipe obstructed by roots.
- Wash your hands after use. Use hot, soapy water to wash hands and other exposed body parts, and then rinse them with clean water after handling or using drain cleaner. Do not eat or smoke while operating or handling drain cleaner. This will help prevent contamination with toxic or infectious material.
- Have a qualified repair person service your drain cleaner using only identical replacement parts. This will ensure its safety.
- Do not put too much stress on the cable. Quickly release tension if it starts to build in the cable. Excess tension will cause the cable to twist, kink, or break.
- Reverse motor direction only when pulling the cable off an obstruction. Trying to push the cable down the pipe or pull it out of a pipe while in reverse operation will unravel and break the cable. Wait for the drum to stop turning completely before changing the rotation direction switch.
- Only use drain cleaner to clean drains of recommended sizes according to these instructions. Other uses or modifying the drain cleaner for other applications may increase the risk of injury.
- Avoid unintentional starting. Prepare to begin work before turning on the tool.
- Do not lay the tool down until it has completely stopped. Moving parts can grab the surface and pull the tool out of your control.
- When using a hand-held power tool. Maintain a firm grip on the tool with both hands to resist starting torque.
- Do not leave the Electric Drain Auger unattended when it is plugged into an electrical outlet. Turn it off and unplug it from its electrical outlet before leaving.
- People with pacemakers should consult their physician(s) before use. An electromagnetic field close to a heart pacemaker could cause pacemaker interference or failure.
- The warnings, precautions, and instructions discussed in this instruction manual can not cover all possible conditions and situations that may occur. The operator must understand that common sense and caution are factors that can not be built into this product, but must be supplied by the operator.
Vibration Safety Warnings
WARNING! This tool vibrates during use. Repeated or long-term exposure to vibration may cause temporary or permanent physical injury, particularly to the hands, arms, and shoulders. To reduce the risk of vibration-related injury.
- Anyone using vibrating tools regularly or for an extended period should first be examined by a doctor and then have regular medical check-ups to ensure medical problems are not being caused or worsened from use. Pregnant women or people who have impaired blood circulation to the hand, past hand injuries, nervous system disorders, diabetes, or Raynaud’s disease should not use this tool. If you feel any vibration-related symptoms (such as tingling, numbness, and white or blue fingers), seek medical advice immediately.
- Do not smoke during use. Nicotine reduces the blood supply to the hands and fingers, increasing the risk of vibration-related injury.
- Wear suitable gloves to reduce the vibration effects on the user.
- Use tools with the lowest vibration when there is a choice.
- Include vibration-free periods each day of work
- Grip tool as lightly as possible (while still keeping safe control of it.) let the tool do the work.
- To reduce vibration, maintain the tool as explained in this manual. If any abnormal vibration occurs, stop use immediately.
Vibration Safety Warnings
WARNING! This manual contains important safety and operating instructions for your battery pack and charger.
- This charger is intended only for charging rechargeable batteries. Any other use may result in the risk of fire, electric shock, or electrocution.
- Since battery tools do not have to be plugged into an electric outlet, they are always operational. Be aware of possible hazards when not using the battery tool or changing accessories. Following this rule will reduce the risk of electric shock, fire, and serious personal injury.
- Do not place battery tools or batteries near fire or heat. This will reduce the risk of explosion and possible injury.
- Do not crush, drop, or damage the battery pack. Do not use a battery pack or charger that has been dropped and has received a sharp blow. A damaged battery is subject to explosion. Properly dispose of a dropped and damaged battery immediately.
- To avoid damage to the electric plug and cord when disconnecting the charger, pull by the plug, not the cord. Ensure the cord is placed where it will not be stepped on, tripped over, or otherwise subjected to damage or stress.
- To reduce the risk of electric shock, unplug the charger from the outlet before attempting any cleaning. Removing the battery pack will not reduce this risk.
- A battery can explode if set near an ignition source, such as a pilot light. Never use any cordless product near an open flame to reduce the risk of serious personal injury. If a battery explodes, it can propel debris and hazardous chemicals. If exposed to debris or chemicals, use water immediately to flush away particles/residue.
- Do not charge the battery tool in a damp location. Do not use, store and charge battery packs or products in locations where the temperature is less than 50°F or more than 100°F。
- Under extreme usage or temperature conditions, battery leakage may occur.
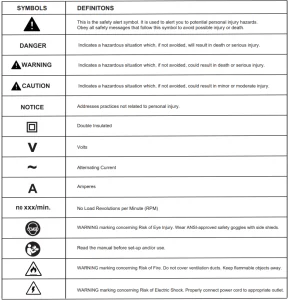
Symbols and Definitions
Know Your Electric Drain Auger from VEVOR
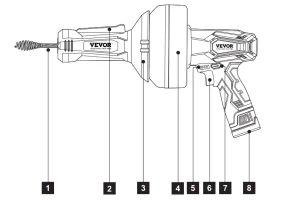
- Cable
- Control Switch
- Housing
- Drum
- LED Battery Indicator
- Switch Trigger
- Forward/Reverse Lever
- Battery Pack
- AC/DC Charging Adaptor
- Charging Base
Electric Drain Auger Specifications
- Working Voltage: 12VDC Max
- No Load Speed: 0-500 RPM
- Dredging Capability: 3/4″-2″
- Cable Diameter: 0.275″ (7mm)
- Cable Length: 25ft (7.62m)
- Battery Pack: 12V Max, 2.0Ah Li-ion
- Charging Time: Approx. 80 Minutes
- Weight: 6.05 Lbs
Unpack and Set Up the Electric Drain Auger
CAUTION: A leakage current device should protect this product’s charger (rated at 30mA or less).
Battery Pack and Charging
The purchased battery will be shipped in a low-charge condition and requires charging prior to use. Allow several cycles of charging and discharging (through use of the tool) for the battery to reach its optimum performance/runtime.
Charging your lithium-ion battery
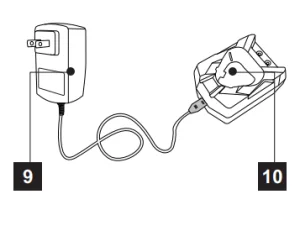
- Connect the AC/DC adaptor outlet end to the charging base.
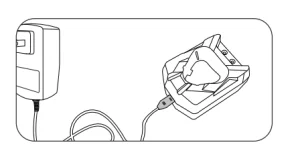
- Plug the AC/DC adaptor into a main power outlet. The charger LED will illuminate green, showing that power is being supplied to the charger correctly.

- Insert the battery pack into the charger, ensuring a firm connection.
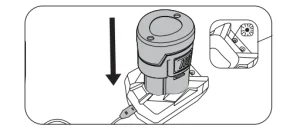
- The RED LED on the charging base is light ON, signifying that the battery is charging.
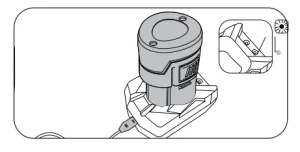
- When the RED LED light is off and the Green LED light on the charging base is ON, it means that the battery is fully charged.
- To remove the battery pack from the charging base, hold the charging base firmly and pull the battery pack out.
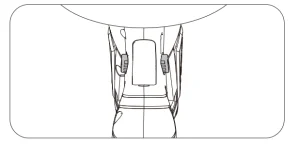
Battery Gauge Indicator
When the battery pack is attached to the tool, press the switch trigger, there are 3 LED lights to indicate the state of battery capacity.

 Installing/Removing the Battery Pack
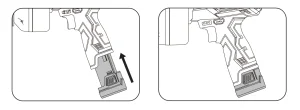
Installing the Battery Pack
Align with the handle base and push it in until it clicks into place.
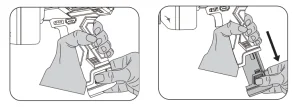
Removing the Battery Pack
- Hold the tool’s handle firmly.
- Press the lock buttons on both sides of the battery pack, then slide it out.
Electric Drain Auger Controls
The variable speed switch trigger delivers higher speed with increased trigger pressure and lower speed with decreased trigger pressure.
To turn the tool on, depress the switch trigger. (If you set the forward/reverse lever in the middle, the switch will be locked.)
To turn the tool off, release the switch trigger and allow the cable to come to a complete stop.
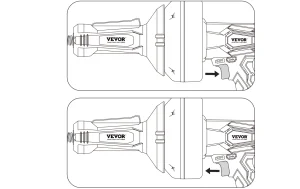
Direction of the forward/reverse lever
Forward
Position the direction of the forward/reverse lever to the left of the switch trigger by pressing the lever with an icon of “forward allow” for forward operation.
Reverse
Position the direction of the forward/reverse lever to the right of the switch trigger by pressing the lever with an icon of “back allow” to reverse the direction.
Position the lock and the switch trigger to help prevent accidental starting when not in use.
Center Lock
Set the forward/reverse lever in the middle, then the switch is locked (centre lock).
NOTICE: To prevent gear damage, always allow the cable to come to a complete stop before changing the direction of rotation.
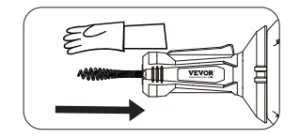
WARNING! Always wear gloves when advancing and retracting the cable manually.
Advancing and Retracting the Cable Manually
To advance cable, lock the switch trigger by placing the forward/reverse lever in center position.
Hold the tool body with one hand and advance the cable with the other.
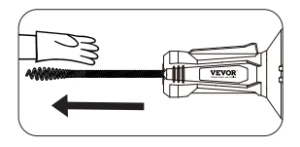
To retract the cable, hold the tool body with one hand and push the cable back with the other.
NOTICE: Do not press and hold the operation switch when manually advancing and retracting the cable.
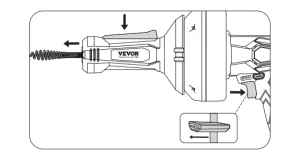
To Advance and Retract the Cable Using the Switch Trigger.
To advance cable;
- Place the direction of the forward/reverse lever in the forward position.
- Press and hold the operation switch on the front handle.
- Then, squeeze and hold the switch trigger to advance the cable.
To retract the cable;
- Place the direction of the forward/reverse lever in reverse position.
- Press and hold the operation switch on the front handle.
- Then, squeeze and hold the switch trigger to retract the cable.
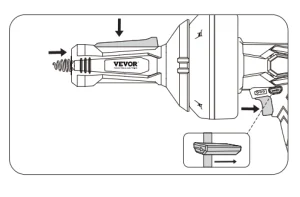
NOTICE: If you do not press and hold the operation switch on the front handle using the switch trigger, the cable stops advancing or retracting, regardless of whether it is in forward or reverse rotation.
Operation
WARNING! Do not allow familiarity with this product to make you careless. Remember that a careless fraction of a second can inflict serious injury.
- Always remove the battery pack from the tool when assembling parts, making adjustments, cleaning, or when not in use. This will prevent accidental starting that could cause serious personal injury.
- Always wear eye protection with side shields marked to comply with ANSI Z87.1. Failure to do so could result in objects being thrown into your eyes and other possible serious injuries.
- Do not use any attachments or accessories not recommended by the manufacturer of this product. The use of attachments or accessories that are not recommended can result in serious personal injury.
WARNING! Do not touch the cable drum while rotating to avoid accidental personal injuries.
Using the Drain Auger
The drain auger can clear obstructions from various drains, including sink, bathtub, and toilet drains. It can also be used to clear drain pipes with a minimum diameter of 0.75 inches and a maximum diameter of 2 inches.
To Clean Obstruction
NOTE: When removing an obstruction from a sink or a bathtub, it maybe necessary to remove the stopper or
overflow cover to gain access to the drainpipe. Toilet drains can be accessed directly through the base of the
bowl.
Hold the drain auger within four inches of the drains or overflow, and manually feed the cable into the drain
pipe.
NOTE: Advance the cable slowly at first. Advancing it too rapidly can result in twisting or binding.
After feeding about six inches of cable into the drain, you may begin advancing the cable using the switch trigger and operation switch or manually.
The cable should advance freely through the drain pipe until it contacts the obstruction or is caught in a P-trap.
If the cable is caught in a P-trap, additional force or increased trigger pressure should be enough to advance
it past the bend in the pipe.
If the cable has contacted an obstruction, there are two ways to remove it.
- Advance the cable by squeezing the switch trigger while holding the operation switch on the front handle. Hold the switch trigger for several seconds, allowing the cable tip to bore into the obstruction. If the cable stops rotating, release the switch trigger to avoid kinking or damaging it. Then, slowly retract the cable from the drain pipe.
- When you release the operation switch on the front handle and squeeze the switch trigger, the cable will rotate but not advance. Hold the switch trigger for several seconds, allowing the obstruction to wrap around the cable. If the cable stops rotating, release the switch trigger to avoid kinking or damaging the cable, then slowly retract the cable and pull the obstruction through the drain.
Once the obstruction is cleared, attempt to flush your toilet or run water through your drain to confirm that the water is flowing freely.
Meanwhile, please ensure the cable is appropriately cleared as described in the Cleaning the Drain Auger section.
In case of obstruction or blocked cornering of the cable, to retract the cable for a certain distance, then advance the cable again, repeatedly move the cable forward and backward to dredge the pipe and move through the corners.
NOTE: Pipe blockage situations vary. When using the cable, it is necessary to lightly depress the switch trigger (low speed) to observe its situation closely. If it is distorted or blocked, stop the machine immediately and then perform different operations according to the actual situation.
If the pipe can not be dredged, please ask a professional for help. DO NOT force the operation and cause unnecessary trouble.
CAUTION:
DO NOT force the cable delivery; otherwise, it will be twisted, knotted, or broken and cause serious injury.
DO NOT advance or retract the cable using the switch trigger unless it is in a drain pipe. When removing the cable from a drain, remove it slowly to avoid “Splashback!”
CAUTION: Do not advance or retract the cable using the switch trigger unless the cable is in the drain pipe.
Cleaning the Drain Auger
The drain auger should be cleaned after each use to prevent contamination and residue buildup.
To clean the cable:
- Remove the battery pack from the tool.
- Pull the cable out from the tool using a clean cloth and warm, soapy water, cleaning it as it advances. Continue to do this until the cable has been fully advanced and thoroughly cleaned.
- Pull the cable back into the tool using a clean, dry cloth, drying it as it retracts. Continue to do this until the cable has been fully retracted.
Maintaining the Electric Drain Auger
WARNING! When servicing, use only identical replacement parts. Using any other parts could create a hazard or cause product damage.
General Maintenance
Avoid using solvents when cleaning plastic parts. Most parts are susceptible to damage from various commercial solvents and may be damaged by their use. Use clean cloths to remove dirt, dust, oil, grease, etc.
CAUTION: Always be sure that the battery pack is removed from the tool when replacing the cable.
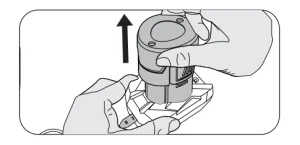
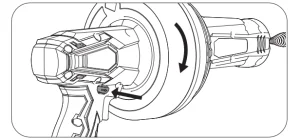
How to Replace the Cable

- Complete the advance of the cable from the drum.
- Unscrew 4 installation screws for the cable drum with a screwdriver.
- Loosen the fixing screws for the cable with a screwdriver.
- Pull the cable out from the head of the front handle.
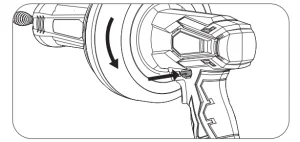
- Insert the new cable from the head of the front handle and tighten the fixing screw on the cable. (Leave cable 1’’ long free from its end)
- Reinstall the drum by tightening the 4 screws with a screwdriver.
- Retract the cable back to the drum manually.
WARNING! Do not start the tool to retract the cable. The exposed cable can lead to unpredictable personal injury, tool damage, damage to indoor objects, fire, electric shock, and other dangerous situations.
Storage and Maintenance of the Electric Drain Auger
- Before inspection and maintenance, please switch off the tool’s power and remove the battery pack!
- Please clean the cable carefully after each use. If it is not to be used for a long time, please apply butter to the surface of the cable to prevent rust.
Troubleshooting the Electric Drain Auger
The variable speed trigger is locked.
Ensure that the forward/reverse lever is in the correct position. Press to the left for forward movement and to the right for backwards movement. If the variable speed trigger is between the two settings, it will be locked.
Cable can not be advancing or retracting.
If use the switch trigger to advance and retract cable, make sure you have press and hold the operation switch on the front handle simultaneously.
The cable is worn or broken.
Stop working and replace the cable immediately according to the section on how to replace the cable described in this manual.
The battery has a short runtime.
Check if the battery is fully charged. If not, charge it. Ensure that the battery is properly charged. It will take 4-5 charging cycles before it reaches optimum charge and runtime.
The Battery Pack can not be charged.
Check if the charger has been plugged into a main power source and all connections are firmly connected. Also, check if the LED indicators are displaying correctly. If not, don’t hesitate to contact VEVOR Customer Service for further assistance.
Sparkling visible through the housing air vents.
A small amount of sparking may be visible through the housing vents. This is normal and does not indicate a problem.
Recommended For Your Project
VEVOR 12V Electric Drain Auger, 25FT Manual


Reviews
There are no reviews yet.