


Discover the ultimate guide to optimizing your VEVOR Farmhouse Kitchen Sink with our comprehensive product manual. This detailed manual covers everything you need to know about the 304 Stainless Steel Drop-In Sink, including setup instructions, troubleshooting tips, and optimization strategies.
Our manual, designed with user-friendliness in mind, ensures you can effortlessly install and maintain your Single Bowl Basin with Ledge & Accessories.
Whether setting up your new Household Dishwasher Sink for a workstation, prep kitchen, or bar sink, this manual is your go-to resource for ensuring maximum efficiency and longevity. Don’t miss out on this essential guide—download your VEVOR Farmhouse Kitchen Sink manual today and take the first step towards a seamless kitchen experience.
VEVOR Farmhouse Kitchen Sink User Manual

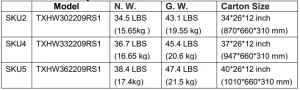
Farmhouse Kitchen Sink Technical Specifications
Assembly Precautions
WARNING: Metal edges may be sharp and cause severe cuts. Use gloves and be careful.
An experienced, licensed professional installer is recommended to install this farmhouse sink.
The cabinet must be installed, secured, plumb, and level. Our farmhouse sinks should only be fastened to a solid-surface countertop.
IMPORTANT: INSPECT the Farmhouse Kitchen Sink before installation to ensure it has not been damaged during shipping. We are not responsible for the sink or countertop if they are damaged during installation.
Check the parts list to ensure you have all the necessary parts.
For easier installation, install the strainer assemblies to the sink before installation.
Follow all local plumbing and building codes.
NOTE: Keep the box and packaging materials until finished. Need help? Email us (the seller) through your Amazon account.
Use Precautions
- TO PREVENT SERIOUS INJURY AND DEATH FROM TIPPING:
1. Clean it after each use! Rinse thoroughly and use a soft towel to dry the sink. - Clean your sink regularly with warm, soapy water. Rinse and dry the sink after using cleaning products.
- Clean up immediately after using any chemical or corrosion products.
- To prevent scratches, wipe it along the brushed direction. Always use the bottom grid to protect your sinks.
NOTE: A stainless steel sink can show rust if steel wool pads are used. Steel wool or metal scouring pads should never be used, as they will leave a residue of small iron particles. They may not be readily visible, but
they will lead to rusting and corrosion. If it happens, scrub the rusty spot properly with a nylon scrubber.
Installation Instructions
Note: Please open the hole according to the opening plate. Opening the hole after receiving goods is recommended to avoid mildew and reduce bacterial growth.
Warm suggestions: because the Farmhouse Kitchen Sink installation is more complicated, please choose a professional with installation experience.
Recommended Tools & Materials
- Tape Measure
- Safety Goggles
- Painter’sTape
- Level
- Framing Square
- Felt-tip Marker/Pencil
- Scissors
- UtilityKnife
- Saw
- Phillips Screwdriver
- Silicone Sealant
- Shims and cabinet fillers
- Drill
- Denatured Alcohol
NOTE: Specialized tools or materials may be necessary to install these kitchen sinks with countertop materials other than wood, marble, or granite.
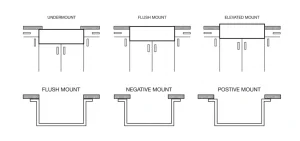
Determine Reveal Type
CAUTION: Proper space is needed for faucet installation. Ensure adequate clearance behind the sink for any faucet, plumbing, and backsplash, and a full range of motion for faucet spouts and handles.

Farmhouse Kitchen Sink Installation Steps
Step 1. Cut the cabinet & countertop
Depending on the installation option, make a proper cutout of the countertop.
- We recommend a 1/4″ reveal on 3 sides when installed undermount.
- For a flush mount or above-counter installation, cut the countertop along the side of the sink profile.
- Make sure the front cut-out of the cabinet and countertop cut-out accurately against the actual height and length of the Apron Sink to ensure an appropriately sized cut-out (Dimension A = Sink Apron Height).
- No template is provided due to the custom nature of each application and installation. The actual sink is used as the template guide for each installation. After centering the sink and allowing for faucets and backsplashes, use a pencil to outline the sink as your guide for the cutout, allowing for any reveal before the actual cutting
Note: Allow clearance for water supply line and drains or garbage disposal, as necessary.
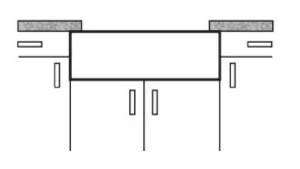
UNDERMOUNT INSTALLATION
(Dimension A = Sink ApronHeight)

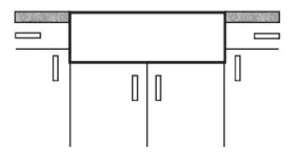
FLUSHMOUNT INSTALLATION
(Dimension B = Sink Apron Height-Stone Thickness)

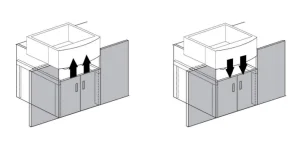
Step 2. Set up structural supports on the inner frame of the sink base cabinet.
Ensure the structural supports, such as garbage disposals, can support the sink’s weight and attachments. As necessary, allow clearance for the water supply line, drains, or garbage disposal.
When the sink is placed onto the cabinet support, ensure the top is evenly flush against the bottom of the countertop.
UNDERMOUNT INSTALLATION
When the sink is placed onto the cabinet support, ensure the top is evenly flush against the bottom of the countertop.
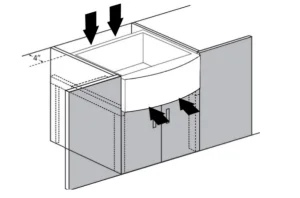
FLUSHMOUNT INSTALLATION
When the sink is placed on the cabinet support, make sure the top is evenly flush against the countertop.
Step 3. Check the alignment of the sink to the supports:
Place the sink onto the sink to check if the sink is resting on it, and then remove the Apron Sink.
Step 4. Apply the silicone sealant to the top of each support:

Step 5. Place the sink onto the support in a proper position:
Adjust the position of the Apron Sink at least 4” between the back of the cabinet to allow faucet installation.
Step 6. Clean the countertop & Apron Sink with denatured alcohol.
Step 7. Apply a narrow bead of silicone adhesive sealant evenly all around the underside of the countertop
Step 8. Cover the countertop of the sink:
Undermount Installation VS Flushmount Installation

Step 9. If necessary, apply the silicone sealant to the joints between the sink, the cabinet, and the countertop.


Farmhouse Kitchen Sink Maintenance/Service
Customers should pay attention to the maintenance of the sink after buying it to extend its service life.
These specific maintenance and cleaning methods are as follows:
- When decorating the house, pay attention to window ventilation to avoid the decoration materials emitting corrosive gas and oxidizing the sink’s surface, resulting in floating rust in the sink.
- Items cannot be directly cut on the sink, and hard or rusty items cannot be in contact with the sink for a long time or stored for a long time. Do not use steel wire balls to scrub the sink; the residual iron elements in the sink will also cause floating rust and scratch the sink.
- Please use a sponge or cloth; if cleaning with a cleaning agent, please choose a neutral cleaning agent and gently scrub.
- The tank’s surface should not contact water containing heavy metals (heavy water). Due to the heavy content of gold, the subordinate water will cause the tank to discolor and develop rust spots. If this phenomenon occurs, please dry the tank immediately with a towel.
- The sink should be kept away from prolonged contact with strong bleach powder, household chemicals, and soap.
- If this happens, immediately clean it with water and dry the sink with a towel.
- Clean the sink using a neutral detergent if it appears to have “floating rust” or “mildew.” The toothpaste can be coated on the rust points and spots and scrubbed clean with a rag.
- If the tank contains a chemical agent, cleaning agent, paint, oil pollution, or other residues, please clean it immediately.
Disposal
The Farmhouse Kitchen Sink should be disposed of per local regulations.
If you are unsure how to proceed, contact your local authority. Only qualified technicians are authorized to repair the farmhouse kitchen sink.
For your safety, please observe all safety notes, precautions, and details in this manual.
Farmhouse Kitchen Sink Warranty
- This warranty shall only cover claims for damage due to a fault in the product’s manufacture.
- If a warranty claim is made, the party entitled to warranty coverage must present the proof of purchase, including the purchase date.
- Customer satisfaction is always the motivation of our brand growth.
We promise to help you solve any issues. Please just let us know if you need help.
OUR SERVICE TEAM PROMISES TO REPLY TO YOUR MESSAGE WITHIN 24 HOURS.
Scope of Warranty
- We guarantee that VEVOR products are produced per ISO 9001 Quality Management procedures and are free of manufacturing defects for the warranty period.
- This warranty covers faults in the products due to manufacturing defects within 1 year from the date of purchase. After inspection by a sales representative, defective products will be replaced or repaired with equivalent goods free of charge.
- Any warranty claim made during the warranty period shall not extend the overall period of warranty coverage.
- Warranty periods: Warranty claim date
Recommended For Your Project
VEVOR Farmhouse Kitchen Sink, 30 inch Manual


Reviews
There are no reviews yet.