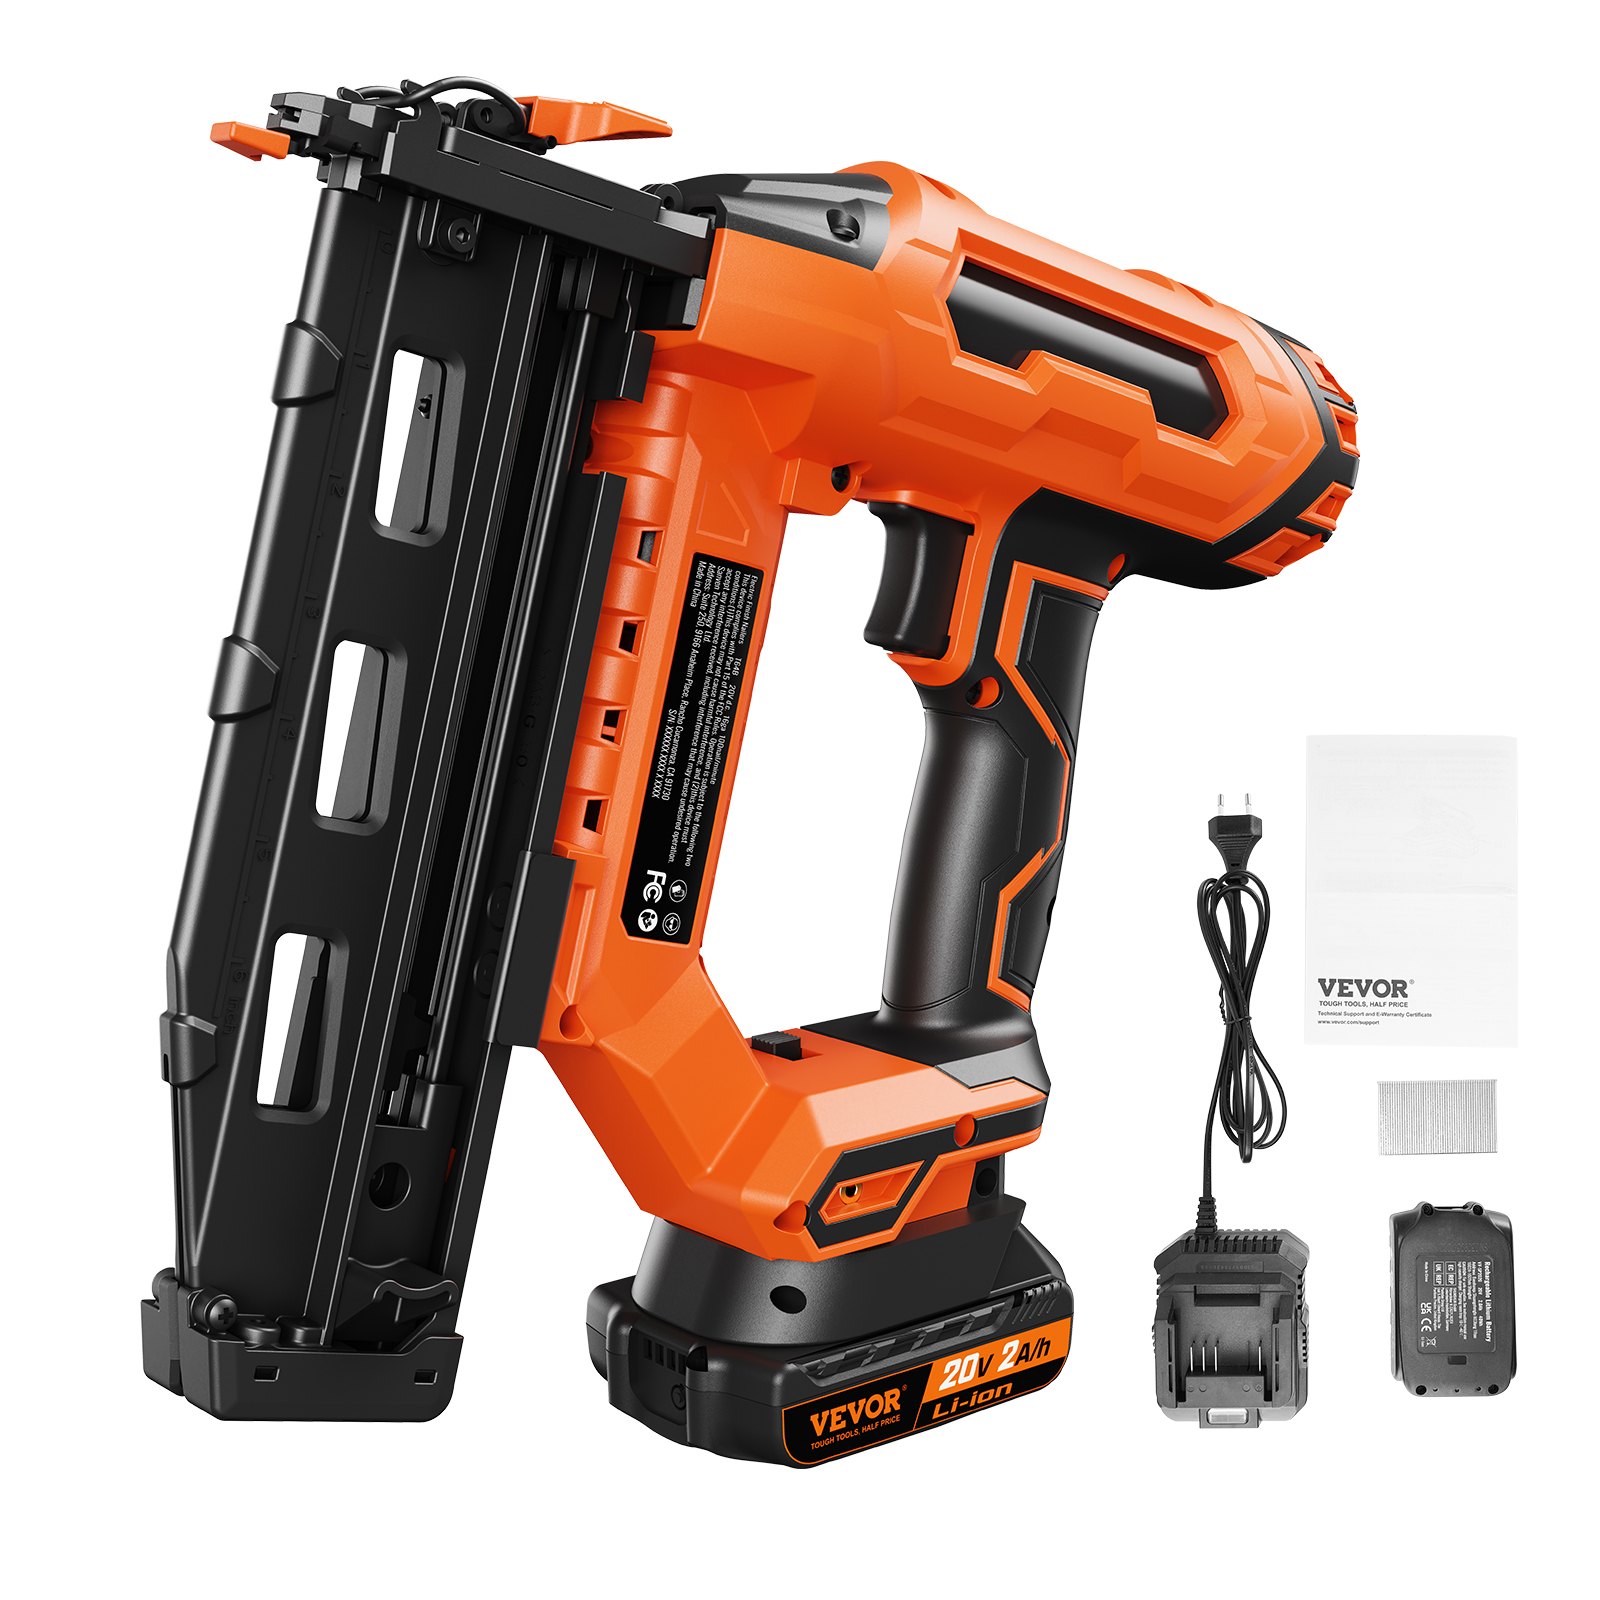


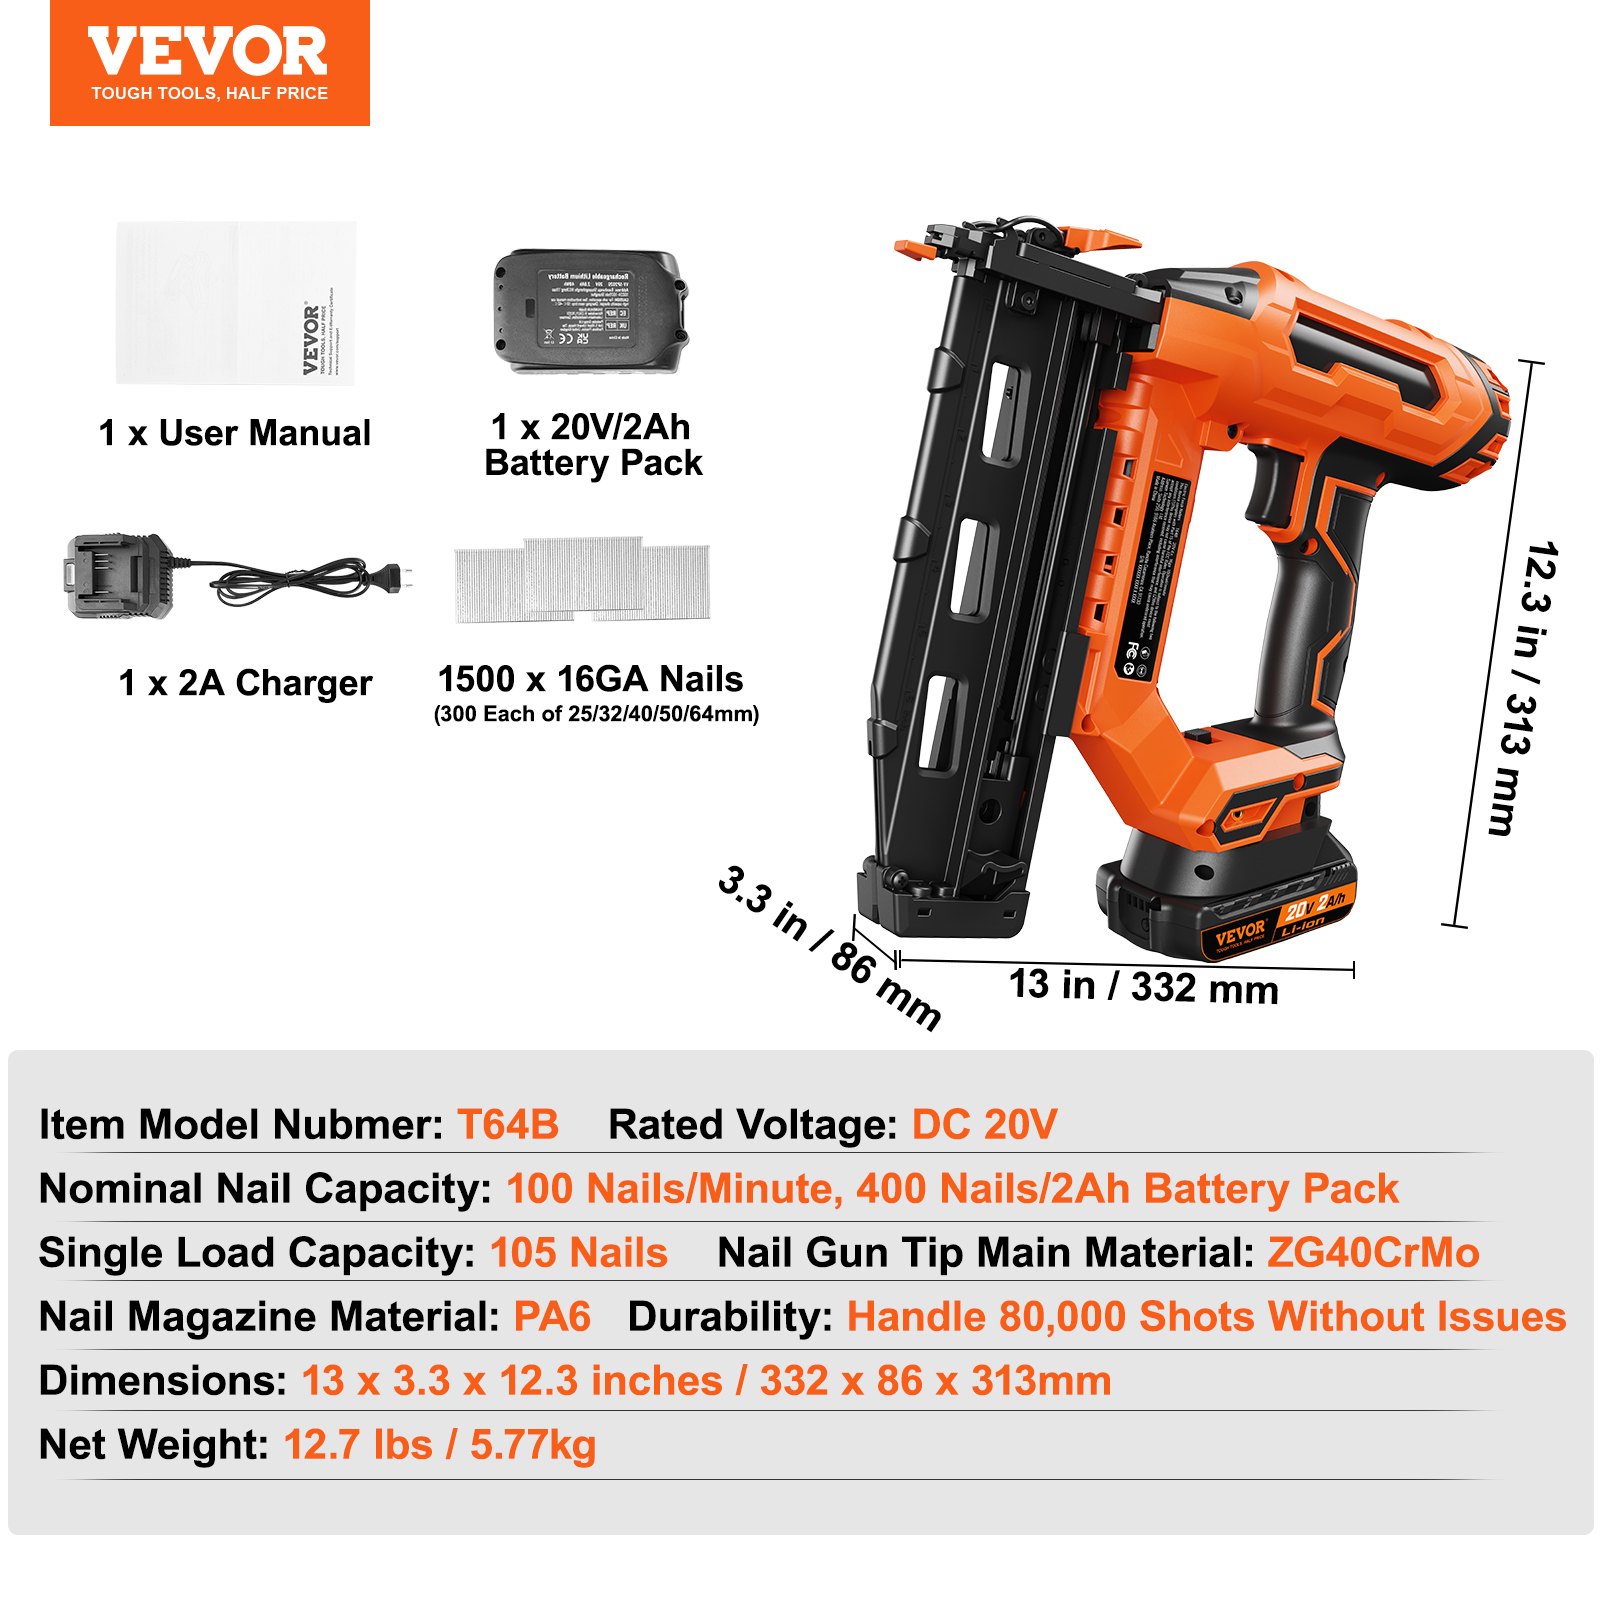
Discover the ultimate guide to mastering your VEVOR 20V Cordless Finish Nailer with our comprehensive product manual. This detailed manual covers every aspect of your Cordless Brad Nailer Kit, including the 16Ga Nails, Battery, and Charger.
Our manual, designed for both beginners and seasoned DIY enthusiasts, offers step-by-step instructions for setup, troubleshooting, and optimal use.
With easy-to-follow diagrams and clear explanations, you can quickly learn how to utilize the tool-free jam release feature and other essential functions of your Battery Powered Framing Nail Gun. Whether you’re working on upholstery or home improvement projects, our manual ensures you get the best performance and longevity from your nail gun. Download now and unlock the full potential of your VEVOR 20V Cordless Finish Nailer.
VEVOR Cordless Finish Nailer User Manual
Model: T64B

General Safety Rules
General safety instructions
WARNING! Read all safety warnings and notes. Failure to follow the instructions listed below may result in electrical shock, fire, and/or injury.
Retain the warning and safety information for the future.
The term “power tool” in the following warnings below refers to mains-powered power tools (with power cord) or cordless power tools (without power cord).
Work Area Safety
- Keep the application area clean and well-lit. Unclean and dark areas lead to accidents.
- Do not use the cordless finish nailer in explosive environments, such as in flammable liquids, gases, or vapors. Power tools generate sparks that can ignite the dust or vapors.
- Keep children and bystanders away when operating the appliance. Distractions can cause you to lose control of it.
Electrical Protective Measures
- The power tool plug must be plugged into the socket. Never change the plug. Do not use plug adapters with grounded power tools. Unmodified plugs and sockets reduce the risk of electric shock.
- Avoid body contact with grounded surfaces such as piping, radiators, stoves, and refrigerators. If your body is grounded, you are at an increased risk of electric shock.
- Do not expose electrical tools to rain or damp environments. Water entering electrical tools increases the risk of electric shock.
- Do not misuse the cable for any other purpose. Never pull on the cable or use it to unplug or to carry the tool. Keep the cable away from heat, oil, sharp edges, or moving parts—damaged or entangled wires increase the risk of electric shock.
- When using the power tool outdoors, use an appropriate extension cord. A cable suitable for outdoor use reduces the risk of electric shock.
- If using the tool in a humid environment can not be avoided, use a power supply protected by an earth leakage circuit breaker (RCCB). This reduces the risk of electric shock.
Personal Safety
- Stay alert, focus on your work, and use common sense when using the device. Do not use the device when you are tired or under the influence of drugs, alcohol, or medication. Carelessness while operating the power tool can result in serious injury.
- Use safety equipment. Always wear eye protection. Suitable safety equipment, such as dust masks, non-slip safety shoes, strong headgear, or ear protection used for such circumstances, reduces the personal injury risk.
- Avoid unintentional starting. Ensure the power tool is turned off before plugging in the power and/or inserting, picking up, or transferring the battery. If you have your finger on the switch when you are wearing the power tool or if you plug in the power to the unit, it may cause an accident.
- Remove any adjustment wrench or wrench before starting the electric tool. A tool or key in a rotating piece of equipment can cause injury.
- Avoid an abnormal posture. Ensure a secure footing and maintain balance at all times. This ensures better control of the electrical device in unexpected situations.
- Dress appropriately. Do not wear loose clothing or jewelry. Keep your hair, clothes, and gloves away from moving parts. Loose clothes, jewelry, or long hair can get caught in the moving parts.
- If accessories are used for the dust extractor or collection device, ensure it is properly connected and in use—using such devices can reduce the risk of dust.
Use and Maintenance of the Electric Tool
- Do not use the electrical device by force. Use the right electrical tool for your application. With a suitable power tool, you work better and more safely in the specified power range.
- Do not use a power tool whose switch is defective. A power tool that cannot be turned on or off is dangerous and must be repaired.
- Disconnect the plug from the mains socket and/or remove the battery before setting the device, changing accessories, or putting the device away. Such precautionary measures reduce the risk of accidentally starting the power tool.
- Store unused electrical tools out of the reach of children, and do not allow persons unfamiliar with the device or this manual to use them. Electric devices in the hands of laymen are dangerous.
- Maintain power tools with care. Check that moving parts are working correctly and do not jam, and that parts are not broken or damaged enough to impair the tool’s functioning. Have damaged parts repaired before using the device. Poorly maintained electrical tools cause many accidents.
- Use power tools, accessories, tools, etc., according to these instructions. Take into account the working conditions and the activity to be performed. Using power tools for purposes other than their intended ones can lead to dangerous situations.
Cordless Finish Nailer Maintenance
a) Only have your power tool serviced by qualified personnel using identical spare parts. This ensures the electrical tool’s safe operation and maintenance.
Tacker – Safety instructions
- Always assume that the tool contains staples. Careless handling of the stapler can cause unexpected stapling of the staples and injury.
- Never point the tool at yourself or other people in the vicinity. Unexpected removal may release a clip and cause injury.
- Do not operate the power tool until firmly seated on the workpiece. If the tool does not contact the workpiece, the clip may bounce off the attachment site.
- Disconnect the tool from the power supply or the battery when the clips are clamped inside the tool. If the stapler is connected, it can be accidentally actuated when removing the hooked staples.
- Be very careful when removing a fixed clip. The system may be cocked, and the clip may be ejected vigorously as you try to remove the jam.
- Do not use this tacker to fix electric cables. The unit is not designed to secure electrical wiring and may damage the insulation of electrical cables, causing electrical shock and fire hazards.
Maintenance and Cleaning
Attention!
- Disconnect the power cable from the mains during maintenance and cleaning! The electric box is maintenance-free.
- Perform cleaning regularly, ideally after each completed task, using a dry, lint-free cloth. Never use water or cleaning agents!
This device’s cable connection is Y Type. When replacing the cable, don’t hesitate to contact the experts.
Disposal

- The 100% environmentally friendly packaging can be disposed of through local recycling centers.
- Do not throw power tools in the household waste!
- You can find ways to dispose of the disused device at your municipality or city administration.
FCC information
CAUTION: Changes or modifications not expressly approved by the party responsible for compliance could void the user’s authority to operate the equipment!
This device complies with Part 15 of the FCC Rules. Operation is subject to the following two conditions:
- This product may cause harmful interference.
- This product must accept any interference received, including interference that may cause undesired operation.
WARNING: Changes or modifications to this product not expressly approved by the party responsible for compliance could void the user’s authority to operate the product.
Note: This cordless finish nailer has been tested and found to comply with the limits for a Class B digital device according to Part 15 of the FCC Rules. These limits are designed to protect reasonably against harmful interference in a residential installation.
This product generates, uses, and can radiate radio frequency energy. If not installed and used per the instructions, it may cause harmful interference to radio communications. However, there is no guarantee that interference will not occur in a particular installation.
If this nailer causes harmful interference to radio or television reception, which can be determined by turning the product off and on, the user is encouraged to try to correct the interference by one or more of the following measures.
- Reorient or relocate the receiving antenna.
- Increase the distance between the product and the receiver.
- Connect the product to an outlet on a circuit different from that to which the receiver is connected.
- Consult the dealer or an experienced radio/TV technician for assistance.
Fasteners Loading Method
- Take K-ESG-T64B as an example
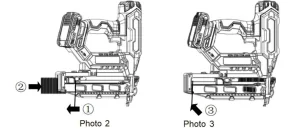
- Pull the pusher back to the end of the magazine. At this time, the pusher should be hung (refer to photo 2)
- Insert the 16Ga finish nail from the rear hole of the magazine and feed it into the front end.
Press the button of the pushpin to push the nail forward. (refer to photo 3)
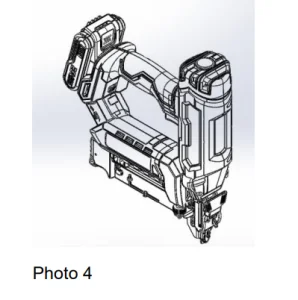
Adjustable depth of drive
(Refer to photo 4)
- Rotate the adjustment knob counterclockwise. At this time, the bumper moves toward the tip of the gun, and the nail will float out of the board’s surface.
- Rotate the adjustment knob clockwise. At this time, the bumper moves toward the handle, and the nail will sink into the board’s surface.
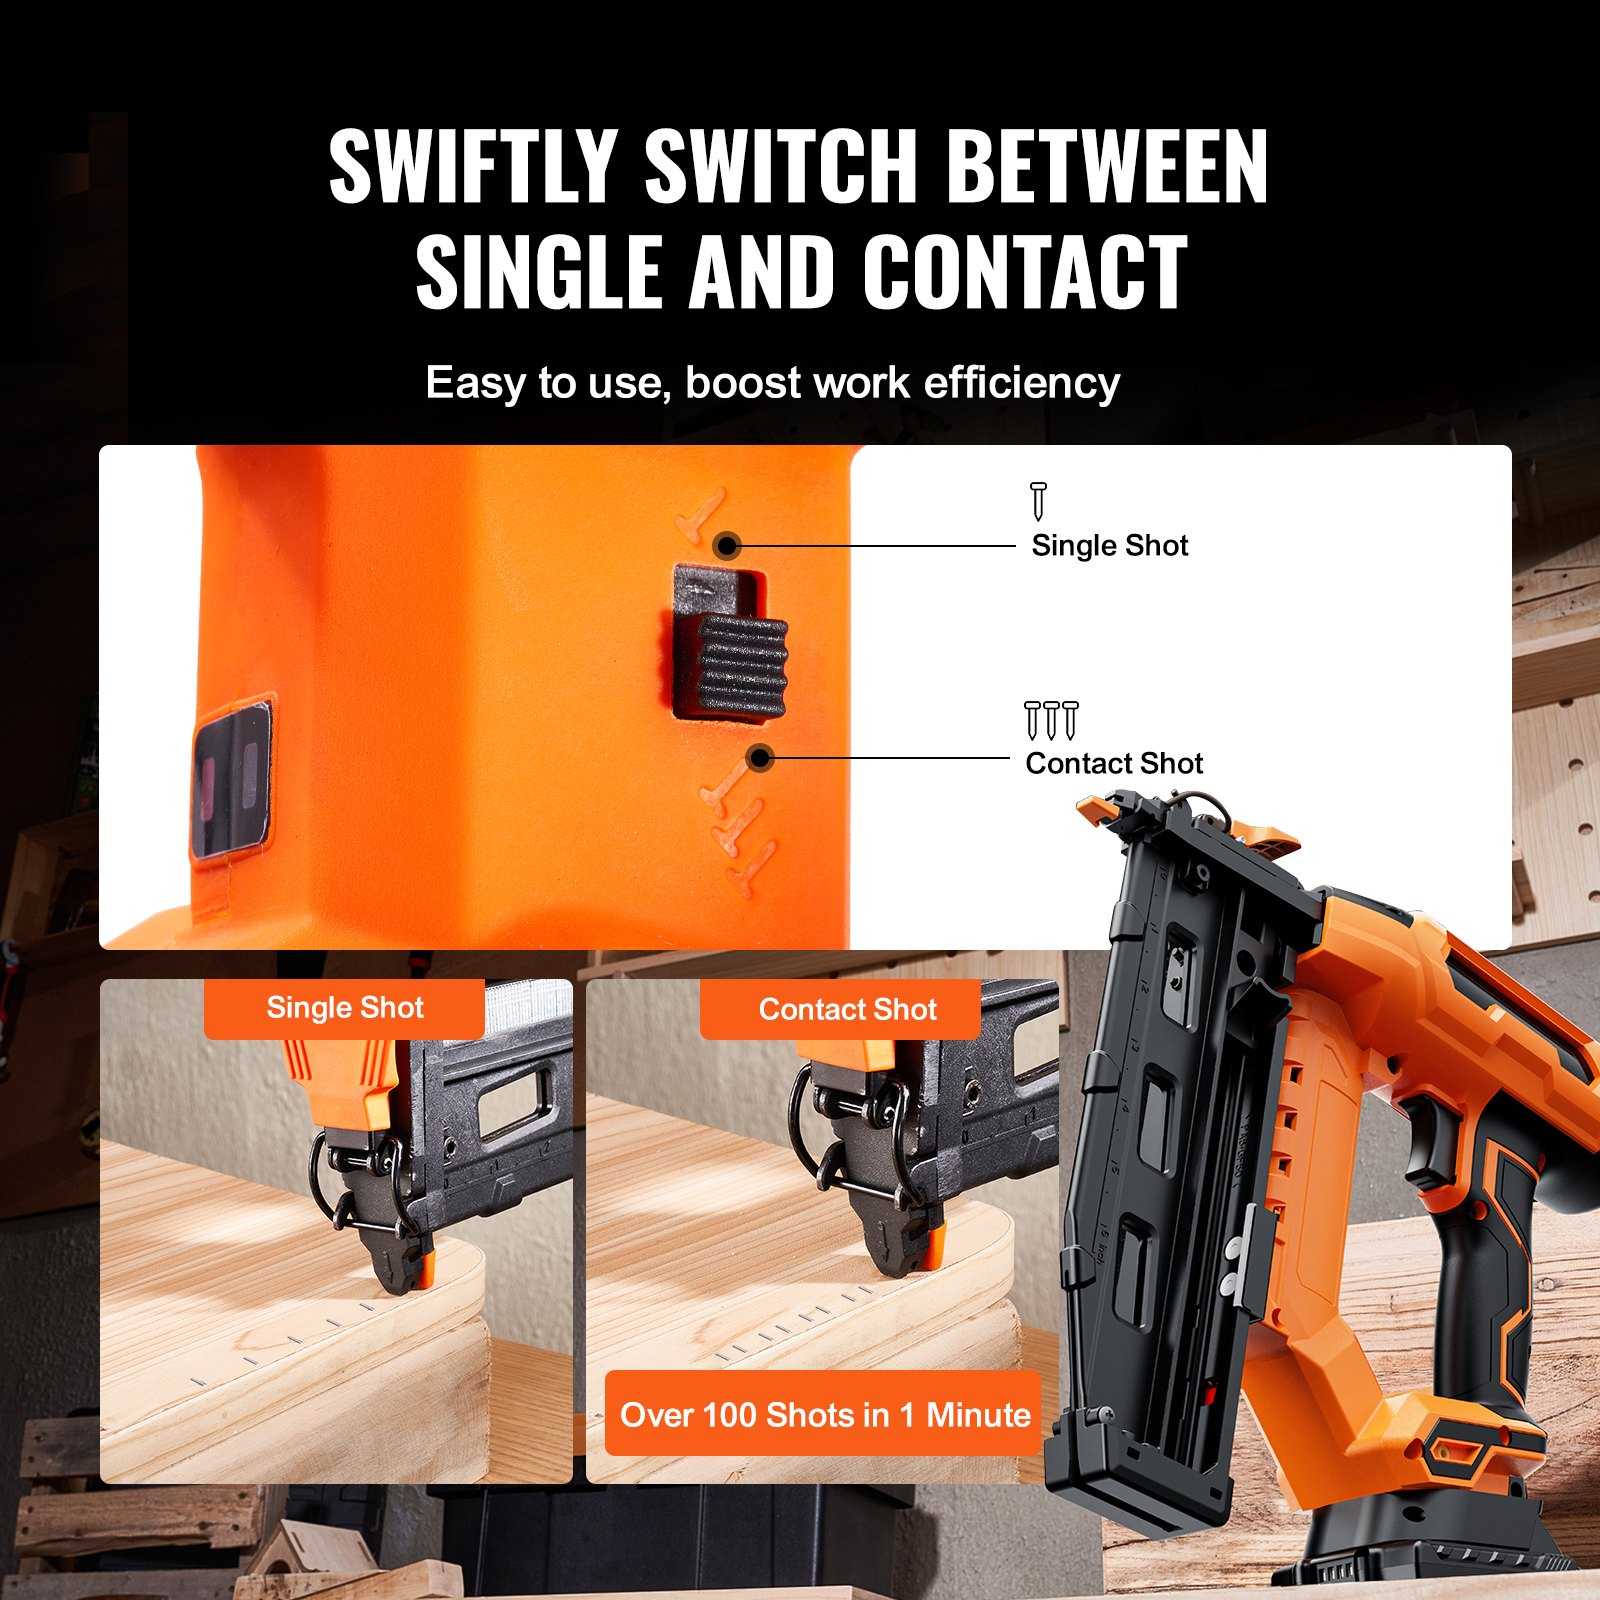
Selectable drive
Choose either sequential or single-fire mode (photo 4)
- Switch to “T”— Single fire mode;
- Switch to “TTT”— Sequential fire mode
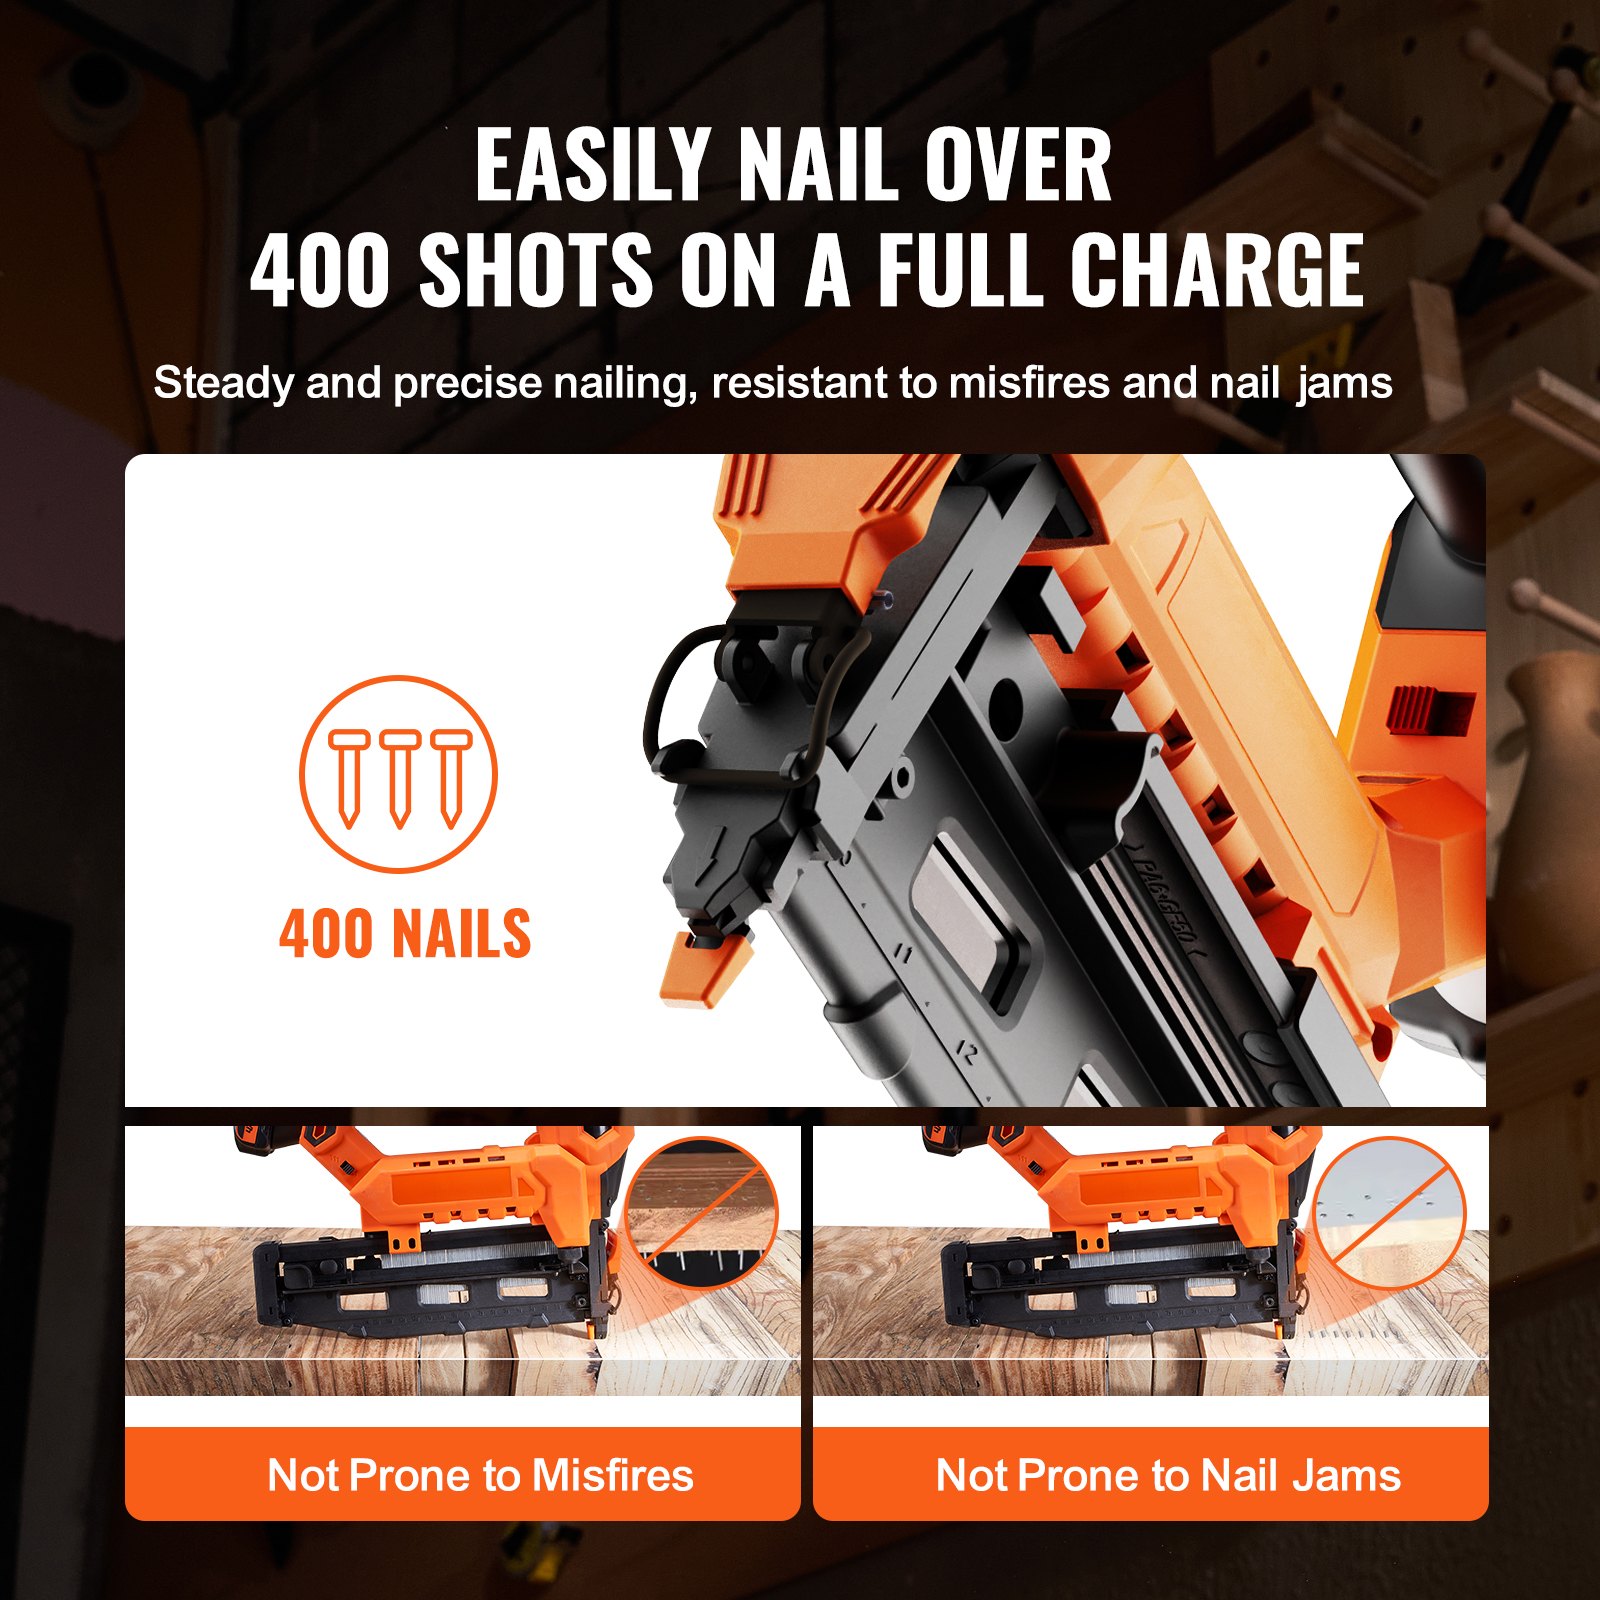
Dry fire defense
When there is no nail in the magazine or the specified number of remaining nails, the nail gun will not fire again to remind the operator to continue putting in nails.
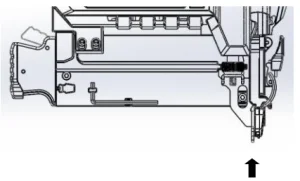
Jam Nails Remove
(Take F50B as an example, Photo 6)
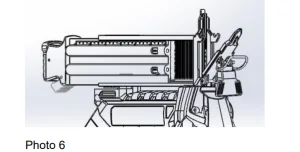
- First, press the handle of the tail of the magazine to open the movable magazine.
- Then pull the quick-release wrench down and open the gun cover.
- Use a screwdriver or pliers to remove the jammed nails.
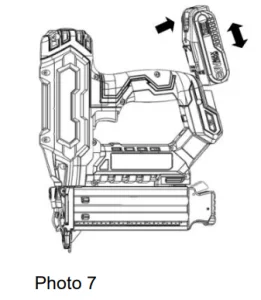
Battery pack plug and battery display
(Photo 7)
- Press the left and right latches of the battery pack simultaneously, and insert and remove the battery pack.
- A battery indicator and button are placed above the battery, and the current battery level is displayed by pressing the button.
Battery Display
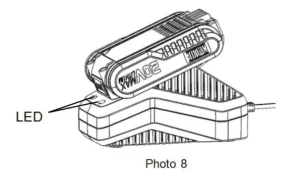
Charging the Cordless Finish Nailer Battery
(Photo 8)
- Plug in the charger according to the adapted power supply. At this time, the charger displays a green light.
- Insert the battery pack to be charged into the charger. After charging, the charger will flash green and display a green light.
Made in China.
Recommended For Your Project
VEVOR 20V Cordless Finish Nailer, Cordless Brad Nailer Kit with 16Ga Nails Manual

Reviews
There are no reviews yet.