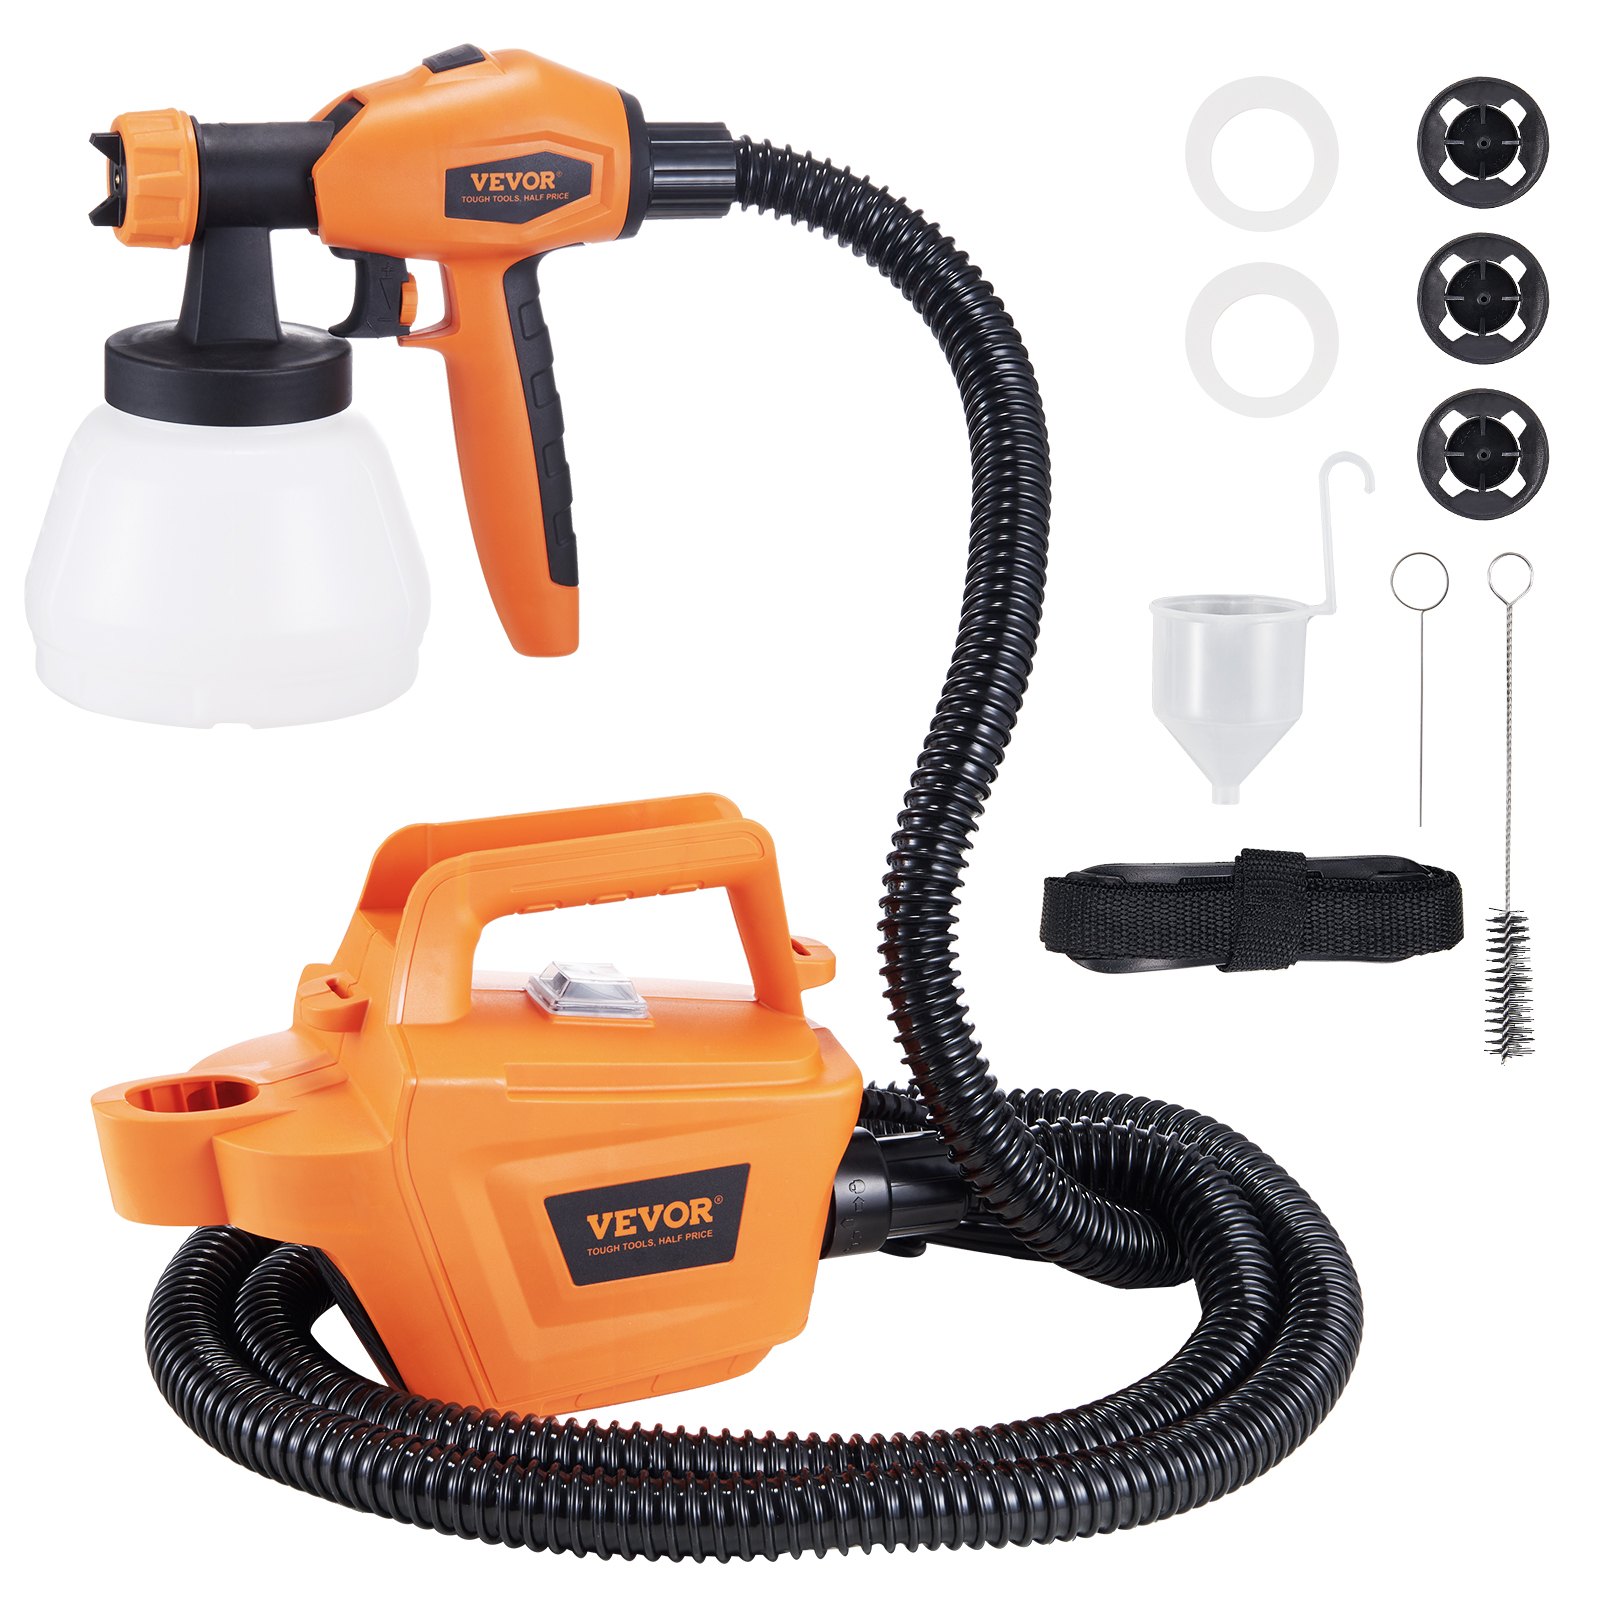
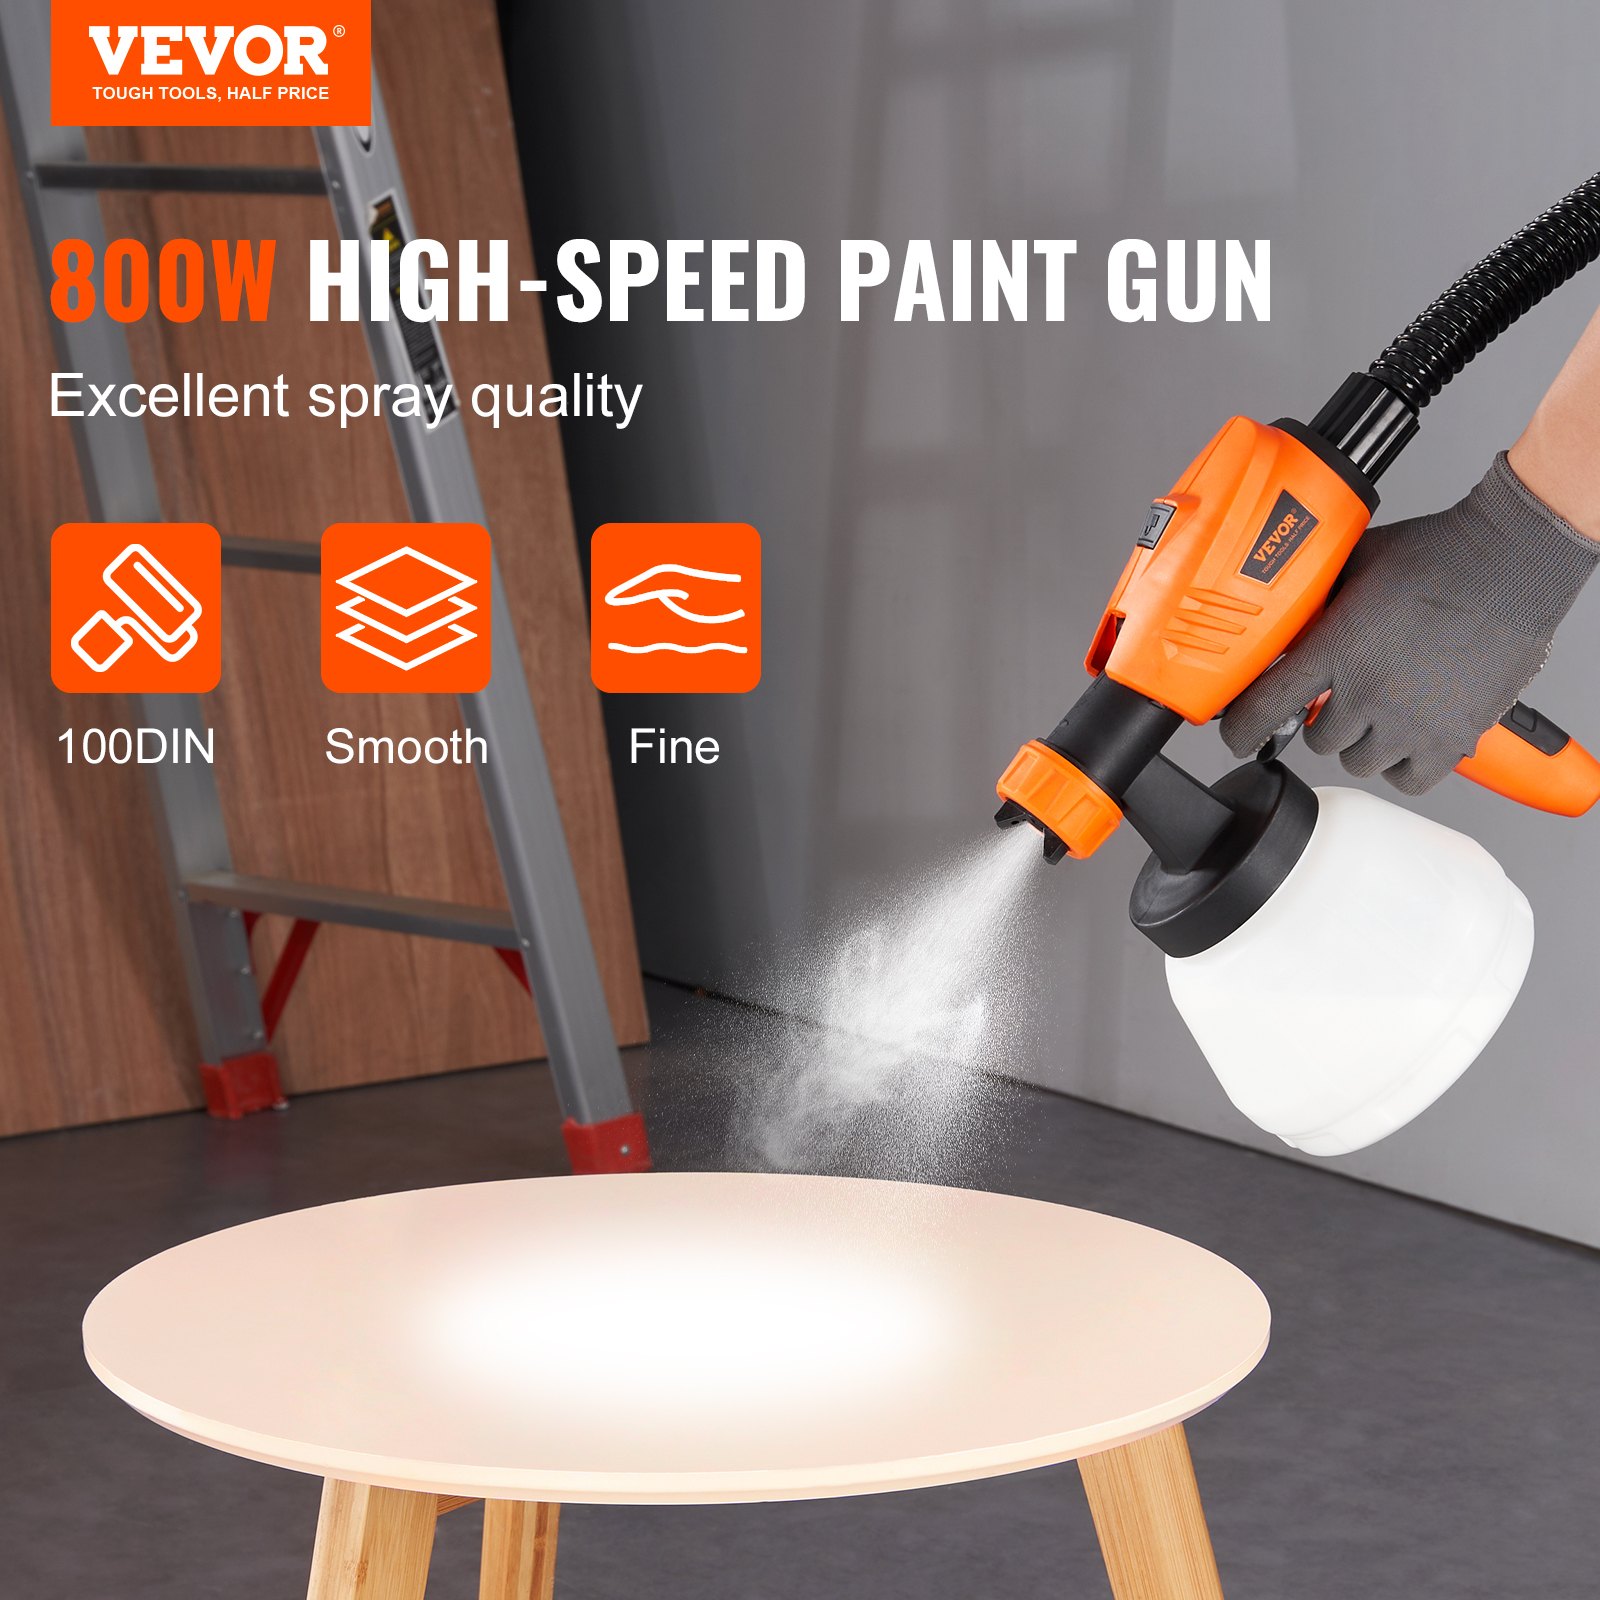

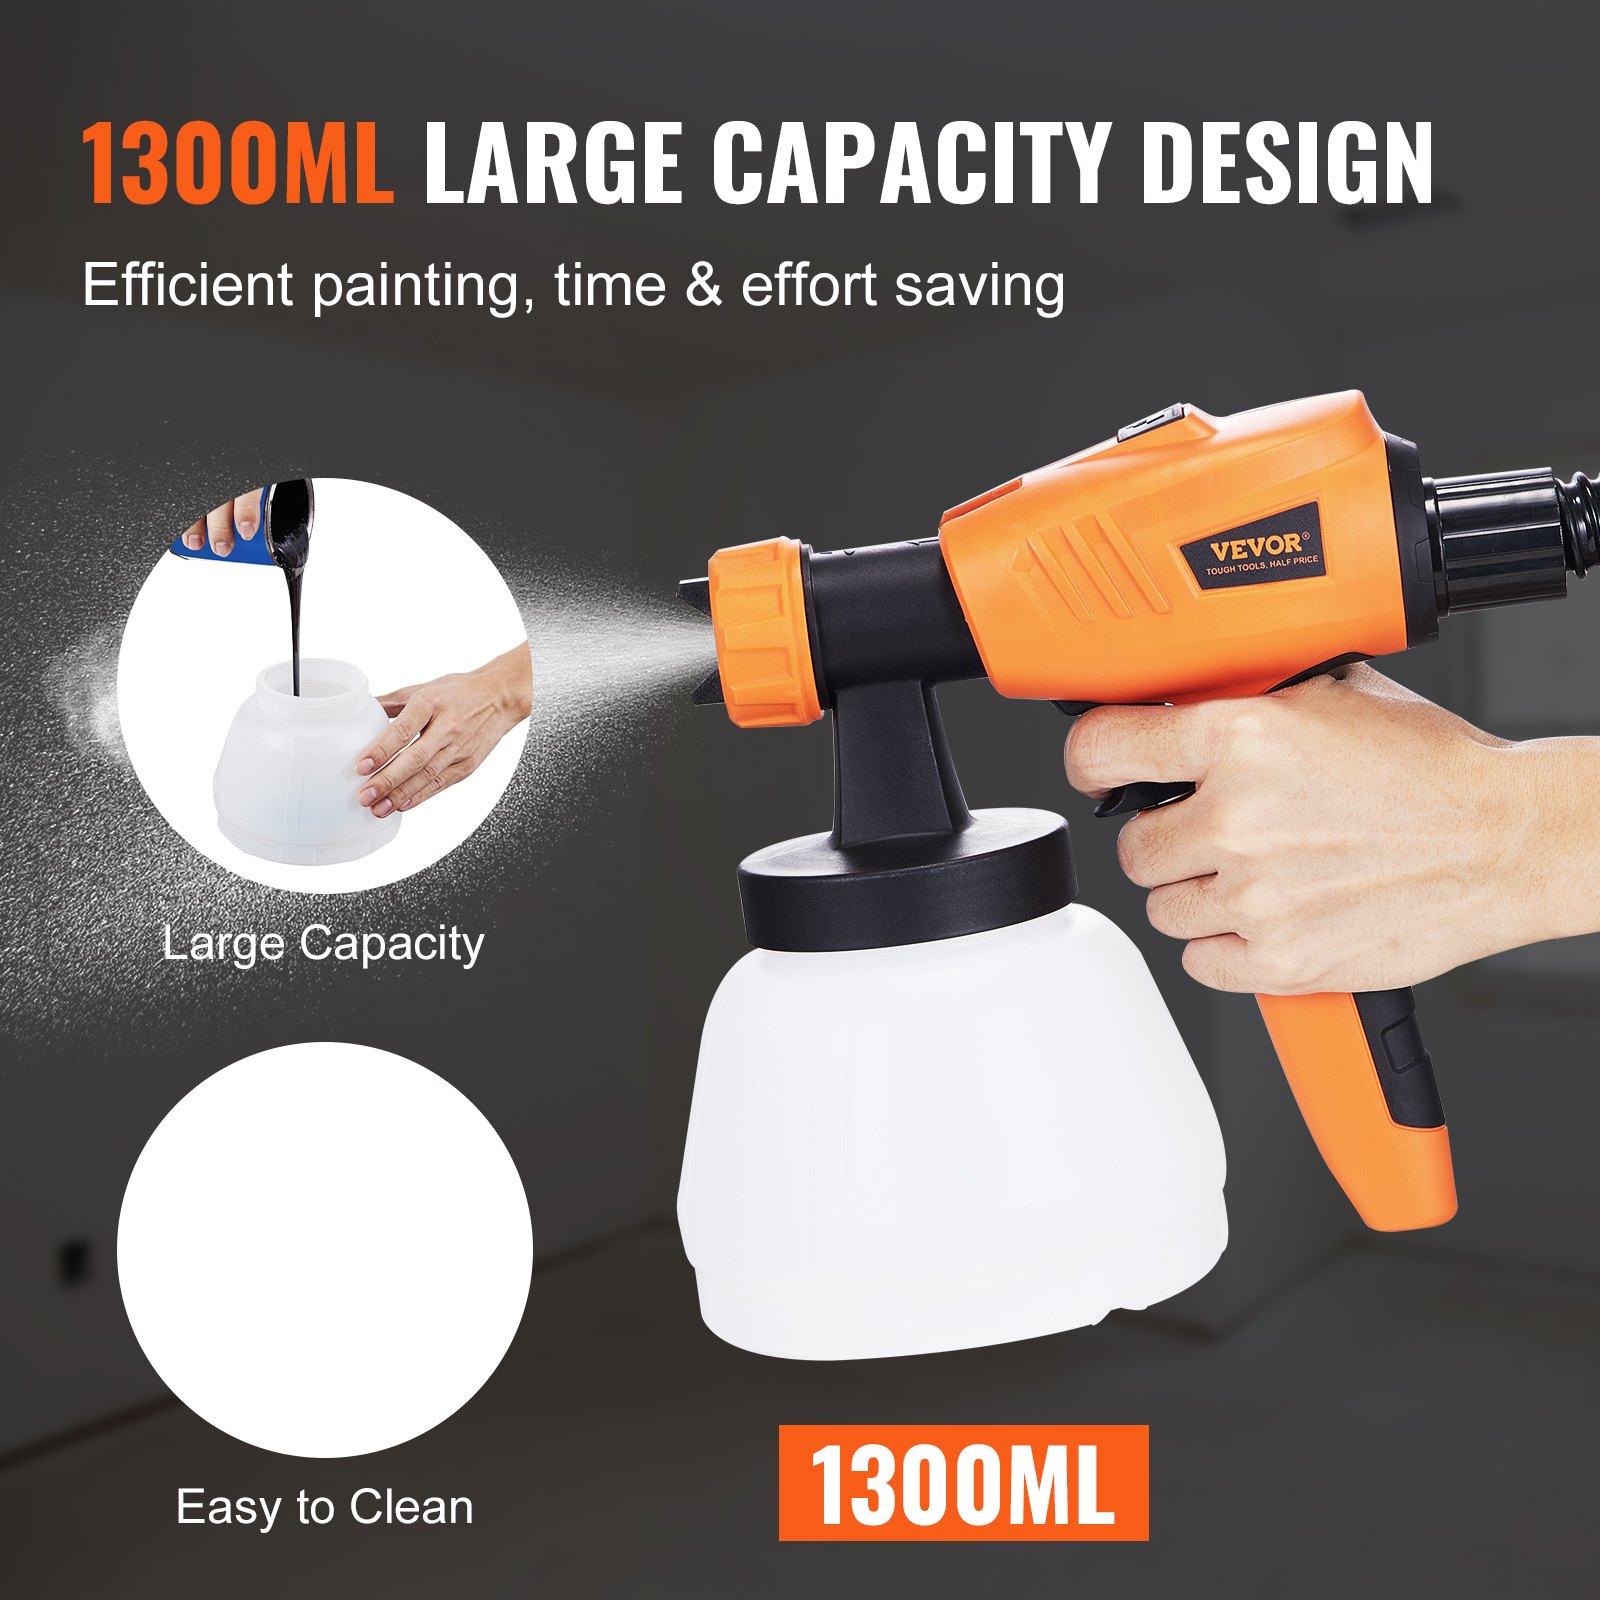

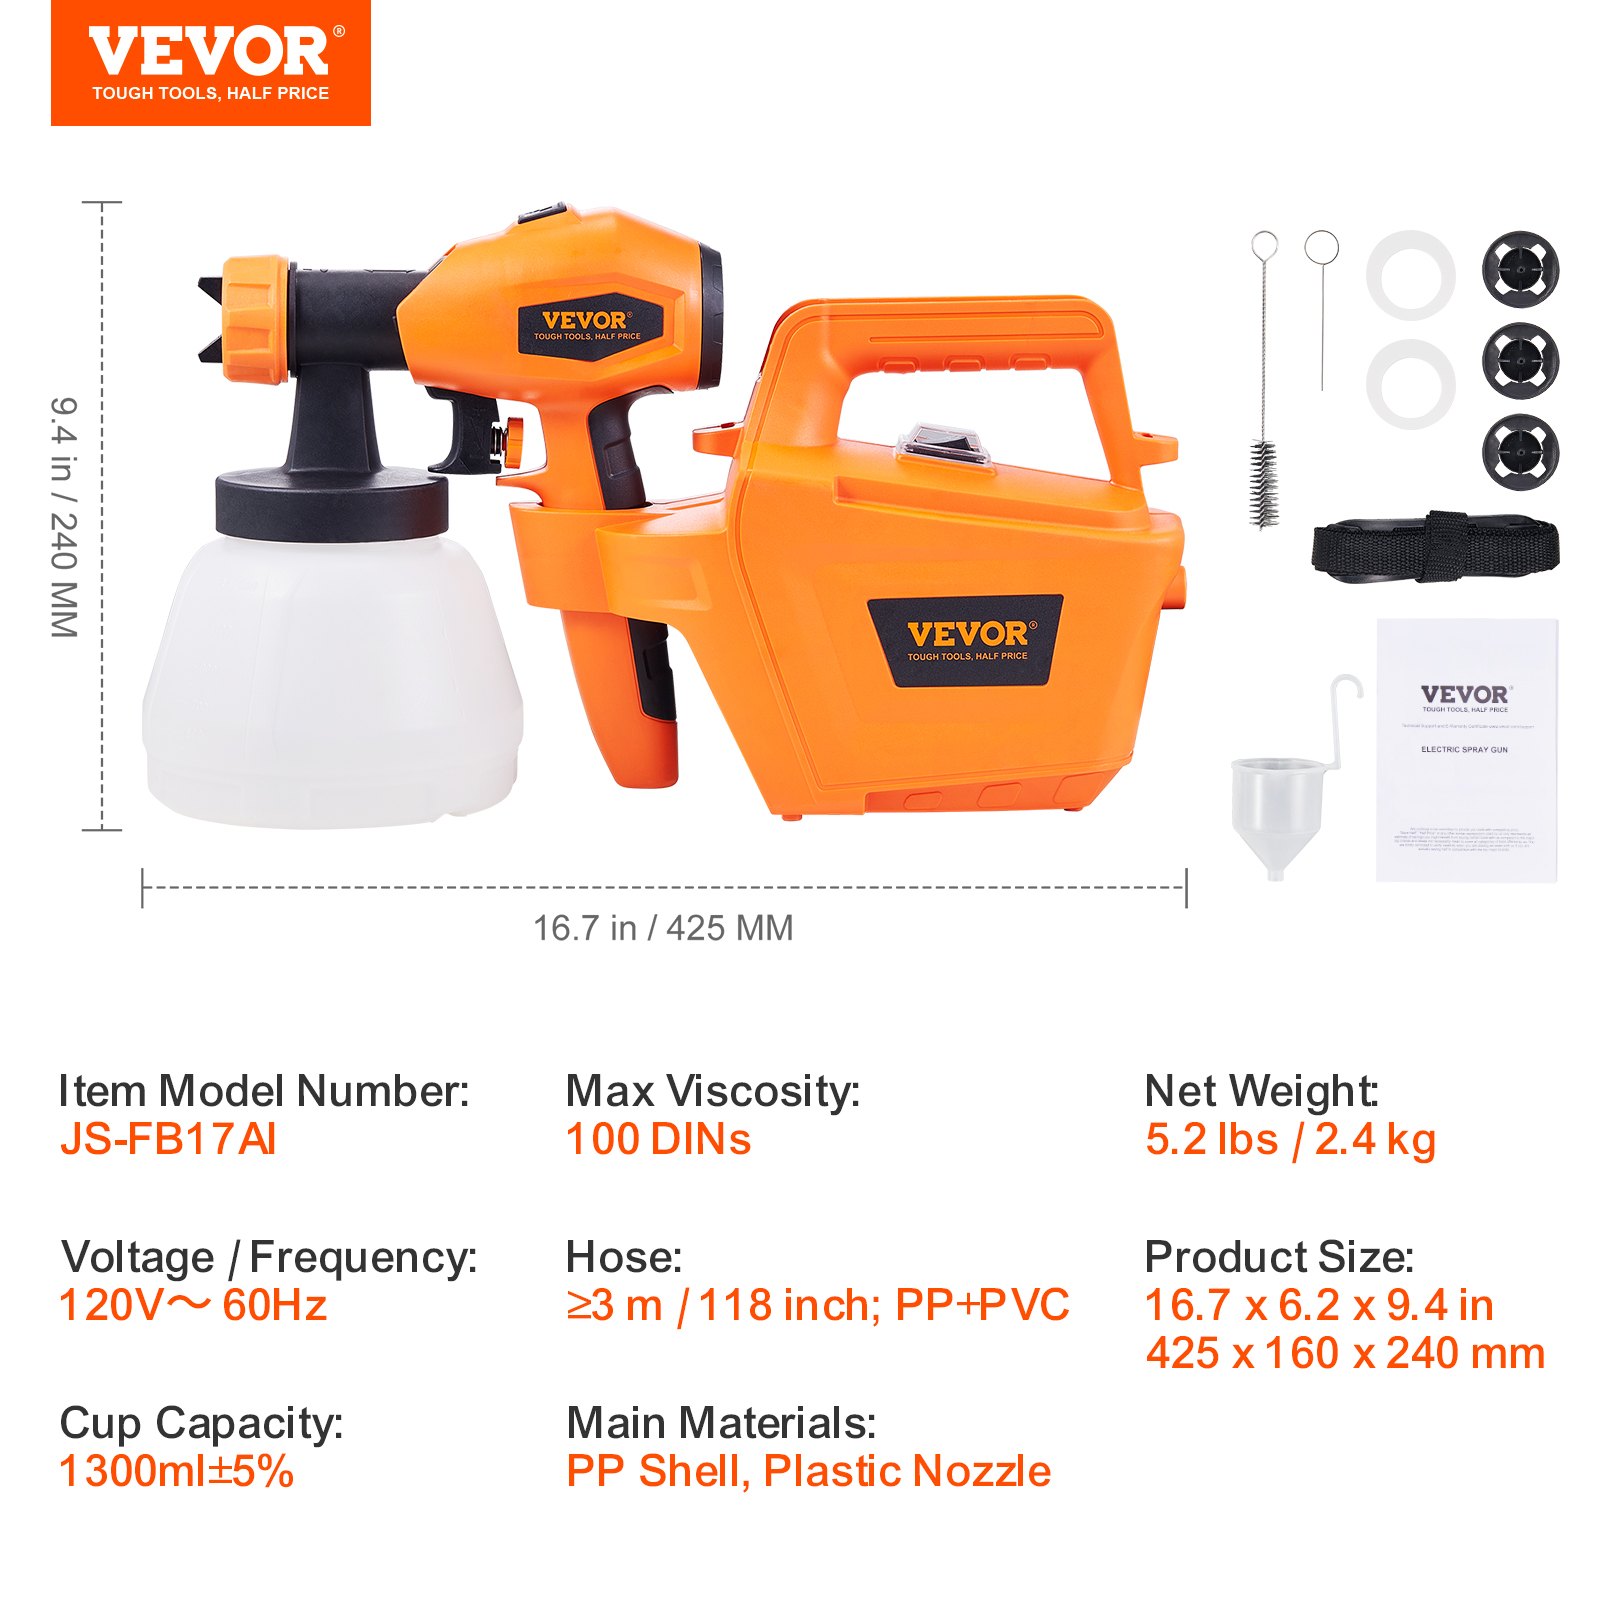
Unlock the full potential of your VEVOR Paint Sprayer with our comprehensive product manual. This 500W Electric Spray Paint Gun, equipped with a 10FT Air Hose, a 1300ml Container, and 3 versatile Spray Patterns, offers professional-level precision for all your painting projects. Whether you’re tackling home interior or exterior walls, fences, or other surfaces, our detailed manual guides you through every setup, operation, and maintenance step.
This manual is designed for user-friendliness. It simplifies troubleshooting and optimization, ensuring you get the most out of your HVLP Spray Gun.
Discover easy-to-follow instructions, illustrated diagrams, and expert tips that make painting easier and more efficient. Download your VEVOR Paint Sprayer manual today to experience hassle-free home improvement and easily achieve stunning results.
VEVOR Paint Sprayer User Manual
MODEL: JS-FB17AI
Important Safety Instructions
To reduce the risks of fire or explosion, electrical shock, and injury to persons, read and understand all instructions included in this manual. Become familiar with the controls and the proper usage of the equipment.
WARNING – To reduce the risk of fire or explosion:
- Do not spray flammable or combustible materials near an open flame or ignition sources such as cigarettes, motors, and electrical equipment.
- For units intended for use with only water-based or mineral spirit-type materials with a minimum flash point of 55°C- Do not spray or clean with liquids having a flash point less than 55°C.
- Paint or solvent flowing through the equipment can result in static electricity, creating a fire or explosion risk in the presence of paint or solvent fumes. All spray system parts, including the pump, spraygun, and objects in and around the spray area, shall be adequately grounded to protect against static discharge and sparks.
- Do not use a paint or a solvent containing halogenated hydrocarbons. See operating instructions for examples of these types of materials.
- Keep the spray area well ventilated and a good supply of fresh air moving through it. Keep the pump assembly in a well-ventilated area, but do not spray it.
- Do not smoke in the spray area.
- Do not operate light switches, engines, or similar spark-producing products in the spray area.
- Keep area clean and free of paint or solvent containers, rags, and other flammable materials.
- Know the contents of the paints and solvents being sprayed. Read all Material Safety Data Sheets (MSDS) and container labels provided with the paints and solvents. Follow the paint and solvent manufacturer’s safety instructions.
- Fire extinguisher equipment shall be present and working.
WARNING – To reduce the risk of skin injection:
- Do not aim the gun at or spray any person or animal.
- Keep hands and other body parts away from the discharge. Do not try to stop leaks with any part of the body.
- Always use the nozzle tip guard. Do not spray without the nozzle tip guard in place.
- Only use a nozzle tip specified by the manufacturer.
- Use caution when cleaning and changing nozzle tips. If the nozzle tip clogs while spraying, follow the manufacturer’s instructions for turning off the unit and relieving the pressure before removing the nozzle tip to clean.
WARNING – To reduce the risk of injury:
- Always wear appropriate gloves, eye protection, and a respirator or mask when painting.
- Do not operate or spray near children. Keep children away from the equipment at all times.
- Do not overreach or stand on an unstable support. Keep effective footing and balance at all times.
- Stay alert and watch what you are doing.
- Do not operate the unit when fatigued or under the influence of drugs or alcohol.
- Household use only.
- This product is of protection class II. That means it is equipped with enhanced or double insulation. WHEN SERVICING, USE ONLY IDENTICAL REPLACEMENT PARTS.
This appliance has a polarized plug. This plug will fit in a polarized outlet only one way. If the plug does not fit fully in the outlet, reverse the plug.
If it still does not fit, contact a qualified electrician to install the proper outlet. Do not change the plug in any way.
SAVE THESE INSTRUCTIONS
Servicing of a Double-Insulated Product
In a double-insulated product, two insulation systems are provided instead of grounding. No grounding means are provided on a double-insulated product, nor should a grounding means be added.
Servicing of a double-insulated product requires extreme care and knowledge of the system, and should be done only by qualified service personnel.
Replacement parts for a double-insulated product must be identical to those in the product.
Intend use
Coating Materials Suitable for Use
Water- and solvent-based paints, finishes, primers, 2-component paints, clear finishes, automotive finishes, staining sealers, wood sealers, and preservatives. (non-flammable materials having a flash-point above 55C).
Coating Materials Not Suitable for Use
Wall paints (emulsion paints), alkali and acidic paints, etc. The tool is to be used only for its prescribed purpose. Any other use is deemed to be a case of misuse.
Technical Specifications

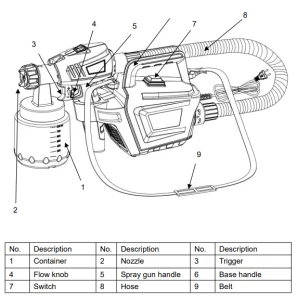
Parts List
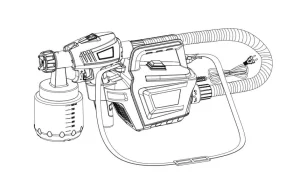
VEVOR Paint Sprayer Operation Instructions
1. Preparing the Coating Material
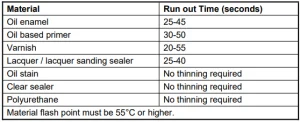
Before spraying, the material being used may need to be thinned with the proper solvent specified by the material manufacturer. Never exceed the thinning advice given by the coating manufacturer.
Note: Material to be sprayed should always be strained to remove any impurities in the paint, which may enter and clog the system. Impurities in the paint will give poor performance and a poor finish.
Thinning chart:
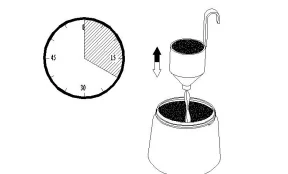
Hold the test cup and measure the time in seconds until the liquid empties. This time is called “Run out Time in Seconds”.
Note: Stir the spraying material thoroughly before measuring and filling it into the canister.
2. Start-up
Before connecting to the mains supply, ensure the supply voltage is identical to the value on the rating plate.
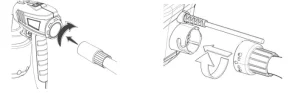
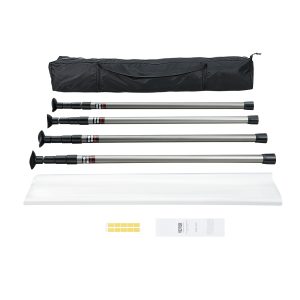
- Mounting the air hose: Tightly insert the air hose coupler into the connections on the machine and the spray gun.
- Unscrew the container from the spray gun. Aligning the suction tube. The container contents are to be sprayed out almost completely. When spraying horizontal surfaces, turn the suction tube forward (A). When spraying objects overhead, turn the suction tube back (B).
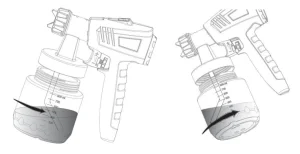
- Pour in the prepared coating material and screw the container tightly onto the spray gun.
- During normal use, carry the gun with the base handle or belt.
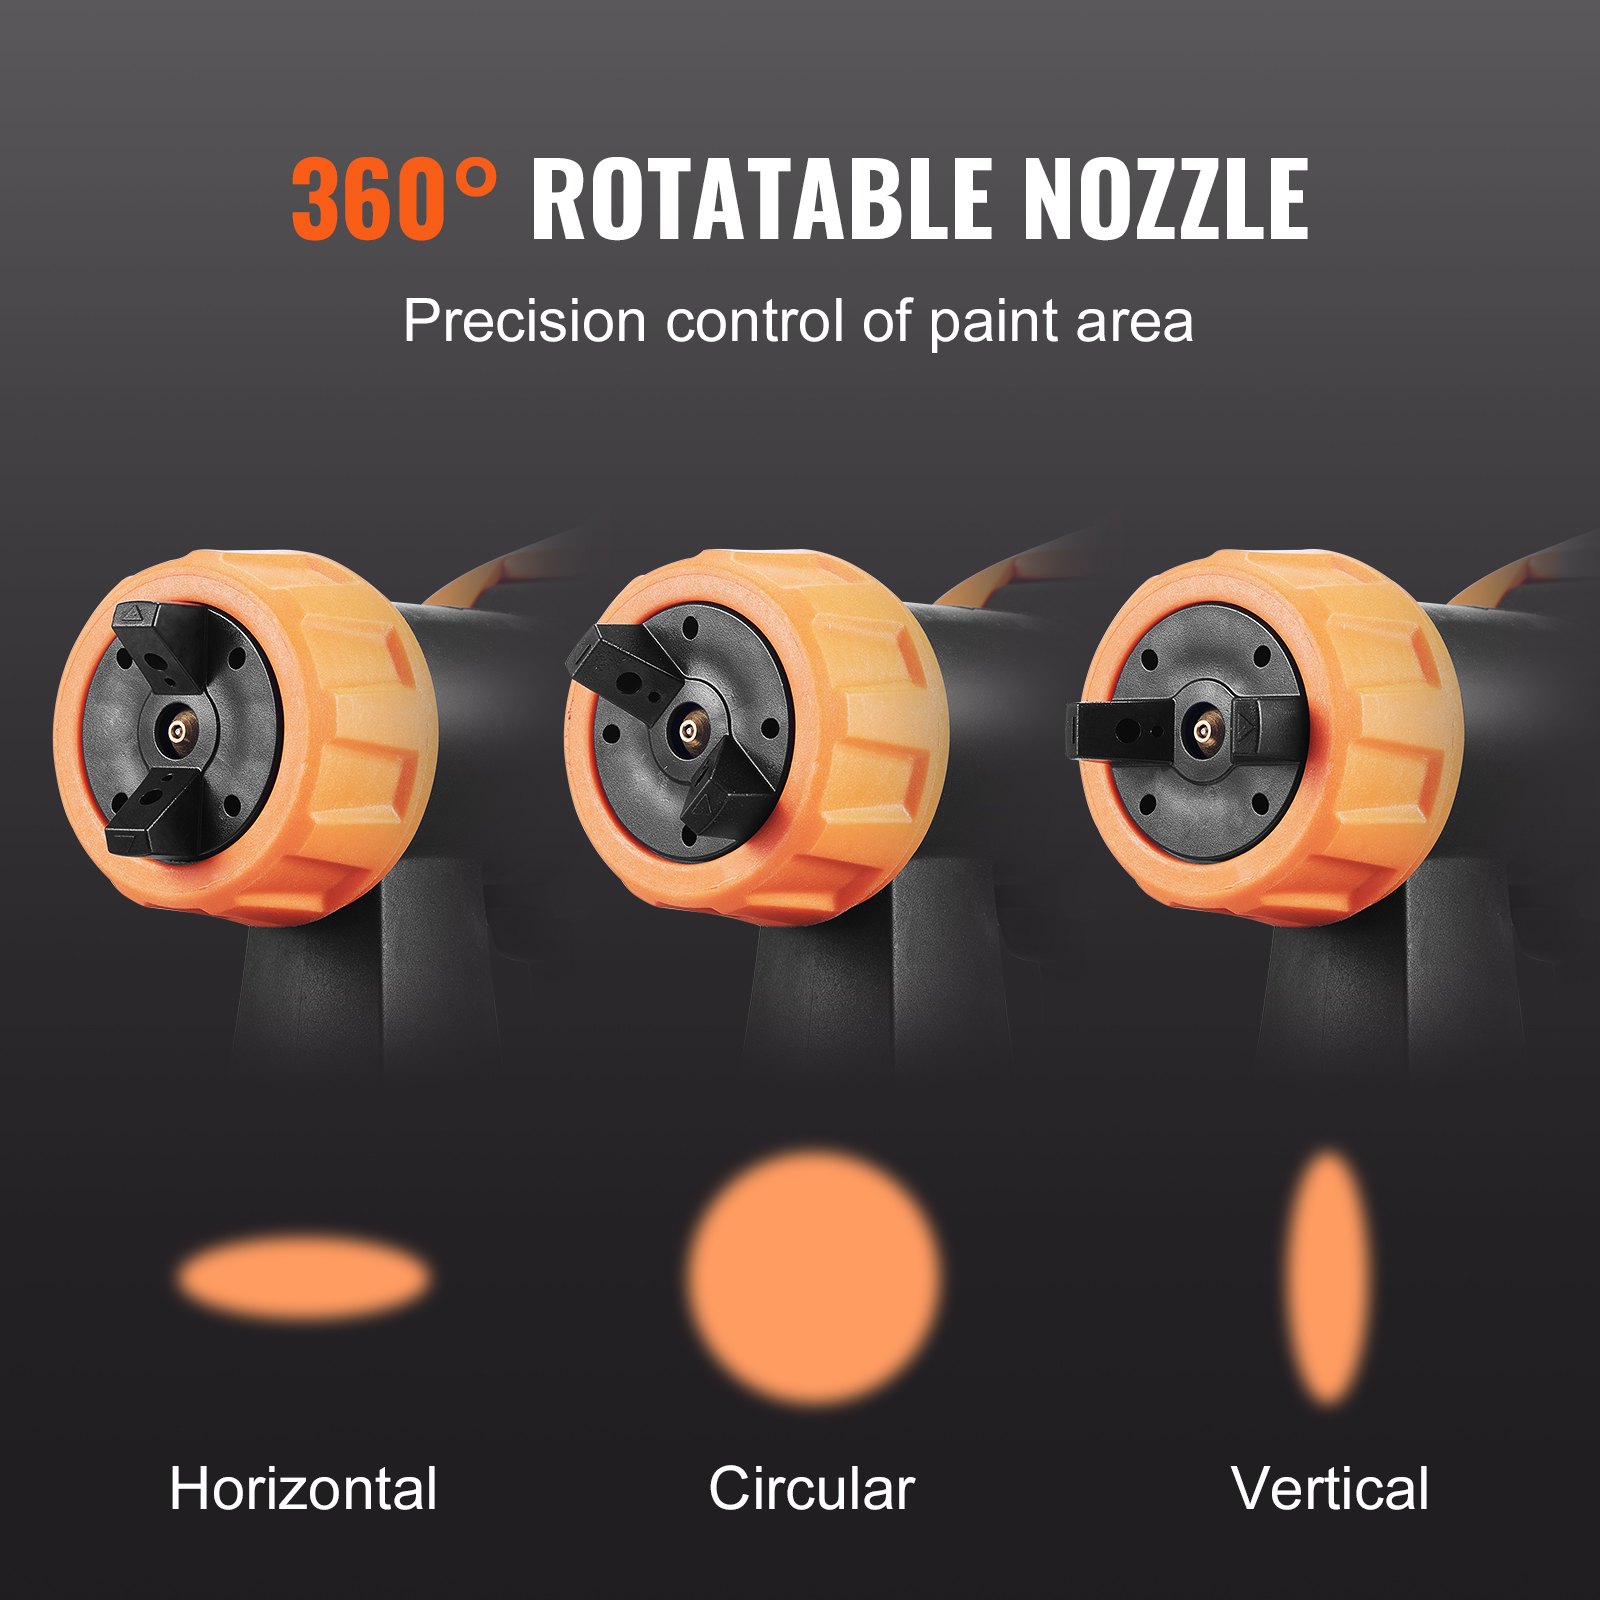
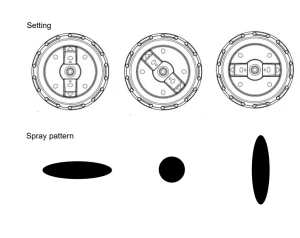
- Adjust the spray setting on the spray gun. Depending on the application and target object, three different spray jet settings can be chosen on the spray gun.
- Push the ON / OFF switch on the machine and start painting.
- Adjusting the Material Volume
Set the material volume by turning the regulator knob on the trigger.
3. Spray Technique
- The spray result depends heavily on the smoothness and cleanliness of the surface to be sprayed. Therefore, the surface should be carefully prepared and kept free of dust.
- Cover all surfaces not to be sprayed.
- Cover screw threads or similar parts of the target object.
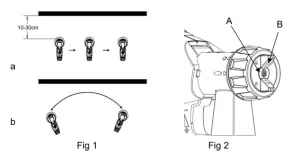
- It is advisable to test the spray gun on cardboard or a similar surface to find the correct setting. Important: Begin spraying outside the target area and avoid interruptions inside the target area.
- Correct (Fig. 1a): Be sure to hold the spray gun at an angle of approximately 10- 30 cm to the target object.
- Incorrect (Fig. 1 b) · Heavy spray fog build-up, uneven surface quality.
- An even movement of the spray gun results in an even surface quality.
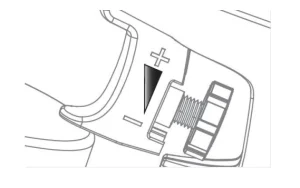
- When coating material builds up on the nozzle (A) and aircap (B)(Fig.2), clean both parts with a solvent or water.
Interruption of Work
- Turn the machine off.
- Put the spray gun in the spray gun holder.
Taking Out of Operation and Cleaning
- Turn the machine off. Activate the trigger guards so that the coating material in the spray gun flows back into the container.
- Unscrew the container. Empty any remaining coating material back into the material tin.
- Pre-clean the container and feed tube with a brush.
- Pour solvent or water into the container. Screw the container back on. Use only solvents with a flashpoint over 55°C
- Turn on the machine and spray the solvent or water into a container or a cloth.
- Repeat the above procedure until the solvent or water emerging from the nozzle is clear.
- Turn the machine off.
- Then empty the container. Always keep the container seal free of coating material residue and check for damage.
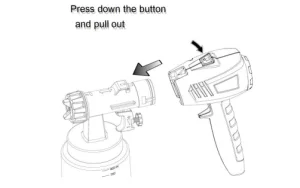
- Press down the quick-release button and pull out the front part of the spray gun. Clean it thoroughly.
- Clean the outside of the spray gun and container with a cloth soaked in solvent or water.
- Unscrew the union nut and remove the air cap and nozzle. Clean them with a brush and solvent or water.
Caution! Never clean the nozzle or air holes in the spray gun with sharp metal objects.
VEVOR Paint Sprayer Maintenance
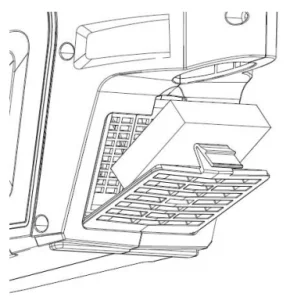
1. Change the air filter
Change the air filter if it is soiled. Release the cover fastening from the machine, place the air filter in the cover, and push the cover back into place.
WARNING! Never operate the machine without the air filter; dirt could be sucked in and interfere with the machine’s function.
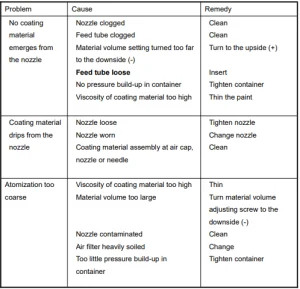
2. VEVOR Paint Sprayer Troubleshooting
Recommended For Your Project
VEVOR Paint Sprayer, 500W Manual

Reviews
There are no reviews yet.