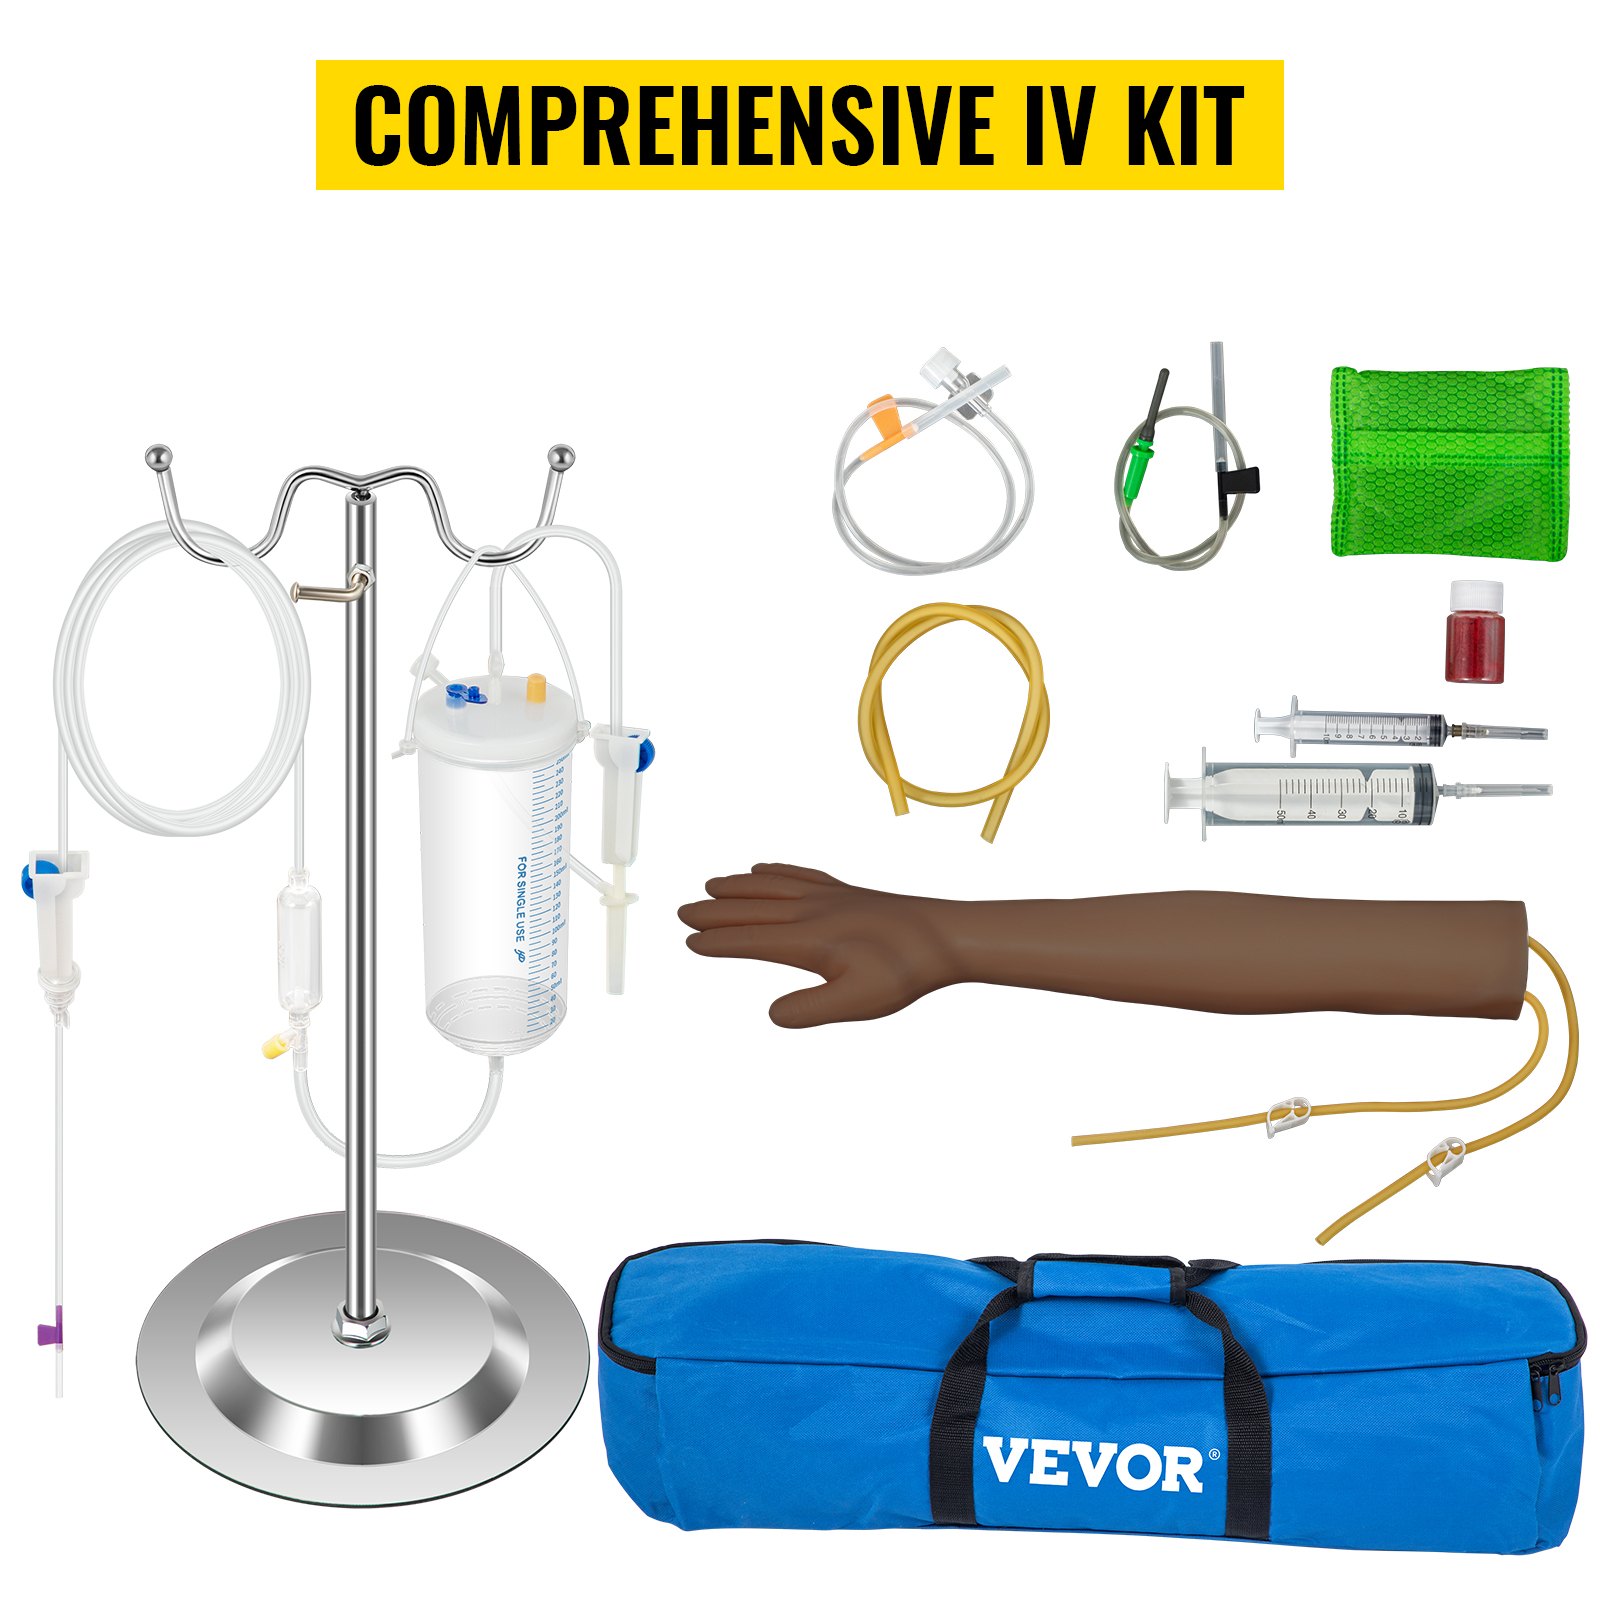
Unlock the full potential of your VEVOR Phlebotomy Practice Kit with our comprehensive and easy-to-follow product manual download. Designed for medical students, nurses, and healthcare professionals, this manual offers step-by-step instructions for setup, optimization, and troubleshooting of your Dark Skin IV Practice Kit.
Our user-friendly guide ensures you can confidently master venipuncture techniques with the included practice arm and infusion stand.
Enhance your learning experience and proficiency in phlebotomy with our detailed manual, crafted to support your educational journey with clear visuals and practical tips. Download now to make the most of your VEVOR Phlebotomy Practice Kit and elevate your skills to a professional level.
VEVOR Phlebotomy Practice Kit User Manual
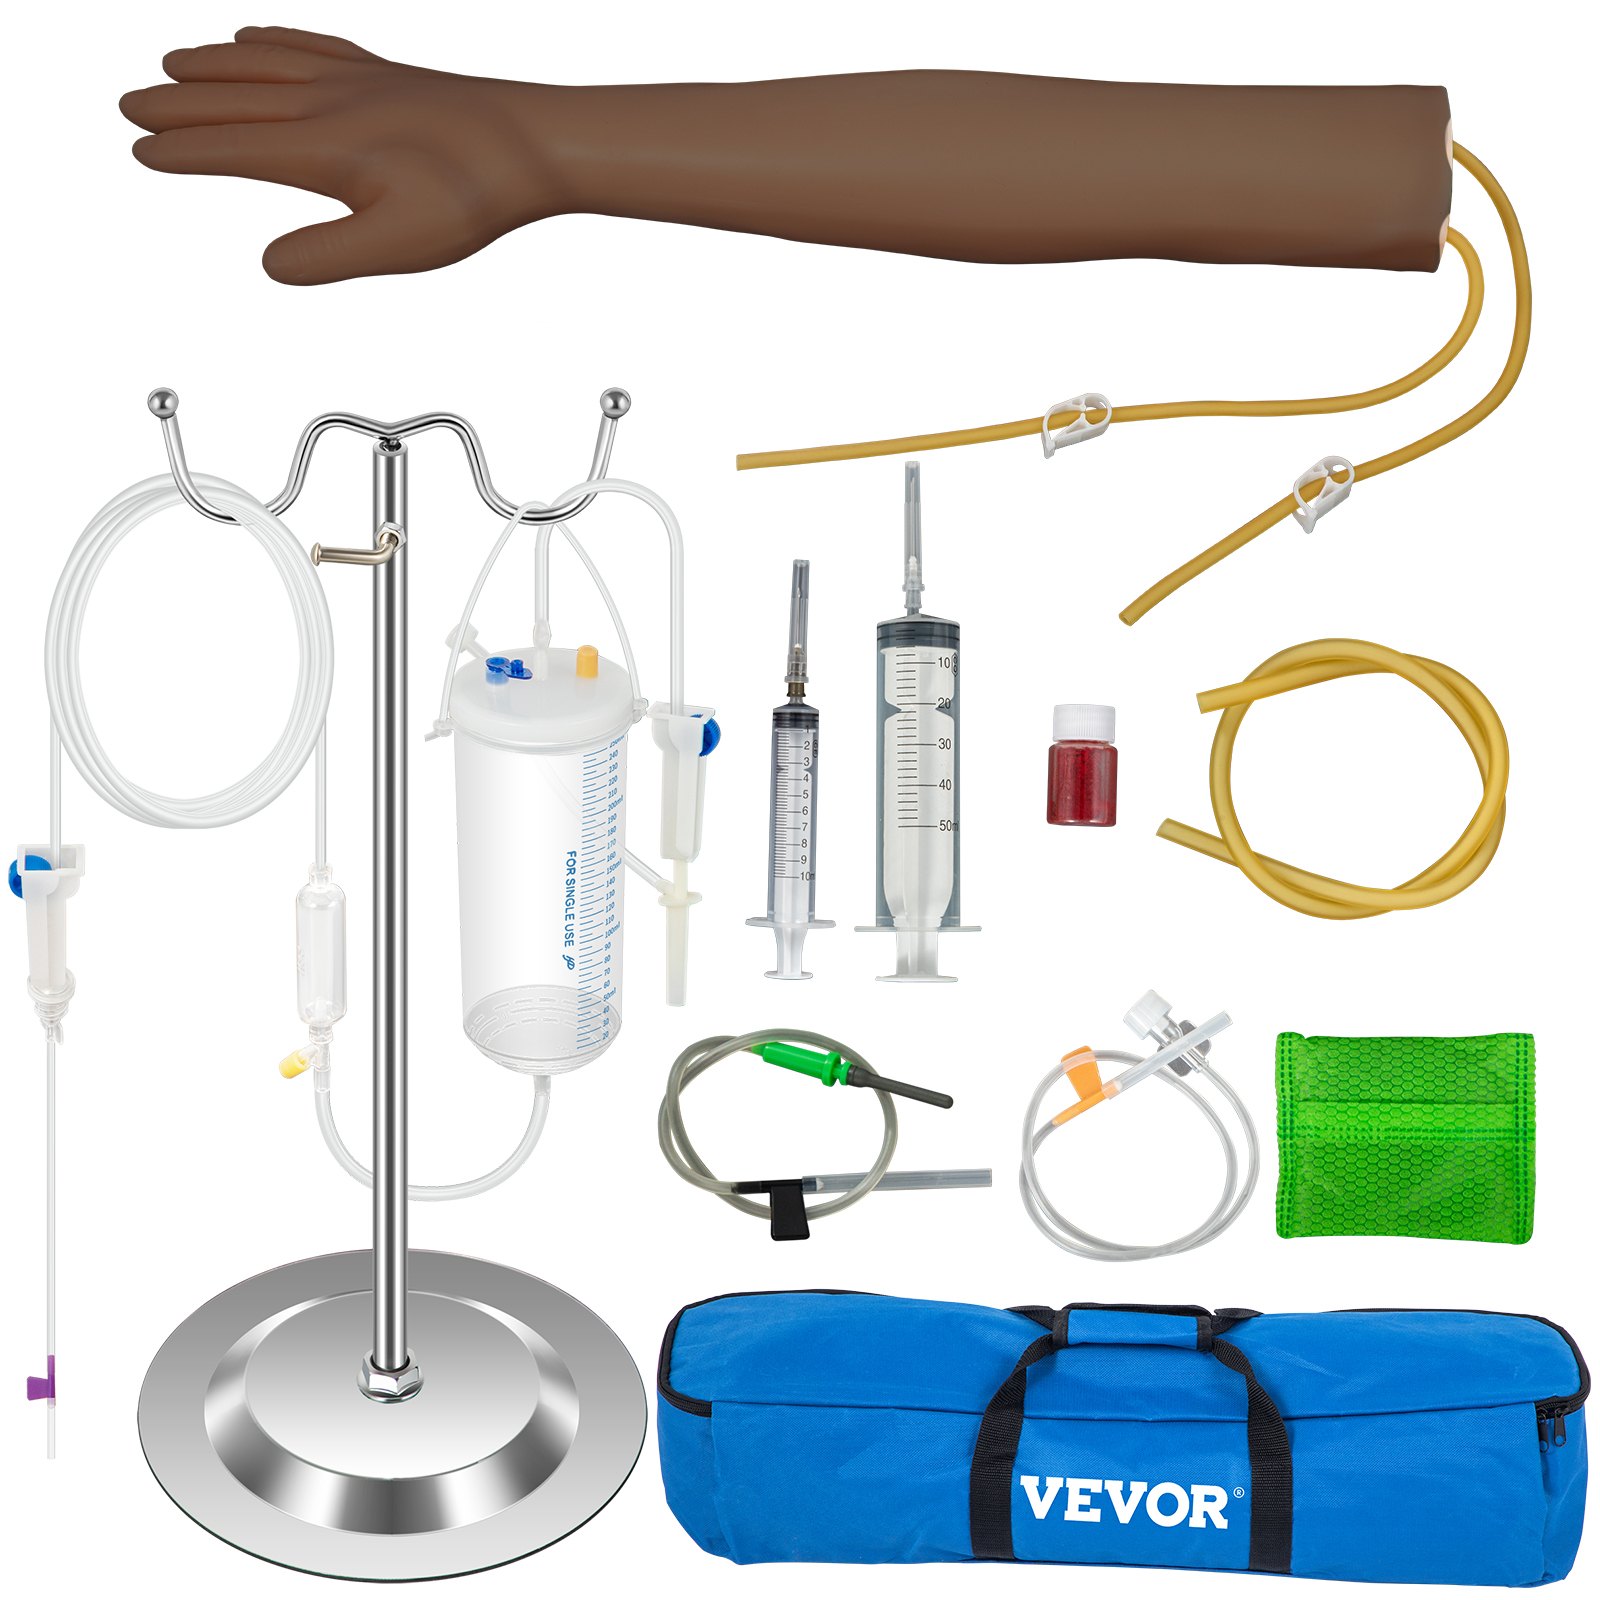
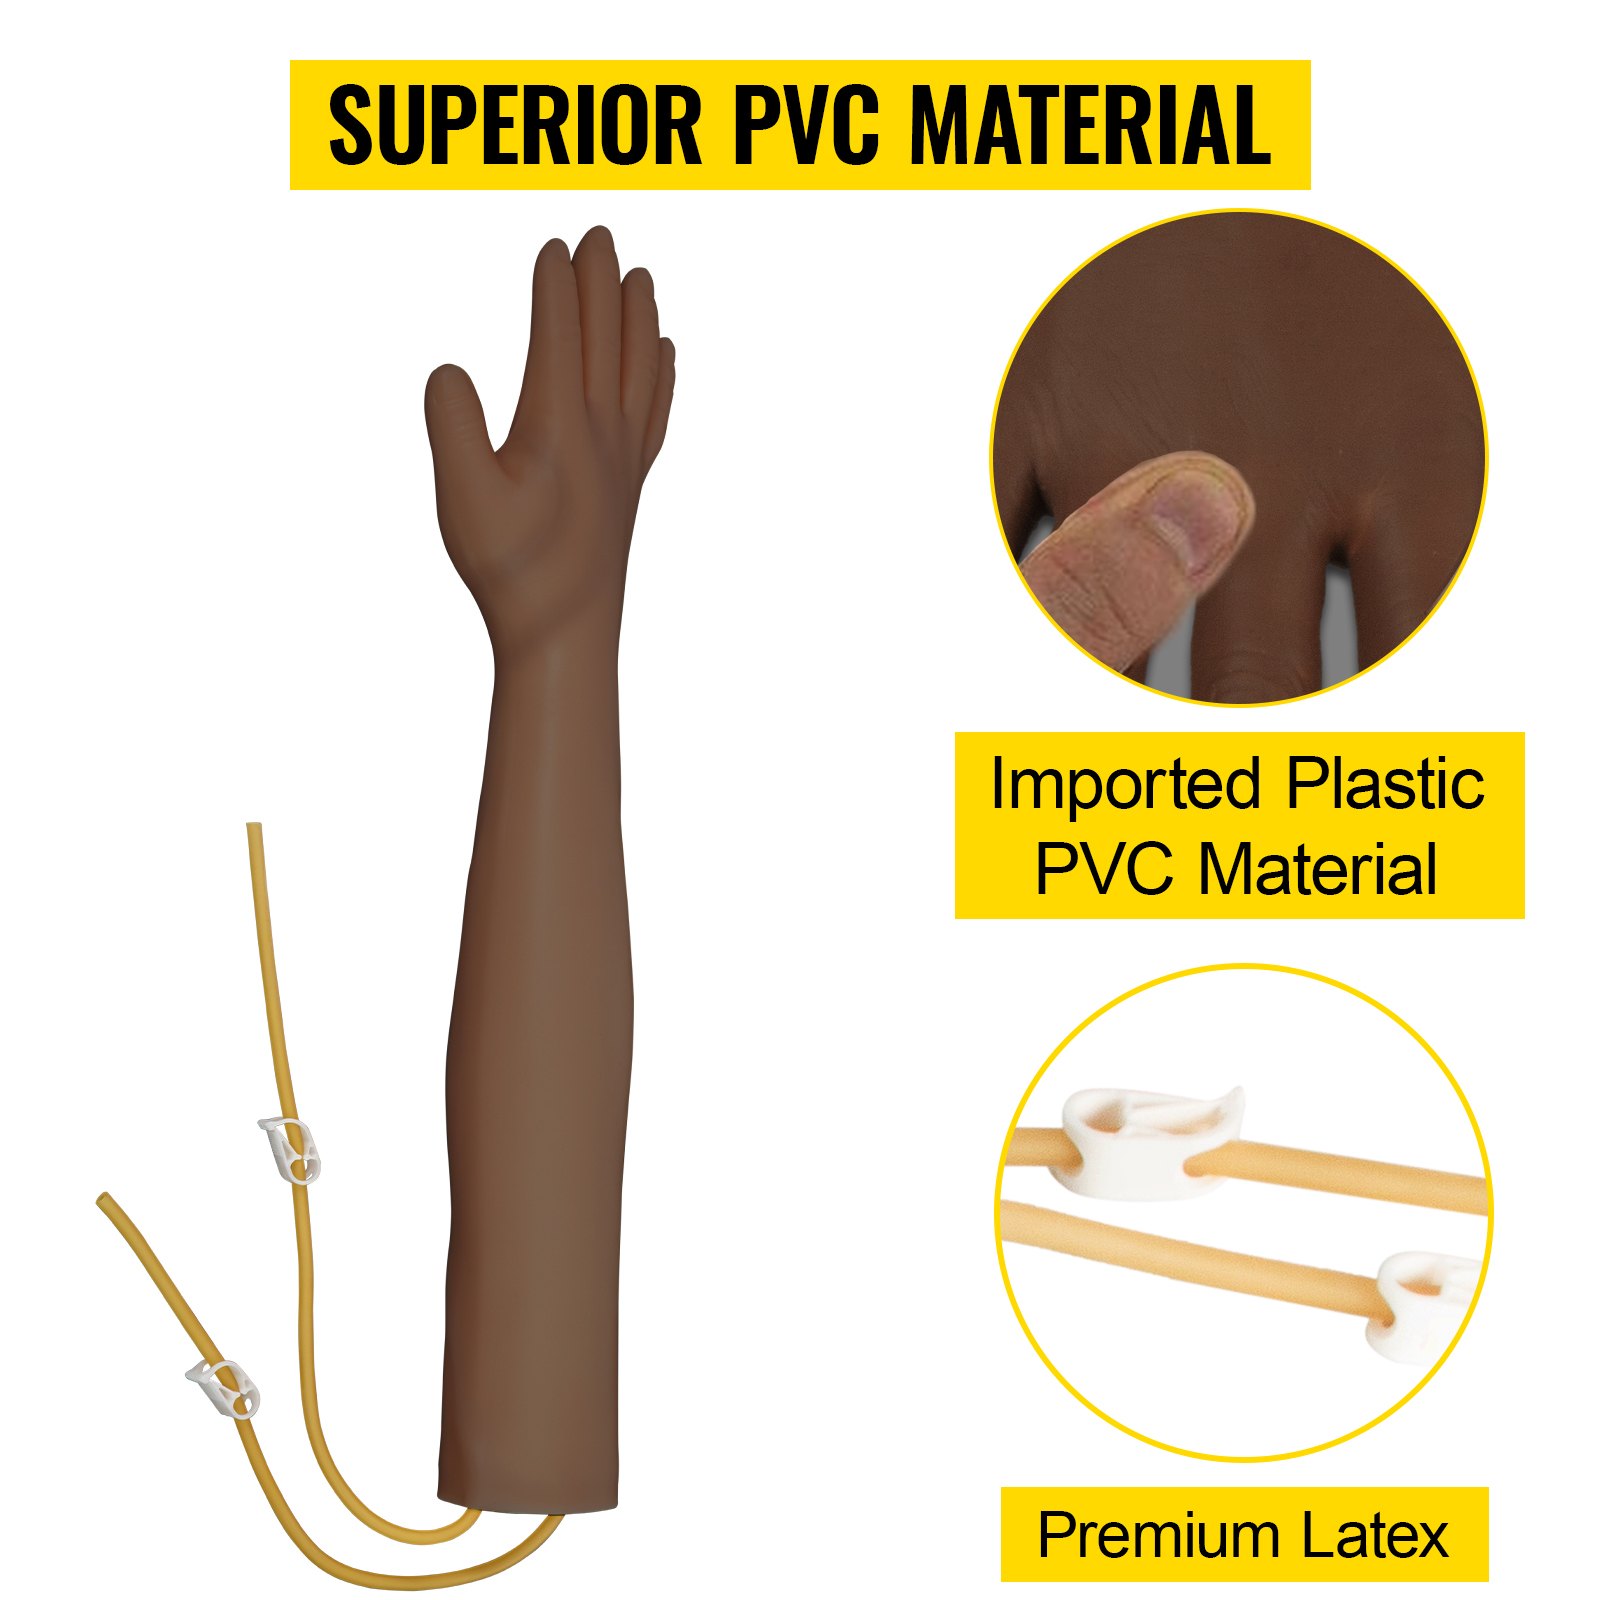
Arm intravenous injection model
Product Function
- The eight main venous systems distributed on the arm can be used for puncture training, such as intravenous injection, infusion (blood), and blood drawing.
- It can be injected into the deltoid muscle.
- The upper limb can be rotated 360 degrees, which can imitate the human arm, which is convenient for puncture practice.
- The needle has an obvious sense of falling into the air, and there is blood return when puncturing correctly.
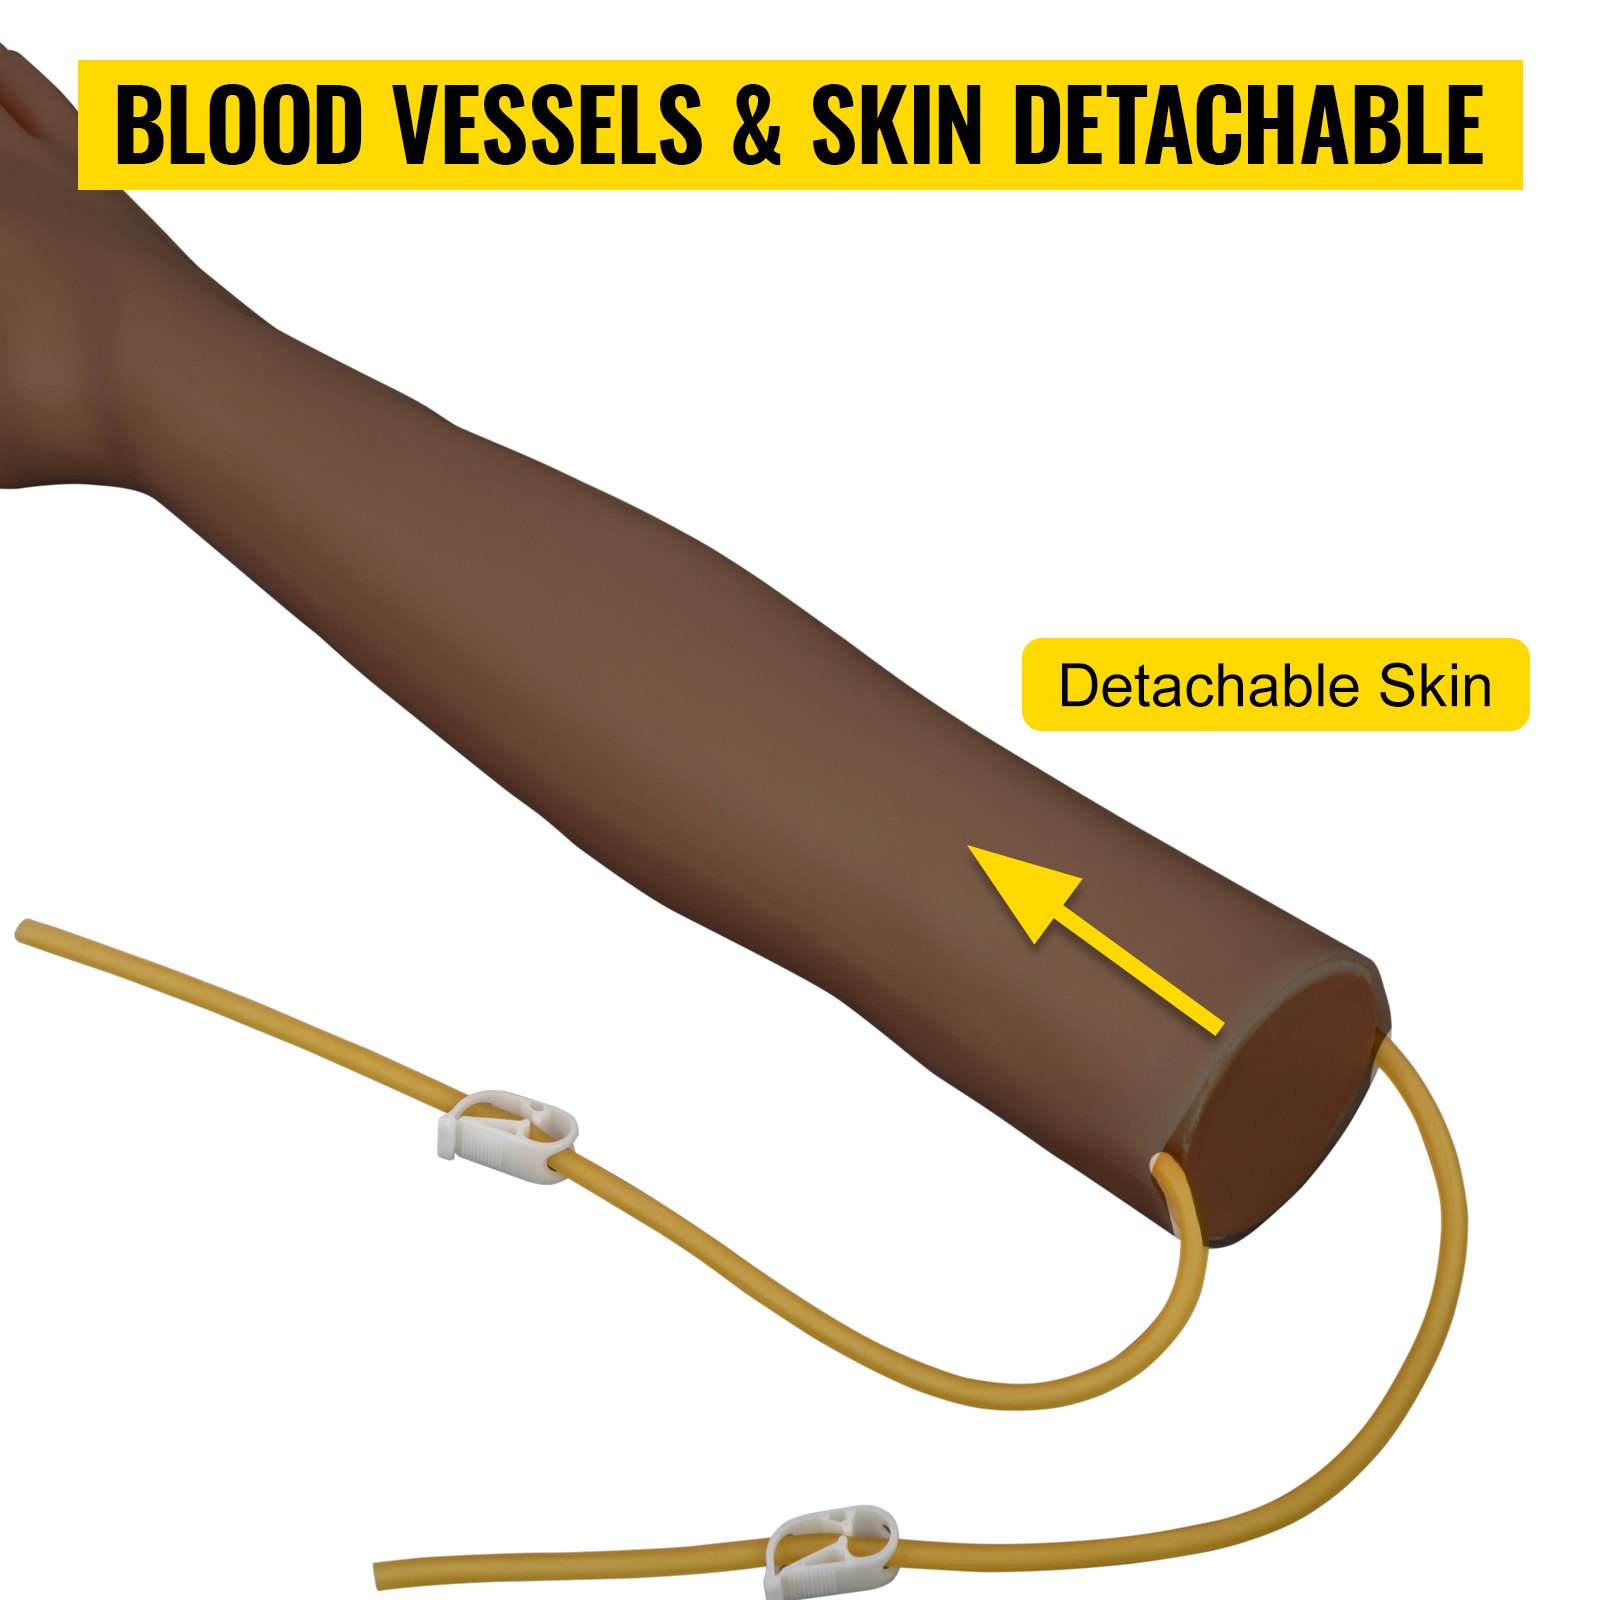
- The same vein and skin puncture site can withstand hundreds of repeated punctures without
leakage. - The annular holster provides multiple training points for intradermal injection, which is put on the model arm. A hillock will appear on the skin if the liquid infusion is correct. After the liquid is drawn out, the hillock will disappear.
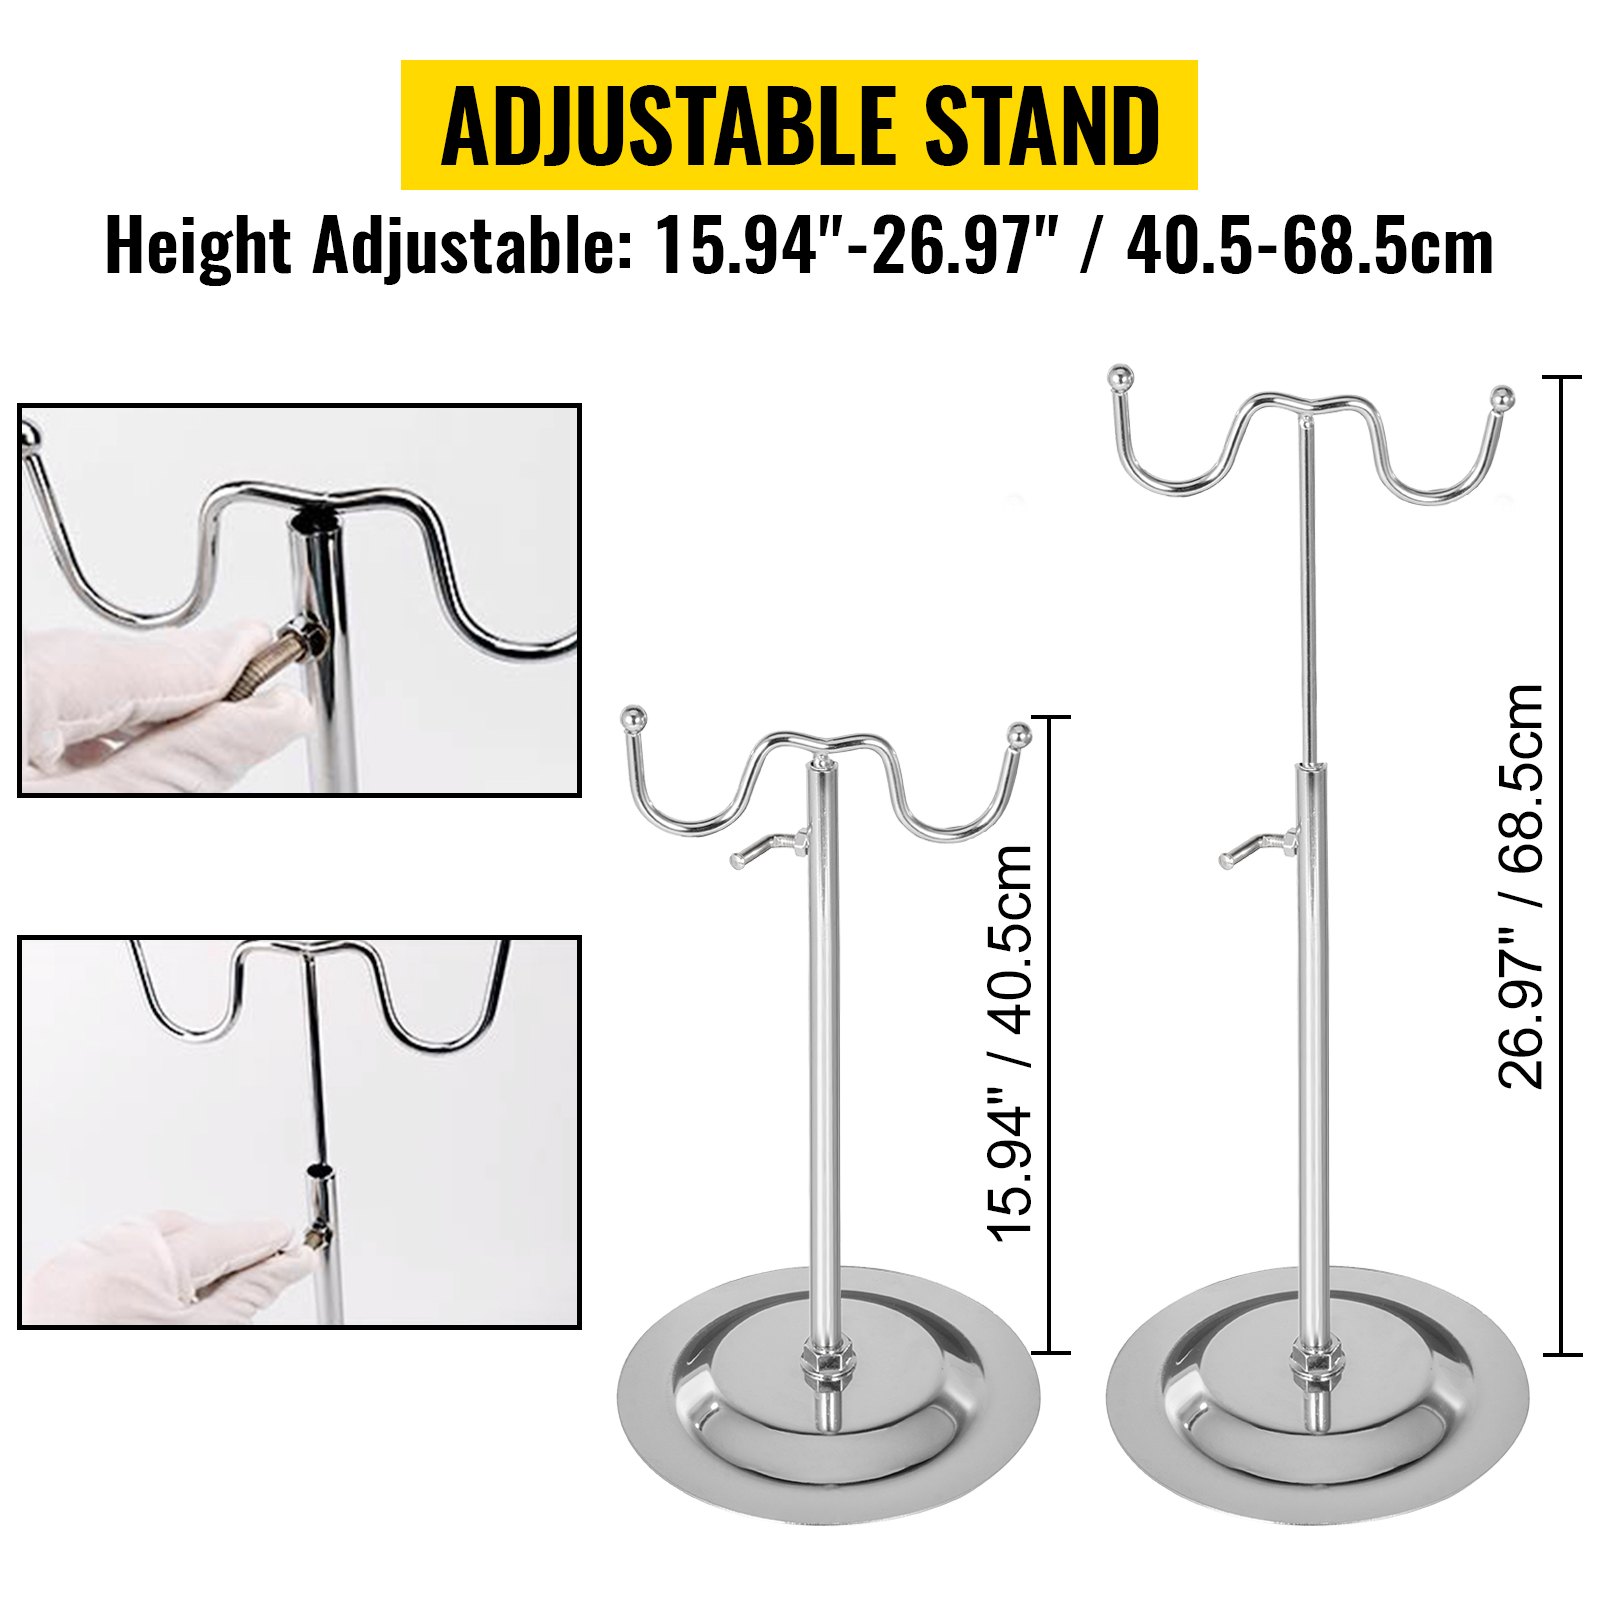
Phlebotomy Practice Kit Installation Method
- Remove the silicone upper limb model and the infusion stand from the packing box.
- Screw the fixing nut to firmly fix the hanging infusion bottle bracket on the jack position of the model support plate.
- Blood simulation with a small amount of blood powder and water configuration.
Training Steps
1. Blood was drawn from the forearm vein or elbow
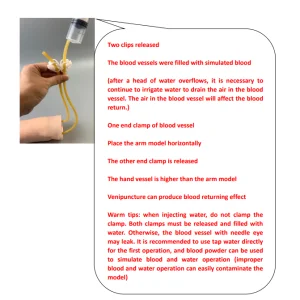
Step 1: A 50 ml disposable syringe was connected to the upper rubber tube of the plastic upper limb model, and the simulated blood was injected and filled into the blood vessels. As shown in the figure:
Step 2: Routine disinfection of the elbow and forearm skin.
Step 3: select the suitable vein, puncture the vein with 5 ml syringe, and draw 2 ml venous blood (blood simulation solution).
2. Intravenous injection or intravenous infusion through the elbow or the forearm:
Intravenous or intravenous infusion inject liquid medicine into the vein under pressure. The common veins are the cephalic vein and the basilic vein.
Purpose:
- Rescue or treatment of patients, through intravenous pressure injection of glucose solubilized liquid or blood patients, increase the blood volume of coronary artery and the carotid artery, to improve the blood flow of heart and brain, and recover blood pressure through reflex to rescue or treat patients.
- It is used to perform some special examinations, etc.
- For chemotherapy.
3. Intravenous injection or intravenous infusion operation training:
Step 1: (the same as step 1 of blood drawing through the elbow forearm vein), using an injection plate, a suitable syringe, No. 6-8 needle, medicine, a sandbag, sterile gloves, and a sterile treatment towel, etc. In case of neonatal patients, the radial vein, blood disease patients contraindicated this method of injection, to avoid bleeding.
Step 2: disinfect the skin of the elbow and forearm routinely, wear sterile gloves and lay sterile hole towel.
Step 3: fix the selected vein with the left index finger and middle finger, the other hand with a syringe (50ml syringe, No. 6-8 needle) with the liquid extracted, and stab into the vein vertically at a 40 ° angle. When the red liquid enters the syringe, clamp the upper rubber tube clamp to block the upper rubber tube, loosen the lower rubber tube clip, fix the puncture needle with one hand, and at the same time, use the other hand to fix the puncture needle.
Push the liquid medicine as fast as possible with one hand, so that the liquid medicine in the syringe flows through the pipeline system in the model.
The liquid medicine enters the waste liquid bottle through the lower rubber tube. After the injection, quickly pull out the needle. When there is red liquid entering the syringe, release the upper rubber pipe clamp and adjust the dripping speed of the intravenous infusion set, so that the red blood simulation liquid in the infusion bottle flows through the pipeline system in the model, and enters the waste liquid bottle through the lower rubber tube, and the puncture needle is fixed.
4. Transfemoral blood transfusion through the elbow and forearm
Step 1: the same as step 1 of drawing blood through the elbow forearm vein.
Step 2: Routine disinfection of the elbow and forearm skin.
Step 3: Select a suitable vein and puncture the vein with an injection needle. When the red liquid enters the vein, adjust the dropping speed of the venous transfusion set to make the red blood simulation liquid in the infusion bottle flow through the pipeline system in the model and enter the waste liquid bottle through the lower rubber tube.
Recommended For Your Project
VEVOR Phlebotomy Practice Kit, Dark Skin Arm Kit Manual


Reviews
There are no reviews yet.