Unlock the full potential of your VEVOR Egg Incubator with our comprehensive product manual download. This detailed guide is designed to make your experience with our Incubators for Hatching Eggs as smooth and efficient as possible.
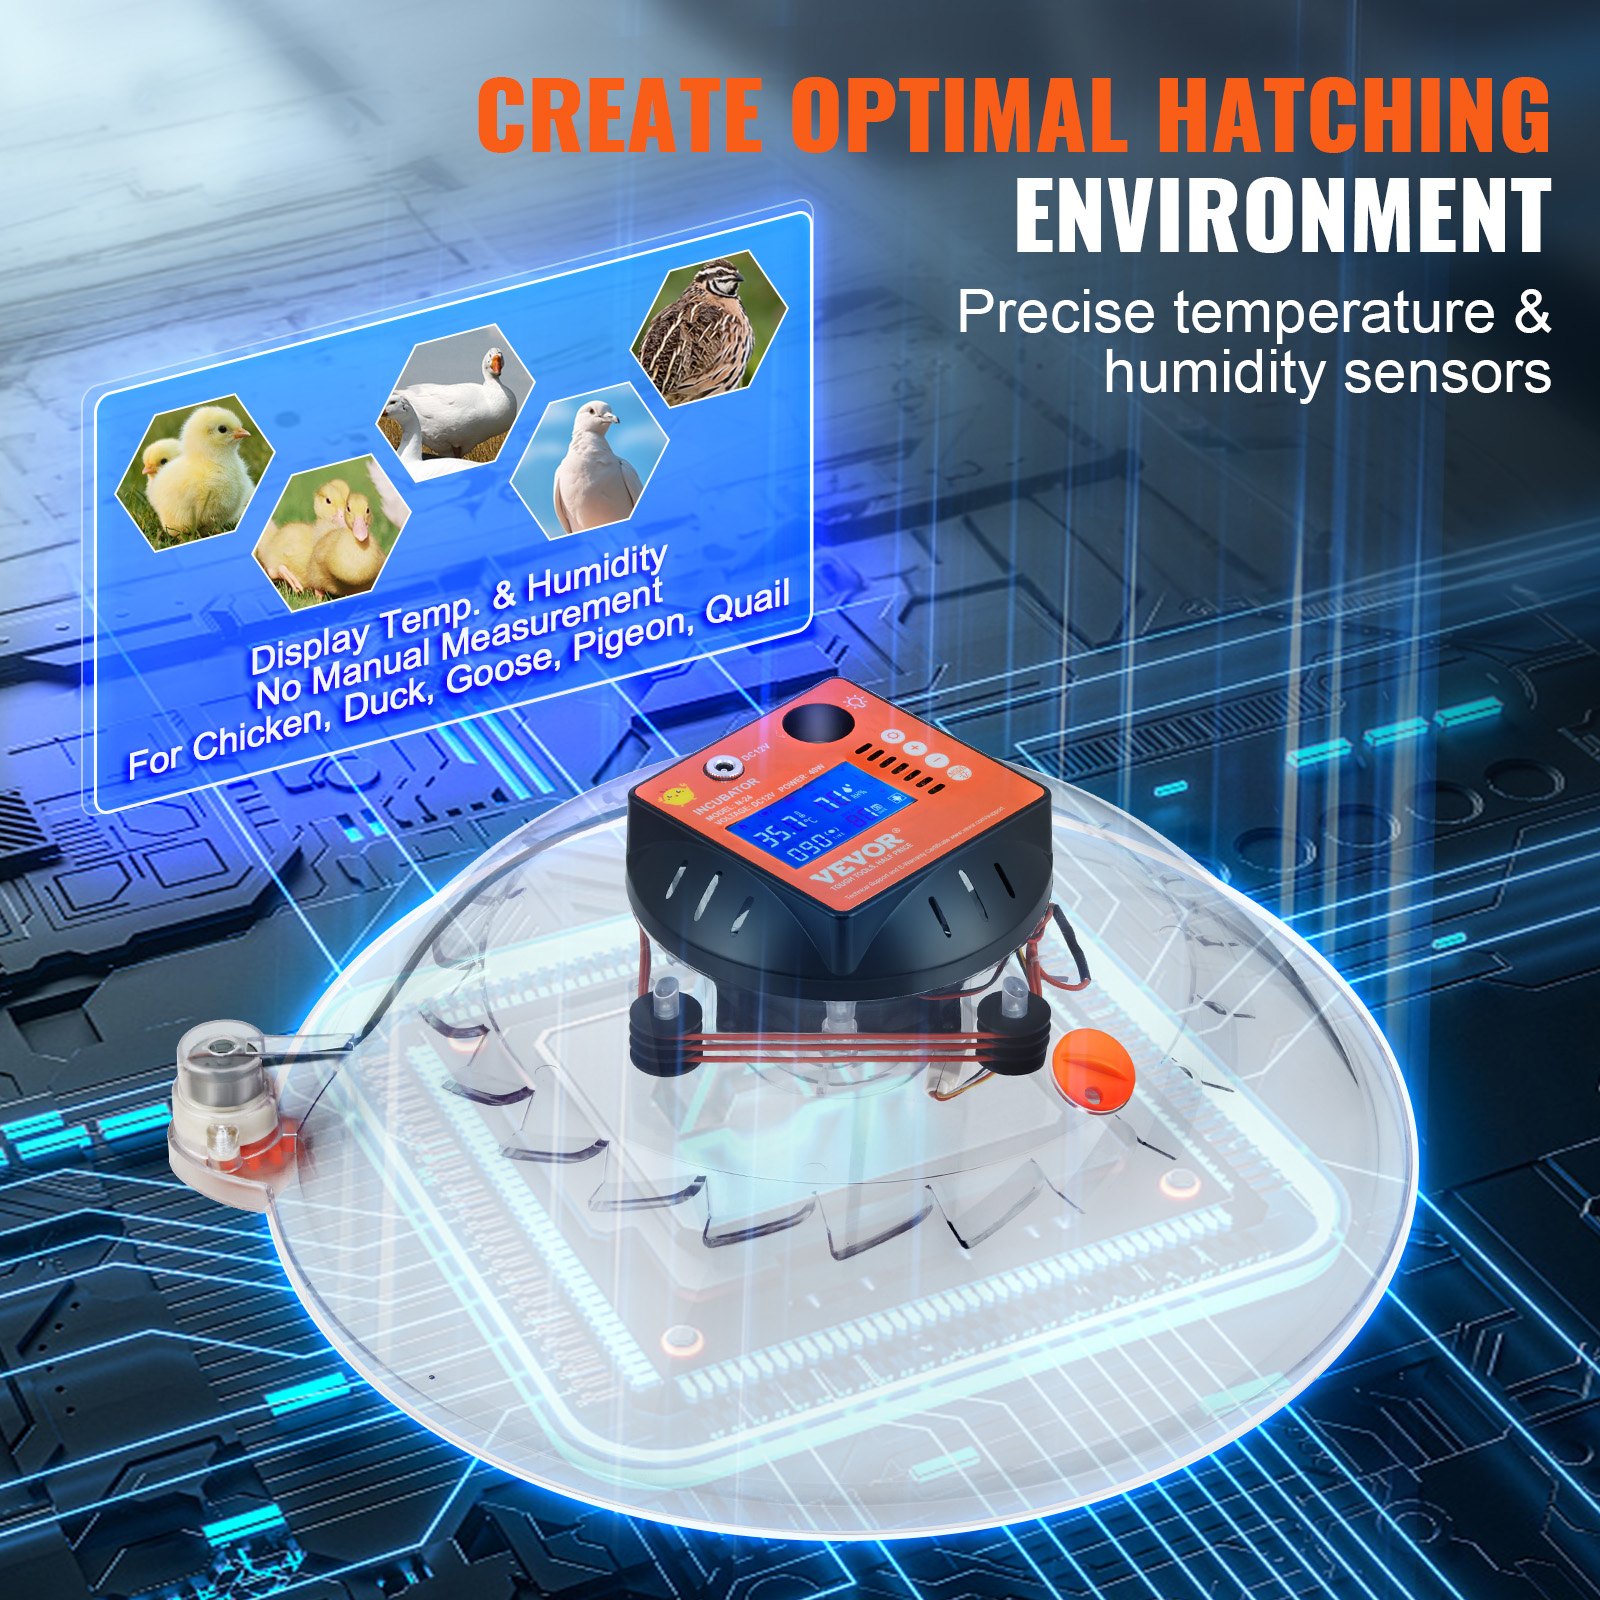
Whether you’re a beginner or an experienced poultry farmer, our manual provides step-by-step instructions for setup, troubleshooting, and optimization. Learn how to use the Automatic Egg Turner with Temperature and Humidity Control to ensure the best hatching conditions for your chicken, duck, or quail eggs.
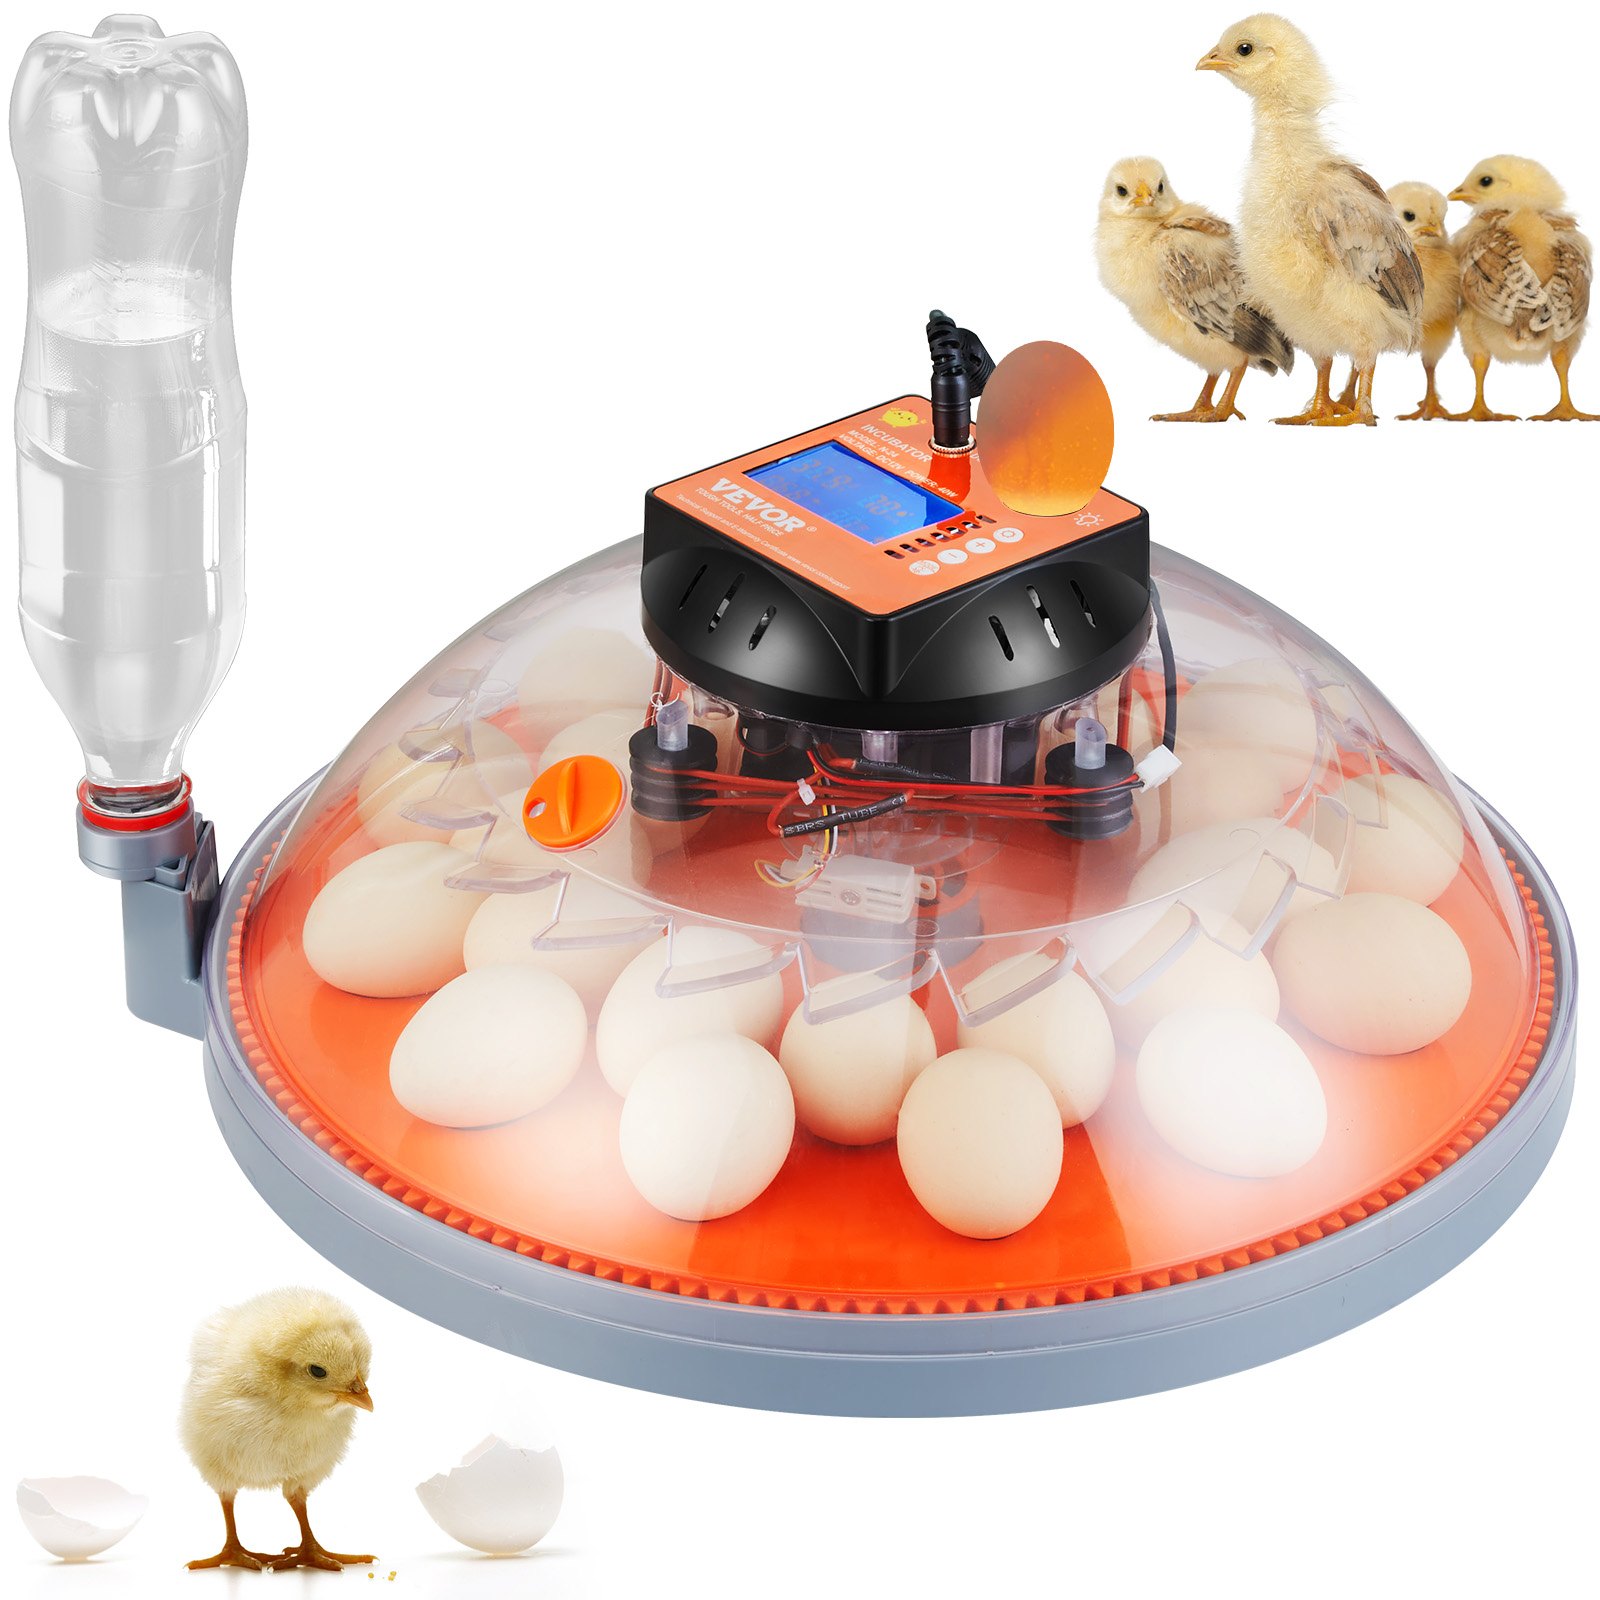
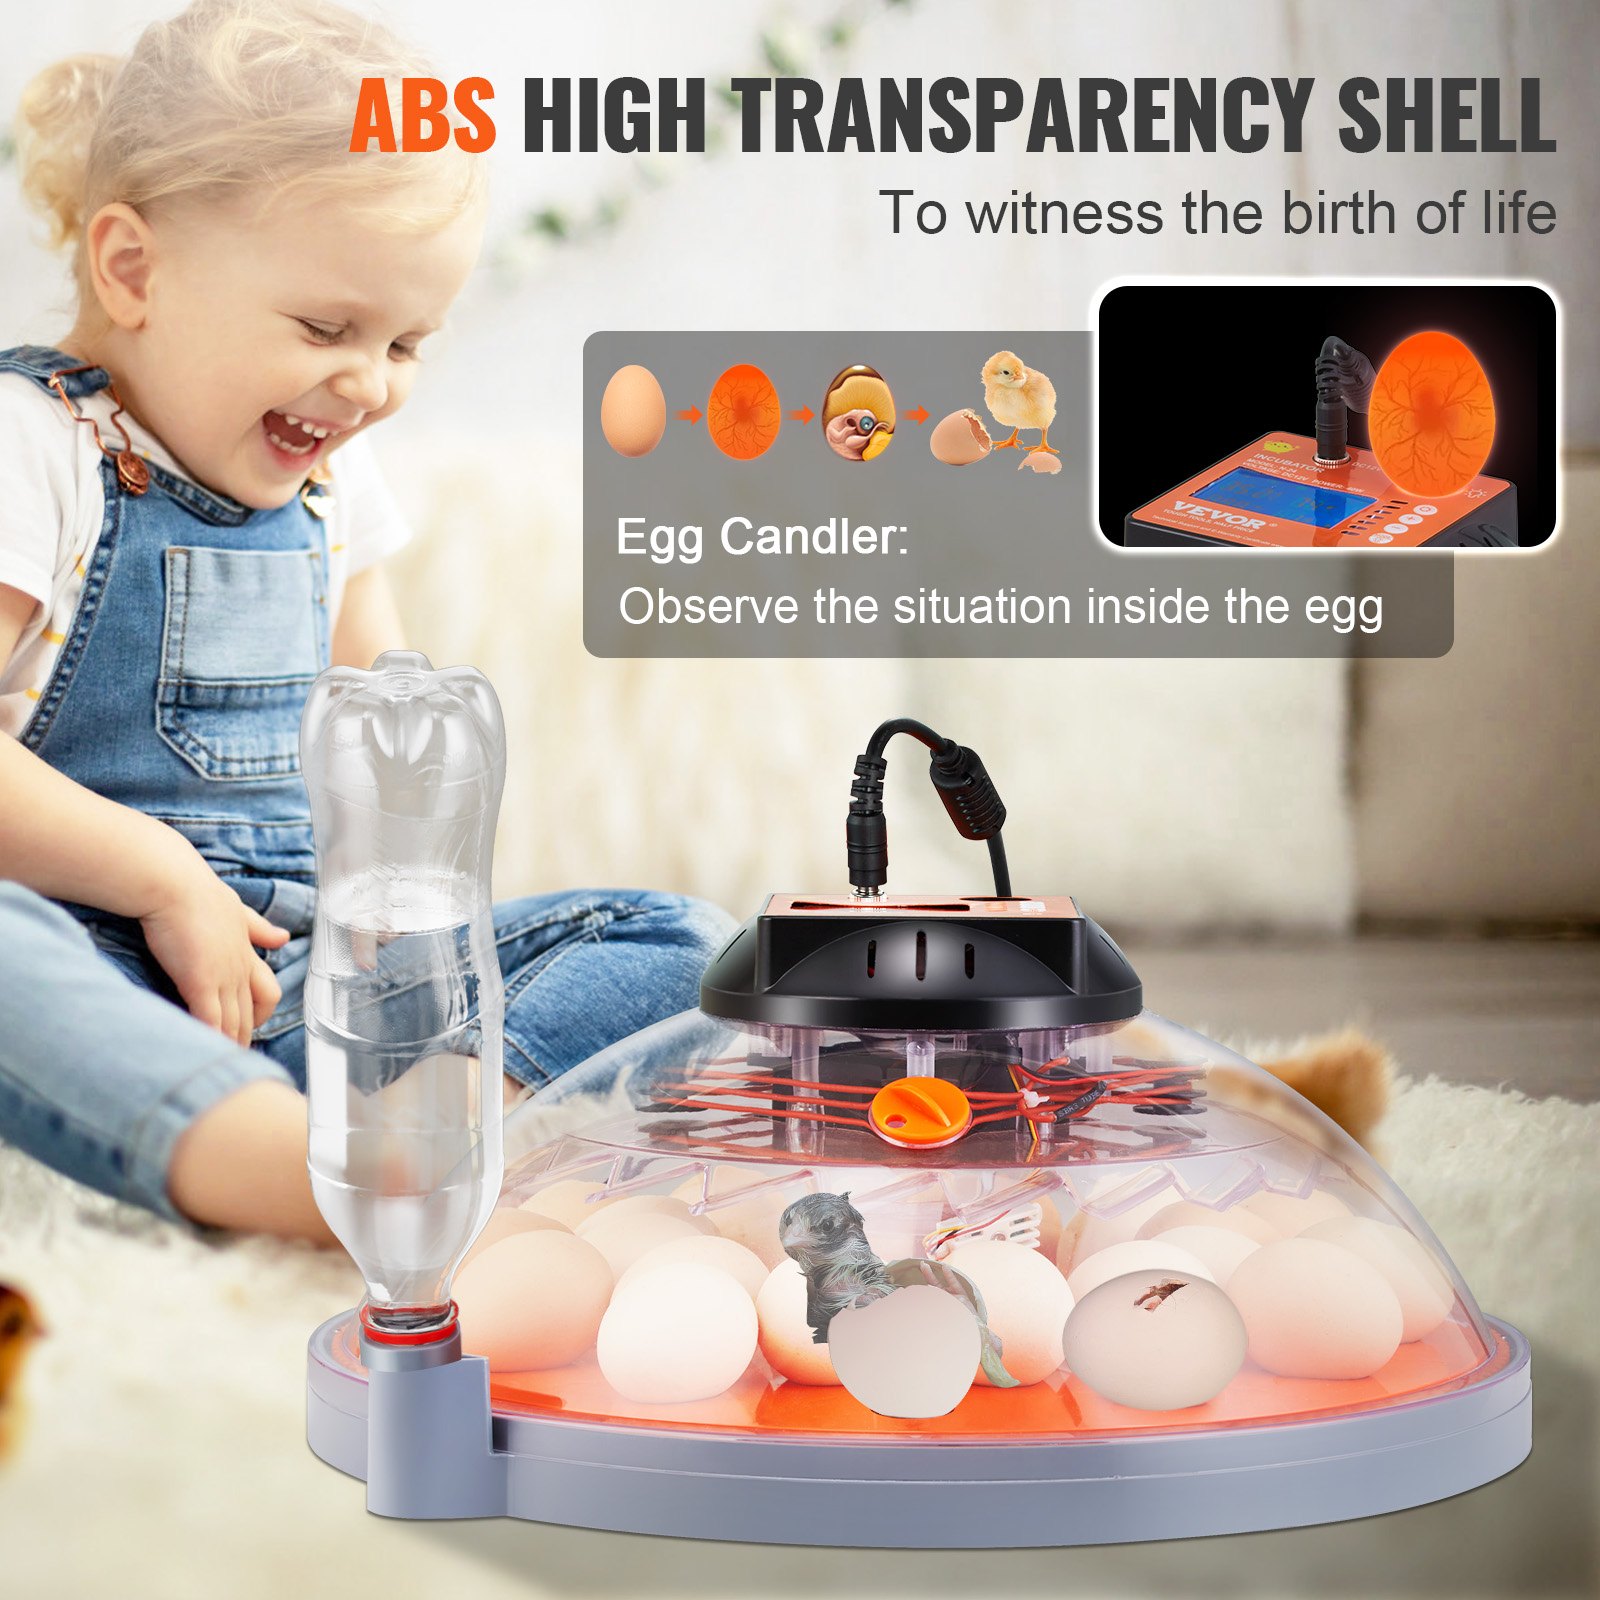
The manual also highlights the features of the 24 Eggs Poultry Hatcher, including its durable ABS Transparent Shell that allows you to monitor the hatching process easily. Download now and get the most out of your VEVOR Egg Incubator!
VEVOR Egg Incubator User Manual
Manual: N24 / N48
Egg Incubator Manual Important Safeguards
WARNING: Read all safety warning, instructions, illustrations, and specifications provided with this electrical appliance.
Failure to follow all instructions in the egg incubator manual may result in electric shock, fire, and/or serious injury.
- This product is connected to the power supply through an adapter.
- Do not use this product in areas exposed to water or other liquids.
- Unplug this product from the wall outlet before cleaning. Do not use liquid aerosol cleaners. Use a damp cloth for cleaning.
- Do not disassemble this product to reduce the risk of electric shock. Please take it to qualified service personnel when service or repair work is required. Opening or removing adapter covers, like the rear cover plate, may expose you to dangerous voltages or other risks. If the cover is damaged, the adapter may no longer be used.
- Do not operate the unit in areas with high temperatures or humidity, since it may prevent it from working correctly.
- This appliance can be used by children aged 8 years and above, and persons with reduced physical, sensory, or mental capabilities or lack of experience and knowledge, if they have been given supervision or instruction concerning using the appliance safely and understand the hazards involved.
- Children shall not play with the appliance.
- Children shall not make cleaning and user maintenance without supervision.
- For indoor use only.
Quick Menu
Product Profile
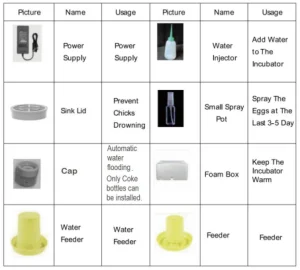
Parts names
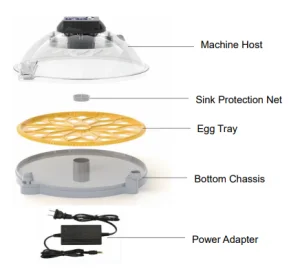
Egg Incubator Features
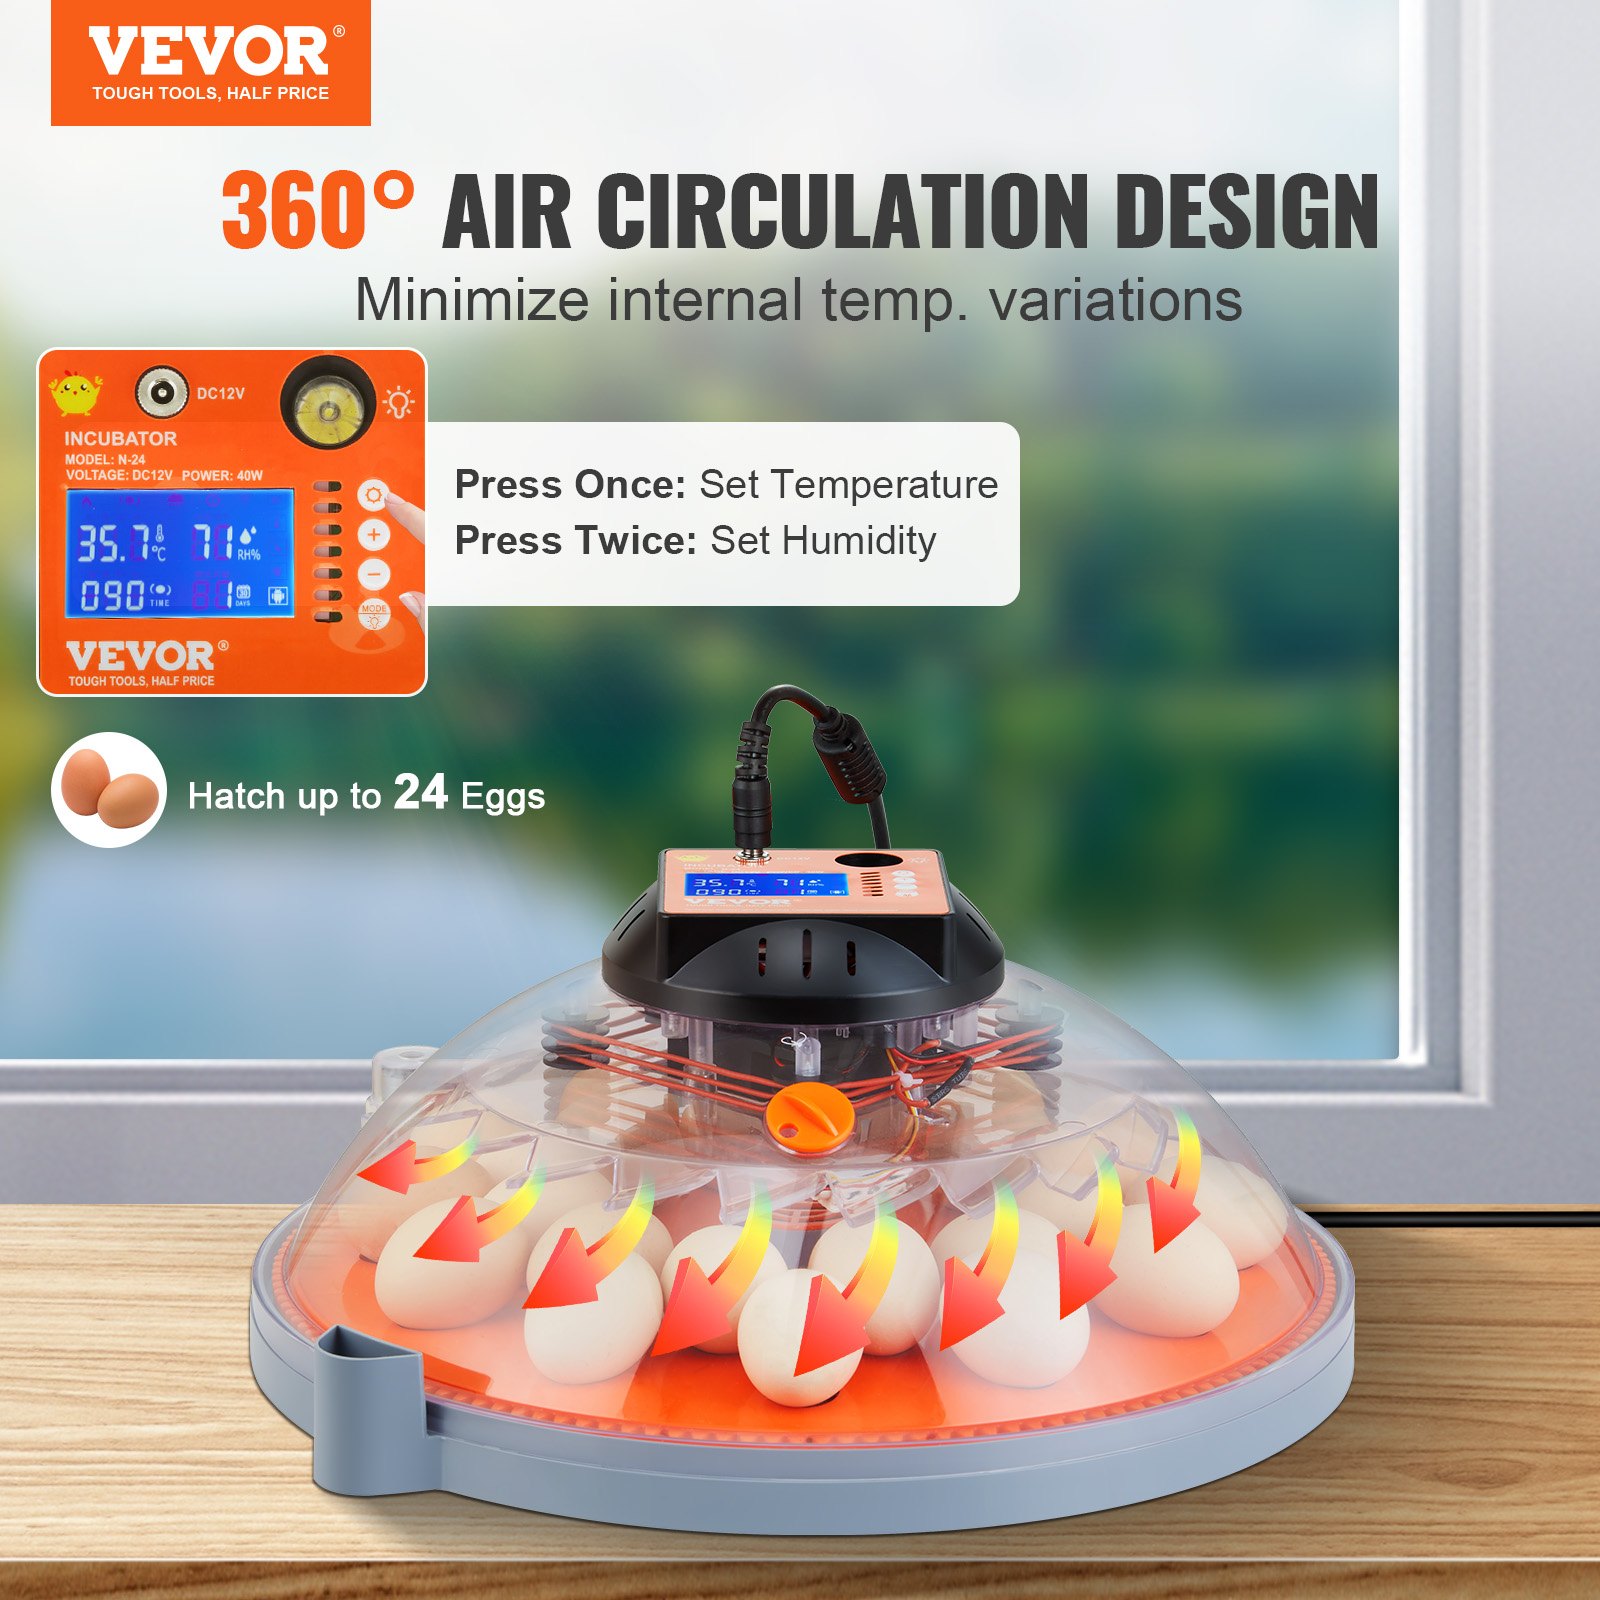
- This egg incubator uses a 360-degree air circulation design, ensuring consistent temperature throughout the machine. It is suitable for hatching all kinds of eggs, including parrot, crane, quail, duck, goose, and wild goose eggs.
- This egg incubator features automatic water intake, eliminating the need to open the cover to add water. This reduces temperature and humidity loss and improves the hatching rate.
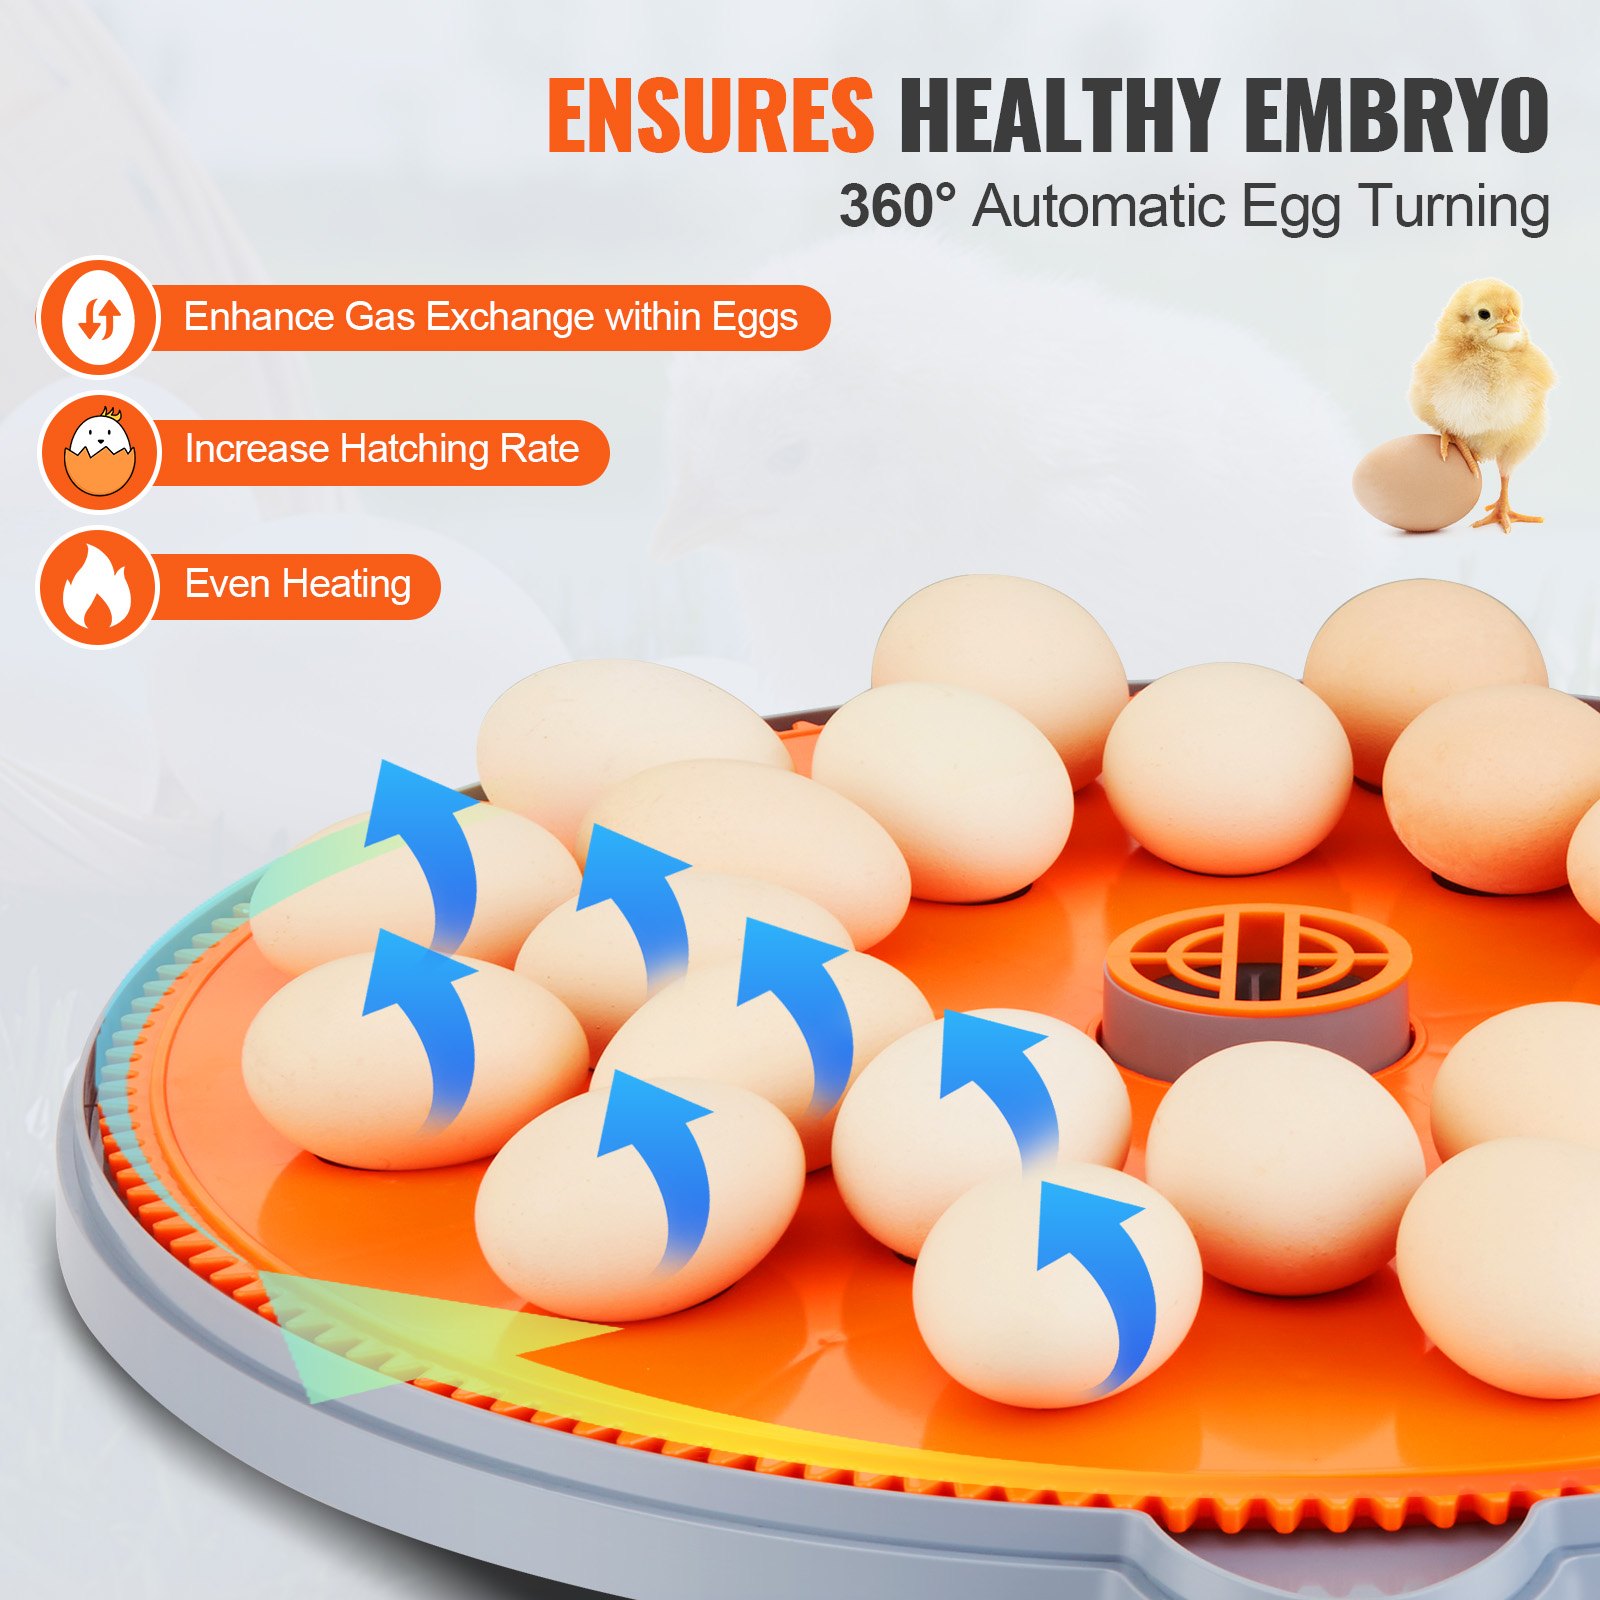
- The egg incubator also features a 360° egg-turning design.
- The egg tray is easy to remove and wash; this machine can be used to incubate and feed chicks.
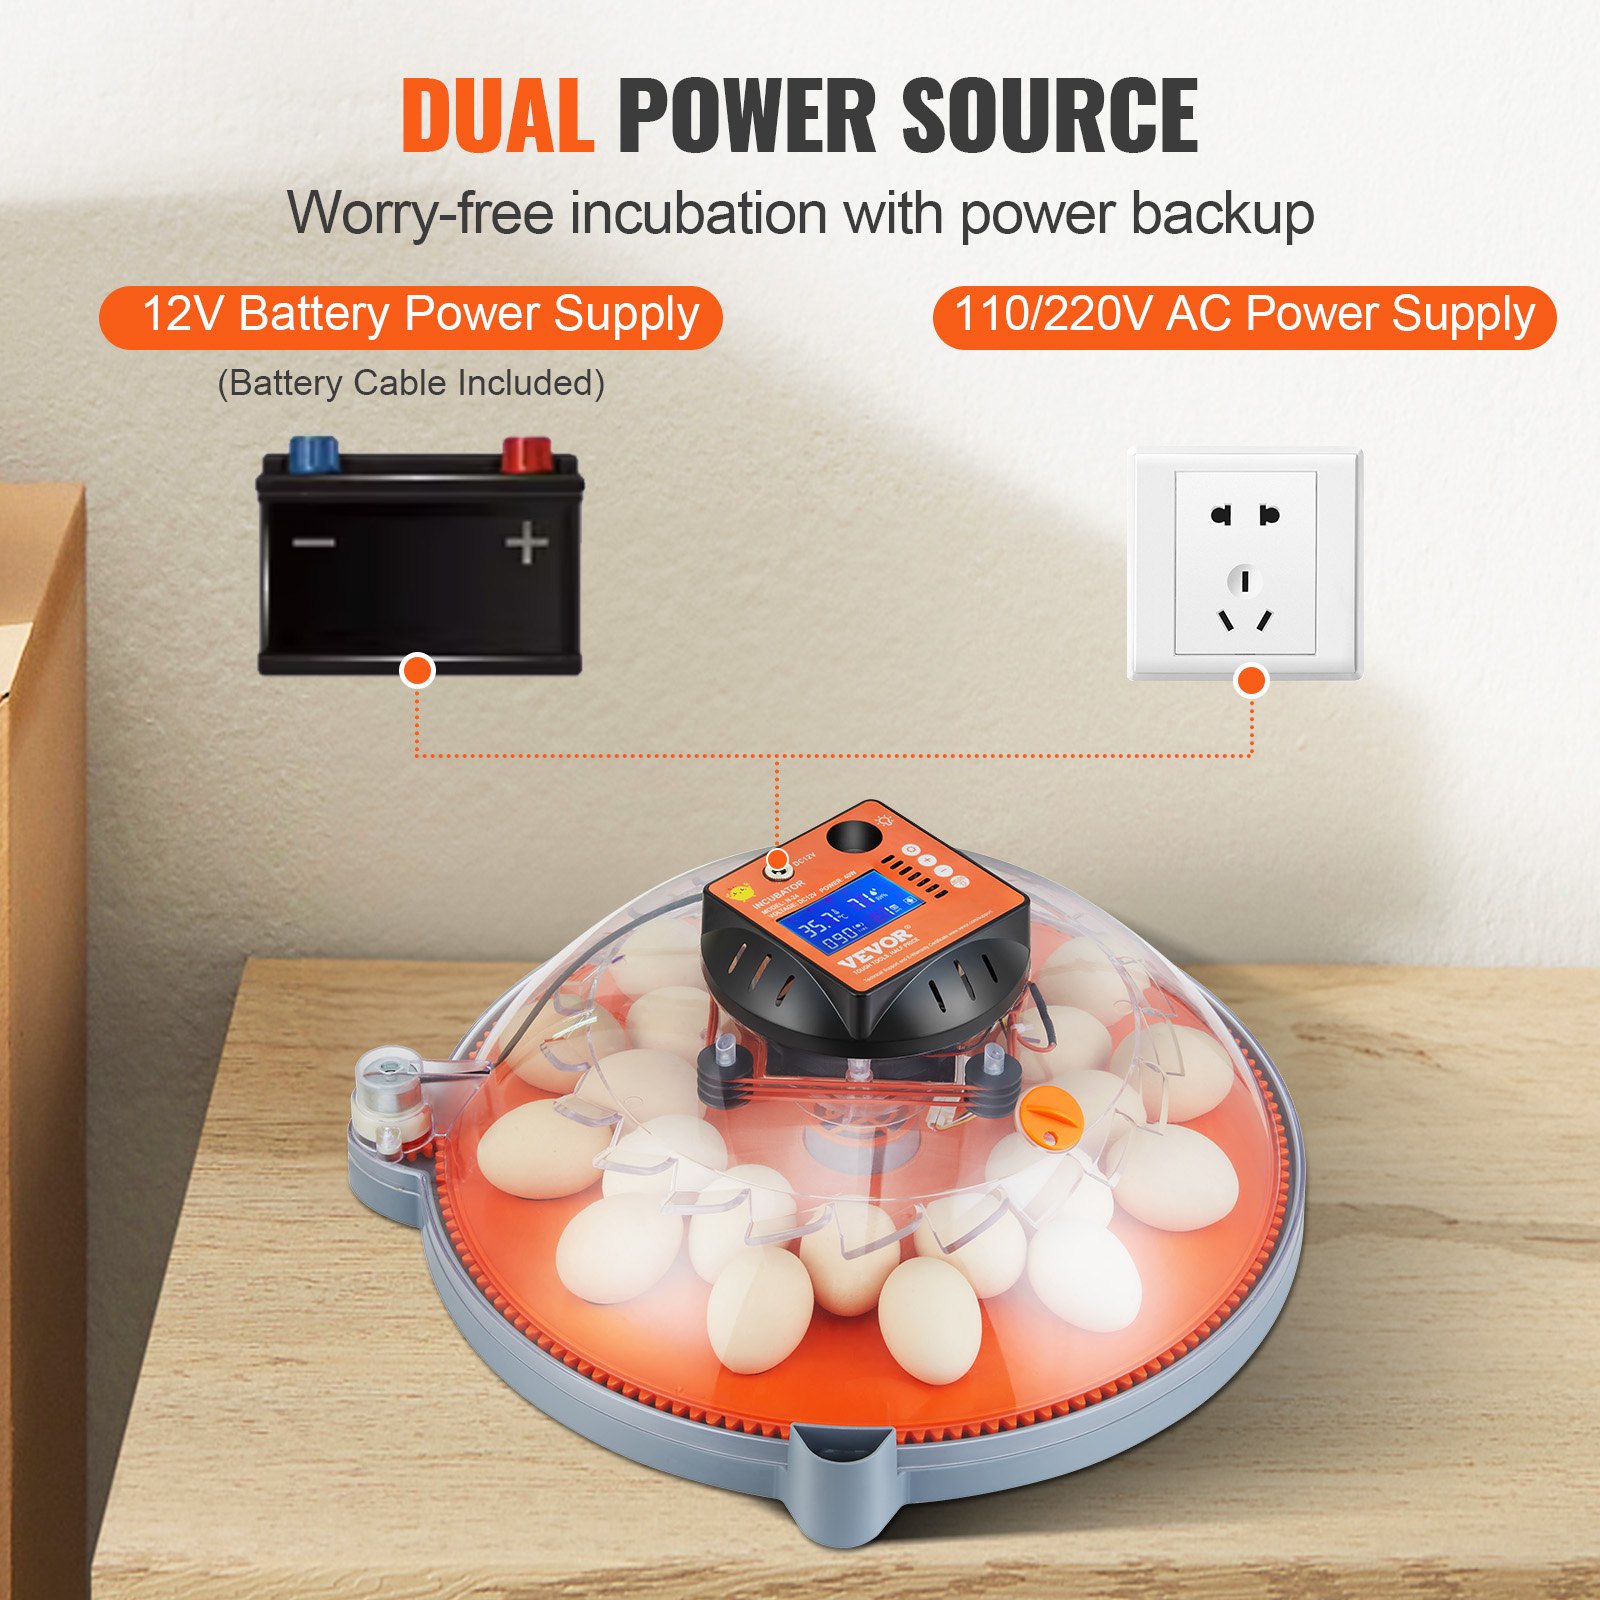
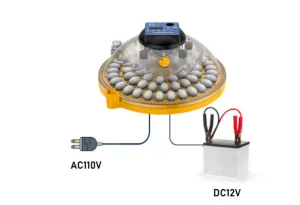
- In a power outage, this machine can be connected to a 12V battery using its dual-electric design.
Note: The machine is showing Celsius instead of Fahrenheit. This manual usesCelsius to teach customers how to use this egg incubator.
Product Description
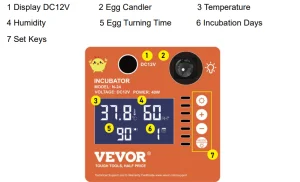
Control Panel Description
Temperature & Humidity
FCC Statement
This device complies with Part 15 of the FCC Rules. Operation is subject to the following two conditions:
(1)This device may not cause harmful interference, and (2) this device must accept any interference received, including interference that may cause undesired operation.
Installation Steps
Egg Incubator Function Introduction
1. Automatic Temperature Control Function
We created this machine to simplify the process of hatching eggs and improve the hatching rate. The factory temperature is set to 37.8 ℃(100.04℉). For users who have no incubation experience, this temperature is suitable for various poultry eggs. The proper range of working temperature is between 37.3 ℃ and 38.5 ℃ (99.14℉-101.3℉). If the temperature falls below 37 ℃(98.6℉) or goes above 38.6 ℃ (101.48℉), the machine will sound an alarm.
2. Automatic Egg Turning Function
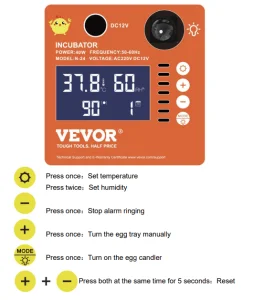
Press the “+” button to see the egg tray rotate. We have set it to turn the eggs every 90-120 minutes during hatching.
3. Egg Candling
Click the “Egg Candling” button to turn on the LED light, and press it again to turn it off. If the LED light is left on for more than 10 minutes, the system will automatically turn it off.
4. Turn off the Alarm Sound
The machine will alarm when it detects abnormal temperature or humidity levels. If you want to stop the alarm, simply press the “-” button.
5. Reset the Machine
To reset the machine, press and hold the “+” and “-” buttons for 5 seconds until “888” is shown on the LED Screen.
6. Set the Temperature
For experienced users or those with specific requirements, click the”Set” button and then press the “+” or “-” button to adjust the temperature. After setting the desired temperature, press the “Set” button again.
Accessories Instructions
Machine Start Test
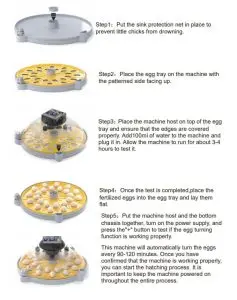
- Connect the motor line with the machine cover cable.
- Add 100ml of water in the outside sink.
- Plug the power in.
- This testing should last about 3-4 hours, and the temperature should reach about 37.8℃(±0.3℃ is okay), 100.04℉ (99.5-100.58℉is okay).
- Finish the test, and everything works well.
Note: The machine is showing Celsius instead of Fahrenheit. This manual is taking the Celsius to teach customers to use this egg incubator.
Direction for Hatching
Flow Chart Of The Incubation Process
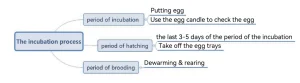
Steps of Incubation
Take hatching chicks as an example to explain the hatching method
Step 1: How to select the fertilized egg
- The fertilized eggs must be fresh eggs laid within 4-7 days. The temperature for keeping fertilized eggs is 10-15℃(50-59℉).
- The surface of the eggshell should have no deformities, cracks, or spots.
- To disinfect the eggs, there are two ways.
- The easy way is to clean the surface of the eggs with wet wipes(the bacteria from the eggshell may infect chicks).
The professional way: First, make a 0.5% solution of potassium permanganate. Then, soak the eggs for 1 minute, take them out, drain them, and rest them(rest the fertilized eggs for 12 hours, note the big end up), and then hatch. The potassium permanganate solution should be prepared and used immediately; otherwise, it will fail due to oxidation.
There is no need to be very careful when disinfecting fertilized eggs. Do not disinfect if the disinfection conditions can not be achieved, because improper disinfection may reduce the hatching rate. Just make sure the egg surfaces are clean and have no spots.
Step 2: Temperature and humidity
The whole incubation period can be incubated at the default temperature of 37.8℃; there is no need to adjust the temperature. Add about 100ml of water (make sure the chassis is full of water) daily, and directly add the chassis (as shown below) with water from the side. The humidity is only auxiliary.
Steps of Incubation
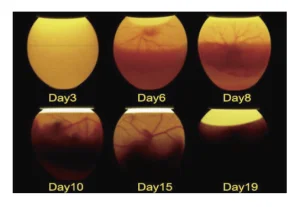
Step 3: Use the egg candle to check each egg
We need to check the development of eggs when the incubation is about 7days.
- Make sure you are in a dark environment.
- Press the “egg candle” button and light only one egg at a time. Take one egg out and put another egg in.
- If you can see bloodshot in the egg, it is well-developed; otherwise, it is not fertilized or weakly fertilized and can not hatch. Mark these unfertilized eggs.
This can improve the incubation rate.
Step 4:Spray the eggs (This is the hatching period)
When it comes to the 17th day (taking chicken eggs as an example), during the incubation period
- Add warm water at 38℃(100.4℉) to a small spray pot.
- Use the spray pot to spray the eggs three times; the fog falls on the eggs naturally.
- Do the spraying 3-5 times daily and close the machine’s cover after spraying. This will help the chicks break the shell successfully. Hatching the eggs also needs to spray warm water during the hatching period.
Step 5: Remove the egg trays (This is the hatching period)
When it comes to the 18th/19th day (taking chicken eggs as an example) during the incubation period:
- Stop turning the eggs, and remove the egg tray.
- Pay attention to the chicken’s broken shell, and spray warm water during this period to prevent the shell from breaking too hard.
Step6: Cool Down Chicks to 30℃ (86℉) and Brood Chicks
Take off the eggshell after the chicks break out of their shells. You can leave the chicks in the incubator for 24-48 hours.
Then, find a cardboard box and place an insulation lamp (not included) inside to cool the temperature down to 30℃(86℉) slowly. Chicks need to be kept warm for 7-10 days in general.
Important Information on the Egg Incubator
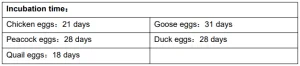
Different eggs have different incubation periods.
You need to add1day of time if you are hatching in the cool season.
All eggs’ incubation is divided into two stages: the early and late periods, with the late period being the last 3-5 days of the incubation period(when the chicks will break the shell) .
Things to do
- You need to remove the egg trays to stop the auto egg turning function, and pay attention to spraying the eggs.
- The white foam incubator can help with heat preservation when hatching eggs, so do not throw it away.
Common parameters
“+” button: Press this button to drive the egg tray to turn.
“-” button: Press this button to stop the alarm sound.
How to reset the machine’s settings
Press the “+” and “-” buttons for more than 5 seconds simultaneously.
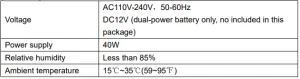
Egg Incubator Working Environment
Accessories Instructions
- Please remove the membrane cover from the machine before use if the machine has one.
- Check that all the power lines are correctly connected before starting the hatching process.
- There may be slight noise during the product’s use, as the fan in the machine is working, but this is a normal phenomenon, and there is no need to worry about it.
- Please clean the machine and empty all the water from it after the hatching process is finished.
- Please keep the instructions, foam boxes, and cartons in good condition.
- If you need to repair or replace any parts, please seek help from the VEVOR team via Amazon.
Analysis of Reasons for Low Incubation Rate
You need to break the egg if you want to analyze the reasons for low incubation rates.
- The chick is fully formed but can not escape the shell. The reason may be that the humidity was not coordinated well in the last 3-5 days, or the eggshell is too hard to break. We recommend spraying warm water on the egg more frequently to help the chick come out.
- The egg yolk is not fully absorbed, and the chick has not formed. The reason may be that the incubation temperature is not high enough or the fertilized egg is too old. We recommend using freshly fertilized eggs laid within the last 3-7 days.
- Too much mucus, and chicks did not form. The reason may be that the humidity was too high during the early incubation period. We recommend keeping the incubator adequately watered. It is not mandatory to add 100ml of water daily.
- For more questions, please seek help from VEVOR through Amazon.
Common Problems
1. The machine is not turning the egg
The machine automatically turns the egg every time, not all the time, to protect the egg and make the egg’s surface temperature more uniform. The motor speed is relatively slow. If you have any doubts, you can manually press the “+” button for detection, or use a marker to draw a line on the axis to observe.
We tested all of them before packing. If your incubator does not turn the egg, please check whether the motor and machine cover lines are well-connected, and check whether each roller is installed in place and placed flat.
If there is any problem, please get in touch with customer service immediately.
2. Power supply
Check whether the power adapter is connected. If not, you can try using a power adapter from a laptop, which is generally universal. If there is any problem, please contact customer service immediately
VEVOR Egg Incubator Accessories
Recommended For Your Project
VEVOR Egg Incubator Manual
Reviews
There are no reviews yet.