
Unlock the full potential of your VEVOR 26CC 6-in-1 Multi-Functional Trimming Tools with our comprehensive product manual. This detailed guide is designed to help you seamlessly set up, troubleshoot, and optimize your Gas Hedge Trimmer, Weed Eater, String Trimmer, Brush Cutter, Edger, and Pole Saw Chainsaw Pruner with Extension Pole.
With step-by-step instructions, clear diagrams, and expert tips, this manual ensures that both beginners and seasoned users can effortlessly navigate through the features and functionalities of these versatile tools.
Whether you’re tackling a simple backyard project or a more complex landscaping task, our user-friendly manual will be your go-to resource for achieving professional-grade results. Download now and elevate your gardening experience with ease and confidence.
VEVOR Gas Hedge Trimmer User Manual
Model: F26-B
Training
- Read the Trimming Tools instructions carefully. Be familiar with the controls and the proper use of the products.
- Never allow children or people unfamiliar with these instructions to use the Trimming Tools. Local regulations can restrict the age of the operator.
- Never operate the product while people, especially children, or pets are nearby.
- Keep in mind that the operator or user is responsible for accidents or hazards occurring to other people or their property.
- Persons under the influence of alcohol, drugs, or medication must not use the product.
- Do not operate the Trimming Tools if you are tired.
- Do not operate the trimming tools without guards or if damaged.
- Never use the Trimming Tools indoors.
- Some of these trimming tools produce toxic exhaust fumes when the engine is started.
- During operation, this product may generate dust, fumes, and smoke containing chemicals that affect your health. So be careful when using your product and protect yourself adequately.
- Also, avoid breathing exhaust fumes voluntarily; always hold the product properly during operation.
- Wear gloves and keep your hands warm.
Preparation
- These Trimming Tools can cause serious injuries. Read the instructions carefully for the correct handling, preparation, maintenance, starting, and stopping. Become familiar with all controls and the proper use of the products.
- Avoid operating the trimming tools while people, especially children, are nearby.
- Dress properly! Do not wear loose clothing or jewellery, which can be caught in moving parts. Use of sturdy gloves, non-skid footwear, and safety glasses is recommended.
- Store the product in a dry, clean place protected from direct sunlight only after the fuel tank has been emptied and the product is cleaned. The product must be stored inside only under these conditions.
- If the cutting attachment strikes any foreign object or the product starts making any unusual noise or vibration, shut off the power source and allow the product to stop.
Disconnect the spark plug connector from the spark plug and take the following steps:
• inspect for damage
• check for, and tighten, any loose parts
• have any damaged parts replaced or repaired with parts having equivalent specifications. - Check the cutting attachment stops turning when the engine idles.
Trimming Tools Operation
- This product should not be used for any purpose other than as described. National regulations can restrict the use of the product.
- While operating, always wear substantial footwear and long trousers. Do not operate the product when barefoot or wearing open sandals. Wear protective glasses or goggles.
- Ensure the area to be worked is clear from stones, sticks, wire, etc., or other objects that could damage the product.
- Thoroughly inspect the area where the product is to be used and remove all objects that the product can throw.
- Before using the product and after any impact, check for signs of wear or damage and repair as necessary.
- Never operate the product with damaged guards or without the guards in place.
- Keep hands and feet away from the cutting attachment at all times, and especially when switching on the engine.
- Never allow children or people unfamiliar with the instructions to use the product.
- Stop using the product while people, especially children, or pets are nearby.
- Only use the product in daylight or good artificial light.
- Keep your body upright during operation. Do not lean forward. Make regular breaks and change your working position to stay concentrated.
- Keep a firm footing and balance during operation. Always use the harness if provided.
- Stop the engine before
• cleaning or when clearing a blockage
• checking, carrying out maintenance, or working on the product
• adjusting the working position of the cutting attachment
• leaving the product unattended - Ensure that the product is correctly located in a designated working position before starting the engine.
- While operating the product, always ensure that the operating position is safe and secure.
- Do not operate the product with a damaged or worn cutting attachment.
- Keep the engine and silencer free of debris, leaves, and excessive lubricant to reduce fire hazards.
- Always ensure that all handles and guards are fitted when using the product. Never attempt to use an incomplete product or one equipped with an unauthorized modification.
- Always use two hands to operate a product fitted with two handles.
- Always be aware of your surroundings and stay alert for possible hazards that you may not be aware of because of the product’s noise.
- Be careful when handling any cutting attachment / sharp edge fitted for trimming the filament line length. Ensure a new filament trimming line is installed correctly before turning the product on.
- Always ensure that air vents are kept clear of debris.
- Only use cutting attachments as listed in the technical data within these instructions. The use of other attachments leads to hazards resulting in personal injuries and property damage.
- Never carelessly touch the product; you can burn yourself. While the product is in operation or shortly thereafter, its parts, such as the exhaust pipe, engine, and other surfaces, are extremely hot! Pay attention to the markings on the product.
Trimming Tools Maintenance and Storage
- Follow the maintenance and repair instructions for this product. Never carry out any modifications to the product.
- When the product is stopped for servicing, inspection, or storage, shut off the power source, disconnect the spark plug connector from the spark plug, and make sure all moving parts have come to a stop. Allow the product to cool before making any inspections, adjustments, etc.
- Maintain and inspect your product regularly. Check for misalignment or binding of moving parts, breakage of parts, and any other condition that may affect the product’s operation. If damaged, have the product repaired before use. Many accidents are caused by poorly maintained products.
- Improper maintenance will lead to the malfunction/ failure of the product.
- Inspect the product before each use, after dropping the product or exposing it to other impacts, to identify significant defects. Check for loose fasteners, fuel leaks, and damaged parts, such as cracks in the cutting attachment.
- Never change the preset rotary speed or the engine and product settings. Information about maintenance and repair is provided in this instruction manual.
- Store the product where the fuel vapour will not reach an open flame or spark. Always allow the product to cool down before storing.
- When not in use, store the product out of the reach of children.
- Use only manufacturers’ recommended replacement parts and accessories.
- Secure the product during transport to prevent loss of fuel, damage, and injury.
- Clean and maintain the product as described in these instructions before storage. Always use guards on cutting attachments when storing.
- Make sure that the air intake of the combustion engine is clear. Keep the air intake free of dust, dirt particles, gases, and fumes.
- Make sure that air circulation is adequate. The product must be easily accessible from all sides.
- Attach the transportation cover for the metal cutting attachment during transport and storage.
Additional safety warnings for the pole saw.
- Interrupt your work when you feel tired. Make regular breaks to regenerate. A moment of inattention while operating the product may result in serious personal injury.
- Keep all parts of the body away from the saw chain. Do not remove cut material or hold material to be cut when the saw chain is moving. Make sure the product is switched off when clearing jammed material.
A moment of inattention while operating the product may result in serious personal injury. - Hold the product by insulated gripping surfaces only, because the saw chain may contact hidden wiring. Saw chains contacting a “live” wire may make exposed metal parts of the product “live” and could give the operator an electric shock.
- Keep all parts of the body away from the saw chain when the product is operating. Before you start the product, make sure the saw chain is not contacting anything. A moment of inattention while operating products may cause entanglement of your clothing or body with the saw chain.
- Always hold the product with both hands on the handles. Holding the product with only one hand or on parts not intended for that increases the risk of personal injury and should never be done.
- Wear safety glasses and hearing protection. Further protective equipment for head, hands, legs, and feet is recommended. Adequate protective clothing will reduce personal injury by flying debris or accidental contact with the saw chain.
- Do not operate a product in a tree. Operation of a product while up in a tree may result in personal injury.
- Always keep proper footing and operate the product only when standing on a fixed, secure, and level surface. Slippery or unstable surfaces, such as ladders, may cause a loss of balance or control of the product.
- When cutting a limb that is under tension, be alert for springback. When the tension in the wood fibers is released, the spring-loaded limb may strike the operator and/or throw the product out of control.
- Use extreme caution when cutting brush and saplings. This slender material may catch the saw chain and be whipped toward to pull you off balance.
- Carry the product by the handles/poles with the product switched off and away from your body. When transporting or storing the product, always fit the guide bar cover. Proper handling of the product will reduce the likelihood of accidental contact with the moving saw chain.
- Follow instructions for lubricating, chain tensioning, and changing accessories. An improperly tensioned or lubricated chain may either break or increase the chance for kickback.
- Keep handles dry, clean, and free from oil and grease. Greasy, oily handles are slippery, causing loss of control.
- Cut wood only. Do not use the trimming tools for purposes not intended. For example: do not use them for cutting plastic, masonry, or non-wood building materials. Use of the product for operations different from intended could result in a hazardous situation.
- Pay attention to national and local regulations. National and local regulations may restrict the use of this product.
- Only use replacement guide bars and saw chains specified by the manufacturer or equivalent replacements. Using non-approved cutting attachments can result in personal injuries and damage to property.
- Before using the product and after any impact or dropping, check for signs of wear or damage and repair as necessary.
- Never remove or modify any guard or safety component. Ensure that guards and other safety components necessary for machine operation are in position, in good working condition, and properly maintained to avoid injuries.
- Remove branches in sections.
- Beware of dangerous operating positions as well as the risk of being struck by falling branches or by those that rebound after hitting the ground.
- Beware of overhead power lines. Do not use the product in any position that causes any part to come within 10 m of overhead electrical lines.
- Never cut in areas where the cutting attachment is out of sight.
Causes and operator prevention of kickback
- Kickback may occur when the nose or tip of the guidebar touches an object, or when the wood closes in and pinches the saw chain in the cut.
- Tip contact in some cases may cause a sudden reverse reaction, kicking the guide bar up and back toward the operator.
- Pinching the saw chain along the top of the guide bar may push the guide bar rapidly back towards the operator.
- Either of these reactions may cause you to lose control of the saw, which could result in serious personal injury. Do not rely exclusively on the safety devices built into your saw. As a product user, you should take several steps to keep your cutting jobs free from accidents or injury.
Kickback is the result of tool misuse and/or incorrect operating procedures or conditions and can be avoided by taking proper precautions, as given below:
- Maintain a firm grip, with thumbs and fingers encircling the product handles, with both hands on the saw, and position your body and arm to allow you to resist kickback forces. The operator can control kickback forces if proper precautions are taken. Do not let go of the product.
- Do not overreach. This helps prevent unintended tip contact and enables better control of the product in unexpected situations.
- Only use replacement bars and chains specified by the manufacturer. Incorrect replacement bars and chains may cause chain breakage and/or kickback.
- Follow the manufacturer’s sharpening and maintenance instructions for the saw chain. Decreasing the depth gauge height can lead to increased kickback.
Additional safety warnings for the pole hedge trimmer
- Keep all parts of the body away from the cutter blade. Do not remove cut material or hold material to be cut when blades are moving. Make sure the switch is off when clearing jammed material. A moment of inattention while operating the hedge trimmer may result in serious personal injury.
- Carry the hedge trimmer by the handle with the cutter blade stopped. When transporting or storing the hedge trimmer, always fit the cutting device cover. Proper handling of the hedge trimmer will reduce possible personal injury from the cutter blades.
- Hold the product by insulated gripping surfaces only, because the cutter blade may contact hidden wiring. Cutter blades contacting a “live” wire may make exposed metal parts of the product “live” and could give the operator an electric shock.
- Check the hedge for foreign objects before operation, e.g. wire fences. Take care that the cutting device does not come into contact with wire or other metal objects.
- Hold the product properly with both hands. Loss of control can cause personal injury.
Fuel handling
- Always switch the product off, disconnect the spark plug connector, and let the product cool down before refueling it. Fuel and fuel vapor are highly flammable. Take care when handling fuel. Never smoke when you’re refueling the product. Do not refuel the product if there is an open fire in the vicinity!
- Always use suitable aids such as funnels and filler necks. Do not spill any fuel on the product or its exhaust system. There is a risk of ignition. Remove spilled fuel carefully from all parts of the product. Any residue that may be present must have been completely volatilized before the product is put into operation!
- Never refuel indoors.
- Never use the product in environments where there is a risk of explosion. Exhaust gases and fuel fumes are noxious. Fuel fumes can ignite.
- Never breathe in any fuel fumes when refueling. Never fill the tank in enclosed spaces, such as basements or sheds. There is a risk of poisoning and explosion!
- Avoid skin contact with petrol.
- Do not eat or drink while you are refueling the product. If you have swallowed petrol or oil, or if petrol or oil has got into your eyes, then seek the advice of a doctor immediately.
- Close the tank lid immediately after filling the tank. Make sure that it is properly closed.
- Never use the product without an air filter.
- Fuel vapour pressure may build up inside the fuel tank depending on the fuel used, weather conditions, and the tank venting system. To reduce the risk of burns and other personal injuries, remove the fuel cap carefully to allow any pressure build-up to release slowly.
- Be aware of fire risks, explosion, and inhalation risks.
- Do not smoke while operating the product, handling fuel, or near fuel.
- Ensure the spark plug lead is secured; a loose lead may cause electrical arcing that could ignite combustible fumes and cause a fire or explosion.
- Check regularly for leaks from the fuel cap and fuel lines.
- Use caution when handling fuel. To avoid any accidental fires, move the product at least 3 metres (10’) from the fuelling point before starting the engine.
- Tighten the fuel cap thoroughly after refilling the fuel tank.
- Do not operate the product if it is leaking fuel. Do not remove the fuel tank cap while the engine is running.
- Use only an approved container.
- Do not store cans of fuel or refill the fuel tank in any place where there is a boiler, stove, wood fire, electrical sparks, welding sparks, or other sources of heat or fire that might ignite the fuel.
- If any fuel spillage occurs during refueling, use a dry rag to wipe up spills and allow remaining fuel to evaporate before turning the engine on again.
- If you have spilled fuel on yourself or on your clothes, change your clothes and wash any part of your body that has come in contact with fuel before turning the engine on again.
- If fuel is ignited, put out the fire with a dry powder fire extinguisher
- If the fuel tank is drained, this should be done outdoors. Vibration and noise reduction.To reduce the impact of noise and vibration emission, limit the time of operation, use low-vibration and low-noise operating modes, and wear personal protective equipment.
Take the following points into account to minimize the vibration and noise exposure risks:
- Only use the product as intended by its design and these instructions.
- Ensure that the product is in good condition and well-maintained.
- Use correct attachments for the product and ensure they are in good condition.
- Keep a tight grip on the handles/gripping surface.
- Maintain this product by following these instructions and keep it well-lubricated(where appropriate).
- Plan your work schedule to spread any high-vibration tool use across a longer period.
- Prolonged use of the product exposes the user to vibrations that can cause a range of conditions collectively known as hand-arm vibration syndrome (HAVS), e.g., fingers going white, as well as specific diseases such as carpal tunnel syndrome.
– To reduce this risk when using the product, always wear protective gloves and keep your hands warm.
The symptoms of HAVS include any combination of the following:
Tingling and numbness in the fingers
Not being able to feel things properly
Loss of strength in the hands
Fingers going white (blanching) and becoming red and painful on recovery (particularly in the cold and wet, and probably only in the tips at first).
Seek medical advice immediately if you experience such symptoms.
The European Physical Agents (Vibration) Directive has been brought in to help reduce hand-arm vibration syndrome injuries to users of products with vibration emission. The directive requires manufacturers and suppliers to provide indicative vibration test results to enable users to make informed decisions as to the period of time a product can be used safely on a daily basis and the choice of tool.
Emergency
Familiarise yourself with the use of this product by using this instruction manual. Memorize the safety directions and follow them to the letter. This will help to prevent risks and hazards.
- Always be alert when using this product, so that you can recognize and handle risks early. Fast intervention can prevent serious injury and damage to property.
- Stop the engine and disconnect the spark plug connector if there are any malfunctions. Have the product checked by a qualified professional and repaired, if necessary, before you operate it again.
- In case of fire, stop the engine and disconnect the spark plug connector.
Take fire-extinguishing measures immediately if the product switch is no longer accessible.
Residual risks
Even if you are operating this product in accordance with all the safety requirements, potential risks of injury and damage remain. The following dangers can arise in connection with the structure and design of this product:
- Health defects can result from vibration emission if the product is used over long periods or not adequately maintained.
- Injuries and damage to property due to broken cutting attachments or the sudden impact of hidden objects during use.
- Danger of injury and property damage caused by flying and thrown objects.
- Burns, if touching hot surfaces.
- Kickback.
Trimming Tools Symbols
On the product, the rating label, and within these instructions, you will find, among others, the following symbols and abbreviations. Familiarise yourself with them to reduce hazards like personal injuries and damage to property.


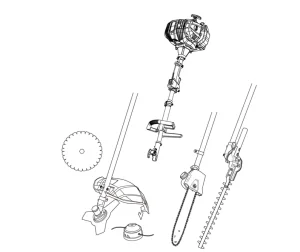
Parts Lists: Trimming Tools


Unpacking
- Unpack all parts and lay them on a flat, stable surface.
- Remove all packing materials and shipping devices if applicable.
- Make sure the delivery contents are complete and free of any damage. If you find that parts are missing or show damage, do not use the product, but contact your dealer. Using an incomplete or damaged product represents a hazard to people and property.
- Ensure that you have all the accessories and tools needed for assembly and operation. This also includes suitable personal protective equipment.

Trimming Tools Assembly
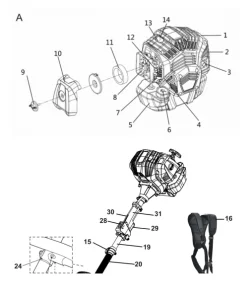
Front handle
- Remove the pre-assembled bolt (A25) and nut (A26) from the handle bracket (A24) and keep them handy (Fig. 1).
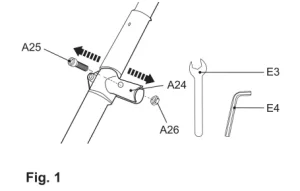
- Insert the shaft end of the front handle(A 27) into the bracket opening. Adjust the front handle by twisting it to align the mounting holes.
- Secure the front handle in position with bolt(A 25) and nut t(A26) (Fig. 2).

Pole assembly
- Choose the desired tool attachment according to the intended operation.
- Remove the pre-attached protection cap from the lower pole(B1/ C1/D1)(Fig.3, step 1).
- Loosen the locking knob(A 22), but don’t entirely remove it (Fig.3, step 2).
- Align and insert the lower pole(B 1/C 1/D 1) into the locking sleeve(A21), while pulling the spring bolt (A23) (Fig.3, steps 3 and 4).
- Slightly twist the lower pole to align the hole with the spring bolt (A23). Release the spring bolt afterward to secure the lower pole in position. Ensure the spring bolt snaps in the hole (Fig. 3, step 5).
- Tighten the locking knob(A 22) to secure the connection(Fig.3, step 6).

Brush Cutter and Grass Trimmer
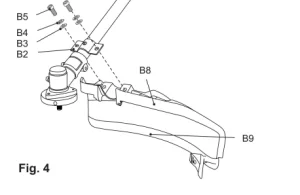
1. Guard
The guard(B8) of the product consists of two pieces: the guard (B8) and guard extension (B9).
- Remove the pre-assembled bolts from the guard.
- Align the mounting holes and assemble the guard (B8) onto the bracket (B2).
- Secure the connection with bolts (B5), spring washers ( (B4) ) and washers(B3) ) using the tool (E4) .(Fig.4).
2. Cutting options
Assemble the relevant cutting attachment to suit the intended operation.
NOTE: The thread on the spindle is left-hand. Turn clockwise to remove and turn anticlockwise to secure the respective cutting attachment.
3. Cutter blade
WARNING! Always wear gloves when handling the cutter blade. Wear gloves while removing the blade cover(B 17) and take care not to come in contact with the cutter blade (B 14) while pulling the two halves apart.
- Rotate the backing flange (B13) until its hole is aligned with the hole on the gear head (B11).
- Insert the hex key (E4) into the holes to lock the spindle (B12).
- Loosen the nut (B16) and remove it together with the locking flange (B15). Do not remove the backing flange (B13).
- Remove the blade cover (B17) by separating the two halves.
- Fit the cutter blade (B14) onto the spindle (B12). Ensure the cutter blades are flush on the extruded ring on the backing flange (B13).
- Place the locking flange (B15) onto the cutter blade (B14).
- Tighten the nut (B16) to secure the cutter blade counterclockwise while locking the spindle (B12) with the hex key (E5). Remove the hex key afterward(Fig. 5).

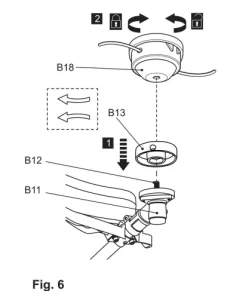
4. Trimming head
- Rotate the backing flange (B13) until its hole is aligned with the hole on the gear head (B11).
- Insert the hex key (E5) into the holes to lock the spindle (B12).
- Loosen the nut (B16) clockwise and remove it together with the locking flange (B15). Do not remove the backing flange (B13).
- Screw the trimming head (B18) counterclockwise onto the spindle (B12) and tighten it by hand while locking the spindle (B12) with the hex key (E5). Remove the hex key afterward (Fig. 6).
Pole Saw
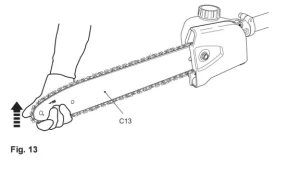
Assemble the guide bar (C13) and saw chain (C12) before operation.
1. Chain and guide bar assembly
- Use only a guide bar (C13) and saw chain (C12) according to the technical data of the pole saw.
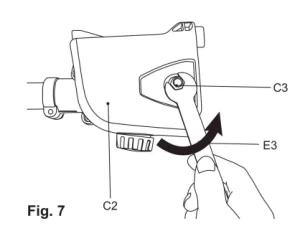
- Place the product on a suitable flat surface with the side cover (C2) facing upwards.
- Unscrew in a counter-clockwise direction the retaining nut (C3) with the assembly wrench (E3) and then remove the side cover (C2). (Fig.7)
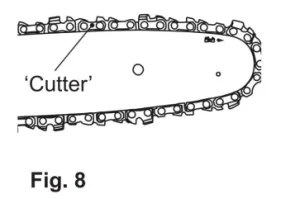
- Spread the saw chain (C12) out with the cutting edges of the chain pointing in the direction of rotation. Slide the saw chain (C12) into the groove around the guide bar (C13). Ensures the saw chain (C12) is installed in the correct direction of rotation. (Fig.8)
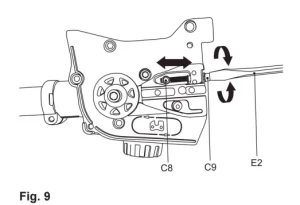
- Use the screwdriver end of the multi tool (E2) to turn the chain tension screw(C9) in a counter-clockwise direction, then move the tension pin (C8) toward the left. If the chain tension screw (C9) is turned in a clockwise direction, then the tension pin (C8) is moved towards the right. (Fig.9)
- Align the saw chain (C12) and the guide bar (C13) assembly with the drive sprocket(C4) and the mounting bolt (C6). Lay the saw chain (C12) around the drivesprocket (C4) and then lower the guide bar (C13) to install it to the mounting bolt (C6).
Make sure the tension pin is inserted into the upper hole on the guidebar (C13). (Fig.10)

- The saw chain movement is as indicated by the arrow (Fig. 11).
Make sure the saw chain (C12) is properly placed over the sprocket wheel (C15)of the guide bar (C13). (Fig.11)

- Refit the cover (C2), fit the rear of the cover, then the front, ensure the pin is located in position. Slightly tighten the remaining nut (C3) by using the assembly wrench(E3)(Fig. 12).
Do not tighten the nuts completely, as saw chain tensioning is required first.

2. Saw chain tensioning
Always check the saw chain tension before use, after first cuts, and regularly during use, approximately every five cuts. After the initial operation, new chains can lengthen considerably.
This is normal during the break-in period, and the interval between future adjustments will lengthen quickly.

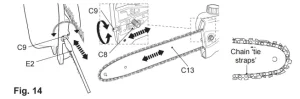
- Screw the tension screw (C9) clockwise or counterclockwise to adjust the tension pin (C8) / guide bar (C13) until the chain’s tie straps are just touching the bottom edge of the guide bar (Fig. 14).
3. Tension test
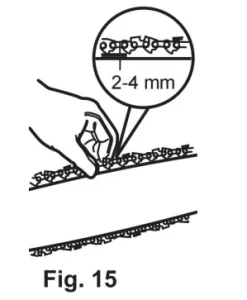
- Check the chain tension by lifting the saw chain (C12) with one hand against the weight of the product. The correct chain tension is achieved when the saw chain can be lifted by approximately 2-4 mm from the guide bar (C13) in the centre (Fig. 15).
- Adjust the tension if you find that the chainsaw is too loose or too tight.
- Pull the saw chain (C12) along the top of the guide bar (C13) by hand from one end to the other, several times. The chain should feel tight but still move freely.
4. Chain lubrication

- Place the product on a stable, level surface with the oil tank cap (C11) facing upward. We recommend laying a non-flammable sheet under the product.
- Unscrew and remove the oil tank cap (C11) (Fig. 16), then add suitable lubricant into the tank. We recommend using environmentally-friendly chain oil specifically intended to be used with this product.

- Do not overfill and leave approximately 5 mm of space to the lower edge to allow the lubricant to expand (Fig. 17).
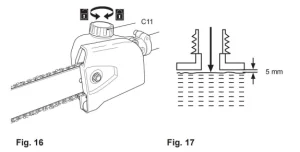
- Wipe up spilled lubricant with a soft cloth and refit the oil tank cap(C11).

- Check the oil level before start-up and regularly during operation
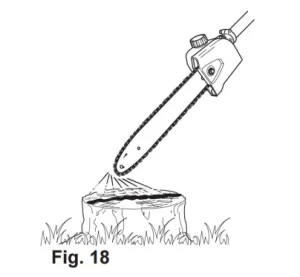
5. Checking

- Check the chain lubrication before each use.
- Make sure the guide bar (C13) and the saw chain (C12) are in place when you check the oil delivery.
- Start the engine; keep it running, and check if the chain oil is delivered as shown in the figure (Fig. 18).
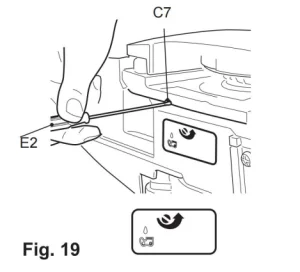
- Turn the adjustment screw (C7) of the oiler on the bottom of the product to adjust the chain oil flow with the multi tool (E2) (Fig. 19).
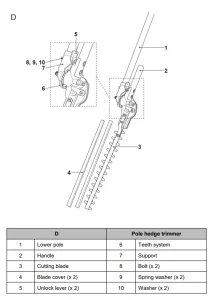
Pole Hedge Trimmer
1. Blade head
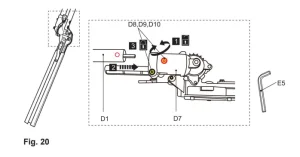
- Loosen the bolts (D8) using tool (E5) until the lower pole(D1) can be inserted into the support (D7) (Fig. 20, step 1). Do not remove the bolts(D8), spring washers (D9), and washers (D10) from the support (D7).
- Align and insert the lower pole (D1) into the support (D7) with a twist motion to the stop until the mounting hole is aligned with the bolt. Use the arrow marking to help with the alignment. (Fig. 20, step 2).
- Tighten the bolts (D8) to secure the lower pole in position(Fig. 20, step 3).
- Hold the handle (D2) with the left hand and the lower pole (D1) with the right hand.
- Press the unlock levers (D5) to disengage the teeth system(D6) and adjust the blade head to the desired position (Fig. 21).
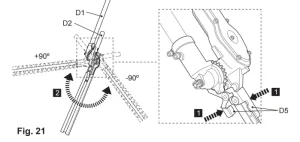
- Release the unlock levers (D5) afterward. Ensure the teeth system(D6) is securely engaged (Fig. 22).

2. Blade cover
- Remove the blade covers (D4) from the blade (D3) before operation(Fig. 23).
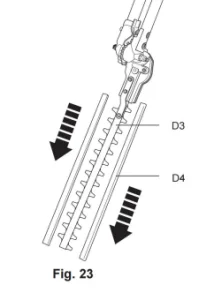
- Refit the blade covers when the product is not in use, e.g., storage and transportation.
Fuel and engine oil
This product is equipped with a 2-stroke engine, the fuel and oil tank are combined, and it is essential to fill a fuel-oil mixture before operating this product. Observe the technical specifications for suitable fuel and engine oil.
- Place the product on a stable, level surface. We recommend laying a non-flammable sheet under the product.
- Avoid spilling and overfilling the tanks.

- Always dispose of fuel, used oil, and soiled objects according to local regulations(see chapter “Recycling and disposal”).
Fuel

- Mix a regular-grade unleaded petrol and a quality engine oil for air-cooled 2-stroke engines in the fuel mixing container (E1) (Fig. 24).
- Petrol and oil have to be filled in the respective sides accordingly to the scale markings on the container (E1). For example, fill petrol to the scale marking “5” first, and then fill 2-stroke oil to the scale marking “5”. This indicates a correct ratio of 40:1 when using the scale 40:1. By tilting the container, the oil falls into the petrol. Shake the container thoroughly to make the mixture.
- Use an anti-oxidant-added quality oil expressly labeled for air-cooled 2-stroke engine use (JASO FC GRADE OIL or ISO EGC GRADE). Do not use BIA or TWC (2-stroke water-cooling type) mixed oil.
- The mixing ratio for petrol: oil is 40:1.


- Always use clean, fresh unleaded petrol. Purchase fuel in quantities that can be used within 30 days.
- Avoid getting dirt, dust, or water in the fuel tank.
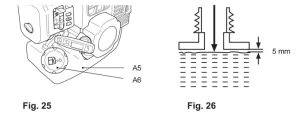
- Unscrew and remove the fuel tank cap (A6) (Fig. 25).
- Fill the tank with correctly mixed fuel/oil using a fuel funnel fitted with a filter to avoid debris entering the tank. Do not overfill. Leave a minimum of space between the top of the fuel and the inside edge of the tank to allow for expansion(Fig. 26).
- Wipe any spilled fuel with a soft cloth and reattach the fuel tank cap.
Trimming Tools Operating Controls


Trimming Tools: Intended Use
This petrol tool 4 in 1 FP4MTP33 is rated at 1 kW.
The product is multifunctional and can be used as a brush cutter, grass trimmer, pole saw, and pole hedge trimmer according to the intended operation with the desired tool attachment.
Brush cutter: with the cutter blade attached, the product is intended to cut heavier weeds, brush and similar vegetation.
Grass trimmer: with the trimming head attached, the product is intended to cut smaller types of weeds, lawn grass, or similar soft vegetation. The product should not be used to cut unusually thick grass or vegetation, wet grass, or to shred leaves, etc.
Pole saw: with the saw chain/guide bar assembly attached, the product is intended for cutting limbs with a thickness of max. 200 mm.
It must not be used for cutting other materials, such as plastic, stone, metal, or wood that contains foreign objects. It may only be used with the guide bar/saw chain combination stated in these instructions. It is not permitted to use other types or sizes.
Pole hedge trimmer: with the hedge trimmer blade, the product is intended for cutting and trimming of high and wide hedges, bushes, and shrubs in domestic gardens. The maximum cutting capacity must be observed. Do not cut branches exceeding the stated maximum capacity.
The use of this product in case of rain or a humid environment is prohibited. For safety reasons, it is essential to read the entire instruction manual before first operation and to observe all the instructions therein.
This product is intended for private domestic use only, not for any commercial trade use. It must not be used for any purposes other than those described.
Trimming Tools Product Functions
Primer
The primer (A7) is positioned underneath the air filter case(A8). Use the primer for cold start (Fig. 27).

Recoil Starter
- The recoil starter handle (A4) is positioned at the rear side of the engine.
- Hold the product stable and pull the recoil starter handle lightly until you feel resistance, then pull it rapidly. Do it again until the engine starts (Fig. 28).


Choke

Control Unit
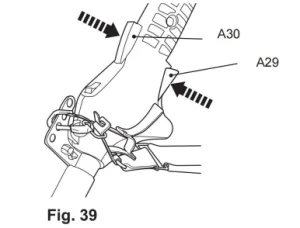
There are three controls on the main handle (A31) with the following functions (Fig. 31):
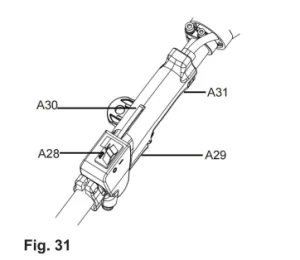
- The throttle interlock (A30) prevents unintentional activation of the throttle trigger (A29).
- The ignition switch (A28) electrically starts or stops the engine.
- Adjust the engine speed with the throttle trigger (A29).
Harness
The harness (A16) helps the operator to carry the product.
- Attach the securing clip (A18) to one of the four loops (A15) (Fig. 32).

- Place the harness (A16) so that it runs over the left shoulder, crossing the chest and back. The securing clip (A18) must be located at the right hip(Fig. 33).

- Ensure the product is appropriately balanced.
- Adjust the length of the harness (A16) so that the securing clip(A18) isapproximately 15 cm below your waist
WARNING! Always attach the product to the harness. Do not carry it only with your hands!
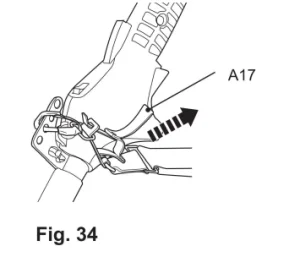
- In case of emergency, hold the front handle (A27) with the left hand, and use the right hand to pull the rope (A17) (Fig. 34). The metal locking bar will be released from the securing clip automatically because of the weight of the product.
Handle Adjustment
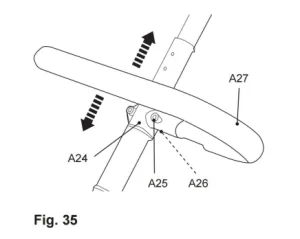
- Loosen the bolts (A25) and nuts (A26). Do not remove the bolts and nuts from the bracket (A24).
- Slide the bracket (A24) up or downward to one of the three positions until the mounting holes are aligned (Fig. 35).
- Tighten the bolts (A25) and nuts (A26) afterward.
WARNING! Make sure the bolts (A25) and nuts (A26) on the bracket (A24) are properly tightened before using the product!
Cutting attachments
(for brush cutter and grass trimmer) Cutter blade
Use the cutter blade (B14) to cut heavier weeds, brush, and similar vegetation.
Trimming head
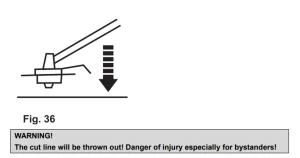
Use the trimming head (B18) to cut smaller types of weed, lawn grass, or similar soft vegetation. The trimming head is equipped with a bumper that helps cut the trimming line (B21) while operating. Tap the bumper on a firm surface, and the spool (B20) will release fresh trimming line (Fig. 36).
A knife (B6) is integrated with the guard extension (B9), and this will cut the trimming line (B21) to the necessary length.
Guard Extension
(for brush cutter and grass trimmer)
The guard (B8) and guard extension (B9) protect the operator against thrown objects during operation. It is equipped with a knife (B6) that cuts the trimming line (B21) (Fig. 37).

Trimming Tools Operation Instructions
General
- Check the product and its accessories for damage before each use. Do not use the product if it is damaged or shows wear.
- Double-check that the accessories and attachments are properly fixed.
- Check the fuel level, refill if necessary.
- Always hold the product by its handles. Keep the handles dry and free from lubricant to ensure safe support.
- Ensure that the air vents are always unobstructed and clear. Clean them if necessary with a soft brush. Blocked air vents may lead to overheating and damage the product.
- Switch the product off immediately if you are disturbed while working by other people entering the working area. Always let the product come to completion before putting it down.
- Do not overwork yourself. Take regular breaks to ensure you can concentrate on the work and have complete control over the product.
Trimming Tools Starting/Stopping
Cold start
- Place the product on a flat, stable surface. Ensure the tool attachment does not touch the ground or any objects.
- Set the ignition switch (A28) to position “I”.
- Deeply press the primer (A7) 7 – 10 times until the fuel is visible.
- Move the choke (A12) upward to the CLOSE position
- Hold the product stable and pull the recoil starter handle (A4) slowly until you feel resistance, then pull it rapidly. Move the choke slightly downward to the middle position if the engine does not start after trying up to 8 times. Do it again until the engine starts (Fig. 38).

- Move the choke (A12) downward to the OPEN position once the engine starts.
- Let the product run idle for a few seconds to warm it up.

- Once the engine is running smoothly, carefully lift the product and secure it to the harness (A16) by way of the securing clip (A18).
- Firmly hold the product with your left hand on the front handle (A27) and your right hand on the main handle (A31).
- Squeeze the throttle interlock (A30) and throttle trigger (A29) to operate the product (Fig. 39).
Warm Start
- Place the product on a flat, stable surface. Ensure the tool attachment does not touch the ground or any objects.
- Set the ignition switch (A28) to position “I”.
- Do not press the primer (A7).
- Ensure the choke (A12) is at the OPEN position.
- Pull the recoil starter handle (A4) lightly until you feel resistance, then pull it rapidly. Do it again until the engine starts (Fig. 40).
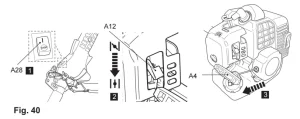
- Once the engine is running smoothly, carefully lift the product and secure it to the harness (A16) using the securing clip (A18).
- Firmly hold the product with your left hand on the front handle (A27) and your right hand on the main handle (A31).
- Squeeze the throttle interlock (A30) and throttle trigger (A29) to operate the product (Fig. 41).

Stopping
- Release the throttle interlock (A30) and throttle trigger (A29) and let the product run at its idle speed for 10 – 15 seconds.
- Set the ignition switch (A28) to position “STOP” (Fig. 42).
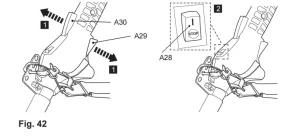
- Carefully put down the product.
Cutting (brush cutter)
- Attach the cutter blade (B14) to cut heavier weeds, brush, and similar vegetation.


- Hold the product firmly so that it sits with a gap between the product and your right side.
- Stand upright, do not lean forward, and pay attention to posture. Keep both feet apart to help retain your balance.
- Never hold the cutting head higher than your hip (Fig. 43); the higher you hold the cutting head, the greater the risk of objects being thrown.
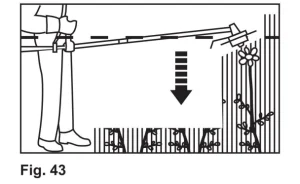
- Carefully plunge the blade from above when cutting long undergrowth.
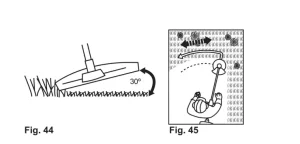
Trimming
- Attach the trimming head (B18) to cut heavier weeds, brush, and similar vegetation.
- Hold the product firmly with a gap between the product and your right side.
- Stand upright, do not lean forward, and pay attention to posture. Keep both feet apart to help retain your balance.
- Hold the trimmer head just above the ground at an angle of approximately 30 °(Fig. 44).
- Move the product with a slow, regular arc from left to right before moving it back to the starting position, before trimming the next area (Fig. 45).
- Ensure the cutting device remains clean and free from off-cuts that may cause it to jam. Check regularly. Stop the engine, set the ignition switch (A28) to “STOP,” and remove the spark plug connector (A13) before checking.
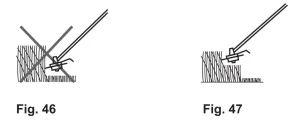
- Trim longer grass in stages; do not cut long grass in one cut (Fig. 46). For the best results, cut longer grass in steps (Fig. 47).
Tips
- For best results, do not cut wet grass because it tends to stick to the cutting head and guard, preventing proper discharge of grass trimmings, and could cause you to slip and fall.
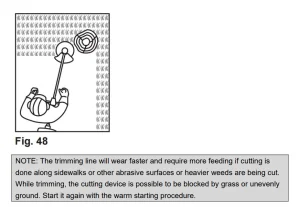
- Pay special attention when performing the work close to trees and bushes. The cutting head could damage sensitive bark and damage fence posts(Fig. 48).
Pruning
Saw chain stop test
The product must always be held with two hands when switching it on.
- Hold the front handle (A27) with your left hand and the main handle(A31) with your right hand.
- When switching on, the guide bar (C13) and the saw chain (C12) must not be in contact with any object.
- Switch the product off. The saw chain will come to a stop in a few seconds.
Kickback

- Kickback is the sudden backward/upward motion of the product, occurring when the chain (at the tip of the chain bar) comes in contact with a log or wood, or when the chain becomes jammed.
- When kickback occurs, the product reacts unpredictably and can cause severe injuries to the operator or bystanders.
- With a basic understanding of “kickback”, the element of surprise can be reduced or eliminated. Sudden surprise contributes to the majority of accidents.
- You should read all the safety warnings and user instructions carefully before attempting to operate this product.
To avoid kickback:
- Never work with a loose, widely stretched, or heavily worn chain.
- Always use a low kickback chain.
- Ensure correct chain tension.
- Ensure the chain is sharpened correctly.
- Never work with the tip of the guide bar.
- Saw with the guide bar at a flat angle.
- Always hold the product firmly with both hands.
Pruning
- Always hold the product firmly with both hands on the handles (A27, A31). Never operate this product using only one hand (Fig. 49).
- Maintain a firm grip with your thumbs and fingers encircling the handles. A firm grip will help you reduce ‘kickback’ and maintain control of the product.
- Always hold the product at an angle of not more than 60° from the horizontal level. Otherwise, safe operation is not possible (Fig. 50).

- Never stand directly under the limb you are sawing. Objects may fall differently than expected. Always position yourself out of the path of falling limbs (Fig. 51).
- Keep other persons away from the cutting end of the product and at a safe distance from the work area. Maintain a minimum distance of 10 m from bystanders (Fig.52).


- Never stand on a ladder or any other unstable support while using the product. Insecure stands invite hazards (Fig. 53).

- Use the product only with a secure footing. Hold the product at the right-hand side of your body. Regularly change the working position and include rest periods during operation.
- Do not operate the product with arms fully extended or attempt to cut areas that are challenging to reach.
- Keep a firm, steady pressure on the product while working with it. Do not try to force the product through the wood; let the cutting device do the work, using the gripping teeth to apply minimal leverage pressure.
- Beware when reaching the end of the cut. The weight of the product may change unexpectedly as it cuts free from the wood. Accidents can occur to the legs and feet. Always remove the product from a wood cut while it is running.

Thin branches
Thin branches can be cut off with one single cut. To prevent the branch from splitting and buckling, the branch should be cut off into several pieces (Fig. 55).

Thick branches
When cutting off larger branches, three cuts are necessary.
- First, cut into the branch from below, outside the place where you intend to cut off the branch. The cut should go from one-third to halfway through the branch (Fig.56).
- Cut into the branch from the top outside at the same height the branch is sawn from top (Fig. 57).
- Last, cut off the stump with one clean cut from top to bottom(Fig. 58).

Trimming
Trimming times

- Adjust the blade head to the required position as described above.
- Cut and remove branches exceeding the cutting capacity of this product using a proper pole saw before operation.
- Always hold the product firmly with both hands on the handles (A27, A31). Never operate this product using only one hand.
NOTE: Try to keep the cutting device angled at approximately 15° to the cutting surface.
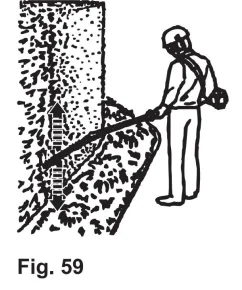
- Cut both sides from the bottom, cutting upwards to the top. This will prevent any of the cuttings from falling into the path of the area still to be cut (Fig. 59).
- After cutting the sides, proceed to the top.
- When cutting wide hedges with the cutting area in sight, move the cutting blade lightly through the cutting surface in a sweeping motion, following the shape of the hedge or shrub. A slight tilt downwards of the cutting blade in the direction of motion is recommended for optimum cutting performance (Fig. 60).

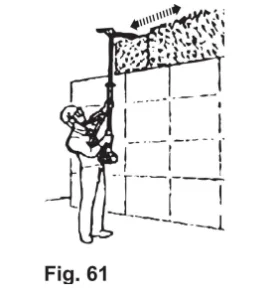
- Move the product with slow motion forward when cutting a higher hedge and the cutting area out of sight (Fig. 61).
- Do not rush and do not attempt to cut too much with one stroke of the cutting blade.
- Cut in several stages if the area being cut is particularly long to achieve a better result; smaller cuttings will allow for easy composting.
NOTE: When shaping, it is advisable to achieve a trapezoidal shape(Fig. 62). A trapezoidal cut corresponds to the natural growth of plants and results in optimal hedge growth, as it will expose more light to the lower end of the hedge.

The Golden Rules for Care
WARNING! Always switch the product off, disconnect the spark plug connector, and let the product cool down before performing inspection, maintenance, and cleaning work!
- Keep the product clean. Remove debris from it after each use and before storage.
- Regular and proper cleaning will help ensure safe use and prolong the life of the product.
- Inspect the product before each use for worn and damaged parts. Do not operate it if you find broken and worn parts.
WARNING! Only perform repairs and maintenance work according to these instructions! A qualified specialist must perform all further work!
General Trimming Tools Cleaning
- Clean the product with a slightly damp cloth and mild soap. Use a brush for areas that are hard to reach.
- In particular, clean the air vents (A2) after every use with a cloth and a brush.
- Remove stubborn dirt with high-pressure air (max. 3 bar).
NOTE: Do not use chemical, alkaline, abrasive, or other aggressive detergents or disinfectants to clean this product, as they might be harmful to its surfaces.
- Check for any damage and wear. Repair damages per this instruction manual or take it to an authorised service centre or a similarly qualified person before using the product again.
Maintenance of the Trimming Tools
Before and after each use, check the product and accessories (such as attachments) for wear and damage. If required, exchange them for new ones as described in this instruction manual. Observe the technical requirements.
Maintenance Table
Inspect and maintain this product regularly based on the maintenance table below.

Cutting Attachment and Guard

- Keep the cutting attachments and the safety guard clean and free of debris. Remove grass trimmings.
- Keep the cutter blade (B14) sharp to maintain optimal cutting performance.
- Replace worn or damaged cutter blades and refill the trimming line on the trimming head with new ones of the same type.
Spool
If the line is used up, replace it with a new spool, or replace the new trimmer line with the spool.

- Lay the product on a flat, stable surface with the trimming head facing upward.
- Remove the trimming head (B18) from the product.
- Press the release latches (B25) on the trimming head housing (B23) to open the cover (B19) (Fig. 63). The cover (B19) and spool (B20) will pop out.
- Before putting the new spool into the trimming head (B18), pass the trimming line (B21) through the holes on the housing.
- Put the new spool into the trimming head housing (B23) and press it to the end, then pull both lines (B21) out more than 10cm.
- Align the notches on the cover to the noses of the housing, and then push the cover firmly onto the housing to close the trimming head.
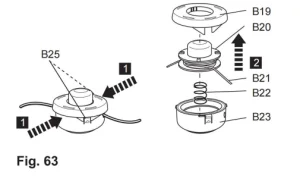
WARNING! The spool is fitted with a spring (B22)! Hold the casing away from you when opening to prevent injuries!
Replacing the spool
- Remove the worn spool and replace it with a new one of the same type and follow the above operation steps.
- Align the notches on the cover to the noses of the housing, and then push the cover firmly onto the housing to close the trimming head.
WARNING! After changing the trimming line, run the product under no load for at least a minute to ensure the line and product are operating correctly!
Replacing the trimmer line
- Remove the worn trimmer line and replace it with a new one of the same type. Take out the spool from the trimmer head. Pls follow the steps described in the above part <Spool>
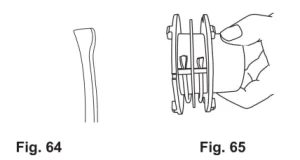
- Cut two new 2m lines with a diameter of 2.5mm. Heat and flatten one end of these two lines. Insert the other end of the lines into the locking holes, and pull the lines until the flattened end locks into place. (Fig.64, 65).
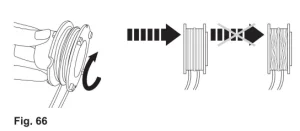
- Wind the lines in a clockwise direction firmly around the spool, ensuring they are correctly in the respective guides. (Fig.66)
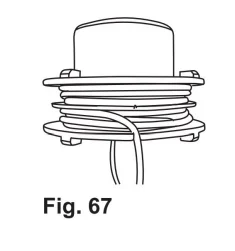
- Leave about 200mm long at last, and stick the lines into the slot to keep them in place. (Fig.67)
- Put the spool back into the trimmer head.
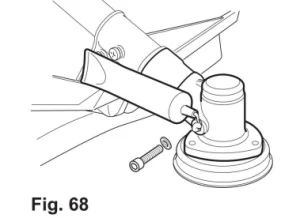
Bevel gear
The bevel gear is filled with grease. Regularly check the quantity and fill up using suitable lubricating grease such as a lithium-based grease.
- Loosen the screw with the hex key (E4) and remove it together with the washer.
- Add suitable lubricant (Fig. 68).
- Refit the washer and screw. Ensure the screw is tightened correctly.
Saw Chain and Guide Bar
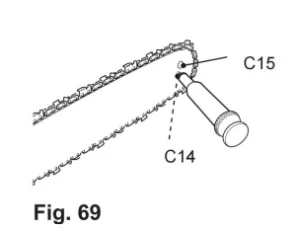
Sprocket Wheel
NOTE: It is not necessary to remove the saw chain (C12) to lubricate the sprocket wheel (C15). Lubrication can be done on the job.
- Clean the sprocket wheel (C15).
- Using a disposable lube gun, insert the needle nose into the lubrication hole (C14) and inject grease until it appears at the outside edge of the sprocket wheel(Fig. 69).
- Rotate the saw chain (C12) by hand. Repeat the lubrication procedure until the entire sprocket wheel (C15) has been greased.
Guide bar and saw chain
Most guide bar problems can be prevented merely by keeping the product well-maintained. Incorrect filling and non-standard cutter and depth gauge settings are the causes of most guide bar problems, primarily resulting in uneven bar wear.
As the bar wears unevenly, the rails widen, which may cause the chain to chatter and make it challenging to complete straight cuts. If the guide bar is insufficiently lubricated and the product is operated with a saw chain that is too tight, this will contribute to rapid bar wear.
To help minimise bar wear, maintenance of the guide bars and the saw chain is recommended.
- Disassemble the guide bar and saw chain in reverse order from assembly.
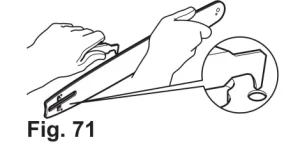
- Check the oiling port (C5) for clogging and clean it if necessary to ensure proper lubrication of the guide bar and saw chain during operation. Use a soft wire small enough to insert into the oil discharge hole (Fig. 70).

- Check the drive sprocket (C4). If it is worn or damaged due to strain, it should be replaced by an authorised service centre or a similarly qualified person.
- Clear residue from the rails on the guide bar (C13) using a screwdriver, putty knife, wire brush, or other similar tool. This will keep the oil passages open to provide proper lubrication to the guide bar (C13) and saw chain (C12) (Fig. 71).
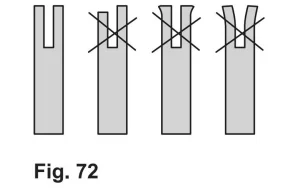
- Check the guide bar ‘rail’ for wear: Hold a ruler (straight edge) against the side of the guide bar and ‘cutter side plates’. If there is a gap between the ruler and the guide bar, the guide bar ‘rail’ is normal.
If there is no gap (ruler flush against the side of the guide bar), the guide bar’s rail is worn and needs to be replaced with a new one of the same type (Fig. 72).
- Check the saw chain for possible wear and damage. Replace it with a new one if required. Experienced users can sharpen a dull saw chain (see chapter “Sawchain sharpening”).
- Refit the saw chain (C12) and the guide bar (C13) as described under “Assembly”.
Saw Chain Sharpening

- Have your saw chain (C12) sharpened professionally at an authorized service center or sharpen the chain yourself.
WARNING! Only sharpen the saw chain yourself if you are trained and have experience! Use proper tools to sharpen the saw chain!
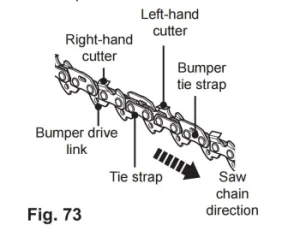
- The height difference between the tooth and the ridge is the cutting depth. When sharpening the saw chain (C12), you have to consider the following points (Fig. 73).
– File angle
– Cutting angle
– File position
– Diameter of the round file
– File depth
- To sharpen the chain, proceed as follows:
– Use protective gloves.
– Ensure the chain is correctly tensioned.
– Engage the chain brake to lock the chain on the bar.
- Use a chain file whose diameter is 1.1 times the cutting tooth depth. Make sure 20% of the file diameter is above the cutter’s top plate.
NOTE: A file guide is available from most reputable tool merchants, and this is the easiest way to hold the file at the correct position.
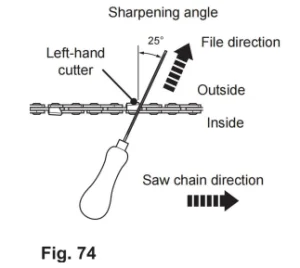
- File at an angle perpendicular to the bar, and at an angle of 25° to the direction of travel (Fig. 74).
- File each tooth from the inside towards the outside only. File one side of the chain first, then turn the saw around and repeat the process.
- Sharpen each tooth equally by using the same number of strokes.
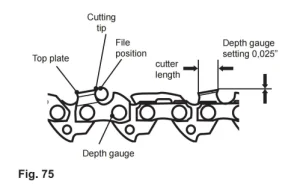
- Keep all cutter lengths equal. Check the safety depth gauge height every 5 sharpenings. If the depth gauges are also trimmed, it is essential that the original profile is restored.
- Use a depth gauge measuring instrument to check the height of the depth gauge. Depth gauge measuring jigs are available from most reputable tool merchants (Fig. 75).
Pole Hedge Trimmer Blade
WARNING! Wear safety gloves when working on the blade. Use appropriate tools to remove debris, e.g., a brush or wooden stick! Never use your bare hands!
- Keep the blade clean and free of debris. Remove trimmings.
- Lubricate the cutting blade (D3) after each use to prolong the lifespan of the blade and product. Apply light machine oil along the edge of the cutting blade (Fig.76).

Air filter
Wash the air filter every 25 hours (if too dusty, every 10 hours) with clear water and dry it. Dip the air filter into clean machine oil if necessary. It can be used after superfluous oil is eliminated.
- Inspect the air filter regularly. Replace it with a new one if necessary(Fig. 77).
- Loosen and remove the fixation bolt (A9) to open the air filter case(A8).
- Remove the filter (A11) and tap it on a solid surface to remove dust.
- Apply a small amount of air filter oil on the filter (A11) to improve filter performance. Wring out surplus oil and put the filter back into the air filter case.
- Re-attach the cover (A10) and secure it with the fixation bolt (A9).
Spark plug
Inspect the spark plug every 25 hours or prior to long-term storage over 30 days if the use has not been this high. Clean or replace with a new one if necessary.
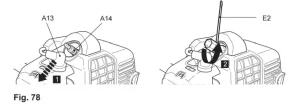
- Disconnect the spark plug connector (A13).
- Loosen the spark plug (A14) anticlockwise using the multi tool (E2) and remove it carefully (Fig. 78).
- Check the spark plug (A14) for damage and wear. The colour of the electrode should be light colored.
- Remove debris from the electrode with a soft-wired brush; avoid heavy cleaning of the electrode.
- Dry the spark plug with a soft cloth if it is wet from fuel.
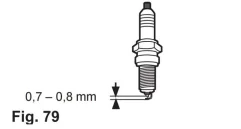
- Check the spark plug gap. It should be 0.7 – 0.8 mm(Fig. 79).
- Replace with a new spark plug if either the electrode or the insulation is damaged.
- When replacing the spark plug, first screw it in hand tight and then lightly tighten it with the multi tool (E2).
WARNING! Do not over-tighten the spark plug to avoid any damage!
Fuel
- Empty the fuel tank (A5) when storing the product for over 30 days to prevent the fuel from deteriorating.
- Unscrew and remove the fuel tank cap (A6) to empty the fuel into a suitable container.
WARNING! Do not store the fuel in the fuel mixing container (E1)!
Carburettor
The manufacturer pre-sets the carburettor. Should it be necessary to make changes, don’t hesitate to get in touch with an authorised service centre or a similarly qualified person. Do not attempt to make any adjustments on your own.
Muffler
If it is necessary to modify or replace the muffler, don’t hesitate to get in touch with an authorized service centre or a similarly qualified person.
Spare Parts/Replacement Parts
The consumer may replace the following parts of this product. Spare parts are available at an authorised dealer or through our customer service.

Repairing your VEVOR Trimming Tools
These trimming tools do not contain any parts that the consumer can repair. Contact an authorised service centre or a similarly qualified person to have it checked and repaired.
There are no spare parts available for this product. Contact an authorized dealer or our customer service for more information.
Trimming Tools Storage
- Switch the product off and disconnect the spark plug connector.
- Clean the product as described above.
- Store the product and its accessories in a dry, frost-free place.
- Always store the product in a place that is inaccessible to children. The ideal storage temperature is between 10°C and 30°C.
- We recommend using the original package for storage or covering the trimming tools with a suitable cloth or enclosure to protect them against dust.
- Empty the tank if you are not going to use the product for an extended period (more than 30 days) and before storing it for the winter.
Trimming Tools Transportation
- Switch the product off and disconnect the spark plug connector.
- Attach transportation guards, if applicable.
- Attach the blade cover (B17, C16, D4).
- Always transport the product by its poles (A19, B1, C1, D1) and handles (D2, A27, A31).
- Protect the product from any heavy impact or strong vibrations that may occur during transportation in vehicles.
- Secure the Trimming Tools to prevent it from slipping or falling over, fuel loss, damage, and injury.
Environmental Protection
- Old Trimming Tools are potentially recyclable and do not, therefore, belong in your household rubbish. You are requested to assist us in our contribution to saving resources and protecting the environment by handing in this appliance at an equipped collection centre (if there is one available).
- Petrol, oil, used oil, mixtures of oil and petrol, and objects contaminated with oil,e.g., cleaning cloths, do not belong with household waste. Dispose of oil-contaminated items per the local guidelines and hand them in at the recycling centres.
- The Trimming Tools come in a package that protects it against damage during shipping. Keep the package until you are sure that all parts have been delivered and the product is functioning correctly. Recycle the package afterwards.
Troubleshooting the Trimming Tools
Suspected malfunctions are often due to causes that the user can fix themselves. Therefore, check the product using this section. In most cases, the problem can be solved quickly


VEVOR Trimming Tools Technical Specifications


Recommended For Your Project
VEVOR 26CC 6-in-1 Gas Hedge Trimmer Manual


Reviews
There are no reviews yet.