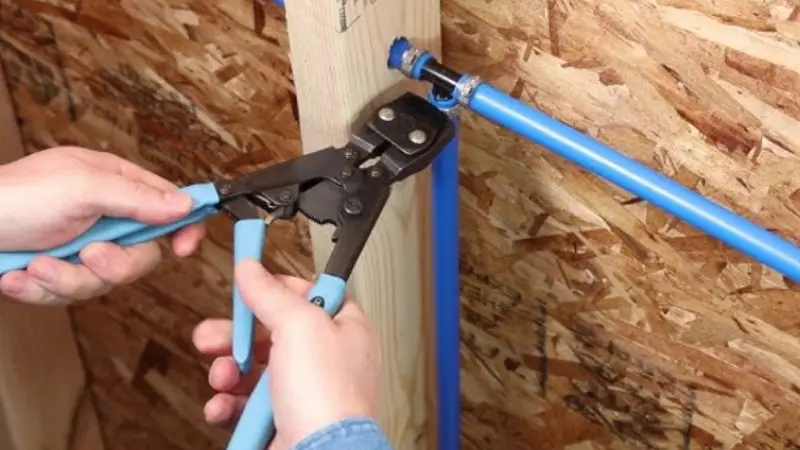
Bei Verwendung eines Crimp-Werkzeug to apply pressure, steady and controlled pressure is used to provide a leak-free and secure pipe connection. The correct pressure is used so that the crimp ring or fitting fits evenly around the pipe without damaging it. Excessive force can cause the pipe or fitting to bend. Under pressure, the connection can leak or become loose over time. Good and consistent pipe joints involve maintaining balance and consistency. Durable, professional-quality results can be achieved with practice.
Why Proper Pressure Matters in Pipe Crimping
Crimping of pipes has become common in plumbing and fluid systems where robust and leak-free connections are imperative. A minimal error in pressure may cause weak joints or failure of the system.
With a crimping tool, apply the right technique to ensure that the fitting fits into the pipe. Appropriate pressure is applied to ensure the crimp ring is in place, effectively sealing the pipe and preventing leaks and compromising system performance.
What Proper Pressure Means in Pipe Crimping Tool Use
The correct crimping pressure for pipes is to apply constant pressure until the crimp ring or fitting is fully seated around the pipe. It is aimed at establishing a good seal without crushing or deforming the pipe.
The correct pressure required when using a crimping tool is to make sure that the fitting fits the pipe firmly. Excessive pressure might damage the pipe or fitting, whereas insufficient pressure might create gaps that can leak.
Why Pressure Is Important in Pipe Crimping Work
Pressure directly influences the strength and sealing capacity of the connection. Precise use of force with crimping tools creates evenly shaped crimp rings around the pipe.
Weak seals and potential leaks are caused by insufficient pressure. Too much force may deform the pipe or damage the fitting. Both scenarios lower the reliability and may lead to long-term problems in plumbing systems.
How to Check Correct Pressure in Pipe Crimping
The connection between the pipes of a correctly crimped pipe should appear smooth, rounded, and uniformly pressed. The crimp ring must fit firmly, with no visible gaps.
A go/no-go gauge can also be used to ensure that the crimp is of the right size set. The safest way of crimping a tool is to follow the best method of working with a Crimp-Werkzeug, so that the pressure remains constant, and to aid in knowing how to crimp without damaging the pipes.
Step-by-Step Pipe Crimping Process for Safe Connections
Crimping of pipes should be done in the proper order to prevent leakages or weak connections. By omitting steps or rushing through the process, one may weaken the connection. Knowledge of when to use a crimping tool apply the right technique will assist you in getting a consistent and professional output. All the steps are significant in developing a solid, leak-resistant seal. When done properly, with the right placement and constant pressure, you will be able to have reliable connections between the pipes that will not fail in the near future.
Prepare the Pipe and Fitting Properly
Begin by choosing the appropriate pipe size and a fitting crimp ring or fitting for the project. Cleanly cut the pipe with a pipe cutter so that the edge is straight and smooth. Always make sure that the end of the pipe is clean and free of dirt, burrs, or damage before proceeding. Crimp the ring on the pipe and then insert the fitting till it stops. This is a crucial step in the correct way to crimp without breaking pipes. Correct preparation also helps with applying the crimping tool, which applies constant pressure to the PEX pipes, ensuring the fitting is tight and secure.
Position the Crimping Tool and Ring Correctly
Install the crimp ring approximately 1/8 inch (3 4 mm) at the end of the pipe in the most sealing position. Place the crimping tool and press it evenly around the ring. Ensure that the tool jaws are not tilted to one side. Make sure you hold the pipe firmly so nothing moves. This is done after the optimal operating method for a Crimp-Werkzeug is established, since proper positioning leads to uniform pressure. Even force should be exerted on pipe fittings when crimping with a crimping tool, ensuring that fittings are positioned correctly can prevent leaks and enhance the strength of connections.
@milusos502 En trabajo sacas la inversion #vevor #vevorpresstool #fentysuperbrandday #angebotefürdichtage #für dich
♬ Originalton – milusos502
Apply Steady Pressure While Crimping
Crimp with slow and controlled force, closing the handles of the crimping tool. Do not hurry or put a quick strain on this may break the pipe or fitting. Keep pressing until the tool has been fully crimped. The correct pressure required when using a crimping tool must be sufficient to squeeze the crimp ring around the pipe. Proper use of force when using crimping tools will help form a good, airtight seal. Consistent crimping tool force to achieve leak-free joints will increase the durability of the joint and the overall system performance.
Inspect the Crimped Connection
Crimp the ring and then examine it to make sure that it is uniformly squashed around the pipe. It is supposed to appear rounded, smooth, and devoid of cracks or abnormal forms. The ring should fit snugly with no apparent holes. A go/no-go gauge can also be used to ensure that the crimp size is correct. This is done to ensure that the correct pressure required to crimp the tools of pipe crimping is used. For a crimping tool, proper pressure on the crimp rings must be applied; inspection ensures the connection is secure, dependable, and long-lasting.
Avoid Common Pipe Crimping Mistakes
Such errors as bending the ring too far away at the end of the pipe, fitting the wrong size, or crimping unevenly, are common. With time, these problems may result in leakages or poor connections. Hurrying the process or not following a sequence of steps can also compromise the quality of the seal. The correct operation of crimping pipes without breaking them helps prevent such issues. When crimping, ensure the correct amount of pressure on pipes and follow every step to achieve strong, secure, and durable connections of pipes.
How to Test a Crimped Pipe Connection for Strength and Safety
Another essential step to ensure your pipe connection is leak-free and strong is testing. Although the crimp may look right, it needs to be tested in the actual environment. When crimping with a tool used give keen care after each crimp to prevent future complications. A test should be done to ensure the pressure was applied properly and the fitting is stable. This measure enhances the safety and long-term performance of the system, particularly in plumbing systems, where leaks can lead to severe damage over time.
Perform a Pressure or Leak Test
Once the crimp is complete, water or air should be passed through the pipe system to ensure that there are no leaks. Monitor the connection and look out against any moisture, drip, or pressure drop. When there is a strong crimped joint, it must be totally dry and stable under normal working conditions. This is done to verify that the correct amount of pressure required to use a crimping tool is applied. In the crimping tool application, to achieve leak-free joints, a constant force is applied; a successful pressure test indicates that the bond is secure and can be used over a long period.
Visually Inspect the Crimp
Inspect the crimp ring closely to be sure that it has been compressed on the pipe evenly. The ring must appear smooth, round, and in the right place without any gaps or damage. The surface should be free of cracks and irregularities. It is a section of the most suitable method of working with a crimping tool since visual inspection helps to reveal errors in the initial phases. When crimping with a crimping tool, it is important to apply the right amount of pressure to the crimp rings, and then a clean and even look will give one confidence that the connection has been properly made.
Troubleshoot Common Crimping Problems
In case of a leak or a weak connection, find the source of the leakage and fix it. Low pressure may cause a loose seal, and excessive force may rupture the pipe or ring. Uneven crimps can also be caused by inappropriate placement of the rings or misalignment of the tools. These problems may be solved by understanding how to apply the necessary force in the use of crimping tools. Proper pressure on pipes and proper placement to enhance results should be used with a crimping tool. The correct re-crimping will normally re-establish a good and non-leaky connection.
How to Maintain Consistency and Safety in Pipe Crimping Work
Stability and reliability are vital to achieving effective, professional outcomes in pipe crimping. Following all the steps in a similar manner to achieve consistency in the connections made is a good idea to ensure consistency and prevent leakage. Correct application and handling of the crimping tool are necessary to prevent errors when using it. Safe work practices can also reduce the risk of injury and enhance overall efficiency. Unitar focuses on constant pressure, correct tool maintenance, and occupational health, which will help you achieve better crimping results and guarantee the long-term functionality of plumbing systems.
Halten Sie den Druck konstant
Use the same amount of force in every crimp to get consistent and consistent results. The crimp ring is pressed down smoothly and steadily to ensure that it fits around the pipe in a tight ring, resulting in a good seal. There should be no rush because the connection can be weakened by the uneven force. The correct pressure required when it comes to the usage of a Crimp-Werkzeug becomes better with practice and experience. Consistency in the use of the crimping tool when creating leak-free joints. This is to ensure durability. Ratcheting tools are useful in that they remind you that you should always apply the same pressure.
Care for Your Crimping Tool
Always clean your crimping tool after use with dust, dirt, or metal particles. Periodically check the jaws to ensure that they are not damaged or worn out, as this may compromise the quality of the crimp. Apply lubricant to moving parts where necessary to ensure the tool is running well. Having a well-maintained tool helps to learn the most effective method of handling a crimping tool safely and enhance effectiveness. Proper pressure when using a crimping tool on pipes will ensure that a tool that is in good condition will provide accurate and consistent results with time.
Sicherheitsvorkehrungen beachten
The fundamental safety measures to be adhered to whenever using pipe crimping tools must always be observed. Wear protective clothing like gloves and safety glasses to prevent injuries. Always avoid placing your hands and fingers in the tool jaws. Operate in a neat and tidy environment to minimize errors and enhance concentration. Care should be taken when crimping with a crimping tool to avoid mishaps and to crimp correctly. Safe handling not only protects you but also assists in developing stronger and better connections of the pipes in any project.
Einpacken
The crimping of the pipes should be observed, regulated, and performed properly to make strong connections that do not leak. With the necessary pressure and taking into account each step, you can get a result that is both consistent and reliable. Each of the stages, starting with the preparation and ending with testing, has a significant role in the quality of the connection. After practice, your abilities will improve, and you will be able to prevent the most frequent errors and improve long-lasting performance in plumbing systems.
FAQ
Do you know whether you applied sufficient pressure?
The crimp ring must be consistently compressed and must pass a go/no-go test. Testing should not have any leaks.
Is it possible to reuse a crimp ring?
No, crimp rings are not to be used again. A secure and reliable connection is always to be made with a new ring.
What to do in case the pipe leaks after crimping?
Strip away the bad part and refit the ring and fitting, and crimp once more with the correct pressure and alignment.


