
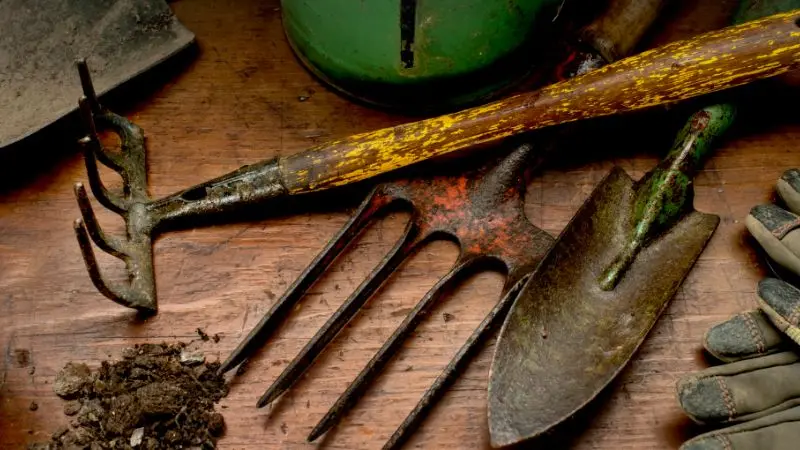
تميل الأدوات المستخدمة في الحديقة إلى الصدأ عند تعرضها للرطوبة والتربة دون عناية. قد يصدأ المعدن بمرور الوقت، فتصبح الأدوات ضعيفة وخشنة ويصعب استخدامها. كما يقلل ذلك من كفاءتها وعمرها الافتراضي، مما قد يستدعي استبدالها مبكرًا. في هذا الدليل البسيط، ستتعرف على طرق سهلة وغير مكلفة لتنظيف أدوات الحديقة الصدئة في منزلك. كما أن الحفاظ على نظافة حديقتك يساهم في صيانة الأدوات. قم بإزالة الأوراق المبللة والحطام باستخدام أدوات مثل... كاسحة العشب يمكن أن يساعد في تقليل تراكم الرطوبة، وهو أحد الأسباب الرئيسية للصدأ على أدوات الحدائق.
لماذا تصدأ أدوات الحدائق مع مرور الوقت
يُعدّ الصدأ مشكلة شائعة بين البستانيين، خاصةً عند استخدام الأدوات بكثرة وإهمال صيانتها. معرفة أسباب الصدأ تُساعدك على تجنّبه مستقبلاً والحفاظ على أدواتك في حالة أفضل لاستخدامها لفترة أطول. لمعرفة كيفية تنظيف أدوات البستنة الصدئة، من المهم أولاً معرفة أسباب الصدأ.
من الضروري معرفة أسباب الصدأ قبل البدء في طرق التنظيف. بعد معرفة السبب، يمكنك اتباع الطريقة الأنسب لإزالة الصدأ من أدوات الحديقة دون استخدام مواد كيميائية، ومنع تكرار هذه المشكلة.
الصدأ عملية بطيئة عموماً، لكنه قد ينتشر بسرعة كبيرة إذا تُرك دون معالجة. لذا، فإن شرح أسبابه يُساعد في توجيهك إلى الخطوات الصحيحة لتنظيف أدوات البستنة الصدئة لاحقاً.
التعرض للرطوبة
السبب الرئيسي لصدأ أدوات الحدائق هو الرطوبة. فإذا تُركت هذه الأدوات تحت المطر أو في تربة رطبة أو في ظروف رطوبة عالية، يبدأ سطحها المعدني بالتفاعل مع الماء والأكسجين. ويؤدي هذا التفاعل تدريجيًا إلى الصدأ، مما يجعل الأدوات ضعيفة وتبدو قديمة ومستهلكة. كما أن غسل الأدوات دون تجفيفها جيدًا قد يتسبب في تراكم الصدأ مع مرور الوقت.
مع ذلك، يغفل العديد من البستانيين عن حقيقة أن حتى القليل من الرطوبة قد يُسبب ضررًا طويل الأمد. فعندما تبقى الأدوات رطبة، فإنها تصدأ بسهولة ويصعب إزالتها. لهذا السبب، من الأهمية بمكان تجفيفها بعد كل استخدام. ولا تقتصر الرطوبة على الماء فحسب، بل تشمل أيضًا الأوراق الرطبة والمخلفات العضوية المتراكمة على الأرض. لذا، يُنصح بتنظيف الحديقة بانتظام باستخدام... كاسحة العشب يساعد في الحفاظ على جفاف المنطقة، مما يقلل من فرص تعرض الأدوات للرطوبة التي تؤدي إلى الصدأ.
ظروف تخزين سيئة
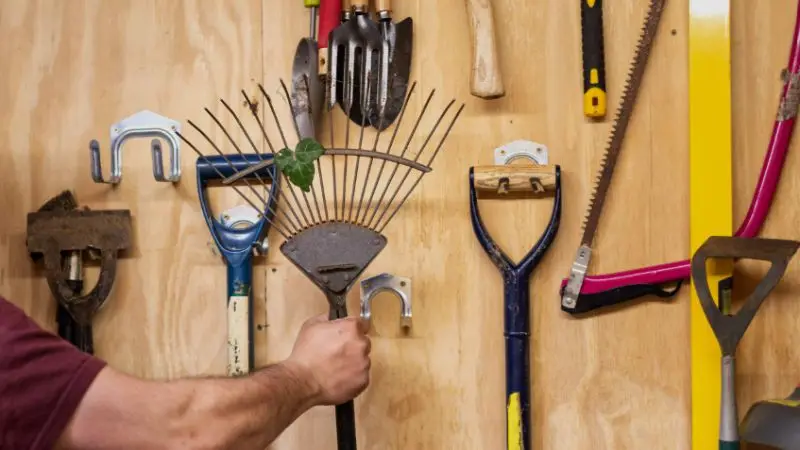
من الأسباب الرئيسية الأخرى لصدأ أدوات الحدائق سوء تخزينها. فالأدوات المخزنة في الخارج، والمعرضة للمطر أو للهواء الطلق، تبدأ بالتآكل بسهولة بالغة. حتى تخزينها في حظائر أو أقبية رطبة قد يعرضها للرطوبة، مما يسبب الصدأ مع مرور الوقت. وللحفاظ على الأدوات المعدنية في حالة جيدة، ينبغي حفظها في مكان جاف وجيد التهوية.
لا يؤثر سوء التخزين على مظهر الأدوات فحسب، بل يُقصر عمرها أيضًا. فمعظم الناس لا ينظفون أدواتهم ولا يعيدونها إلى أماكنها المخصصة بعد استخدامها، مما يُسرّع عملية الصدأ. لذا، يُعدّ تخزين الأدوات في مكان جاف إجراءً بسيطًا بالغ الأهمية. كما يُساعد ذلك في معرفة كيفية استعادة الأدوات القديمة الصدئة في الحديقة في وقت قصير، فمع التخزين السليم، لن تتعرض الأدوات لأي ضرر، وسيصبح تنظيفها أسهل بكثير في المستقبل.
عدم وجود صيانة منتظمة
من أكثر أسباب الصدأ شيوعاً عدم الحفاظ على أدوات البستنة في حالة جيدة. غالباً ما تتغطى الأدوات بالأوساخ والرطوبة بعد العمل في التربة. إذا لم يتم تنظيفها، فإنها تبقى على سطح المعدن وتبدأ بالصدأ تدريجياً. مع مرور الوقت، يصعب إزالة هذا التراكم ويضر بالأداة.
يمكن تجنب هذه المشكلة بتنظيف الأدوات بعد كل استخدام. فمهام بسيطة كالمسح والتجفيف قد تُطيل عمر الأدوات بشكل ملحوظ. يتجاهل الكثيرون خطوات الصيانة البسيطة، مما قد يؤدي إلى صدأ شديد في المستقبل. ومن الجوانب المهمة الأخرى لمعرفة كيفية تنظيف أدوات الحدائق الصدئة والحفاظ عليها لسنوات، تعلم كيفية العناية بها جيدًا. كما أن الحفاظ على نظافة مكان العمل يُسهم في تحسين العناية بالأدوات. كاسحة العشب إن إزالة الحطام تجعل من السهل تنظيف وتجفيف وتخزين أدواتك بشكل صحيح بعد الاستخدام، مما يساعد على منع تكون الصدأ.
الأدوات والمواد الأساسية لإزالة الصدأ
يجب أن تبدأ عملية التنظيف بوضع جميع الأدوات والمواد اللازمة في مكان واحد قبل البدء بالتنظيف الفعلي. هذا سيُسهّل العملية ويُمكّنك من تنظيف أدوات الحديقة الصدئة في المنزل بسهولة ودون أي انقطاع. بمجرد تجهيز كل شيء، يمكنك المتابعة خطوة بخطوة بطريقة أكثر تحكمًا، لتحقيق نتائج أفضل.
تضمن المواد المناسبة اتباع الطريقة المثلى لإزالة الصدأ من أدوات الحديقة دون إتلاف سطحها المعدني. وهي مواد بسيطة ومنخفضة التكلفة، وعادةً ما توجد في معظم المنازل أو في المتاجر المحلية.
أدوات أساسية للتنظيف والفرك
تُعد أدوات التنظيف الميكانيكية ذات أهمية بالغة في إزالة الصدأ من الأسطح، إذ تساعد في إزالة طبقة الصدأ وتجهيز الأداة لتنظيف أعمق.
- فرشاة سلكية مقاومة للصدأ الشديد.
- صدأ متوسط وصوف فولاذي ناعم.
- ورق صنفرة خفيف لإزالة الصدأ والتشطيب.
يجب استخدام هذه الأدوات بحذر لتجنب تلف المعدن نتيجة الضغط المستمر. وتُعدّ هذه الأدوات مفيدة للغاية عند وجود دليل إرشادي مُفصّل لتنظيف معدات البستنة الصدئة، لأنها تُشكّل المرحلة الأولى من التنظيف الفيزيائي.
حلول التنظيف الطبيعية
إنه حل طبيعي آمن على الأدوات واليدين، ويساعد على إزالة الصدأ. يُنصح باستخدامه قبل أو بعد عملية التنظيف لضمان فعاليته.
- يُستخدم الخل الأبيض لنقع الأجزاء الصدئة.
- إزالة الصدأ الخفيف - عصير الليمون.
- منظف المعجون: صودا الخبز مع الماء.
تُستخدم هذه المواد لإزالة الصدأ وتسهيل تقشيره عن الأسطح. وهي مفيدة للغاية عند الرغبة في التركيز على كيفية ترميم أدوات الحديقة القديمة الصدئة بسهولة دون استخدام مواد كيميائية قاسية. وباستخدامها الصحيح، تجعل عملية التنظيف أكثر فعالية وصديقة للبيئة.
مواد الدعم والتشطيب
بعد إزالة الصدأ، هناك بعض الأشياء الإضافية التي يمكن استخدامها لإنهاء العمل ومنع الصدأ على الأدوات في المستقبل.
- دلو أو وعاء لنقع الأدوات.
- قطعة قماش للتجفيف.
- قفازات واقية للتعامل الآمن.
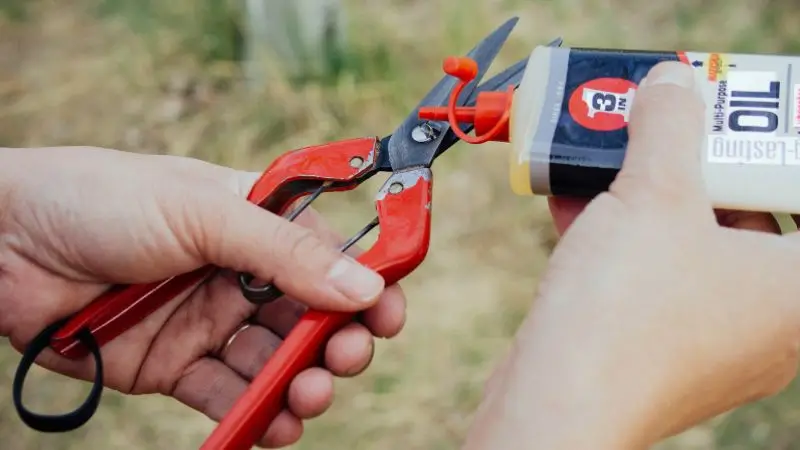
- مواد التشحيم مثل WD-40 أو زيوت الآلات.
تساعد هذه المواد على التخلص من الرطوبة وتغطية المعدن بطبقة واقية. يجب تجفيف المعدات بشكل صحيح، لأن حتى كمية قليلة من الرطوبة قد تُسبب الصدأ. يضمن وضع الزيت على طرفها إحكام إغلاق السطح واستمرار عمل الأدوات بسلاسة.
دليل خطوة بخطوة لتنظيف أدوات الحدائق الصدئة
تنظيف أدوات الحديقة الصدئة أسهل بكثير باتباع خطوات بسيطة بالترتيب الصحيح. كل خطوة تُساعد في إزالة الأوساخ، وتليين الصدأ، والحفاظ على المعدن لاستخدامه لاحقًا. إذا كنت تبحث عن كيفية تنظيف أدوات الحديقة الصدئة في المنزل بسهولة، فسيُرشدك هذا الدليل إلى كل شيء بطريقة سهلة وعملية.
يُنصح دائمًا باتباع الإجراءات الصحيحة لتحقيق أفضل النتائج وتجنب إتلاف أدواتك. كما يساعدك ذلك في تطبيق الطريقة الأنسب لإزالة الصدأ عن أدوات الحديقة باستخدام وسائل طبيعية دون مواد كيميائية قاسية.
كما أنه دليل سهل خطوة بخطوة لتنظيف أدوات البستنة الصدئة، وبالتالي، يمكن استخدام الأدوات القديمة مرة أخرى. ويمكن تعلم كيفية ترميم أدوات البستنة الصدئة القديمة في أقصر وقت ممكن وإطالة عمرها مع العناية المناسبة.
الخطوة الأولى: غسل الأوساخ والتربة
ابدأ بمسح أدواتك لإزالة جميع الأوساخ والطين والتراب. امسح أي شيء عالق بالسطح بالماء والفرشاة. والسبب في هذه الخطوة هو أن الصدأ يُزال بشكل أكثر فعالية عندما تكون الأداة نظيفة. تذكر تنظيف الزوايا والوصلات حيث يميل التراب إلى التراكم. بعد الغسل، تخلص من الماء الزائد وانتقل إلى الخطوة التالية. هذه هي الخطوة الأولى البسيطة لتنظيف أدوات الحديقة الصدئة، وهي الخطوة الأولى لتحضير السطح للتنظيف العميق.
الخطوة الثانية: انقع في الخل لإزالة الصدأ
ضع الأدوات الصدئة في خل أبيض واتركها طوال الليل أو لبضع ساعات. يساعد الخل على تليين الصدأ المعدني وتليينه. تُعد هذه الطريقة من أنسب الطرق لإزالة الصدأ عن أدوات الحديقة طبيعيًا، فهي سهلة وخالية من المواد الكيميائية. وهي فعالة مع الصدأ الخفيف والثقيل. يصبح التنظيف الفعلي أسرع وأكثر فعالية بعد نقع الصدأ، ثم إزالته في الخطوة التالية.
الخطوة 3: إزالة الصدأ
أزل الأدوات ونظفها بفرشاة سلكية أو سلك تنظيف معدني. ركز على الأجزاء الصدئة واستمر في الفرك حتى يصبح السطح أنظف. قد تحتاج بعض البقع إلى مزيد من التنظيف، ولكن يصبح الأمر أسهل مع النقع. خذ وقتك لإنجاز العمل على أكمل وجه. هذه خطوة مهمة في دليل تنظيف أدوات البستنة الصدئة لأنها تزيل طبقة الصدأ تمامًا.
الخطوة الرابعة: تنظيف الصدأ العنيد باستخدام صودا الخبز
في حالة الصدأ العنيد، حضّر عجينة من صودا الخبز والماء. ضعها على الأجزاء الصدئة واتركها لبضع دقائق. ثم افركها بفرشاة أو سلك تنظيف. يساعد هذا في إزالة الصدأ الذي لا يُزيله الخل. هذه خطوة فعّالة لتنظيف أدوات الحديقة الصدئة في المنزل بسهولة، خاصةً الأدوات القديمة ذات الصدأ العميق.
الخطوة الخامسة: اغسل وجفف تماماً
اغسل الأدوات بالماء الجاري لإزالة جميع مواد التنظيف. اغسلها وجففها بقطعة قماش. يمكنك أيضًا وضعها في الشمس قليلًا للتأكد من عدم وجود رطوبة بداخلها. هذه خطوة أساسية، لأن الرطوبة قد تؤدي إلى الصدأ مجددًا. عند ترميم أدوات الحديقة القديمة الصدئة، يُعد التجفيف الجيد أمرًا بالغ الأهمية لأنه يقلل من التلف في المستقبل.
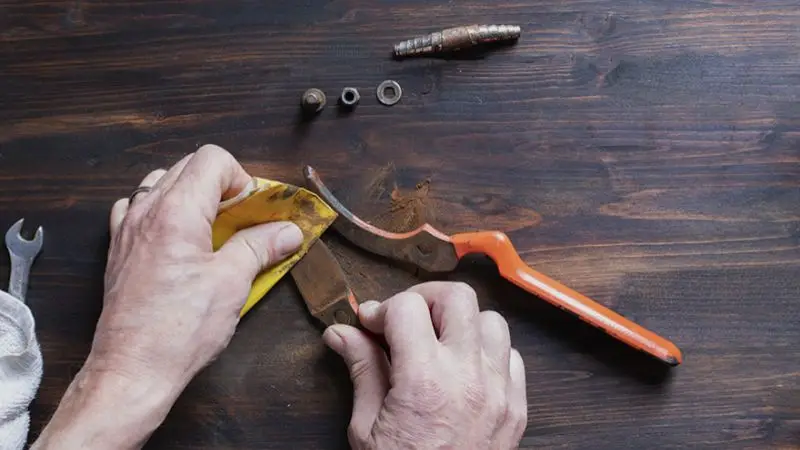
الخطوة السادسة: تنعيم المناطق الخشنة والصدئة
امسح أي بقع خشنة أو صدئة متبقية بورق الصنفرة. افركها بأصابعك حتى تصبح ناعمة مرة أخرى. هذه الخطوة تُحسّن مظهر الأدوات وأداءها. انتبه للحواف والمفاصل التي قد لا تزال عليها آثار صدأ. في هذا الدليل المُفصّل لتنظيف أدوات البستنة الصدئة، تُختتم عملية التنظيف.
الخطوة 7: وضع الزيت لمنع الصدأ في المستقبل
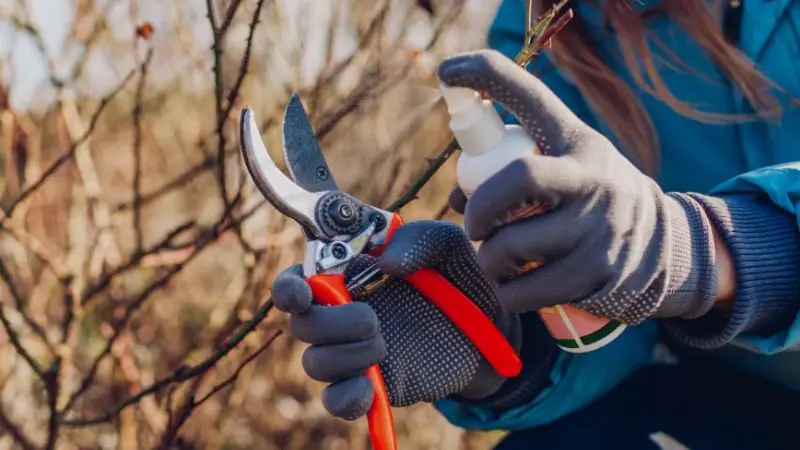
اللمسة الأخيرة: قم بتغطية جميع الأجزاء المعدنية بطبقة رقيقة من الزيت. امسح السطح بقطعة قماش. يُشكّل الزيت طبقة واقية تمنع الصدأ الناتج عن الرطوبة، كما يحافظ على الأدوات في حالة جيدة. هذه المرحلة الأخيرة مهمة في عملية تنظيف أدوات الحديقة الصدئة، لأنها تضمن استخدامًا طويل الأمد لها.
كيفية منع أدوات الحديقة من الصدأ مرة أخرى
ثاني خطوة بعد تنظيف الأدوات الصدئة هي التأكد من عدم عودتها للصدأ. فالعناية والاستخدام السليم يوفران عليك الوقت والجهد في المستقبل. الوقاية، إلى جانب التنظيف، لا تقل أهمية، خاصةً عند تعلم كيفية تنظيف أدوات الحديقة الصدئة في المنزل بسهولة.
يحرص معظم الناس على غسل أدواتهم جيدًا ثم يتركونها دون عناية، مما يؤدي إلى ظهور الصدأ مجددًا خلال فترة وجيزة. يمكن تجنب هذه المشكلة باتباع بعض العادات البسيطة التي ستُقلل من الحاجة إلى التنظيف مستقبلًا.
كما أن هذه التدابير الوقائية تشكل أساس الطريقة الأنسب للتخلص من صدأ أدوات الحدائق بطريقة طبيعية، حيث أن الأدوات التي تتم صيانتها وتنظيفها جيداً تبقى لفترة أطول في حالة جيدة.
جفف الأدوات بعد كل استخدام
احرص دائمًا على تجفيف أدوات البستنة بعد غسلها أو استخدامها. فالصدأ ينتج حتى عن كميات قليلة من الماء المتبقية على المعدن.
امسح جميع الأجزاء والمفاصل والأماكن التي قد يتجمع فيها الماء بقطعة قماش نظيفة. هذه طريقة سهلة للغاية تقلل بشكل كبير من تراكم الصدأ مع مرور الوقت.
إحدى أبسط الطرق للمساعدة في استعادة أدوات الحدائق القديمة الصدئة في وقت قصير هي تجفيف الأدوات بشكل صحيح، لأن هذا يمنع حدوث أضرار إضافية بعد التنظيف.
خزّن الأدوات في مكان جاف
من المهم للغاية تخزين الأدوات بشكل صحيح لمنع الصدأ. تأكد من وضعها في مكان جاف ومغطى، مثل سقيفة أو صندوق تخزين، دائماً.
لا تترك الأدوات في الخارج أو في أماكن رطبة، لأن الرطوبة في الهواء ستؤدي تدريجياً إلى صدأ المعدن. قد يحدث الصدأ حتى مع أدنى نسبة رطوبة على المدى الطويل.
إحدى النقاط الواردة في الدليل التفصيلي لتنظيف أدوات البستنة الصدئة هي عادات التخزين الجيدة، لأنها تساعد على منع عواقب التنظيف على مدى فترة طويلة من الزمن.
إلى جانب التخزين السليم، يُعدّ الحفاظ على حديقتك خالية من المخلفات الرطبة أمراً بالغ الأهمية أيضاً. كاسحة العشب يمكن أن يساعد في الحفاظ على بيئة أنظف وأكثر جفافاً، مما يقلل بشكل مباشر من خطر تكون الصدأ على أدوات الحديقة الخاصة بك بمرور الوقت.
@ashtonbrown007 كاسحة ساحات فيفور #ساحة العمل #رعاية الحديقة #كنسة العشب #ربيع #جز العشب #vevortools #أداة #تنظيف الربيع #إزالة الأعشاب
♬ المقاتلون – أوكتا ساوندز
ضعي الزيت بانتظام
لحماية الأدوات من الرطوبة، يُنصح بدهنها بطبقة خفيفة من الزيت بعد تنظيفها أو استخدام الزيت. يمكن استخدام زيت التشحيم أو أي زيت تشحيم خفيف.
امسح الأجزاء المعدنية بقطعة قماش ووزع المادة بالتساوي. هذا يشكل طبقة واقية تبطئ الصدأ.
يُعد التزييت أيضًا عملية مهمة في تنظيف أدوات الحدائق الصدئة لأنه يحافظ على لمعان الأدوات وطلائها، ويمكن استخدامها لفترة طويلة.
أخطاء شائعة تتسبب في عودة الصدأ
قد يعود الصدأ حتى بعد تنظيف أدواتك بشكل صحيح، في حال حدوث أخطاء بسيطة في العناية. يُقلل معظم البستانيين، دون قصد، من عمر أدواتهم بإهمالهم الممارسات الشائعة. عند تعلم كيفية تنظيف أدوات البستنة الصدئة في المنزل، من المهم معرفة ما يجب تجنبه بقدر أهمية عملية التنظيف نفسها.
يؤدي هذا الخطأ إلى تراكم الصدأ بشكل متكرر، مما يجعل صيانة الأدوات أكثر صعوبة في المستقبل. بمنع هذه المشكلة، يمكنك تحقيق نتائج أفضل على المدى الطويل من خلال اتباع الطريقة الأكثر فعالية لإزالة الصدأ من أدوات الحدائق.
بمعرفتك لهذه الأخطاء، ستتمكن أيضًا من المساهمة في العملية الصحيحة خطوة بخطوة لتنظيف أدوات البستنة الصدئة، وستتمكن من الحفاظ على أدواتك لفترة أطول.
ترك الأدوات مبللة بعد التنظيف
من الأخطاء الشائعة ترك الأدوات مبللة بعد غسلها أو استخدامها. حتى آثار الماء المتبقية على المعادن قادرة على التسبب في تكوّن الصدأ تدريجياً.
يغسل الكثيرون أدواتهم دون تجفيفها جيداً، مما يُبطل مفعول عملية التنظيف. ويعود الصدأ أسرع مما هو متوقع، حيث تتراكم الرطوبة في المفاصل والحواف.
من أهم جوانب كيفية تنظيف أدوات الحدائق الصدئة هو تجفيفها جيداً، وإلا فلن يختفي الصدأ حتى بعد التنظيف الشامل.
تخزين الأدوات على الأرض
الخطأ الآخر هو ترك الأدوات على الأرض بعد استخدامها أو تنظيفها. عادةً ما تكون الرطوبة موجودة على الأرض، وتنتقل إلى المعدن، مما يؤدي إلى الصدأ.
على الرغم من أن الأدوات قد تبدو جافة، إلا أنها قد تتلف ببطء عند ملامستها للتربة الرطبة أو الإسمنت. وعلى المدى الطويل، يتسبب ذلك في مشاكل صدأ متكررة ويقصر من عمر الأدوات.
يُعد التخزين فوق الأرض أمراً ضرورياً في عملية ترميم أدوات الحدائق القديمة الصدئة في وقت قصير لأنه يمنع تعرضها للرطوبة بشكل إضافي.
تجاهل بقع الصدأ المبكرة
لا ينبغي إهمال بقع الصدأ الصغيرة، فهي تتكاثر بسرعة إذا تُركت دون معالجة. كثير من البستانيين لا يتخذون أي إجراء إلا بعد أن يصبح الصدأ شديداً.
يسهل تنظيف الصدأ في مراحله الأولى ويتطلب جهدًا أقل. أما إهماله، فسيؤدي إلى تفاقم المشكلة وزيادة الوقت والجهد المبذول في التنظيف لاحقًا.
يمكن أن تضمن عمليات التحقق المتكررة نجاح البرنامج التعليمي خطوة بخطوة لتنظيف أدوات البستنة الصدئة، وسيكون من الأسهل إدارة الصدأ قبل انتشاره.
استخدام الأدوات دون صيانة دورية
ومن الأخطاء الكبيرة الأخرى الاستخدام المتكرر لأدوات البستنة دون صيانتها بشكل صحيح. فالتربة والأوساخ والرطوبة التي تتبقى بعد استخدام هذه الأدوات تتسبب في صدئها تدريجياً.
لا تُتبع عادةً إجراءات التنظيف والتجفيف والتزييت الأساسية، مما يُقلل من عمر الأدوات. ويؤدي ذلك إلى تراكم الصدأ بشكل متكرر مع مرور الوقت.
تُعد العناية المنتظمة عنصراً أساسياً في تنظيف أدوات الحدائق الصدئة في المنزل بسهولة، حيث أنها تحافظ على قوتها ونظافتها وتبقيها جاهزة للاستخدام لفترة طويلة من الزمن.
يتم إحتوائه
أدوات البستنة ليست صعبة الصيانة والتنظيف، شريطة اتباع الخطوات اللازمة. يمكن استعادة الأدوات القديمة بسهولة إلى حالتها الأصلية باستخدام بعض المواد البسيطة والتنظيف المنتظم.
عندما تتعرف على كيفية تنظيف أدوات الحديقة الصدئة في المنزل بسهولة، ستوفر المال والوقت اللازمين لاستبدالها. السرّ الرئيسي للحفاظ على الأدوات في حالة جيدة هو المواظبة على ذلك.
باستخدام هذا الدليل، يمكنك أيضًا استخدام الطريقة الأكثر فعالية لإزالة الصدأ من أدوات الحدائق باستخدام الطرق الطبيعية ومنع مشاكل الصدأ في المستقبل.
الأسئلة الشائعة
ما هي أسهل طريقة لتنظيف أدوات الحديقة الصدئة في المنزل؟
لتنظيف الأدوات الصدئة: اغسلها لإزالة الأوساخ، ثم ضعها في الخل، وافركها بفرشاة سلكية، ثم ضع عليها الزيت لمنع الصدأ. هذه الطريقة سهلة وآمنة لاستخدام معظم أدوات الحدائق.
كيف يمكن تنظيف أدوات الحديقة من الصدأ بأكثر الطرق طبيعية؟
يُعدّ الخل الأبيض وعصير الليمون وبيكربونات الصوديوم من أكثر الطرق الطبيعية فعالية لإزالة الصدأ عن أدوات الحدائق. يمكن استخدام هذه المواد العضوية لتليين الصدأ دون إتلاف المعدن.
هل من الممكن ترميم أدوات الحدائق القديمة الصدئة؟
نعم، يمكن إحياء الأدوات القديمة عن طريق نقعها وفركها وصنفرتها. يمكنك بسهولة معرفة كيفية ترميم أدوات الحديقة الصدئة القديمة في وقت قصير مع العناية المناسبة وجعلها مفيدة مرة أخرى.
ما هو معدل استخدام أدوات التنظيف في الحديقة لمنع الصدأ؟
يُنصح بغسل الأدوات بعد استخدامها. فالتنظيف المتكرر يحميها من الصدأ، كما يُسهّل عليك تنظيف أدوات البستنة الصدئة خطوة بخطوة.
ما هو السبب وراء استمرار صدأ أدوات الحدائق؟
يُعزى صدأ أدوات الحدائق بشكل رئيسي إلى الرطوبة، وسوء التخزين، وعدم الصيانة. ويساعد تجفيفها وتزييتها على منع الصدأ مع مرور الوقت.


